

Page 1
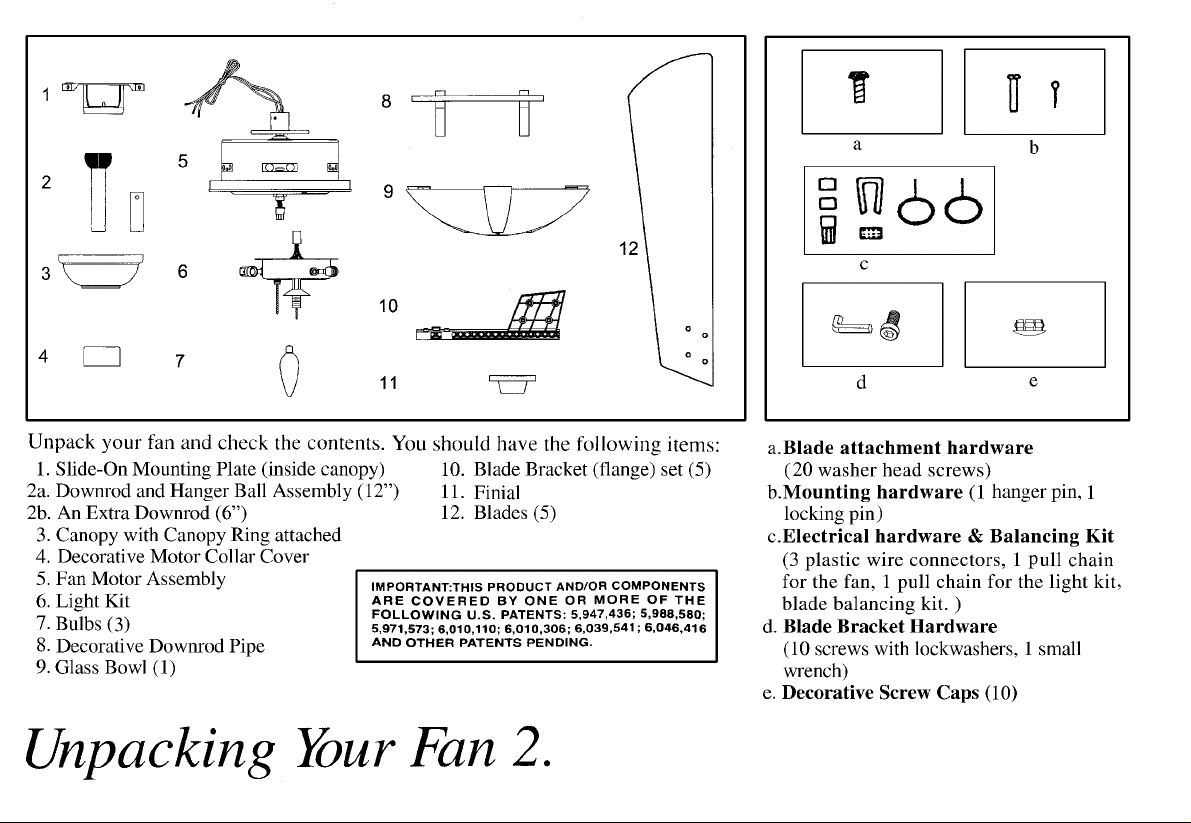
Page 2

Page 3
Page 4
Page 5
Page 6

Page 7

Hanging the Fan
REMEMBER to turn off the power.
Follow the steps below to hang your fan
properly.
NOTE: This fan is recommended for the
standard ceiling mounting using the
downrod provided with this fan. When
using standard ceiling installation with
an 12 inch downrod provided, the
distance from the ceiling to the bottom
of the fan blades will be approximately
18 inches.
THE FAN MUST BE MOUNTED WITH A
MINIMUM OF 7 FEET CLEARANCE FROM
THE TRAILING EDGE OF THE BLADES TO
THE FLOOR.
THE GLASS IS FRAGILE, USE CARE
WHEN INSTALLING THE FAN.
STANDARD CEILING
MOUNTING
1. Remove the canopy ring from the
canopy by turning the ring to the right
until it unlocks (Figure 5).
2. Remove the mounting plate from
the canopy by loosening the four screws
on the top of the canopy. Remove the
two non-slotted screws and loosen the
slotted screws. This will enable you to
remove the mounting plate (Figure 6).
Figure 5
Figure 6
3. Loosen the two set screws on the
decorative downrod pipe.
4. Route the wire exiting the top of
the fan motor through the decorative
motor collar cover then the decorative
downrod pipe and canopy ring. Make
sure the slot openings are on top. Route
the wires through the canopy and then
through the ball/downrod assembly
(Figure 7).
5. Loosen, but do not remove, the set
screws on the collar on the top of the
motor housing.
Figure 7
6. Align the holes at the bottom of the
downrod with holes in the collar on top
4.
Page 8

of the motor housing (Figure 7).
Carefully insert the hanger pin through
the holes in the collar and downrod. Be
careful not to jam the pin against the
wiring inside the downrod. Insert the
locking pin through the hole near the end
of the hanger pin until it snaps into its
locked position, as noted in the circle
inset of Figure 7.
7. Re-tighten the set screws on the
collar on the top of the motor housing.
8. Adjust the decorative downrod
pipe and motor collar cover on the
downrod until they sit properly on the
top of the fan motor housing.
9. Re-tighten the two set screws on
the decorative downrod pipe that were
loosened in step 3 (Figure 7).
10. Proceed to “Installing the Fan ”
section.
FAILURE TO PROPERLY INSTALL
LOCKING PIN AS NOTED IN STEP 6
COULD RESULT IN FAN LOOSENING AND
POSSIBLY FALLING.
WARNING
CHANGING THE DOWNROD
(OPTIONAL)
An extra 6 inch downrod is supplied
with the fan for close-to the ceiling
installation, please see following steps on
5.
changing the downrod prior to
installation. NOTE: OMIT
DECORATIVE DOWNROD PIPE
WHEN USING THE 6 INCH
DOWNROD.
1. Remove the hanger ball by
loosening the set screw at the top of the
12" downrod assembly which holds the
hanger ball to the downrod (This is not
the screw with green wire attached).
Slide the hanger ball down the downrod
and remove the support pin.
2. Insert the support pin in the holes at
the top of 6" downrod and slide the
hanger ball up to the 6" downrod. Make
sure the support pin is properly seated in
the grooves in the top of the hanger ball.
3ˊ Tighten the set screw firmly.
Installing Fan to the
Electrical Box
WHEN MOUNTING THE FAN ON A SLOPED
CEILING, THE STANDARD BALL/DOWNROD
MOUNTING METHOD MUST BE USED. THE
MOUNTING PLATE MUST BE MOUNTED SO
THAT THE SLOT OPENINGS ARE ON THE
LOWER SIDE BY SLIDING THE MOUNTING
PLATE FROM THE TOP DOWN
1. Pass the 120-volt supply wires
through the center hole in the ceiling
mounting plate as shown in Figure 8.
CAUTION
2. Install the ceiling mounting plate
on the electrical box, sliding the
mounting plate over the two screws
provided with the outlet box. Note that
the flat side of the mounting plate is
toward the electrical box.
Figure 8
Standard Mounting
Figure 9
Page 9

Page 10

Page 11

Attaching the Light
Kit/Glass Bowl
CAUTION- To reduce the risk of
electrical shock, disconnect the
electrical supply circuit to the fan
before installing light kit.
THE GLASS IS FRAGILE, USE
CARE WHEN INSTALLING THE
LIGHT KIT AND THE GLASS
SHADE.
1. Remove one of three mounting
screws and lockwashers in the light kit
plate and loosen the other two mounting
screws and lockwashers.
2. Connect the 9-position molded
adaptor plug exiting the fan motor
assembly with the adaptor plug exiting
the light kit (Figure 13).
3. Align the two key slots in the light
kit with the two mounting screws
lockwashers
place the light kit over two screws, turn
the light kit clockwise until it locks,
tighten the two mounting screws
lockwashers
4. Re-install the mounting screw and
lockwashers that was removed in step 1
and tighten firmly.
in the light kit plate and
.
and
and
5. With the power off, insert the light
bulbs into the light kit sockets (Max.
40W provided).
6. Pass the light switch chain through
the center hole in the glass bowl and
then through the hole in the finial
(Figure 14). Pass the fan switch through
the side hole in the glass bowl.
7. Position the glass bowl over the
threaded tube of the light kit and finger
tight with finial.
8. Install the fobs provided to the light
switch chain and fan switch chain.
8.
Page 12

Page 13

Page 14

Page 15

 Loading...