

Page 1
1 year Limited Warranty (please see inside for details)
HIGH VELOCITY AIR
CIRCULATOR
MODEL: HVP-30E
UL#E144918
OWNER’S MANUAL
READ&SAVE THESE INSTRUCTIONS
Page 2
HIGH VELOCITY AIR CIRCULATOR
ASSEMBLY AND OPERATING INSTRUCTIONS
CAUTION: Read and follow all instructions before operating fan. Do not use fan if
any part is damaged or missing.
WARNING: To reduce the risk of fire or electrical shock, DO NOT use this fan with
any solid state speed control device. This appliance has a 3-prong grounded plug
that must be inserted into a matching outlet. To reduce the risk of electrical shock,
this grounding plug must not be removed from the plug. Where a t wo-prong wall
outlet is encountered, it must be replaced: contact a qualified electrician. DO NOT
attempt to remove this safety feature. Use your fan only with adequate wiring that is
up to Code. Connect to properly grounded outlets only.
RULES FOR SAFE OPERATION:
● Always unplug unit for cleaning.
● Always unplug unit when not in use.
● Always unplug when moving unit from one location to another.
● Do not place foreign objects through guard when fan is in operation..
● Do not operate without fan guards properly locked.
● Do not use this fan with an extension cord.
● Do not use fan in windows. Rain and moisture may create an electrical hazard.
● Do not place fan or any parts near an open flame, cooking or other heating
appliance.
● Do not operate this unit with a damaged cord or plug, especially when this unit
has malfunctioned, or been dropped or damaged.
● Make sure fan is on a stable flat surface when in operation.
● Close supervision is necessary when this unit is used by or near children.
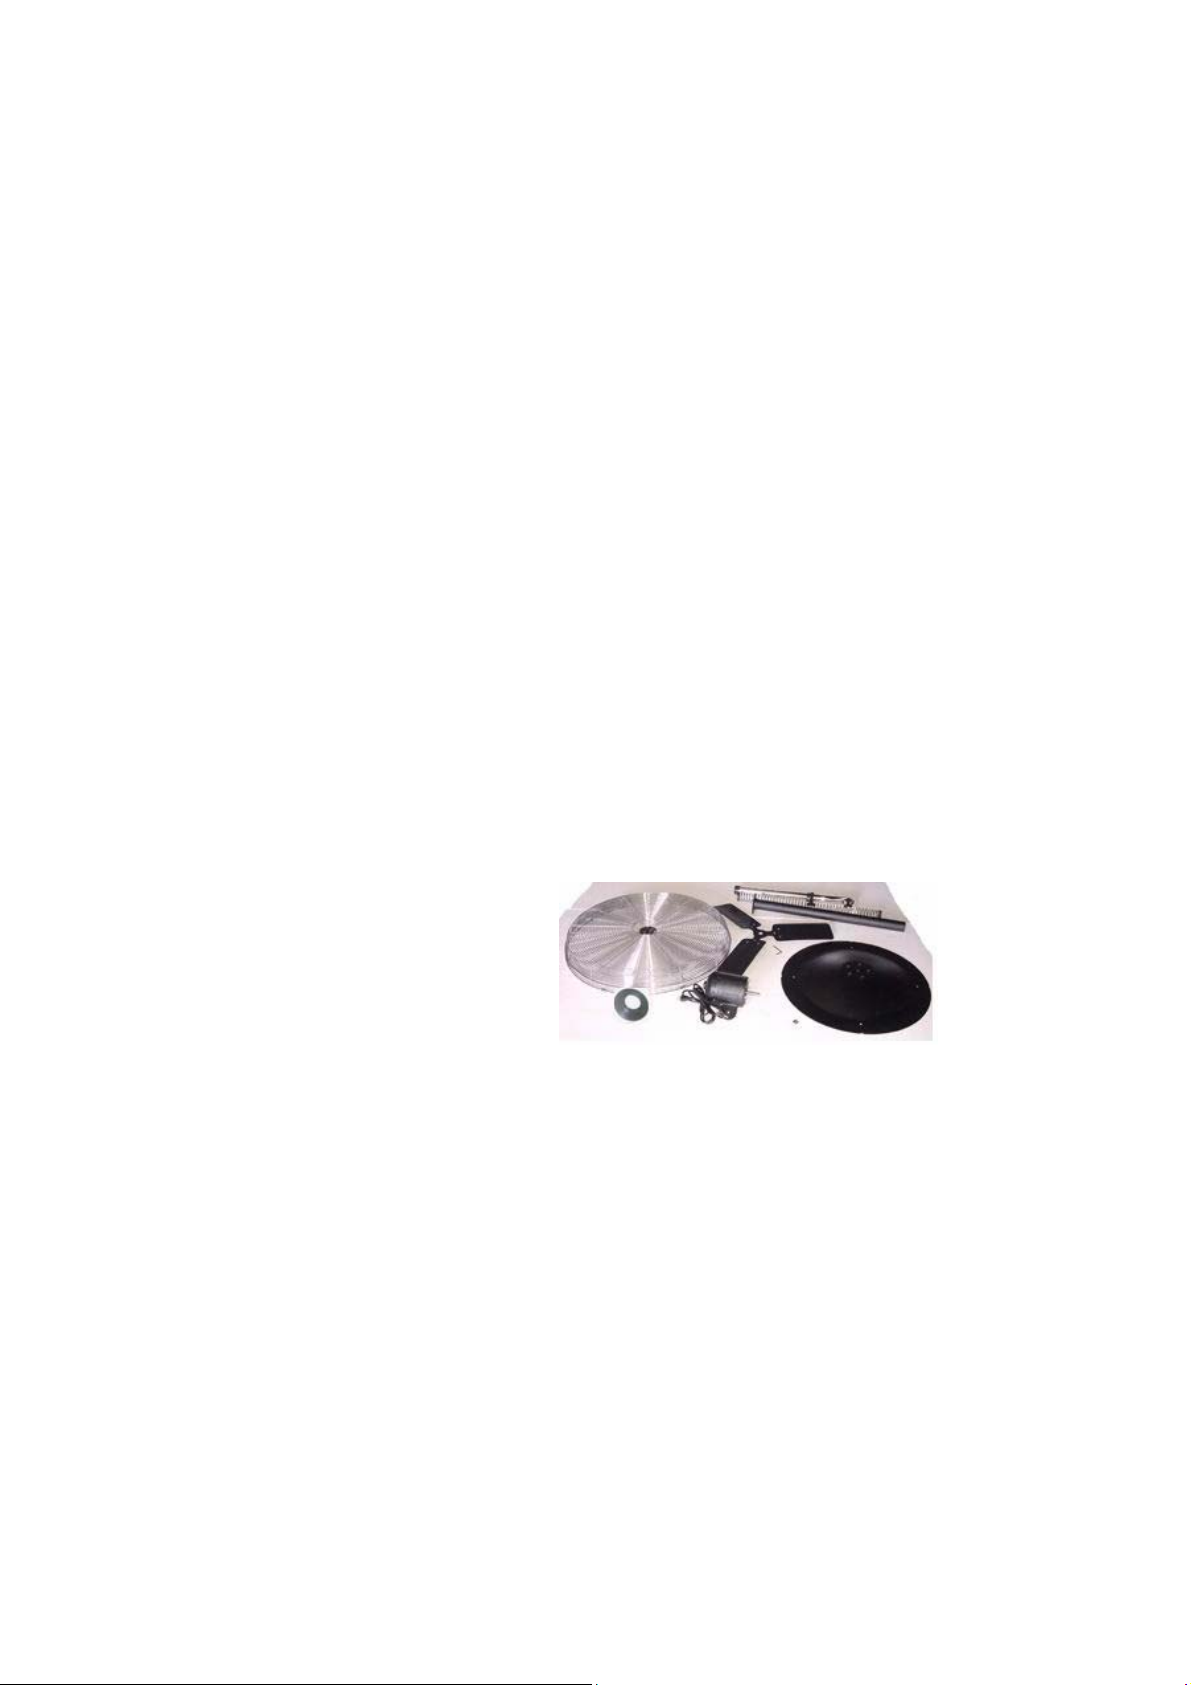
UNPACK YOUR FAN AND CHECK THE CONTENTS
● Front &Rear Guard
● Fan Blade Assembly
● Support Post
● Extension Pipe Assembly
● Shock Absorbent Spring
● Base Cover
● Motor Assembly
● Hardware package
Page 3
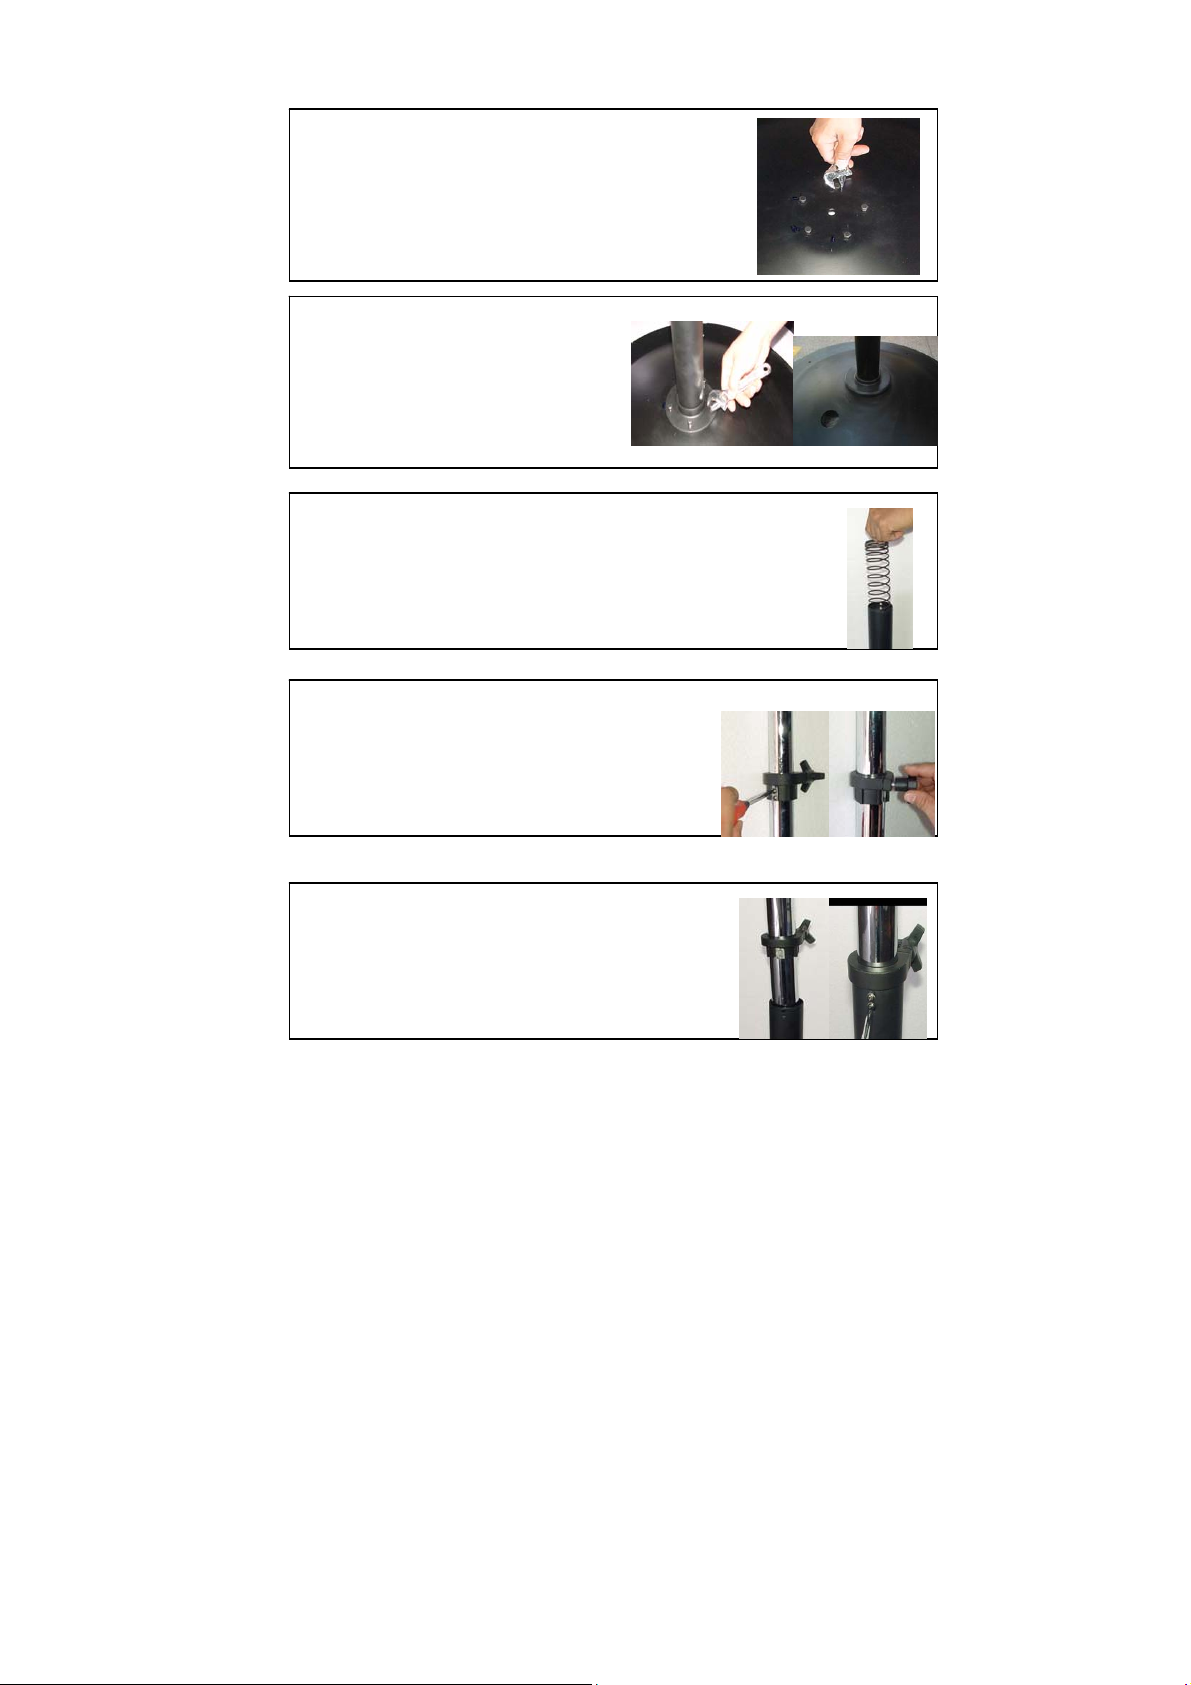
ASSEMBLY INSTRUCTIONS
1. Remove five hexagonal screws from
base, save them for step 2.
2. Attach support post to base by
tightening back the five hexagonal
screws from step 1 and slide
coupler cover onto base.
3. Slide shock absorbent spring into
support post.
4. Loosen height adjustment knob and
remove two set screws on black ring
around extension pipe, save them for
step 5.
5. Slide extension pipe into support post.
Fix black ring onto support post by
tightening back two set screws from
step 4.
Page 4
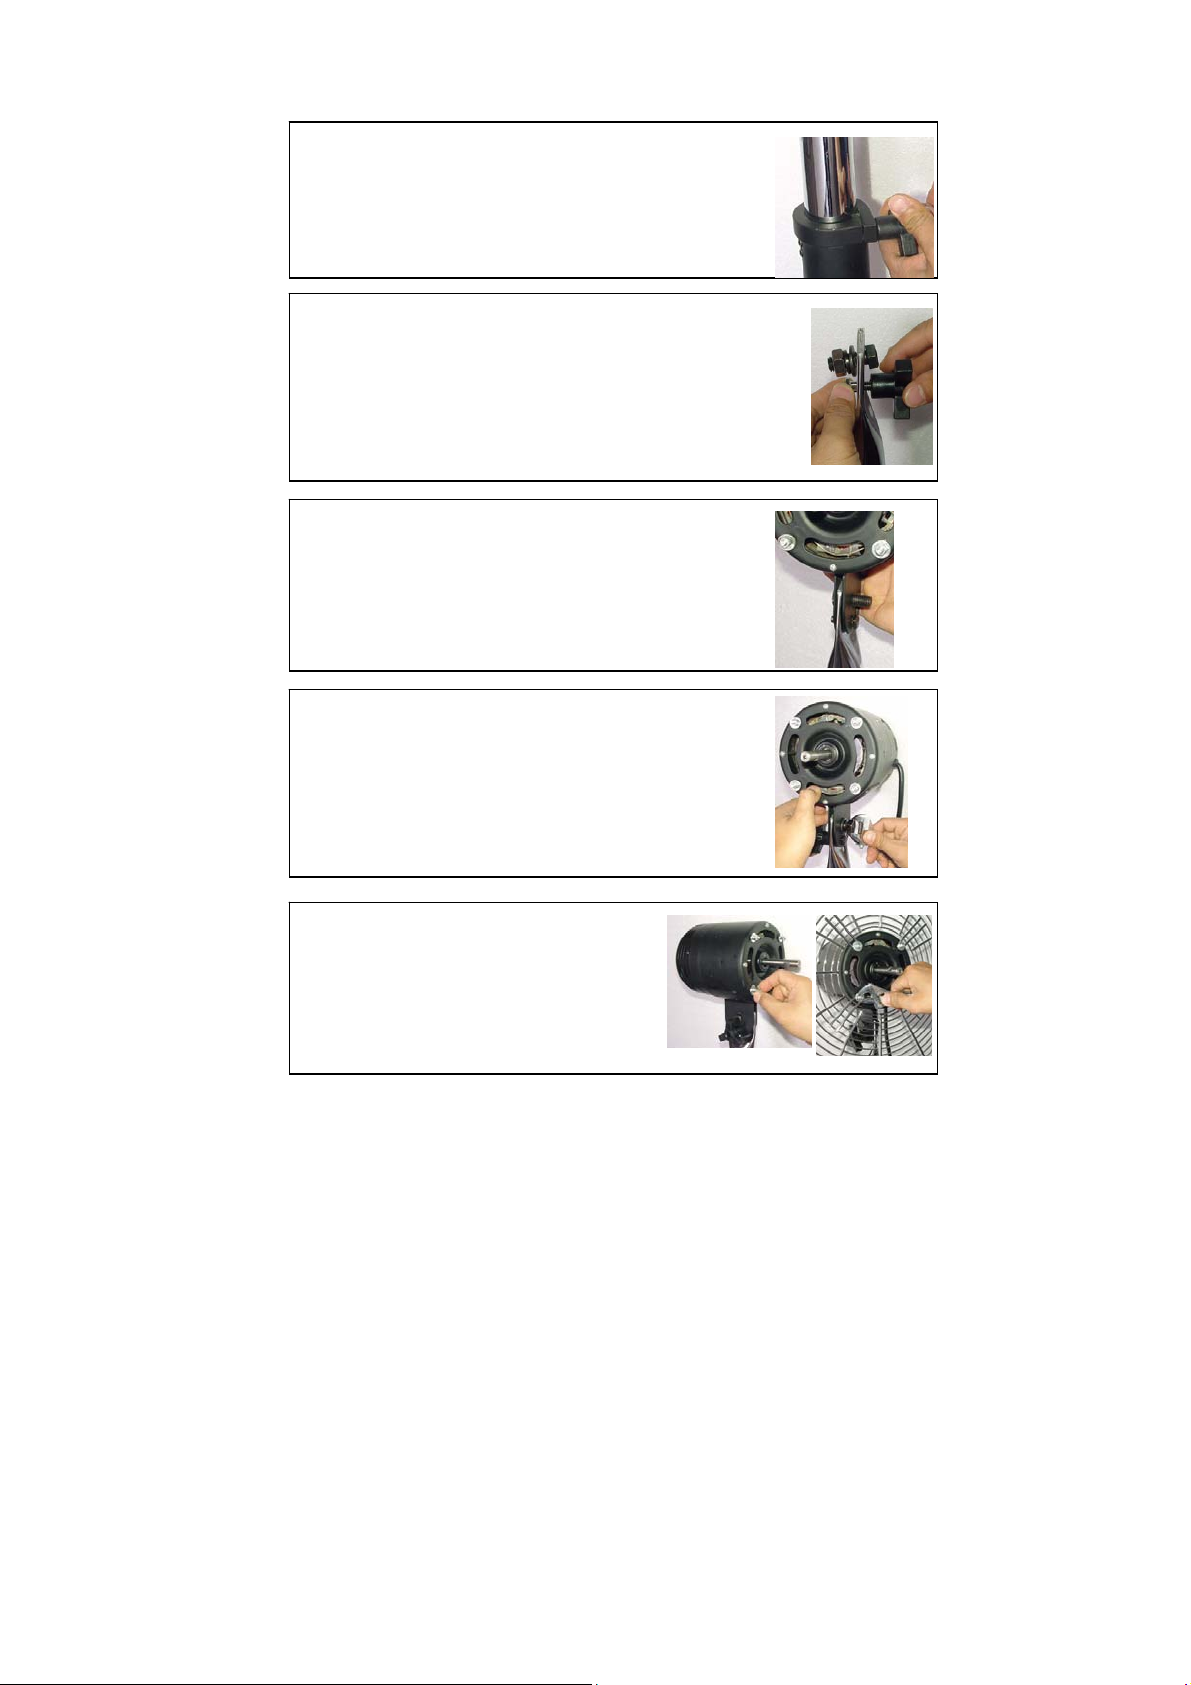
6. Adjust extension pipe to your desired
height and secure it by tightening back
the height adjustment knob.
7. Remove tilt adjustment knob and hexagonal
Bolt from the top of the extension pipe, then
remove the large hexagonal bolt, nut, spring
washer from the top of the extension pipe.
Save them for step 6.
8. Carefully insert the large hexagonal bolt
into the hole and the other smaller bolt
into slots to fix the fan head assembly to
the extension pipe .
9. Carefully insert the large Hexagonal nut,
spring washer and flat washer through
the large hexagonal bolt, and make sure
to tighten it. Fix tilt adjustment 3 prong
knob with the smaller hexagonal bolt .
10. Remove four hexagonal nuts, spring
washers and flat washers from motor
through bolts. Set rear guard in proper
position and fix to motor through bolts
by securing back the nuts and washers
removed.
Page 5

11. Install fan blade assembly onto motor
shaft by tightening the set screw on blade
assembly to the sunken space on motor
shaft. Make sure set screw is tightly
secured by a Philips-head screw driver
(not provided).
12. Assembly front guard to rear guard by fixing both
guards together with clips on the rim of front
guard.
13. Adjust extension pipe to your desired height
and secure it by tightening the height
adjustment knob. Pass the supply cord
through cord warp clip.
OPERATING INSTRUCTIONS:
1. Set fan on a dry, stable, flat surface.
2. Connect power plug to any standard 120-volt AC outlet. Caution: Make sure
the Speed Control is in the off position.
3. Pass the Supply Cord through Cord Warp Clip.
4. Pull the chain on the motor assembly to set to the desired setting –The pull
chain controls the fan speed as follows: 1 pull-Low, 2 pulls-Medium, 3 pullsHigh and 4 pulls-Off.
5. To change the tilting angle of the Fan Head, Loosen the Tilt Adjustment Knob
on the fan head joint,, tilt the Fan Head to the desired angle and tighten 3
prong knob.
Note :It is normal for the motor to feel warm to touch during operation. The motor is
thermally protected and will automatically shut off when it overheats for any reason.
If this happens immediately disconnect the fan from the power outlet.
Page 6

The motor bearings are permanently lubricated at the factor y and do not require
any additional lubrication.
CLEANING
WARNING: Unplug from electrical supply source before cleaning. After servicing,
any safety device (including grills and blades) must be reinstalled or remounted as
previously installed.
Use soft damp cloth then wipe with dry cloth. Do not use harmful cleaners. Do not
bend the blades.
Wash guards and blades with water and a soft brush. Avoid harsh chemical
cleaners.
DO NOT IMMERSE MOTOR IN WATER.
Allow fan to dry completely before use.
MODEL WATTS(W) AMPS(A) Volts N.W. G.W.
LOW MED HI LOW MED HI V kg kg
HVP-30E
172 195 225 1.52 1.68 1.91 120 26 31.5
*These are approximate measures.
If you should have any further questions, please contact CUSTOMER SERVICE at
56 64 14 00.
Shipping costs for any returns of product as part of a claim on the warranty must be
paid by the customer.
Page 7

Garantia Limitada de 1 Año (Ver adentro para mas detalles)
CIRCULADOR DE AIRE DE AL TA
VELOCIDAD
MODELO: HVP-30E
UL#E144918
MANUAL DEL USUARIO
LEA Y GUARDE ESTAS INSTRUCCIONES
Page 8

CIRCULADOR DE AIRE DE DE ALTA VELOCIDAD
INSTRUCCIONES DE ENSAMBLAJE Y MANEJO
PRECAUCION: Lea y siga estas instrucciones antes de utilizar este ventilador. No
utilice el ventilador si alguna pieza está dañada o perdida.
AVISO: Para reducir el riesgo de fuego o electrocución, NO use este ventilador con
controles de velocidad de estado sólido. Este aparato tiene un enchufe a t ierra de
tres puntas el cual deberá ser introducido en un tomacorriente correspondiente.
Para reducir el riesgo de electrocución, este enchufe a tierra no deberá ser
removido. Si lo va a utilizar donde existe un tomacorriente para enchufes de dos
puntas, este deberá ser reemplazado: acuda a un electricista calificado. No intente
eliminar esta característica de seguridad. Use su ventilador solo con cableado
adecuado y que se encuentre bajo código. Conecte solo a tomacorrientes que
estén propiamente conectados a tierra.
REGLAS PARA UN MANEJO SEGURO:
● Siempre desconecte la unidad antes de limpiarla.
● Siempre desconecte cuando no esté en uso.
● Siempre desconecte cuando mueva la unidad de lugar.
● No coloque objetos extraños a través de la rejilla protectora cuando el
ventilador esté funcionando.
● No utilizarlo sin las rejillas del ventilador correctamente aseguradas.
● No utilice cables de extensión eléctrica.
● No utilice el ventilador en cercanía de ventanas. La humedad y la lluvia
pueden causar electrocución.
● No coloque el ventilador o cualquiera de sus piezas cerca del fuego o aparatos
de cocina o calentamiento.
● No maneje esta unidad con cables o enchufes dañados, especialmente
cuando la unidad ha funcionado mal o se ha caído o dañado.
● Asegúrese que el ventilador sea manejado solo en superficies planas
estables.
● Supervisión cercana es necesaria cuando esta unidad es usada por o cerca
de niños.
Page 9

DESEMPAQUE SU VENTILADOR Y VERIFIQUE EL CONTENIDO
● Protector Frontal y Protector Trasero
● Aspa
● Emsamblaje Soporte
● Pipa de Extension
● Resorte Absorbente de Impactos
● Base
● Ensamblaje del Motor
● Paquete de Herramientas
INSTRUCCIONES DE MONTAJE
1. Retire los cinco tornillos hexagonales de la
base, y guardelos para el siguiente paso.
Unir el pie del soporte a la base
2.
ajustando los cinco tornillos hexagonales
del paso 1. Deslizar la cubierta de
la base.
3. Deslizar el restorte amortiguador dentro
del pie de soporte.
4. Quitar la perilla de ajuste de la altura y
los dos juegos de tornillos que se
encuentran en el aro negro alrededor
del tubo de extensión.Guardarlos para
el paso 5.
Page 10

5. Desilizar el tubo de extensión dentro del
pie de soporte. Colocar el aro negro dentro
del pie de soporte ajustando los dos juegos
de tornillos del paso 4.
6. Ajustar el tubo de extensión a la altura deseada
y asegurarlo ajustando nuevamente la perilla de
ajuste de altura.
7. Quitar la perilla de ajuste de ángulo y el tornillo
hexagonal de la parte superior del tubo de
extensión. Guardarlos para el paso 8.
8. Cuidadosamente inserte el perno hexagonal en el
agujero y el otro perno de menor tamaño insértelo
en las ranuras para colocar la cabeza del ventilador
a la pipa de extensión.
9. Cuidadosamente coloque la tuerca hexagonal
grande, la arandela de resorte y la arandela plana
a través del perno hexagonal grande, apretelos.
Ajuste el perno hasta el punto tres para la inclinación
con el perno hexagonal pequeño.
Page 11

10. Retire las 4 tuercas hexagonales, las
arandelas de resorte y las arandelas
planas del motor por medio de los
pernos. Coloque el protector trasero
en medio de los pernos asegurando de
nuevo las tuercas y arandelas retiradas.
11. Montar la protección delantera a la protección
de atrás ajustando ambas con los ganchos que
están en el borde de la protección delantera.
12. Instalar la paleta del ventiador dentro del
eje del motor ajustando los tornillos en el
ensamble de la paleta al espacio hundido
en el eje del motor. Cerciórese que el tornillo
este bien asegurado con un
destornillador tipo cruz (no suministrado).
13. Ajuste la pipa de extensión a la altura
deseada y asegúrela apretando la perilla
de ajuste de altura. Pase el cable de
suministro a través del clip de formación.
INSTRUCCIONES DE MANEJO
1. Colocar al ventilador en una superficie seca, estable y plana.
2. Conectar el enchufe a cualquier toma estándar de 120 voltios C.A.
Precaución: Asegusere de que el botón de control de velocidad esté en o
positión de apagado.
3. Colocar el cable eléctrico dentro gancho.
4. Hale la cadena del ensamblaje del motor para la programación deseada – esta
cadena controla las velocidades así: Halar 1 vez para velocidad baja (low),
dos veces para velocidad media (medium), 3 veces para velocidad alta (high)
y 4 veces para apagar (off).
Page 12

5. Pata cambiar el angulo de inclinación de la cabeza del ventilador, suelte la
perilla de ajuste de la unión de la cabeza, mueva la cabeza hasta la inclinacion
deseada y aprete la perilla en posición tres.
NOTA: Es normal que el motor se sienta tibio durante su funcionamiento. Este está
protegido en cuanto a altas temperaturas y se apagará solo si se sobrecalienta por
alguna razón. Si esto sucede, desconectelo inmediatamente del tomacorri entes.
Los cojinetes del motor han sido lubricados perma nentemente en la fábrica y no
requieren lubricación adicional.
LIMPIEZA
AVISO: Desconecte del tomacorriente antes de limpiar el ventilador. Luego de
limpiarlo, cualquier pieza de seguridad (incluyendo rejillas y aspas) deberán ser
instaladas debidamente de nuevo.
Use un paño suave húmedo para limpiar y luego frote con un paño seco. No use
limpiadores dañinos. No doble las aspas.
Lave las rejillas y aspas con agua y un cepillo suave. Evite el uso de limpiadores
químicos. NO SUMERJA EL MOTOR EN AGUA. Permita que el ventilador se
seque completamente antes de usarlo nuevamente.
MODELO VATIOS(W) AMPS(A) Voltios P.N. P.B.
Baja Media Alta Baja Media Alta V kg kg
HVP-30E
172 195 225 1.52 1.68 1.91 120 26 31.5
*Estas son medidas aproximadas.
Si tiente alguna pregunta, comuníquese con Servicio al Cliente sin costo alguno al
56 64 14 00.
Los gastos de manejo y envió concernientes con la garantía deben ser pagados
por el cliente.
Nota: Si el cordón de alimentación es dañado, este debe de ser reemplazado por el
fabricante o su agente de servicio o por personal calificado para evitar el riesgo.
 Loading...