

King Living KingCove Outdoor Assembly Instructions Manual

Coffee Table Insert
Shelf Insert
Shelf Frame
Seat Cushion
Seat Brackets
Platform (P1772-D760)
Coffee Table Frame
Platform (P760-D760)
Legs (4x per Platform)
Legs (4x per Platform)
Back Cushion
(Front View)
Back Frame
(Front View)
Back Frames
(Side View)
Back Cushion
(Side view)
Cushion Joining Lip
(rear of cushion)
Sun Lounge Brackets
KingCove Outdoor
Assembly Instructions
Two people are required for safe assembly.
Opening Box
Ensure that you DO NOT push your knife too far into the box when cutting it open.
Lift the cardboard with one hand while cutting, thereby keeping the blade well away from your furniture.
To assemble your furniture please follow steps 1-24.
Components:
The King Cove is designed to be exible.
You can alter the King Cove’s conguration
& components easily to suit your needs.
The King Cove components and
congurations shown here may not
reect your exact purchase, the number
of components you have will depend on
which conguration or package
you purchased. However, these
general instructions do apply
to ALL King Cove components
and congurations.
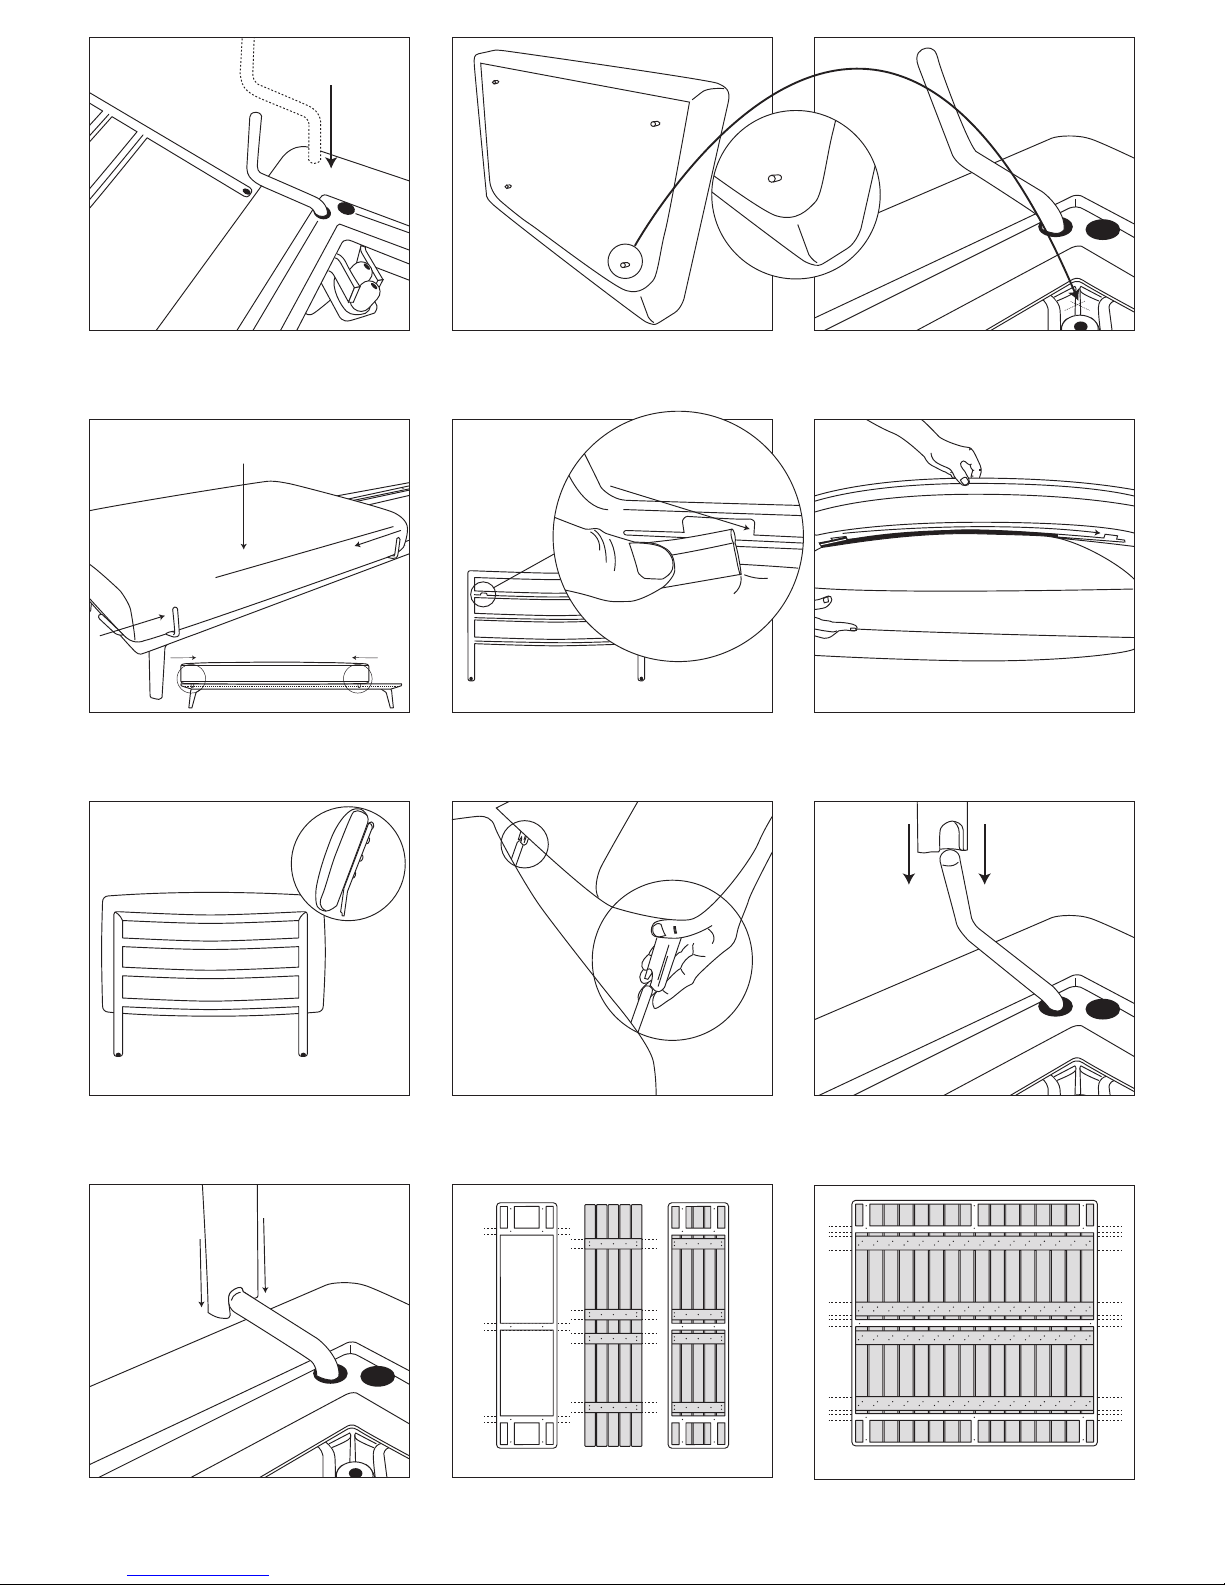
1: Carefully tilt the Platform onto its side to
expose underneath. This makes it easier to
attach the legs correctly.
2: Insert the legs into the receiving twin holes
located in each corner of the platform.
3: The leg’s curved surface should be facing
outward at a 45º angle (as shown).
5: Place the Back Frames on the ground
where you intend to t them. Ensure the Back
Frame lines up with the corresponding holes.
4: There are several holes around the platform. These holes work as pairs, the width of a pair matches
the width of a Back Frame. This gives you various options to change the location of the Back Frames and
the Shelf.
Shelf InsertShelf Frame Insert & Frame
Table Frame & Table Insert
6: Push Back Brackets into the Platform holes
(short part of Bracket into the Platform). It may be
easier tting Seat Cushion before tting the Back
Frames (as shown here). It’s your choice.
8: Check Seat Cushion position: Try sliding the
Seat Cushion to check for movement. Too much
movement indicates the Seat Cushion (& Pins)
may NOT be correctly positioned.
11: Back Frames (with Back Cushions attached)
may now be tted onto the Platform using the
Back Brackets (already inserted onto the Platform).
14: Push Back Frame evenly all the way down
to join securely to the Bracket. The Platform
above is shown without Seat Cushion (for clarity).
9: Insert the Back Cushion’s Joining Lip
(located behind the Back Cushion) by ‘threading’
it into the groove on the rung of the Back Frame.
12: Line-up Back Frame Arms to the Brackets.
15: The Shelf Insert ts onto the Shelf Frame
with support slats running parallel (bottom view).
10: Slide the Cushion’s Joining Lip all the way
along the groove to secure the Back Cushion to
the Back Frame.
13: Insert Back Frame onto the Back Brackets
and push down. The Platform above is shown
without Seat Cushion (for clarity).
16: The Coee Table Insert ts onto the Coee
Table Frame with support slats running parallel
(bottom view).
7: Fit the Seat Cushion onto the Platform. The pins under the Seat Cushion sit within the Platform
preventing the Seat Cushion from sliding o. The Seat Cushion is designed to sit on top of the platform
(i.e. it is not permanently xed in position). DO NOT pull or drag the King Cove by the Seat Cushion.
 Loading...