

Page 1
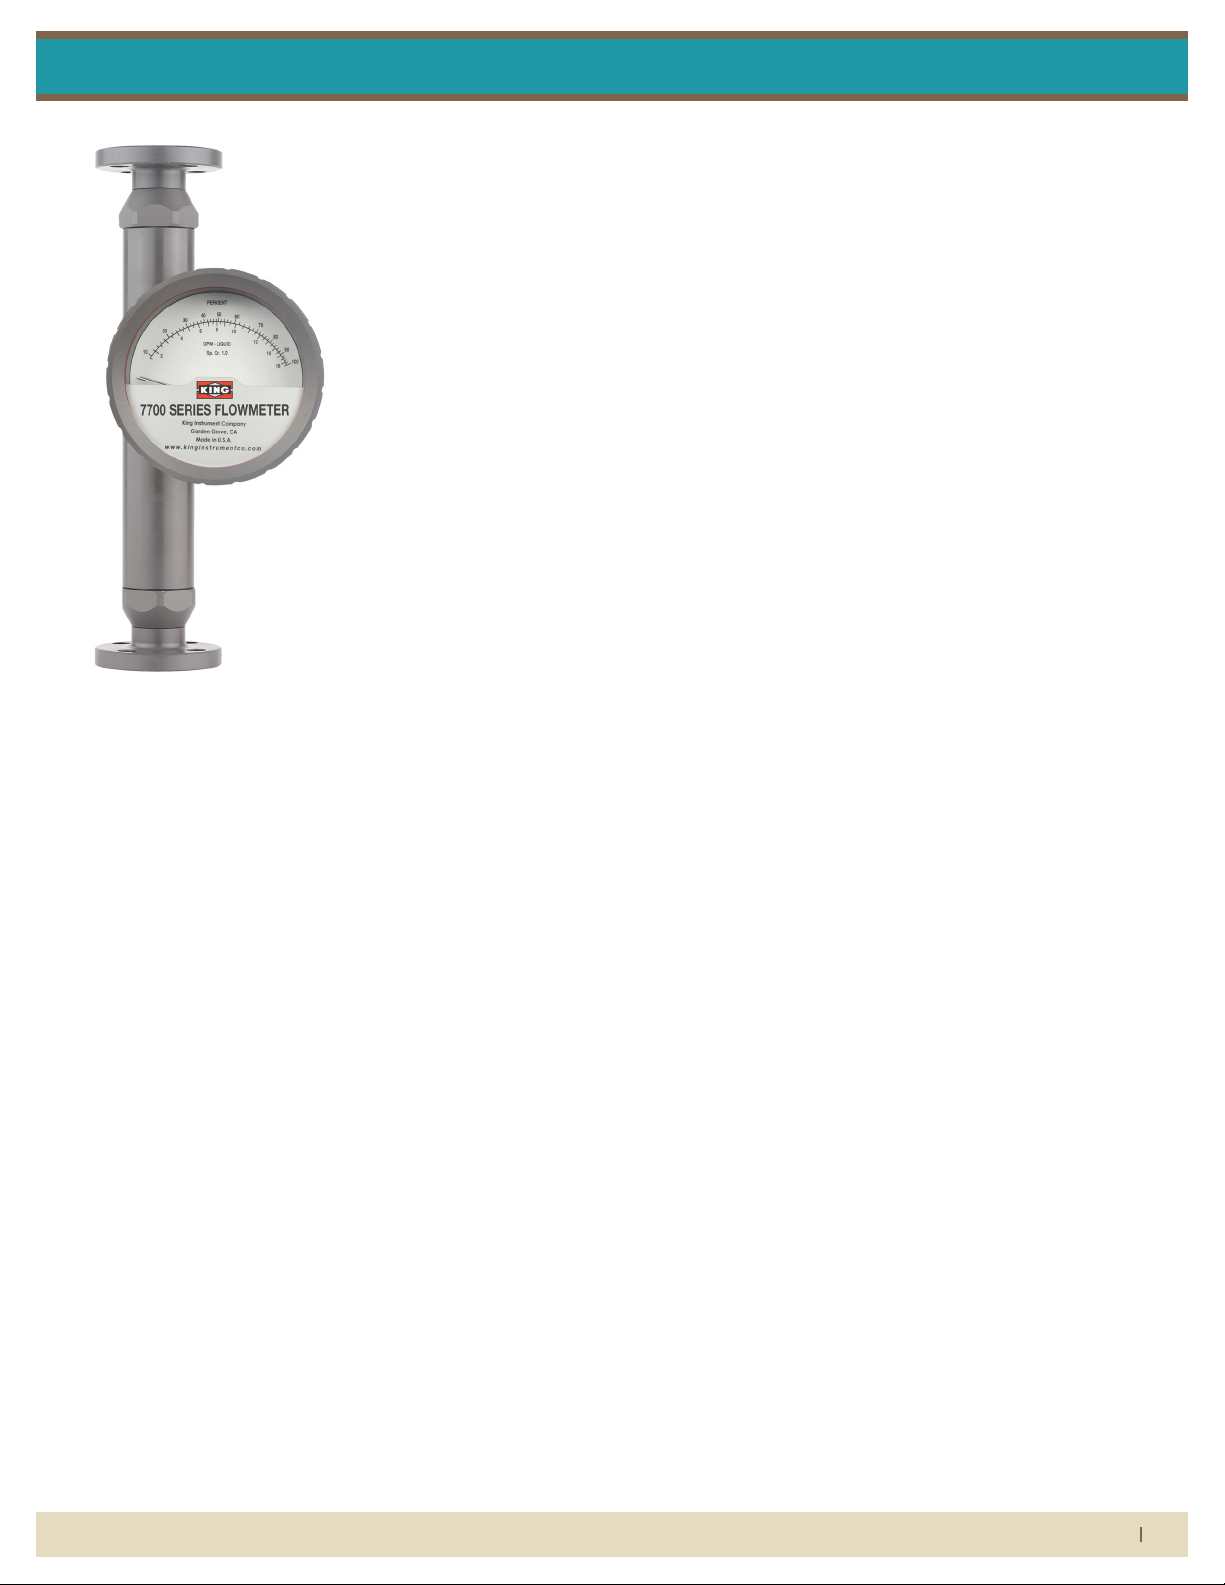
7720 Series
Installation Instructions
FLOW METER LIMITED WARRANTY
Meters are warranted against defects in materials and workmanship to the original user for a period of
thirteen (13) months from the date of factory shipment, provided the meter is installed, operated and maintained in accordance with King Instrument Company’s instructions and recommendations.
This warranty does not apply if failure is caused or contributed to by any of the following: improper handling, improper storage, abuse, unsuitable application of the product, lack of reasonable and necessary
maintenance, use exceeding suggested pressure and temperature maximums, improper packaging for
return, or repairs made or attempted to be made by anyone other than King Instrument Company, Inc.
KING INSTRUMENT COMPANY, INC. MAKES NO WARRANTY AS TO THE FITNESS OF ITS PRODUCTS FOR SPECIFIC APPLICATIONS.
This warranty is valid for the original end-user only and does not apply to products that have been damaged or modied. This warranty is non-transferrable and is limited to replacement or repair. The liability of
King Instrument Company arising out of its supply of the products, or their use, shall not in any case exceed
the cost of correcting defects in the products as set forth above.
THIS WARRANTY IS A LIMITED WARRANTY AND SHALL BE IN LIEU OF ANY OTHER WARRANTIES, EXPRESSED
OR IMPLIED, INCLUDING BUT NOT LIMITED TO ANY IMPLIED WARRANTY OR MERCHANTABILITY OR FITNESS
FOR A PARTICULAR PURPOSE. THERE ARE NO OTHER WARRANTIES WHICH EXIST BEYOND THE DESCRIPTION
OR FACE HEREOF.
IN NO EVENT SHALL KING INSTRUMENT COMPANY BE LIABLE FOR LOSS OF PROFITS, INDIRECT, CONSEQUENTIAL OR INCIDENTAL DAMAGES.
Products should be returned, prepaid, to King Instrument Company, Inc. with proof of purchase. Call factory
for Return Merchandise Authorization (RMA) number and return instructions.
THIS IS IMPORTANT INFORMATION.
READ IT CAREFULLY BEFORE BEGINNING WORK.
1) Inspect meter for damage that may have occurred during shipping.
Report any damage to the container to the freight carrier immediately.
2) Remove any shipping material placed in the inlet and outlet of the
meter. (This is done to prevent damage caused by movement of the
oat during shipping).
3) Make sure your pressure, temperature, uid and other requirements
are compatible with the meter and components (including o-rings).
4) Select a suitable location for installation to prevent excess stress on
the meter which may result from:
a) Misaligned pipe.
b) The weight of related plumbing.
c) “Water Hammer” which is most likely to occur when ow is
suddenly stopped as with quick closing solenoid operated
valves. (If necessary, a surge chamber should be installed. This
will also be useful in pressure start-up situations.)
d) Thermal expansion of liquid in a stagnated or valve isolated
system.
e) Instantaneous pressurization which will stress the meter and
could result in tube failure.
NOTE: In closed thermal transfer or cooling systems, install the meter
in the cool side of the line to minimize meter expansion and contraction and possible uid leaks at the threaded connections.
5) Handle the meter carefully during installation.
a) Use an appropriate amount of teon tape on external pipe
threads before making connections. Do not use paste or stick
type thread sealing products.
6) Install the meter vertically with the inlet port at the bottom. No
piping runs are required. Because the guide rod extends from the top
of the meter during operation, 4” of straight pipe must be provided at
the outlet of the meter.
7) Meters used in gas service should have suitable valves plumbed in
at the inlet and outlet of the meter. These valves should be no more
than 1-1/2 pipe diameters from the meter ports. The valve at the outlet should be used to create back pressure as required to prevent oat
bounce. It should be set initially and then left alone. The inlet valve
should be used for throttling purposes. Depending on the installation,
valves may not be essential, but they are most useful in many installations. Remember: To get a correct reading of ow in gas service, it is
necessary to know the pressure right at the outlet of the meter (before
the valve).
ADDITIONALLY:
• 7720 Series meters are designed for vertical installation only.
(Inletat bottom, Outlet at top)
• Do not remove or adjust the screws on the side of the indicator
housing. These screws were positioned during factory
calibration and represent the zero adjustment. If the pointer is set
on zero, proceed with installation. If the pointer is not set at zero,
follow these steps:
1) Remove front cover with gasket and shield from indicator
housing.
2) Loosen set screw at the base of the pointer hub.
When it comes to ow...we’re instrumental.
(714) 891-0008 • www.kinginstrumentco.com
1
Page 2
7720 Series
PARTS LIST:
7720 SERIES ASSEMBLY
SHIELD RETAINER
1
SHIELD GASKET
2
SHIELD
3
4
5
6
7
8
9
10
11
12
INDICATOR HOUSING/
POINTER NEEDLE SET SCREW
FLOAT
END FITTING O-RING
OUTLET END FITTING
ORIFICE HOUSING O-RING
ORIFICE HOUSING/
OUTLET FLOAT STOP
10
9
8
7
32
1
9
11
12
11
6
5
11
METER TUBE ASSEMBLY
ORIFICE ASSEMBLY
HOUSING ASSEMBLY
13
TAPER SLEEVE
14
INLET END FITTING
INLET FLOAT STOP
HOUSING ASSEMBLY
12
11
15
FLANGE
1
1
1
1
CONFIGURATIONS VARY BY FLOW RATE AND METER SIZE.
1
FNPT
1
11
14
15
SHIELD RETAINER O-RING
4
Installation Instructions
3) Reposition pointer to zero line.
4) Tighten set screw with a 1/16” allen wrench by holding the pointer
hub and gently tightening the set screws.
5) Replace front cover with gasket and shield on
indicator housing.
CAUTION: ZERO IS FACTORY SET WHEN METER IS CALIBRATED.
DO NOT LOOSEN SCREWS THAT FASTEN INDICATOR HOUSING
TO METER BODY. IF INDICATOR HOUSING IS MOVED, THE METER
WILL NEED TO BE CALIBRATED
Maximum Non-Shock
Pressure and Temperature
Temp Size
4 and 6
Size
8 thru 12
130°F Max 150 psig 125 psig
The maximum ambient temperature for the
indicator housing is 158°F.
CAUTION
• O-rings should be replaced if meter is disassembled after it has been
in service.
• Do not loosen nuts that fasten indicator housing to metering tube.
If the relationship of meter tube and indicator housing are changed,
meter must be calibrated.
• Serious property damage and great personal injury could occur as
the result of a meter misused or used in an unsuitable application.
CLEANING:
Carefully remove the owmeter from piping system. Remove the
threaded outlet end tting and withdraw the oat from the top. All
necessary instrument components are now fully accessible for cleaning
with a bottle brush and appropriate mild soap solution*. Before the
meter is reassembled, inspect all parts for damage. O-rings should be
replaced during meter maintenance and cleaning.
To reassemble, carefully guide the magnetic oat back into the tube.
Reinstall and tighten outlet end tting. Reinstall the instrument into
the plumbing system after removing the old teon tape (with a wire
brush) and replacing with fresh teon tape.
*Do not use cleaning agents that will damage oat, tube or o-rings.
Meters should be cleaned with a mild soap solution. This will be an
eective cleaner of rust stains. Caution must be used so that materials
of construction are not damaged by cleaning solutions. Hard water
deposits can be removed with 5% acetic acid solution (vinegar).
WARNING:
Pressure and temperature ratings are based on a study of the engineering data for particular materials used in construction and on the
design of individual models. This information is supplemented by
destructive test results. Meters with stainless enclosures must never be
operated without shields securely in place. Meters exposed to dicult
environments such as those created by certain chemicals, excessive
vibration or other stress inducing factors could fail at or below the
suggested maximums. Never operate meters above pressure and
temperature maximums. It is strongly recommended that all meter
installations utilize an appropriate pressure relief valve and/or rupture
disc. The pressure settings and locations of these devices should be
such that meters cannot be over pressurized. Meter failure could result
in damage to equipment and serious personal injury. Always use
suitable safety gear, including OSHA approved eye protection when
working around meters in service. We are happy to pass along chemical compatibility information that has been published by the manufacturer’s of raw materials used in our products; however, this information
should not be construed as a recommendation made by King Instrument Company, Inc. for a specic application.
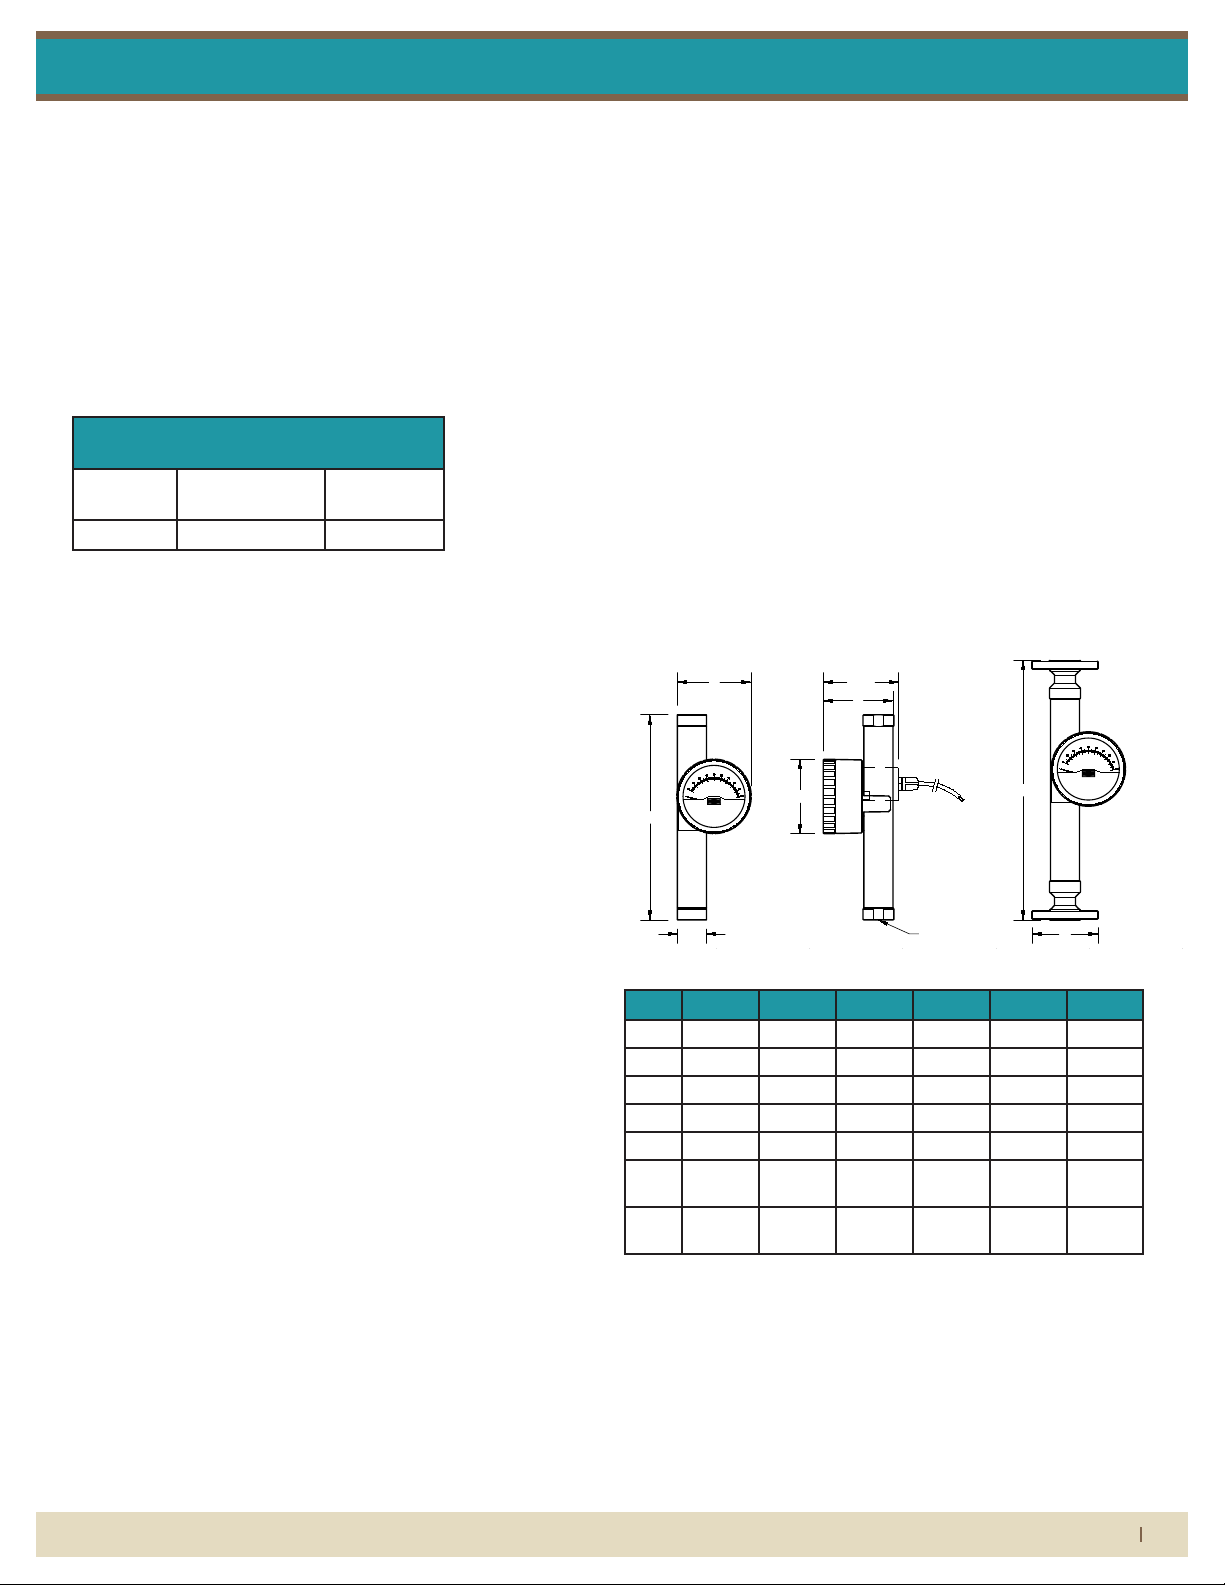
OVERALL DIMENSIONS:
B
D
7700 SERIES FLOWMETER
King Instrument Company
Garden Grove, CA
Made in U.S.A.
www.kinginstrumentco.com
A
Ø4.80
4.87
E
Dim. 706-714 715-722 724-726 728-734 736-738 740-744
A 1.30 1.88 2.34 3.46 4.46 5.49
B 11.000 13.240 13.864 13.875 - -
C* 1/2” 1” 1-1/2” 2” 3” 4”
D 4.32 4.86 5.24 6.35 7.26 8.24
E 3.92 4.50 4.96 6.08 7.08 8.11
F** 13.125/
13.625
G** 3.50/
3.75
* FNPT/Flange Connection **150#/300#
16.750/
17.500
18.625/
19.250
4.25/
4.88
17.156/
17.786
5.00/
6.12
6.00/
6.50
7700 SERIES FLOWMETER
King Instrument Company
Garden Grove, CA
www.kinginstrumentco.com
GC
Made in U.S.A.
18.562/
19.696
9.00/
10.00
F
17.867/
18.867
7.50/
8.25
REPAIR
7720 meters that require repair should be sent to the factory. Please
call for aReturn Merchandise Authorization (RMA) number and return
instructions.
When it comes to ow...we’re instrumental.
(714) 891-0008 • www.kinginstrumentco.com
2
Page 3

5
6
7
8
INDICATOR HOUSING/
POINTER NEEDLE SET SCREW
FLOAT
OUTLET FLOAT STOP
METER TUBE ASSEMBLY
HOUSING ASSEMBLY
13
TAPER SLEEVE
14
INLET END FITTING
INLET FLOAT STOP
HOUSING ASSEMBLY
1
1
CONFIGURATIONS VARY BY FLOW RATE AND METER SIZE.
1
1
15
7720 Series
7720 SERIES ASSEMBLY
PARTS LIST:
1. Shield Retainer
2. Shield Gasket
3. Shield
4. Sheild Retainer O-Ring
5. Indicator Housing/Meter Tube Assembly
6. Pointer Needle Set Screw
7. Float
8. Outlet Float Stop Housing Assembly
9. End Fitting O-Ring
10. Outlet End Fitting
11. Orice Housing O-Ring
12. Orice Housing/ Orice Assembly
13. Inlet Float Stop Housing Assembly
14. Taper Sleeve
15. Inlet End Fitting
1
CONFIGURATIONS VARY BY FLOW RATE AND
METER SIZE.
1
1
FLANGE
1
1
1
15
FNPT
Installation Instructions
10
9
8
7
4
32
5
6
1
11
12
11
11
11
9
12
11
14
13
FLANGE FNPT
15
10
11
11
9
When it comes to ow...we’re instrumental.
13
11
9
(714) 891-0008 • www.kinginstrumentco.com
3
Page 4

7720 SERIES 4-20 mA TRANSMITTER
To convert the measured flow into a 4-20 mAdc signal, an angle of
rotation transmitter is mounted to the indicator. This device is factory
calibrated to ensure accuracy and should only be adjusted by King
Instrument Company.
4-20 mA TRANSMITTER SPECIFICATIONS:
POWER SUPPLY:
MAXIMUM CURRENT CONSUMPTION:
TEMPERATURE LIMITS:
OUTPUT:
ACCURACY: <=0.5%
LINEARITY:
INFLUENCE FROM BEARING: +/- 0.1%
ELECTRICAL CONNECTIONS:
S1
SPANZERO
-
+
OUT
V
TRANSMITTER HOUSING
TRANSMITTER SHAFT
TRANSMITTER
JUMPER WIRE
RED WIRE (+)
BLACK WIRE (-)
7720 SERIES INDUCTIVE SLOT SENSOR
All 7720 Series flowmeters may be fitted with one or two inductive slot
sensors. Inductive slot sensors are 2-wire, DC, low current devices and are
designed to be used with a remote barrier / switch isolator capable of
Inductive
5-25V DC (Switch Isolator)
NAMUR
<= 1mA-Float Present
>= 3mA (15mA Max.)-Float Absent
2kHZ
IP67
POS=BROWN / NEG=BLUE
TERMINALS: #1=POS / #2=NEG
General Purpose
UL:
CSA:SENSOR APPROVALS:
TEMPERATURE INFLUENCE (AMBIENT): +/- 0.03% per degree C
POWER SUPPLY INFLUENCE: +/- 0.1%
LOAD RESISTANCE INFLUENCE: +/- 0.03% at R max.
ZERO POINT MARK
ZERO POINT MARK
(2 WIRE ONLY)
TRANSMITTER - REAR VIEW 2-WIRE CONNECTION
ZERO: POTENTIOMETER P1 FOR
ZERO POINT
POTENTIOMETER P2 FOR
MEASURING RANGE AND
VALUE
SPAN:
S1:
DUAL ALARM WIRING DIAGRAM
RED-2
BLACK-2
BLACK-3
(GROUND)
RED-1
BLACK-1
BROWN
BLUE
BLACK-3
BROWN
BLUE
RED-2
BLACK-2
ALARM
SENSOR
ALARM
SENSOR
(HIGH)
(LOW)
(GROUND)
BLACK-1
RED-1
7720 SERIES 4-20 mA TRANSMITTER
To convert the measured flow into a 4-20 mAdc signal, an angle of
rotation transmitter is mounted to the indicator. This device is factory
calibrated to ensure accuracy and should only be adjusted by King
Instrument Company.
4-20 mA TRANSMITTER SPECIFICATIONS:
POWER SUPPLY:
MAXIMUM CURRENT CONSUMPTION:
TEMPERATURE LIMITS:
OUTPUT:
12-33V DC
40 mA
-13°F to 158°F
4 to 20 mAdc
ACCURACY: <=0.5%
LINEARITY:
+/- 0.4%
INFLUENCE FROM BEARING: +/- 0.1%
ELECTRICAL CONNECTIONS:
S1
SPANZERO
-
+
OUT
V
TRANSMITTER HOUSING
TRANSMITTER SHAFT
TRANSMITTER
JUMPER WIRE
RED WIRE (+)
BLACK WIRE (-)
V-V+OUT
ext
R
R
ext: EXTERNAL RESISTANCE =
POWER SUPPLY (V) -12V
OUTPUT SIGNAL (mA)
H
Inductive
5-25V DC (Switch Isolator)
NAMUR
<= 1mA-Float Present
>= 3mA (15mA Max.)-Float Absent
2kHZ
IP67
POS=BROWN / NEG=BLUE
TERMINALS: #1=POS / #2=NEG
General Purpose
TEMPERATURE INFLUENCE (AMBIENT): +/- 0.03% per degree C
POWER SUPPLY INFLUENCE: +/- 0.1%
LOAD RESISTANCE INFLUENCE: +/- 0.03% at R max.
ZERO POINT MARK
ZERO POINT MARK
(2 WIRE ONLY)
TRANSMITTER - REAR VIEW 2-WIRE CONNECTION
ZERO: POTENTIOMETER P1 FOR
ZERO POINT
POTENTIOMETER P2 FOR
MEASURING RANGE AND
VALUE
SPAN:
S1:
H: DC POWER SUPPLY
(-25°C to 70°C)
S1
SPANZERO
-
+
OUT
V
TRANSMITTER HOUSING
TRANSMITTER SHAFT
TRANSMITTER
JUMPER WIRE
RED WIRE (+)
BLACK WIRE (-)
General Purpose
UL:
CSA:SENSOR APPROVALS:
ZERO POINT MARK
ZERO POINT MARK
(2 WIRE ONLY)
TRANSMITTER - REAR VIEW 2-WIRE CONNECTION
ZERO: POTENTIOMETER P1 FOR
ZERO POINT
POTENTIOMETER P2 FOR
MEASURING RANGE AND
VALUE
SPAN:
SWITCH FOR REVERSING
ROTATION (NOT
APPLICABLE)
S1:
RED-2
BLACK-2
BLACK-3
(GROUND)
RED-1
BLACK-1
BROWN
BLUE
BLACK-2
(GROUND)
ALARM
BLACK-1
RED-1
BROWN
BLUE
BLACK-3
BROWN
BLUE
RED-2
BLACK-2
ALARM
SENSOR
ALARM
SENSOR
(HIGH)
(LOW)
(GROUND)
BLACK-1
RED-1
1
2
3
6
5
4
7720 Series
7720 SERIES INDUCTIVE SLOT SENSOR
All 7720 Series owmeters may be tted with one or two inductive slot
sensors. Inductive slot sensors are 2-wire, DC, low current devices and
are designed to be used with a remote barrier / switch isolator capable
of powering the sensor and providing the desired switching option(s).
Barrier / switch isolators are available with 220VAC, 110VAC or 24VDC
supply voltage requirements, contain single pole double throw (SPDT )
relays, and are DIN rail mountable. (Only 24VDC units are actually
powered by the rail.) See barrier / switch isolator specications for
electrical connections and further details.
INDUCTIVE SLOT SENSOR-ELECTRICAL
SPECIFICATIONS
TYPE: INDUCTIVE
SUPPLY VOLTAGE: 5-25V DC (Switch Isolator)
OUTPUT: NAMUR
OUTPUT LOAD CURRENT: <= 1mA-Float Present
>= 3mA (15mA Max.)-Float Absent
SWITCHING FREQUENCY: 2kHZ
HOUSING RATING: IP67
WIRING: 2 Conductor, NAMUR
POS=BROWN / NEG=BLUE
TERMINALS: #1=POS / #2=NEG
PEPPERL+FUCHS UL: General Purpose
SENSOR APPROVALS CSA: General Purpose
7720 SERIES ASSEMBLY INDUCTIVE SLOT SENSOR
Installation Instructions
ELECTRICAL CONNECTIONS
BLACK-2
(GROUND)
RED-1
BLACK-1
SINGLE ALARM WIRING DIAGRAM
BLACK-3
(GROUND)
SETTING ALARM TRIGGER POINTS
1) Unscrew the SHIELD RETAINER to remove the SHIELD and GASKET.
2) Remove the SHIELD and GASKET.
3) Carefully loosen the ALARM NUT. (Loosen just enough to rotate the
ALARM SENSOR BRACKET).
4) Carefully rotate the ALARM SENSOR BRACKET to the desired alarm
set point. If the meter has DUAL ALARMS, set the LOW ALARM set
point and then the HIGH ALARM set point.
5) Tighten the ALARM NUT.
6) Replace the SHIELD and GASKET, secure with the SHIELD RETAINER.
RED-2
BLACK-2
RED-1
BLACK-1
BLACK-1
DUAL ALARM WIRING DIAGRAM
RED-1
When it comes to ow...we’re instrumental.
(714) 891-0008 • www.kinginstrumentco.com
7720 SERIES ASSEMBLY
INDUCTIVE SLOT SENSOR
PARTS LIST:
1. Shield retainer
2. Shield and Gasket
3. Indicator Housing/
Meter Tube Assembly
4. Pointer Hub and
Pointer Needle
5. Alarm Nut
6. Alarm Sensor Bracket
BLACK-2
(GROUND)
BLACK-1
RED-1
ALARM
BROWN
BLUE
BLACK-3
(GROUND)
BROWN
BLUE
ALARM
SENSOR
(HIGH)
RED-2
BLACK-2
ALARM
SENSOR
(LOW)
BROWN
BLUE
4
Page 5

7720 Series
7720 SERIES 4-20 mA TRANSMITTER
To convert the measured flow into a 4-20 mAdc signal, an angle of
rotation transmitter is mounted to the indicator. This device is factory
calibrated to ensure accuracy and should only be adjusted by King
Instrument Company.
4-20 mA TRANSMITTER SPECIFICATIONS:
POWER SUPPLY:
MAXIMUM CURRENT CONSUMPTION:
TEMPERATURE LIMITS:
OUTPUT:
12-33V DC
40 mA
-13°F to 158°F
4 to 20 mAdc
ACCURACY: <=0.5%
LINEARITY:
+/- 0.4%
INFLUENCE FROM BEARING: +/- 0.1%
ELECTRICAL CONNECTIONS:
V-V+OUT
ext
R
H
TEMPERATURE INFLUENCE (AMBIENT): +/- 0.03% per degree C
POWER SUPPLY INFLUENCE: +/- 0.1%
LOAD RESISTANCE INFLUENCE: +/- 0.03% at R max.
(-25°C to 70°C)
7720 SERIES
INSTALLATION
INSTRUCTIONS
Installation Instructions
7720 SERIES 4-20 mA TRANSMITER
To convert the measured ow into a 4-20 mAdc signal, an angle of
rotation transmitter is mounted to the indicator. This device is factory calibrated to ensure accuracy and should only be adjusted by
King Instrument Company.
4-20 MA TRANSMITTER SPECIFICATIONS:
POWER SUPPLY: 12-33V DC
MAXIMUM CURRENT CONSUMPTION: 40 mA
TEMPERATURE LIMITS: -13°F to 158°F (-25°C to 70° C)
OUTPUT: 4 to 20 mAdc
ACCURACY: <=0.5%
LINEARITY: +/- 0.4%
INFLUENCE FROM BEARING: +/- 0.1%
TEMPERATURE INFLUENCE (AMBIENT): +/- 0.03% per degree C
POWER SUPPLY INFLUENCE: +/- 0.1%
LOAD RESISTANCE INFLUENCE: +/- 0.03% at R max.
SETTING THE OUTPUT RANGE
Initial adjustment to the transmitter is made during
mounting by aligning the housing and shaft zero points.
Fine tuning of the device using the”ZERO” and “SPAN”
potentiometers are competed after all electrical connec
tions are checked and power is supplied to transmitter.
The “ZERO” potentiometer is adjusted using a watchmak
ers screw driver to set the minimum output, 20 mAdc, the
pointer is rotated to full scale ow and the “SPAN” poten
tiometer is adjusted. This process is repeated until the full
current range has been veried.
ELECTRICAL CONNECTIONS:
SPAN
ZERO
S1
TRANSMITTER
TRANSMITTER HOUSING
ZERO POINT MARK
OUT
-
V
+
TRANSMITTER SHAFT
ZERO POINT MARK
BLACK WIRE (-)
RED WIRE (+)
JUMPER WIRE
(2 WIRE ONLY)
TRANSMITTER - REAR VIEW
ZERO: POTENTIOMETER P1 FOR ZERO POINT
SPAN: POTENTIOMETER P2 FOR MEASURING
RANGE AND VALUE
S 1: SWITCH FOR REVERSING
ROTATION (NOT APPLICABLE)
-
-
-
V-V+OUT
2-WIRE CONNECTION
R
ext: EXTERNAL RESISTANCE =
R
When it comes to ow...we’re instrumental.
ext
H
POWER SUPPLY (V) -12V
OUTPUT SIGNAL (mA)
H: DC POWER SUPPLY
(12V-33V)
(714) 891-0008 • www.kinginstrumentco.com
5
 Loading...