

King Canada 8010L, 8020L Instruction Manual

COPYRIGHT © 2011 ALL RIGHTS RESERVED BY KING CANADA TOOLS INC.
12V LI-ION CORDLESS DRILL KIT
plusplus
performanceperformance
INSTRUCTION MANUAL
MODEL: 8010L
WARRANTY INFORMATION
2-YEAR
LIMITED WARRANTY
FOR THIS 12V LI-ION DRILL
KING CANADA TOOLS
OFFERS A 2-YEAR LIMITED WARRANTY
FOR NON-COMMERCIAL USE.
PROOF OF PURCHASE
Please keep your dated proof of purchase for warranty and servicing purposes.
LIMITED TOOL WARRANTY
King Canada makes every effort to ensure that this product meets high quality and
durability standards. King Canada warrants to the original retail consumer a 2-year
limited warranty as of the date the product was purchased at retail and that each
product is free from defects in materials. Warranty does not apply to defects due
directly or indirectly to misuse, abuse, normal wear and tear, negligence or
accidents, repairs done by an unauthorized service center, alterations and lack of
maintenance. King Canada shall in no event be liable for death, injuries to persons
or property or for incidental, special or consequential damages arising from the use
of our products.
To take advantage of this limited warranty, return the product at your expense
together with your dated proof of purshase to an authorized King Canada service
center. Contact your retailer or visit our web site at www.kingcanada.com for an
updated listing of our authorized service centers. In cooperation with our authorized
serviced center, King Canada will either repair or replace the product if any part or
parts covered under this warranty which examination proves to be defective in
workmanship or material during the warranty period.
NOTE TO USER
This instruction manual is meant to serve as a guide only. Specifications and
references are subject to change without prior notice.
P
ARTS DIAGRAM & PARTS LISTS
Refer to the Parts section of the King Canada web site for the most updated parts
diagram and parts list.
KING CANADA INC. DORVAL, QUÉBEC, CANADA H9P 2Y4
www.kingcanada.com

1. KNOW YOUR TOOL
Read and understand the instruction manual and labels affixed to the tool. Learn its
application and limitations as well as its specific potential hazards.
2. Don’t use power tools in damp or wet locations or expose them to rain. Keep work area
well lit and provide adequate surrounding work space.
3. USE RIGHT TOOL.
Don’t force the tool or the attachment to do a job for which it was not designed.
4. WEAR PROPER APPAREL.
Do not wear loose clothing, gloves, neckties or jewelry (rings, watch) because they could
get caught in moving parts. Non-slip footwear is recommended. Wear protective hair
covering to contain long hair. Roll up long sleeves above the elbows.
5. MAINTAIN TOOL WITH CARE.
Keep tool clean for best and safest performance. Follow instructions for operation and
changing accessories.
6. DISCONNECT TOOLS.
Before servicing, when changing accessories or attachments.
7. AVOID ACCIDENTAL STARTING.
Make sure the switch is in the ‘’OFF’’ position before connecting battery.
8. USE RECOMMENDED ACCESSORIES.
Consult the manual for recommended accessories. Follow the instructions that
accompany the accessories. The use of improper accessories may cause hazards.
9. CHECK FOR DAMAGED PARTS.
Before further use of the tool, a guard or other parts that are damaged should be
carefully checked to ensure they will operate properly and perform their intended
function. Check for alignment of moving parts, breakage of parts, mounting, and any
other conditions that may affect its operation. A guard or other parts which are damaged
should be properly repaired or replaced.
Specific Safety Instructions
1. Only use
King attachments and accessories, serious injury can result if this warning is
not respected.
2. Before installing or changing an accessory, remove the battery from the tool. This
will prevent accidental starts and possible injuries.
3. Hold power tool by insulated grip surface, an accessory could contact hidden wiring,
contact with a “live” wire will make exposed metal surfaces “live” and will shock the
operator.
4. Avoid body contact with earthed or grounded surfaces such as pipes, radiators,
stoves and refrigerators. Risk of electric shock if your body is grounded.
5. Use clamps or any other practical way to secure and support the workpiece to a stable
platform. Holding the work by hand or against your body is unstable and may lead to
loss of control.
6. Wear protective gloves and safety glasses, an accessory can become extremely hot
during operation, danger of burns!
7. Do not use the tool if switch does not turn it on or of
f. Any tool that cannot be controlled
with the switch is dangerous and must be repaired.
GENERAL & SPECIFIC
SAFETY INSTRUCTIONS
LITHIUM-ION BATTERY &
CHARGER INFORMATION
WARNING: The warnings, cautions, and instructions discussed in this instruction manual
cannot cover all possible conditions and situations that may occur. It must be understood
by the operator that common sense and caution are factors which cannot be built into this
product, but must be supplied by the operator.
WARNING: Get to know your cordless drill. Do not plug in charger or install battery into
drill until you have read and understood this instruction manual. Only use the supplied
King charger (K-8012LCG) to charge the King 12V Lithium-ion battery (K-8012LBT).
Charging any other battery may damage the charger and possibly cause serious injury.
Battery and Charger Safety Precautions
1) Do not store or carry battery
in a way which metal objects could contact the exposed
metal end of the battery. The battery could short-circuit causing a fire, personal injury
and damage to the battery.
2) Never attempt to open the battery for any reason. If battery housing has cracked,
discontinue use immediately and do not try to recharge it. Dispose of battery.
3) Never charge a wet battery or a battery that shows signs of corrosion.
4) Do not use an extension cord with the charger, plug charger directly into a 120V AC
receptacle.
5) Do not use charger if power cord is damaged, replace damaged cord or charger.
6) Do not charge battery when work area or the battery temperature is or below 00C or
above 450C.
7) Unplug charger when not in use.
8) It is important to recycle or dispose of battery properly at your nearest battery
recycling location.
9) The contents of the battery is slightly acidic, do not incinerate the battery, it can
explode in a fire.
10) A small leakage from the battery may occur under extreme usage, charging or
temperature conditions. This does not indicate a battery failure. However, if the battery
housing is cracked and leakage gets on your skin, follow these steps;
-Wash with soap immediately.
-Neutralize area with mild acid such as vinegar or lemon juice.
-If leakage gets into your eyes, flush with clean water for a minimum of 10 minutes, then
seek medical attention.
Lithium-ion Battery
Lithium-ion batteries do not have a memory and do not require to be completely
discharged periodically
. After use, charge battery so that it is fully charged for the next time
you use this tool.
A
fully charged battery will only loose about 2% of its charge per month
during storage.
GETTING TO KNOW YOUR TOOL
SPECIFICATIONS
Model ........................................................................................................................
8010L
Voltage..........................................................................................................................12V
Battery type ............................................................................................
1300m/Ah (li-ion)
Keyless chuck ..............................................................................................................
3/8”
Number of speeds and range
........................................................2 (0-300, 0-1050 RPM)
Torque settings ........................................................................................................17 + 1
Torque..................................................................................................................
133 in/lbs
Charger ....................................................................................................................
1 hour
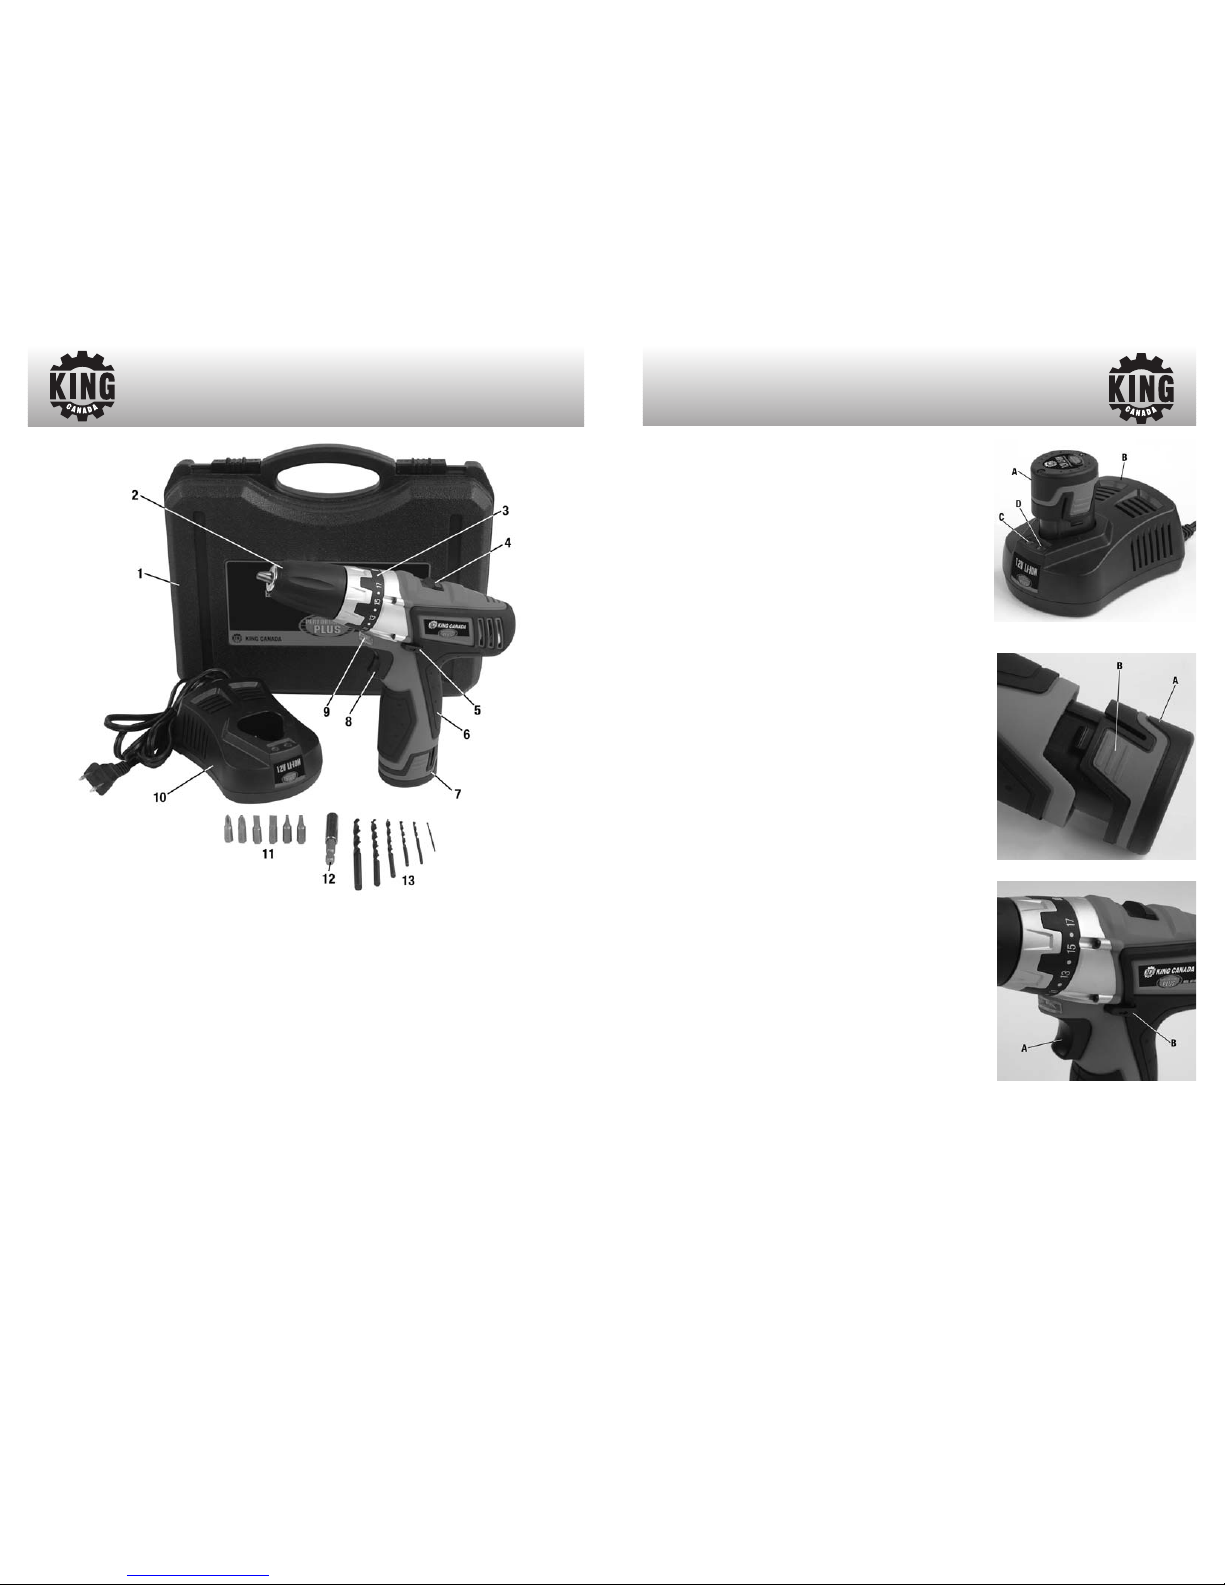
1. Carrying case
2. 3/8” keyless chuck
3. Torque setting ring
4. 2 speed gearbox selector
5. Forward/reverse switch
6. 12V Lithium-ion cordless drill
7. 12V Lithium-ion battery
8. Variable speed trigger
9. LED work light
10. 12V Lithium-ion battery charger
11. 6 screwdriver bits (Robertson #1,
Robertson #2, Phillips #1, Phillips #2,
5mm flat, 6mm flat)
12. Magnetic bit extension
13. 6 drill bits (1.5, 2.5, 3, 4, 5, 6mm)
Figure 1
OPERATION
Using your 12V Li-ion cordless drill
WARNING:
Do not install battery until the accessory is
installed securely to the tool.
Wear protective gloves
and safety glasses,
an accessory can become extremely
hot during operation, danger of burns!
Charging the battery
To charge the battery (A) Fig.2, plug charger (B) power
cord into a 120V AC receptacle (do not use extension
cord). The red LED (C) will light up to indicate power to
the charger. Place the battery stem into the charger
opening, make sure it is fully inserted into charger, the
green LED (D) will start flashing indicating the charging
procedure has begun. Once the green LED (D) stops
flashing, the battery is fully charged and ready to use.
Installing/removing battery from drill
To install a battery (A) Fig.3 into the base of the cordless
drill, simply slide the battery up into the base of the drill
and push it all the way until the battery clips (B) snap and
hold the battery into place.
To remove the battery from the base of the drill,
simultaneously press both battery clips on both sides of
the battery and pull the battery away from the drill.
Variable speed trigger
Your cordless drill is equipped with a variable speed
trigger (A) Fig.4. The speed can be controled from the
minimum to the maximum RPM just by the pressure
applied to the trigger switch. Apply more pressure to
increase speed and apply less pressure to decrease
speed. Release trigger to stop drill.
Forward/reverse switch and trigger lock
Your cordless drill is equipped with a forward/reverse
switch and trigger lock (B) Fig.4. It is located above the
trigger. This switch is designed to change the direction of
rotation of the keyless chuck and to lock the trigger to
help prevent accidental starts and battery discharge. For
a forward rotation (with the chuck pointing away from
you) move the lever to the left. For reverse rotation move
the lever to the right. To lock the trigger, place the lever in the center position.
WARNING! Do not change the rotation direction until the drill chuck has come to a
complete stop. Changing the rotation during an operation can cause damage to the
tool.
Figure 2
Figure 3
Figure 4
 Loading...