


K 113
ProMeat
Kıyma Makinesi
Kullanma Kılavuzu / Instruction Manual
Model No: K 113 ProMeat
Kıyma Makinesi / Meat Grinder
Meat Grinder
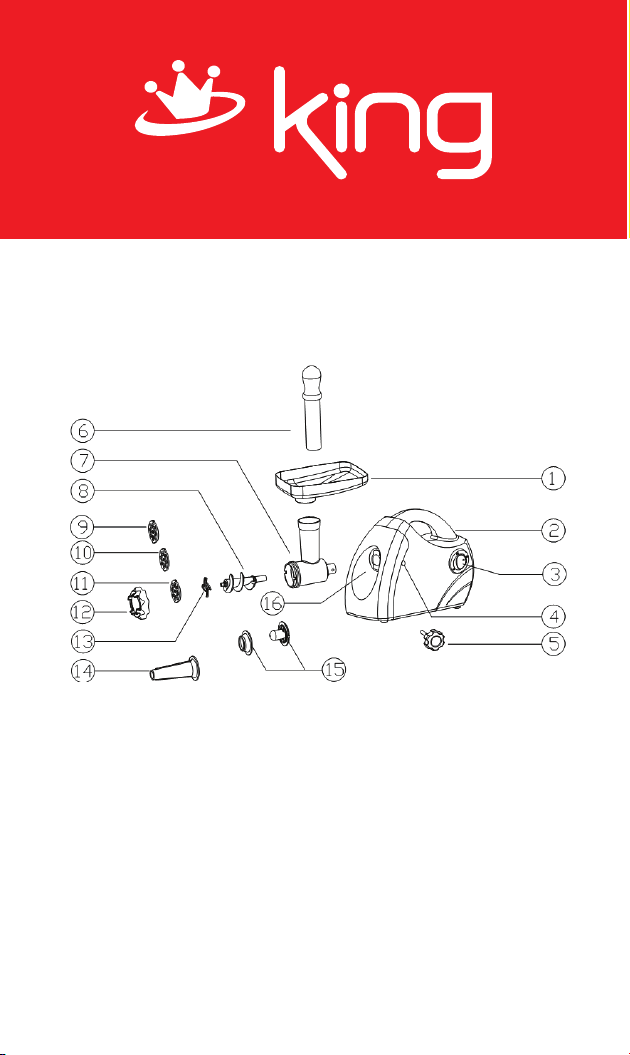
MAIN PARTS
1. Hopper plate
2. Motor housing
3. ON/OFF/ REV
4. Locking knob hole
5. Locking knob
6. Food pusher
7. Head
8. Feed screw
9. Cutting plate (fine)
10. Cutting plate (medium)
11. Cutting plate (coarse) switch
12. Fixing ring
13. Cutting blade
14. Sausage attachment
15. Kibbe attachment
16. Head inlet

IMPORTANT SAFEGUARDS
■
Household use only. Do not use for industrial purpose.
■
Unplug from outlet when assembling and disassembling the unit.
■
Close supervision is necessary when any appliance is used near children.
■
When carrying the unit be sure to hold the motor housing with both hands. Do not carry
the unit by holding only the hopper plate or head.
■
Do not fix the cutting blade and cutting plate when using kibbe attachment.
■
Never feed food by hand. Always use food pusher.
■
Do not grind hard food such as bones, nuts, etc.
■
Do not grind ginger and other materials with hard fiber.
■
Continuous running of meat grinder should be not more than 10 minutes with the
following 10 minutes interval for motor cooling.
■
Reverse function is prohibited while the appliance is operating (For example
switch“ON” knob to “REV” knob or on the contrary), wait at least one minute until grinder
has come to a complete stopotherwise it may cause an abnormal noise, vibration or a
transitory electric spark in the appliance. It could result easily damage to appliance and
make a user frightened.
■
After use, there would be a little food left in the grinder head. This is normal. There
might be a bit of black metal powder adhering to the food ground in the end. Please pick
them out and throw away, do not eat them.
■
To avoid jamming, do not force to operate the unit with excessive pressure.
■
When the circuit breaker activates, do not switch on.
■
Never try to replace the parts and repair the unit by yourself.
■
This appliance is not intended for use by persons(including children) with reduce
physical, sensory or mental capabilities, or lack of experience and knowledge, unless
they have been given supervision or instruction concerning use of the appliance by a
person responsible for their safety.
■
If the supply cord is damaged,it must be replaced by the manufacturer or its service
agent or a similarly qualified person in order to avoid a hazard.
■
Children should be supervised to ensure that they do not play with the appliance.
FOR THE FIRST TIME
■
Check that voltage indicated on the rating label corresponds the mains voltage in your
home.
■
Wash all parts (except body) in warm soapy water.
■
Before plugging in, ensure the “ON/OFF/ REV” switch is turned to "OFF" position.
INSTRUCTION FOR USE
ASSEMBLING
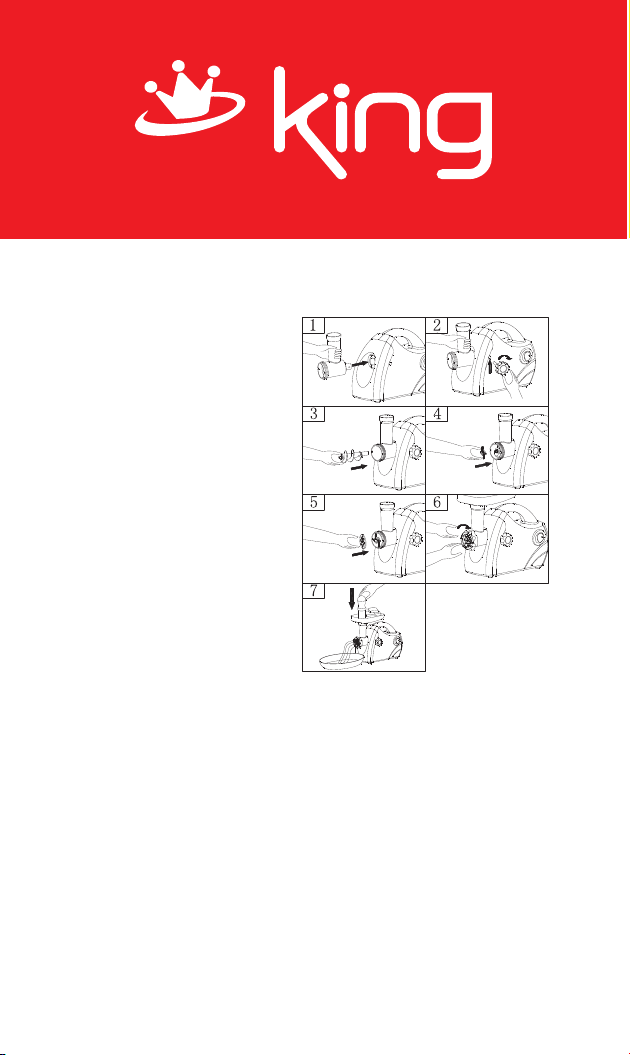
■
Holding the head and insert it in the
inlet with one hand, place the locking
knob into the hole on the side of the
motor housing, tighten it clockwise to
secure the head .(fig.2)
■
Place the feed screw into the head,
long end first, by turning the feed screw
slightly until it is set into the motor
housing (fig.3).
■
Place the cutting blade onto the feed
screw shaft with the blade facing the
front as illustrated (fig.4). If it is not fitted
properly, meat will not be ground.
■
Place the desired cutting plate next to the cutting blade, fitting protrusions in the slots
(fig.5).
■
Support or press the centre of the cutting plate with one finger then screw the fixing
ring until tight with another hand (fig.6). Do not over tighten.
■
Place the hopper plate on the head and fix into position.
■
Locate the unit on a firm place.
■
The air passage at the bottom and the side of the motor housing should be kept free
and not blocked.
MINCING MEAT
■
Cut all foods into pieces (Sinewless, boneless and fatless meat is recommended,
approximate size :20mmx20mmx60mm) so that they fit easily into the hopper opening.
■
Plug in and turn the “ON/OFF/ REV” switch to "ON" position.
■
Feed foods into the hopper plate. Use only the food pusher (fig.7).

■
After use switch the unit off and unplug it from the power supply.
REVERSE FUNCTION
■
In case of jamming switch the appliance off by turning the “ON/OFF/ REV” switch to
"REV" position..
■
Feed screw will be rotating in the opposite direction, and the head will get empty.
■
If it doesn't work, switch the unit off and clean it.
MAKING KIBBE
RECIPE
STUFFING
Mutton 100g
Olive oil 1 1/tablespoons
Onion (cut finely) 1 1/tablespoons
Spices to your taste
Salt to your taste
Flour 1 1/tablespoons
■
Mince mutton once or twice.
■
Fry onion until brown and add minced
mutton, all spice, salt and flour.
OUTLET COVER
Lean meat 450g
Flour 150-200g
Spices to your taste
Nutmeg (cut finely) 1
Powdered red pepper to your taste
Pepper to your taste
■
Mince meat three times and mix all ingredients together in a bowl. More meat and less
flour for outlet cover creates better consistency and taste.
■
Grind the mixture three times.
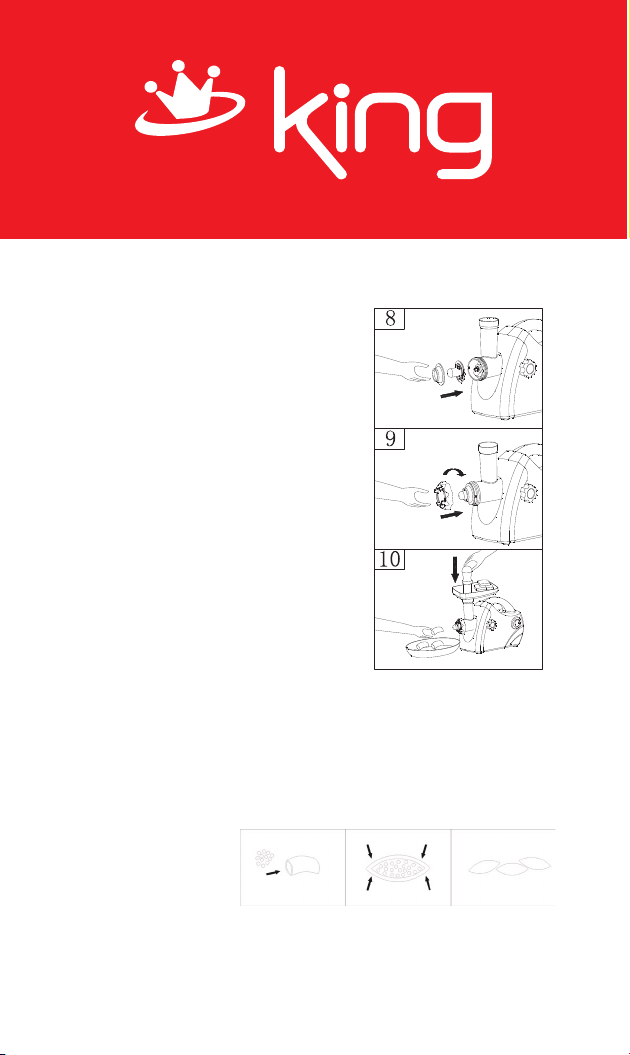
■
Disassemble by reversing the steps from 5-3 to remove the cutting plate and cutting
blade.
■
Place kibbe attachments onto the feed screw shaft together, fitting protrusions in the
slots (fig.8).
■
Screw fixing ring into place until tight. Do not over tighten (fig.9).

■
Make the cylindrical
outlet cover (fig.10).(
■
Form kibbe as illustrated
below and deep fry.
MAKING SAUSAGE
■
Before starting please assemble sausage attachment as per following (fig.11)
CLEANING AND MAINTENANCE
DISASSEMBLING
■
Make sure that the motor has
stopped completely.
■
Disconnect the plug from the
power outlet.
■
Disassemble by reversing the
steps from 6-1 pictures.
■
If the fixing ring is not easily removed
by hands, please use tools (fig.12).
■
To remove the cutting plate easily,
place a screwdriver between the cutting
plate and the head as illustrated and lift it up (fig.13).
CLEANING
■
Remove meat, etc. Wash each part in warm soapy water.
■
A bleaching solution containing chlorine will discolor aluminum surfaces.
■
Do not immerse the motor housing in water, but only wipe it with a damp cloth.
■
Thinners and petrol will crack or change the color of the unit.
■
Wipe all the cutting parts by vegetable oil -wet cloth.

PARÇALARI
1. Üst plaka
2. Motor gövdesi
3. ON/OFF/ REV düğmesi
4. Kilitleme kolu deliği
5. Kilitleme kolu
6. Yiyecek itici
7. Başlık
8. Besleme vidası
9. Kıyma plakası (ince)
10. Kıyma plakası (orta)
11. Kıyma plakası (kalın)
12. Sabitleme halkası
13. Kesici bıçak
14. Sosis ataçmanı
15. İçli köfte ataçmanı
16. Başlık yerleştirme yeri

ÖNEMLİ EMNİYET TALİMATLARI
■
Sadece evde kullanılabilir. Sanayi amaçlı kullanmayınız.
■
Cihazı monte ve demonte ederken fişini prizden çekiniz.
■
Herhangi bir cihaz çocukların yanında kullanılacağı zaman yakın gözetim gerekmektedir.
■
Cihazı taşıyacağınız zaman her iki elinizle motor gövdesini tuttuğunuzdan emin
olunuz. Üst plakasından veya başlık kısmından tutarak taşımayınıız.
■
İçli köfte ataçmanını kullanırken kesici bıçağı ve kıyma plakasını takmayınız.
■
Asla elinizle yiyecekleri ittirmeyiniz. Daima iticiyi kullanınız.
■
Kemik, kafa kısmı gibi sert yiyecekleri kıymayınız.
■
Zencefil ve diğer sert kabuklu malzemeleri kıymayınız.
■
Kıyma makinesi sürekli olarak 10 dakikadan fazla çalıştırılmamalıdır, tekrar
çalıştırmadan önce motorun soğuması için 10 dakika bekleyiniz.
■
Cihaz çalışırken ters yöne çalıştırma fonksiyonunun kullanılması yasaktır (örneğin;
düğme “ON” konumunda iken “REV” veya aksi bir konuma çevrilmesi), kıyma makinesi
tamamen durana kadar en az bir dakika bekleyiniz, aksi takdirde anormal bir sese,
titreşime veya elektrik kıvılcımlarının çıkmasına neden olur. Cihazın kolayca hasar
görmesine ve tüketicinin korkması ile sonuçlanabilir.
■
Kullandıktan sonra kıyma başlığında az miktarda yiyecek kalabilir. Bu normaldir.
Yiyeceğin köküne bağlı olarak uç kısmında çok az miktarda siyah metal toz kalabilir.
Lütfen çıkartınız ve atınız, bunları yemeyiniz.
■
Cihazın sıkışmaması için, aşırı baskı ile cihazı çalışmaya zorlamayınız.
■
Devre kesici aktive olduğu zaman , cihazı çalıştırmayınız.
■
Asla parçalarını değiştirmeye veya cihazı kendiniz tamir etmeye çalışmayınız.
■
Bu cihaz fiziksel ve zihinsel kapasitesi düşük (çocuklar dahil) veya deneyim ve
bilgiden yoksun kişilerin, güvenliklerinden sorumlu kişilerin yakın gözetimi olmaksızın
veya cihazın kullanımına dair bilgi verilmeden, kullanmalarına izin verilmemelidir.
■
Eğer ana kablosu hasara uğramışsa en yakın yetkili KING servisince yenisi ile
değiştirilmelidir.
■
Çocukların cihazla oynamadıklarından emin olmak için gözetlenmelidirler.
İLK KULLANIM İÇİN
■
Evinizdeki voltajla cihaz üzerinde belirtilen voltajın aynı olduğundan emin olunuz.
■
Bütün parçalarını (gövde hariç) ılık sabunlu suda yıkayınız.
■
Cihazın fişini prize takmadan önce,“ON/OFF/ REV” düğmesinin OFF" konumunda
olduğundan emin olunuz.

KULLANIM TALİMATI
MONTELEME
■
Bir elinizle başlığı tutunuz ve yerine
sokunuz, kilitleme kolunu motor
gövdesinin yanında bulunan deliğin
içine sokunuz ve başlığı emniyete
almak için saat yönünde çeviriniz ve
sıkıştırınız.(Şek.2)
■
Besleme vidasını uzun kısmı ilk
girecekşekilde başlığın içine motor
gövdesine yerleşene kadar çevirerek
yerleştiriniz, (fig.3).
■
Kesici bıçağı besleme vidasının
milinin üzerine bıçak ön tarafa
bakacak şekilde yerleştiriniz.
(Şek.4). Eğer uygun bir şekilde
yerleştirilmezse et kıyılmayacaktır.
■
İstediğiniz kıyma plakasını kesici bıçağın üzerine çıkıntıların deliklerin üzerine gelecek
şekilde yerleştiriniz. (Şek.5).
■
Kıyma plakasının ortasını bir parmağınızla destekleyiniz veya bastırınız ve sonra diğer
elinizle sabitleme halkasını sıkılaşana kadar vidalayınız. (Şek.6). Aşırı sıkmayınız.
■
Üst plakayı başlığın üzerine yerleştiriniz ve yerine sabitleyiniz.
■
Cihazı sert bir yüzeyin üzerine yerleştiriniz.
■
Cihazın alt tarafındaki hava geçiş yerlerinin ve motor gövdesinin kenarlarının serbest
olmalı ve bloke olmamalıdır.
ET KIYMA
■
Üst plakanın içine kolayca sığması için bütün yiyecekleri parçalara (sinirsiz, kemiksiz
ve yağsız et tavsiye edilir, yaklaşık ölçüleri: 20 mm x 20 mm x 60 mm) kesiniz.
■
Fişini prize takınız ve “ON/OFF/ REV” düğmesini "ON" konumuna çeviriniz.
■
Üst plakayı yiyecekle besleyiniz. Sadece iticiyi kullanınız. (Şek.7).
■
Kullandıktan sonra cihazı kapatınız ve fişini prizden çekiniz.
TERS YÖNE ÇEVİRME FONKSİYONU
■
Cihazın sıkışması durumunda “ON/OFF/ REV” düğmesini “REV” konumuna çeviriniz.
■
Besleme vidası ters yöne dönecektir ve başlık boşalacaktır.
■
Eğer olmaz ise, cihazı kapatınız ve temizleyiniz.
İÇLİ KÖFTE YAPIMI
TARİFİ
MALZEMELER
Koyun eti 100g
Zeytinyağı 1 1/çorba kaşığı
Soğan (ince kıyılmış) 1 1/çorba kaşığı
Baharatlar zevkinize göre
Tuz zevkinize göre
Un 1 1/çorba kaşığı
■
Koyun etini bir veya iki kez kıyınız.
■
Soğanı esmerleşene kadar kızartınız ve
kıyılmış olan eti, bütün baharatları, tuz ve
unu ilave ediniz.
DIŞ KABUĞU (KAPAĞI)
Yağsız et 450g
Un 150-200g
Baharatlar zevkinize göre
Küçük hindistan cevizi (ince kesilmiş) 1
Kırmızı pul biber Powdered zevkinize göre
Biber zevkinize göre
■
Eti üç kez kıyınız ve bütün malzemeleri bir arada bir kabın içinde sıkıştırınız. Fazla et
ve az unlu dış kabuk daha yoğun ve lezzetli olur.
■
Karışımı üç kez kıyınız.
■
Kıyma plakasını ve kesici bıçağı çıkartmak için 5’ten 3’e geriye doğru adımları
uygulayınız.
■
İçli köfte ataçmanını besleme vidası milinin üzerine çıkıntılar deliklerin üzerine gelecek
şekilde yerleştiriniz. (Şek.8)
■
Sabitleme halkasını sıkışana kadar vidalayınız. Aşırı sıkmayınız. (fig.9).
■
Dış kabuğu silindir şeklinde
yapınız. (Şek.10)
■
İçli köfteyi yandaki şekilde
görüldüğü gibi oluşturunuz ve
kızartınız.
 Loading...