

Page 1

Built-in oven
Встраиваемый
духовой шкаф
OK 205
Instruction booklet
Руководство по эксплуатации
356910001 GRAFICHE MDM Forli
Page 2
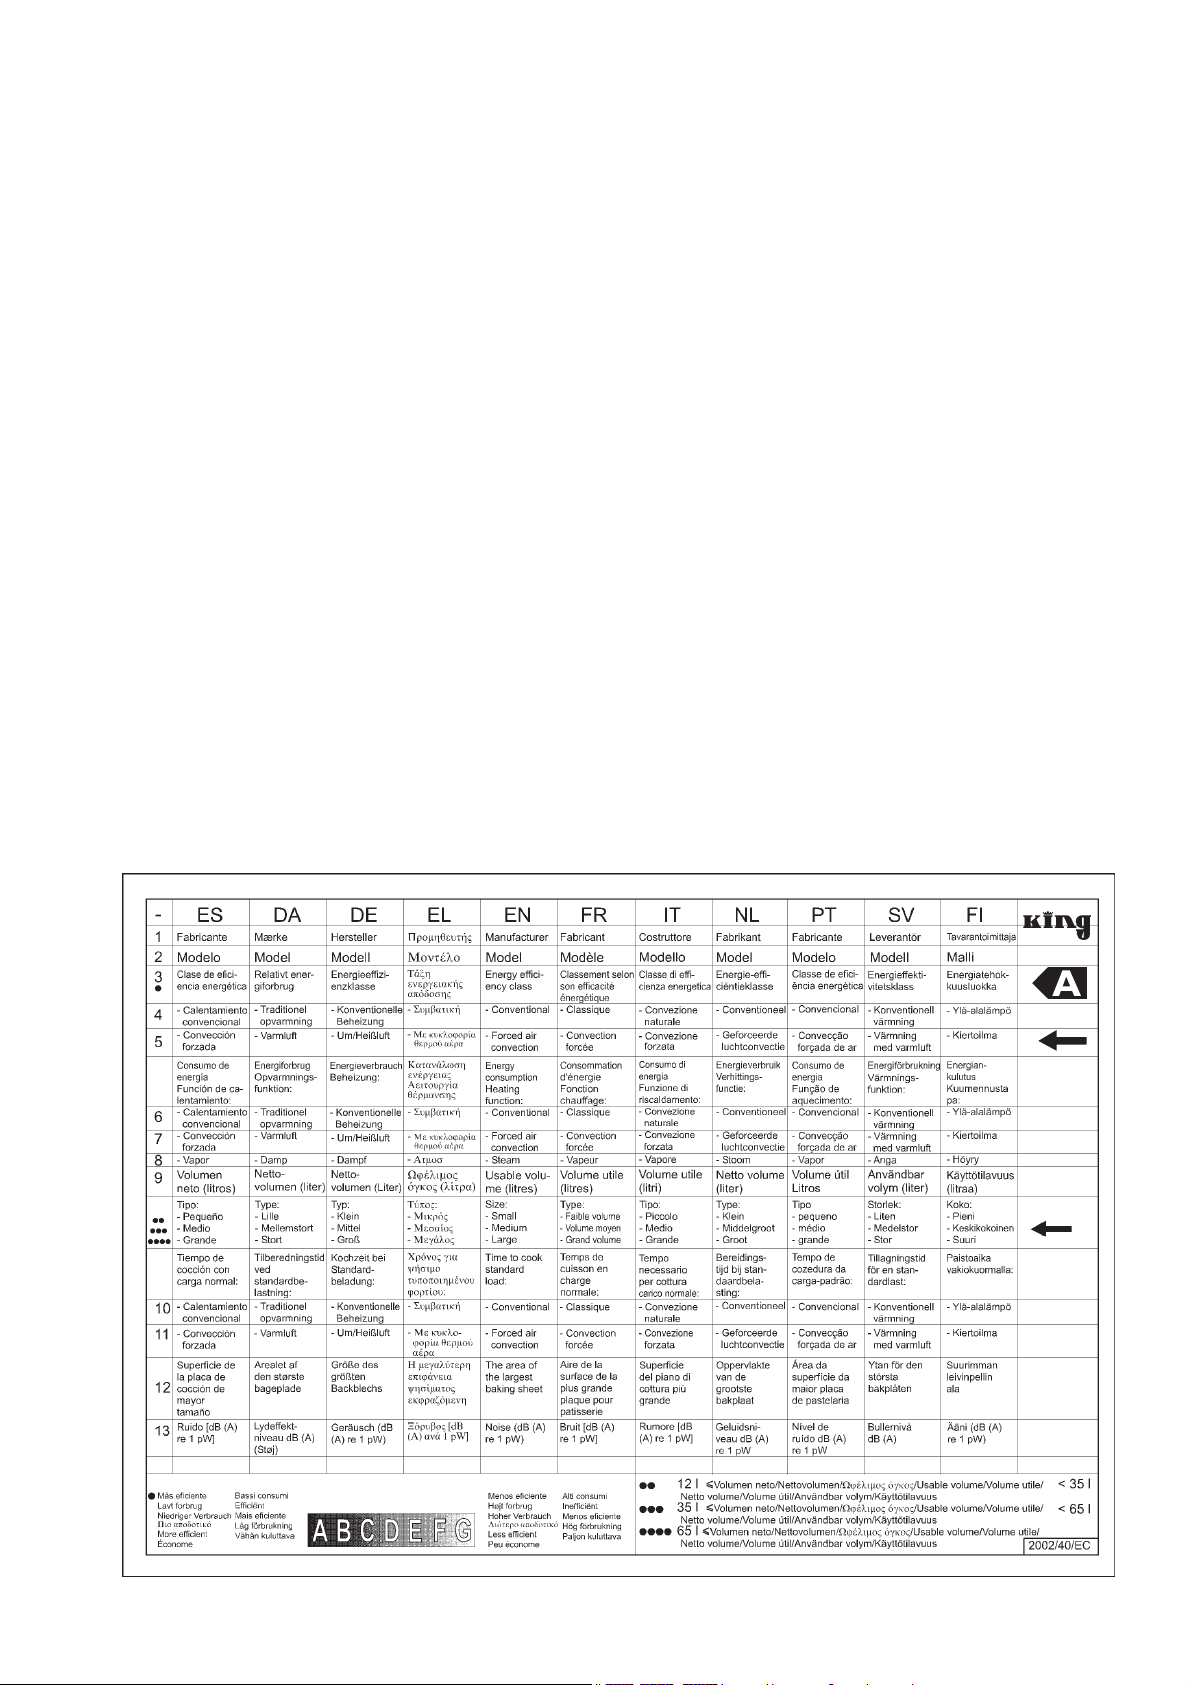
OK 205
0,79 kWh
0,78 kWh
53
43 min.
41 min.
1130 cm²
2
Page 3
English
Important Safety Information
These warnings are provided in the interest of safety. You MUST read them carefully before installing or using the appliance.
Installation
• It is mandatory that all operations required for the
installation are carried out by a qualified or competent
person, in accordance with existing rules and
regulations.
• It is dangerous to alter the specification in any way.
• Once you removed all packaging from the appliance,
ensure that it is not damaged and the electric cable is
in perfect conditions. Otherwise, contact your dealer
before proceeding with the installation.
Child Safety
• This appliance has been designed to be operated by
adults and children under supervision. Young children
MUST NOT be allowed to tamper with the controls or play
near or with the oven.
• Accessible parts of this appliance may become hot
when it is in use. Children should be KEPT AWAY until it
has cooled.
During use
• This appliance has been designed for cooking edible
foodstuff only and MUST NOT be used for any other
purposes.
• Ensure that all control knobs are in the OFF position
when not in use.
• Should you connect any electrical tool to a plug near
this cooking appliance, ensure that electric cables are
not in contact with it and keep them far enough from
the heated parts of this appliance.
• If the appliance is out of order, disconnect it from the
electric supply.
• Do not leave untensils containing foodstuffs, e. g. fat
or oil in or on the appliance. This could cause damage
in case the appliance is inadvertently switched on.
• Always place the dripping pan in position to collect fat
when using the grill or when cooking meat. Pour a little
water into the dripping pan to avoid smoke and
unpleasant smells.
• Appliances become very hot with use, and retain their
heat for long periods after use. Care should be taken
to avoid touching heating elements inside the oven.
• Always stand back from the oven when opening
the oven door during cooking or at the end of it
to allow any build up of steam or heat to release.
• Never use steam or high pressure steam cleaners to
clean the appliance.
• Disconnect the appliance from the electrical supply,
before carrying out any cleaning or manteinance work.
• Some parts of the appliance are covered by a shockproof plastic film. Remove this film before using the
oven.
• This appliance is meant to operate with a singlephased connection to 230 V electrical supply. An
eventual 400 V poliphasic connection without earth
wire will destroy the oven and the hob, if fitted.
• The manufacturer disclaims any responsability
should all the safety measures not be carried out.
Service
• Under no circumstances should you attempt to repair
the appliance yourself. Repairs carried out by
unexperienced persons may cause injury or serious
malfunctioning. Refer to your local Service Centre.
Always insist on genuine spare parts.
Environmental Information
• After installation, please dispose of the packaging with
due regard to safety and the environment.
• When disposing of an old appliance, make it unusable,
by cutting off the cable.
•
The symbol on the product or on its packaging
indicates that this product may not be treated as
household waste. Instead it shall be handed over to
the applicable collection point for the recycling of
electrical and electronic equipment. By ensuring this
product is disposed of correctly, you will help prevent
potential negative consequences for the environment
and human health, which could otherwise be caused
by inappropriate waste handling of this product. For
more detailed information about recycling of this
product, please contact your local city office, your
household waste disposal service or the shop where
you purchased the product.
Guide to Use the instructions
The following symbols will be found in the text to guide you
throughout the Instructions:
Safety Instructions
• Always use oven gloves to remove pans from the oven.
• For hygiene and safety reasons, this appliance should
be kept clean at all times. A build-up of fats or other
foodstuff could result in a fire.
Step by step instructions for an operation
Hints and Tips
Environmental information
3
Page 4
Contents
For the User For the Installer
Important Safety Information 3
Description of the Oven 3
Controls 4
When the oven is first installed 5
Electronic programmer 6
Using the Oven 8
Cooking Tables 11
Cleaning and Maintenance 12
Something not working... 14
Technical Data 17
Technical Assistance 15
Installation 16
Electrical connection 17
It is most important that this instruction book
is be retained with the appliance for future
reference. Should the appliance be sold or
transferred, always ensure that the book is left
with the appliance in order that the new
owner can get to know the functions of the
appliance and the relevant warnings.
MANUFACTURER:
ELECTROLUX HOME PRODUCTS ITALY S.p.A.
Viale Bologna, 298
47100 FORLÌ (Italy)
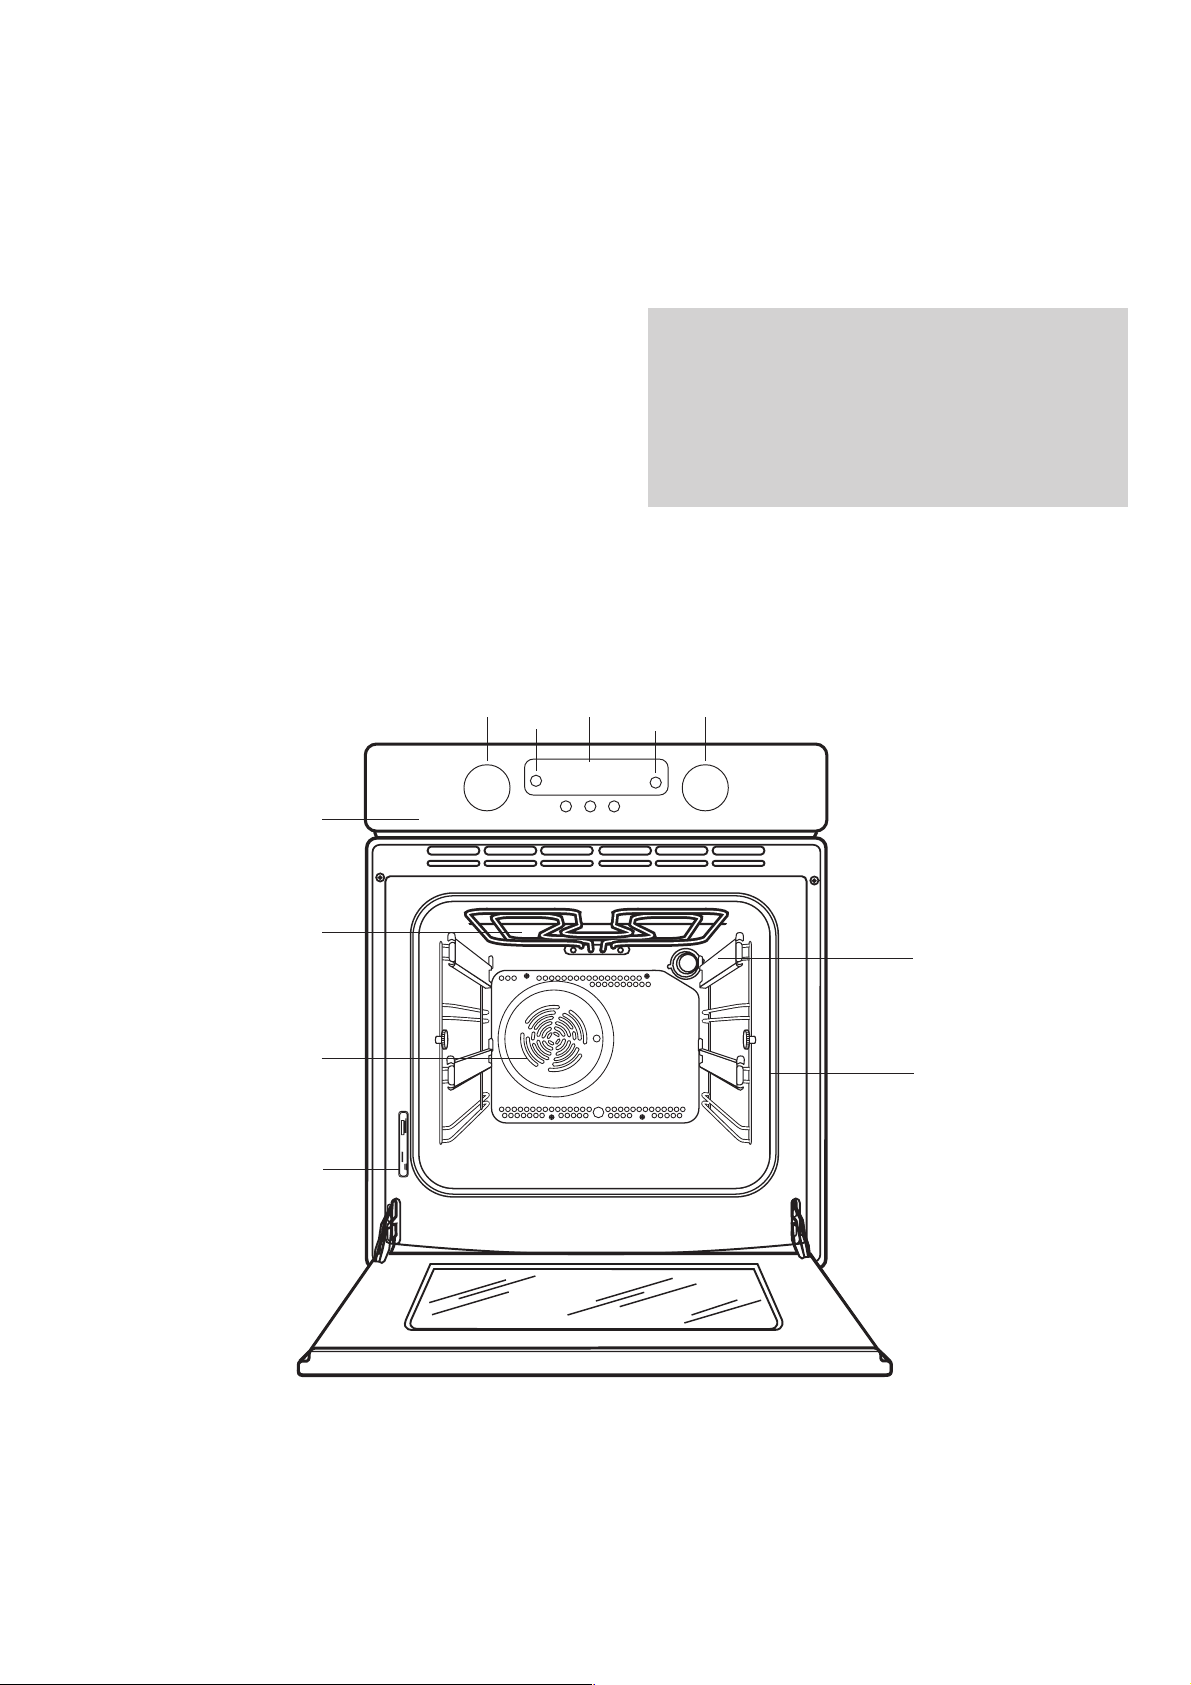
Description of the Oven
54
3
2
6
10
11
1
7
8
9
1. Control Panel
2. Thermostat Control Knob
3. Thermostat Control Light
4. Electronic Programmer
5. Oven Control Function Knob
6. Mains on Light
7. Grill Element
8. Oven Light
7. TelescopicRrunners
10.Oven Fan
11. Rating Plate
4
Page 5
Controls
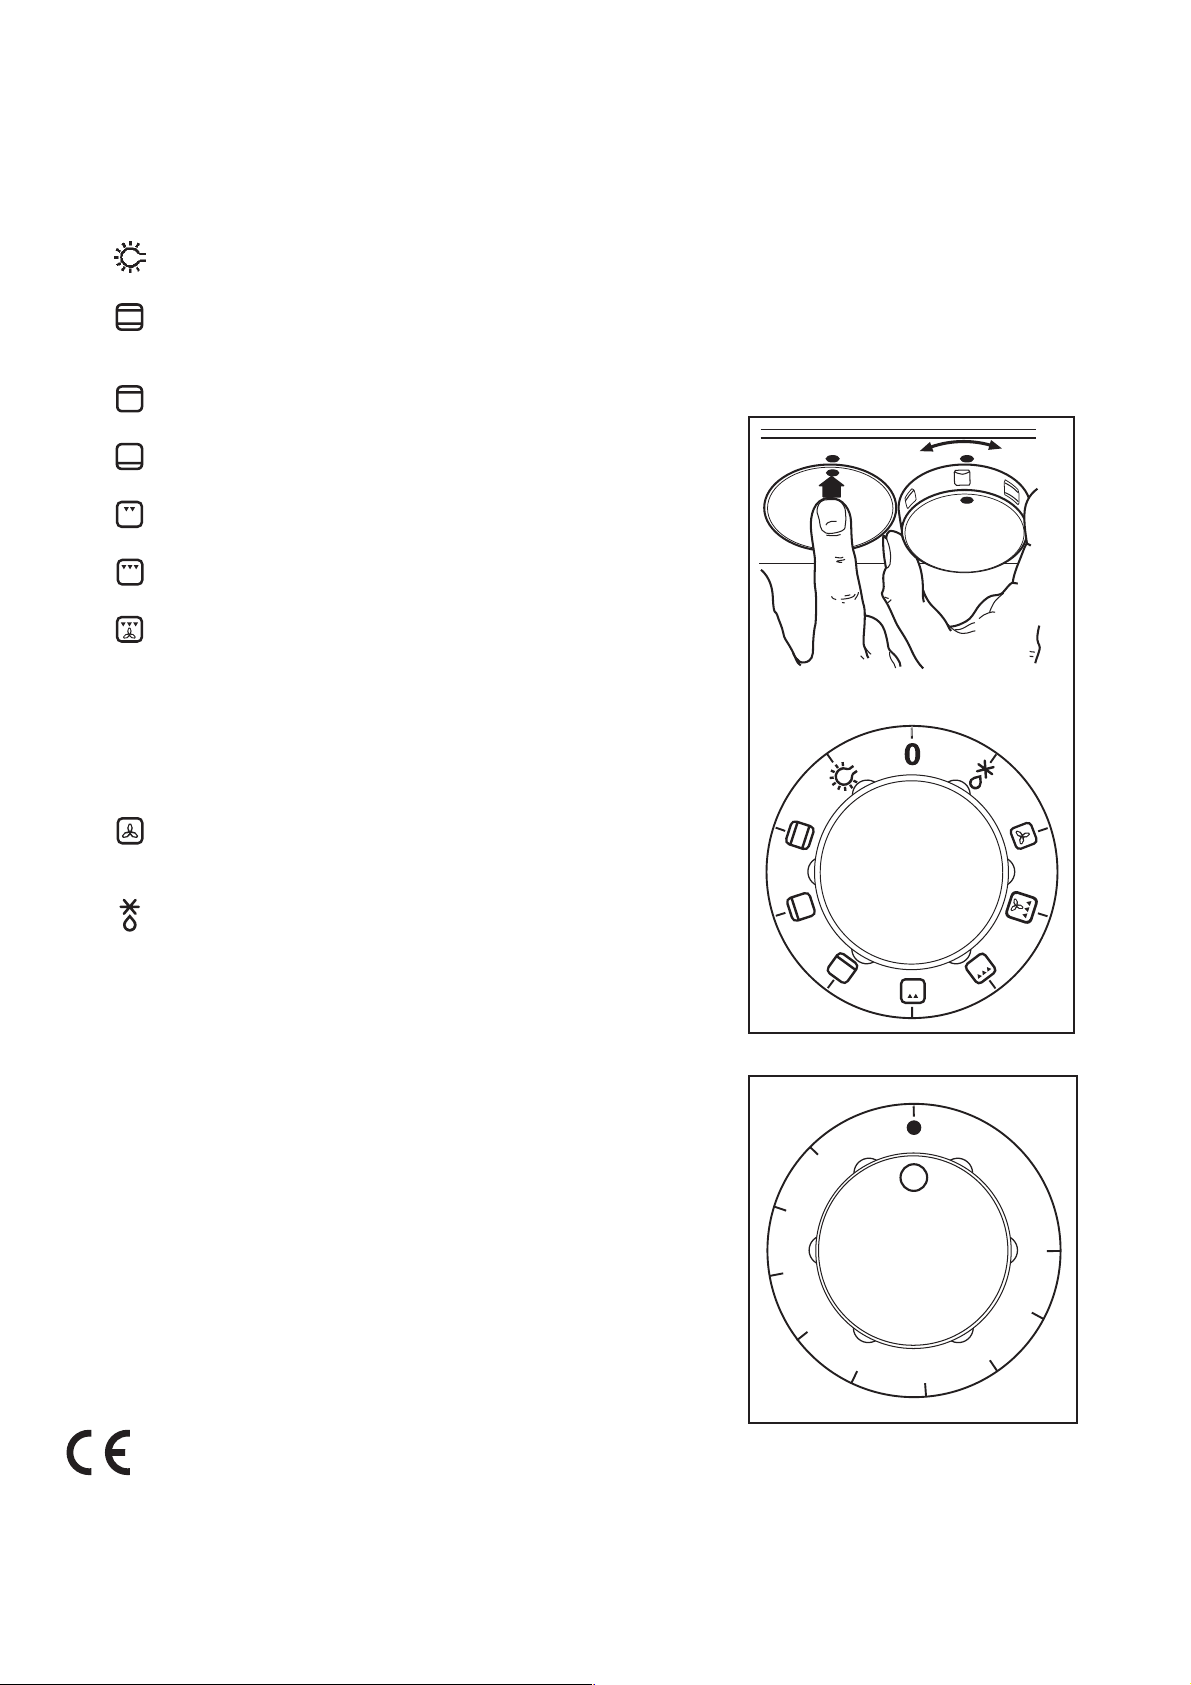
Oven function control knob (Fig. 1)
The oven function control knob can have the following
symbols and functions:
Oven Light - The oven light will be on
without any cooking function
Conventional cooking - The heat comes
from both the top and bottom element,
ensuring even heating inside the oven.
Top heating element - The heat comes
from the top of the oven only.
Bottom heating element - The heat
comes from the bottom of the oven only.
Inner grill element only - can be used for
grilling small quantities.
Double Grill - The full grill element will be
on.
Thermal Grilling - This function offers an
alternative method of cooking food items,
normally associated with conventional
grilling. The grill element and the oven fan
operate together, circulating hot air around
the food. When using this function,
select a maximum temperature of
200°C.
Fan cooking - This allows you to roast or
roast and bake simoultaneously using any
shelf, without flavour transference.
Defrost Setting - This setting is intended
to assist in thawing of frozen food.
Thermostat control knob (Fig. 2)
Turn the thermostat control knob to select temperatures
between 50°C and MAX (230°C).
Oven control light (I)
It will come on every time an heating element is set on
operation.
Thermostat control light (°C)
Once the oven temperature has been selected, the
temperature light will come on and remain on until the
oven has reached the correct setting; after that, it will go
on and off with the thermostat, showing how the temperature is being maintained.
This appliance complies with the following E.E.C.
Directives:
*73/23 - 90/683 (Low VoltageDirective);
*93/68 (General Directives);
*89/336 (Electromagnetical Compatibility Directive)
and subsequent modifications.
Fig. 1
50
MAX
100
200
150
Fig. 2
5
Page 6
The Safety Thermostat
This oven is provided with a safety thermostat. In case of
malfunctioning of the main thermostat, and consequent
over-heating, the safety device will stop the power supply
to the appliance. If this happens, call your local Electrolux
Service Centre. Under no circumstances should you
attempt to repair the appliance yourself.
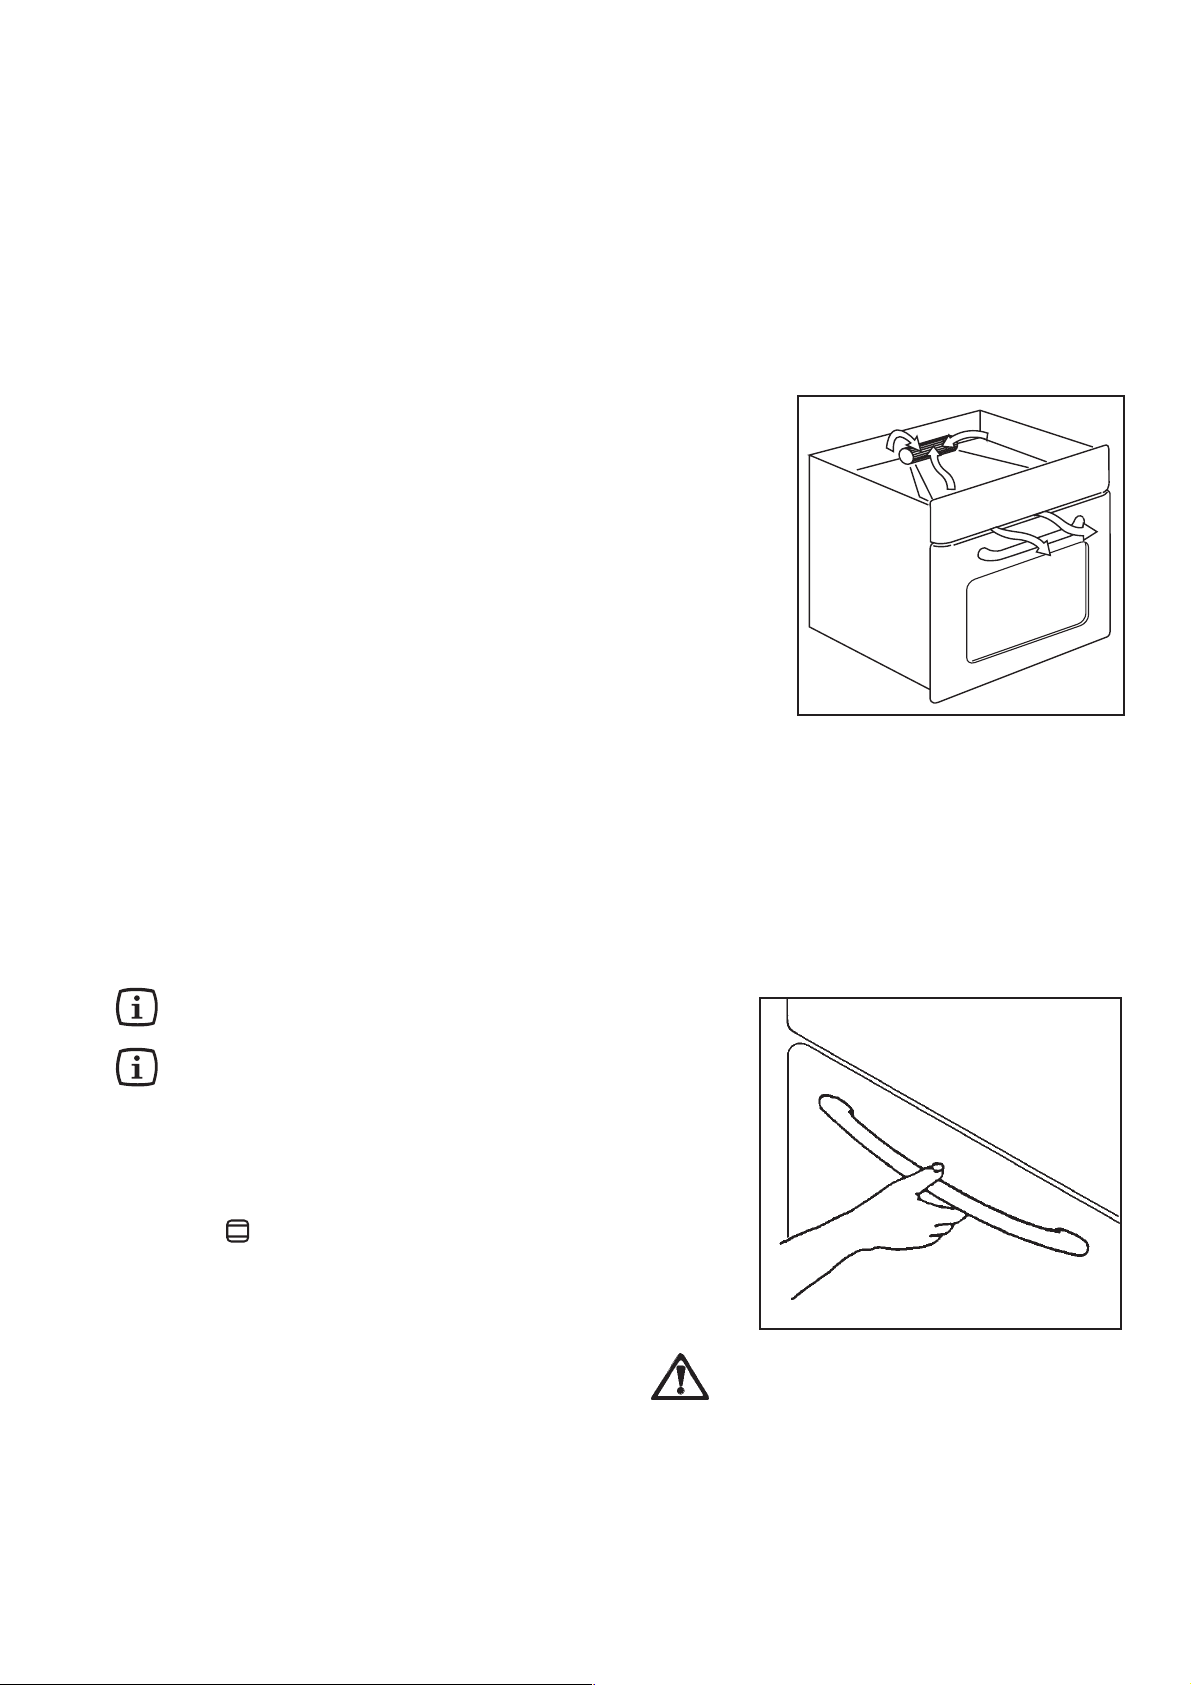
The cooling fan
The cooling fan is designed to cool the walls of the oven
and the components of the oven itself.
The fan switches on automatically after a few minutes of
cooking. Warm air is blown out through the aperture near
the oven door handle. When the oven is switched off, the
fan will remain on in order to cool the oven and kitchen
cabinets properly, after which it switches off automatically.
NOTE: The fan may run up to 45 minutes after cooking
has been completed. Leaving the door ajar will lessen
the cooling time.
Fig. 3
FO 2259
When the oven is first installed
The oven will work only if the time of day has
been set with the electronic programmer (see
paragraph "Setting the time of day") .
Before cooking for the first time, carefully wash
the oven accessories.
Once the oven has been installed:
a) set the thermostat knob to MAX (230 °C);
b) switch the oven function control knob to conventional
cooking ( );
c) allow the oven to run empty for approximately 45
minutes;
d) open a window for ventilation.
During this time, an unpleasant odour may be emitted.
This is absolutely normal, and is caused by residues of
manufacturing.
Repeat this operation for the grill and fan cooking function.
Once this operation is carried out, let the oven cool down,
then clean the oven cavity with a soft cloth soaked in warm
soapy water.
Fig. 4
FO 2161
To open the oven door, always catch the
handle in its central part (Fig. 4).
6
Page 7

Electronic programmer
4
5
6
123
Fig. 5
The oven will work only if the time of day has been set.
Moreover, the oven can also be operated without any programme.
7
8
FO 2571
1. Push button for selecting a function
2. Decreasing control button “ ”
3. Increasing control button “ ”
4. Display
5. “Cooking Duration” pilot lamp
6. “End of cooking” pilot lamp
7. “Minute minder” pilot lamp
8. “Time of day” pilot lamp
Setting the time of day
When the power supply is switched on, or after a power failure, the “Time
of day” pilot lamp will flash on the display.
To set the correct time of day:
1. press button “ ” or “ ”.
2. After the setting is carried out, wait for 5 seconds: the “Time of day”
pilot lamp will go out and the display will show the set time. The
appliance is ready for use.
To reset the correct time of day:
1. press button repeatedly to select the “Time of day” function. The
relevant pilot lamp will start flashing. Then proceed as described
above.
The time of day may be reset only if no automatic function (cook
duration or end of cooking ) has been set.
“Cooking Duration” function
Thanks to this function, the oven will automatically switch off at the end
of a programmed cooking duration time. Place food in the oven, select
a cooking function and adjust the cooking temperature. Press button
repeatedly to select the “Cooking Duration” function. The relevant pilot
lamp will start flashing. Then, proceed as follows:
To set the duration time:
1. press button “ ” or “ ”.
2. After the setting is carried out, wait for 5 seconds: the "Cooking
Duration" pilot lamp will come on and the display will revert to
the time of day.
3. When cooking time is over, the oven will be switched off automatically
and an acoustic alarm will be heard, while the pilot lamp will start
flashing. Turn the oven function and the thermostat control knob to
zero.
To switch off the acoustic alarm, press any button. NOTE: when
doing this operation, the oven will be operated again, therefore,
remember to turn the oven function and the thermostat control knob
to zero at the end of the cooking time.
To cancel the duration time:
1. Press button repeatedly to select the “Cooking Duration” function.
The relevant pilot lamp will flash and the display will show the
remaining cooking time.
2. Press button “ ” until the display shows “0:00”. After 5 seconds
the pilot lamp will go out and the display will revert to the time of
day.
7
Page 8

“End of cooking” function
Thanks to this function, you can set the oven to switch off automatically when a
programmed end of cooking time is over. Place food in the oven, select a cooking
function and adjust the cooking temperature. Press button repeatedly to select
the “End of cooking” function. The relevant pilot lamp will start flashing. Then,
proceed as follows:
To set the End of cooking time:
1. press button “ ” or “ ”.
2. After the setting is carried out, wait for 5 seconds: the “End of cooking” pilot
lamp will come on and the display will revert to the time of day.
3. When cooking time is over, the oven will be switched off automatically and an
acoustic alarm will be heard, while the pilot lamp will start flashing. Turn the
oven function and the thermostat control knob to zero.
To switch off the acoustic alarm, press any button. NOTE: when doing this
operation, the oven will be operated again, therefore, remember to turn the
oven function and the thermostat control knob to zero when cooking is over.
To cancel the End of cooking time:
1. Press button repeatedly to select the “End of cooking” function. The
relevant pilot lamp will flash and the display will show the programmed
End of cooking time.
2. Press button “ ” until the display shows the current time of day. The
programmer will beep and the pilot lamp will go out.
“Cooking duration” and “End of cooking
time” combined
The functions “Cooking duration” e “End of cooking time” can be used simultaneously
to set the oven to switch on and off automatically at a later time.
1. With the “Cooking duration” function (carry out the cooking duration setting
as described in the relevant chapter) set the duration time. Then, press button
: the display will show the programmed setting.
2. With the “End of cooking time” function (carry out the End of cooking
setting as described in the relevant chapter) set the end of cooking time.
The relevant pilot lamps will come on and the display will show the time of
day. The oven will switch on and off according to the set programmes.
“Minute minder” function
The minute minder alarm will sound at the end of a timed period, but THE OVEN
WILL REMAIN ON, if it is in use.
To set the minute minder:
1. Press button repeatedly to select the “Minute minder” function. The relevant
pilot lamp will start flashing.
2. Then, press button “ ” or “ ” (maximum: 2 hours, 30 minutes).
3. After the setting is carried out, wait for 5 seconds: the “Minute minder” pilot
lamp will come on.
4. At the end of the timed period, the pilot lamp will start flashing and acoustic
alarm will be heard. To switch off the acoustic alarm, press any button.
To cancel the minute minder:
1. Press button repeatedly to select the “Minute minder” function. The relevant
pilot lamp will flash and the display will show the remaining time.
2. Press button “ ” until the display shows “0:00”. After 5 seconds the pilot
lamp will go out and the display will revert to the time of day.
How to switch off the display
1. Press two or three programmer push buttons simoultaneously and keep
them pressed for about 5 seconds. The display will switch off.
2. To switch on the display, press any button.
The display can be switched off only if no other functions have been
set.
8
Page 9
Using the Oven
Always cook with the oven door closed.
• Stand clear when opening the drop down oven door.
Do not allow it to fall open - support the door using the
door handle, until it is fully open.
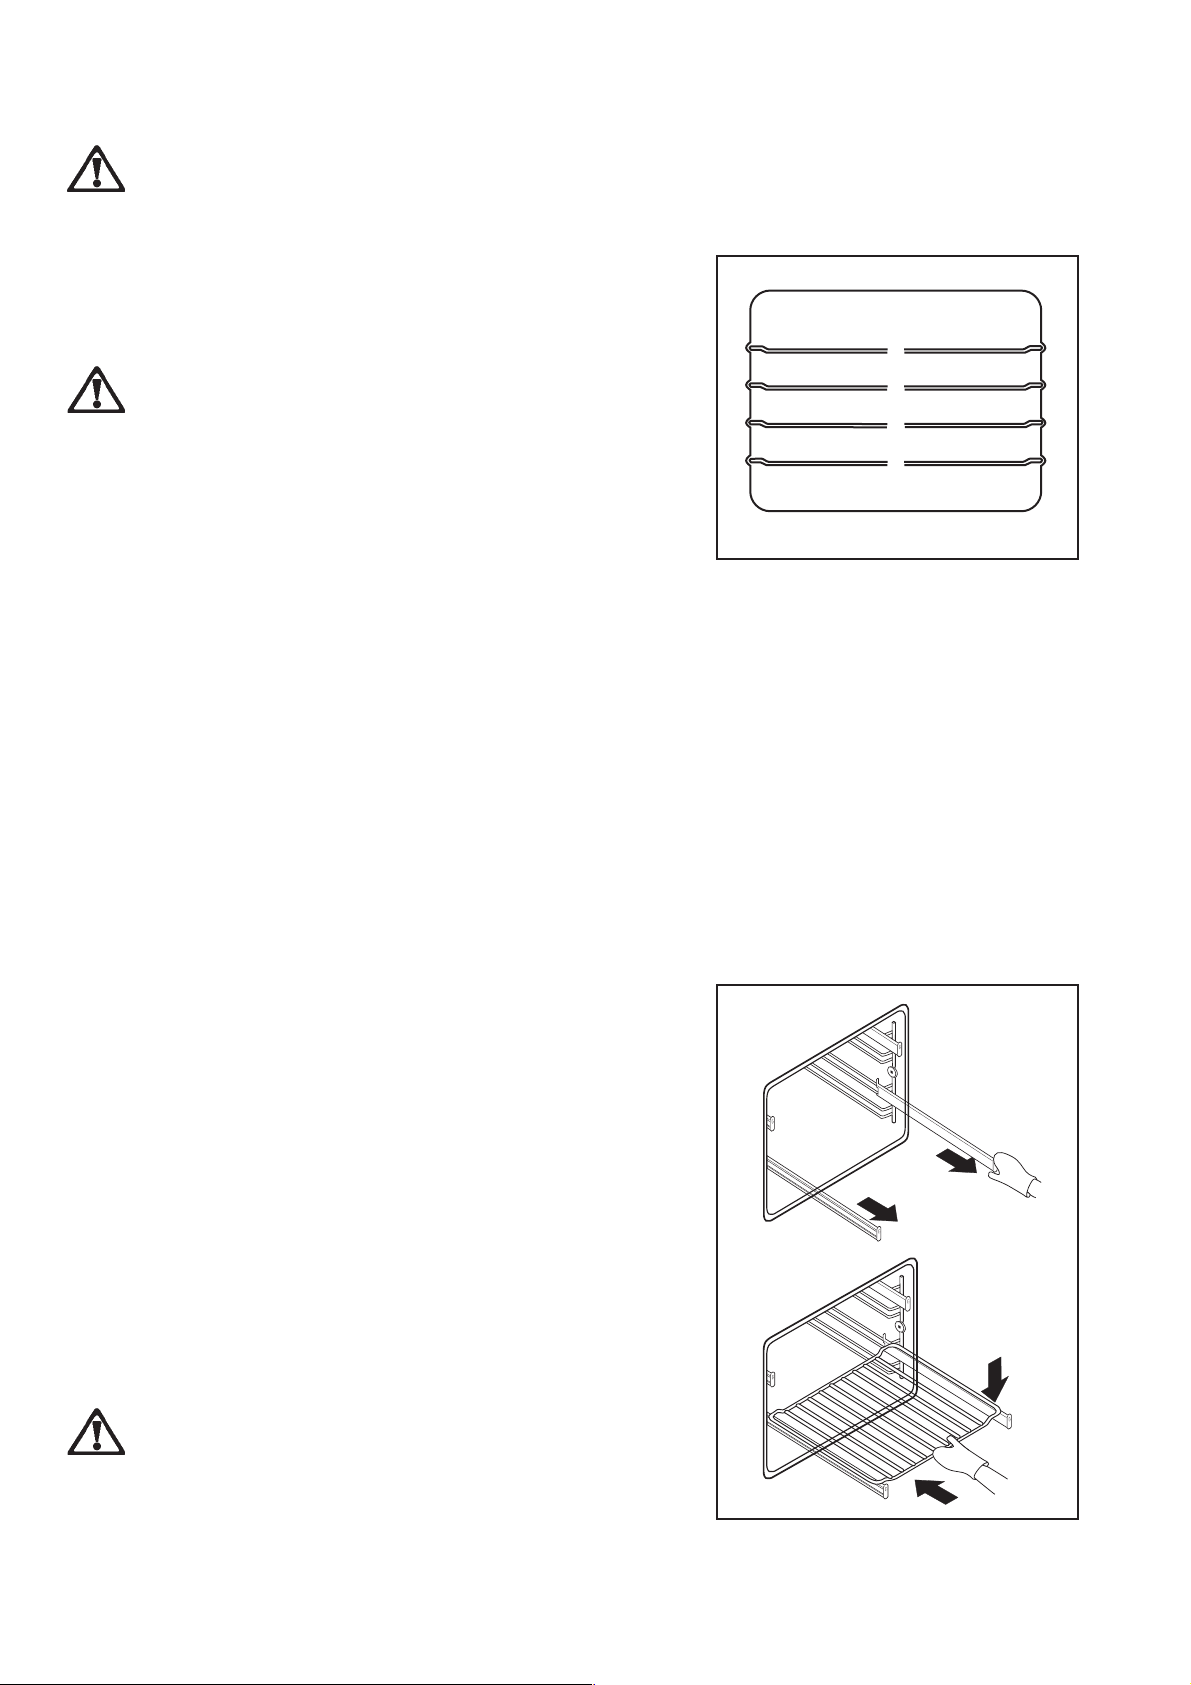
• The oven has four shelf levels. The shelf positions are
counted from the bottom of the oven as shown in figure
6.
Warning! - Do not place cookware directly on
the oven base and do not cover it with aluminium
foil while cooking, as you can damage the
enamelled surfaces and the food you are cooking.
Always place pans, heat-resisting pans and
aluminium foils on the oven shelves.
4
3
2
1
Condensation and steam
The oven is supplied with an exclusive system which
produces a natural circulation of air and the constant
recycling of steam. This system makes it possible
to cook in a steamy environment and keep the
dishes soft inside and crusty outside. Moreover,
the cooking time and energy consumption are
reduced to a minimum. During cooking steam may
be produced which can be released when opening
the oven door. This is absolutely normal.
However, always stand back from the oven
when opening the oven door during cooking or
at the end of it to allow any build up of steam
or heat to release.
If the steam comes into contact with a cool surface on
the outside of the oven, e.g. a trim, it will condense
and produce water droplets. To reduce condensation,
ensure the oven is well heated before placing food in the
oven cavity.
A short oven pre-heating (about 10 minutes) will then
be necessary before any cooking.
We recommend you to wipe away condensation after
each use of the appliance.
Fig. 6
FO 0019
Telescopic shelf supports (Fig. 7)
Shelf levels 2 and 4 are fitted with telescopic shelf
supports, to allow en easier operation when inserting or
removing the shelves.
Pull the right and left hand telescopic shelf supports
completely out, as shown in figure 7.
Place the shelf or the grill pan on the telescopic shelf
supports, then gently push them all inside the oven (Fig.
7).
Do not attempt to close the oven door if the
telescopic shelf supports are not completely
inside the oven. This could damage the door
enamel and glass.
Fig. 7
9
Page 10
Always cook with the oven door closed.
Conventional cooking
Turn the oven function control knob to the relevant symbol
( ) and set the thermostat knob on the required temperature. If you need more heat from the top or the bottom
of the oven, turn the oven function control knob to (top
heating element only) or (bottom heating element
only).
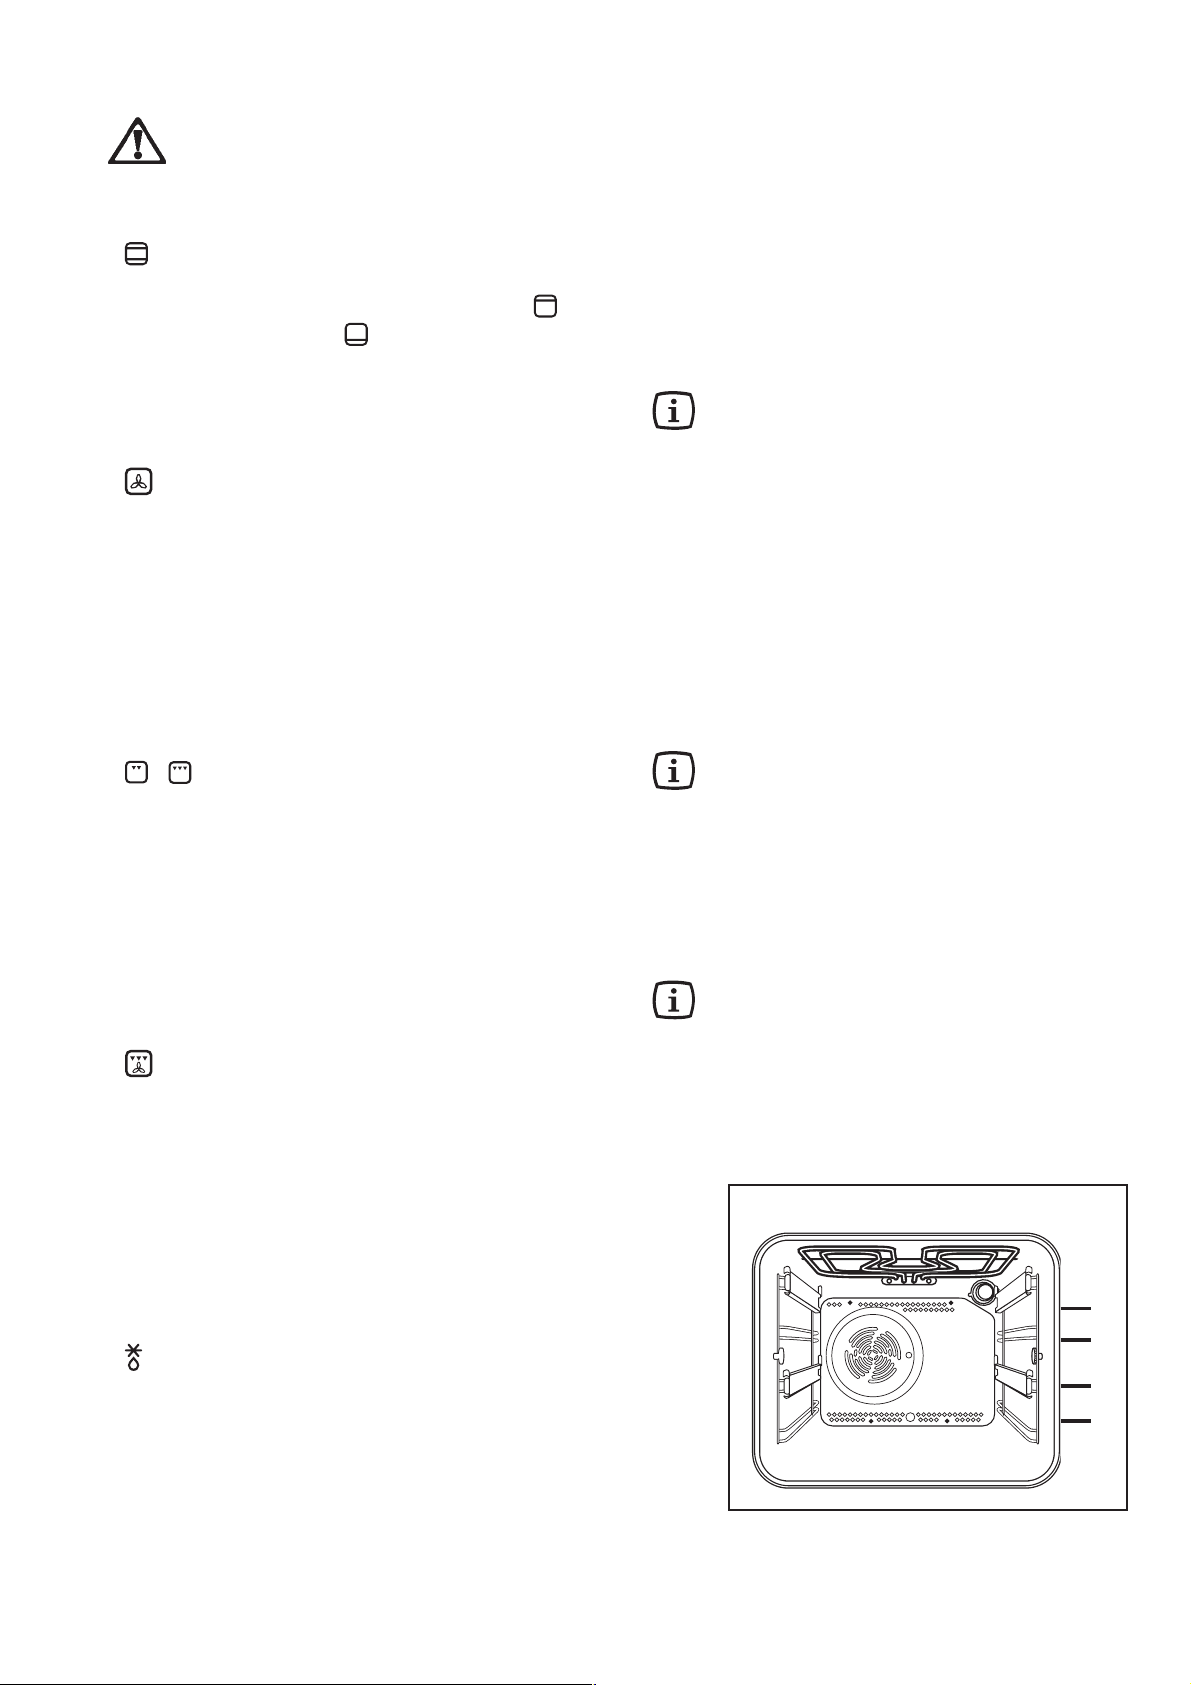
Fan cooking
Turn the oven function control knob to the relevant symbol
( ) and set the thermostat knob on the required temperature. The fan behind the back panel circulates heated air
into the oven.
If you need to cook more than one dish in the fan oven at
the same time, place the shelves on the first and third
position from the bottom (Fig. 8). If you are cooking only
one dish in the fan oven, use the lower positions, as this
will give you better results.
Grilling
Turn the oven function control knob to the relevant symbol
( - )and set the thermostat knob on the required
temperature. When using the double grill function, you
will obtain even heating on the whole surface of the dish.
When grilling meat or fish, spread a little oil on them and
always place them on the oven grid. The shelf level
depends on the thinckness of the food.
Always place the dripping pan at the lowest level, with
some water in it, to avoid smoke and unpleasant smells.
• Carefully supervise cookings with fats or oil, since
these types of foodstuff can result in a fire, if overheated. For the same reason, be careful when placing
or removing food in the oven, not to let any fat or oil fall
on the oven base. If this happens, carefully clean the
oven to avoid unpleasant smells or smoke.
Hints and Tips on Cooking
Fish and Meat
You can place meat in oven proof dishes, or directly on the
oven shelf. In this case, remember to place the dripping
pan in the first position from the bottom with some water
in it. The dripping pan will avoid the falling of melted fat on
the oven base.
White meat, poultry and fish in general, need a medium
temperature cooking (between 150 and 175 °C). If you
need to cook red meat (slightly browned on the outside
and more gently cooked in the inside), a higher temperature (between 200 and 220 °C) for a short time is
recommended.
Hints and Tips on baking
Cakes usually need a medium temperature cooking,
between 150 and 200 °C.
A short oven pre-heating (about 10 minutes) is
recommeded when cooking cakes or baking. Once the
cooking has been started, keep the oven door closed
during all the cooking time, and check the cooking results
through the oven door glass.
Thermal grilling
Turn the oven function control knob to the relevant symbol
( ) and set the thermostat knob on the required temperature. When using this cooking function, select a
maximum temperature of 200°C.
The full grill element and the oven fan operate alternately,
circulating hot air around the food. The need to check and
turn food is reduced. With the exception of toast and rare
steaks, you can thermal grill all the foods you would
normally cook under a conventional grill.
Defrosting
Turn the oven function control knob to the relevant symbol
( ) and set the thermostat knob on the OFF position
(symbol : ). The oven fan operates without heat and
circulates the air, at room temperature, inside the oven.
• The temperatures inside the oven can reach 230°C.
Always ensure that you are using oven proof baking
trays, oven dishes, etc.
• Do not place pans, biscuit pans or aluminium foil
directly on the base of the oven. This could cause a
heat build-up which could affect the performance of the
oven and damage the oven enamel.
Hints and Tips on grilling
If you need to grill meat or fish, place them directly on the
shelf after spreading a little oil on them. In the grill
function, heat comes only from the top element. Therefore,
you need to adjust the cooking level depending on meat
or fish's thickness. Always remember to place the dripping
pan in the lower position with some water in it.
Fan cooking
4
3
2
1
Fig. 8
FO 0351
10
Page 11

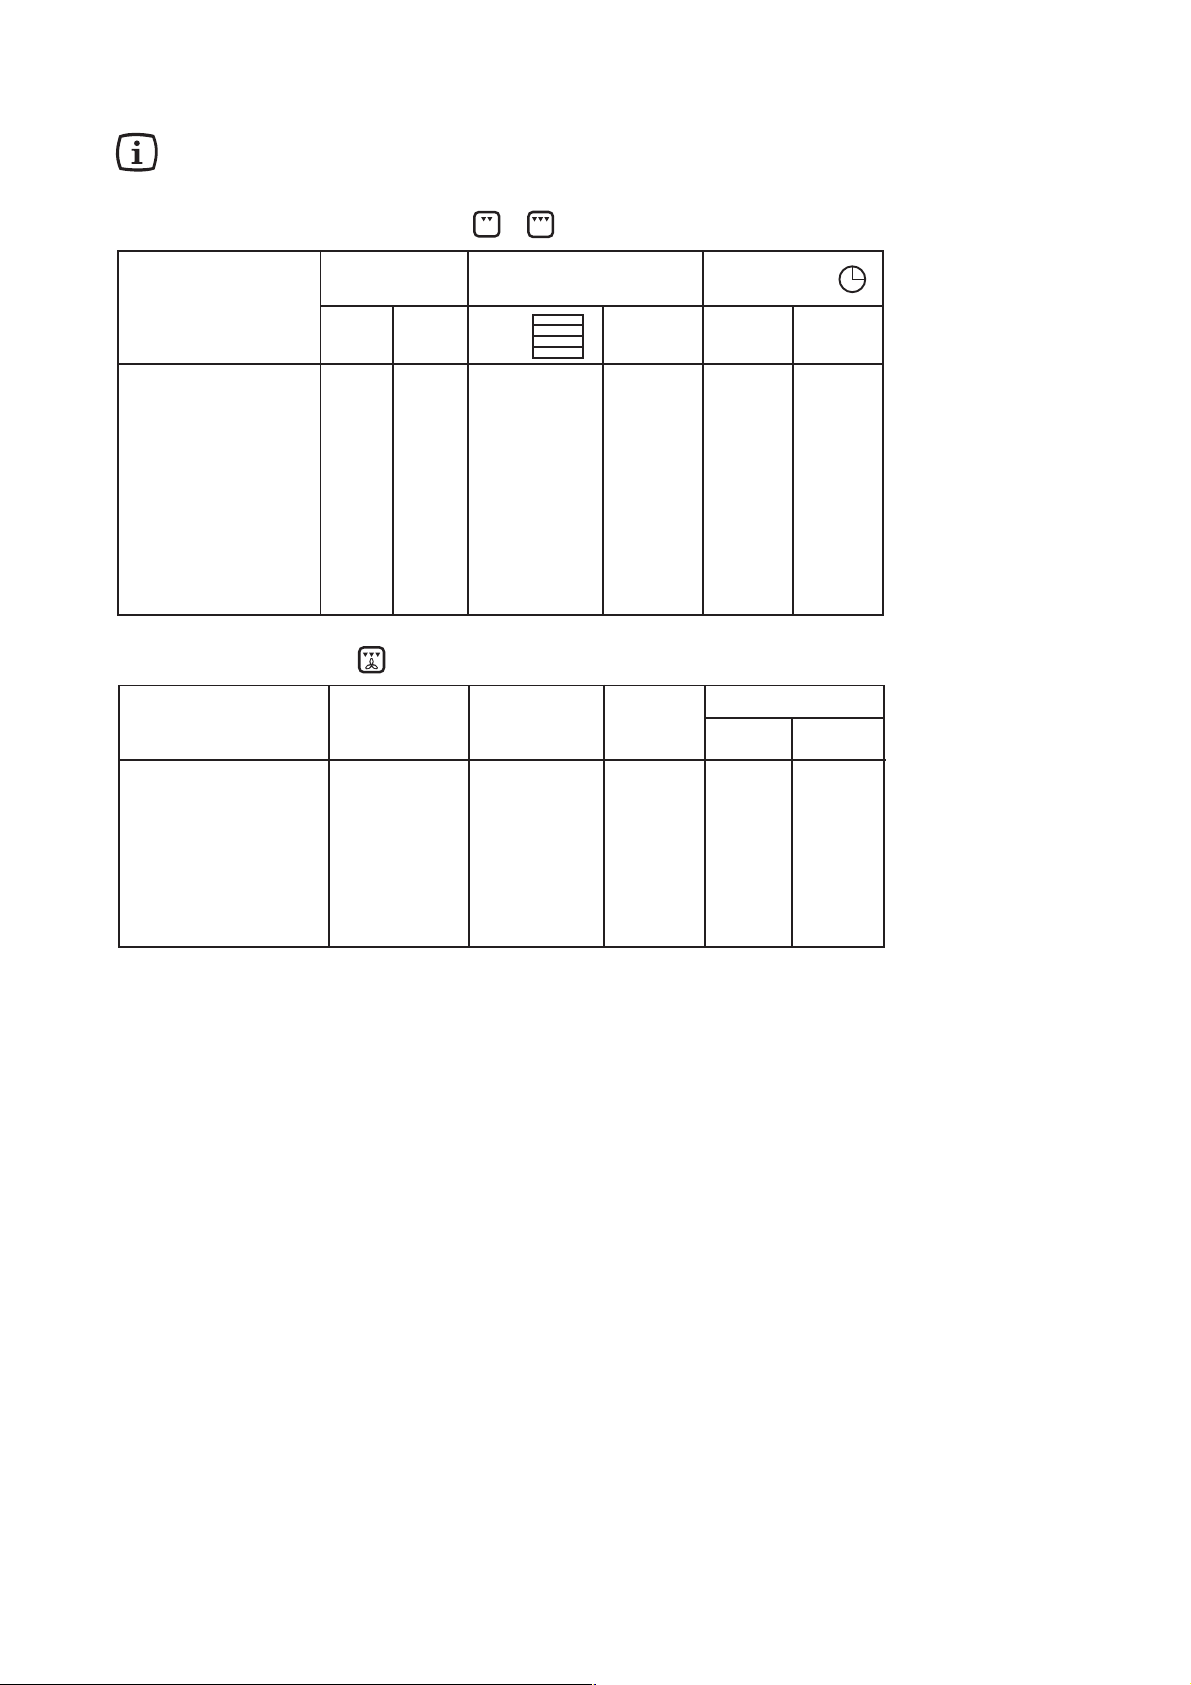
Cooking Tables
Cooking times do not include pre-heating time. We reccomend a short oven pre-heating (about 10 minutes) before
cooking. Shelf positions are counted from bottom of the oven.
Conventional and fan cooking
TYPE OF DISH
Weight (gr.)
Traditional Cooking
Level
temp. °C
4
3
2
1
Fan Oven
Level
4
3
2
1
temp. °C
CAKES
Whipped up kneading
Shortbread dough
Butter-milk cheese cake
2 170 2 (1 and 3)* 160 45 ~ 60 In cake mould
2 170 2 (1 and 3)* 160 20 ~ 30 In cake mould
1 160 2 150 60 ~ 80 In cake mould
Apple cake 1 180 2 (1 and 3)* 170 40 ~ 60 In cake mould
Strudel 2 175 2 150 60 ~ 80
Jam-tart 2 175 2 (1 and 3)* 160 30 ~ 40
Fruit cake 1 175 1 160 45 ~ 60 In bread pan
Sponge cake 1 175 2 (1 and 3)* 160 30 ~ 40 In cake mould
Christmas cake 1 170 1 160 40 ~ 60 In cake mould
Plum cake 1 170 1 160 50 ~ 60 In bread pan
Small cakes 2 175 2 (1 and 3)* 160 25 ~ 35 In baking tray
Biscuits 2 160 2 (1 and 3)* 150 20 ~ 30 In baking tray
Meringues 2 100 2 (1 and 3)* 100 90 ~ 120 In baking tray
Buns 2 190 2 (1 and 3)* 180 12 ~ 20 In baking tray
Pastry: Choux 2 200 2 (1 and 3)* 190 15 ~ 25 In baking tray
BREAD AND PIZZA
1000 White bread 1 190 2 180 40 ~ 60 1-2 pieces
500 Rye bread 1 190 1 180 30 ~ 45 In bread pan
500 Bread rolls 2 200 2 (1 and 3)* 175 20 ~ 35 6-8 rolls
250 Pizza 1 210 2 (1 and 3)* 190 15 ~ 30 in baking pan
FLANS
Pasta flan 2 200 2 (1 and 3)* 175 40 ~ 50 in mould
Vegetable flan 2 200 2 (1 and 3)* 175 45 ~ 60 in mould
Quiches 1 200 2 (1 and 3)* 180 35 ~ 45 in mould
Lasagne 2 180 2 160 45 ~ 60 in mould
Cannelloni 2 200 2 175 40 ~ 55 in mould
MEAT
1000 Beef 2 190 2 175 50 ~ 70 On grid
1200 Pork 2 180 2 175 100 ~ 130 On grid
1000 Veal 2 190 2 175 90 ~ 120 On grid
1500
English roast beef
1500 underdone 2 210 2 200 50 ~ 60 On grid
1500 done 2 210 2 200 60 ~ 70 On grid
1500 well done 2 210 2 200 70 ~ 80 On grid
2000 Shoulder of pork 2 180 2 170 120 ~ 150 With rind
1200 Shin of pork 2 180 2 160 100 ~ 120 2 pieces
1200 Lamb 2 190 2 175 110 ~ 130 Leg
1000 Chicken 2 190 2 175 60 ~ 80 Whole
4000 Turkey 2 180 2 160 210 ~ 240 Whole
1500 Duck 2 175 2 160 120 ~ 150 Whole
3000 Goose 2 175 2 160 150 ~ 200 Whole
1200 Rabbit 2 190 2 175 60 ~ 80 Cut in pieces
1500 Hare 2 190 2 175 150 ~ 200 Cut in pieces
800 Pheasant 2 190 2 175 90 ~ 120 Whole
Meat loaf 2 180 2 160 40 ~ 60 in bread pan
FISH
1200 Trout/Sea bream 2 190 2 (1 and 3)* 175 30 ~ 40 3-4 fishes
1500 Tuna fish/Salmon 2 190 2 (1 and 3)* 175 25 ~ 35 4-6 fillets
NOTE:
This chart is intended as a guide only. It may be necessary to increase or decrease the temperature to suit your individual requirements.
Only experience will enable you to determine the correct setting for your personal requirements.
Shelf positions are counted from bottom of the oven.
(*) If you need to cook more than one dish at the same time, we recommend you to place them on the levels quoted between brackets
Cooking
time
NOTES
minutes
.
11
Page 12
Cooking Tables
Cooking times do not include pre-heating time. We reccomend a short oven pre-heating (about 10 minutes) before
cooking. Shelf positions are counted from bottom of the oven.
Cooking chart - Grilling -
Quantity
TYPE OF DISH
Pieces Weight
Fillet steaks
Beef-steaks 4 600 3 max 10 ~ 12 6 ~ 8
Sausages 8 — 3 max 12 ~ 15 10 ~ 12
Pork chops 4 600 3 max 12 ~ 16 12 ~ 14
Chicken (cut in two) 2 1000 3 max 30 ~ 35 25 ~ 30
Kebabs 4 — 3 max 10 ~ 15 10 ~ 12
Chicken (breast) 4 400 3 max 12 ~ 15 12 ~ 14
Hamburger 6 600 3 max 10 ~ 15 8 ~ 10
Fish (fillets) 4 400 3 max 12 ~ 14 10 ~ 12
Sandwiches 4-6 — 3 max 5 ~ 7 —
Toast 4-6 — 3 max 2~4 2 ~ 3
4 800 3 max 12 ~ 15 12 ~ 14
Level
Grilling
4
3
2
1
temp.
Cooking time
°C
(minutes)
Upper
side
Lower
side
Thermal grilling
TYPE OF DISH Quantity Shelf Temp. Time in minutes
(gr.) level °C lower upper
side side
Rolled joints
Chicken (cut in two) 1000 3 200 25 ~ 30 20 ~ 30
Chicken legs — 3 200 15 ~ 20 15 ~ 18
Quail
Vegetable gratin — 3 200 20 ~ 25 —
St. Jacques shells — 3 200 15 ~ 20 —
Mackerel — 3 200 15 ~ 20 10 ~ 15
Fish slices 800 3 200 12 ~ 15 8 ~ 10
(turkey) 1000 3 200 30 ~ 40 20 ~ 30
500 3 200 25 ~ 30 20 ~ 25
The chart is intended as a guide only and should be adjusted according to taste.
When using the thermal grill function, select a maximum temperature of 200°C.
When using the thermal grill function, select a maximum temperature of 200°C.
12
Page 13
Cleaning and Maintenance
General Cleaning
Before carrying out any cleaning or
manteinance work, always disconnect the
appliance from the electrical supply, and
allow it to cool down.
• When using spray cleaning products, be careful not
to spread them on the heating elements or on the
thermostat sensor.
• Never use harsh abrasives, steel wool or cleaners
with bleach, as they could damage the enamel and
the oven door glass.
The Oven Cavity
The enamelled oven cavity is best cleaned whilst the oven
is still warm. It is advisable to wipe the oven over with a soft
cloth soaked in warm soapy water after each use.
However, from time to time, it will be necessary to do a
more complete cleaning, using a proper oven cleaner.
In case of particularly tough stains, you can use stainless
steel cleaning products or some warm vinegar.
If cooking fruits, some over-heated natual acids
can squeeze and settle on the oven enamel,
causing stains quite difficult to remove. This could
affect the enamel brightness, but it will have no
consequence on the oven performances. To avoid
these stains to be burnt out during the next
cooking, carefully clean the oven cavity after all
fruits cookings.
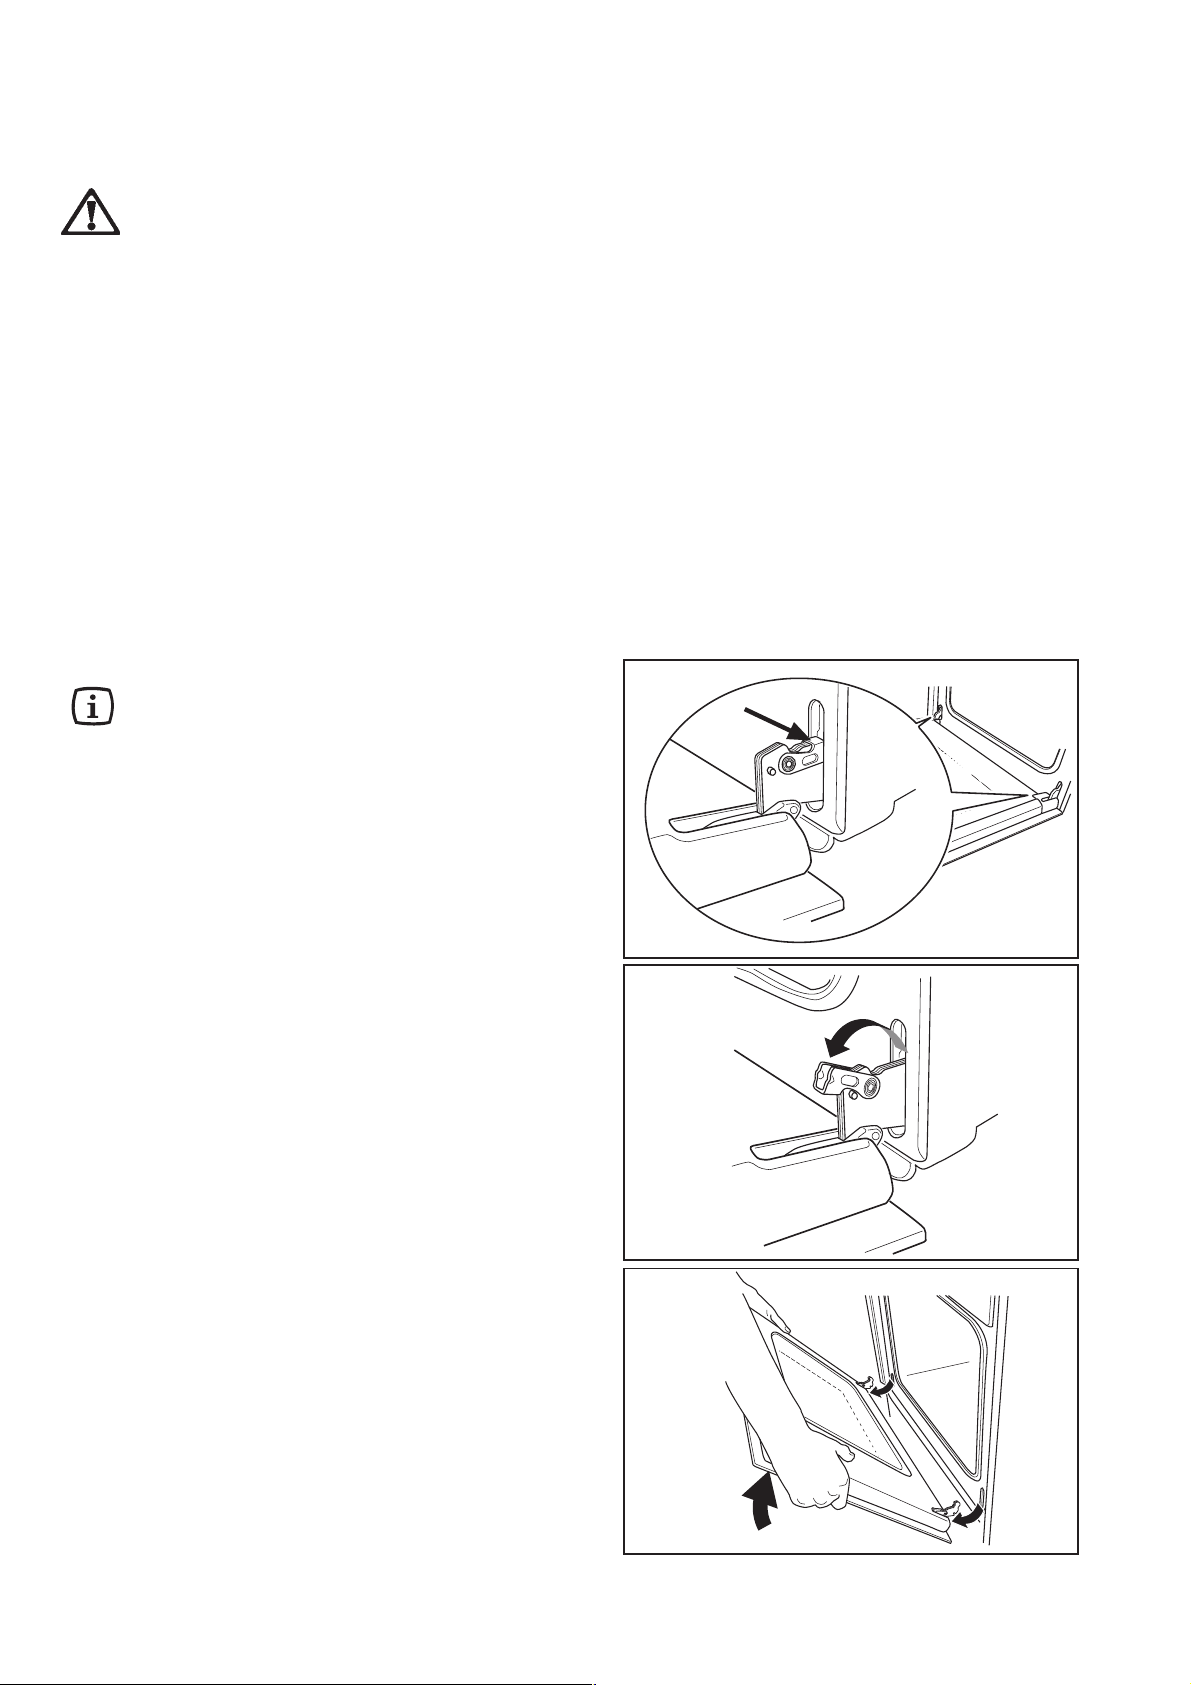
The Oven Door and its gasket
Before cleaning the oven door, we recommend you to
remove it from the oven.
Proceed as follows:
1) open the oven door completely;
2) find the hinges linking the door to the oven (Fig. 9);
3) unlock and turn the small levers located on the two
hinges (Fig. 10);
4) handle the door by its left- and right-hand sides, then
slowly turn it towards the oven until it is half-closed
(Fig. 11);
5) gently pull the oven door off its site (Fig. 11);
6) place it on a steady plan.
Clean the oven door glass with warm water and a softh
cloth only.
Once the cleaning is carried out, refit the oven door,
following the procedure in reverse.
Fig. 9
Fig. 10
The correct operation of the oven is ensured by a gasket
placed round the edge of the oven cavity.
• Periodically check the condition of this gasket. If
necessary, clean it without using abrasive cleaning
products.
•
If the gasket shows to be damaged, call you local
Service Centre. Do not use the oven until it has been
repaired.
Fig. 11
13
Page 14

Models in stainless steel or aluminium:
We recommend to clean the oven door using only a wet
sponge and dry it up after cleaning with a soft cloth.
Never use steel wool, acids or abrasive products as they
can damage the oven surface. Clean the oven control
panel following the same precautions.
Oven Shelves and Shelf
Supports
To clean the oven shelves, soak in warm soapy water and
remove stubborn marks with a well wetted soap
impregnated pad.
Rinse well and dry with a soft cloth.
The shelf supports can be removed for easy cleaning.
Proceed as follows:
1) remove the front screw while keeping the shelf support
in position with the other hand (Fig. 12);
2) disengage the rear hook and take off the shelf support
(Fig. 13);
1) once the cleaning is carried out, refit the shelf supports
following the procedure in reverse.
Fig. 12
Please, ensure the retaining nuts are secure when
refitting the shelf support.
When cleaning the shelf supports, take care
not to remove the lubricating grease behind
the telescopic runners. This is meant to ensure
their good operation.
Replacing the Oven Light
Ensure the electricity supply is switched off
before carrying out this operation.
The oven bulb has to comply to these features:
a) resistant to temperatures of 300 °C;
b) electric rate: 230 V - 50 Hz;
c) electric power rate: 15/25 W;
d) connection type: E 14.
To replace the bulb, proceed as follows (Fig. 14):
a) push in and turn the glass lid anticlockwise;
b) remove tha faulty bulb;
c) replace it with a new one;
d) refit the glass lid;
e) switch on the electricity supply.
Fig. 13
Fig. 14
14
Page 15
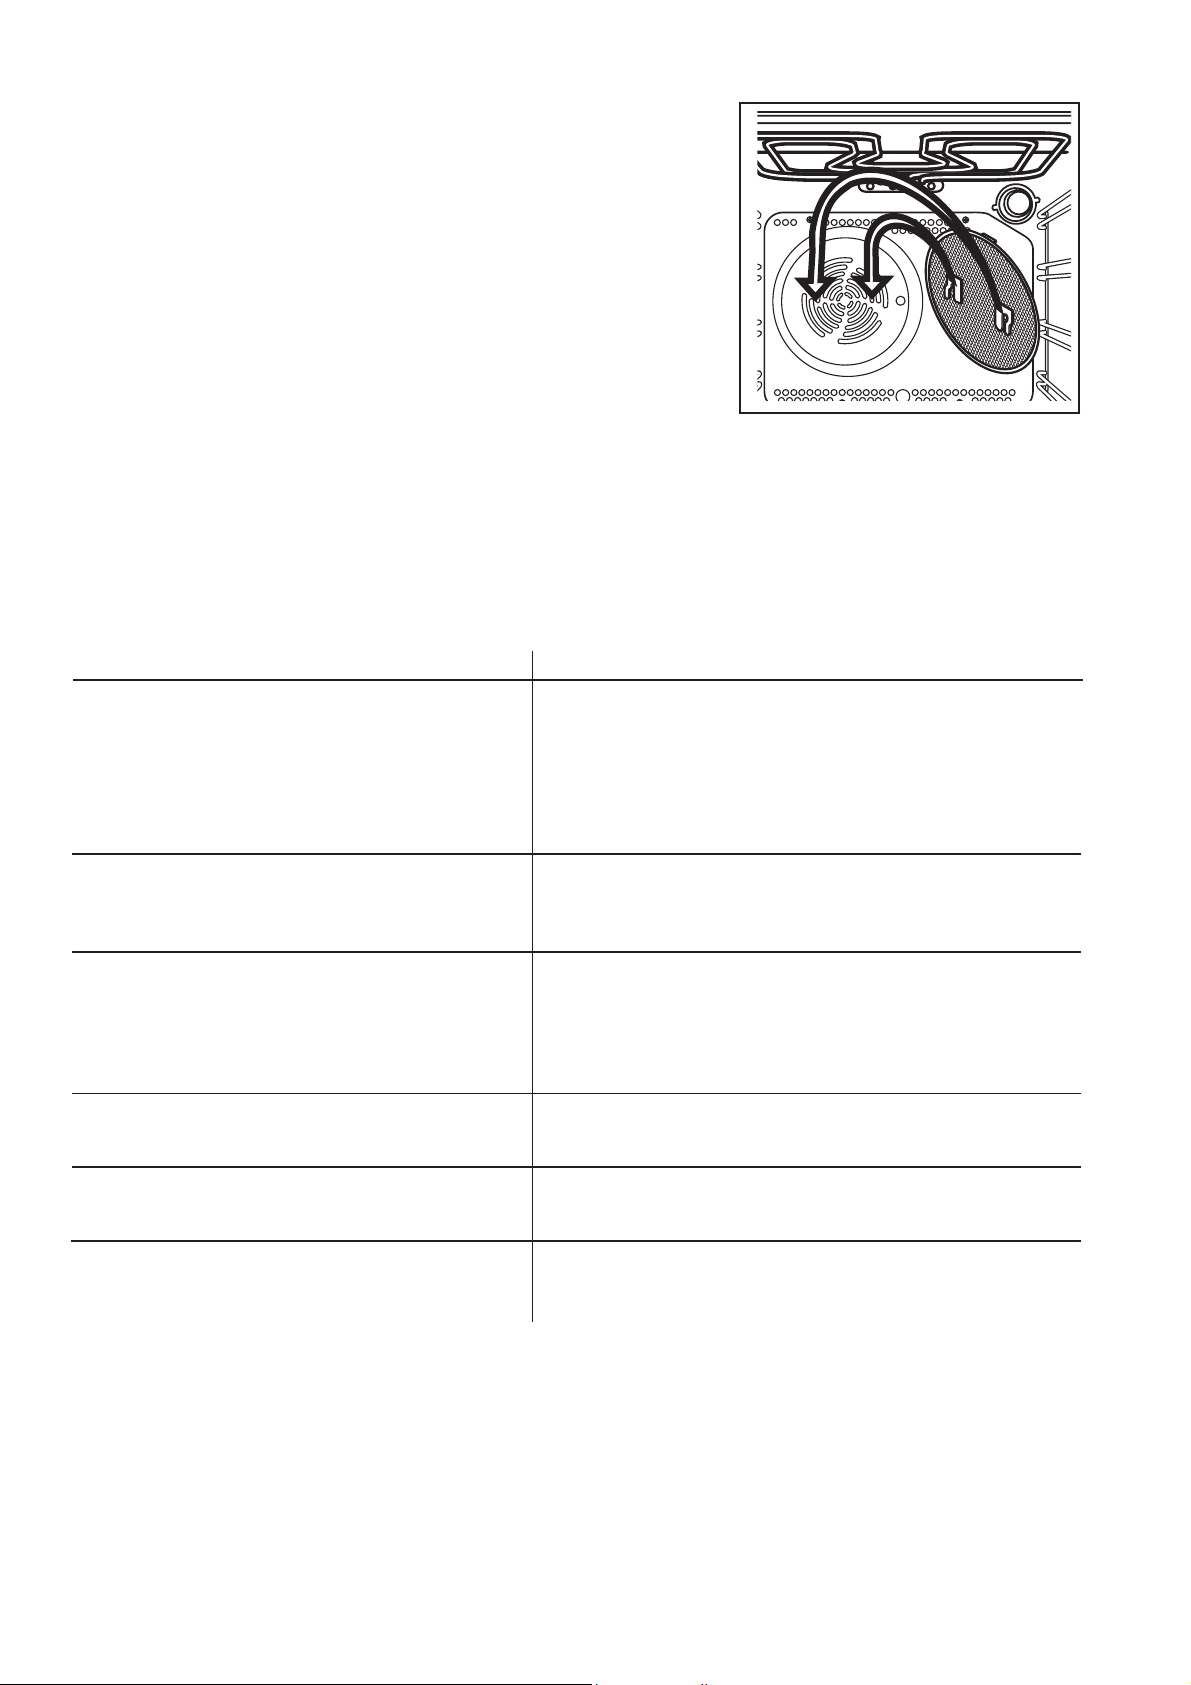
Grease Filter
When cooking meat, the grease filter must be fitted over
the oven fan by clipping it over the vents in the back
panel. This will prevent a built-up of fat on the fan impellor.
Do not use abrasive materials to clean the seal. The
grease filter is dishwasher proof.
When cooking is completed and the oven has cooled
down, remove the filter by pushing the protruding tongue
on the filter upward (see Fig. 16).
Wash the filter after use using warm soapy water.
Fit the grease filter only when roasting.
Fig. 16
Something not working...
If the appliance is not working correctly, please carry out the following checks, before contacting your local
Service Centre.
SYMPTOM
The oven does not come on
The oven temperature light does not come on
The oven light does not come on
It takes too much time to finish the dishes, or
they are cooked too fast.
Steam and condensation settle on the food and
the oven cavity.
SOLUTION
Check that both a cooking function and a temperature have
been selected
or
Check the appliance is wired in properly, and the socket
switch or the switch from the mains supply to the oven are
ON.
Turn the thermostat knob on a temperature
or
Turn the oven function control knob on a function.
Turn the oven function control knob on a function
or
Buy a new oven light bulb, asking for it to your local Service
Centre and replace it by following the instruction provided in
this booklet.
Refer to the contents of this booklet, especially to the chapter
"Using the oven".
Leave dishes inside the oven no longer than 15-20 minutes
after the cooking is completed.
The display shows "12,00".
Set the time of day (see chapter "Electronic programmer"
paragraph "Set the time of day").
15
Page 16
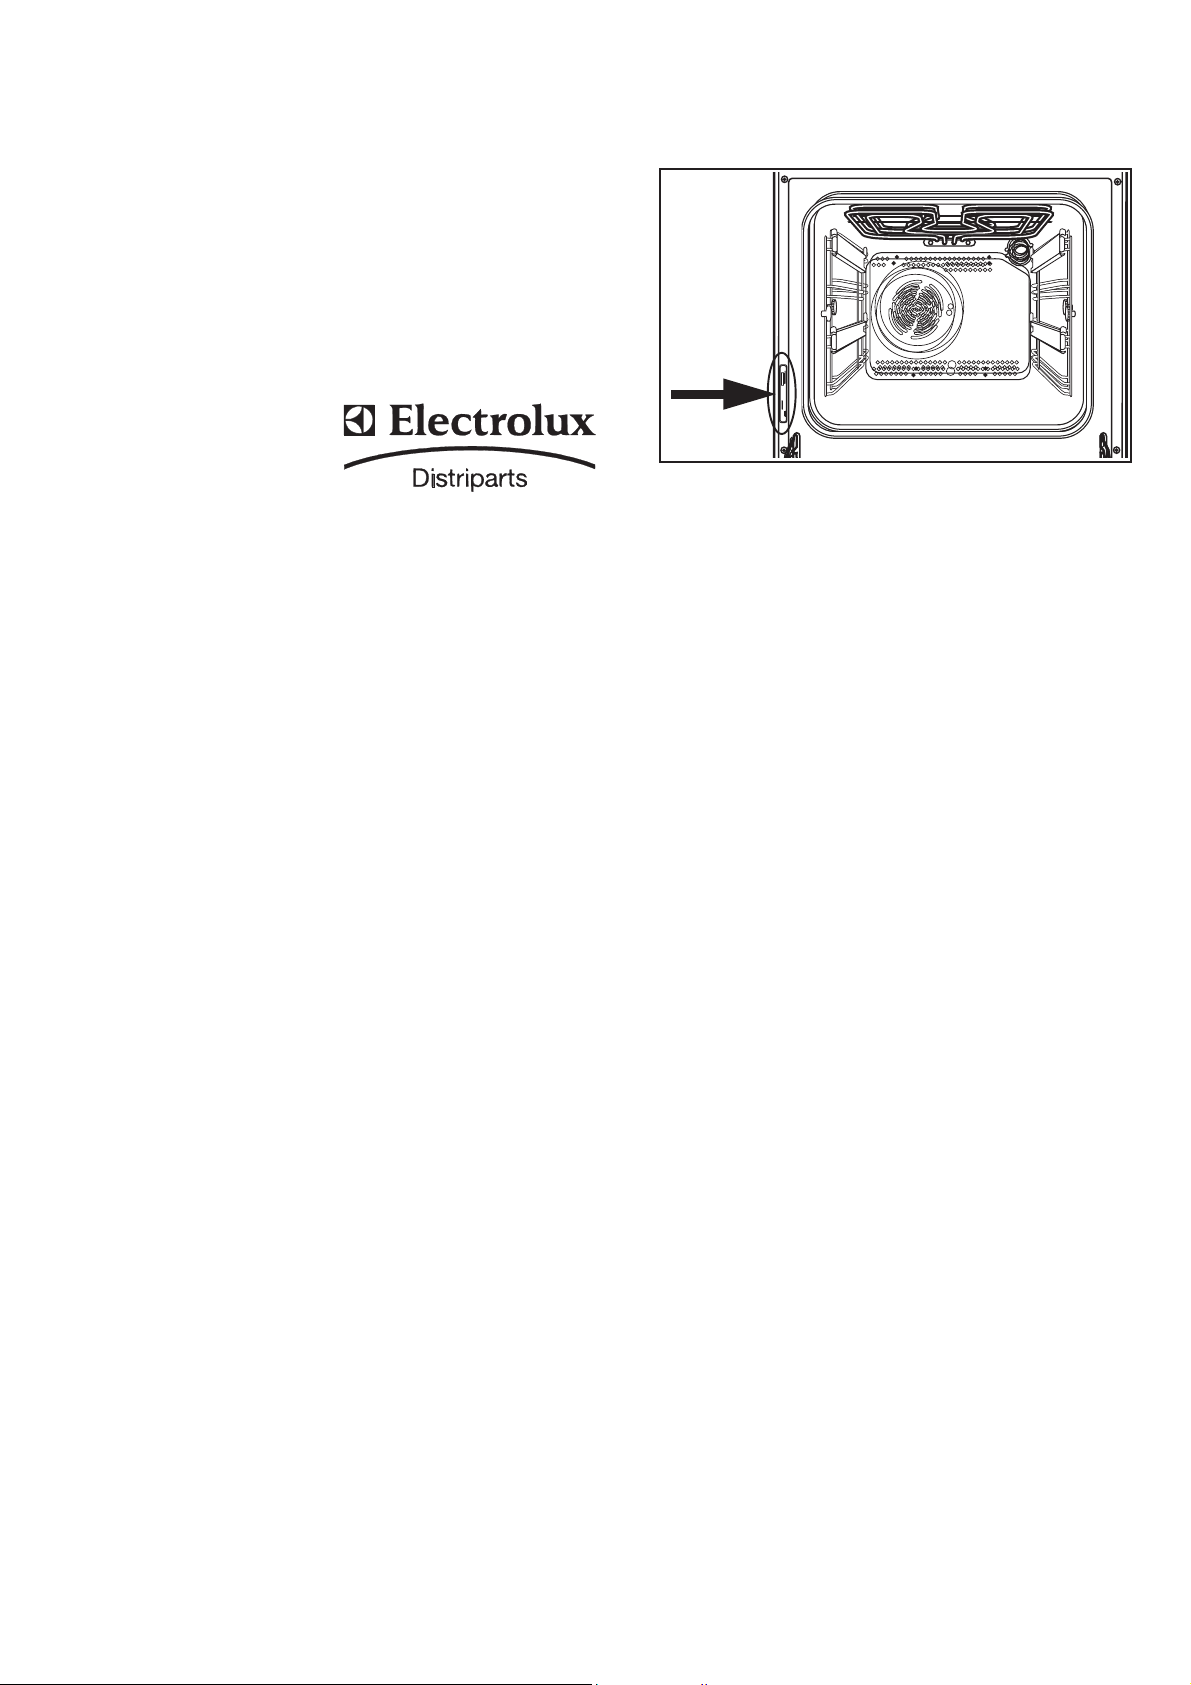
Technical Assistance
If after the checks listed in the previous chapter, the
appliance still does not work correctly, contact your
local Service Centre, specifying the type of
malfunctioning, the appliance model (Mod.), the product
number (Prod. No.) and the serial number (Ser. No.)
marked on the identification plate.
This plate is placed on the front external edge of the oven
cavity (Fig. 17).
Original spareparts,
certified by the product
manufacturer and
carrying this symbol are
only available at our
Service Centre and
authorized spareparts
shops.
Fig. 17
Technical Data
Recess dimensions
Height in-column 580 mm
undertop 593 mm
Width 560 mm
Depth 550 mm
Oven cavity dimensions
Height 335 mm
Width 395 mm
Depth 400 mm
Volume 53 l
Heating elements ratings
Bottom heating element 1000 W
Top heating element 800 W
Full Oven (Top+Bottom) (1000 + 800) 1800 W
Inner Grill heating element 1650 W
Double Grill heating element 2450 W
Oven rear heating element 2000 W
Convection fan 25 W
Cooling fan 25 W
Oven lamp 25 W
Voltage tension (50 Hz) 230 V
Maximum power rating (230 V - 50 Hz) 2500 W
16
Page 17

Installation
The following instructions are meant to a qualified
technician, in order to allow him carry out the
installation in compliance with the rules in force.
The building-in and the electrical connection fo the
appliance must be carried out by a qualified and
authorized technician only.
Building In
It is important that the dimensions and materials of the
surround or cabinet into which the oven will be built are
correct and will withstand a temperature increase.
A correct installation will have to ensure a proper protection
against contact with electric parts or merely functionally
isolated parts.
All the units meant to ensure protection have to be fitted
not to be taken away without using any tool.
We recommed not to install the appliance near refrigerators
or freezer, since the heat could affect the performance of
these appliances.
Fig. 18
Oven dimensions
The oven dimensions are shown in Fig. 18.
In-Column recess dimensions
The recess must have the dimensions shown in Fig. 19.
Undertop recess dimensions
The recess must have the dimensions shown in Fig. 20.
Securing the oven to the cabinet
- Fit the appliance into the cabinet recess.
- Open the oven door and secure the oven to the kitchen
cabinet with four wood screws, which fit the holes
provided in the oven frame (Fig. 21).
When installing an electric plate hob over the oven, the
hob's electrical connection and the oven's one have to be
carried out separately, for security reasons and to let the
oven be taken off the unit easier, if necessary.
Fig. 19
Fig. 20
FO 0290
Fig. 21
17
Page 18

Electrical connection
Before the appliance is connected:
1) check that the main fuse and the domestic installation
can support the load;
2) check that the power supply is properly earthed in
compliance with the current rules;
3) check the socket or the double pole switch used for
the electrical connection can be easily reached with
the appliance built in the forniture unit.
This appliance is supplied with connection cable (type
H05 V2V2-F (T90), section 3x 1,5 mm2) fitted with plug.
The plug has to be fitted in a proper socket.
If connecting the appliance directly to the electric system,
a double pole switch must be installed between the
appliance and the electricity supply, with a minimum gap
of 3 mm between the switch contacts and of a type
suitable for the required load in compliance with the
current rules. The earth wire must not be interrupted by
the double switch pole and it should be 2-3 cm. longer
than the other cables.
The connection cable has to be placed in order that, in
each part, it cannot reach a temperature 50 °C higher than
the room temperature.
After the connection is carried out, test the heating
elements for about 3 minutes.
Terminal block
The oven has an easily accessible terminal block, which
is meant to work with an electric single-phase rate of
230 V (Fig. 22).
The manufacturer disclaims any
responsability should all the safety
measures not be carried out.
Fig. 22
18
Page 19

19
Page 20

РУССКИЙ
Важная информация по технике безопасности
Правила техники безопасности приводятся в интересах Вашей безопасности и безопасности окружающих. Вам
СЛЕДУЕТ
внимательно прочитать их перед тем, как приступить к установке или эксплуатации духового шкафа.
Установка
• Обязательным требованием является выполнение
всех операций по установке прибора
квалифицированным электриком или компетентным
специалистом в соответствии с действующими
нормами и правилами.
• Изменение характеристик духового шкафа или
внесение какихлибо изменений в его конструкцию
сопряжено с опасностью.
• Вынув прибор из упаковки, удостоверьтесь в
отсутствии на нем какихлибо повреждений, а также
в идеальном состоянии сетевого шнура. В противном
случае перед тем, как приступать к его установке,
обратитесь в авторизованный сервисный центр.
Безопасность детей
• Данный прибор предназначен для эксплуатации
взрослыми и детьми, находящимися под
присмотром. Маленьким детям НЕЛЬЗя ПОЗВОЛяТЬ
трогать ручки управления или играть с духовым
шкафом или вблизи него.
• Доступные детали духового шкафа могут
нагреваться во время работы. Детей следует
держать
НА РАССТОяНИИ от него, пока он не остынет.
При эксплуатации
• Данный духовой шкаф предназначен только для
приготовления пищи и
любых других целях.
• Если духовой шкаф не используется, убедитесь,
что все ручки управления находятся в положении
«Выкл».
• Если Вы включаете какойлибо электроприбор в
розетку, находящуюся вблизи духового шкафа,
убедитесь, что электрические провода не касаются
его, а также держите их на расстоянии от
нагревающихся частей данного прибора.
• В случае неисправности прибора отключите его от
сети электропитания.
• Не оставляйте посуду с продуктами, например,
жиром или маслом, внутри духового шкафа. Это
может привести к выходу прибора из строя при его
случайном включении.
• Всегда устанавливайте противень для сбора жира
при использовании гриля или приготовлении мяса.
Для предотвращения образования неприятных
запахов и дыма налейте в этот противень немного
воды.
• Во время использования духовой шкаф нагревается
и в течение длительного времени остается горячим.
Будьте осторожны и не прикасайтесь к
нагревательным элементам внутри прибора.
• При открывании дверцы духового шкафа во
время приготовления пищи или по его
окончании стойте подальше от духового шкафа,
чтобы дать выйти скопившемуся пару или теплу.
• Доставая посуду из духового шкафа, всегда
используйте кухонные рукавицы.
• В целях обеспечения гигиены и безопасности
содержите прибор в чистоте. Скопление остатков
жира или пищи может привести к возгоранию.
• Для чистки данного прибора нельзя использовать
пар или паровое чистящее устройство.
• Перед проведением технического обслуживания
духового шкафа или его чисткой отсоедините прибор
20
НЕ ДОЛЖЕН использоваться в
от сети электропитания и подождите, пока он
остынет.
• Некоторые детали прибора покрыты
противоударной пластиковой пленкой. Удалите эту
пленку перед началом эксплуатации духового
шкафа.
• Данный прибор предназначен для питания от
однофазной сети напряжением 230 В. Подключение
к многофазной сети напряжением 400 В без
заземляющего провода приведет к выходу из строя
духового шкафа и варочной панели, если таковая
имеется.
• Изготовитель снимает с себя всякую
ответственность в случае несоблюдения каких
либо правил техники безопасности.
Техническое обслуживание
• Ни при каких обстоятельствах не следует пытаться
отремонтировать прибор самостоятельно. Ремонт,
выполненный некомпетентным лицом, может
привести к получению травм или к серьезным
повреждениям изделия. Обращайтесь в ближайший
авторизованный сервисный центр. При этом всегда
настаивайте на использовании оригинальных
запасных частей.
Информация по охране
окружающей среды
• После установки изделия утилизируйте упаковку с
должным соблюдением правил безопасности и охраны
окружающей среды.
• При утилизации старого изделия выведите его из
строя, обрезав сетевой шнур как можно ближе к
прибору.
• Символ
указывает, что при утилизации данного изделия с
ним нельзя обращаться как с обычными бытовыми
отходами. Вместо этого, его следует сдавать в
соответствующий пункт приемки электрического и
электронного оборудования для последующей
утилизации. Обеспечив правильную утилизацию
данного изделия, Вы поможете предотвратить
потенциальные негативные последствия для
окружающей среды и здоровья человека, которые
могли бы иметь место в противном случае. За
более подробной информацией о правилах
обращения с такими изделиями, их утилизации и
переработки обращайтесь в местные органы власти,
в службу по утилизации отходов или в магазин, в
котором Вы приобрели данное изделие.
на самом изделии или его упаковке
Указания по использованию
настоящего руководства
Вы встретите в тексте настоящего руководства
следующие символы, которые помогут Вам
ориентироваться в нем:
Указания по безопасности
Пошаговые указания по эксплуатации
Советы и рекомендации
Информация по охране окружающей
среды
Page 21

Содержание
Указания для пользователя Указания для монтажника
Важная информация по технике
безопасности 20
Описание духового шкафа 21
Первое включение духового шкафа 23
Электронный программатор 24
Эксплуатация духового шкафа 26
Таблицы приготовления 28
Чистка и техническое обслуживание 30
Возможные неисправности 33
Сервис 34
Технические данные 34
Установка 35
Электрическое подключение 36
Очень важно сохранять настоящую инструкцию
для того, чтобы она могла быть использована
и в будущем. В случае продажи или передачи
изделия другому лицу убедитесь, что оно
передается вместе с инструкцией с тем, чтобы
новый владелец мог ознакомиться с правилами
функционирования изделия и
соответствующими предупредительными
указаниями.
ИЗГОТОВИТЕЛЬ:
ELECTROLUX HOME PRODUCTS ITALY S.p.A.
Viale Bologna, 298
47100 FORLI (Italy)
Описание духового шкафа
54
3
2
6
10
11
1
7
8
9
1. Панель управления
2. Ручка выбора температуры
(ручка термостата)
3. Индикаторная лампочка термостата
4. Электронный программатор
5. Ручка выбора режима духового шкафа
6. Индикаторная лампочка включения
7. Гриль
8. Лампочка освещения духового шкафа
7. Телескопические направляющие
10. Вентилятор духового шкафа
11. Паспортная табличка
21
Page 22

Органы управления
Ручка выбора режима духового
шкафа (Рис. 1)
На ручке выбора режима духового шкафа имеются
следующие символы, обозначающие соответствующие
режимы работы:
Освещение духового шкафа
Включено только освещение духового
шкафа, при этом не задействован ни
один из режимов приготовления
Традиционный режим приготовления
Тепло поступает как от верхнего, так и
от нижнего нагревательных элементов,
обеспечивая равномерный нагрев
внутреннего пространства духового
шкафа.
Верхний нагревательный элемент
Тепло поступает только сверху духового
шкафа.
Нижний нагревательный элемент
Тепло поступает только снизу духового
шкафа.
Только внутренний элемент гриля
может использоваться для приготовления
на гриле небольших количеств
продуктов.
Двойной гриль В этом режиме
полностью включается нагревательный
элемент гриля.
Конвекционный гриль Эта функция
делает возможным альтернативный
метод приготовления пищи, обычно
ассоциирующийся с приготовлением на
гриле. Элемент гриля и вентилятор
духового шкафа работают
одновременно, обеспечивая циркуляцию
горячего воздуха вокруг
приготавливаемых продуктов. При
использовании этого режима
задавайте максимальную
температуру в 200°C.
Режим конвекции Этот режим
позволит Вам одновременно готовить
продукты на разных уровнях без
взаимопроникновения запахов.
Размораживание Этот режим
предназначен для размораживания
замороженных продуктов.
Рис. 1
Ручка выбора температуры
(ручка термостата) (Рис. 2)
Поворачивая ручку выбора температуры Вы можете
выбрать температуру приготовления в пределах от
50°C до MAX (230°C).
Индикаторная лампочка
включения (I)
Эта лампочка загорается в случае, когда включен хотя
бы один из нагревательных элементов.
Индикаторная лампочка
термостата (°C)
Эта лампочка загорается после выбора температуры
приготовления и будет гореть до тех пор, пока эта
температура не будет достигнута; затем она будет
гаснуть и загораться, указывая на поддержание
заданной температуры.
22
50
MAX
100
200
150
Рис. 2
Page 23

Предохранительный
термостат
Духовой шкаф оборудован предохранительным
термостатом. В случае неисправности основного
термостата и последующего перегрева это
предохранительное устройство отключит духовой шкаф
от электропитания. Если такое cлучится с Вашим
духовым шкафом, обратитесь в авторизованный
сервисный центр. Ни при каких обстоятельствах не
следует пытаться отремонтировать прибор
самостоятельно.
Охлаждающий вентилятор
Охлаждающий вентилятор предназначен для
охлаждения стенок духового шкафа и его компонентов.
Этот вентилятор автоматически включается через
несколько минут после начала процесса
приготовления. Горячий воздух удаляется из духового
шкафа через отверстие, находящееся рядом с ручкой
дверцы духового шкафа. После выключения духового
шкафа охлаждающий вентилятор продолжает работать
для обеспечения должного охлаждения корпуса
духового шкафа и кухонной мебели, в которую он
встроен, затем он автоматически выключается.
ПРИМЕЧАНИЕ: Вентилятор может работать в течение
еще 45 минут после завершения приготовления. Если
полностью открыть дверцу духового шкафа, время,
необходимое для охлаждения, уменьшиться.
Рис. 3
FO 2259
Первое включение духового шкафа
Духовой шкаф будет работать только после
установки текущего времени суток с
помощью электронного программатора (см.
параграф “Установка текущего времени”) .
Перед первым приготовлением пищи тщательно
вымойте принадлежности духового шкафа.
Перед первым использованием духового
шкафа:
a) установите ручку выбора температуры в положение
MAX (230 °C);
b) установите ручку выбора режима в положение,
соответствующее традиционному режиму
приготовления (
c) дайте духовому шкафу поработать вхолостую в
течение примерно 45 минут;
d) откройте окно для обеспечения вентиляции кухни.
В это время может появиться специфический запах.
Это совершенно нормальное явление, вызванное
сгоранием в духовом шкафу остатков производственных
материалов.
Повторите эту операцию с использованием режимов
гриля и конвекции.
После выполнения этой операции дайте духовому
шкафу остыть, затем протрите его изнутри мягкой
тряпкой, смоченной в теплом мыльном растворе.
);
Рис. 4
FO 2161
Для того, чтобы открыть дверцу духового
шкафа, всегда беритесь за центральную
часть ручки (Рис. 4).
23
Page 24

Электронный программатор
1. Клавиша выбора режима
2. Клавиша уменьшения “ ”
3. Клавиша увеличения “ ”
4. Дисплей
5. Индикатор “Время приготовления”
6. Индикатор “Окончание времени приготовления”
7. Индикатор “Таймер”
8. Индикатор “Текущее время”
5
6
Рис. 5
4
7
8
123
Духовой шкаф будет работать только после установки
текущего времени суток. Духовой шкаф можно
эксплуатировать и без задания какойлибо программы.
FO 2571
Установка текущего времени
При включении питания или после сбоя электропитания индикатор
“Текущее время” на дисплее
Для установки текущего времени:
1. нажимайте клавишу “ ” или “ ”.
2. После выполнения установки подождите 5 секунд: индикатор
“Текущее время”
Теперь духовой шкаф готов к использованию.
Коррекция текущего времени:
1. нажав несколько раз клавишу
время”. Соответствующий индикатор замигает. Затем, действуйте
как указано выше.
Коррекцию текущего времени можно произвести только в том
случае, если не задан ни один из автоматических режимов
(“Время приготовления”
приготовления”
погаснет и дисплей покажет заданное время.
).
начинает мигать.
, выберите режим “Текущее
или “Время окончания
Режим “Время (продолжительность)
приготовления”
Этот режим обеспечивает автоматическое выключение духового
шкафа по истечении заданного времени (продолжительности)
приготовления. Поместите продукты в духовой шкаф, задайте
режим работы духового шкафа и выставьте температуру
приготовления. Нажав несколько раз клавишу , выберите режим
работы “Время приготовления”. Соответствующий индикатор
замигает. Затем действуйте следующим образом:
Задание времени (продолжительности) приготовления:
1. нажимайте клавишу “
2. После выполнения установки подождите 5 секунд: загорится
индикатор “Время приготовления”
индикации текущего времени.
3. По истечении времени приготовления духовой шкаф
автоматически выключится, при этом будет подан звуковой сигнал
и замигает индикатор. Поверните в нулевое положение ручку
выбора режима и ручку термостата.
Для отключения звукового сигнала нажмите любую клавишу.
ПРИМЕЧАНИЕ: после выполнения этой операции духовой шкаф
снова включится, поэтому по истечении времени приготовления
не забудьте установить ручки выбора режима и термостата в
нулевое положение.
Отмена заданного времени приготовления:
1. Нажав несколько раз клавишу , выберите режим работы “Время
приготовления”. Соответствующий индикатор замигает и
дисплей покажет оставшееся время
2. Нажимайте клавишу “ ” до тех пор, пока дисплей не покажет
“0:00”. Через 5 секунд индикатор погаснет и дисплей вернется в
режим индикации текущего времени.
” или “ ”.
и дисплей вернется в режим
приготовления.
24
Page 25

Режим “Время окончания
приготовления”
С помощью этого режима Вы можете задать автоматическое выключение
духового шкафа по наступлении заданного времени окончания приготовления.
Поместите продукты в духовой шкаф, задайте режим работы духового шкафа
и выставьте температуру приготовления. Нажав несколько раз клавишу
выберите режим работы “Время окончания приготовления”. Соответствующий
индикатор
Задание времени окончания приготовления:
1. нажимайте клавишу “
2. После выполнения установки подождите 5 секунд: Индикатор “Время
окончания приготовления”
индикации текущего времени.
3. По истечении времени приготовления духовой шкаф автоматически
выключится, при этом будет подан звуковой сигнал и замигает индикатор.
Поверните в нулевое положение ручку выбора режима и ручку термостата.
Для отключения звукового сигнала нажмите любую клавишу.
ПРИМЕЧАНИЕ: после выполнения этой операции духовой шкаф снова
включится, поэтому по окончании приготовления не забудьте установить
ручки выбора режима и термостата в нулевое положение.
Отмена заданного времени окончания приготовления:
1. Нажав несколько раз клавишу
окончания приготовления”. Соответствующий индикатор замигает и
дисплей покажет заданное время окончания приготовления.
2. Нажимайте клавишу “
время суток. Программатор выдаст короткий звуковой сигнал, а индикатор
погаснет.
замигает. Затем действуйте следующим образом:
” или “ ”.
загорится и дисплей вернется в режим
, выберите режим работы “Время
” до тех пор, пока дисплей не покажет текущее
,
Совместное использование режимов
работы “Время приготовления” и
“Время окончания приготовления”
Режимы “Время приготовления” и “Окончание времени приготовления” можно
использовать одновременно для задания автоматического включения и
выключения духового шкафа по истечении некоторого времени.
1. В режиме “Время приготовления”
приготовления, как описано в соответствующей главе. Затем нажмите
клавишу
2. В режиме “Время окончания приготовления”
приготовления, как описано в соответствующей главе.
Соответствующий индикатор загорится и дисплей покажет текущее время.
Духовой шкаф включится и выключится в соответствии с заданной
программой.
: дисплей покажет заданное время приготовления.
задайте время (продолжительность)
задайте время окончания
Режим “Таймер”
По окончании заданного времени таймер подаст звуковой сигнал, но, если
ДУХОВОЙ шкаф был включен, он не выключится.
Установка таймера:
1. Нажав несколько раз клавишу , выберите режим “Таймер”.
Соответствующий индикатор
2. Затем нажимайте клавишу “ ” или “ ” (максимум: 2 часа, 30 минут).
3. После выполнения установки подождите 5 секунд: индикатор “Таймер”
загорится.
4. По окончании заданного времени индикатор замигает и раздастся
звуковой сигнал. Для отключения звукового сигнала нажмите любую
клавишу.
Отмена установки таймера:
1. Нажав несколько раз клавишу , выберите режим “Таймер”.
Соответствующий индикатор замигает и дисплей покажет
оставшееся время.
2. Нажимайте клавишу “ ” до тех пор, пока дисплей не покажет “0:00”.
Через 5 секунд индикатор погаснет и дисплей вернется в режим
индикации текущего времени.
замигает.
Выключение дисплея
1. Нажмите одновременно две или три клавиши программатора и
держите их нажатыми в течение примерно 5 секунд. Дисплей
выключится.
2. Для включения дисплея нажмите любую клавишу.
Дисплей можно выключить только в том случае, если не заданы
никакие другие режимы.
25
Page 26

Эксплуатация духового шкафа
4
3
2
1
Всегда готовьте при закрытой дверце
духового шкафа.
• Держитесь на расстоянии от духового шкафа при
открытии его откидывающейся дверцы. Не давайте
ей упасть придерживайте ее рукой за ручку до тех
пор, пока она полностью не откроется.
• Духовой шкаф имеет четыре уровня направляющих.
Положения уровней направляющих отсчитываются
снизу, как показано на рисунке 6.
Внимание! Не кладите никакие предметы на
дно духового шкафа и не накрывайте его
алюминиевой фольгой во время приготовления,
т.к. это может привести к повреждению
эмалированных поверхностей и порче
приготовляемых продуктов.
Всегда устанавливайте сковороды,
жаропрочные блюда и кладите алюминиевую
фольгу на противни или решетки духового
шкафа.
Рис. 6
Конденсация и пар
Духовой шкаф оборудован эксклюзивной системой,
обеспечивающей естественную циркуляцию воздуха
и постоянную рециркуляцию пара. Эта система
позволяет готовить под воздействием пара и
получать хорошо прожаренные, хрустящие снаружи
и мягкие внутри блюда. Более того, при этом
сводятся к минимуму время приготовления и
потребление энергии. Во время приготовления
пищи образуется пар, который выходит наружу при
открытии дверцы духового шкафа. Это совершенно
нормальное явление.
Тем не менее, всегда держитесь на расстоянии
от духового шкафа при открытии его дверцы во
время приготовления пищи или по его окончании,
чтобы дать возможность выйти избыткам пара или
тепла.
При попадании пара на холодную поверхность за
пределами духового шкафа, например, на
поверхность стеклянной дверцы, он конденсируется,
в результате чего на ней образуются капельки воды.
Для уменьшения конденсации не забывайте хорошо
прогреть духовой шкаф перед тем, как поместить туда
продукты.
Перед любым приготовлением пищи требуется
кратковременный (около 10 минут) прогрев
духового шкафа.
Мы рекомендуем Вам протирать дверцу для удаления
конденсата после каждого использования духового
шкафа.
FO 0019
Телескопические держатели
противней (Рис. 7)
Уровни 2 и 4 оборудованы телескопическими
держателями для облегчения вынимания и установки
противней.
Полностью выдвиньте правый и левый телескопические
держатели, как показано на рисунке 7.
Установите решетку или противень на
телескопические держатели противней, затем
осторожно задвиньте их в духовой шкаф до упора
(Рис.7).
Не пытайтесь закрыть дверцу духового
шкафа, если телескопические держатели
противней не полностью задвинуты внутрь.
Это может привести к повреждению эмали
и стекла дверцы.
26
Рис. 7
Page 27

Эксплуатация духового шкафа
Всегда готовьте при закрытой дверце духового
шкафа.
Традиционное приготовление
Поверните ручку выбора режима духового шкафа на
соответствующий символ ( ) и установите ручку термостата
на нужную температуру. Если Вы хотите, чтобы больше тепла
поступало на блюдо снизу или сверху, поверните ручку
выбора режима духового шкафа на символ
верхний нагревательный элемент) или
нагревательный элемент).
(только нижний
(только
Режим конвекции
Поверните ручку выбора режима духового шкафа на
соответствующий символ ( ) и установите ручку термостата
на нужную температуру. В этом режиме расположенный за
задней стенкой вентилятор создает в духовом шкафу
циркуляцию нагретого воздуха.
Если Вы хотите одновременно готовить в режиме конвекции
несколько блюд, установите решетки на первый и третий
уровни снизу (Рис. 8). Если Вы хотите готовить в режиме
конвекции только одно блюдо, используйте нижние уровни,
т.к. это позволит Вам получить лучшие результаты.
Приготовление на гриле
Поверните ручку выбора режима духового шкафа на
соответствующий символ ( ) и установите ручку
термостата на нужную температуру. Использование функции
двойного гриля позволит Вам обеспечить равномерный
нагрев всей поверхности приготавливаемого блюда.
При приготовлении на гриле мяса или рыбы их необходимо
смазать маслом и уложить на решетку. Решетку следует
устанавливать на тот или иной уровень в зависимости от
толщины приготавливаемого куска.
Всегда помните о том, что необходимо установить на самом
низком уровне противень для сбора жира и налить в него
немного воды во избежание появления дыма и неприятных
запахов.
Конвекционный гриль
Поверните ручку выбора режима духового шкафа на
соответствующий символ ( ) и установите ручку термостата
на нужную температуру. При использовании данного
режима максимальная температура не должна
превышать 200°C.
Нагревательный элемент полного гриля и вентилятор духового
шкафа работают попеременно, обеспечивая обдув блюда
горячим воздухом. При этом уменьшается необходимость
проверки состояния блюда и его переворачивания. За
исключением тостов и тонких стейков Вы можете готовить на
конвекционном гриле все те блюда, которые Вы обычно
готовите на обычном гриле.
• Тщательно контролируйте приготовление пищи на масле
или жире, т.к. при их перегреве возможно возгорание.
По той же причине, кладя продукты в духовой шкаф или
вынимая их из него, следите за тем, чтобы жир или
масло не попали на дно духового шкафа. Если такое все
же произойдет, тщательно вычистите духовой шкаф во
избежание появления неприятных запахов или дыма.
Советы и рекомендации
по приготовлению
рыбы и мяса
Вы можете укладывать мясо на жаропрочные тарелки или
прямо на решетку духового шкафа. В этом случае не забудьте
установить противень для сбора жира на первый уровень
снизу и налить в него немного воды. Это предотвратит
попадание расплавленного жира на дно духового шкафа.
Белое мясо, птицу и рыбу следует готовить при средней
температуре (между 150 и 175 ° C). Если Вы хотите приготовить
красное мясо (чуть сильнее прожаренное снаружи и более
мягкое внутри), рекомендуется готовить его при более
высокой температуре (от 200 до 250°C) в течение
непродолжительного времени.
Советы и рекомендации
по приготовлению выпечки
Приготовление выпечки обычно следует выполнять при
средней температуре (в пределах между 150 и 200 °C).
Перед выпечкой рекомендуется выполнять кратковременный
(около 10 минут) прогрев духового шкафа. После начала
приготовления держите дверцу духового шкафа закрытой в
течение всего времени приготовления и контролируйте его
результаты через стекло дверцы.
Советы и рекомендации
по приготовлению на гриле
Если Вы хотите приготовить на гриле мясо или рыбу,
уложите их прямо на решетку, предварительно полив
небольшим количеством растительного масла. При
использовании режима “Гриль” тепло поступает только от
верхнего нагревательного элемента. Поэтому Вам следует
устанавливать решетку на тот или иной уровень в зависимости
от толщины приготавливаемого куска мяса или рыбы. Всегда
помните о том, что необходимо установить на более низком
уровне противень для сбора жира и налить в него немного
воды.
Режим конвекции
Размораживание
Поверните ручку выбора режима духового шкафа на
соответствующий символ ( ) и установите ручку термостата
в положение OFF (символ ). Вентилятор духового шкафа
работает без нагрева, при этом в духовом шкафу
поддерживается комнатная температура.
• Температура внутри духового шкафа может достигать
230°C. Всегда убеждайтесь в том, что используемые
Вами противни, тарелки и т.д. являются жаропрочными.
• Не ставьте сковороды или формы для выпечки и не
кладите алюминиевую фольгу непосредственно на дно
духового шкафа. Это может вызвать перегрев, который
может негативно сказаться на функционировании духового
шкафа, и привести к повреждению его эмали.
Рис. 8
4
3
2
1
FO 0351
27
Page 28

Таблицы приготовления
Время приготовления не включает время предварительного прогрева духового шкафа. Мы рекомендуем перед любым
приготовлением пищи выполнять кратковременный (около 10 минут) прогрев духового шкафа. Положения направляющих
отсчитываются снизу.
Традиционное приготовление и приготовление в режиме конвекции
Традиционное
приготовление
БЛЮДО
Вес (г)
Уровень
Темп. °C
4
3
2
1
ВЫПЕЧКА
Изделия из взбитого теста
Песочный торт
Сырный пирог
Яблочный пирог 1 180 2 (1 и 3)* 170 40 ~ 60 В форме для выпечки
Штрудель 2 175 2 150 60 ~ 80
Пирог с вареньем 2 175 2 (1 и 3)* 160 30 40
Фруктовый пирог 1 175 1 160 45 ~ 60 В форме
Бисквитный торт 1 175 2 (1 и 3)* 160 30 ~ 40 В форме для выпечки
Рождественский пирог 1 170 1 160 40 ~ 60 В форме для выпечки
Сливовый торт 1 170 1 160 50 ~ 60 В форме
Небольшие торты 2 170 2 (1 и 3)* 160 25 ~ 35
Бисквиты 2 160 2 (1 и 3)* 150 20 ~ 30
Безе 2 100 2 (1 и 3)* 100 90 ~ 120
Небольшие торты 2 190 2 (1 и 3)* 180 12 ~ 20
Выпечка: Французские пирожные
1000 Белый хлеб 1 190 2 180 40 ~ 60 2 штуки
1000 Говядина 2 190 2 175 50 ~ 70 На решетке
1200 Свинина 2 180 2 175 100 ~ 130 На решетке
1000 Телятина 2 190 2 175 90 ~ 120 На решетке
1500
1500 слабо прожаренный 2 210 2 200 50 60 На решетке
1500 умеренно прожаренный 2 210 2 200 60 70 На решетке
1500 хорошо прожаренный 2 210 2 200 70 80 На решетке
2000 Свиная лопатка 2 180 2 170 120 ~ 150 С корочкой
1200 Свиная рулька 2 180 2 160 100 ~ 120 2 шт.
1200 Баранина 2 190 2 175 110 ~ 130 Нога
1000 Курица 2 190 2 175 60 ~ 80 Целиком
4000 Индейка 2 180 2 160 210 ~ 240 Целиком
1500 Утка 2 175 2 160 120 ~ 150 Целиком
3000 Гусь 2 175 2 160 150 ~ 200 Целиком
1200 Кролик 2 190 2 175 60 ~ 80 Разрезанный на куски
1500 Заяц 2 190 2 175 150 ~ 200 Разрезанный на куски
1200 Форель/Морской окунь 2 190 2 (1 и 3)* 175 30 ~ 40 34 штуки
1500 Тунец/Лосось 2 190 2 (1 и 3)* 175 25 ~ 35 46 филе
ХЛЕБ И ПИЦЦА
500 Ржаной хлеб 1 190 1 180 30 ~ 45 В сковороде
500 Булочки 2 200 2 (1 и 3)* 175 20 ~ 35 68 штук
250 Пицца 1 210 2 (1 и 3)* 190 15 ~ 30
ОТКРЫТЫЕ ПИРОГИ
Пирог с пастой 2 200 2 (1 и 3)* 175 40 ~ 50 В форме
Пирог с овощами 2 200 2 (1 и 3)* 175 45 ~ 60 В форме
Пирог с начинкой 1 200 2 (1 и 3)* 180 35 ~ 45 В форме
Лазанья 2 180 2 160 45 ~ 60 в форме
Канеллони 2 200 2 175 40 ~ 55 В форме
МЯСО
Английский ростбиф
800 Фазан 2 190 2 175 90 ~ 120 Целиком
Формованный фарш 2 180 2 160 40 ~ 60 на сковороде
РЫБА
2 170 2 (1 и 3)* 160 45 ~ 60 В форме для выпечки
2 170 2 (1 и 3)* 160 20 ~ 30 В форме для выпечки
1 160 2 150 60 ~ 80 В форме для выпечки
2 200 2 (1 и 3)* 190 15 ~ 25
Приготовление в режиме
конвекции
Уровень
4
3
2
1
Темп. °C
Время
приготовления
ПРИМЕЧАНИЯ
минуты
На противне для выпечки
На противне для выпечки
На противне для выпечки
На противне для выпечки
На противне для выпечки
На противне для выпечки
ПРИМЕЧАНИЕ:
Приведенные в таблице значения температуры являются только ориентировочными. В зависимости от индивидуальных предпочтений
или пожеланий может потребоваться увеличение или уменьшение температуры. Только опыт позволит Вам внести необходимые
коррективы в значения, указанные в приведенных таблицах.
Положения направляющих отсчитываются снизу.
(*) Если Вы хотите одновременно готовить несколько блюд, мы рекомендуем размещать их на уровнях, указанных в скобках.
28
Page 29

Таблицы приготовления
Время приготовления не включает время предварительного прогрева духового шкафа. Мы рекомендуем
перед любым приготовлением пищи выполнять кратковременный (около 10 минут) прогрев духового
шкафа. Положения направляющих отсчитываются снизу.
Таблица приготовления на гриле
БЛЮДО
Говяжье филе
Количество
Штук Вес
Приготовление
на гриле
Уровень
4
3
2
1
Темп.
приготовления (минуты)
Верхняя
°C
сторона
4 800 3 max 12 ~ 15 12 ~ 14
Время
Нижняя
сторона
Бифштексы 4 600 3 max 10 ~ 12 6 ~ 8
Сосиски 8 — 3 max 12 ~ 15 10 ~ 12
Свиные отбивные 4 600 3 max 12 ~ 16 12 ~ 14
Курица (раз. поп.) 2 1000 3 max 30 ~ 35 25 ~ 30
Кебаб 4 — 3 max 10 ~ 15 10 ~ 12
Курица (грудка) 4 400 3 max 12 ~ 15 12 ~ 14
Гамбургеры 6 600 3 max 10 ~ 15 8 ~ 10
Рыба (филе) 4 400 3 max 12 ~ 14 10 ~ 12
Сэндвичи 46 — 3 max 3 ~ 7 —
Тосты 46 — 3 max 2 ~ 4 2 ~ 3
Конвекционный гриль
БЛЮДО Количество Уровень Tемп. Время (минуты)
(г) уровень °C нижняя верхняя
сторона сторона
Мясо на косточке
Курица (раз. на две части)
Ножки курицы — 3 200 15 20 15 ~ 18
Перепел
Запеканка из овощей — 3 200 20 ~ 25 —
Гребешки в раковинах — 3 200 15 ~ 20 —
Скумбрия — 3 200 15 ~ 20 10 ~ 15
Ломтики рыбы 800 3 200 12 ~ 15 8 ~ 10
(инд.) 1000 3 200 30 ~ 40 20 ~ 30
1000 3 200 25 30 20 ~ 30
500 3 200 25 ~ 30 20 ~ 25
Приведенные в таблице значения температуры являются только ориентировочными и могут быть изменены в
соответствии с индивидуальными предпочтениями.
При использовании режима “Конвекционный гриль” задавайте максимальную температуру в 200°C.
29
Page 30

Чистка и техническое обслуживание
Общая чистка
Перед выполнением какихлибо операций по
чистке прибора или по его техническому
обслуживанию отсоедините его от сети
электропитания.
• При использовании чистящих спреев следите за тем,
чтобы они не попали на нагревательные элементы или на
датчик термостата.
• Никогда не используйте жесткие абразивные средства,
металлические губки или чистящие средства,
содержащие отбеливатель, т.к. они могут повредить
эмаль и стекло дверцы духового шкафа.
Чистка камеры духового
шкафа
Эмалированную камеру духового шкафа лучше всего чистить,
когда она еще не остыла. Рекомендуется протирать камеру
духового шкафа мягкой тряпкой, смоченной в теплом мыльном
растворе, после каждого выполнения пищи. Однако,
периодически потребуется выполнять более полную и
глубокую чистку, используя для этого специальное средство
для чистки духового шкафа.
В случае наличия трудноудалимых пятен можно использовать
чистящие средства для нержавеющей стали или немного
подогретого уксуса.
При приготовлении фруктов возможно попадание
брызг горячих природных кислот, содержащихся в
них, на эмалированную поверхность камеры духового
шкафа. Это приводит к образованию на ней
трудноудалимых пятен. Это может сказаться на
яркости эмали, но никак не повлияет на работу
духового шкафа. Во избежание выгорания таких пятен
при следующем приготовлении тщательно очищайте
камеру духового шкафа после каждого приготовления
фруктов.
Рис. 9
Дверца духового шкафа и
уплотнение
Перед тем, как приступать к чистке дверцы духового шкафа,
мы рекомендуем снять ее с него.
Действуйте следующим образом:
1) полностью откройте дверцу;
2) найдите две петли, с помощью которых она крепится к
корпусу духового шкафа (Рис. 9);
3) разблокируйте и поверните маленькие рычажки,
расположенные в обеих петлях (Рис. 10);
4) возьмитесь за дверцу слева и справа и медленно
поднимите ее в полузакрытое положение (Рис. 11);
5) после этого осторожно выньте ее, потянув на себя (Рис.
11);
6) положите дверцу на устойчивую ровную поверхность.
Мойте стекло дверцы, используя только мягкую тряпку,
смоченную в теплой воде.
После окончания чистки установите дверцу духового шкафа
на место, выполнив вышеописанную процедуру в обратном
порядке.
Правильность работы духового шкафа обеспечивается
уплотнением, проложенным вдоль краев его камеры.
• Периодически проверяйте состояние этой прокладки.
При необходимости мойте ее неабразивным моющим
средством.
•
Если уплотнение окажется поврежденным,
обратитесь в авторизованный сервисный центр. Не
используйте духовой шкаф до его замены или
ремонта.
Рис. 10
Рис. 11
30
Page 31

Модели из нержавеющей стали или алюминия:
Мы рекомендуем чистить дверцу духового шкафа
только влажной губкой и затем вытирать ее мягкой
тряпкой.
Никогда не используйте металлические губки или
кислотные или абразивные средства, т.к. они могут
повредить поверхности духового шкафа. Выполняйте
чистку панели управления духового шкафа с
соблюдением аналогичных предосторожностей.
Противни и держатели
противней
Для чистки противней духового шкафа обильно
промойте их теплой водой с мылом; устраните
трудноудалимые загрязнения с помощью хорошо
смоченной в мыльном растворе губки.
Хорошо сполосните их и вытрите мягкой тряпкой.
Держатели противней можно снять для большего
удобства чистки.
Действуйте следующим образом:
1) снимите передний винт, придерживая держатель на
месте другой рукой (Рис. 12);
2) отцепите задний крюк и снимите держатель (Рис.
13);
1) после окончания чистки установите держатели на
место, выполнив вышеописанную процедуру в
обратном порядке.
Рис. 12
После установки держателей на место проверьте,
чтобы все гайки были плотно затянуты.
При чистке держателей противней не
удаляйте смазку, нанесенную сзади
телескопических направляющих. Она
необходима для обеспечения их
правильного функционирования.
Замена лампочки
внутреннего освещения
Перед выполнением этой операции
убедитесь в том, что электропитание
выключено.
Лампочка освещения духового шкафа должна
соответствовать следующим требованиям:
a) устойчивость к температурам до 300°C;
b) напряжение: 230 В 50 Гц;
c) мощность: 15/25 Вт;
d) тип цоколя: E 14.
Для замены лампочки действуйте следующим образом
(Рис.14):
a) надавите на стеклянный плафон и поверните
его против часовой стрелки;
b) выньте неисправную лампочку;
c) замените ее на новую;
d) установите на место стеклянный плафон;
e) включите электропитание.
Рис. 13
Рис. 14
31
Page 32

Жироулавливающий фильтр
При приготовлении мяса над вентилятором следует
установить жироулавливающий фильтр, вставив его в
отверстия на задней панели. Это предотвратит
накапливание жира на крыльчатке вентилятора. Для
чистки уплотнения не используйте абразивные
средства. Жироулавливающий фильтр можно мыть в
посудомоечной машине.
По окончании приготовления и после того, как духовой
шкаф остыл, снимите фильтр, отжав вверх его
выступающий язычок (см. Рис. 16).
После использования промойте фильтр теплой водой
с мылом.
Устанавливайте жироулавливающий фильтр
только при жарке мяса.
Рис. 16
32
Page 33

Возможные неисправности...
Если прибор не функционирует должным образом, перед тем, как обращаться в авторизованный
сервисный центр, пожалуйста проверьте, нельзя ли устранить неисправность нижеописанными
способами.
НЕИСПРАВНОСТЬ
Духовой шкаф не включается
Не загорается индикаторная лампочка
термостата духового шкафа
Не загорается лампочка освещения духового
шкафа
Для приготовления продуктов требуется
слишком много или слишком мало времени.
УСТРАНЕНИЕ
Убедитесь, что заданы как режим работы духового шкафа,
так и температура
или
Проверьте правильность электрического подключения
духового шкафа, а также наличие напряжения в розетке, в
которую он включен.
Поворотом ручки термостата задайте какуюлибо
температуру
или
Поворотом ручки выбора режима задайте какойлибо
режим работы духового шкафа
Поворотом ручки выбора режима задайте какойлибо
режим работы духового шкафа
или
Приобретите в авторизованном сервисном центре новую
лампочку и замените старую лампочку освещения в
соответствии с указаниями, приведенными в настоящей
инструкции.
См. содержание настоящей инструкции, в частности главу
“Эксплуатация духового шкафа”.
Пар и конденсат осаждаются на продуктах и в
камере духового шкафа.
Дисплей показывает “12,00”.
Оставляйте продукты в духовом шкафу в течение не более
1520 минут после завершения их приготовления.
Установите текущее время с помощью электронного
программатора (см. параграф “Установка текущего
времени”).
33
Page 34

Сервис
Если после проведения проверок, описанных в
предыдущем разделе, прибор попрежнему не
работает должным образом, обратитесь в
авторизованный сервисный центр, указав тип
неисправности, модель прибора (Mod.),
продуктовый номер (Prod. No.) и серийный номер
(Ser. No.) указанные на паспортной табличке.
Эта табличка находится внутри духового шкафа с
передней внешней стороны (Рис. 17).
Оригинальные
запчасти,
сертифицированные
изготовителем
прибора и
снабженные данным
символом, имеются только в наших сервисных
центрах и в авторизованных магазинах по продаже
запчастей.
Рис. 17
Технические характеристики
Размеры ниши для
встраивания духового шкафа
Высота при встраивании в колонну 580 мм
под столешницу 593 мм
Ширина 560 мм
Глубина 550 мм
Размеры внутренней камеры духового шкафа
Высота 335 мм
Ширина 395 мм
Глубина 400 мм
Объем 53 л
Мощность нагревательных
элементов
Нижний нагревательный элемент 1000 Вт
Верхний нагревательный элемент 800 Вт
Верхний + нижний нагревательный
элементы (1000 + 800) 1800 Вт
Внутренний нагревательный элемент
гриля 1650 Вт
Двойной нагревательный элемент гриля 2450 Вт
Задний нагревательный элемент 2000 Вт
Вентилятор конвекции 25 Вт
Охлаждающий вентилятор 25 Вт
Лампочка освещения духового шкафа 25 Вт
Напряжение питания (50 Гц) 230 В
Максимальная потребляемая
34
мощность (230 В 50 Гц) 2500 Вт
Page 35

Установка
Следующие указания предназначены для
квалифицированного специалиста и их задачей
является помочь ему произвести установку
прибора в соответствии с действующими
нормами.
Встраивание и электрическое подключение
духового шкафа должны выполняться только
квалифицированным и уполномоченным
специалистом.
Встраивание
Необходимо чтобы все размеры мебели, в которую
встраивается духовой шкаф, соответствовали
приведенным указаниям, а ее материал был
теплоустойчивым.
Правильно выполненная установка должна
предотвратить возможность прикосновения к
токоведущим или лишь функционально изолированным
деталям.
Все предохранительные устройства должны быть
установлены таким образом, чтобы их нельзя было
снять без специального инструмента.
Мы рекомендуем не устанавливать духовой шкаф
вблизи холодильника или морозильника, т.к. идущее
от него тепло может отрицательно сказаться на
работе этих приборов.
Рис. 18
Рис. 19
FO 0290
Размеры духового шкафа
Размеры духового шкафа приведены на Рис. 18.
Размеры ниши для
встраивания духового
шкафа в колонну
Ниша должна иметь размеры, указанные на Рис. 19.
Размеры ниши при
встраивании под
столешницу
Ниша должна иметь размеры, указанные на Рис. 20.
Крепление духового шкафа к
кухонной мебели
Вставьте духовой шкаф в нишу для встраивания в
кухонной мебели,
Откройте дверцу духового шкафа и прикрепите
духовой шкаф к кухонной мебели с помощью
четырех шурупов, пропустив их через отверстия в
его раме (Рис. 21).
При установке варочной панели над духовым шкафом
ее электрическое подключение и подключение духового
шкафа должны выполняться по отдельности как по
соображениям безопасности, так и для того, чтобы при
необходимости можно было легко снять духовой шкаф.
Рис. 20
Рис. 21
35
Page 36

Электрическое подключение
Перед подключением прибора:
1) удостоверьтесь, что предохранитель сети и
электрическая сеть в Вашей квартире выдерживают
соответствующую нагрузку;
2) удостоверьтесь, что электрическая сеть имеет
должное заземление, соответствующее
действующим нормам;
3) удостоверьтесь, что при установленной на место
варочной панели обеспечивается легкий доступ к
розетке сети и вилке сетевого шнура.
Прибор поставляется с сетевым шнуром (типа H05
V2V2F (T90), сечением 3x 1,5 мм2), оснащенным вилкой.
Эту вилку следует включать в соответствующую сетевую
розетку.
При неразъемном подключении прибора к сети
необходимо установить между ними двухполюсный
размыкатель с расстоянием между разомкнутыми
контактами не менее 3 мм, тип которого по
действующим правилам соответствует требуемой
нагрузке. Провод заземления не должен разрываться
двухполюсным размыкателем; он должен быть на 23
см длиннее других проводов.
Сетевой провод должен быть размещен таким образом,
чтобы никакая его часть не могла нагреться до
температуры, на 50 °C превышающей комнатную
температуру.
После выполнения подключения проверьте работу
нагревательных элементов в течение около 3 минут.
Клеммная колодка
Духовой шкаф оснащен легко доступной клеммной
колодкой, предназначенной для подключения к
однофазной сети электропитания напряжением 230 В
(Рис. 22).
Изготовитель не несет никакой
ответственности в случае несоблюдения
какихлибо правил техники безопасности.
Рис. 22
36
Page 37

37
Page 38

36
Page 39

37
תירבע
.וב שומיש וא רישכמה תנקתה ינפל ןויעב ןתוא אורקל ךתבוח .תוחיטב ימעטמ תונתינ הלא תורהזא
בושח תוחיטב עדימ
הנקתה
יאנכט ידי לע הנעצובתהנקתהל תושרדנה תולועפהלכש הבוח •
.םימייקה תונקתהו םיללכה יפל ,רישכ םדא וא ךמסומ
.ןכוסמ יהשלכ ךרדב טרפמה יוניש •
אוהש אדו ,רישכמהמ הזיראה ירמוח לכ תא ריסתש ירחא •
םא .ןיקתו םלש בצמב אצמנ ילמשחה לבכהשו קזנ אלל םלש
.הנקתהה עוציב ךשמה ינפל ץיפמל הנפ ,אל
םידליל תוחיטב
.החגשה תחת םידליו םירגובמ ידי לע הלעפהל ןנכות הז רישכמ •
םע קחשל וא םידקפב תעגל םיריעצ םידליל רשפאל רוסא
.ותברקב וא רונתה
שומישה תעב םמחתהל םילולע הז רישכמ לש םישיגנ םיקלח •
.ררקתי רישכמהש דע םידלי קיחרהל שי .וב
שומישה ךלהמב
וב שמתשהל רוסאו דבלב םילכאמ לושיבל ןנכות הז רישכמ •
.תורחא תורטמל
רשאכ (OFF) יובכ בצמב םיוצמ הרקבה ירותפכ לכש אדו •
.שומישב וניא רונתה
לושיב רישכמ תברקב עקשל והשלכ ילמשח ילכ רבחת םאב •
םילבכה יכו םיילמשח םילבכ ןיבל וניב עגמ רצונ אלש אדו ,הז
.הז רישכמ לש םימחה םיקלחהמ םיקוחר
.למשחהמ ותוא קתנ ,ןיקת וניא רישכמה םא •
דיל,ןמש וא ןמוש ןוגכ ,םילכאמ םיליכמהחבטמ ילכ ריאשהל ןיא •
הרקמב קזנל םורגל הלולע םילכ תראשה .וילעמ וא רישכמה
.גגושב לעפומ רישכמה וב
שומיש תעב ןמוש ףוסיאל ףוטפטה ןגא תא ביצהל שי דימת •
ןגאל םימ לש הנטק תומכ גוזמ .רשב לושיב תעב וא לירגב
.םימיענ-אל תוחירו ןשע עונמל תנמ לע ףוטפטה
םימח םיראשנו שומישה ךשמב דואמ םיממחתמ םירישכמ •
תעגל אלש רהזיהל שי .ןכמ רחאל תכשוממ הפוקת ךשמב
.רונתה ךותב םומיח יפוגב
תחיתפ תעב רונתהמ דחא דעצ קחרמב דומעל שי דימת •
לש רורחש רשפאל תנמ לע ופוסב וא לושיב ןמזב תלדה
.ורבטצהש םיזגו םידא
.רונתהמ םיריס תאצוהל רונת תופפכב שמתשהל שי דימת •
.תע לכב יקנ רונתה לע רומשל שי ,תוחיטבו תוהג ימעטמ •
םורגל הלולע םירחא לכאמ ירמוח וא םינמוש לש תורבטצה
.הפירשל
הובג ץחלב רוטיק יוקינ תונוכמב וא רוטיקב שמתשהל רוזא •
.רונתה יוקינל
.הקוזחת וא יוקינ עוציב ינפל למשחהמ רישכמה תא קתנ •
.םיעוזעזלדימע יטסלפ יוסיכבםיסוכמ רונתהמ םימיוסמםיקלח •
.רונתב שומישה ינפל הז יוסיכ רסה
.טלוו 230 חוכ קפסל יזאפ-דח רוביח םעלועפל דעונ הז רישכמ •
תאו רונתה תא סורהי הקראה אלל יזאפ-יבר טלוו 400 רוביח
.תנקתומ איה םאב ,הריכה
יעצמא לכ תטיקנ יא לש הרקמב תוירחא לכ ריסמ ןרצייה •
.תוריהזה
לופיט
םיעצובמה םינוקית .הרקמ לכב רונתה תא ןקתל תוסנל ןיא •
הלקתל וא העיצפל םורגל םילולע םיכמסומ-אל םישנא ידי לע
שומיש שורדל שי דימת .ימוקמה תורישה זכרמל הנפ .הרומח
.םיירוקמ ףוליח יקלחב
הביבסה תוכיא לע עדימ
יתוחיטב ןפואב הזיראה ירמוח תא קלסל שי ,הנקתהה רחאל •
.הביבסה תוכיאב בשחתהבו
.לבכה תריזג ידי לע ותוא תיבשהל שי ןשי רונת קוליס תעב •
רצומב לפטל ןתינ אלש ןייצמ ותזיראב וא רצומב למסה
•
המיאתמה ףוסיאה תדוקנל וריבעהל שי אלא .תיתיב תלוספכ
רצומה קוליס תחטבה ידי לע .ילמשחו ינורטקלא דויצ רוזחימל
לע םרגיהל לולעה יתואירבו יתביבס קזנ עונמל רוזעת ,הכלהכ
לע רתוי טרופמ עדימ תלבקל .הז רצומ לש ןיקת-אל קוליס ידי
וא תיתיבה תלוספה קוליס תורישל ,הייריעל הנפ ,הז רצומ קוליס
.רצומה תא תשכר הנממש תונחל
ףוגב ךתוא תוחנהל תנמ לע טסקטב ואצמיי ןלהל םילמסה
:תוארוהה
תוחיטב תוארוה
לועפת ןיגב בלש ירחא בלש תוארוה
תוישומיש תוצע
הביבסה תוכיא לע עדימ
תוארוהב שומישל תויחנה
Page 40

38
:ןרציה
ELECTROLUX HOME PROUCTS ITALY S.p.A.
Viale Bologna, 298
47100 FORLÌ (ITALY)
רישכמל דומצב הז תוארוה רפס קיזחהל רתויב בושח
,רישכמה לש הרבעה וא הריכמ לש הרקמב .ידיתע ןויעל
תנמ לע רישכמל דומצב רמשיי הז רפסש אדוול שי
תאו םידיקפתה תא תעדל םישדחה םילעבל רשפאל
.רישכמה לש תויטנוולרה תורהזאה
םיניינע ןכות
שמתשמה רובעןיקתמה רובע
37 בושח תוחיטב עדימ
38 רונתה רואית
40 רונתה לש הנושארה הנקתהה תעב
41 ינורטקלא תנכת
43 רונתב שומיש
45 לושיב תואלבט
47 הקוזחתו יוקינ
50 ...דבוע אל והשמ םא
51 ינכט עויס
51 םיינכט םינותנ
52 הנקתה
53 ילמשח רוביח
רונתה רואית
הרקב חול .1
טטסומרת תוסיו רותפכ .2
טטסומרת תוסיו תירונ .3
ינורטקלא תנכת .4
רונת תרקב רותפכ .5
ילמשח חתמ תירונ .6
לירג .7
רונת תירונ .8
תויפוקסלט תוליסמ .9
רונת ררוואמ.10
ילמשח ןקת תיחול.11
6
2 4
8
5
3
9
1
7
11
Page 41

39
2 רויא
(1 רויא) רונת תרקב רותפכ
:ןלהל תולועפל שמשמו םילמסה תא הארמ רונתה תרקב רותפכ
תלועפ לכ אלל קולדת רונתה תרונ - רונת תרונ
לושיב
םומיחה ףוגמ עיגמ םוחה - ילנויצנבנוק לושיב
ךותב םג םומיח רשפאתמש ךכ ןותחתהו ןוילעה
.רונתה
ןוילעה קלחהמ עיגמ םוחה - ןוילע םומיח ףוג
.דבלב רונתה לש
קלחהמ עיגמ םוחה - ןותחת םומיח ףוג
.דבלב רונתה לש ןותחתה
לירג לושיבל שמשמ - דבלב ימינפ לירג ףוג
.תונטק תויומכב
.קלוד אלמה לירגה ףוג - לופכ לירג
תיפולח הטיש העיצמ וז הלועפ - ימרת לירג
לושיבל רשקהב ללכ ךרדב ,םילכאמ לושיבל
רונתה ררוואמו לירגה ףוג .ילנויצנבנוק לירג
.ןוזמה ביבס םח ריווא םימירזמו דחיב םילעופ
הרוטרפמט רחב ,וז היצקנופב שומיש תעב
.סויזלצ תולעמ 200 לש תיברמ
תולצל וא תולצל ךל רשפאמ - ררוואמב לושיב
תרבעה אלל ףדמ לכב תינמז וב תופאל םגו
.םעט
תרשפהב עייסל שמשמ הז בצמ - הרשפה בצמ
.אופק לכוא
(2 רויא) טטסומרת תרקב רותפכ
תולעמ 50 ןיב תרוטרפמט תריחבל שמשמ טטסומרתה רותפכ
.סויזלצ תולעמ 230 לש םומיסקמל
(I) רונת תרקב תירונ
םומיחה ףוג לעופש םעפ לכב קולדת וז תירונ
(‘צ תולעמ) טטסומרת תרקב תירונ
הרוטרפמטה תירונ ,רונתה לש הרוטרפמטה תריחב רחאל
;הנוכנה הרוטרפמטל עיגמ רונתהש דע תקלוד ראשיתו קולדת
ךות טטסומרתה יפל ןיגוריסל הבכתו קולדת איה ןכמ רחאל
.היוצרה הרוטרפמטה לע הרימש
1 רויא
םידקפ
100
150
200
MA X
50
Page 42

40
תוחיטבה טטסומרת
טטסומרתב הלקת לש הרקמב תוחיטב טטסומרתב ןגומ רונתה
תקפסא תא קיספיתוחיטבה ןקתה,רונתה לש תוממחתהו ישארה
לש תורישה זכרמל תונפל שי ,הזכ הרקמ לכב .רישכמל למשחה
.הרקמ םושב רונתה תא ןקתל תוסנל ןיא .Electrolux
רוריקה ררוואמ
רונתה יביכר תאו רונתה תוריק תא ררקל דעונ רוריקה ררוואמ
ומצע.
םח ריווא .לושיב לש תוקד רפסמ רחאל תיטמוטוא קלוד ררוואמה
,רונתה יוביכ תעב .תלדה תידי דיל חתפה ךרד רונתהמ הנופמ
תונורא תאו רונתה תא ררקל תנמ לע לועפל ךישמי ררוואמה
וילאמ הבכ אוה ןכמ רחאלו הכלהכ חבטמה.
.לושיבה רמג רחאל תוקד 45 דע לועפל יושע ררוואמה :הרעה
רוריקה ןמז תא רצקת “ץירח” בצמב החותפ תלדה תראשה.
FO 2259
3 רויא
ינרוטקלאה תנכתב העשה תעיבק רחאל לעפי רונתה
.(“העשה תעיבק” הקספ האר) דבלב
רונתה ירזיבא תא ףוטש ,הנושארה םעפב לושיבה ינפל
.הדיפקב
:רונתה תנקתה רחאל
(MAX ) םומיסקמל טטסומרתה רותפכ תא בבוס (א
;(‘צ תולעמ 180 )
;( ) ילנויצנבנוק לושיבל רונתה תרקב רותפכ תא רבעה (ב
.תוקד 45 -כ ךשמב קיר בצמב לועפל רונתל רשפא (ג
.רורוואל ןולח חתפ (ד
ידי לע םרגנו ןיטולחל ילמרונ הז חיר .םיענ אל חיר ןכתיי ,הז ןמזב
.רוצייה ךילהתמ תויראש
.ררוואמ תרזעב לושיבו לירגב לושיבל הלועפה לע רוזח
ללח תא הקנ ךכ רחאו ררקתהל רונתל ןת ,הלועפה רמג רחאל
.םימח ןובס ימב הגופסה הכר תילטמב רונתה
FO 2161
4 רויא
דימת תידיב זוחאל שי ,רונתה תלד תחיתפל
.(4 רויא) יזכרמה הקלחב
רונתה לש הנושארה הנקתהה תעב
Page 43

41
ינורטקלא תנכת
הלועפ תריחבל רותפכ לע ץחל .1
” ” הדרוה רותפכ .2
” ” האלעה רותפכ .3
הגוצת .4
“לושיב ךשמ” תירונ .5
“לושיב םויס” תירונ .6
“רוחאל הריפס” תירונ .7
“העש” תירונ .8
רונתה תא ליעפהל ןתינ ןכ ומכ .דבלב העשה תעיבק רחאל לעפי רונתה
.יהשלכ תינכות ילב םג
העשה תעיבק
בהבהת העשה תירונ ,למשח תקספה רחאל וא חוכה קפס תלעפה תעב
.הגוצתב
:הנוכנה העשה תעיבקל
.” ” וא ” ” רותפכ לע ץחל .1
גיצת הגוצתהו הבכת העשה תירונ :תוינש 5 ןתמה ,העשה תעיבק רחאל .2
.שומישל ןכומ רישכמה .העבקנ רשא העשה תא
:העשה לש שדחמ העיבקל
תיטנוולרה תירונה .“העש” היצקנופה תריחבל םימעפ רפסמ רותפכה לע ץחל .1
.ליעל ראותמכ ךשמה .בהבהל ליחתת
ךשמ) יהשלכ תיטמוטוא הלועפ העבקנ אל םא שדחמ העשה תא עובקל ןתינ
.( לושיב םויס וא לושיב
“לושיב ךשמ” תלועפ
תא סנכה .תנכותמה לושיבה ךשמ ףוסב וילאמ הבכיי רונתה ,וז הלועפל תודוה
רותפכה לע ץחל .לושיבה תרוטרפמט תא ןווכו לושיב תלועפ עבק ,רונתל לכאמה
ליחתת תיטנוולרה תירונה .“לושיב ךשמ” הלועפה תריחבל םימעפ רפסמ
:ןמקלדכ לעפ ,ןכמ רחאל .בהבהל
:ןמזה ךשמ תעיבקל
.” ” וא ” ” רותפכ לע ץחל .1
הגוצתהו קולדת לושיבה ךשמ תירונ :תוינש 5 ןתמה ,העשה תעיבק רחאל .2
.העשה תא בוש גיצת
.תירונה בוהבה ןמזב םוזמז עמשייו וילאמ הבכי רונתה ,לושיבה ןמז רמגב .3
.ספאל טטסומרתה רותפכ תאו רונתה תלועפ רותפכ תא בבוס
רונתה ,וז הלועפ עוציב תעב :הרעה .והשלכ רותפכ לע ץחל ,םוזמזה יוביכל
טטסומרתה רותפכ תאו רונתה תלועפ רותפכ תא בבוסל רוכז ןכל .בוש לעפוי
.לושיבה ןמז רמגב ספאל
:ןמזה ךשמ לוטיבל
תירונה .“לושיב ךשמ” הלועפה תריחבל םימעפ רפסמ רותפכה לע ץחל .1
.רתונה לושיבה ןמז תא הארמ הגוצתהו בהבהת תיטנוולרה
הבכת תירונה ,תוינש 5 ירחא .“0:00” הארמ הגוצתהש דע ” ” רותפכ לע ץחל .2
.העשה תא בוש גיצת הגוצתהו
5 רויא
4
7
1
32
8
5
6
FO 2571
Page 44

42
“לושיב רמג” תלועפ
סנכה .תנכותמה לושיבה ןמז רמגב רונתה לש יטמוטוא יוביכ עובקל ןתינ וז הלועפ תועצמאב
רפסמ רותפכ לע ץחל .לושיבה תרטרפמט תא ןווכו לושיב תלועפ רחב ,רונתל לכאמה תא
,ןכמ רחאל .בהבהל ליחתת תיטנוולרה תירונה .“לושיב רמג” תלועפ תריחבל םימעפ
:ןמקלדכ לעפ
:לושיבה ןמז רמג תעיבקל
.” ” וא ” ” רותפכ לע ץחל .1
בוש גיצת הגוצתהו קולדת “לושיב רמג” תירונ :תוינש 5 ןתמה ,העשה תעיבק רחאל .2
.העשה תא
רותפכ תא בבוס .תירונה בוהבה ןמזב םוזמז עמשייווילאמ הבכירונתה ,לושיבה ןמז רמגב .3
.ספאל טטסומרתה רותפכ תאו רונתה תלועפ
.בוש לעפוי רונתה ,וז הלועפ עוציב תעב :הרעה .והשלכ רותפכ לע ץחל ,םוזמזה יוביכל
.לושיבה רמגב ספאל טטסומרתה רותפכ תאו רונתה תלועפ רותפכ תא בבוסל רוכז ןכל
:לושיבה ןמז רמג לוטיבל
תיטנוולרה תירונה .“לושיב רמג” תלועפ תריחבל םימעפ רפסמ רותפכ לע ץחל .1
.תנכותמה לושיבה רמג ןמז תא הארמ הגוצתהו בהבהת
תירונהו בהבהי תנכתה .תיחכונה העשה תא הארמ הגוצתהש דע ” ” רותפכ לע ץחל .2
.הבכת
דחיב “לושיב ןמז רמג” םגו “לושיב ךשמ”
הקלדה רשפאל תנמ לע תינמז וב “לושיב ןמז רמג“ו “לושיב ךשמ” תולועפב שמתשהל ןתינ
.רתוי רחואמ דעומב רונתה לש םייטמוטוא יוביכו
קרפב ראותמכ לושיבה ךשמ תעיבק תא עצב) “לושיב ךשמ” הלועפה תועצמאב .1
תא גיצת הגוצתה : רותפכ לע ץחל ,ןכמ רחאל .הלועפה ךשמ תא עבק (יטנוולרה
.תתנכותמה הרדגהה
קרפב ראותמכ לושיבה רמג תעיבק תא עצב) “לושיב ןמז רמג” הלועפה תועצמאב .2
.לושיבה רמג ןמז תא עבק (יטנוולרה
תוינכותה יפל הבכיו לעפי רונתה .העשה תא גיצת הגוצתהו וקלדי תיטנוולרה תוירונה
.ועבקנ רשא
“רוחאל הריפס” תלועפ
אוה םא ,לועפל ךישמי רונתה ךא ,רוחאל הריפסה רמגב לעפי רוחאל הריפסה םזמז
.שומישב
:רוחאל הריפסה תעיבקל
תיטנוולרה תירונה .“רוחאל הריפס” הלועפה תריחבל םימעפ רפסמ רותפכה לע ץחל .1
.בהבהל ליחתת
.(תוקד 30 ,תועש 2 :םומיסכמ) ” ” וא ” ” רותפכ לע ץחל .2
.לעפת “רוחאל הריפס” תירונה :תוינש 5 ןתמה ,העשה תעיבק רחאל .3
לע ץחל ,םוזמזה יוביכל .םזמזה עמשייו בהבהל ליחתת תירונה ,רוחאל הריפסה ףוסב .4
.והשלכ רותפכ
:רוחאל הריפסה לוטיבל
תיטנוולרה תירונה .“רוחאל הריפס” הלועפה תריחבל םימעפ רפסמ רותפכה לע ץחל .1
.רתונה ןמזה תא הארמ הגוצתהו בהבהת
הגוצתהו הבכת תירונה ,תוינש 5 ירחא .“0:00” הארמ הגוצתהש דע ” ” רותפכ לע ץחל .2
.העשה תא בוש גיצת
הגוצתה יוביכ ןפוא
.הבכת הגוצתה .תוינש 5 -כ ךשמב תינמז וב תנכת ירותפכ השולש וא םיינש לע ץחל .1
.הגוצתה תלעפהל והשלכ רותפכ לע ץחל .2
.דבלב תורחא תולועפ ורחבנ אל םא הגוצתה תא תובכל ןתינ
Page 45

43
רוטיקו םיעקשמ
תירוזחמ ריווא תעונת תרצויה תידעלב תכרעמב דיוצמ רונתה
תביבסב לושיב תרשפאמ וז תכרעמ .רוטיק לש ידימת רוזחימו
ומכ .ץוחבמ תוכירפו םינפבמ תוכר ןהש תונמ לע הרימש ךות רוטיק
לושיבה ךלהמב .םומינימל םידרוי היגרנאה תכירצו לושיבה ןמז ,ןכ
ךילהת .רונתה תלד תחיתפ תעב ררחתשמה ,רוטיק תורצוויה ןכתית
.ןיטולחל יעבט הז
תחיתפ תעב רונתהמ דחא דעצ קחרמב דומעל שי דימת ,םלוא
םידא לש רורחש רשפאל תנמ לע ופוסב וא לושיב ןמזב תלדה
.ורבטצהש זגו
אוה ,רונתל ץוחמ רירק חטשמ םע רישי עגמ רצוי רוטיקה םא
תא םמחל דפקה ,יוביעה תתחפהל .םימ יעקשמ רוצייו הבעתי
.רונתה ללחל םילכאמ תסנכה ינפל בטיה רונתה
לכ ינפל (תוקד 10 -כ) רצק םידקמ םומיח עצבל ךרוצ שי
.לושיב
.רישכמב שומיש לכ ירחא םימ תופיט בגנל םיצילממ ונא
(7 רויא) םייפוקסלט םיפדמ יכמות
םיעייסמה םייפוסקלט םיפדמ יכמותב םידיוצמ 4 -ו 2 םיפדמ יסלפמ
.םתאצוהו םיפדמ תסנכה תעב רתוי חונ לועפתה
הצוחה ינמיהו ילאמשה םייפוקסלטה םיפדמה יכמות תא ךושמ
.7 רויאב ראותמכ ,ףוסה דע
םייפוקסלטה םיפדמה יכמותלע לירגה תבחמתא וא ףדמה תא חנה
.(7 רויא) רונתה ךותל הרזחב תונידעב םתוא לחשהו
םיפדמה יכמות םא רונתה תלד תא רוגסל תוסנל ןיא
הזכ ןויסינ .ףוסה דע רונתה ךותב םניא םייפוקסלטה
.תלדה לש תיגוגזבו לייאמאב עוגפל לולע
רונתב שומיש
4
3
2
1
FO 0019
6 רויא
7 רויא
.לושיבה תעב הרוגס תלד לע דימת רומשל שי
.הטמ יפלכ תחתפנה רונתה תלד תחיתפ תעב קחרמ רומש •
תידי תועצמא תלדב ךומת - חותפ בצמל לופיל תלדל תתל ןיא
.האלמה התחיתפ דע תלדה
תיתחתמ םירפסנ םיפדמהימוקימ.םיפדמיסלפמהעברא רונתל •
.6 רויאב גצומכ רונתה
רונתה סיסב לע תורישי לושיב ילכ חינהל ןיא - !הרהזא
ןכתייו תויה ,לושיבה ןמזב םוינימולא דידרב ותוסכל ןיאו
.לכאמלו לייאמא יחטשמל קזנ
ידידרו םוחל םידימע םיריס ,םיריס חינהל שי דימת
.רונתה יפדמ לע םוינימולא
Page 46

44
רונתב שומיש
ילנויצנבנוק לושיב
עבקו ( ) יטנוולרה למסל רונתה תלועפ תרקב רותפכ תא בבוס
קוקז התא םא .טטסומרתה רותפכב היוצרה הרוטרפמטה תא
רותפכ תא בבוס ,רונתה לש ןותחתה וא ןוילעה קלחהמ םוח רתויל
ףוג) וא (דבלב ןוילע םומיח ףוג) בצמל רונתה תלועפ תרקב
.(דבלב ןותחת םומיח
ררוואמ תרזעב לושיב
עבקו ( ) יטנוולרה למסל רונתה תלועפ תרקב רותפכ תא בבוס
ירוחאמ ררוואמה .טטסומרתה רותפכב היוצרה הרוטרפמטה תא
.רונתה ךותל םמוחמ ריווא םירזמ ירוחאה חולה
חנה ,תינמז וב ררוואמ רונתב תחא הנממ רתוי לשבל ךרוצ שי םא
םא .(8 רויא) הטמלמ תישילשהו היינשה הדמעב םיפדמה תא
תודמעב שמתשה ,דבלב ררוואמה רונתב תחא הנמ לשבמ התא
.רתוי תובוט תואצות תלבקל תונותחתה
לירגב לושיב
( - ) יטנוולרה למסל רונתה תלועפ תרקב רותפכ תא בבוס
תעב .טטסומרתה רותפכ תועצמאב היוצרההרוטרפמטה תא עבקו
.הנמה ינפ לע דיחא היהי םומיחה ,לופכ לירג תלועפב שומיש
םתוא חנהו םהילע ןמשטעמ חרמ ,לירגב םיגד וארשב לושיבתעב
.לכאמה יבועב יולת ףדמה סלפמ .רונתה תשר לע דימת
טעמ םע רתויב ךומנה סלפמב ףוטפטה ןגא תא חינהל שי דימת
.םימיענ אל תוחירו ןשע עונמל תנמ לע וב םימ
ימרת לירג
( ) יטנוולרה למסל רונתה תלועפ תרקב רותפכ תא בבוס
תעב .טטסומרתה רותפכב היוצרה הרוטרפמטה תא עבקו
תולעמ 200 לש תיברמ הרוטרפמט רחב ,וז היצקנופב שומיש
.סויזלצ
ריווא םימירזמו ןיגוריסל םילעופ רונתה ררוואמו אלמה לירגה ףוג
.םיתחופ םילכאמה תא ךופהלו קודבל ךרוצה .ןוזמה ביבס םח
לכל ימרת לירגב שמתשהל ןתינ ,תובע תוצמואו םימינצ דבלמ
.ילנויצנבנוק לירגב לשבל גוהנ ותוא לכאמ
הרשפה
בבוסו ( ) יטנוולרה למסל רונתה תלועפ תרקב רותפכ תא בבוס
לעופ רונתה ררוואמ .( :למס) יובכ בצמל טטסומרתהרותפכ תא
.רדחה תרוטרפמטב רונתה ךותב ריוואה תא םירזמו םומיח אלל
תולעמ 230 ידכ דע עיגהל תויושע רונתה ךותב תורוטרפמטה •
רונת ילכ ,הייפא תוינבתב שמתשהל דימת דיפקהל שי.סויזלצ
.רונתה םוחל םידימעה ‘וכו
תורישי םוינימולא ידידר וא טיווקסיב יריס ,םיריס חינהל ןיא •
הלולעה םוח תורבטצהל םורגל םילולע הלא .רונתה סיסב לע
.ולש לייאמאל קיזהלו רונתה עוציב לע עיפשהל
הלאכ םילכאמש םושמ,ןמשב וא ןמושב לושיבלע חיגשהלשי •
התואמ .ידמ רתוי םיממחתמ םה םא הפירשל םורגל םילולע
םתאצוהו רונתל םילכאמ תסנכה תעב רהזיהל שי ,הביסה
הרקמב .רונתה סיסבלע ןמוש וא ןמש לופייאלש תנמ לע ונממ
םימיענ אל תוחיר עונמל תנמ לע הדיפקב רונתה תא הקנ ,הזכ
.ןשעו
8 רויא
.לושיבה תעב הרוגס תלד לע דימת רומשל שי
רשב לושיבל תוישומיש תוצע
םיגדו
ףדמ לע תורישי וא רונתל םידימעה םילכב רשב חינהל ןתינ
ןושארה ףדמב ףוטפטה ןגא תאסינכהל דפקה,הז הרקמב.רונתה
לע ךתומ ןמוש תליפנ ענמי ףוטפטה ןגא .םימ תפסותב הטמלמ
.רונתה סיסב
תינוניב הרוטרפמטב יללכ ןפואב םיגדו תופוע ,ןבל רשב לשבל שי
םודא רשב לשבל ךרוצ שי םא .(סויזלצ תולעמ 175 -ל 150 ןיב)
שמתשהל ץלמומ ,(םינפבמ רתוי ןידע לושיבו ץוחבמ הלק המחשה)
ךשמב (סויזלצ תולעמ 220 -ל 200 ןיב) רתוי ההובג הרוטרפמטב
.רתוי הרצק הפוקת
הייפאל תוצע
200 -ל 150 ןיב ,תינוניב הרוטרפמטב תוגוע לשבל שי ללכ ךרדב
.סויזלצ תולעמ
תנכה םשל (תוקד 10 -כ ךשמב) שארמ רונתה תא םמחל ץלמומ
רונתה תלד לע רומשל שי ,לושיבה תליחת רחאל .הייפא וא תוגוע
ךרד לושיבה תואצות תא קודבלו לושיבה תפוקת לכ ךשמב הרוגס
.רונתה תלד ןולח
לירגב שומישל תוצע
תורישי תונמה תא חנה ,לירגב םיגד וא רשב לשבל ךרוצ שי םא
,לירג בצמב .ןהילע ןמש לש הקד הבכש תחירמ רחאל ףדמה לע
תמר תא ןווכל שי ןכל .דבלב ןוילעה םומיחה ףוגמ עיגמ םוחה
ןגא תא חינהל רוכזל שי דימת .גדה וא רשבה יבוע יפל לושיבה
.םימ תפסותב הנותחתה הדמעב ףוטפטה
4
3
2
1
ררוואמ תרזעב לושיב
FO 0351
Page 47

45
ררוואמ רונת
ררוואמ תרזעבו ילויצנבנוק לושיב
4
3
2
1
4
3
2
1
תוגוע
הגוע תינבתב 60 ~ 45 160 *(3-ו 1) 2 170 2
םירמש אלל קצב
הגוע תינבתב 30 ~ 20 160 *(3-ו 1) 2 170 2
האמח קצב
הגוע תינבתב 80 ~ 60 150 2 160 1
תנמשמ הניבג תגוע
הגוע תינבתב 60 ~ 40 170 *(3-ו 1) 2 180 1 םיחופת תגוע
80 ~ 60 150 2 175 2 לדורטש
40 ~ 30 160 *(3-ו 1) 2 175 2 הביר תויגוע
םחל תינבתב 60 ~ 45 160 1 175 1 תוריפ תגוע
הגוע תינבתב 40 ~ 30 160 *(3-ו 1) 2 175 1 גופס תגוע
הגוע תינבתב 60 ~ 40 160 1 170 1 דלומ גח תגוע
םחל תינבתב 60 ~ 50 160 1 170 1 םיפיזש תגוע
הייפא תינבתב 35 ~ 25 160 *(3-ו 1) 2 175 2 תונטק תוגוע
הייפא תינבתב 30 ~ 20 150 *(3-ו 1) 2 160 2 תויגוע
הייפא תינבתב 120 ~ 90 100 *(3-ו 1) 2 100 2 תופצקמ
הייפא תינבתב 20 ~ 12 180 *(3-ו 1) 2 190 2 תוקותמ תוינמחל
הייפא תינבתב 25 ~ 15 190 *(3-ו 1) 2 200 2 טינשמרק :תודיטשפ קצב
הציפו םחל
תודיחי 1-2 60 ~ 40 180 2 190 1 ןבל םחל 1000
םחל תינבתב 45 ~ 30 180 1 190 1 ןופיש םחל 500
תוינמחל 6-8 35 ~ 20 175 *(3-ו 1) 2 200 2 תוינמחל 500
הייפא תינבתב 30 ~ 15 190 *(3-ו 1) 2 210 1 הציפ 250
ןאלפ תוגוע
תינבתב 50 ~ 40 175 *(3-ו 1) 2 200 2 הטספ ןאלפ
תינבתב 60 ~ 45 175 *(3-ו 1) 2 200 2 תוקרי ןאלפ
תינבתב 45 ~ 35 180 *(3-ו 1) 2 200 1 תודיטשפ
תינבתב 60 ~ 45 160 2 180 2 הינזל
תינבתב 55 ~ 40 175 2 200 2 ינולנק
רשב
תשרב 70 ~ 50 175 2 190 2 רקב 1000
תשרב 130 ~ 100 175 2 180 2 ריזח 1200
תשרב 120 ~ 90 175 2 190 2 לגע 1000
ילגנא יולצ רקב
1500
תשרב 60 ~ 50 200 2 210 2 אנ 1500
תשרב 70 ~ 60 200 2 210 2 ינוניב 1500
תשרב 80 ~ 70 200 2 210 2 בטיה יושע 1500
הפילק םע 150 ~ 120 170 2 180 2 ריזח ףתכ 2000
תודיחי 2 120 ~ 100 160 2 180 2 ריזח קוש 1200
לגר 130 ~ 110 175 2 190 2 הלט 1200
םלש 80 ~ 60 175 2 190 2 ףוע 1000
םלש 240 ~ 210 160 2 180 2 ודוה 4000
םלש 150 ~ 120 160 2 175 2 זוורב 1500
םלש 200 ~ 150 160 2 175 2 זווא 3000
ךותח 80 ~ 60 175 2 190 2 בנרא 1200
ךותח 200 ~ 150 175 2 190 2 בנרא 1500
םלש 120 ~ 90 175 2 190 2 ןויספ 800
םחל תינבתב 60 ~ 40 160 2 180 2 רשב ץיצק
גד
םיגד 3-4 40 ~ 30 175 *(3-ו 1) 2 190 2 המורבא /לרופ 1200
הליפ 4-6 35 ~ 25 175 *(3-ו 1) 2 190 2 ןומלס / הנוט גד 1500
יתרוסמ לושיב
(םרג) לקשמ
הנמ גוס
סלפמ
תורעה
ןמז
לושיב
תוקד
‘צ ‘עמ ‘פמט
סלפמ
‘צ ‘עמ ‘פמט
:הרעה
ךיתושירדל םיאתמה רתויב ןוכנה ןמזה תא עובקל ןתינ .ךיתושירדל םיאתל תנמ לע הרוטרפמטה תא דירוהל וא תולעהל ךרוצ ןכתיי .דבלב היחנהל הדעונ וז הלבט
.דבלב תוסנתה ידי לע תוישיאה
.הלעמ יפלכ רונתה תיתחתמ םירפסנ םיפדמה ימוקימ
.םיירגוסה ןיב םיניוצמה םיסלפמב ןביצהל םיצילממ ונא ,ןותנ ןמזב תחא הנממ רתוי לשבל ךרוצ שי םא (*)
םיפדמה ימוקימ .לושיבה ינפל (תוקד 10 -כ) רצק ןמזל רונתה תא שארמ םמחל םיצילממ ונא .שארמ םומיח ןמז םיללוכ םניא לושיבה ינמז
.הלעמ יפלכ רונתה תיתחתמ םירפסנ
לושיב תואלבט
Page 48

46
לושיב תואלבט
דצ
ןוילע
‘צ ‘עמ ‘פמט
תודיחי
לקשמ
תומכ
לושיב ןמז
(תוקד)
דצ
ןותחת
לירגב לושיב
הנמ גוס
סלפמ
4
3
2
1
- לירגב - לושיב תלבט
ימרת לירג
תוקדב ןמז ‘פמט ףדמ תומכ הנמ גוס
דצ דצ ‘צ ‘עמ סלפמ (םרג)
ןוילע ןותחת
30 ~ 20 40 ~ 30 200 3 1000 (ודוה)
תודלור
30 ~ 20 30 ~ 25 200 3 1000 (םיאצח) ףוע
18 ~ 15 20 ~ 15 200 3 — ףוע יערכ
25 ~ 20 30 ~ 25 200 3 500
וילש
— 25 ~ 20 200 3 — םימרקומ תוקרי
— 20 ~ 15 200 3 — תופדצ
15 ~ 10 20 ~ 15 200 3 — לרקמ
10 ~ 8 15 ~ 12 200 3 800 גד תוסורפ
.ישיא םעט יפל המיאתהל שיו דבלב היחנהל הדעונ וז הלבט
.סויזלצ תולעמ 200 לש תיברמ הרוטרפמט רחב ,יפוסה לירגה תלועפב שומיש תעב
.סויזלצ תולעמ 200 לש תיברמ הרוטרפמט רחב ,יפוסה לירגה תלועפב שומיש תעב
םיפדמה ימוקימ .לושיבה ינפל (תוקד 10 -כ) רצק ןמזל רונתה תא שארמ םמחל םיצילממ ונא .שארמ םומיח ןמז םיללוכ םניא לושיבה ינמז
.הלעמ יפלכ רונתה תיתחתמ םירפסנ
14 ~ 12 15 ~ 12 ‘סכמ 3 800 4
הליפ תוצמוא
8 ~ 6 12 ~ 10 ‘סכמ 3 600 4 רקב תוצמוא
12 ~ 10 15 ~ 12 ‘סכמ 3 — 8 תויקינקנ
14 ~ 12 16 ~ 12 ‘סכמ 3 600 4 ריזח יחתנ
30 ~ 25 35 ~ 30 ‘סכמ 3 1000 2 (םיאצח) ףוע
12 ~ 10 15 ~ 10 ‘סכמ 3 — 4 בבק
14 ~ 12 15 ~ 12 ‘סכמ 3 400 4 (הזח) ףוע
10 ~ 8 15 ~ 10 ‘סכמ 3 600 6 רגרובמה
12 ~ 10 14 ~ 12 ‘סכמ 3 400 4 (הליפ) גד
— 7 ~ 5 ‘סכמ 3 — 4-6 םיכירכ
3 ~ 2 4~2 ‘סכמ 3 — 4-6 םימינצ
Page 49

47
הקוזחתו יוקינ
יללכ ןויקינ
תא קתנל שי דימת ,לופיט וא יוקינ תדובע עוציב ינפל
.ררקתהל ול רשפאלו ילמשחה םרזהמ רישכמה
רזפל אלש רהזיה ,סיסרת גוסמ יוקינ ירצומב שומיש תעב •
.טטסומרתה ןשייח לע וא םומיחה יפוג לע םתוא
ירמוחבוהדלפרמצב ,םישק םיקחושםירמוחבשמתשהלרוסא •
לייאמאל קיזהל םילולע הלאש םושמ ,ןיבלמ םיליכמה יוקינ
.רונתה תלד ןולחלו
רונתה ללח
ןיידע רונתהש העשב לייאמא הפוצמהרונתה ללח תאתוקנל בטומ
ימב הגופסה הכר תילטמ תועצמאב רונתה תא בגנל ץלמומ .םח
םילשהל ךרוצ היהי תעל תעמ םלוא .שומיש לכ ירחא םימח ןובס
.םירונת יוקינל ינקת רישכת תועצמאב יוקינה תא
סיסב לע יוקינ ירצומב שמתשהל ןתינ ,םישק םימתכ לש הרקמב
.םח ץמוחב וא הדלפ רמצ
תוממוחמ תויעבט תוצמוח ,תוריפ לושיב לש הרקמב
םורגלו רונתה לייאמא לע בשייתהלו טחסיהל תויושע
לע עיפשהל םילולע הלא םימתכ .םריסהל השקש םימתכל
לע .רונתה יעוציב לע ועיפשי אל ךא לייאמאה לש הקרבהה
תוקנל שי ,אבה לושיבב הלא םימתכ תפירשמ ענמיהל תנמ
.תוריפ לושיב לכ ירחא הדיפקב רונתה ללח תא
הלש םטאהו רונתה תלד
.רונתהמ הקרפל םיצילממ ונא ,רונתה תלד יוקינ ינפל
:ןמקלדכ לעפ
;ףוסה דע רונתה תלד תא חתפ (1
;(9 רויא) רונתל תלדה תא םירבחמה םיריצה תא רתא (2
םיריצה ינש לע םימקוממה םינטקה םיפונמה תא בבוסו ררחש (3
;(10 רויא)
רונתה יפלכ התוא בבוסו ןימיו לאמש דצמ תלדה תא קזחה (4
;(11 רויא) רוגס יצח בצמ דע
;(11 רויא) תונידעב רונתה תלד תא ףולש (5
.ביצי רושימ לע התוא חנה (6
.דבלב הכר תילטמבו םירשופ םימב רונתה תלד ןולח תא הקנ
.ךופהה תולועפה רדסב המוקמל תלדה תא רזחה ,יוקינה רמגב
ותלועפ תא חיטבמ רונתה ללח יתפש ביבס םקוממה םטא
.הניקתה
ותוא הקנ ,ךרוצ שי םא .םטאה בצמ תא קודבל שי םעפ ידמ •
.םיקחוש יוקינ ירישכת אלל
ןיא .ימוקמה תורישה זכרמל הנפ ,םטאב קזנ הלגתמ םא
•
.ונוקית דע רונתב שמתשהל
9 רויא
10 רויא
11 רויא
Page 50

48
םיפדמה יכמותו רונתה יפדמ
רסהו םימח ןובס ימב םתוא בטרה ,םיחותפה םיפדמה יוקינל
.ןובס םע בוטר דפ תועצמאב םישק םימתכ
.הכר תילטמב שבייו בטיה ףוטש
.תולקב םתוקנל תנמ לע םיפדמה יכמות תא קרפל ןתינ
:ןמקלדכ לעפ
היינשה ךדיב ףדמה ךמות בוציי ךות ימדקה גרובה תא אצוה (1
;(12 רויא)
;(13 רויא) ףדמה ךמות תא אצוהו ירוחאה ווה תא ףולש (2
תולועפהרדסבםמוקמל םיפדמה יכמות תא רזחה ,יוקינהרמגב (3
.ךופהה
.םיפדמה יכמות תרזחה תעב םיקדוהמ החטבאה ימואש אדו
זירג תא ריסהל אלש רהזיה ,םיפדמה יכמות יוקינ תעב
דעונ הז זירג .תויפוקסלטה תוליסמה ירוחאמ הכיסה
.ןיקתה םדוקפת תא חיטבהל
12 רויא
רונתה תרונ תפלחה
.וז הלועפ עוציב ינפל םרזהמ רישכמה קותינ אדו
:ןלהל םינוירוטירקב דומעל רונתה תרונ לע
.‘צ תולעמ 300 דע תורוטרפמטל תודימע (א
;ץרה 50 - טלוו 230 :ילמשח חתמ (ב
;טאוו 15/25 :ילמשח קפסה (ג
.E 14 :רוביח גוס (ד
:(14 רויא) ןמקלדכ לעפ ,הרונה תפלחהל
;ןועשה ןוויכ דגנ תיכוכזה הסכמ תא בבוסו ףחד (א
;הפורשה הרונה תא אצוה (ב
;השדח הרונה ףלחה (ג
;תיכוכזה הסכמ תא רזחה (ד
.ילמשחה םרזה תא לעפהו רבח (ה
14 רויא
13 רויא
:םוינימולאבו הטסורנב םימגד
דבלב חל גופס תועצמאב רונתה תלד תא תוקנל םיצילממ ונא
.הכר תילטמ תועצמאב יוקינה רחאל השביילו
,םיקחוש םירמוחב וא תוצמוחב ,הדלפ רמצב שמתשהל רוסא
םילח תוריהזה יעצמא םתוא .חטשה ינפל םיקיזמ הלאש םושמ
.חותפה רונתה חול יוקינ לע
Page 51

49
ןמוש ןנסמ
רונתה ררוואמ לעמ ןמושה ןנסמ תא ביכרהל שי ,רשב לושיבב
ענומ הז ןנסמ .ירוחאה חולב רורוואה יחתפ לעמ ותדמצה ידי לע
םיקחוש םירמוחב שמתשהל ןיא .ררוואמה יבהלב ןמוש תורבטצה
.חידמל דימע ןמושה ןנסמ .םטאה יוקינל
ררוואמה תא אצוה ,רונתה תוררקתה רחאל ,לושיבה רמגב
הילעמ יפלכ ןנסמה לש תטלובה תינושלה תפיחד ידי לע
.(16 רויא האר)
.םימח ןובס ימ תועצמאב שומישה רחאל ןנסמה תא ףוטש
.דבלב היילצ תעב ןמושה ןנסמ תא ןקתה
16 רויא
Page 52

50
ןורתפ
הרוטרפמטו לושיב תלועפ תריחב אדו
וא
בצמב בצמנ עקשה גתמ יכו ןיקת ןפואב למשחל רישכמה רוביח אדו
.לעופ
טטסומרתה גתמב הרוטרפמט בצה
וא
.רונתה לש תולועפה תרקב גתמב לושיב תלועפ בצה
.רונתה לש תולועפה תרקב גתמב לושיב תלועפ בצה
וא
יפל תורישה זכרממ השדח הרונב רונתה תרואת תרונ תא ףלחה
.הז ךירדמב תועיפומה תוארוהה
.“רונתב שומיש” קרפב דחוימב ,הז ךירדמ לש םיניינעה ןכותב ןייע
םויס רחאל תוקד 15-20 -ל רבעמ רונתה ךותב םילכ ריאשהל ןיא
.לושיבה
תעיבק” הקספ ,“ילמשח תנכת” קרפה תא האר) העשה תא עבק
.(“העשה
ןמיס
קלוד וניא רונתה
תקלוד הניא רונתה לש הרוטרפמטה תירונ
תקלוד הניא רונתה תרונ
תונמהש וא ןמז ידמ רתוי חקול לושיבה םויס
.ידמ רהמ תולשבתמ
.רונתה ללחבו תונמה לע םירבטצמ םימו רוטיק
.“12,00” הגיצמ הגוצתה
.ימוקמה תורישה זכרמל היינפ ינפל ןלהל תוקידבה תא עצב ,הכלכה דבוע וניא רישכמה םא
...דבוע אל והשמ םא
Page 53
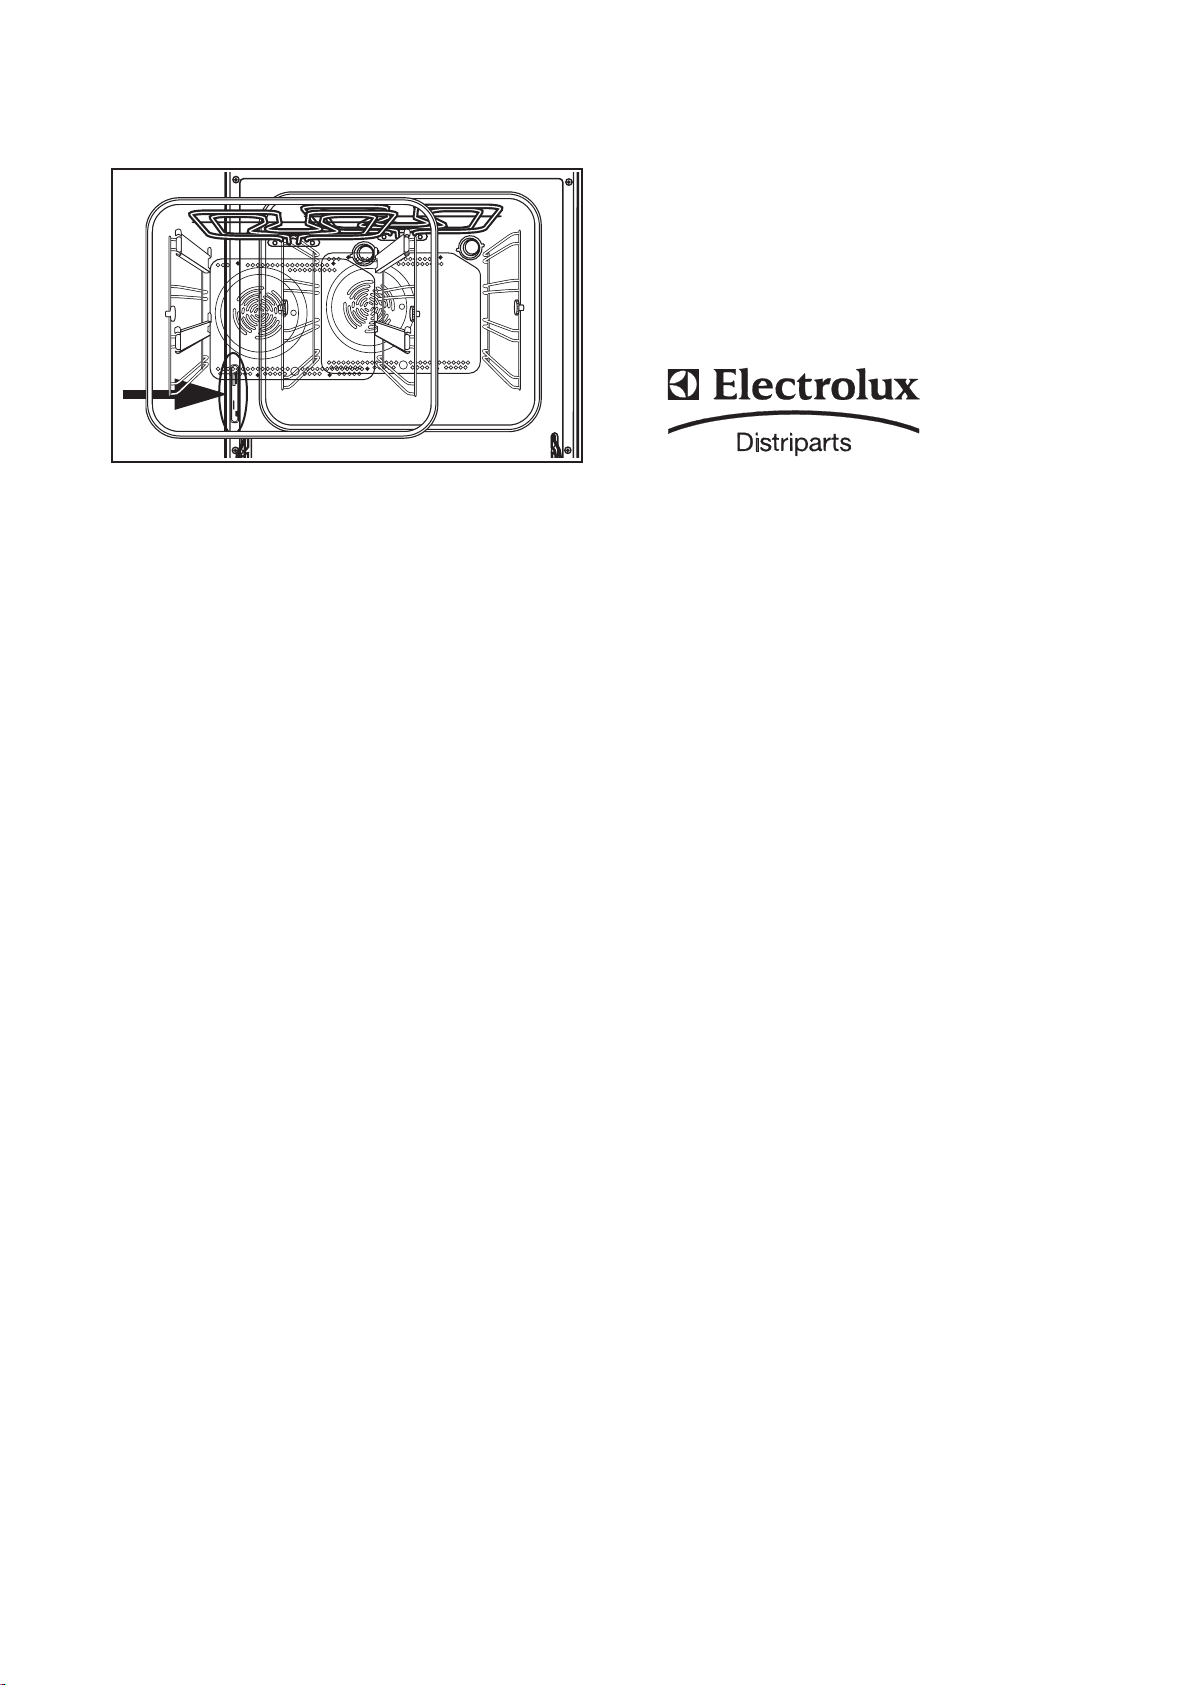
51
החמוג תודימ
מ“מ 580 ירוט הבוג
מ“מ 593 שישל תחתמ
מ“מ 580 בחור
מ“מ 550 קמוע
חותפ ללח תודימ
מ“מ 335 הבוג
מ“מ 395 בחור
מ“מ 400 קמוע
רטיל 53 חפנ
םיינכט םינותנ
םומיחה יפוג יקפסה
טאו 1000 ןותחת םומיח ףוג
טאו 800 ןוילע םומיח ףוג
טאו 1800 (800 + 1000) (ןותחתו ןוילע) םלש רונת
טאו 1650 ימינפ לירג םומיח ףוג
טאו 2450 לופכ לירג םומיח ףוג
טאו 2000 ירוחא רונת םומיח ףוג
טאו 25 העסה ררוואמ
טאו 25 רוריק ררוואמ
טאו 25 רונת תרונ
טלוו 230 (ץרה 50) חתמ
טאו 2500 (ץרה 50 - טלוו 230) יברמ קפסה
ןיידע רישכמה םדוקה קרפב תוטרופמה תוקידבה רחאל םא
ןויצ ךות ,ימוקמה תורישה זכרמל הנפ ,ןיקת ןפואב לעופ וניא
(.Prod. No) רצומה רפסמ ,(.Mod) רישכמה םגד ,הלקתה גוס
.יוהיזה תיחולב םינמוסמה (.Ser. No) ירודיסה רפסמהו
.(17 רויא) רונתה ללח לש ימדקה הצקב תמקוממ וז תיחול
ףוליח יקלח שוכרל ןתינ
םירשואמה םיירוקמ
רצומה ןרצי ידי לע
הז למס םיאשונהו
זכרממ
ונלש תורישה
תויונחמו
.דבלב תושרומ ףוליח יקלח
ינכט עויס
17 רויא
Page 54

52
רשפאל תנמ לע ךמסומ יאנכט שמשל ודעונ ןלהל תוארוהה
.םיימוקמה םיללכה יפל הנקתה עצבל ול
יאנכט ידי לע ועצובי רישכמה לש ילמשחה רוביחהו הבכרהה
.דבלב השרומו ךמסומ
הבכרה
בכרוי וב ןוראה וא החמוגה לש םירמוחהו תודימהש בושח
.הרוטרפמטב היילעל םידימעו םינוכנ ויהי רונתה
םיקלח םע עגמ ינפמ הבוט הנגה חיטבהל תבייח הנוכנ הנקתה
.דבלב תידוקפת הניחבמ םידדובמה םיקלח םע וא םיילמשח
ילבמ הנגה חיטבהל ודעונ רשא תודיחיה לכב שמתשהל שי
.םילכב שומיש אלל םאיצוהל
וא םיררקמ תברקב רישכמה תא ןיקתהל אלש םיצילממ ונא
לש םיעוציבה לע עיפשהל לולע רצונה םוחהו רחאמ איפקמ
.ולא םירישכמ
רונתה תדימ
.18 רויאב תוגצומ רונתה תודימ
תירוט החמוגל תודימ
.19 רויאב טרופמכ הנייהת החמוגה תודימ
שישל תחתמ החמוגל תודימ
.20 רויאב טרופמכ הנייהת החמוגה תודימ
ןוראל רונתה קודיה
.ןוראב ללחל רישכמה תא םאתה -
תועצמאב חבטמה ןוראל רונתה תא קדהו רונתה תלד תא חתפ רויא) רונתה ףוגב םירוחל םימיאתמה ,ץע יגרוב העברא
.(21
רוביחה תא עצבל שי ,רונתה לעמ תילמשח הריכ תנקתה תעב
תוחיטב ימעטמ ,דרפנב רונתה לש הז תאו הריכה לש ילמשחה
,רתוי הטושפ הרוצב הדיחיהמ רונתה קותינ רשפאל תנמ לעו
.ךרוצה יפל
FO 0290
18 רויא
19 רויא
20 רויא
הנקתה
21 רויא
Page 55

53
22 רויא
ילמשח רוביח
:רישכמה רוביח ינפל
םידמוע תיבה לש תילמשחה תכרעמהו ישארה ךיתנהש אדו (1
;רונתה לש סמועב
םיללכה יפל הכלהכ תקראומ חתמה תקפסאש אדו (2
;םיימוקמה
םישמשמההלופכהתויבטוקה גתמלוא עקשל עיגהלןתינש אדו (3
.ותחמוגב ןקתומ רישכמה רשאכ ילמשחה רוביחל
,H05 V2V2-F T90 גוס) רוביח לבכ םע קפוס הז רישכמ
עקשל עקתה תא סינכהל שי .עקת םע(2מ“מ 1.5 לע 3 בחור ךתח
.םיאתמ
שי ,תילמשחה תכרעמל תורישי רישכמה רוביח לש הרקמב
,הלופכ תויבטוק גתמ למשחה תקפסאל רישכמה ןיב ןיקתהל
םיאתמה גוסו גתמה יעגמ ןיב תוחפה לכל מ“מ 3 לש חוור לעב
רבעוי אל הקראהה טוח .םיימוקמה םיללכה יפל שורדה סמועל
לש הז לע הלוע וכרואש אדוול שיו הלופכה תויבטוקה גתמ ךרד
.מ“ס 2-3 -ב םירחאה םיטוחה
הרוטרפמטלקלחףאב עיגהללכוי אלשךכרוביחהלבכתאביצהלשי
.רדחה תרוטרפמט לעמ ‘צ תולעמ 50 לש
.תוקד 3 -כ ךשמב םומיחה יפוג תא קודב ,רוביחה עוציב רחאל
םירוביח ספ
חתמ םע דובעל דעונה שיגנ םירוביח ספב דיוצמ רונתה
.(22 רויא) טלוו 230 לש יזאפ-דח
לכ תטיקנ יא לש הרקמב תוירחא לכ ריסמ ןרצייה
.תוריהזה יעצמא
Page 56

Built-in oven
הנבומ רונת
OK 205
Instruction Booklet
תוארוה רפס
GRAFICHE MDM - Forlì 35691-0001
 Loading...