

Page 1
electrical mfg. company
9131 - 10th Avenue South Seattle Washington 98108
INSTALLATION & MAINTENANCE MANUAL
Model: KBP2406 240V-1phase Unit Heater
WARNING
Model: KBP2406 is 240 volt. It is important that you
verify the power supply voltage is the same as the
nameplate voltage of the heater. Improper installation
or failure to follow the procedures as outlined in this
manual can result in damage to the heater. Note that
the KBP2406 will operate at 208 volt but will produce
25% less wattage and draw 13% less Amps. Disconnect all power from the heater at the main service
panel before attempting to install or service this unit.
All electrical wiring must conform to local electrical
Unpack & Inspect Your New Heater
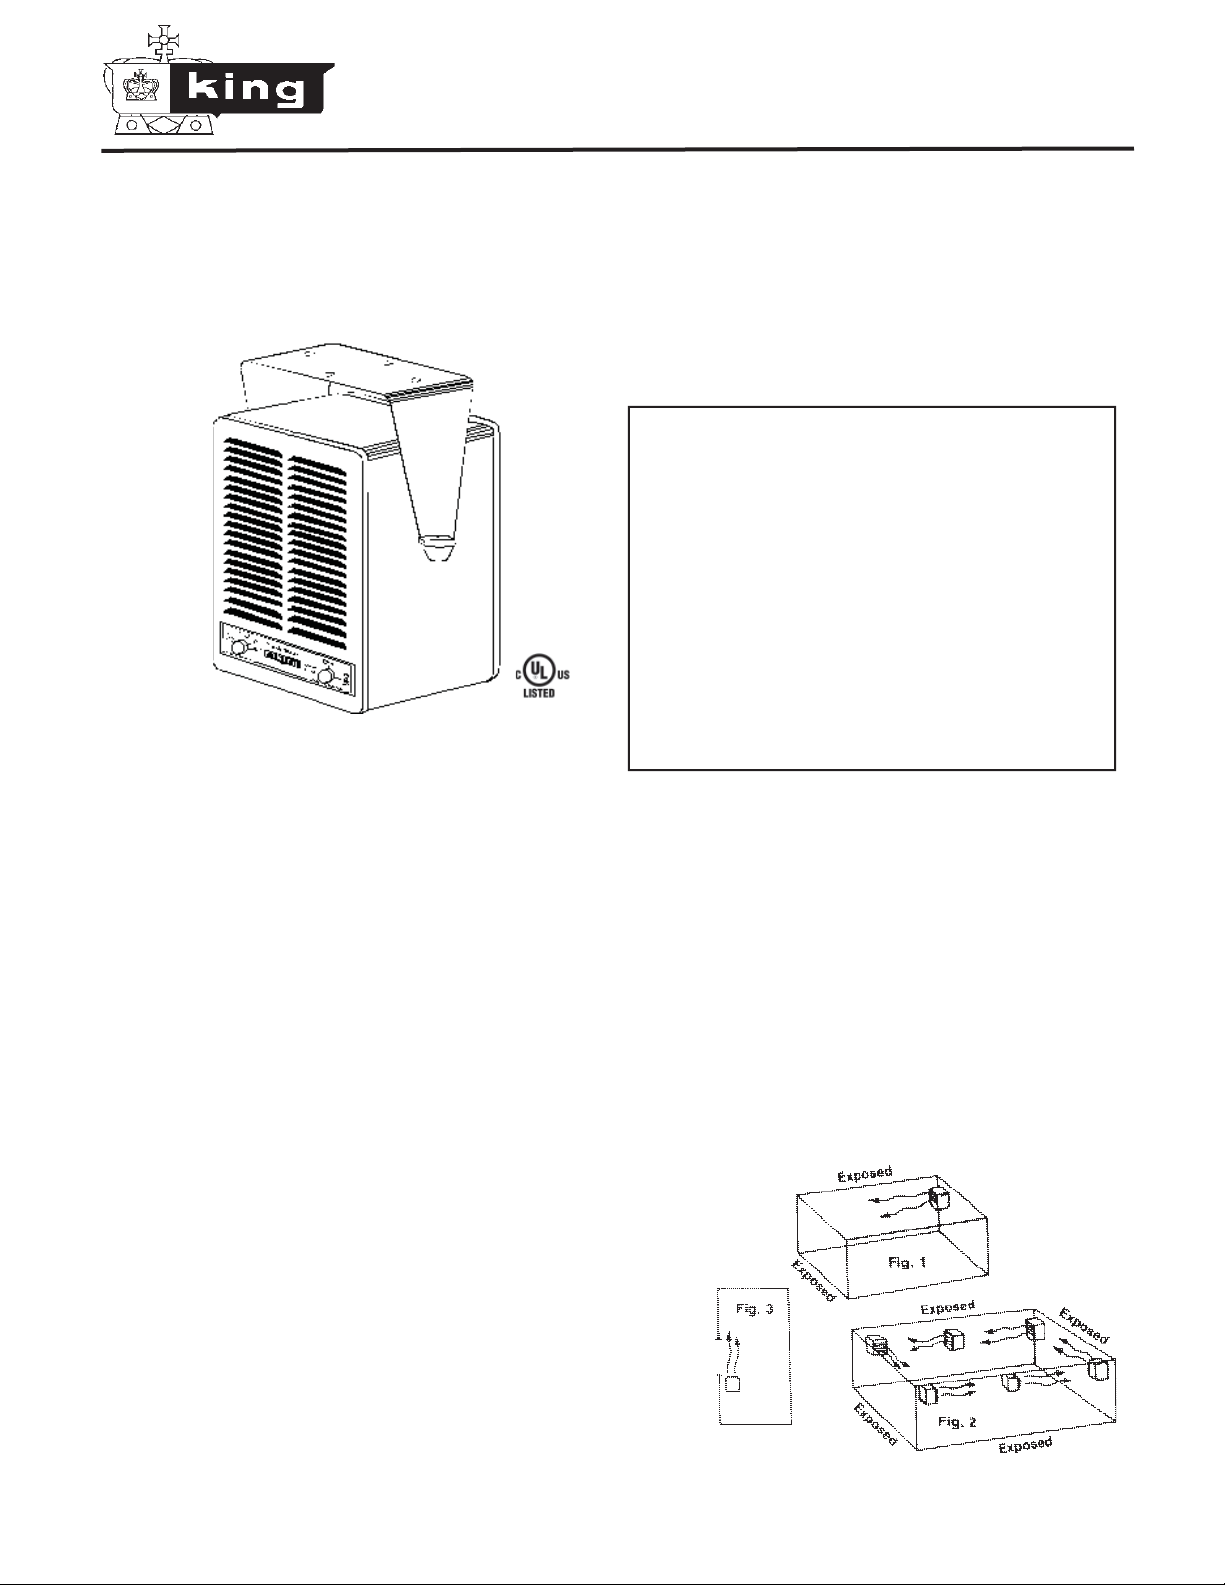
Remove heater from box and inspect it for any damage. Verify
you have received the mounting bracket and accessories.
codes. Heater circuit must be properly protected.
Mounting Heater
Tools Needed
You will need the following tools to install your unit heater:
-Screwdriver - (Phillips & Slotted)
-Wire Cutters
-Pliers
-Adjustable Wrench
-Electric Drill
Hardware Needed
Y
ou will need the following hardware:
-Adequate gauge & length of wire for your application
-Proper size fuses or breakers to handle amperage
-Proper wire connectors for your application
-Appropriate size fasteners to mount heater.
In certain applications conduit may be required by code.
Check local electrical codes. If you want to be able to turn the
heater be sure to use flexible conduit.
Mounting Height
When the air flow of the heater is directed vertically or
horizontally the minimum mounting height is 6 feet in USA
and 8 feet in Canada. Mounting heights depend upon building
utilization and heater kW capacity.
Distance From Walls
Maintain 6" minimum clearance to side walls and 2" to ceiling
in back of the heater (air intake side). Maintain 18" clearance in
front of the heater (discharge side).
Locate a stud in ceiling or wall and securely fasten bracket with a
minimum of two #12 fasteners 1-1/4" long. Attach heater to bracket
with 3/8" x 1" wingnut & lock washer supplied. Install the lock washer
between the bracket and heater. Do not put lock washer on the plastic
wingnut. After desired air discharge position has been determined
tighten wingnut so heater will not pivot.
Location of Heater
The heater should be installed out-of-reach of persons. The direction
of airflow should not be restricted by machinery, beams, etc. and
the airflow should wipe exposed walls, rather than blowing directly
at them. When more than one heater is used in an area the heaters
should be arranged so that the air discharge of each heater supports
the airflow of the others to provide best circulation of warm air. (see
airflow chart)
2007KBP2406.indd : 3/08
Page 2
King electrical mfg. company 9131 - 10th Avenue South Seattle Washington 98108
Wiring Heater
WARNING - Before proceeding further
with the installation of this heater, turn off
the power and lock the supply line for the
heater at the main service box.
1. Remove wiring compartment cover.
2. Remove one of the knockouts from back of unit.
It is not necessary to remove grill covers.
3. Size service wire to adequately handle Amp load
of heater. Refer to the Circuit Sizing Table for
proper wire size and circuit protection.
4. Connect supply wire to L1 & L2 as shown in the
diagram below.
5. Secure power supply cable with clamps.
6. Connect groundwire to the green pigtail.
7. Reinstall wiring compartment cover.
8. Adjust the heater to the desired position.
WATTS BTUH
6484
1900
9727
2850
3800
12969
4750
16211
19454
5700
* Per the National Electric Code heating circuits are considered a continuous load and therefore must be derated
by 20%. For example: a 20 Amp heating circuit can not have more than 16 Amps of load connected. If heater is
operated at 208V it will draw 13% less Amps and produce 25% less wattage.
** Assumes an 8 ft. high ceiling; Use cubic feet to estimate wattage requirement when ceiling is not 8 ft.
*** If area is larger than 720 sq. ft. / 5,760 cubic feet use more than one heater.
CIRCUIT SIZING TABLE
VOLTS
240
240
240
240
240
AMPS
1-PHASE
WIRE
SIZE
8
#14 / 2
12
#14 / 2
16
#12 / 2
#10 / 2
20
#10 / 2
24
CIRCUIT
PROTECTION*
15A - 2P
15A - 2P
20A - 2P
30A - 2P
30A - 2P
AREA COVERED
(sq. ft.** / cubic ft.***)
240 / 1920
360 / 2880
480 / 3840
600 / 4800
720 / 5760
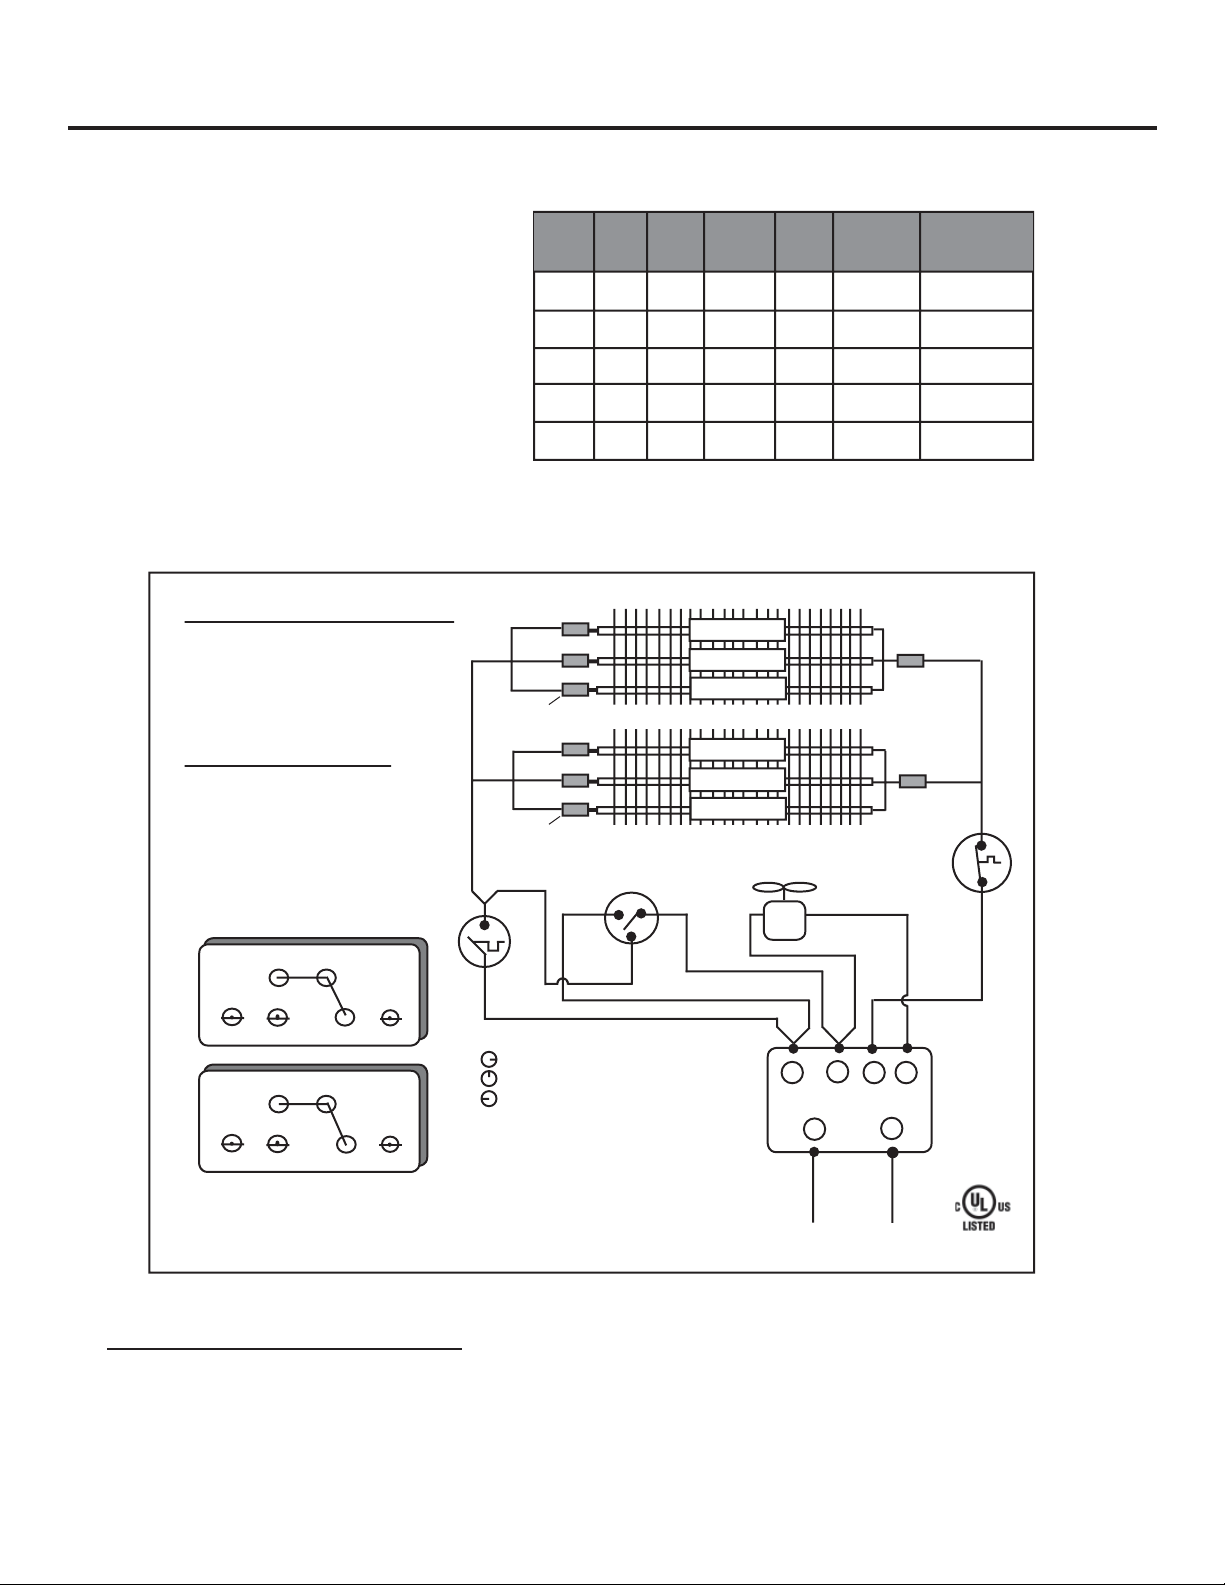
INSTALLATION INSTRUCTIONS
This heater is shipped from the factory wired for
maximum wattage of 5700 Watts at 240 Volts.
To reduce the wattage unplug (disconnect) an
insulated push on terminal and wrap with electrical
tape to prevent the possibility of electrical contact
with other parts.
Field Wattage Selection
1. 5700 Watts factory wired
2. 4750 Watts disconnect terminal A
3. 3800 Watts disconnect terminals A,D
4. 2850 Watts disconnect terminals A,B,D
5. 1900 Watts disconnect terminals A,B,C,D
E - Black Do Not Disconnect (Common)
F - Red Do Not Disconnect
Thermostat
E
Common
AB
F
950
950
E
Common
CD
F
950
950
END VIEW OF ELEMENT SHOWING
QUICK CONNECT TERMINALS
1900•2850•3800•4750•5700
WATTAGES AVAILABLE IN ONE UNIT
950
950
A
ORANGE
F
RED
B
BLUE
Insulated Push on
Terminal
C
YELLOW
F
RED
D
GRAY
BLACK #14
Insulated Push on
Terminal
BLACK #14
RED #14
DELAY
2
GRAY #16
OFF ....... L1-0, L2-0
FAN ....... L1-2, L2-4
HEAT...... L1-1, L2-4, L2-3
FAN DELAY
1-3 N.C., 1-2 N.O.
1-2 Closes on Temp Rise
Pic-A-Watt
Metal Sheath Element
FAN
1
3
KBP2406
240V -1ph
950 WATT
950 WATT
950 WATT
950 WATT
950 WATT
950 WATT
PURPLE #16
BLACK #16
FAN
BLACK #16
ORANGE #14
1
2
34
Rotary Switch
AB
BLACK
BLACK
L1
L2
E
E
LIMIT
BLACK #14
2007KBP2406.indd : 3/08
Maintenance & Warranty Information:
The high quality and superior design of this heater will provide years of trouble-free performance. Each year
the heater should be checked and cleaned for lint and dust accumulation. We recommend using a soft bristlebrush such as a paint brush to assist in removing contaminants from the heater. The motor is permanently lubricated and does not need servicing. King Mfg. Company will repair or replace without charge any KBP2406
heater found to be defective or malfunctioning for five years after purchase to the original owner.
 Loading...