

Page 1
Model No: K 279 Minni
Toz Torbalı Elektrikli Süpürge
Bagged Vacuum Cleaner
Kullanma Kılavuzu / Instruction Manual
K 279 Minni
Elektrikli Süpürge
Vacuum Cleaner
Page 2
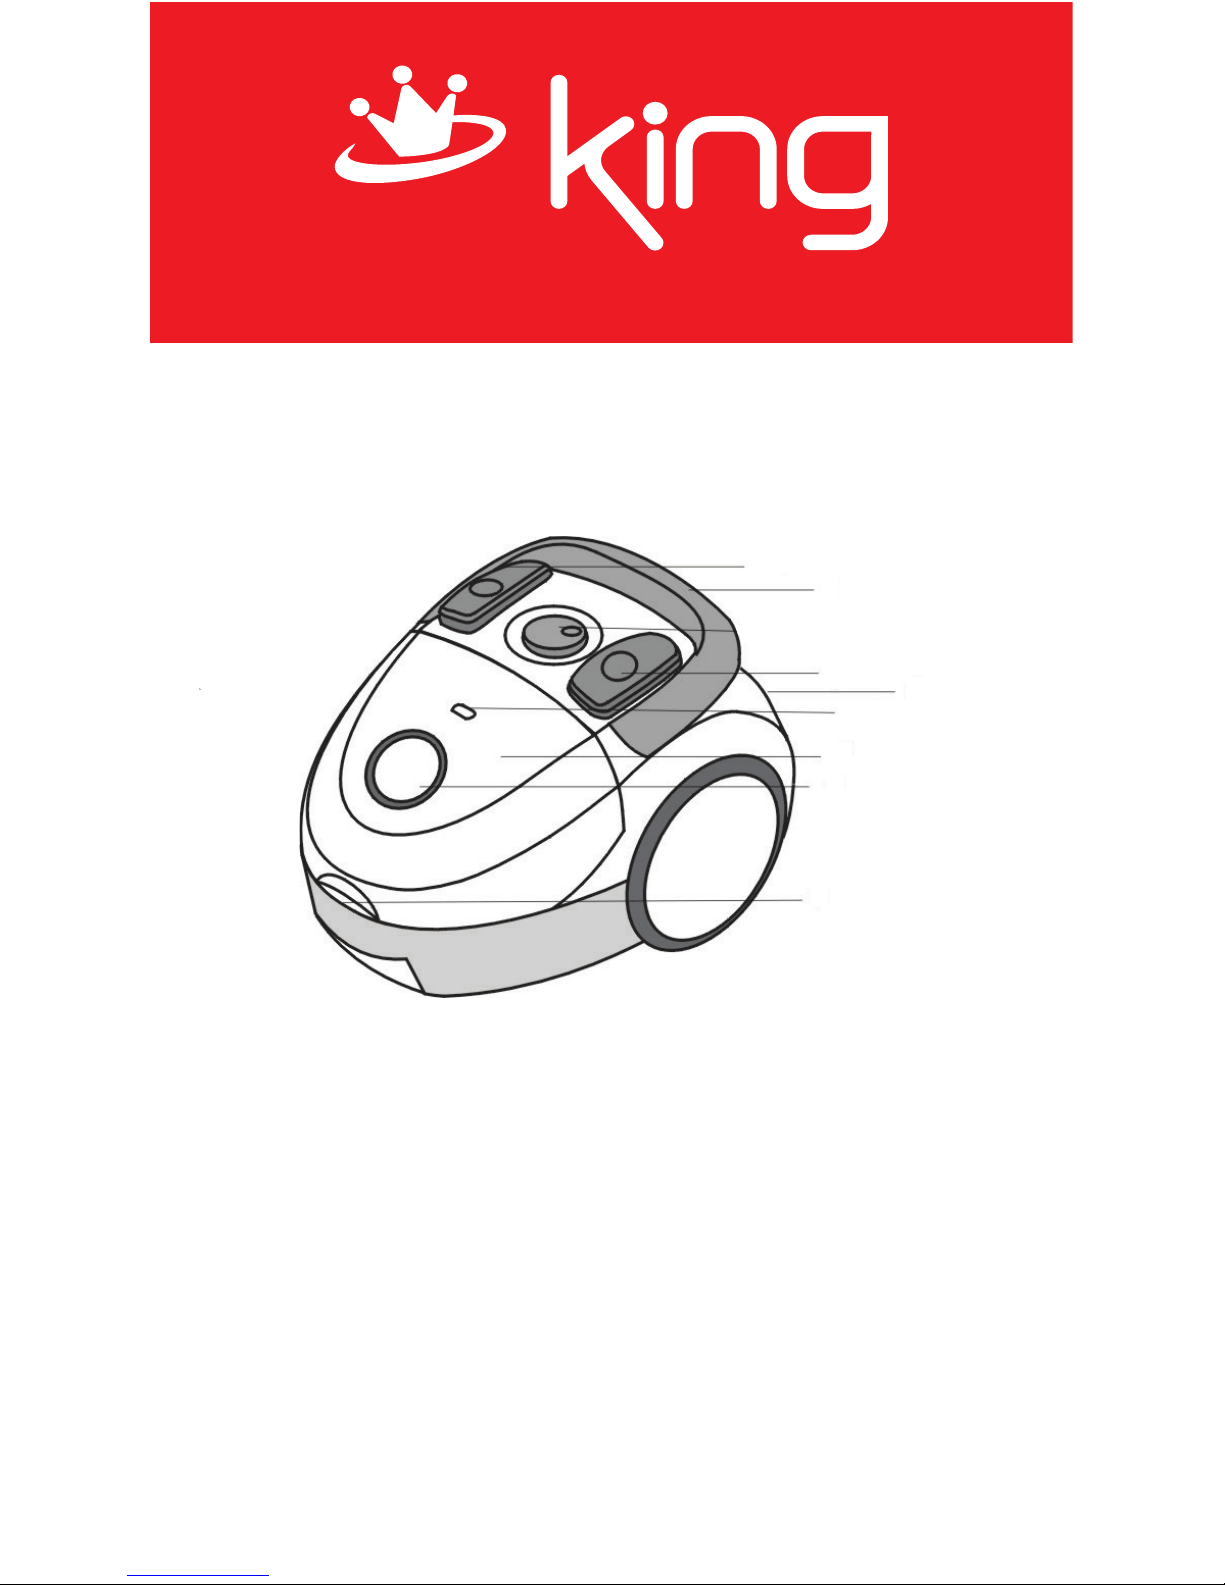
Overview the components
1. On/off switch
2. Cable & Plug
3. Carrying handle
4. Cable-winding key
5. Dust bag filling display
6. Dust bag compartment (front cover)
7. Hose connection
8. Handle for opening the dust bag compartment
1
2
5
6
7
8
3
4
Page 3

Instruction Manual
General Safety Instructions
■
Read the operating instructions carefully before putting the appliance into
operation and keep the instructions including the warranty, the receipt and, if
possible, the box with the internal packing.
■
The appliance is designed exclusively for private use and for the envisaged
purpose. This appliance is not fit for commercial use. Do not use it outdoors (except
if it is designed to be used outdoors). Keep it away from sources of heat, direct
sunlight, humidity (never dip it into any liquid) and sharp edges. Do not use the
appliance with wet hands. If the appliance is humid or wet, unplug it immediately. Do
not put it in water.
■
When cleaning or putting it away, switch off the appliance and always pull out the
plug from the socket (pull on the plug, not the cable) if the appliance is not being
used and remove the attached accessories.
■
Do not operate the machine without supervision. If you should leave the
workplace, always switch the machine off or remove the plug from the socket (pull
the plug itself, not the lead).
■
To protect children from the dangers posed by electrical appliances, make sure
that the cable is hanging low and that children do not have access to the appliance.
■
This appliance is not intended for use by persons (including children) with reduced
physical, sensory or mental capabilities, or lack of experience and knowledge,
unless they have been given supervision or instruction concerning use of the
appliance by a person responsible for their safety.
■
Children should be supervised to ensure that they do not play with the appliance.
■
Check the appliance and the cable for damage on a regular basis. Do not use the
appliance if it is damaged.
■
Do not try to repair the appliance on your own. Always contact an authorized
technician. To avoid the exposure to danger, always have a faulty cable be replaced
only by the manufacturer, by our customer service or by a qualified person and with
a cable of the same type.
■
Use only original spare parts.
■
Pay careful attention to the following “Special Safety Instructions“.
Page 4

Special Safety Instructions
■
Do not suck up liquids!
■
Do not suck up hot ashes or pointed or sharp objects!
■
Do not use the appliance in humid rooms!
■
Never use without the filter. Check that the filter is inserted correctly!
■
Hair, clothing and body parts away from the vacuum nozzle during use!
■
Keep the vacuum cleaner away from sources of heat like radiators, ovens, etc.!
Start-up
■
Insert the connection head of the suction hose into the hose connector (8) until it
locks in place. To do so, please press the buttons simultaneously. In order to release
the hose again, please press the buttons once more on the connection head.
■
Keep the buttons pressed down and then pull out the hose.
■
Please attach the telescopic suction tube to the grip end (see section ‘Suction Tube’).
■
Then assemble the floor nozzle and/or the accessories.
Using the Appliance
1. Unwind the length of cable (2) you require.
2. Insert the mains plug into a correctly installed 220-240V, 50-60 Hz power socket.
Turn on the device with the on/off switch (1) by pushing the regulator downwards.
3. Vacuum at a steady speed. There is no need to exert pressure.
4. Attention: pay attention to the range that can be covered with the cable length.
Telescopic Suction Tube:
1. This makes it possible to adapt the height to your individual body size. Unlock
the coupling by turning the wide section of the suction tube to the left.
2. Move the suction tube as required. To lock the coupling, turn the wide suction
tube to the right.
Cable winding device:
Pull out the cable (2) up to the maximum length indicated with the yellow mark.
Never pull the cable out up to the red mark as the cable winding can be damaged.
Said damages are not covered by the warranty. Winding Press the cable (4) winding
button and guide the cable. Hold the cable to avoid wrapping.
Page 5

Nozzle Attachment:
Crevice nozzle/Brush nozzle: For vacuuming upholstery, curtains and in corners
and crevices etc.
‘2-in-1’ nozzle: When this is folded together it can be used as a groove nozzle. If
you would like to use the brush nozzle, pull the brush section in the direction of the
arrow until it locks in place.
Floor nozzle: To clean carpets or smooth surfaces.
Smooth floors: Press down the lever with the brush symbol with your foot. The
brush is now visible.
Carpets: Press down the opposite lever.
Releasing the nozzles: Pull these off while turning slightly.
Air Slide:
Open the air slide on the hose handle in order to regulate the airflow or to clear any
particles sticking to the nozzle.
Dust bag replacement display (6):
Hold the hose up into air. If the dust bag change display lights up, the bag is full.
Please change it.
Changing the dust bag:
■
Pull the plug out of the socket.
■
Open the lid of the dust bag compartment by the handle (9) (until its locks in place).
■
Remove the bag by pulling the fixing device carefully towards the rear in order to
make the bag more easily accessible. Then remove the dust bag by pulling it upwards.
■
Insert a new bag. Please ensure that the bag is located correctly in the guide
mechanism. Close the cover so that it snaps into place.
Filter:
Your appliance has two filters.
Motor protection filter (inlet filter):
The inlet filter is located in the dust bag compartment. The filter is located vertically
in the rear section of the dust housing. Remove the filter by pulling upwards. Clean
the engine protection filter after dust bag changes. If necessary, the filter can also be
washed in warm water without any additives. Place it back into place only once it is
completely dry!
Page 6

Outlet filter:
The appliance is also equipped with an outlet filter. This filter is to be found on the
side of your device behind the ventilation grille. Open the ventilation grille by turning
the filter cover (7) in the direction of "OPEN". Then pull the grille out towards the
front. Remove the filter and clean as described above. Please reinsert the filter
correctly and then close the ventilation grille. Please turn the filter cover in the
direction of "LOCK".
Cleaning and storage
Cleaning
■
Pull the plug out of the socket before cleaning!
■
Clean the casing with a dry cloth.
Storage
■
Let the iron cool down completely.
■
Wind the cable completely.
■
Position the device either horizontally or vertically in order to suspend the hook
on the floor nozzle in the parking assistance on the rear or the bottom of the device.
Guarantee
The device supplied by our Company is covered by month guarantee starting on the
date of purchase (receipt). During the life of the guarantee any fault of the device or
its accessories to material or manufacturing defects will be eliminated free of charge
by repairing or, at our discretion, by replacing it. The guarantee services do not entail
an extension of the life of the guarantee nor do they give rise to any right to a new
guarantee! Proof of the guarantee is provided by the proof of purchase. Without
proof of purchase no free replacement or repair will be carried out. If you wish to
make a claim under the guarantee please return the entire machine in the original
packaging to your dealer together with the receipt. Damage to accessories does not
mean automatic free replacement of the whole machine. In such cases please
contact our hotline. Broken glass or breakage of plastic parts are always subject to
a charge. Defects to consumables or parts subject to wearing, as well as cleaning,
maintenance or the replacement of said parts are not covered by the guarantee and
hence are to be paid! The guarantee lapses in case of unauthorized tampering.
After the expiry of the guarantee
After the expiry of the guarantee repairs can be carried by the competent dealer or
repair service against the payment of the ensuing costs.
Page 7

PARÇALARI
1. Açma kapama düğmesi
2. Fişli kablo
3. Taşıma yeri
4. Kablo sardırma pedalı
5. Toz torbası dolum ekranı
6. Toz torbası bölümü(ön kapak)
7. Hortum girişi
8. Toz torba bölümünü açma yeri
1
2
5
6
7
8
3
4
Page 8

ÖNEMLİ EMNİYET TALİMATLARI
■
Elektrikli süpürgenizi kullanmadan önce kullanım kılavuzunuzu dikkatlice
okuyunuz ve kullanım kılavuzu ile birlikte garanti, fatura ve mümkünse kutusu ile
birlikte içindeki paketide saklayınız.
■
Elektrikli süpürge yalnızca özel kullanım ve öngörülen amaçlar için tasarlanmıştır.
Bu makine ticari amaçlar için kullanılamaz. Açık havada kullanmayınız(açık hava
için tasarlanmadığı sürece). Isı veren maddelerden, direkt olarak güneş ışığından,
nemden (hiç bir sıvının içine sokmayınız) ve kesici ve delici aletlerden uzak tutunuz.Makineyi ıslak ellerle kullanmayınız. Makine ıslak veya nemli ise hemen fişten
çekiniz. Suya sokmayınız.
■
Makine temizleneceği veya kaldırılacağı zaman makineyi kapatınız ve her zaman
fişi soketten çıkartınız(fişinden tutup çekiniz, kablosundan çekmeyiniz) ve
çıkarılabilir aksesuarları çıkartınız.
■
Kontrol etmeden makinenizi çalıştırmayınız. Makineyi işyerinizde bırakacaksanız
her zaman kapatınız ve fişini çekiniz. (fişinden tutup çekiniz, kablosundan çekmeyiniz)
■
Çocuklarınızı elektrikli aletlerin yaratibileceği sorunlardan uzak tutmak için
kablonun her zaman toplu olduğundan ve çocukların ulaşamayacağı bir yerde
olduğundan emin olunuz.
■
Bu makine bir gözetmen veya sorumlu kişi olmadığı müddetçe onların güvenliği
için çocuklar, fiziksel engelliler, akıl ve ruh sağlığı bozuk olanlar veya kullanmayı
bilmeyenler tarafından kullanılması için tasarlanmamıştır.
■
Çocukların makine ile oynamadığından emin olunmalıdır.
■
Makineyi kendiniz tamir etmeyiniz. Her zaman yetkili bir KING servisi ile kontağa
geçiniz. Oluşabilecek bir tehlikeden kaçınmak için, arızalı bir kablo sadece üretici, müşteri
hizmetleri veya yetkili bir KING servisi tarafından aynı tip bir kablo ile değiştirilmelidir.
■
Sadece orijinal yedek parçaları kullanınız.
■
Özel güvenlik talimatlarına dikkat ediniz.
Özel Güvenlik Talimatları
■
Sıvıları makinenin içine çekmeyiniz.
■
Sıcak, sivri veya delici aletleri makinenin içine çekmeyiniz.
■
Makineyi nemli odalarda kullanmayınız.
■
Filtre olmadan kullanmayınız. Filtreyi doğru yerleştirdiğinizden emin olunuz.
■
Saç, kıyafet ve cildinizi elektrikli süpürgeden uzak tutunuz.
■
Elektrikli süpürgeyi ısı veren aletlerden, radyatörlerden, fırın vb. aletlerden uzak
tutunuz.
Page 9

Başlangıç
■
Hortum bağlantısının(8) içine hortumun başlığını yerine girene kadar yerleştiriniz.
Yerleştirmek için lütfen düğmelere sırasıyla basınız. Hortumu serbest bırakmak için
de hortum bağlantı yerindeki düğmeye tekrar basınız.
■
Düğmeye basılı tutun ve hortumu çekiniz.
■
Teleskopik boruyu tutma yerinin ucuna ekleyiniz.(’Emiş borusu’ bölümüne
bakınız’)
■
Daha sonra yer fırçasını ve aksesuarları takınız.
Makineyi Kullanma
■
Kablonun uzunluğunu(2) ihtiyacınıza göre çekiniz.
■
Ana fiş kablosunu doğru voltajlı prize takınız.
■
Cihazı çalıştırmak için ON/OFF pedalına(1) basınız.
■
Vakumlama hızı sabittir. Basınç uygulamaya gerek yoktur.
Dikkat: Kabloyla çevrilmiş alana dikkat ediniz.
Teleskobik Boru
■
Bu sizin vücut ölçülerinize göre emme hortumunun yüksekliğini ayarlamanızı
mümkün kılar. Borunun kilidini açmak için borunun geniş kısmını sola doğru çeviriniz.
■
Boruyu gerektiği gibi hareket ettiriniz. Boruyu kilitlemek için borunun geniş kısmını
sağa doğru çeviriniz.
Kablo Sardırma Pedalı
■
Kabloyu (2) maksimum sarı işaret çıkana kadar çekiniz. Asla kırmızı işaret çıkana
kadar çekmeyiniz, kablo zarar görebilir.
■
Bahsedilen zararlar garanti altında değildir.
■
Kablo sardırma pedalına basınız ve kabloyu yönlediriniz. Kablonun düğüm
olmaması için tutunuz.
Page 10

Uç aksesuarları
Fırça ucu: Döşemelik kumaş, perde ve köşeleri vakumlamak için.
2 si 1 arada ucu: Bu uç takıldığı zaman emici ucu olarak kullanabilirsiniz. Fırça ucu
olarak kullanmak isterseniz, fırça bölümünü ok yönünde püskürtücü yerine girene
kadar çekiniz.
Yer fırçası: Halı veya yumuşak yüzeyler için kullanılır.
Yumuşak yüzeyler: Ayağınız ile fırça sembolüne basarak düğmeyi aşağı bastırınız.
Fırça şimdi gözükmektedir.
Halılar: Düğmenin aksi yönüne basınız.
Uçları ve fırçayı çıkartmak için yumuşakça döndürerek çekiniz.
Hava Kapakçığı:
Hortuma yapışmış pislikleri temizlemek ve hava akımını düzenlemek için hortum
bölümündeki hava kapakçığını açınız.
Toz torbası değiştirme göstergesi (6)
Hortumu yukarı tutunuz. Eğer toz torbası göstergesi yanarsa, torba doludur. Lütfen
değiştiriniz.
Toz torbasını değiştirme:
■
Cihazın fişini prizden çekiniz.
■
Toz torbası bölmesinin kapağını açma yerinden tutarak açınız (9).
■
Toz torbaya daha kolay ulaşılabilmesi için sabitleme yerini dikkatlice geriye doğru
çekerek toz torbayı çıkartınız. Daha sonra toz torbayı yukarı doğru çekerek çıkartınız.
■
Yeni torbayı yerine koyunuz. Torbanın doğru mekanizmanın içine yerleştirildiğinden emin olunuz. Daha sonra kapağı kapatınız.
Filtre
■
Makinenizin iki adet filtresi bulunmaktadır:
■
Motor koruma filtresi(iç filtre)
■
İç filtre toz torbası bölümün içinde yer almaktadır.
■
Filtre, torba bölümünün arka tarafında bulunmaktadır.
■
Filtreyi yukarı doğru çekerek çıkartınız. Toz torbası değiştikten sonra motor
koruma filtresini temizleyiniz. Gerekirse filtresini sıcak suda hiç bir katkı maddesi
eklemeden yıkayabilirsiniz. Filtre tamamiyle kuruduktan sonra yerine yerleştirebilirsiniz.
Page 11

Hava Çıkış filtresi:
Makinenizde hava çıkış filtreside bulunmaktadır. Filtre havalandırma ızgarasının
arka tarafında bulunmaktadır. Havalandırma ızgarasını filtre kapağını 'OPEN'
yönüne çevirerek açabilirsiniz. Daha sonra havalandırma ızgarasını öne doğru
çekiniz. Filtreyi çıkartıp aşağıda belirtildiği gibi temizleyiniz. Daha sonra filtreyi doğru
bir şekilde yerine yerleştiriniz ve havalandırma ızgarasını kapatınız. Filtreyi 'LOCK'
yönüne doğru çevirip kapatınız.
Temizleme ve saklama
■
Cihazı temizlemeden önce fişini prizden çekiniz.
■
Cihazın dış yüzeyini kuru bir bezle temizleyiniz.
Saklama
■
Süpürgenizin tamamen soğumasını bekleyiniz.
■
Kabloyu tamamen sarınız.
■
Cihazı yatay veya yer fırçasının üzerinde bulunan kancanın arka tarafta bulunan
takma yerine takılırak dikey konumda konumlandırınız.
Page 12

Page 13

Page 14

Page 15

SATIŞ SONRASI SERVİS
Cihazda bir arıza olması halinde King Yetkili Servisi’ne başvurmadan önce
aşağıdaki kontrolleri yapınız.
1- Fiş prize doğru olarak takılmış mı?
2- Evin elektrik tesisatında bir problem var mı?
3- Kullanım talimatları doğru olarak uygulanmış mı?
Eğer arıza halen giderilmediyse size en yakın King Yetkili Servisi’ne müracaat ediniz.
Bu cihazla ilgili tüm yedek parçalar kılavuz kitapçığında sunulan King Yetkili
Servisi’nden temin edilebilir. Bir sorun ile karşılaştığınızda lütfen bizi arayınız.
DİKKAT: Cihazı yere düşürmemeye dikkat ediniz. Kullanım esnasında cihazı
düşürürseniz ilk olarak fişini prizden çekiniz. Düşme esnasında cihazın parçaları
kırılabilir ve cihaz hasar görebilir. Bu durumda cihazı kullanmadan önce King
Yetkili Servisi’ne tetkik ettiriniz.
TAŞIMA VE NAKLİYE
Cihazın naklini kendi orjinal kutusu ve bölmeleri ile veya cihazın etrafını koruyacak
yumuşak bir bezle sararak yapmak gerekir. Yanlış ambalajlama esnasında plastik
parçalar kırılabilir, elektrik aksamı zarar görebilir.
NOT: ÜRÜNÜN MÜŞTERİYE İNTİKALİNDEN SONRA YÜKLEME, BOŞALTMA VE TAŞIMA
SIRASINDA OLUŞAN ARIZALAR VE HASARLAR GARANTİ KAPSAMINA GİRMEZ.
UYARI: Bu cihazla ilgili her türlü tamir ve onarım yalnız King Yetkili Servisleri tarafından yapılır.
Yetkili Servislerimiz dışındaki kişilerce yapılan herhangi bir tamir ve onarımı girişimi tüketici
haklarının tamamen ortadan kalkmasına neden olacaktır. Bu cihazla ilgili tüm yedek parçalar
yalnız bu kılavuz kitapçığında sunulan King Yetkili Servisleri’nden temin edilmek zorundadır.
King Servislerinden temin edilmemiş King harici yedek parçalar ile yapılan tamiratlardan
şirketimiz sorumlu değildir. Bir sorun ile karşılaştığınızda lütfen bizi arayınız.
Çevre: Cihazınızı kullanmak istemediğiniz
zaman veya ömrü tükendiğinde diğer çöplerle
birlikte atmayınız. Tekrar dönüşüm için
cihazları toplayanlara veriniz. Böylece çevreye
saygı göstermiş olursunuz.
 Loading...