

Kinetik BPM3C User Manual

Wrist Type Blood Pressure Monitor
By Paul Aylett at 4:42 pm, May 05, 2011
User Manual
BPM3 Series

2
Thank you for purchasing the Kinetik Medical
Wrist Type
Blood Pressure Monitor.
This monitor is an easy to use and accurate way to measure your blood pressure. Before you
start, it is important that you read this instruction manual.
Blood pressure testing is easy. To get the most out of this product, please follow the
subsequent recommendations.
We hope you will be satisfied with your Wrist Type Blood Pressure Monitor. If you have
any questions, please contact your local pharmacist or healthcare professional.
Introduction
Content
Introduction
Parts
Setting up your Blood Pressure Monitor
Clock and Data Adjustment
Using your Blood Pressure Monitor
Assessing High Blood Pressure for Adults
Additional Information on Blood Pressure
Specification
Interpretation of Blood Pressure (BP) Results
Troubleshooting
Maintenance
Blood Pressure Record Table
Explanation of Symbols on Unit
2
3
4 - 5
6
7 - 11
12
13
14
15
16 - 17
18
19
20

Introduction
Thank you for purchasing the Kinetik Medical
This monitor is an easy to use and accurate way to measure your blood pressure. Before you
start, it is important that you read this instruction manual.
Blood pressure testing is easy. To get the most out of this product, please follow the
subsequent recommendations.
We hope you will be satisfied with your Wrist Type Blood Pressure Monitor. If you have
any questions, please contact your local pharmacist or healthcare professional.
Wrist Type
2
Blood Pressure Monitor.
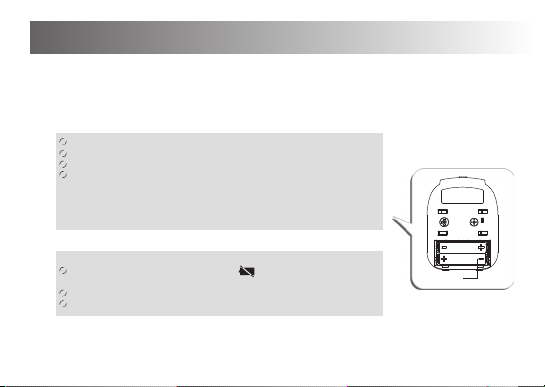
Loading Batteries
a. Open battery cover a t the back of the device (cover slides off).
b. Insert two "AAA" bat teries, observing correct polarity.
c. Close the battery do or.
4
Non-rechargeable batteries a re not to be recharged.
Always remove exhausted batt eries from the monitor.
The supply terminals are not to be short circuited.
Do not mix old and new batte ries or different types of batteries. Do not use
rechargeable batteries. Only batteries of the same or equivalent type as
recommended are to be used. Batteries must be handled with care under adu lt
supervision. If batteries le ak and come into contact with skin or eyes, w ash
immediately with copious amo unts of water.
Setting up your Blood Pressure Monitor
Replacing Batteries
When the LCD screen displays 'low battery' , new batteries must be
inserted immediately to ensu re accurate results.
Rechargeable batteries with a voltage of 1.2V are not suitable for this p roduct.
Please dispose of batteries according to battery manufacturer's instructi ons.
Battery
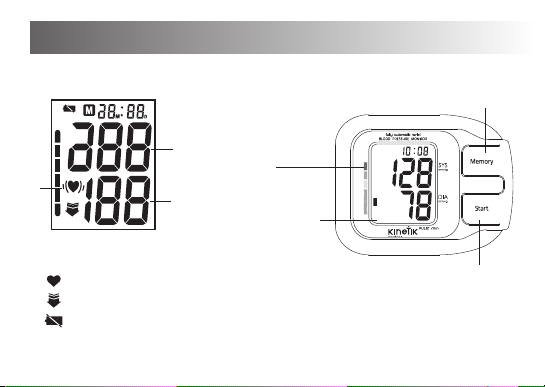
Parts
Pulse
pulse detected (appears during testing)
deflate to measure (deflate air in cuff)
Systolic
Diastolic
BLOOD PRESSURE
LEVEL CLASSIFICATION
INDICATOR
LCD Screen
low battery
3
Memory
Start
Setting up your Blood Pressure Monitor
Loading Batteries
a. Open battery cover a t the back of the device (cover slides off).
b. Insert two "AAA" bat teries, observing correct polarity.
c. Close the battery do or.
Non-rechargeable batteries a re not to be recharged.
Always remove exhausted batt eries from the monitor.
The supply terminals are not to be short circuited.
Do not mix old and new batte ries or different types of batteries. Do not use
rechargeable batteries. Only batteries of the same or equivalent type as
recommended are to be used. Batteries must be handled with care under adu lt
supervision. If batteries le ak and come into contact with skin or eyes, w ash
immediately with copious amo unts of water.
Replacing Batteries
When the LCD screen displays 'low battery' , new batteries must be
inserted immediately to ensu re accurate results.
Rechargeable batteries with a voltage of 1.2V are not suitable for this p roduct.
Please dispose of batteries according to battery manufacturer's instructi ons.
4
Battery

a. Once you install the battery or turn off the monitor, it will enter Clock
Mode, and LCD will display time and date by turns. See picture 2&2-1.
b. Whil e the mon itor is i n Clock M ode, pres sing both the “Sta rt” and
“Memory” button simultaneously, a beep is heard and the month will blink
at first. See picture 2-2. Press the button “Start” repeatedly, the day,
hour and minute will blink in turn. While the number is blinking, press
the button“ Memory ” to increase the number. Hold down the button
“Memory”, the number will increase fast.
c. You can turn of f the monito r by pressing “Start” button when the minute
is b linking , then the time a nd date is confirmed.
d. The moni tor will turn off automatically after 1 minute of no operation, with
the time and date unchanged.
e. Once you change the batteries, you should re-adjust the time and date.
6
Clock and Data Adjustment
picture 2
picture 2-1
picture 2-2
Setting up your Blood Pressure Monitor
Putting on the Cuff
a. Place the cuff on ba re skin onto the left wrist making sure that the meter
body is on the palm side, centre of the wrist, as in the pictur e.
b. Place the cuff 1~2cm above the wrist joint.
c. Use your free hand t o adjust the tightness of the cuff until it is firm.
d. To ensure the cuff i s the correct tightness, no tension should b e felt on the
wrist.
Please put the cuff on t he left wrist.
Do not wrap the cuff too tightly, otherwise results will be inaccurat e.
The cuff can be detached and cleaned by hand with warm, soapy water.
Rinse thoroughly with co ld water and towel dry.
To detach the cuff, care fully pull it away from the monitor body. To reattach,
push the cuff and monito r body together so that the clips lock in pla ce,
ensuring it is the corre ct way around (the long part of the cuff shou ld be to the
left of the LCD screen).
DO NOT IRON.
5

Clock and Data Adjustment
a. Once you install the battery or turn off the monitor, it will enter Clock
Mode, and LCD will display time and date by turns. See picture 2&2-1.
b. Whil e the mon itor is i n Clock M ode, pres sing both the “Sta rt” and
“Memory” button simultaneously, a beep is heard and the month will blink
at first. See picture 2-2. Press the button “Start” repeatedly, the day,
hour and minute will blink in turn. While the number is blinking, press
the button“ Memory ” to increase the number. Hold down the button
“Memory”, the number will increase fast.
c. You can turn of f the monito r by pressing “Start” button when the minute
is b linking , then the time a nd date is confirmed.
d. The moni tor will turn off automatically after 1 minute of no operation, with
the time and date unchanged.
e. Once you change the batteries, you should re-adjust the time and date.
6
picture 2
picture 2-1
picture 2-2
 Loading...