

Kinetik BPM1C User Manual [nl]

User Manual
BPM I Series
By Paul Aylett at 11:53 am, Jun 05, 2012

Thank you for buying and using the Kinetik Medical Fully Automatic Blood Pressure Monitor.
This monitor is an easy to use and accurate way to measure your blood pressure.
Before you start, it is important to read this instruction manual.
Blood pressure testing is easy. To get the most out of this product, please follow our
recommendations on the next page.
- Setting up your Fully Automatic Blood Pressure Monitor
- Your first test
- How to test
- What your results mean
We hope you will be satisfied with your Fully Automatic Blood Pressure Monitor. If you have
any questions, please contact your local pharmacist or healthcare professional.
2
Introduction
Introduction 2
Parts 3
Setting up your Blood Pressure Monitor
Battery Loading 4
Connecting the Cuff 4
Putting on the Cuff 5
Using your Blood Pressure Monitor 6-13
Your first test 6
Start 7
Measuring Process 8
Memory 9
What the results mean 10
Re-measuring 11
Shut Down 11
Interpretation of Blood Pressure Results 12
Additional Information on Blood Pressure 13
Specification 14
Abnormality & Troubleshooting 15
Maintenance 16
CONTENT
4-5
Blood Pressure Record Table 17
Explanation of symbols on unit 18

Thank you for buying and using the Kinetik Medical Fully Automatic Blood Pressure Monitor.
This monitor is an easy to use and accurate way to measure your blood pressure.
Before you start, it is important to read this instruction manual.
Blood pressure testing is easy. To get the most out of this product, please follow our
recommendations on the next page.
- Setting up your Fully Automatic Blood Pressure Monitor
- Your first test
- How to test
- What your results mean
We hope you will be satisfied with your Fully Automatic Blood Pressure Monitor. If you have
any questions, please contact your local pharmacist or healthcare professional.
2
Introduction
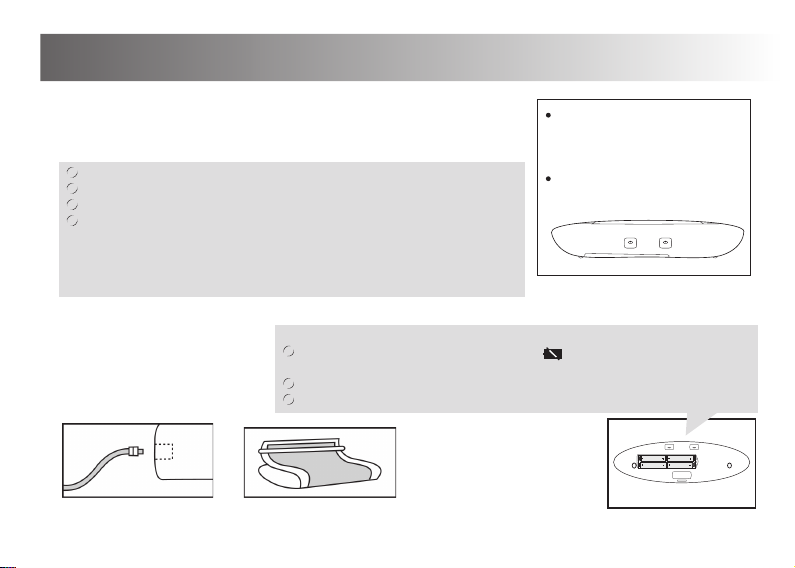
Loading the Batteries
a. Open the battery cover at the back of the monitor.
b. Insert four “A AA” batteries, observing correct polarity.
c. Close the battery cover.
If using an external power supply,
ensure that batteries are removed
from battery compartment.
For external power supply, use a
6V600mA DC Adaptor (not
included in this pack)
Replacing Batteries
When the LCD screen displays ‘low battery’ , new batteries must be inserted
immediately to ensure accurate results.
Rechargeable batteries with a voltage of 1.2V are not suitable for this product.
Please dispose of batteries according to battery manufacture’s instructions.
Insert the rubber tube plug of
the cuff firmly into the cuff socket
located on the side of the monitor
to ensure there is no air leakage.
The cuff should be ready to
use. Ensure that the end is
passed through the metal loop
and the hook and loop fastening
is facing outwards.
Non-rechargeable batteries are not to be recharged.
Exhausted batteries are to be removed from the monitor.
The supply terminals are not to be short circuited.
Do not mix old and new batteries or different types of batteries. Do not use
rechargeable batteries. Only batteries of the same or equivalent type as
recommended are to be used. Batteries must be handled with care under
adult supervision. If batteries leak and come into contact with the skin or
eyes, wash immediately with copious amount of water.
Setting up your Blood Pressure Monitor
b.
a.
Connecting the Cuff
4
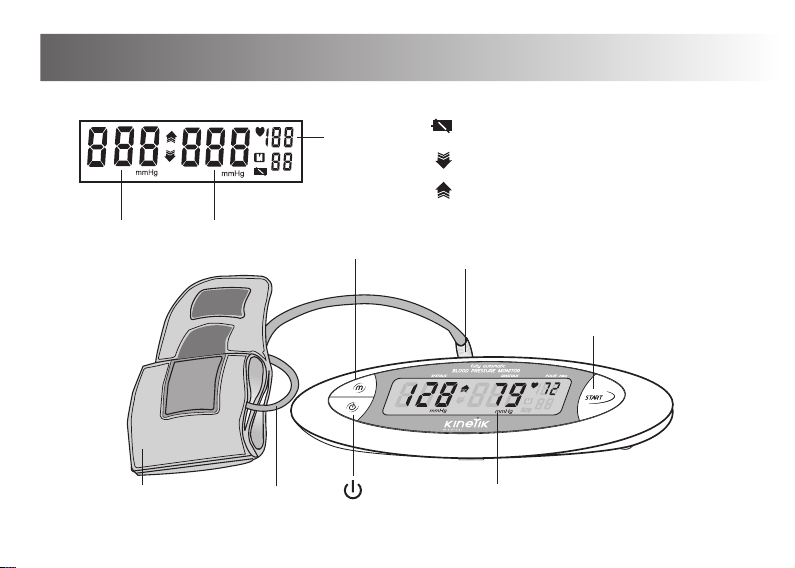
low battery
deflate to measure (deflate air in cuff)
inflate to measure
Pulse
Systolic
Diastolic
Cuff
Cuff tubule socket
Rubber tubule
Memory
LCD
Start
Parts
3
Loading the Batteries
a. Open the battery cover at the back of the monitor.
b. Insert four “A AA” batteries, observing correct polarity.
c. Close the battery cover.
If using an external power supply,
ensure that batteries are removed
from battery compartment.
For external power supply, use a
6V600mA DC Adaptor (not
included in this pack)
Replacing Batteries
When the LCD screen displays ‘low battery’ , new batteries must be inserted
immediately to ensure accurate results.
Rechargeable batteries with a voltage of 1.2V are not suitable for this product.
Please dispose of batteries according to battery manufacture’s instructions.
Insert the rubber tube plug of
the cuff firmly into the cuff socket
located on the side of the monitor
to ensure there is no air leakage.
The cuff should be ready to
use. Ensure that the end is
passed through the metal loop
and the hook and loop fastening
is facing outwards.
Non-rechargeable batteries are not to be recharged.
Exhausted batteries are to be removed from the monitor.
The supply terminals are not to be short circuited.
Do not mix old and new batteries or different types of batteries. Do not use
rechargeable batteries. Only batteries of the same or equivalent type as
recommended are to be used. Batteries must be handled with care under
adult supervision. If batteries leak and come into contact with the skin or
eyes, wash immediately with copious amount of water.
Setting up your Blood Pressure Monitor
b.
a.
Connecting the Cuff
4
Using your Blood Pressure Monitor
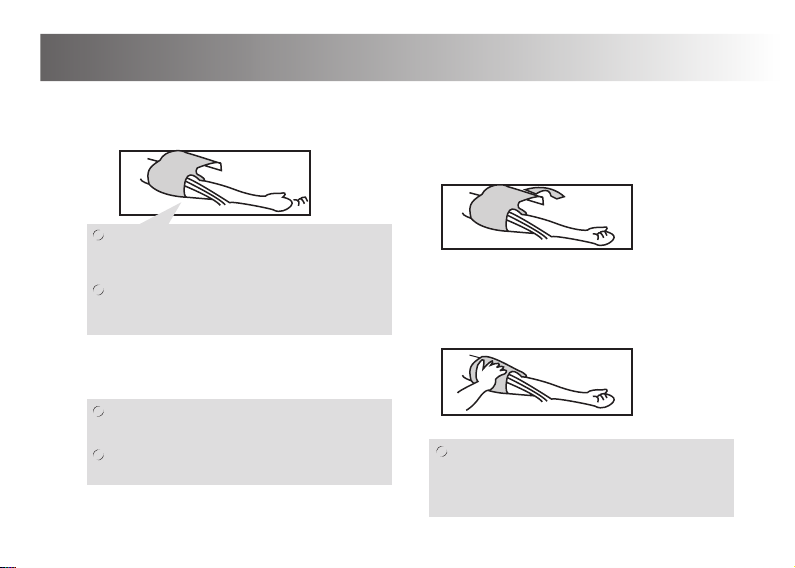
Your first test
The British Hypertension Society (BHS) recommends that for your first test, you test both
your arms. (Note: Ensure you do not suffer from any medical conditions which will prevent
you from having your blood pressure measured in both arms). This will determine which arm
should be used for future measurements. Take note of your systolic (high number) reading
on both arms. The arm which gives the higher systolic reading should be used in the future
for testing.
Example
Left arm: 132 (systolic)
86 (diastolic)
Right arm: 128 (systolic)
84 (diastolic)
Then use your left arm
6
Setting up your Blood Pressure Monitor
Putting on the Cuff
a. Place the cuff 1~2cm above the elbow joint.
Measuring can be done on light clothing such as a
shir t or blouse. However, if you have a weak
pulse, it is recommended you test on a bare arm.
Remove any tight or restrictive clothing from your
arm. For example, restriction caused by rolling up
shir t sleeve.
b. Place hand on a flat surface with the palm
facing up and with the rubber tube running
down the center of the arm.
c. Turn the cuff end outwards and tighten it
by pulling it through the metal loop and
pressing the hook surface of the cuff on
to the loop surface of the cuf f.
d. Use your free hand to adjust the
tightness of the cuff until it is firm.
To get the correct tightness of the cuff, you should
be able to fit two fingers under the cuff.
Concerned about which arm to use?
Please refer to ‘Your first test’ on page 6.
The cuff can be cleaned by hand with warm,
soapy water. Rinse thoroughly with cold water
and towel dry.
DO NOT IRON.
5
 Loading...