

Page 1

Kinetec Data Capture™
Avant toute utilisation lire ce document.
Kinetec SAS se réserve le droit de toutes modifications techniques.
Before use, please read this document.
Kinetec SAS reserves the right to effect technical modifications.
Vor Benutzung unbedingt dieses Dokument lesen.
durchzuführen.
Manuel d'utilisation
FR
User manual
Bedienungsanleitung
Kinetec SAS behält sich das Recht vor, jegliche technische Änderung
IFU-Data-Capture-V2-467896370-1
Notice Originale
EN
DE
01/2016
Page 2

Page 3

Page 4

Page 5

Guide de l’installation et de l’utilisation
Lire attentivement ce guide pour connaître la procédure de configuration et d’installation
avant d’utiliser le logiciel KINETEC DATA CAPTURE™.
Sommaire
Page
Avertissements et consignes de sécurité .................................... 2
Présentation ................................................................................... 2
Description ............................................................................................................................... 3
Installation ...................................................................................... 4
Configuration minimale requise .......................................................................................... 4
Installation ................................................................................................................................ 4
Utilisation ........................................................................................ 6
Avec une clé USB branchée sur l’ordinateur .................................................................... 6
Ecran principal ........................................................................................................................ 6
Gestion des programmes ..................................................................................................... 7
Gestion de la programmation journalière ......................................................................... 8
Sauvegarde des données du patient ................................................................................ 9
Formatage de la clé USB ...................................................................................................... 9
Edition du rapport patient .................................................................................................. 10
Sans clé USB branchée sur l’ordinateur ........................................................................... 11
Edition du rapport patient - sans clé USB branchée ..................................................... 11
Réglage de la date et de l’heure ..................................................................................... 11
Désinstaller KINETEC DATA CAPTURE™ ....................................... 12
Informations produits ................................................................... 12
Nettoyage de la clé USB ..................................................................................................... 12
Elimination et recyclage ..................................................................................................... 12
Conditions de garantie ....................................................................................................... 12
KINETEC DATA CAPTURE™ FR 1/12
Page 6

Avertissements et consignes de sécurité
AVERTISSEMENT : Il est fortement conseillé de désactiver tout antivirus et de fermer toutes les
applications actives avant de procéder à l’installation.
AVERTISSEMENT : En cas de coupure de courant, de problème sur l’ordinateur ou d’erreur de
communication, recommencer l’opération en cours et vérifier tous les paramètres :
nom du patient, liste des programmes et programme journalier.
AVERTISSEMENT : En cas de coupure de courant, de problème sur l’ordinateur ou d’erreur de
communication, vérifier les paramètres affichés à la télécommande. Recommencer
l’opération si les données dans la télécommande sont incomplètes.
AVERTISSEMENT : Pour un maximum de sécurité, la télécommande doit toujours être confiée au patient
lors de l’utilisation de la machine en rééducation.
AVERTISSEMENT : Toujours vérifier les paramètres de mouvement affichés à la télécommande avant de
commencer la séance de rééducation.
AVERTISSEMENT : Le rapport patient est édité uniquement à titre d’information.
AVERTISSEMENT : Le praticien détermine le protocole et s’assure de sa bonne exécution (réglages,
temps de séance et fréquence d’utilisation).
AVERTISSEMENT : En cas d’interférences réciproques, électromagnétiques ou autre avec d’autres
appareils, éloigner le dispositif.
AVERTISSEMENT : Toute modification de l'appareil est strictement interdite.
Présentation
Le logiciel KINETEC DATA CAPTURE™ couplé à la télécommande de l’appareil de mobilisation passive du
Genou KINETEC SPECTRA™ ou KINETEC OPTIMA S4™ et d’Epaule KINETEC CENTURA™ permet :
- de réaliser la programmation de l’appareil,
- d’éditer des bilans d’utilisation de l’appareil par patient.
KINETEC DATA CAPTURE™ FR 2/12
Page 7

1
3
1.2
1.1
5
3 2 4
Description
Le Kit KINETEC DATA CAPTURE™ est composé des éléments suivants :
1 • Une télécommande soit pour appareil de genou
ou appareil d’épaule
1.1 Logement de la clé USB
1.2 Couvercle de protection
2 • Une clé USB comprenant le programme
d’installation
3 • De plusieurs clés USB patient
4 • D’un jeu d’étiquettes enlevables pour
l’identification du patient
5 • D’une boîte de rangement pour clés USB
6 • Manuel d’utilisation
Référence de commande :
4615003700 Planche de 189 étiquettes enlevables
« Nom du patient »
4670025632 Kit de 5 clés USB vierges
livrées avec boîte de rangement (5) et
planche d’étiquettes « Nom du patient »
4670025640 Kit de 20 clés USB vierges
livrées avec boîte de rangement (5) et
planche d’étiquettes « Nom du patient »
KINETEC DATA CAPTURE™ FR 3/12
Page 8

Installation
Configuration minimale requise
Configuration matérielle
Processeur cadencé à 1 GHz
Mémoire RAM 512 Mo (1 Go conseillé)
Espace disque requis 50 Mo
Port USB
Installation
Il est fortement conseillé de désactiver tout antivirus et de fermer toutes les applications actives avant de
procéder à l’installation.
Connecter la clé USB programme d’installation du Logiciel KINETEC DATA CAPTURE™.
Remarque : si l’installation ne démarre pas automatiquement au bout de quelques secondes, lancer
l’explorateur Windows, sélectionner le lecteur de la clé USB, double-cliquer sur le fichier
setup.exe.
A Installation de Microsoft .NET Framework 4.
Cliquer sur Accepter
Ce message s’affichera uniquement si l’ordinateur n’est
pas déjà équipé de cette option.
B Lancement de l’assistant de l’installation du logiciel.
Cliquer sur Installer.
Configuration logicielle
Système d’exploitation Microsoft Windows XP, Vista
ou 7, Microsoft .NET Framework 4 (téléchargement
automatique au cours de l’installation, si
necessaire)
Résolution vidéo 1024 x 768 pixels (minimum
conseillé)
Une connexion Internet doit
être disponible.
Installation de Framework.
Cette opération peut
prendre quelques minutes
KINETEC DATA CAPTURE™ FR 4/12
Page 9

C Installation du KINETEC DATA CAPTURE™.
A la fin de l’installation, le logiciel se lance automatiquement.
La langue d’affichage est réglée par défaut sur l’Anglais.
(voir le point D pour le changement)
Un raccourci est créé automatiquement sur le bureau ainsi que
dans la liste des programmes du menu démarrer.
D Changement de la langue si besoin.
Sélectionner l’option Langue disponible dans le menu Outils.
Sélectionner votre langue et cliquer sur OK, et suivre les instructions.
Le logiciel est prêt à être utilisé.
E Déconnecter la clé programme d’installation.
Conseil : ne pas utiliser cette clé comme une clé patient,
conserver cette clé logiciel pour une éventuelle réinstallation.
KINETEC DATA CAPTURE™ FR 5/12
Page 10

Utilisation
Pour lancer le logiciel KINETEC DATA CAPTURE™, cliquer sur l’icône de raccourci sur le bureau
Windows ou dans la zone de lancement rapide ou dans le menu Démarrer, Programmes,
Kinetec puis clique sur l’icône KINETEC DATA CAPTURE™.
Avec une clé USB branchée sur l’ordinateur
Connecter la clé USB puis lancer le logiciel
KINETEC DATA CAPTURE™.
Cliquer sur OK pour valider le patient, l’écran
d’identification du patient disparaît, le nom de
celui-ci est affiché dans la case Patient.
Remarque :
Lors de la première utilisation d’une clé USB
aucun nom n’est renseigné.
Cliquer sur Modifier pour renseigner celui-ci puis
cliquer sur OK, l’écran d’identification du patient
disparaît, le nom de celui-ci est affiché dans la
case Patient.
Ecran principal
Affichage du nom du patient.
Affichage du rapport patient (voir page 10)
Gestion des programmes (voir page 7)
Gestion de la programmation journalière
(voir page 8)
Sauvegarde des données (voir page 9)
Formatage de la clé USB (voir page 9)
Arrêt du logiciel et retour sous Windows
Barre de menu, toutes les fonctions du logiciel
sont en double dans la barre de menu, ainsi que
le manuel d’utilisation dans le menu « ? ».
Remarque : Il est inutile de double cliquer pour accéder à une fonction, un seul clic suffit.
KINETEC DATA CAPTURE™ FR 6/12
Page 11
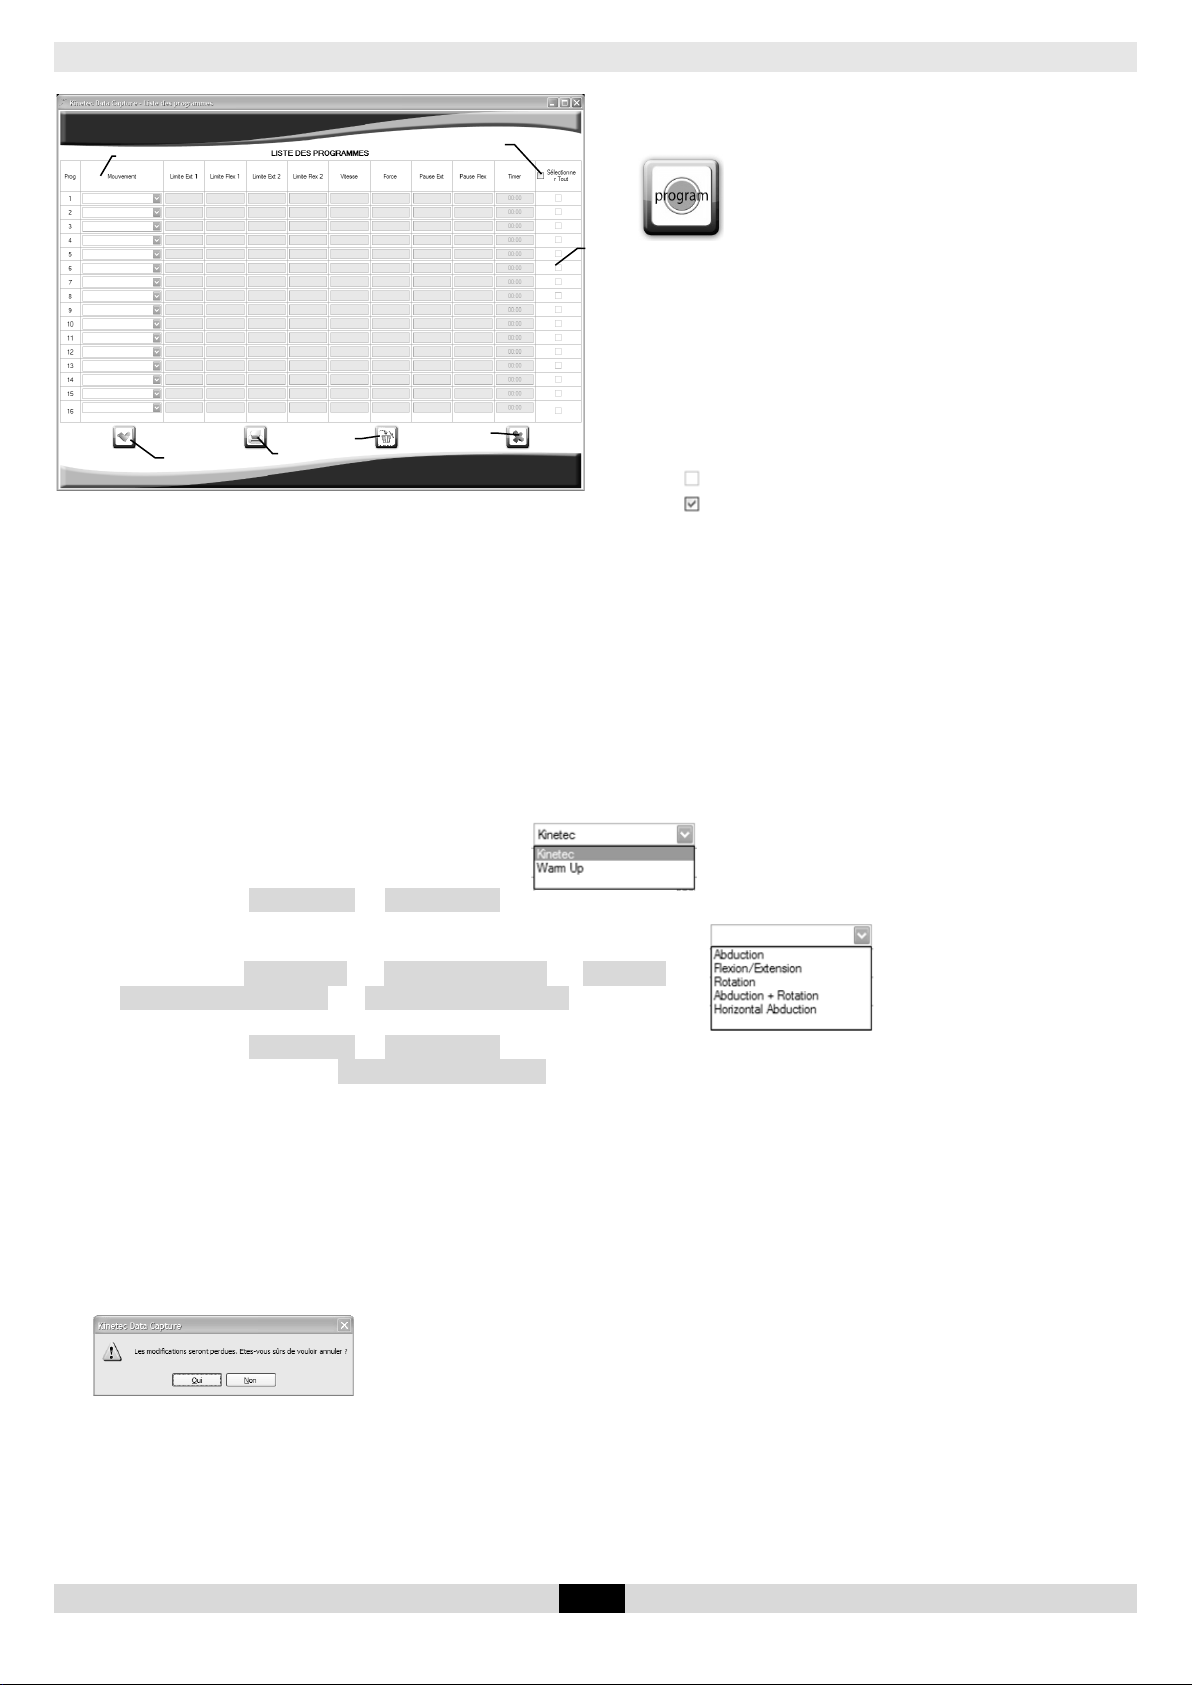
Gestion des programmes
Cette fonction est accessible uniquement si une
clé USB est branchée.
Cliquer sur l’icône « Program » pour y
accéder.
Lors de la première utilisation ou après un
formatage de la clé USB aucun programme n’est
disponible
Zone de saisie des paramètres des programmes
Présélection de tous les programmes en vue de
leurs suppressions
Programme non sélectionné
Programme sélectionné
Présélection d’un programme en vue de sa suppression
Validation de la liste des programmes et retour à l’écran principal
Effacement des programmes présélectionnés
Annulation des modifications effectuées et retour à l’écran principal
Impression des programmes mémorisés dans la clé USB, l’impression se fait sur l’imprimante par défaut
sélectionnée dans Windows
Mouvements possibles :
- Avec clé USB formatée pour le genou :
Mouvement « Kinetec » ou « Warm Up »
Les colonnes Limite Ext 1 et Limite Flex 2 ne seront pas accessibles.
- Avec clé USB formatée pour l’épaule :
Mouvement Abduction ou Flexion/Extension ou Rotation ou
Abduction + Rotation ou Horizontal Abduction,
Les colonnes Limite Ext 2 et Limite Flex 2 seront accessibles uniquement
pour le mouvement d’Abduction + Rotation.
Remarque :
- Il est possible de mémoriser jusqu’à 16 programmes.
- Lors de la connexion de la clé USB sur la télécommande de l’appareil KINETEC
de la clé seront visibles, les programmes déjà enregistrés dans la télécommande seront inaccessibles,
mais resteront mémorisés.
- Il est possible de déplacer le curseur d’un champ à l’autre à l’aide de la touche Tabulation.
- Lors de l’appui sur le bouton Annuler, la boîte de dialogue ci-dessous apparaît :
⇒ Cliquer sur Oui pour retourner à l’écran principal (les modifications seront
perdues).
⇒ Cliquer sur Non pour revenir à la liste des patients.
®
, seul les programmes
KINETEC DATA CAPTURE™ FR 7/12
Page 12

Gestion de la programmation journalière
Cette fonction est accessible uniquement si une clé USB est branchée. Cette fonction permet
d’effectuer un programme pré-mémorisé en fonction de la date du jour. A chaque mise sous
tension de l’attelle, les paramètres du programme correspondant à la date du jour seront
présélectionnés.
Liste de planification des programmes
Calendrier permettant de sélectionner une date
Liste des programmes mémorisés sur la clé USB
Bouton permettant d’ajouter la date et le
numéro de programme préalablement
sélectionnés à la liste de planification
Sélection du programme à ajouter à la liste de
planification
Effacement de la planification :
Bouton « Tout », pour supprimer toute la planification, un message de confirmation apparaîtra,
Bouton « Ligne sélectionnée » pour supprimer directement la ligne en surbrillance,
attention aucun message de confirmation
Impression du protocole journalier, l’impression se fait sur l’imprimante par défaut sélectionnée dans
Windows
Annulation des modifications effectuées et retour à l’écran principal
Validation de la planification et retour à l’écran principal
Remarque :
- Il est toujours possible de modifier les paramètres de mouvement avant de débuter la séance de
rééducation ou en cours de séance.
- La planification des programmes est possible sur une période maximum d’environ 6 mois. Par exemple :
si la date de début de planification est le 1
juillet et après.
- Lorsque les dates de planification ne sont pas consécutives, les paramètres du programme à la date
antérieure sont présélectionnés. Par exemple : le programme n°1 est planifié le 1
programme n°2 est planifié le 5 janvier ; les 2, 3 et 4 janvier, à chaque mise sous tension, les paramètres
du programme n°1 seront présélectionnés.
- Cette fonction nécessite que les programmes aient été préalablement mémorisés (voir chapitre
Gestion des programmes, page 7).
- Pour régler la date et l’heure de la poignée, voir chapitre Réglage de la date et de l’heure page 11.
- Lors de l’appui sur le bouton Annuler, la boîte de dialogue ci-dessous apparaît :
⇒ Cliquer sur Oui pour retourner à l’écran principal (les modifications seront
perdues).
⇒ Cliquer sur Non pour revenir à la liste des patients.
A présent, la clé USB est prête à être utilisée avec l’attelle de mobilisation passive.
Avertissement : Pour un maximum de sécurité, la télécommande doit toujours être confiée au patient
lors de l’utilisation de la machine en rééducation.
Avertissement : Toujours vérifier les paramètres de mouvement affichés à la télécommande avant de
commencer la séance de rééducation.
er
janvier, il sera impossible de planifier un programme le 6
er
janvier, le
KINETEC DATA CAPTURE™ FR 8/12
Page 13

Sauvegarde des données du patient
A B C D E F G H I
J K L
M
N O P Q R S T U V W X Y Z
a
b c d
e
f
g
h i j k l
m
n
o
p
q
r
s
t
u
v
w
x
y
z
! " #
$ % & ' ( ) * + ,
-
.
/ : ; < = > ? [ ]
_
{
}
Cette fonction est accessible uniquement si une clé USB est branchée.
Sur l’écran principal (voir page 6), cliquer sur le bouton sauvegarde des données.
Les données sont mémorisées automatiquement dans le disque dur de l’ordinateur, un message
de confirmation de sauvegarde s’affiche.
Cette fonction permet d’éditer le rapport patient plus tard (voir page 11).
Si aucune donnée n’est présente sur la clé USB un message s’affiche :
Formatage de la clé USB
Sur l’écran principal (voir page 6), cliquer sur le bouton formatage du support mémoire.
Un message de confirmation apparaît.
Cliquer sur OK pour valider, toutes les données
patient contenues sur la clé USB seront effacées,
mais resteront en mémoire sur votre disque dur si elles
ont été sauvegardées sur le disque dur (voir
sauvegarde des données du patient, page 9).
Cliquer sur Annuler pour retourner à l’écran principal
et annuler le formatage de la clé USB, les données
patient sont conservées.
Si OK.
Les clés USB sont différentes pour une utilisation avec
une attelle de genou ou avec une attelle d’épaule.
Sélectionner l’utilisation en cliquant sur l’appareil
concerné.
La fenêtre d’identification du patient s’affiche,
cliquer sur OK pour valider le nouveau patient, et
indiquer celui-ci sur l’étiquette de la clé USB.
La clé est prête à être utilisée avec l’attelle de
mobilisation sélectionnée, puis retour à l’écran
principal.
Remarque : si aucun nom n’est renseigné, la clé sera
prête à être utilisée avec l’attelle de mobilisation
sélectionnée, les données seront enregistrées mais
aucun nom ne sera lié à ces données.
Certains caractères sont incompatibles avec la poignée, ce message peut apparaître,
Utiliser uniquement les caractères autorisés ci-dessous :
KINETEC DATA CAPTURE™ FR 9/12
Page 14

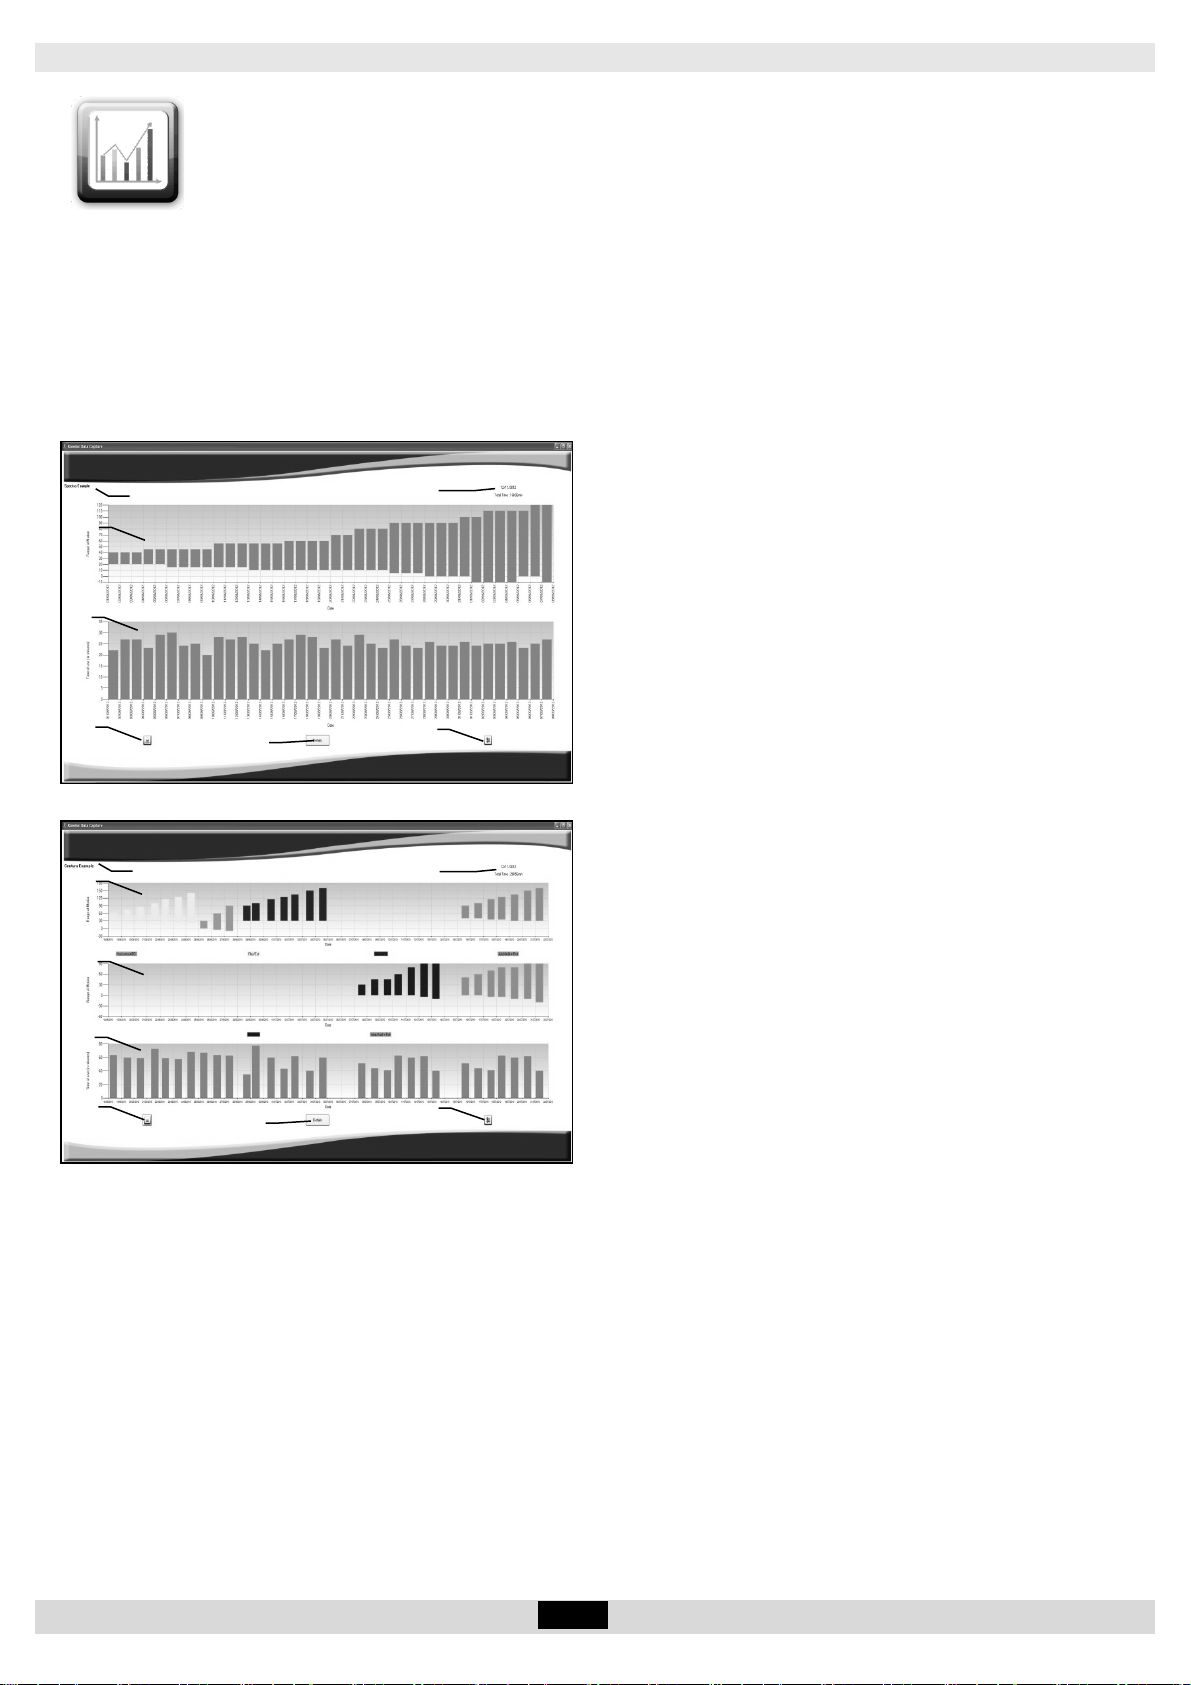
Edition du rapport patient
Rapport patient sur appareil de genou
Rapport patient sur appareil d’épaule
Sur l’écran principal (voir page 6), cliquer sur le bouton Rapport patient.
Le rapport qui s’affiche est édité avec les données enregistrées sur la clé USB, pour éditer le
rapport patient sans clé USB, voir page 11.
Remarques :
Toutes les séances enregistrées sous le même nom de patient s’afficheront dans le rapport, si le
patient a réalisé 2 séances le rapport comportera uniquement 2 colonnes, si le patient a fait 45
séances, le rapport comportera 45 colonnes, une colonne correspond à une séance.
2 rapports sont disponibles et dépendent du type d’appareil utilisé, appareil de genou ou
appareil d’épaule.
Nom du patient
Temps total de mobilisation passive ainsi que la
date d’édition du rapport
Graphique de l’amplitude articulaire par séance
Amplitude du genou
Amplitude du moteur d’abduction
Amplitude du moteur de rotation
Graphique du temps de la séance
Touche détails, permet l’affichage des données
moyennes des séances de traitement
Impression du rapport patient, l’impression se fait
sur l’imprimante par défaut sélectionnée dans
Windows
Sortie de l’affiche du rapport patient et retour à
l’écran principal
Remarques : Lorsque la flèche de la souris passe sur
une barre de séance (sans cliquer), un message
s’affiche indiquant toutes les informations de la
séance de travail.
Un clic sur une barre de séance permet d’afficher les
séances de la semaine, un deuxième clic affiche les
séances de la journée, au troisième clic retour à la
vision globale.
KINETEC DATA CAPTURE™ FR 10/12
Page 15

Sans clé USB branchée sur l’ordinateur
Appuyer sur
touches
Vérifier si la télécommande n'est pas
l’appareil).
Affichage de la date et de l’heure
L’heure est configurée en HH :MM :SS
Sortie du mode de modification de la
télécommande.
Les fonctions du logiciel sont limitées : uniquement à
l’édition du rapport patient avec les données
préalablement sauvegardées sur l’ordinateur, voir
page 9.
Edition du rapport patient - sans clé USB branchée
Sur l’écran principal, cliquer sur le bouton rapport
patient.
Une fenêtre s’ouvre proposant de sélectionner les
données sauvegardées.
Sélectionner le patient et cliquer sur OK.
Le rapport s’affiche, voir page 10 pour plus de
détails.
Réglage de la date et de l’heure
La date et l’heure utilisées dans le logiciel data capture sont gérées dans la poignée de commande de votre
appareil de mobilisation passive.
Il est recommandé de vérifier régulièrement l’exactitude de cette donnée.
La procédure de réglage est la même sur un appareil de genou et d’épaule, la présence de la clé USB n’est
pas obligatoire.
Début
Affichage Commentaires
Mettre l’appareil hors tension
Appuyer simultanément sur les 2 touches et
mettre sous tension
Le jour clignote
Changement du jour si besoin
Validation et passage au changement du
mois et ainsi de suite pour toutes les zones
Ou validation globale
et
Ou
20/10/12
15:22:35
20/10/12
15:22:35
25/10/12
15:22:35
25/10/12
15:22:35
KINETEC
SPECTRA VXX.X
bloquée (voir le manuel de
réglée en usine.
La date est configurée en JJ/MM/AA
le nouveau jour clignote.
Le mois clignote.
date et de l’heure puis retour a
l’utilisation normale de la
Si la date et l’heure sont 01/01/00 00:00, après une mise hors tension de l’appareil, changer la pile dans la
poignée de commande.
KINETEC DATA CAPTURE™ FR 11/12
Page 16

Désinstaller KINETEC DATA CAPTURE™
Pour désinstaller KINETEC DATA CAPTURE™ (et tous ses composants),
Utiliser la fonction Ajout/Suppression de programmes de Windows (dans Panneau de configuration)
1. Cliquer sur Démarrer puis sur Panneau de configuration.
2. Double-cliquer sur Ajouter ou Supprimer des programmes.
3. Faire défiler la liste des applications installées jusqu’à ce que KINETEC DATA CAPTURE™ soit affiché, puis
cliquer dessus.
4. Cliquer sur le bouton Supprimer.
Informations produits
Nettoyage de la clé USB
Nous recommandons un nettoyage régulier.
Utiliser un produit de nettoyage et/ou de désinfection (solution sans alcool ou < à 5% d’alcool) à l’aide
d’un chiffon doux légèrement humidifié.
Elimination et recyclage
a • Emballage : L’emballage doit être séparé des composants plastiques et papier/carton et remis aux
emplacements spécifiques de recyclage.
b • Appareil : Il contient des composants électroniques, des câbles, des pièces en plastique, en acier
et en aluminium. Quand l’appareil n’est plus opérationnel, démonter et séparer en groupes de
matériaux et les remettre à des unités de recyclage autorisées ou retourner l’appareil à Kinetec pour
destruction.
Conditions de garantie
La garantie KINETEC® est strictement limitée au remplacement gratuit ou à la réparation en usine de la
pièce ou des pièces reconnues défectueuses.
Kinetec SAS garantit ses appareils 2 ans contre tous vices de fabrication, à partir de la date d’achat
par le consommateur.
Kinetec SAS est le seul habilité à juger de l’application de la garantie sur ses appareils.
La garantie ne peut intervenir si l’appareil a fait l’objet d’un usage anormal ou a été utilisé dans des
conditions d’emploi autres que celles contenues dans notre manuel d’utilisation.
La garantie ne s’appliquera pas non plus en cas de détérioration ou accident provenant de
négligence, défaut de surveillance ou d’entretien provenant d’une transformation du matériel ou
d’une tentative de réparation du matériel.
KINETEC DATA CAPTURE™ FR 12/12
Page 17

Page 18

Page 19

Installation and user’s guide
Please read this guide carefully to learn how to configure and install the KINETEC DATA
CAPTURE™ software before using it.
Summary
Page
Warnings and safety
instructions ....................................
2
Presentation
Description ................................................................................................................... 3
............................................................................. 2
Installation ............................................................................... 4
Minimum Configuration Required ........................................................................... 4
Installation .................................................................................................................... 4
Use
........................................................................................... 6
With a USB key connected to the computer ....................................................... 6
Main screen ................................................................................................................. 6
Program management ............................................................................................. 7
Daily programming management .......................................................................... 8
Save patient data ...................................................................................................... 9
Format the USB key .................................................................................................... 9
Generate patient report .......................................................................................... 10
No USB key connected to the computer ............................................................. 11
Generate patient report - no USB key connected ............................................. 11
Setting the date and time ....................................................................................... 11
Setting the date and time on the computer (Windows XP) .............................. 12
Setting the date and time on the computer (Windows 7) ................................ 13
Uninstall KINETEC DATA CAPTURE™ ....................................... 14
Product
Information
Cleaning the USB key ............................................................................................... 14
Disposal and recycling .............................................................................................. 14
Warranty Terms ........................................................................................................... 14
............................................................... 14
KINETEC DATA CAPTURE™ EN 1/14
Page 20

Warnings and safety instructions
WARNING: We strongly recommend disabling your anti-virus and closing all active applications
before proceeding with the installation.
WARNING: In case of power failure, a problem on the computer or a communications error, please
restart the current operation and check all the settings: patient name, program list and
daily program.
WARNING: In case of power failure, a problem on the computer or a communications error, check
all the settings displayed on the hand controller. Repeat the operation if the data in the
hand controller is incomplete.
WARNING: For maximum safety, the hand controller should always be given to the patient when the
machine is used in rehabilitation.
WARNING: Always check the motion parameters displayed on the hand controller before starting the
rehabilitation session.
WARNING: The patient report is printed solely for information.
WARNING: The practitioner determines the protocol and ensures its proper implementation
(settings, session duration and frequency of use).
WARNING: In case of mutual electromagnetic or other interference with other appliances, move the
appliance further away.
WARNING: Modifying the appliance in any way is strictly forbidden.
Presentation
The KINETEC DATA CAPTURE™ software, coupled with the hand controller of the KINETEC Spectra™, KINETEC
Optima S4™ and Kinetec Centura™ Shoulder passive mobilisation appliances, lets you:
- program the appliance,
- produce appliance usage reports per patient.
KINETEC DATA CAPTURE™ EN 2/14
Page 21

5 3 2
4
Description
The KINETEC DATA CAPTURE™ Kit is composed of the following elements:
A hand controller for a knee appliance or shoulder appliance
1 •
1.1 USB key slot
1.2 Protective cover
A USB key with the installation program
2 •
Several patient USB keys
3 •
A set of removable labels to identify patients
4 •
A storage box for USB keys
5 •
User's guide
6 •
Order reference:
4615003700 Sheet with 189 removable
"Patient's Name" labels
4670025632 Set of 5 blank USB keys
delivered with storage box (5)
Name" labels
4670025640 Set of 20 blank USB keys
delivered with storage box (5)
and sheet of "Patient's
and sheet of "Patient's
Name" labels
KINETEC DATA CAPTURE™ EN 3/14
Page 22

Installation
Minimum Configuration Required
Hardware
1GHz processor
512MB RAM (1GB recommended)
50MB disk space required
USB port
Installation
We strongly recommend disabling your anti-virus and closing all active applications before proceeding with the
installation.
Connect the USB key with the KINETEC DATA CAPTURE™ Software installation program.
Note: If the installation does not start automatically after a few seconds, run Windows Explorer,
select your USB reader and double-click setup.exe.
A Installing Microsoft .NET Framework 4.
Click Accept
This message is only displayed if this option is not already installed on
the computer.
.
An internet connection must be
available.
This operation may take a few
B Launch the software installation Wizard.
Click Install.
Software
Microsoft Windows XP, Vista or 7 operating
system, Microsoft .NET Framework 4
(automatically downloaded during the
installation if necessary)
Video resolution 1024 x 768 pixels (minimum
recommended)
Installing Framework.
minutes
KINETEC DATA CAPTURE™ EN 4/14
Page 23

C Installing KINETEC DATA CAPTURE™.
Once the installation is completed, the software will start up
automatically.
The default display language is English. (see point D to change it)
A shortcut is automatically created on the desktop and in the Start
Menu program list.
D Changing the language if necessary.
Select the Language option in the Tools menu.
Select your language, click OK and follow the instructions.
The software is ready to be used.
E Disconnecting the installation program key.
We recommend that you do not use this key as a patient key. Keep
this software key in case you need to reinstall the system.
KINETEC DATA CAPTURE™ EN 5/14
Page 24

Use
To launch the KINETEC DATA CAPTURE™software, click the shortcut on the Windows desktop or
in the Quick Launch area or in the Start menu, Programs, Kinetec then click the KINETEC DATA
CAPTURE™ icon.
With a USB key connected to the computer
Main screen
Note: There is no need to double click to access a function, use a single click.
Connect the USB key then start the KINETEC DATA
CAPTURE™ Software.
Click OK to confirm the patient; the patient
identification screen disappears and their name is
displayed in the Patient box.
Note:
When using a USB key for the first time, there is no
name.
Click Modify to enter it then click OK; the patient
identification screen disappears and their name is
displayed in the Patient box.
Disconnect the hand controller from your splint.
Generate patient report (see page 10)
Save data (see page 9)
Format the USB key (see page 9)
Menu bar: all the software functions are
also available in the menu bar, and the
user's guide is available in the "?" menu.
Patient name display.
Program management (see page 7)
Daily program management
Quit the software and return to Windows
(see page 8)
KINETEC DATA CAPTURE™ EN 6/14
Page 25

Program management
Preselect a program for removal
Validate the program list and return to the main screen
This function is only available if a USB key is
connected.
Click the "Program" icon to access it.
When this function is used for the first time, or after
formatting the USB key, no programs are available.
Program parameters input area
Preselect all programs for removal
Unselected program
Selected program
Erase preselected programs
Undo changes and return to the main screen
Print the programs saved on the USB key: the programs are printed on the default Windows printer
Possible movements:
- With a USB key formatted for knees:
"Kinetec" or "Warm Up" movement
The Limit Ext 1 and Limit Flex 2 columns are not available.
- With a USB key formatted for shoulders:
Abduction or Flexion/Extension or Rotation or Abduction + Rotation
or Horizontal Abduction movement,
The Limit Ext 2 and Limit Flex 2 columns are only available for the Abduction + Rotation
movement.
Note:
- Up to 16 programs can be stored.
- When connecting the USB key to the KINETEC
are visible. Programs that have already been stored on the controller cannot be accessed but remain in
memory.
- It is possible to move the cursor from one field to another using the Tab key.
- When pressing the Cancel button, the following dialogue box is displayed:
®
appliance hand controller, only the programs on the key
-> Click Yes to return to the main screen (modifications will be lost).
-> Click No to return to the patient list.
KINETEC DATA CAPTURE™ EN 7/14
Page 26

Daily programming management
This function is only available if a USB key is connected. This function allows a pre-stored program to
be performed according to the current date. Each time the splint is switched on, the program
parameters corresponding to the current date will be preselected.
Program planner list
Calendar to select a date
List of programs stored on the USB key
Button to add the previously selected date
and
program number to the planner list
Select the program to add to the planner list
Erase from the planner list:
"All" button, to erase the whole planner list. A confirmation message is displayed.
"Selected line" button to directly erase the highlighted line. Caution: no confirmation message is displayed.
Print the daily protocol: the protocols are printed on the default Windows printer
Undo changes and return to the main screen
Validate the planner and return to the main screen
Note:
- It is always possible to change the motion parameters before starting or during the rehabilitation
session.
- Program planning is possible over a maximum period of about six months. For example: if the planner
start date is the 1
- When planning dates are not consecutive, program parameters as of the earlier date are preselected.
For example: program No. 1 is scheduled for January 1
January 2, 3 and 4, each time the power is swit
- This feature requires the programs to have been previously stored (see Chapter "Program
Management"
- To set the date and time on the hand controller, see chapter "Setting the date and time", page 11.
- When pressing the Cancel button, the following dialogue box is displayed:
st
of January, it will be not be possible to plan a program on or after 6
, page 7).
th
of July.
st
, program No. 2 is scheduled for Jan. 5. On
ched on, the settings of program 1 will be preselected.
-> Click Yes to return to the main screen (modifications will be lost)
-> Click No to return to the patient list
The USB key is now ready to be used with the passive mobilisation splint.
Warning: For maximum safety, the hand controller should always be given to the patient when the
appliance is used in rehabilitation.
Warning: Always check the motion parameters displayed on the hand controller before starting the
rehabilitation session.
KINETEC DATA CAPTURE™ EN 8/14
Page 27

Save patient data
This function is only available if a USB key is connected.
Click the Save Data button on the main screen (see page 6).
The data are automatically saved on the computer's hard drive and a confirmation message is
displayed.
This function lets you generate patient reports later (see page 11).
If there is no data on the USB key, a message is displayed:
Format the USB key
Click the Format Storage Key button on the main screen (see page 6).
A confirmation message is displayed.
Click OK to confirm. All patient data on the USB key
will be deleted but will still be available on your
hard drive if they have been backed up on the
hard drive (see save patient data, page 9).
Click Cancel to return to the main screen and
cancel the USB key formatting. Patient data will be
kept.
If OK.
The USB keys used with knee splints and shoulder
splints are different.
Select the use by clicking the appropriate
appliance.
The patient identification window is displayed. Click
OK to confirm the new patient and identify the
patient on the USB key label.
The key is ready to be used with the selected
mobilisation splint, then return to the main screen.
Note: if no name is entered, the key will be ready to
be used with the selected mobilisation splint, the
data will be saved but there will be no name linked
to the data.
Some characters are not compatible with the hand controller, this message may be displayed.
Only use the authorised characters listed below:
KINETEC DATA CAPTURE™ EN 9/14
Page 28
Generate patient report
Patient report for the knee appliance
Patient report for the shoulder appliance
On the main screen, click the Patient report button (See page 6).
The displayed report is generated from data stored on the USB key. To generate patient reports
without a USB key, see page 11.
Note:
The report will includes all sessions stored under the same patient name.
If the patient carried out 2 sessions, the report will only contain 2 columns. If the patient has
carried out 45 sessions, the report will contain 45 columns. One column corresponds to one
session.
2 reports are available and correspond to the type of appliance used: knee appliance or
shoulder appliance.
Patient name
Total time of passive mobilisation and date report
generated
Range of motion per session graph
Knee range of motion
Abduction motor range
Rotation motor range
Session time graph
Details button:
to display treatment session averages
Print the patient report: the reports are printed on
the default Windows printer
Exit the patient report display and return to the main
screen
Notes: When the arrow hovers over a session bar (without
clicking it), a message is displayed with all the information
concerning the work session.
Clicking a session bar displays the sessions for the week.
Clicking a second time displays the sessions for the day.
Clicking a third time returns to the overall view.
KINETEC DATA CAPTURE™ EN 10/14
Page 29

No USB key connected to the computer
Start
Press buttons
Display
Comments
Switch the appliance off
Check that the controller
manual).
Press both buttons at the same time
20/10/12
The factory-set date and
HH:MM:SS
The day blinks
20/10/12
15:22:35
Change the day if necessary
25/10/12
15:22:35
The new day blinks.
Confirm and proceed to change the
25/10/12
15:22:35
The month blinks.
Or for global confirmation
KINETEC
SPECTRA VXX.X
Exit "change date and time"
The software functions are limited. You are only able to
generate patient reports using data already stored on the
computer (see page 9).
Generate patient report - no USB key connected
Click the patient report button on the main screen.
A window opens allowing you to select the saved data.
Select the patient and click OK.
The report is displayed; see page 10 for more details.
Setting the date and time
The date and time used by the KINETEC DATA CAPTURE™ software are managed in the hand controller of your
passive mobilisation appliance.
We recommend that you regularly check that they are correct.
The procedure for setting the date and time is the same for knee and shoulder appliances. No USB keys are
required.
isn't blocked (see appliance
and switch on
and
15:22:35
time are displayed.
The date is in the format
DD/MM/YY
The time is in the format
or
month and so on for the other areas
mode and return to normal
use of the controller.
If the date and time are set to 01/01/00 00:00 after switching the appliance off, change the battery of the hand
controller.
KINETEC DATA CAPTURE™ EN 11/14
Page 30

Setting the date and time on the computer (with Windows XP Operating System)
A. Select the “start” menu then click on “Control Panel”
B. Click on “Date, Time, Language, and Regional Options”
C. Click on “Regional and Language Options”
D. Click on button “Customize…”
E. In the tab “Date”, change “Short date format” to
“dd/MM/yy”
Note: if “dd/MM/yy” doesn't appear in the drop down
list, write it with keyboard
F. Click on button “ok” to exit
You can now launch the KINETEC DATA CAPTURE™ software
At the end of use of KINETEC DATA CAPTURE™ software, you can initialize the short date format to its initial value.
KINETEC DATA CAPTURE™ EN 12/14
Page 31

Setting the date and time on the computer (with Windows 7 Operating System)
A. Select the “start” menu then click on “Control Panel”
B. Click on “Date, Time, Language, and Regional Options”
C. Click on “Modify format of date, time or numbers”
D. Change “Short date format” to “dd/MM/yy”
Note: if “dd/MM/yy” doesn't appear in the drop down list,
write it with keyboard
E. Click on button “ok” to exit
You can now launch the KINETEC DATA CAPTURE™ software
At the end of use of KINETEC DATA CAPTURE™ software, you can initialize the short date format to its initial value.
KINETEC DATA CAPTURE™ EN 13/14
Page 32

Uninstall Kinetec® Data-Capture
To uninstall KINETEC DATA CAPTURE™ (and all its components),
Use the Windows Add/Remove Programs function (in the Control Panel)
1. Click Start then Control Panel.
2. Double-click Add or Remove Programs.
3. Scroll through the list of installed applications until KINETEC DATA CAPTURE™ is displayed, then click on it.
4. Click on the Remove button.
Product Information
Cleaning the USB key
We recommend regular cleaning.
Use a cleaning and / or disinfecting product (solution without alcohol or <5% alcohol) using a moist soft
cloth.
Disposal and recycling
a • Packaging: The packaging must be separated into plastic and paper / cardboard components
and delivered to specific recycling locations.
b • Appliance: It contains electronic components, cables, plastic, steel and aluminium parts. When the
appliance is no longer operational, disassemble and separate it into groups of materials, then deliver
them to authorised recycling units or return the unit to Kinetec for destruction.
Warranty Terms
The KINETEC® warranty is strictly limited to the replacement, free of charge, or to factory repairs of part(s)
recognised as defective.
Kinetec SAS warrants its appliance against all manufacturing defects for two years from the date of
purchase by the consumer.
Only Kinetec SAS is competent in assessing the applicability of the warranty on its
products.
The warranty does not apply if the appliance has been subjected to abnormal use or used in conditions
other than those specified in our user's manual.
Nor will the warranty apply in case of damage or accident arising out of negligence, lack of supervision
or maintenance arising from an alteration of the equipment or from an at
equipment.
tempt to repair the
KINETEC DATA CAPTURE™ EN 14/14
Page 33

Page 34

Page 35

Installations- und Bedienungsanleitung
Lesen Sie diese Bedienungsanleitung aufmerksam durch, um sich vor dem Einsatz der KINETEC
DATA CAPTURE™ Software mit dem Konfigurations- und Installationsverfahren vertraut zu
machen.
Inhalt
Seite
Warnungen und
Sicherheitshinweise ...........................................
Darstellung ......................................................................................
Beschreibung ....................................................................................................................... 3
Installation ................................................................................... 4
Systemanforderungen ........................................................................................................ 4
Installation ............................................................................................................................. 4
Anwendung
Mit einem USB-Stick am Rechner ...................................................................................... 6
Hauptfenster ......................................................................................................................... 6
Verwaltung der Programme ............................................................................................. 7
Verwaltung des Tagesprogramms ................................................................................... 8
Speichern der Patientendaten ......................................................................................... 9
Formatierung des USB-Sticks ............................................................................................. 9
Erstellen des Patientenberichts ........................................................................................ 10
Ohne USB-Stick am Rechner ............................................................................................ 11
Erstellen des Patientenberichts – ohne USB-Stick am Rechner ................................. 11
Einstellen von Datum und Uhrzeit .................................................................................... 11
................................................................................. 6
Deinstallation der Software KINETEC DATA CAPTURE™ ............. 12
2
2
Produktinformationen
Reinigen des USB-Sticks ...................................................................................................... 12
Entsorgung und Recycling ................................................................................................
Garantiebedingungen ...................................................................................................... 12
.................................................................. 12
12
KINETEC DATA CAPTURE™ DE 1/12
Page 36

Warnungen und Sicherheitshinweise
WARNUNG: Es wird dringend empfohlen, vor der Installation sämtliche Antivirus-Programme zu
deaktivieren und alle aktiven Anwendungen zu schließen.
WARNUNG: Beginnen Sie die laufende Maßnahme wieder von Neuem, wenn Stromausfälle,
Computerprobleme oder Kommunikationsfehler auftreten, und prüfen jeden der
folgenden Parameter: Patientenname, Programmliste und Tagesprogramm.
WARNUNG: Prüfen Sie die auf der Fernbedienung angezeigten Parameter bei Stromausfällen,
Computerproblemen oder Kommunikationsfehlern. Wiederholen Sie die Maßnahme, wenn
die Daten in der Fernbedienung unvollständig sind.
WARNUNG: Zur Gewährleistung einer maximalen Sicherheit muss die Fernbedienung bei der
Nutzung des Geräts zwecks Rehabilitation stets dem Patienten übergeben werden.
WARNUNG: Überprüfen Sie vor dem Beginn einer Rehabilitationssitzung immer die auf der
Fernbedienung angezeigten Bewegungsparameter.
WARNUNG: Der Patientenbericht wird nur zur Information editiert.
WARNUNG: Der behandelnde Arzt legt das Protokoll fest und vergewissert sich über die
ordnungsgemäße Ausführung (Einstellungen, Sitzungsdauer und Häufigkeit der
Anwendung).
WARNUNG: Stellen Sie das Gerät in größerer Entfernung zu anderen Geräten auf, wenn
elektromagnetische oder sonstigen Interferenzen mit diesen Geräten auftreten.
WARNUNG: Jede Veränderung am Gerät ist streng untersagt.
Darstellung
Mit Hilfe der an die Fernbedienung des passiven Kniebewegungsgerätes Kinetec Spectra DC™ oder KINETEC
Optima S4™ und des passiven Schulterbegewungsgeräts KINETEC Centura™ angeschlossenen Software Kinetec
Data Capture™ ist Folgendes möglich:
- die Programmierung des Geräts,
- der Ausdruck von Gerätenutzungsbilanzen pro Patient.
KINETEC DATA CAPTURE™ DE 2/12
Page 37

5
3
2
4
Beschreibung
Die Software KINETEC DATA CAPTURE™ enthält folgende Elemente:
1 • Eine Handbedienung für das Knie- oder Schulterbewegungsgerät
1.1 USB-Stick-Fach
1.2 Schutzabdeckung
2 • Einen USB-Stick mit dem Installationsprogramm
3 • Mehrere Patienten-USB-Sticks
4 • Ein Satz abnehmbarer Etiketten für die Patientenkennzeichnung
5 • Eine Dose zum Verstauen der USB-Sticks
6 • Das Benutzerhandbuch
Bestell-Nr.:
4615003700 Satz Blätter mit 189 abnehmbaren Etiketten
„Patientenname“
4670025632 Satz mit 5 neuen USB-Sticks
zum Verstauen (5) und Etiketten
„Patientenname“
4670025640 Satz mit 20 neuen USB-Sticks mit Dose
zum Verstauen (5) und Etiketten
„Patientenname“
KINETEC DATA CAPTURE™ DE 3/12
Page 38

Installation
Systemanforderungen
Hardware-Konfiguration
Prozessor mit mindestens 1 GHz
RAM-Speicher 512 MB (1 GB wird empfohlen) Freier
Festplattenspeicher mindestens 50 MB
USB-Port
Installation
Es wird dringend empfohlen, vor der Installation sämtliche Antivirus-Programme zu deaktivieren und alle
aktiven Anwendungen zu schließen.
Stecken Sie den USB-Stick der KINETEC DATA CAPTURE™ Software.
Hinweis: Wenn das Setup nicht automatisch nach einigen Sekunden startet, öffnen Sie den Windows-
Explorer, wählen Sie den USB-Port aus und starten Sie das Setup durch einen Doppelklick
auf die Datei setup.exe.
A Installation von Microsoft .NET Framework 4.
Klicken Sie auf Annehmen.
Dieses Fenster wird nur angezeigt, wenn diese Option noch nicht auf
dem Rechner installiert ist.
Software-Konfiguration
Betriebssystem Microsoft Windows XP, Vista oder 7,
Microsoft .NET Framework 4 (ggf. automatischer
Download während der Installation)
Videoauflösung 1024 x 786 Pixel
Mindestauflösung)
Eine Internetverbindung muss
verfügbar sein.
(empfohlene
Installation von Framework.
Dieser Vorgang kann einige
Minuten in Anspruch nehmen
B Aufrufen des Setup-Assistenten der Software.
Klicken Sie auf Installieren.
KINETEC DATA CAPTURE™ DE 4/12
Page 39

C Installation der KINETEC DATA CAPTURE™-Software.
Am Ende der Installation startet die Software automatisch.
Standardmäßig ist die Sprache auf Englisch eingestellt.
(Siehe Punkt D zum Anpassen der Sprache)
Ein Shortcut wird automatisch auf dem Dekstop abgelegt, sowie in der
Programmliste des Startmenüs.
D Anpassen der Sprache (falls erforderlich).
Wählen Sie die Option Sprache im Tools-Menü.
Wählen Sie die gewünschte Sprache und klicken Sie auf OK. Folgen Sie
anschließend den Anweisungen.
Die Software ist jetzt betriebsbereit.
E Auswerfen des USB-Sticks mit dem
Installationsprogramm.
Hinweis: Verwenden Sie diesen USB-Stick nicht als
Patienten-USB-Stick sonder bewahren Sie sie für eine
eventuelle Neuinstallation auf.
KINETEC DATA CAPTURE™ DE 5/12
Page 40

Anwendung
Klicken Sie auf das Symbol KINETEC DATA CAPTURE™ auf dem Windows-Desktop, in der
Schnellstartleiste oder im Menü Start, Programme, KINETEC
CAPTURE™ zu starten.
Mit einem USB-Stick am Rechner
Stecken Sie den USB-Stick ein und starten Sie die
KINETEC DATA CAPTURE™-Software.
Klicken Sie auf OK um den Patienten zu bestätigen.
Die Patientenkennungsmaske wird ausgeblendet und
der Name des Patienten wird im Feld „Patient“
angezeigt.
Hinweis:
Bei der ersten Verwendung eines USB-Sticks ist das
Namensfeld leer.
Klicken Sie auf Ändern, um den Namen einzugeben,
und dann auf OK. Die Patientenkennungsmaske wird
ausgeblendet und der Name des Patienten wird im
Feld „Patient“ angezeigt.
Hauptfenster
Anzeige des Patientennamens
Anzeige des Patientenberichts (siehe Seite 10)
Verwaltung der Programme (siehe Seite 7)
Verwaltung der Tagesprogramme (siehe Seite 8)
Speichern der Daten (siehe Seite 9)
Formatierung des USB-Sticks (siehe Seite 9)
Schließen der Software und Rückkehr zu
Windows
Menüleiste. Alle Funktionen der Software sind
ebenfalls in der Menüleiste vorhanden, sowie
auch das Handbuch im Menü „?“.
Hinweis: Die Funktionen können durch einfachen Klick aufgerufen werden, ein Doppelklick ist nicht erforderlich.
®
, um die Software KINETEC DATA
KINETEC DATA CAPTURE™ DE 6/12
Page 41

Verwaltung der Programme
Diese Funktion ist nur verfügbar, wenn ein USB-Stick
gesteckt ist.
Klicken Sie auf die Schaltfläche
„Programm“, um auf die Funktion
zuzugreifen.
Bei der ersten Verwendung oder nach einer
Formatierung des USB-Sticks ist keinerlei Programm
verfügbar.
Erfassungsbereich für die Programmparameter
Vorauswahl aller Programme, die gelöscht
werden sollen
Programm nicht ausgewählt
Programm ausgewählt
Vorauswahl eines Programms, um es zu löschen
Bestätigen der Programmliste und Rückkehr zum Hauptfenster
Löschen vorausgewählter Programme
Annullieren der durchgeführten Änderungen und Rückkehr zum Hauptfenster
Ausdrucken der im USB-Stick gespeicherten Programme. Der Ausdruck erfolgt auf dem in Windows
gewählten Standarddrucker.
Mögliche Bewegungen:
- Mit einem für das Knie formatierten USB-Stick:
Bewegungen „Kinetec“ oder „Warm-Up“.
Die Spalten Limit Ext 1 und Limit Flex 2 sind nicht verfügbar.
- Mit einem für die Schulter formatierten USB-Stick:
Bewegungen Spreizen oder Biegen/Strecken oder Drehen oder
Spreizen + Drehen oder Horizontal spreizen.
Die Spalten Limit Ext 1 und Limit Flex 2 sind nur für die Bewegung Spreizen + Drehen verfügbar.
Hinweis:
- Es ist möglich, bis zu 16 Programme zu speichern.
- Beim Anschluss des USB-Sticks an der Handbedienung des KINETEC
dem Stick angezeigt. Der Zugriff auf die bereits in der Handbedienung gespeicherten Programme ist nicht
möglich, obwohl diese Programme dennoch gespeichert bleiben.
- Mit Hilfe der Tab-Taste kann der Cursor von einem Feld zum nächsten bewegt werden.
- Nach dem Klicken auf die Schaltfläche Abbrechen erscheint die nachstehende Dialogbox:
⇒ Klicken Sie auf Ja, um zum Hauptfenster zurückzukehren (die Änderungen
gehen verloren).
⇒ Klicken Sie auf Nein, um zur Patientenliste zurückzukehren.
®
-Geräts werden nur die Programme auf
KINETEC DATA CAPTURE™ DE 7/12
Page 42

Verwaltung des Tagesprogramms
Diese Funktion ist nur verfügbar, wenn ein USB-Stick gesteckt ist. Diese Funktion ermöglicht die
Ausführung eines nach Datum vorgespeicherten Programms. Bei jedem Einschalten der Schiene
werden die Programmparameter des betreffenden Datums vorausgewählt.
Liste der Programmvorausplanungen
Kalender zum Auswählen eines Datums
Liste der auf dem USB-Stick gespeicherten
Programme
Mit dieser Schaltfläche werden das zuvor
ausgewählte Datum und die
Programmnummer zur Vorausplanungsliste
hinzugefügt
Auswahl der Programme, die der Planungsliste
hinzugefügt werden sollen
Löschen der Vorausplanung
Schaltfläche „Alle“ zum Löschen der gesamten Vorausplanung. Eine Bestätigungsmeldung wird angezeigt.
Schaltfläche „Markierte Zeile“ zum direkten Löschen der markierten Zeile. Achtung, es wird keine
Bestätigungsmeldung angezeigt.
Ausdrucken des Tagesprotokolls. Der Ausdruck erfolgt auf dem in Windows gewählten Standarddrucker.
Annullieren der durchgeführten Änderungen und Rückkehr zum Hauptfenster
Bestätigung der Vorausplanung und Rückkehr in das Hauptfenster.
Hinweis:
- Es ist sowohl vor Beginn jeder Sitzung als auch während der Sitzung jederzeit möglich, die
Bewegungsparameter für die Rehabilitation zu ändern.
- Die Programmvorausplanung kann für maximal ca. 6 Monate erstellt werden. Beispiel: Wenn der Beginn
der Vorausplanung auf den 1. Januar festgelegt wurde, ist es nicht möglich, ein Programm für den 6.
Juli und später zu planen.
- Wenn die Vorausplanungsdaten nicht aufeinanderfolgen, werden die Programmparameter des
früheren Datums vorausgewählt. Beispiel: Programm Nr. 1 ist für den 1. Januar geplant, Programm Nr. 2 für
den 5. Januar; am 2., 3.
vorausgewählt.
- Diese Funktion macht es erforderlich, dass die Programme vorher gespeichert werden (siehe Kapitel
Verwaltung der Programme, Seite 7).
- Einstellen von Datum und Uhrzeit der Fernbedienung siehe Kapitel Einstellen von Datum und Uhrzeit Seite
11.
- Nach dem Klicken auf die Schaltfläche Abbrechen erscheint die nachstehende Dialogbox:
Der USB-Stick ist nun bereit für den Einsatz mit der passiven Bewegungsschiene.
Warnung: Zur Gewährleistung einer maximalen Sicherheit muss die Fernbedienung bei der Nutzung des
Geräts zwecks Rehabilitation stets dem Patienten übergeben werden.
Warnung: Vor dem Beginn einer Rehabilitationssitzung immer die auf der Fernbedienung angezeigten
Bewegungsparameter überprüfen.
und 4. Januar werden bei jedem Einschalten die Parameter des Programms N. 1
⇒ Klicken Sie auf Ja, um zum Hauptfenster zurückzukehren (die
Änderungen gehen verloren).
⇒ Klicken Sie auf Nein, um zur Patientenliste zurückzukehren
KINETEC DATA CAPTURE™ DE 8/12
Page 43

Speichern der Patientendaten
Diese Funktion ist nur verfügbar, wenn ein USB-Stick gesteckt ist.
Klicken Sie im Hauptfenster (siehe Seite 6) auf die Schaltfläche Daten speichern.
Die Daten werden automatisch auf der Festplatte des Rechners gespeichert.
Eine Meldung wird zur Bestätigung des Speicherns angezeigt.
Diese Funktion dient zur späteren Ausgabe des Patientenberichts (siehe Seite 11).
Wenn auf dem USB-Stick keine Daten vorhanden sind wird die
folgende Meldung angezeigt:
Formatierung des USB-Sticks
Klicken Sie im Hauptfenster (siehe Seite 6) auf die Schaltfläche Formatierung des
Speichermediums.
Eine Bestätigungsmeldung wird angezeigt.
Klicken Sie zum Bestätigen auf OK. Alle Patientendaten auf dem USBStick werden gelöscht, bleiben jedoch auf Ihrer Festplatte gesichert,
wenn Sie sie vorher dort gespeichert haben (siehe Speichern der
Patientendaten, Seite 9). Klicken Sie auf Löschen, um zum Hauptfenster
zurückzukehren und die Formatierung des USB-Sticks rückgängig zu
machen. Die Patientendaten bleiben gespeichert.
Falls OK.
Es werden verschiedene USB-Sticks für die Anwendung mit einer Knie-
oder Schulterschiene verwendet.
Wählen Sie die Verwendung, indem Sie auf das betreffende Gerät
klicken.
Das Patientenkennungsfenster wird angezeigt. Klicken Sie auf OK, um
den neuen Patienten zu bestätigen und schreiben Sie seinen Namen auf
das Etikett des USB-Sticks.
Der USB-Stick ist bereit zur Verwendung mit der gewählten
Bewegungsschiene. Das Hauptfenster wird wieder angezeigt.
Hinweis: Wenn kein Name angegeben ist, kann der USB-Stick mit der
gewählten Bewegungsschiene verwendet werden und die Daten
werden gespeichert. Allerdings sind sie dann keinem Namen zugeordnet.
Bestimmte Zeichen können mit dem Handgerät nicht verwendet werden. Diese Meldung
kann dann angezeigt werden. Verwenden Sie nur die unten aufgeführten Zeichen:
KINETEC DATA CAPTURE™ DE 9/12
Page 44

Erstellen des Patientenberichts
Patientenbericht - Kniegerät
Patientenbericht - Schultergerät
Klicken Sie im Hauptfenster (siehe Seite 6) auf die Schaltfläche Patientenbericht.
Der angezeigte Patientenbericht wird mit den auf dem USB-Stick gespeicherten Daten erstellt. Zur
Erstellung des Patientenberichts ohne USB-Stick, siehe Seite 11.
Hinweise:
Alle unter dem gleichen Patientennamen gespeicherten Übungen erscheinen in dem Bericht. Wenn
der Patient 2 Übungen absolviert hat, umfasst der Bericht nur 2 Spalten. Wenn der Patient 45
Übungen absolviert hat, umfasst der Bericht 45 Spalten. Jede Spalte entspricht einer Übung.
2 Berichte sind verfügbar, je nach Typ des verwendeten Knie- oder Schultergeräts.
Name des Patienten
Gesamtdauer der passiven Bewegung und Datum der
Berichterstellung
Graphik der Gelenkbewegung pro Übung
Bewegung des Knies
Bewegung des Spreizmotors
Bewegung des Drehmotors
Graphik der Übungsdauer
Detail-Taste zur Anzeige der durchschnittlichen Daten
der Behandlungsübung
Ausdrucken des Patientenberichts. Der Ausdruck
erfolgt auf dem in Windows gewählten
Standarddrucker.
Schließen des Patientenberichts und Rückkehr in das
Hauptfenster.
Hinweise: Wenn der Mauszeiger über einen Übungsbalken
gleitet (ohne darauf zu klicken) wird eine Meldung mit
allen Informationen der Übung angezeigt.
Durch Anklicken des Übungsbalkens können die Übungen
der Woche angezeigt werden. Ein Zweiter Klick zeigt die
Übungen des Tages und ein dritter Klick zeigt erneut die
Übersicht an.
KINETEC DATA CAPTURE™ DE 10/12
Page 45

Ohne USB-Stick am Rechner
Einstellen der Werkseinstellung für das
Die Funktionen der Software sind begrenzt: Sie dient nur
der Erstellung des Patientenberichts mit den bereits auf
dem Rechner gespeicherten Daten, siehe Seite 9.
Erstellung des Patientenberichts - ohne USB-Stick am Rechner
Klicken Sie im Hauptfenster auf die Schaltfläche
Patientenbericht.
Ein Fenster zur Auswahl der gespeicherten Daten wird
angezeigt.
Wählen Sie den Patienten und klicken Sie anschließend
auf OK.
Der Bericht wird angezeigt. Siehe Seite 10 für weitere
Details.
Einstellen des Datums und der Uhrzeit
Das von der KINETEC DATA CAPTURE™-Software verwendete Datum sowie die Uhrzeit werden im Handgerät Ihres
passiven Bewegungsgeräts verwaltet.
Wir empfehlen, die Übereinstimmung dieser Daten regelmäßig zu prüfen.
Das Einstellungsverfahren ist bei dem Knie- bzw. Schultergerät identisch. Der USB-Stick muss nicht zwingend gesteckt
sein.
Anfang
Gerät ausschalten
Beide Tasten gleichzeitig
betätigen und einschalten
Der Tag blinkt
Änderung des Tags, falls
erforderlich
Bestätigung und Übergang zum
Monat. Dies erfolgt für alle
Bereiche
Oder allgemeine Bestätigung
Tasten
betätigen
oder
oder
und
Anzeige
20/10/12
15:22:35
20/10/12
15:22:35
25/10/12
15:22:35
25/10/12
15:22:35
KINETEC
SPECTRA VXX.X
Kommentare
Prüfen, ob die Fernbedienung nicht
blockiert ist (siehe Gerätehandbuch).
Datums und die Uhrzeit.
Konfiguration des Datums: TT/MM/JJJJ
Konfiguration der Uhrzeit: HH:MM:SS
Der neue Tag blinkt.
Der Monat blinkt.
Datums- und Uhrzeitänderung schließen.
Zurück zur normalen Verwendung der
Fernbedienung.
Wenn nach dem Ausschalten des Geräts das Datum und die Uhrzeit der Übungen im
Patientenbericht mit 01/01/00 00:00 angezeigt werden sollten Sie die Batterie im Handgerät wechseln.
KINETEC DATA CAPTURE™ DE 11/12
Page 46

Deinstallation der Software Kinetec Data-Capture™
Zur Deinstallation der Software KINETEC DATA CAPTURE™ (und sämtlicher Bestandteile):
Verwenden Sie die Funktion Hinzufügen/Entfernen von Programmen von Windows (in der Systemsteuerung)
- Klicken Sie auf Start und anschließend auf Systemsteuerung.
- Doppelklicken Sie auf Hinzufügen oder Entfernen von Programmen.
- Scrollen Sie in der Liste der installierten Anwendungen, bis KINETEC DATA CAPTURE™ angezeigt wird und
klicken Sie darauf.
- Klicken Sie auf die Schaltfläche Entfernen.
Produktinformationen
Produktinformationen
Reinigen des USB-Sticks
Wir empfehlen, eine regelmäßige Reinigung durchzuführen.
Verwenden Sie ein Reinigungs- und/oder Desinfektionsmittel (alkoholfreie Lösung oder mit < 5 % Alkohol)
mit Hilfe eines weichen, leicht angefeuchteten Tuchs.
Entsorgung und Recycling
a • Verpackung: Die Verpackung muss getrennt nach Kunststoff- und Papier/Karton-Bestandteilen an den
speziell dafür bestimmten Recycling-Sammelstellen abgegeben werden.
b • Gerät: Dieses enthält elektronische Bauteile, Kabel, Teile aus Kunststoff, Stahl und Aluminium.
Demontieren Sie das betriebsunfähige Gerät und trennen Sie es in die entsprechenden
Materialgruppen auf, die an zugelassenen Recycling-Sammelstellen abgegeben werden können, oder
senden Sie das Gerät zur Entsorgung an Kinetec zurück.
Garantiebedingungen
Die KINETEC®-Garantie ist strikt begrenzt auf den kostenlosen Ersatz oder auf die werkseitige Reparatur des/der als
fehlerhaft anerkannten Teile.
Kinetec SAS gewährt für Verarbeitungsfehler an ihren Geräten eine Garantie von 2 Jahren ab dem Datum des Kaufs
durch den Verbraucher.
Kinetec SAS hat die alleinige Entscheidungsbefugnis im Hinblick auf die Garantieanwendung bei
ihren Geräten.
Die Garantie erlischt bei unsachgemäßer Anwendung des Geräts oder bei nicht in der Bedienungsanleitung
genannten zweckentfremdeten Anwendungsbedingungen.
Die Garantie findet ebenfalls keine Anwendung im Falle von Beschädigungen oder Unfällen, die durch eine
Materialveränderung aufgrund von Fahrlässigkeit, mangelnder Überprüfung oder Wartung entstanden sind oder
durch den Versuch einer Reparatur des Materials.
KINETEC DATA CAPTURE™ DE 12/12
Page 47

Page 48

R
 Loading...