

Page 1

User Guide
Health Technologies
QTUG USER GUIDE v1.0
© Kinesis Health Technologies 2014
All Rights Reserved
Page 2

Address: NovaUCD
Belfield Innovation Park
Belfield
Dublin 4, Ireland
Internet address: http://www.kinesis.ie
Email address: info@kinesis.ie
© 2014 Kinesis Health Technologies Ltd., All Rights Reserved.
2
Page 3

3
This User Guide introduces you to QTUG (Quantitative Timed Up and Go), and helps you quickly learn how to perform
a mobility assement or a falls risk assessment on a patient. For detailed information about the QTUG application, refer
to the application help-files, which you access through the QTUG Help Menu. The User Guide also contains useful
information about configuring QTUG, transferring data files from the tablet to a PC or microSD card for organizing your
QTUG patient files, and using all of the QTUG features.
Intended Use
QTUG is intended to measure gait and mobility parameters for automated, quantitative gait and mobility assessment
via a Timed Up and Go test, using body-worn inertial sensors.
Indications for Use
QTUG is indicated for use with patients who would benefit from assessment of mobility and falls risk.
Thank you for purchasing QTUG
Please read this user guide throroughly before using QTUG. This guide includes important safety information.
Please keep the user guide for future reference.
Page 4

4
Read these safety messages carefully.
This device contains an RF transmitter. It is also an intentional RF receiver and even if other equipment complies with
CISPR emissions requirements, those devices may interfere with the operation of this device.
Radio Information Transmit Characteristics: 2.4GHz Bluetooth radio using GFSK, DQPSK, and 8DPSK modulation and
75kHz bandwidth. Frequency Range in MHz: 2400-2483.5. Output Power in dBm: 5-6.
This equipment has been tested and found to comply with the EMC limits for the Medical Device Directive 93/42/EEC
(EN 55011 Class A and EN 60601-1-2).
These limits are designed to provide reasonable protection against harmful interference in a typical medical
installation. The equipment generates, uses, and can radiate radio frequency energy and, if not installed and used in
accordance with the instructions, may cause harmful interference to other devices in the vicinity. However, there is no
guarantee that interference will not occur in a particular installation. If this equipment does cause harmful interference
with other devices, which can be determined by turning the equipment off and on, the user is encouraged to try to
correct the interference by one or more of the following measures:
Important Safety Information
WARNING
The use of portable and mobile radio frequency (RF) equipment may have an impact on this and other pieces of medical equipment.
Page 5
5
• Reorient or relocate the receiving device.
• Increase the separation between the equipment.
• Connect the equipment into an outlet on a circuit different from that to which the other device(s) is connected.
• Consult the manufacturer for help.
The use of portable and mobile RF equipment may have an impact on this and other pieces of medical equipment.
The use of accessories, cables, or transducers other than those specified in this manual can significantly increase
emissions performance and degrade immunity performance of the product. Also, by using an accessory, transducer,
or cable with the product, other than those specified in this manual, it becomes the responsibility of the third-party
supplier or the user of the product, to determine compliance with the requirements of IEC 60601-1-2 when using this
item.
CAUTION
It is prudent to separate all electrical equipment that is very close in distance to the QTUG system. If it is essential to use the QTUG
system very close to other electrical equipment, it is prudent to determine, by observation, if the performance of either product is
affected by unintended electromagnetic coupling.
WARNING
It is advised not to use equipment other than the following devices listed by manufacturer (Kinesis QTUG sensors with Bluetooth
radio) stacked on or near the product, but if it is required for your location to stack or use equipment that is adjacent to the product, all
must be verified to work and verification shall occur to ensure the product operates properly before conducting any procedures.
WARNING
No modification of this equipment is allowed.
Page 6
6
Glossary
Term Definition
Inertial sensor Wireless sensors including tri-axial accelerometer and tri-axial gyroscope daughter board
Timed Up and Go (TUG) test
Standard mobility assessment commonly used to assess mobility and risk of falls.
Longer completion times are thought to indicate higher risk of falling.
Safety instructions in this user guide
Note: contains useful information
Warning/caution: warns of risk of injury, possible material damage, and possible incorrect results
It is recommended to refer to the manual
Page 7

7
Contents
1. What’s in the box? 8
2. Getting started with the tablet 9
2.1 Tablet layout 9
2.2 Charging the battery 10
2.3 Turning the tablet on and off 11
2.4 Use of third party applications 11
3. Getting started with the sensor 12
3.1 Sensor layout 12
3.2 Sensor dock layout 13
3.3 Charging the sensor 14
3.4 Turning the sensor on and off 14
3.5 Resetting the sensor 15
4. Set up the QTUG test 16
4.1 QTUG test requirements 16
4.2 Physical set up 17
4.3 Set up QTUG application on the tablet 18
5. Perform the QTUG test 21
6. Interpreting QTUG test results 25
7. Using QTUG test results 26
8. After use 29
9. Troubleshooting 30
10. Parameter definition 31
11. Technical specifications 36
12. Regulatory Information 38
13. Warranty 40
Page 8
8
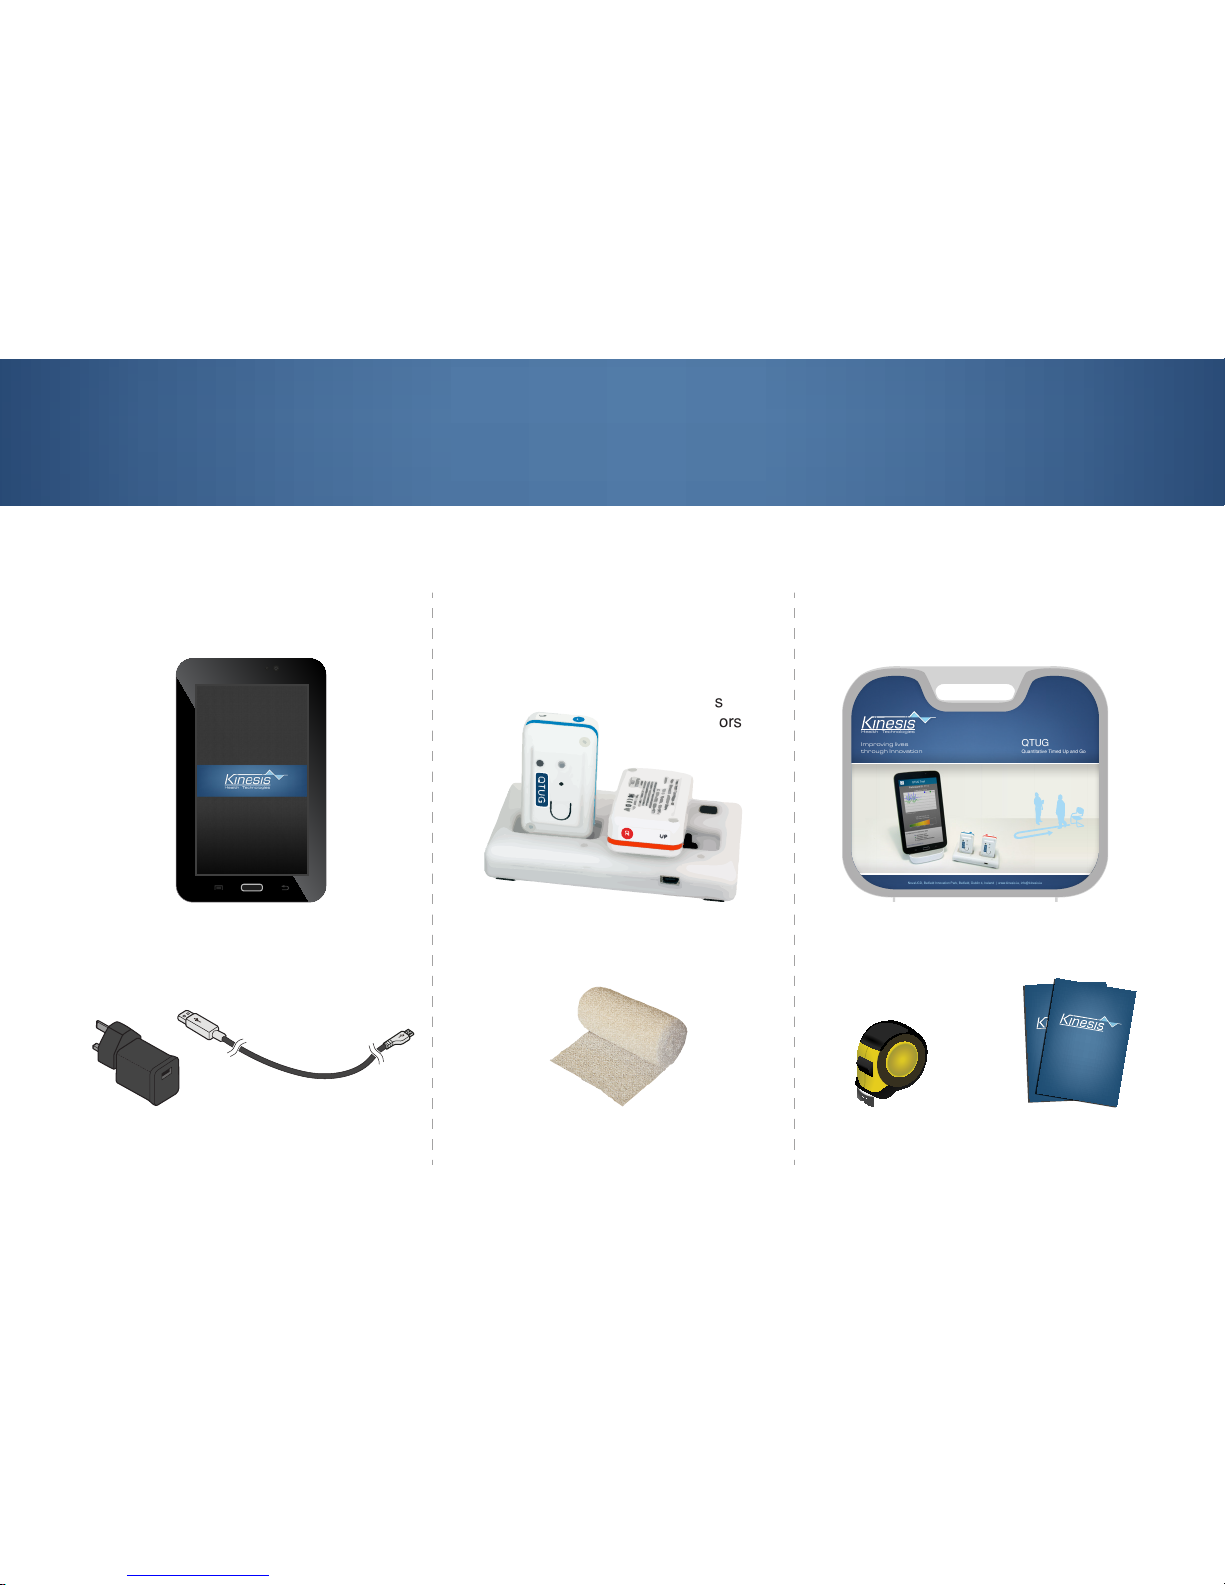
QTUG package includes the following components.
1. What’s in the box?
7” tablet
Power adaptor USB cable
2 wireless
inertial sensors
Sensor dock
Elasticated bandages
Tablet and its accessories Sensor and its accessories Miscellaneous
Measuring tape
Carrying case
Quick Start Guide
Warranty and Safety
Health Technologies
Improving lives
through Innovation
QTUG
Quantitative Timed Up and Go
NovaUCD, Belfield Innovation Park, Belfield, Dublin 4, Ireland | www.kinesis.ie, info@kinesis.ie
Health Technologies
QTUG WARRANTY AND SAFETY
© Kinesis Health Technologies 2014
All Rights Reserved
Health Technologies
QTUG WARRANTY AND SAFETY
© Kinesis Health Technologies 2014
All Rights Reserved
Health Technologies
QTUG QUICK START GUIDE
© Kinesis Health Technologies 2014
All Rights Reserved
Health Technologies
QTUG QUICK START GUIDE
© Kinesis Health Technologies 2014
All Rights Reserved
Page 9
1. Chapter
9
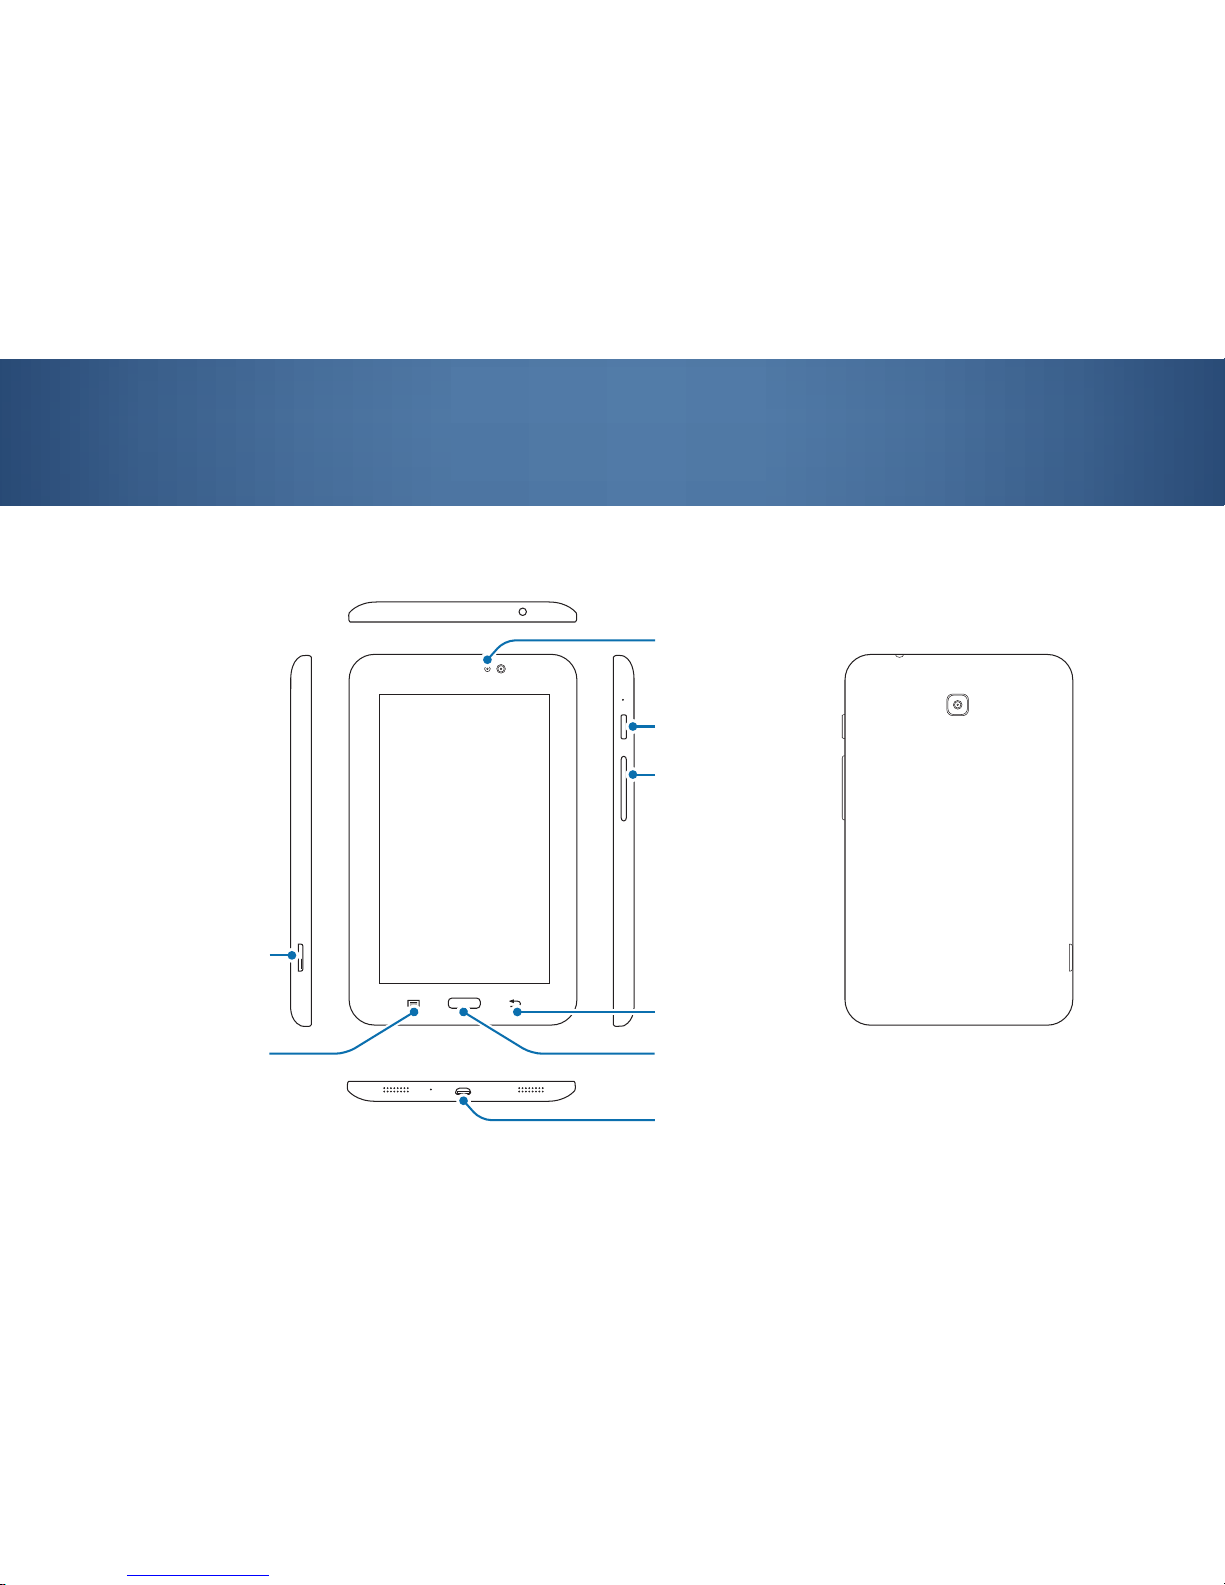
2.1 Tablet layout
2. Getting started with the tablet
HOME button
memory card slot
VOLUME button
POWER button
BACK button
multipurpose jack
MENU button
light sensor
Page 10
10
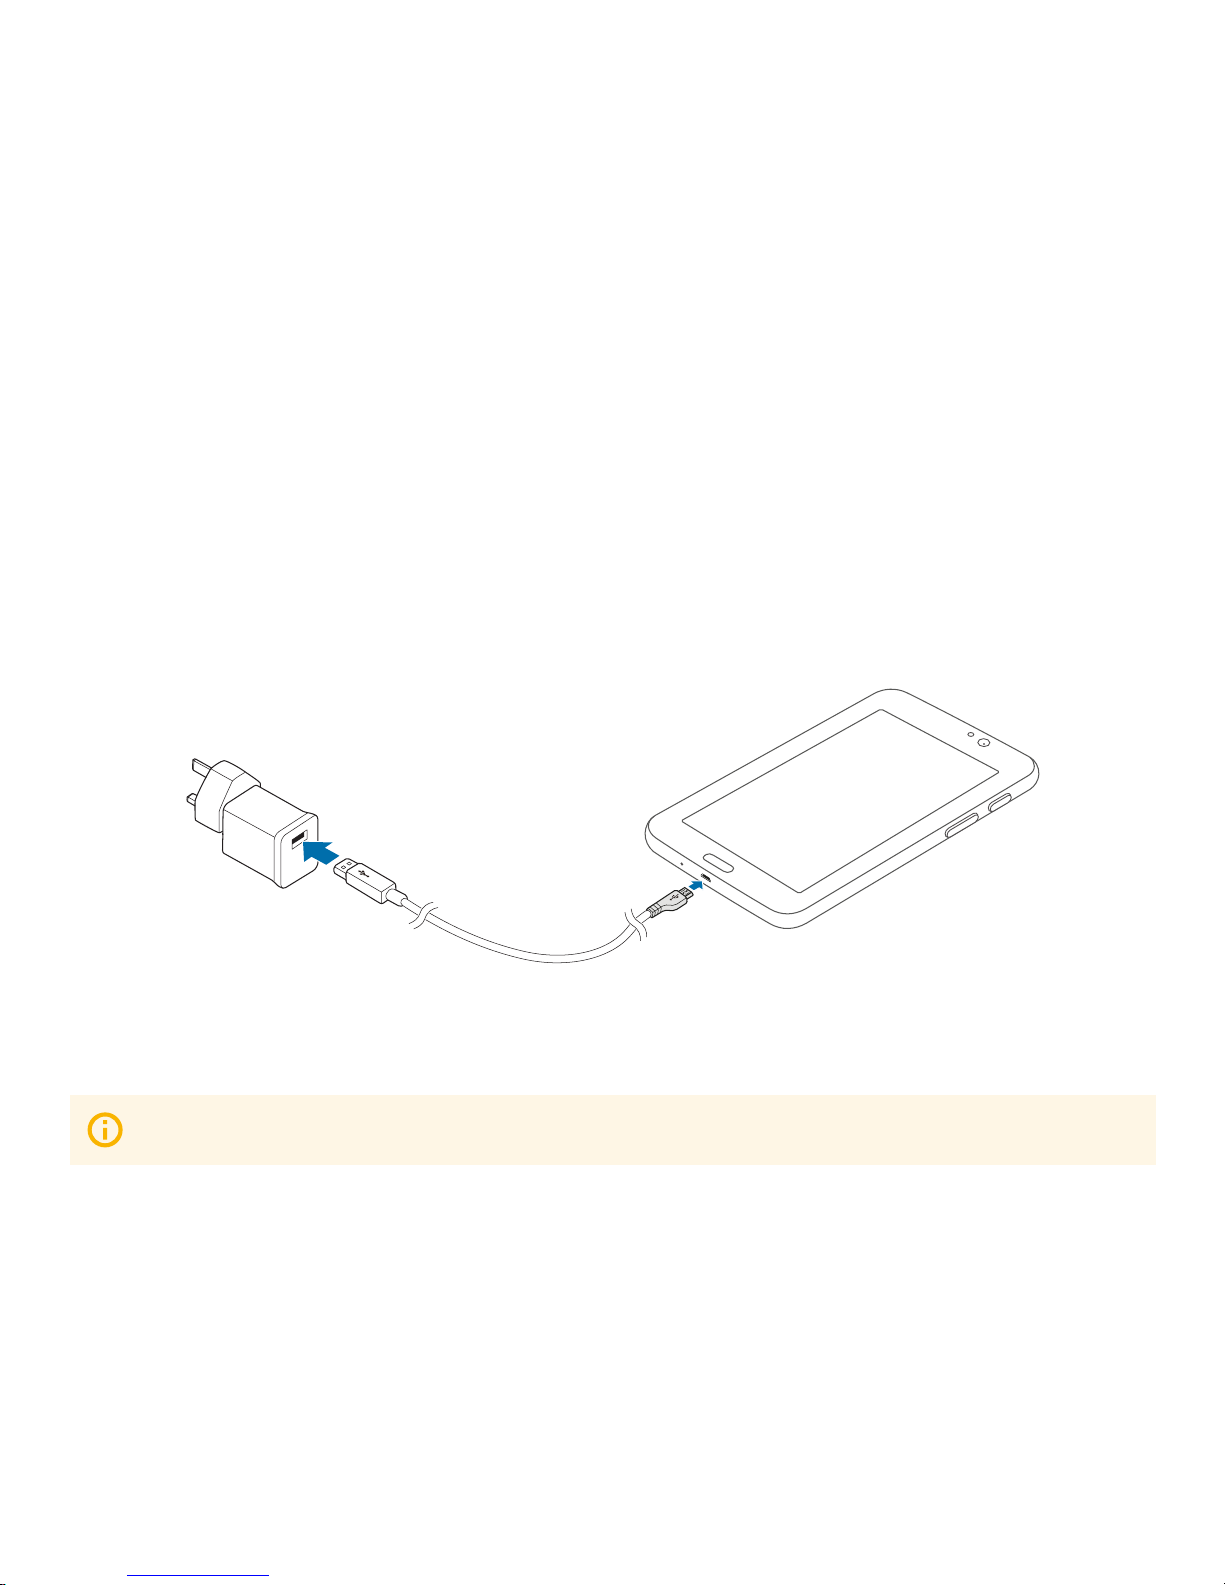
2.2 Charging the battery
When the battery power is low, the tablet emits a warning tone and displays a ‘low battery’ power message.
If the battery is completely discharged, the tablet cannot be turned on immediately when the charger is connected.
Allow a depleted battery to charge for a few minutes before running on the tablet.
Charging with the charger
Connect the large end of the USB cable to the USB power adaptor and then plug the end of the USB cable into the
mulitpurpose jack under the tablet.
Ensure the tablet is charged before performing a QTUG test.
After fully charging, unplug the USB cable from the tablet, and then unplug it from the electric socket.
connect to power adaptor
plug into multipurpose jack
Page 11
11
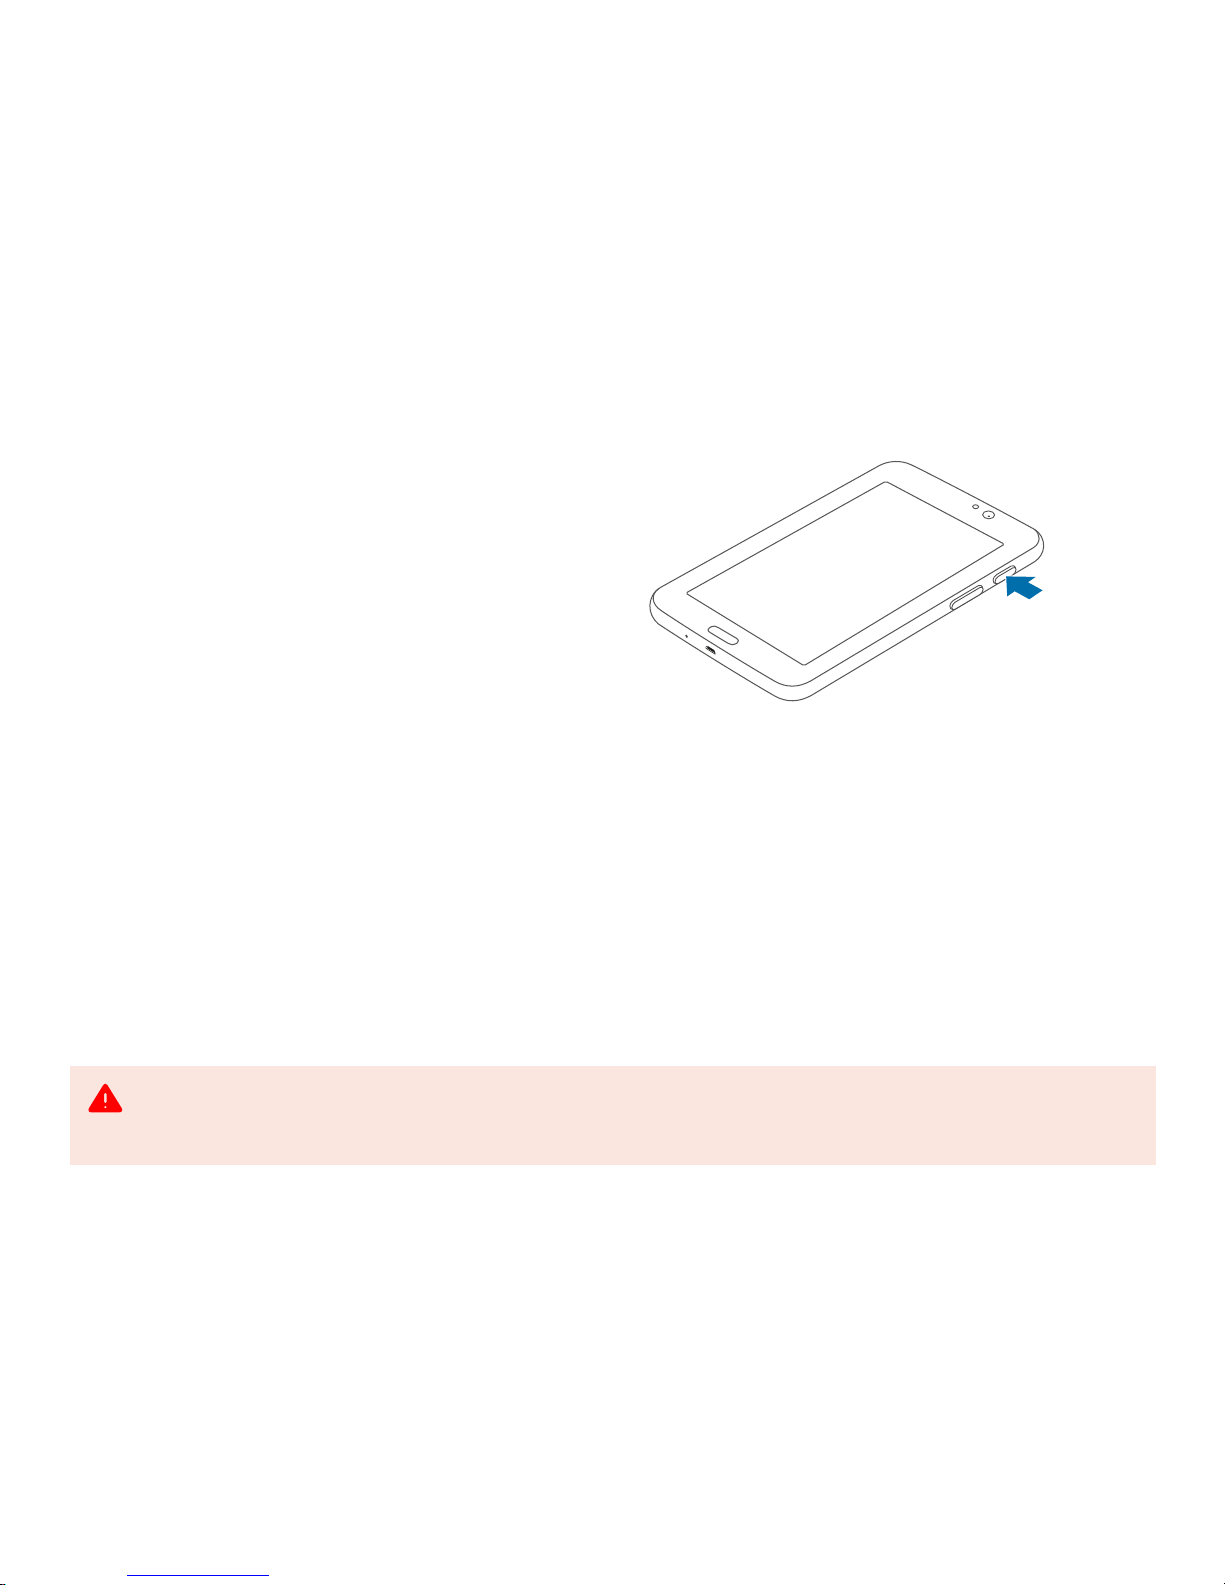
2.3 Turning the tablet on and off
To turn on the tablet, press and hold the POWER button
for a few seconds until you see the Samsung logo. Wait
a moment for the tablet to boot up.
If the tablet’s screen turns off to sleep mode, briefly
press the POWER button or tap once on the screen to
wake it up.
To turn off the tablet, press and hold the POWER
button, and then tap Power off and confirm the shut
down.
2.4 Use of third party applications
The tablet provided should ONLY be used with the
QTUG application. Installing third party applications
on the dedicated tablet may interfere with the correct
operation of the QTUG application.
press and hold
POWER button
The tablet provided is intended to be dedicated for exclusive use with the QTUG application. Installing third party applications onto
the tablet may interfere with the correct operation of QTUG application and interfere with the correct calculation of the results.
Please restrict your use of the tablet to QTUG ONLY.
Page 12
12
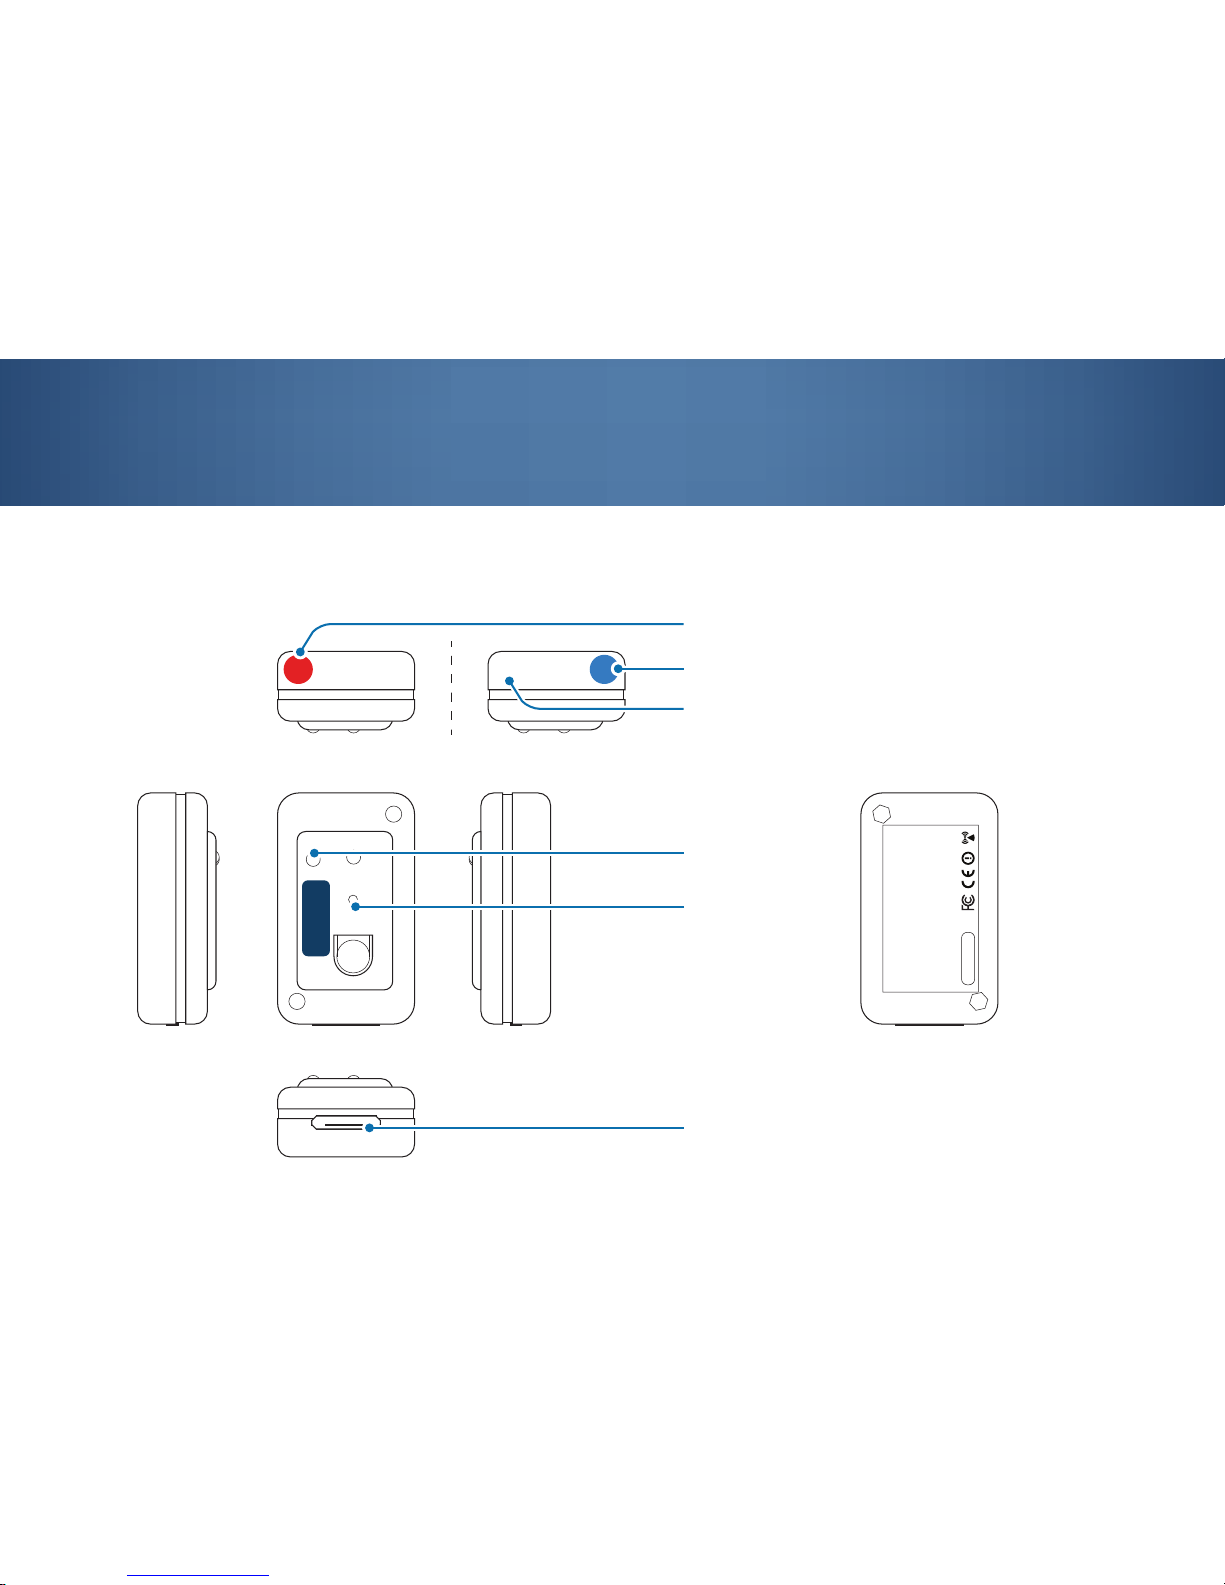
3.1 Sensor layout
3. Getting started with the sensor
QTUG
R
UP
L
UP
BT RADIO ID
Kinesis Health Technologies Ltd.
Model: Shimmer2R w/450mAH Battery
Contains: FCC ID: X2W-SR7-1; T9-RN42
IC: 8838A-SR71; 6514A-RN42
MEDICAL EQUIPMENT INTERMITTENT OPERATION
WITH RESPECT TO ELECTRIC SHOCK, FIRE AND
MECHANICAL HAZARDS ONLY IN ACCORDANCE
WITH UL60601-1, IEC/EC60601, IEC60601-1-2
Made In Ireland 06/14
activity LED
restart pin
charging socket
R indicates the Red sensor attached to the Right leg
L indicates the bLue sensor attached to the Left leg
this side of the sensor facing upwards in orientation
Page 13

13
3.2 Sensor dock layout
micro USB power connector
Kinesis Model: QTUG Charger
Revision: 1.0.0
Use only supplied power adapter.
Approved for use only with
Kinesis QTUG system.
For indoor use only
RESET button
socket
power LED
charging LED
Page 14

14
3.3 Charging the sensor
Place the sensor in the sensor dock, ensuring sensor
socket connected to socket in sensor dock. The power
LED on the sensor dock turns only green when the
sensor is turned on, and when the sensor and the
sensor dock is successfully connected.
The sensor battery is not fully charged while the
charging LED remains orange. If the charging LED turns
off, the sensor battery is fully charged.
The sensor battery should last approximately 5 hours
under normal working conditions.
3.4 Turning the sensor on and off
Turning on and off with the sensor dock
To turn on the sensor, place the sensor in the sensor
dock. If either of the two sensors do not turn on just
reinsert into the dock. The activity LED on the sensor
turns orange. Wait a moment for the sensor to boot up.
When it is ready, the activity LED on the sensor turns
green.
To turn off the sensor, press and hold the RESET
button for a minimum of 7 seconds until the power LED
on the sensor dock turns off.
Charging LED on sensor dock
LED colour Description
Orange Sensor battery is not fully charged.
Off Sensor battery is fully charged.
Power LED on sensor dock
Green
Sensor is successfully connected to the
sensor dock.
Off
Sensor is not turned on and/or is not
connected to the sensor dock.
Activity LED on sensor
LED colour Description
Orange Sensor is turned on and booting up.
Green Sensor is turned on and is ready.
Off Sensor is turned off.
Page 15

15
Turning the sensor on and off directly
Use a paper clip or a pen, press the restart pin to turn
on the sensor. The activity LED turns orange. Wait a
moment for the sensor to boot up. When it is ready, the
activity LED turns green.
To turn off the sensor, press and hold the restart pin for
7 seconds until the activity LED turns off.
3.5 Resetting the sensor
Use a paper clip or a pen to reset the sensor. Press
the restart pin once and the activity LED turns orange.
When it is ready, the activity LED turns green.
To reset the sensor with the sensor dock, press the
RESET button once. The activity LED on the sensor
turns orange. When it is ready, the activity LED on the
sensor turns green.
Ensure the sensors are charged before using QTUG.
QTUG
press the restart pin
to turn on or to reset
the sensor
Page 16

16
4.1 QTUG test requirements
To perform a QTUG test on a patient, ensure the patient is wearing comfortable walking shoe. You will require the
following to complete a QTUG test:
4. Set up the QTUG test
4m (13’1”) of linear floor space.
One standard chair with seat approx. 46 cm (18”) high and
total chair height approx. 65 cm (25.6”) high with arm-rests.
4m / 13’1”
Ensure the chair used for the test is stable (i.e. chair without wheels).
Page 17

17
4.2 Physical set up
2
Position the chair at the start
of the 3m (9’10”) space.
1
Clearly mark the start and end (turn)
points on the floor placed exactly
3m (9’10”) apart, measured from
patient’s toes when seated.
3m / 9’10”
3m / 9’10”
end (turn) point
start point
Ensure the 3m (9’10”) distance is accurately measured from the chair to the end point.
Incorrectly measured distance may result in incorrectly derived gait and mobility parameters.
Page 18

18
4.3 Set up QTUG application on the tablet
3
Turn on the Red sensor and bLue sensor.
Then turn on the tablet and tap the QTUG
icon to launch the QTUG application.
4
Tap the HELP button on the action bar to
open a popup window with help information.
Tap the SETTINGS button to change the
patient ID format or measurement units.
SETTINGS button
ABOUT button
HELP button
action bar
Page 19

19
6
Enter DOB, height and weight by tapping the
- and + buttons or the number and entering
manually. Select a gender by tapping the MALE
or FEMALE button. Tap ‘New Test’ to proceed.
5
Type in a new patient ID to create a new patient
profile and tap the SUBMIT button to proceed to
the patient profile page.
Do not use a patients’ Personally Identifiable
Information (PII) as part of patient ID.
Enter height and weight to nearest cm or ft/inch
and kg or lbs.
Page 20

20
7
If the sensors are not connected yet,
the application will take approx. 5 seconds
to automatically connect to the sensors.
8
When sensors have connected successfully,
the QTUG test screen will appear.
Page 21

21
5. Perform the QTUG test
Ensure the sensors are firmly connected to the patient
to reduce the risk of tripping while walking.
Loosely fitted sensors may result in an invalid test or
adversely affect algorithm operation.
1
Seat the patient on the chair in
order to explain the test.
2
Secure the sensors firmly on the shins
(mid-point of the anterior shank) using an
elasticated bandage.
QTUG
QTUG
Uneven, slippery or otherwise unsuitable underfoot
conditions may affect gait and turning and adversely
affect the mobility assessment.
Page 22

22
3
The sensors must be placed in the correct
orientation with the socket facing down and the
QTUG logo facing out, the Red sensor on the
Right leg and the bLue sensor on the Left leg.
QTUG
QTUG
user’s point of view
socketsocket
QTUG
R
UP
R
UP
QTUG
L
UP
L
UP
4
When the patient is ready, say ‘Go’ and tap
the START button on the QTUG application.
When START is tapped, the activity LED on the sensor
flashes alternately green-orange in streaming mode.
Failure to use the correct orientation
will result in an incorrect calculation
of mobility parameters and falls risk.
Page 23

23
5
The patient must get up from the chair,
walks 3m (9’10”) to the turning point as
marked on the floor, turn at the turning
point, walk back to the chair and sit down.
3m / 9’10”
3m / 9’10”
The patient has to walk exactly 6m (19’7”). The test is calibrated to give valid results based on accurate measurement of the
3m (19’7”) distance from the chair to the turning point. Incorrectly measured distance may result in incorrectly derived gait
and mobility parameters.
Page 24

24
6
When the patient is reseated, tap the STOP
button to stop recording data. The sensor
data is displayed on the screen.
7
On the application, tap the ACCEPT button
to confirm that the test is valid (i.e. the patient
performed the test correctly), and to save data.
Tap RETEST if the test is invalid and you wish
to perform test again and discard data, the start
screen is displayed.
Page 25

25
An accepted and valid test displays and saves the test results. The definitions
of these results are explained in the table below.
Definition Description
TUG test time Time taken to complete the TUG test.
Falls risk estimate (FRE)
Statistical risk of falls based on a model derived from
community dwelling older adults.
Comparison to ref. data
Comparison of each patients’ mobility (as measured by
QTUG) when compared to average values for the population.
Parameters deemed out of the normal range are shown
here (if no parameters are deemed outside this range, no
parameters are shown here).Al
Detailed results Comprehensive quantitative assessment of mobility.
Inertial sensor data
Graphical representations of left and right shank medio-
lateral angular velocity.
For detailed explanation of the results, read chapter ‘10. Parameter defintion’.
6. Interpreting QTUG test results
Page 26

26
Export results from database
The results for all patients can be retrieved as a SQLite database or exported in Excel format. To export results from
database, tap the Export to Excel button in the Settings. The Excel file with the extension *.xls is stored in the ‘My
Files’ / ‘Kinesis’ / ‘Export’ directory.
7. Using QTUG test results
When the results are displayed, options are available to generate a PDF report for an individual test or to export all
patient results from the database.
Generate PDF report
The results for a given test can be exported to a PDF report, which documents the clinical info and QTUG results.
On the results screen, tap the PDF button to generate this report which is stored in the ‘My Files’ / ‘Kinesis’ / ‘Export’
directory of the tablet. In the Export folder, you can find the PDF report with the extension *.pdf.
Page 27

27
Backup patients’ data onto a microSD card
To backup the data onto a microSD card, tap the BACKUP button in the Settings. Data can also be retrieved from the
tablet by connecting the tablet to a PC or laptop via the USB cable supplied and browsing to the ‘My Files’ / ‘Kinesis’ /
‘Data’ directory. In the Data folder, you can find the database file with the name qtug.db.
View previous tests
Previous tests from a given patient are listed under the patient profile page for each patient.
Page 28

28
Erase patient data from internal storage
Prior to erasing patient data, ensure that data are backed up to a PC or laptop. To erase the data from the internal
storage on the tablet, tap on ‘My Files’ and tick the ‘Kinesis’ folder. On top of the screen, tap on the bin icon and
confirm with ‘Yes’ to delete the ‘Kinesis’ folder. Permanently erased data cannot be recovered.
Erase patient data from microSD card, only if a microSD card is used
To erase the data from the microSD card, tap on ‘My Files’ / ‘extSdCard’ and tick the ‘Kinesis’ folder. On top of the
screen, tap on the bin icon and confirm with ‘Yes’ to delete the ‘Kinesis’ folder.
Page 29
29
Sensors
At the end of the assessment, remove the sensors from the elasticated bandages. The sensors can be wiped down
using standard clinical alcohol wipes to reduce risk of infection.
After cleaning, insert the sensors into the sensor dock to be fully charged for the next assessment. Please turn off the
sensors after they are fully charged.
Tabl e t
At the end of the assessment, press the HOME button on the tablet to close the QTUG application. Please turn off the
tablet after use. If the battery power is low, connect the tablet to the USB power adaptor for charging. Before cleaning,
it is essential to remove the connecting USB cable for the tablet from the power inlet socket of the device.
Storage and handling conditions
For safe keeping, place the tablet, sensors and accessories in the designated foam slots in the carry case after use,
cleaning or charging. Store the carry case in a cool, dry location.
8. After use
Ensure no liquids get into the tablet and sensor via the charging socket, otherwise malfunctions may occur. Never immerse the
devices in disinfectant or other liquids; otherwise the tablet and sensor may be damaged, resulting in a hazard to users and patients.
The tablet and sensor must be completely dry before being started up.
Page 30

30
9. Troubleshooting
If there are any problems which cannot be rectified immediately, contact Kinesis technical support.
Problem Cause Remedy
The tablet does not turn on The battery is flat Check that tablet is fully charged.
The sensor does not connect The sensor is turned off Check that sensor is switched on.
The sensor does not turn on The battery is flat
Check that sensor is fully charged.
If problem persists, close down the tablet and reboot.
The test keeps failing Sensors are not firmly fastened Ensure sensors are firmly and securely fastened to the patient’s shin.
Sensors are not correctly
positioned
Ensure sensors are oriented correctly with the socket facing down
and the logo facing out, the right sensor on the right leg and the left
sensor on the left leg
Page 31

31
10. Parameter definition
Definition of mobility paramters produced by QTUG.
Parameter Description
Falls risk estimate (%) Statistical risk of falling (defined for community dwelling older adults over 60 years of age)
TUG recording time (s) Time to complete TUG test
Temporal gait parameters
Parameter Description
Time taken to stand (s) Time from ‘Go’ to first heel strike or toe-off point
Number of gait cycles Number of gait cycles in total test
Number of steps Number of steps in TUG test
Cadence (steps/min) Average number of steps taken per minute during test
Walk time (s) Time from first to last heel-strike or toe-off point - time patient actually spends in locomotion during TUG test
Average swing time (s)
Average swing time over all gait cycles, averaged across both legs, swing time is defined as the time
between a toe-off point and the heel strike point on the same foot.
Average stance time (s)
Average stance time over all gait cycles, stance time is defined as the time between a heel-strike and toe-
off point on the same foot
Page 32

32
Average stride time (s) Time for one stride (time between successive heel-strikes), averaged over all gait cycles
Average step time (s)
Average of times between heel-strike of one foot to heel strike of the opposite foot measured in seconds
(sec)
Average single support (%) Proportion of a gait cycle spent on either foot
Average double suppor t (%) Proportion of a gait cycle spent on both feet
Swing time variability (%) Coefficient of variability in swing time
Stance time variability (%) Coefficient of variability in stance time during TUG test
Stride time variability (%) Coefficient of variability in stride time during TUG test
Step time variability (%) Coefficient of variability in step time during TUG test
Single support variability (%) Coefficient of variability in the proportion of a gait cycle spent on a single foot
Double support variability (%) Coefficient of variability in proportion of a gait cycle spent on both feet
Spatial gait parameters
Parameter Description
Average stride velocity (cm/s) Average walking speed during TUG test
Stride velocity variability (%) Variation in walking speed during TUG test
Average stride length (cm) Average stride length during TUG test
Stride length variability (%) Coefficient of variability in stride length over TUG test
Page 33

33
Turn parameters
Parameter Description
Pre-turn time (s) Time from ‘go’ to median gait event of TUG test
Post-turn time (s) Time from median gait event of TUG to end of test
Ratio of pre-turn to post-turn
times
Ratio of Time from ‘go’ to median gait event of TUG to Time from median event of TUG to end of test
Time taken to turn (s) Time taken to turn
Number of strides in turn Number of steps in turn
Turn steps/time ratio Ratio of the number of steps taken to turn to the time taken to turn
Angular velocity parameters
Parameter Description
Forward rotation speed at turn
time (deg/s)
Angular velocity in sagittal plane at median gait event of TUG test
Range of peak forward rotation
speed (deg/s)
Range of angular velocity in the sagittal plane at mid-swing over entire walk
Average peak forward rotation
speed (deg/s)
Average angular velocity in the sagittal plane at mid-swing over entire walk
Minimum side-to-side rotation
speed (deg/s)
Minimum angular velocity in the side-to-side direction during the assessment
Maximum side-to-side rotation
speed (deg/s)
Maximum angular velocity in the side-to-side direction during the assessment
Page 34

34
Average side-to-side rotation
speed (deg/s)
Average angular velocity in the side-to-side direction during the assessment
Minimum for ward rotation speed
(deg/s)
Minimum for ward angular velocity in the sagittal plane during the assessment
Maximum forward rotation speed
(deg/s)
Maximum forward angular velocity during the assessment
Average forward rotation speed
(deg/s)
Average forward angular velocity during the assessment
Variation in for ward rotation
speed (%)
Coefficient of variation in forward angular velocity during the assessment
Variation in side-to-side rotation
speed (%)
Coefficient of variation in angular velocity in the side-to-side direction during the assessment
Minimum horizontal rotation
speed (deg/s)
Minimum angular velocity in the transverse plane during the assessment
Maximum horizontal rotation
speed (deg/s)
Maximum angular velocity in the transverse plane during the assessment
Average horizontal rotation
speed (deg/s)
Average angular velocity in the transverse plane during the assessment
Variation in horizontal rotation
speed (%)
Coefficient of variation in angular velocity in the transverse plane during the assessment
Angular velocity x Height parameters
Parameter Description
Minimum for ward rotation speed
x Height (deg.m/s)
Related to average velocity of shank in forward direction
Page 35

35
Maximum forward rotation speed
x Height (deg.m/s)
Related to maximum linear velocity of shank in forward direction
Average forward rotation speed x
Height (deg.m/s)
Related to minimum linear velocity of shank in forward direction
Minimum side-to-side rotation
speed x Height (deg.m/s)
Related to minimum linear velocity of shank in side-to-side direction
Maximum side-to-side rotation
speed x Height (deg.m/s)
Related to maximum linear velocity of shank in side-to-side direction
Average side-to-side rotation
speed x Height (deg.m/s)
Related to average linear velocity of shank in side-to-side direction
Minimum horizontal rotation
speed x Height (deg.m/s)
Related to minimum linear velocity of shank in vertical direction
Maximum horizontal rotation
speed x Height (deg.m/s)
Related to maximum linear velocity of shank in vertical direction
Average horizontal rotation
speed x (deg.m/s)
Related to average linear velocity of shank in vertical direction
Page 36

36
Specifications
Model Shimmer2R w/450mAH Battery
Power supply Input 100 - 240V AC 50-60Hz
Output 7.5 VDC 15W nominal, 1.7A Max
Current consumption 700mA (7.5V input)
Weight < 700 grams (1.4 pound)
Operating Conditions +5 ˚C – +40 ˚C (20% – 95% Relative Humidity)
Storage/Transport Conditions -20 ˚C – +60 ˚C (20% – 95% Relative Humidity)
Bluetooth Radio Transmit Band 2.4Ghz
Modulation GFSK, DQPSK, and 8DPSK
Frequency Range 2400MHz – 2483.5MHz
Output Power Min: 5 dBm; Typical: 6 dBm; Max: 6 dBm
Bluetooth Radio Receiver Bandwidth 75kHz
Frequency Range 2400MHz – 2483.5MHz
IP Rating None
11. Technical specifications
Page 37

37
Sterility The device is not sterile
Re-use The device can be reused
Essential performance The device has no essential performance
Expected service life 3 years, dependent on battery usage
User maintainable parts None
Symbols on QTUG label
This device is authorized under part 18 of the
Declaration of Conformity.
This radio device belongs to Class 2 for which restrictions or bans
apply regarding its placing on the market or putting into service.
This device fulfils the provisions of EC directive
93/42/EEC (EN 55011 Class A and EN 60601-1-2).
This device contains an RF transmitter and an intentional RF
receiver. Interference may occur in the vicinity of equipment.
Correct disposal of this product (Waste Electrical & Electronic Equipment)
This marking shown on the product, accessories or literature indicates that it should not be disposed of,
with other household wastes at the end of its working life. To prevent possible harm to the environment
or human health from uncontrolled waste disposal, please seperate these items other types of waste
and recycle them responsibly to promote the sustainable reuse of material resources.
Users should contact their supplier and check the terms and conditions of the purchase contract. This
product and its electronic accessories should not be mixed with other commercial wastes for disposal.
This product does not contain any hazardous substances.
Page 38

38
12. Regulatory Information
Declaration of Conformity
The Kinesis Health Technologies QTUG product meets the relevant medical device regulations in EU and all other geographies in which it is
made available for sale. As the legal manufacturer, Kinesis Health Technologies (and its distributors) shall comply will all applicable laws and
regulations relating to medical devices, specifically the Medical Device Directive 93/42/EEC (‘MDD’) as it pertains to a Class I medical device
(without a measurement function). In the United States, QTUG meets the Quality System Regulations (‘QSR’), specifically the FDA 21 CFR part
820 for a class I medical device (exempt from 501(k) regulation).
Restrictions on Use of QTUG
THE KINESIS QTUG PRODUCT IS NOT INTENDED, DESIGNED OR AUTHORIZED FOR CONTINUOUS COMMUNICATION OF REAL TIME
DATA. THE SOFTWARE IS NOT INTENDED, DESIGNED OR AUTHORIZED FOR PROVIDING TIME-CRITICAL MEDICAL CARE, PROVIDING
MEDICAL OR OTHER EMERGENCY RESPONSE ALERTS OR ANY OTHER ANY APPLICATIONS OUTSIDE THE INTENDED USE SPECIFIED
IN THE USER GUIDE, OR FOR USE IN ANY CIRCUMSTANCE IN WHICH THE FAILURE OF QTUG WOULD PRESENT AN UNREASONABLE
RISK OF ILLNESS OR INJURY TO THE USER.
Medical Device Regulatory Compliance
QTUG is intended to measure gait and mobility parameters for automated, quantitative gait and mobility assessment during the Timed Up and Go
test, using body-worn inertial sensors. QTUG is indicated for use with patients who would benefit from assessment of mobility and falls risk.
In purchasing QTUG, the customer acknowledges and understands that the software is registered as a medical device under the Medical
Device Directive and that Kinesis may not put products ‘on sale’ without first certifying to CE conformance. Similarly, for the US, the customer
acknowledges and understands that the software is registered as a medical device under the Quality System Regulations. For such products,
the purchase and subsequent use or resale by the customer must be with Kinesis express permission and in accordance with relevant medical
device regulations.
Kinesis (or where appropriate, its local distributors) shall act as the complaint handling point of contact for any complaints relating to QTUG.
Complaints shall be defined in accordance with the MDD.
Page 39

39
Any complaints should be provided in English and in writing to Kinesis (or where appropriate, its local distributors). Complaints submitted shall be
handled in accordance with complaint handling processes mandated by the MDD.
Representations and Warranties
Kinesis and its Distributors warrant that QTUG, when used in compliance with the documentation complies with the essential requirements of the
MDD. Kinesis will perform its obligations in compliance with all applicable laws and regulations.
By purchasing QTUG, the customer acknowledges that:
• it has been informed by Kinesis and is aware and understands that QTUG, specifically the Software, is a Medical Device within the meaning
of the Section 2(a) of Article 1 of the MDD and further that the customer is responsible for informing its customers that QTUG is a Medical
Device.
• the customer shall not in any way alter, modify, repair, attempt to repair or replace the Hardware or Software or relevant labelling except as
otherwise permitted by Kinesis in writing.
Page 40

40
12 Months Warranty
This warranty covers the QTUG sensors, tablet and software and accessories (together referred to as the ‘Product’) supplied by Kinesis Health
technologies. Subject to the warranty conditions below, Kinesis warrants to the original end customer purchasing the Product (‘you’) that,
for a period of 12 months from the original date of the purchase of the Product by you, the Product will be free from defects in materials and
workmanship.
If during the period of the warranty this Product proves defective under normal use and service, you must notify Kinesis or local distributor of
the defect in the Product within 12 months of the date of the purchase of the Product by you and you must return the Product to Kinesis or local
distributor within 30 days of notifying Kinesis or local distributor of that defect. If, having inspected the Product, Kinesis accepts the Product is
defective, Kinesis will (in its sole discretion) either repair or replace the par t causing the defect or replace the Product without charge.
Warranty Conditions
• This warranty does not cover the Product if it has been resold or used for rental purposes.
• This warranty does not cover defects in the Product that are caused by accidental damage, your and/or any third party’s negligence or
unreasonable use, use with products not supplied by Kinesis, use of Product otherwise than in accordance with Kinesis’s QTUG User Guide
or any other instructions provided with the Product, or any other cause unrelated to defects in material and workmanship.
• This warranty does not cover the Product if it has been modified or repaired by any person other than Kinesis.
• Repair or replacement under the terms of this warranty does not give right to extension to or a new starting of the period of warranty.
• This warranty does not cover the following:
» Periodic checks, maintenance, repair and replacement of parts due to normal wear and tear.
» Upgrading of software.
» The product has been used in conjunction with accessories and/or software not approved by Kinesis for use with this Product
» Accidents, Acts of God or any cause beyond the control of Kinesis caused by but not limited to lightning, water, fire, public disturbances
and improper ventilation.
» Un-authorised modifications or repairs to the Product.
13. Warranty
Page 41

QTUG
© Kinesis Health Technologies
All Rights Reserved
 Loading...