

Kindred THE DESIGNER user manual

INSTALLATION INSTRUCTIONS
FOR THE DESIGNER SERIESBY KINDRED
GENERAL ADVICE
Please read these instructions before you begin installation.
1. Unpack the sink and inspect for any shipping damage before starting the installation.
Do not install a damaged unit.
2. Franke Kindred Canada Limited accepts no liability for damage to the countertop, or sink fixture, during
installation.
3. Installation of The Designer Series product may require custom cabinetry. We recommend that an
experienced cabinet maker build the new cabinet, or is responsible for modifications to existing
cabinets, for this product.
4. To ensure a proper fit between the sink and the cabinet, and any support framing, we
recommend providing the cabinetmaker with the actual sink to be installed.
5. Kindred undermount sinks include a factory supplied masonite template to assist the
fabricator/installer when preparing the countertop cut-out. This template has been sized to
reveal approximately 1/4" of the sink rim. Any variance from this standard is certainly
permissible, but must be based upon agreement between the customer and the
fabricator/installer.
6. The aesthetics of the installed product is of the utmost importance. Please take the necessary
care to ensure that any exposed silicone joints are kept to a minimum, the sink is properly
aligned to the cut-out, and excess silicone is cleaned from the sink.
7. The Designer Series product is hand fabricated, and dimensions of the the product will vary
from one unit to the next. Industry accepted dimensional variance for this type of product is
within 1/8".
8. Product specifications are available at “Tools for the Trade” located on our website at
www.kindredcanada.com.
ITEMSSUPPLIED BYKINDRED
In addition to the Installation Instructions provided, Kindred has supplied the following items within the
sinkpackage:
•
The Designer Seriesproduct
•
3 1/2" stainlesssteel sink strainers
•
1/8" masonite template for undermountsinks
31216
1105 1
FURTHER ASSISTANCE
For additional assistance, you may contact our Customer Service Department by phone:
CANADA: (866) 687-7465 USA: (800) 637-6485
(705) 526-4764 215) 712-2626
or you maychoose to send usan e-mail
CANADA: info.fkc@kindredcanada.com USA: customer.service@fhpsinks.com
THE DESIGNER SERIES
FARMHOUSESINKS
Installation Options
With appropriate planning, Kindred Farmhouse sinksmaybe installed several different ways.
The sink... the base cabinetunit ... and the countertop ... must be selected with a specific installation in mind.
Kindred Farmhouse sinksmaybe installed as:
1. Undermount sinks (rim of the sink is below the countertop)
2. Built-up sinks(rim of the sink is raised above the countertop)
Built-up sinks may be installed with up to 1 1/2" ofthe side of the sinkexposed
(above the top surface ofthe countertop).
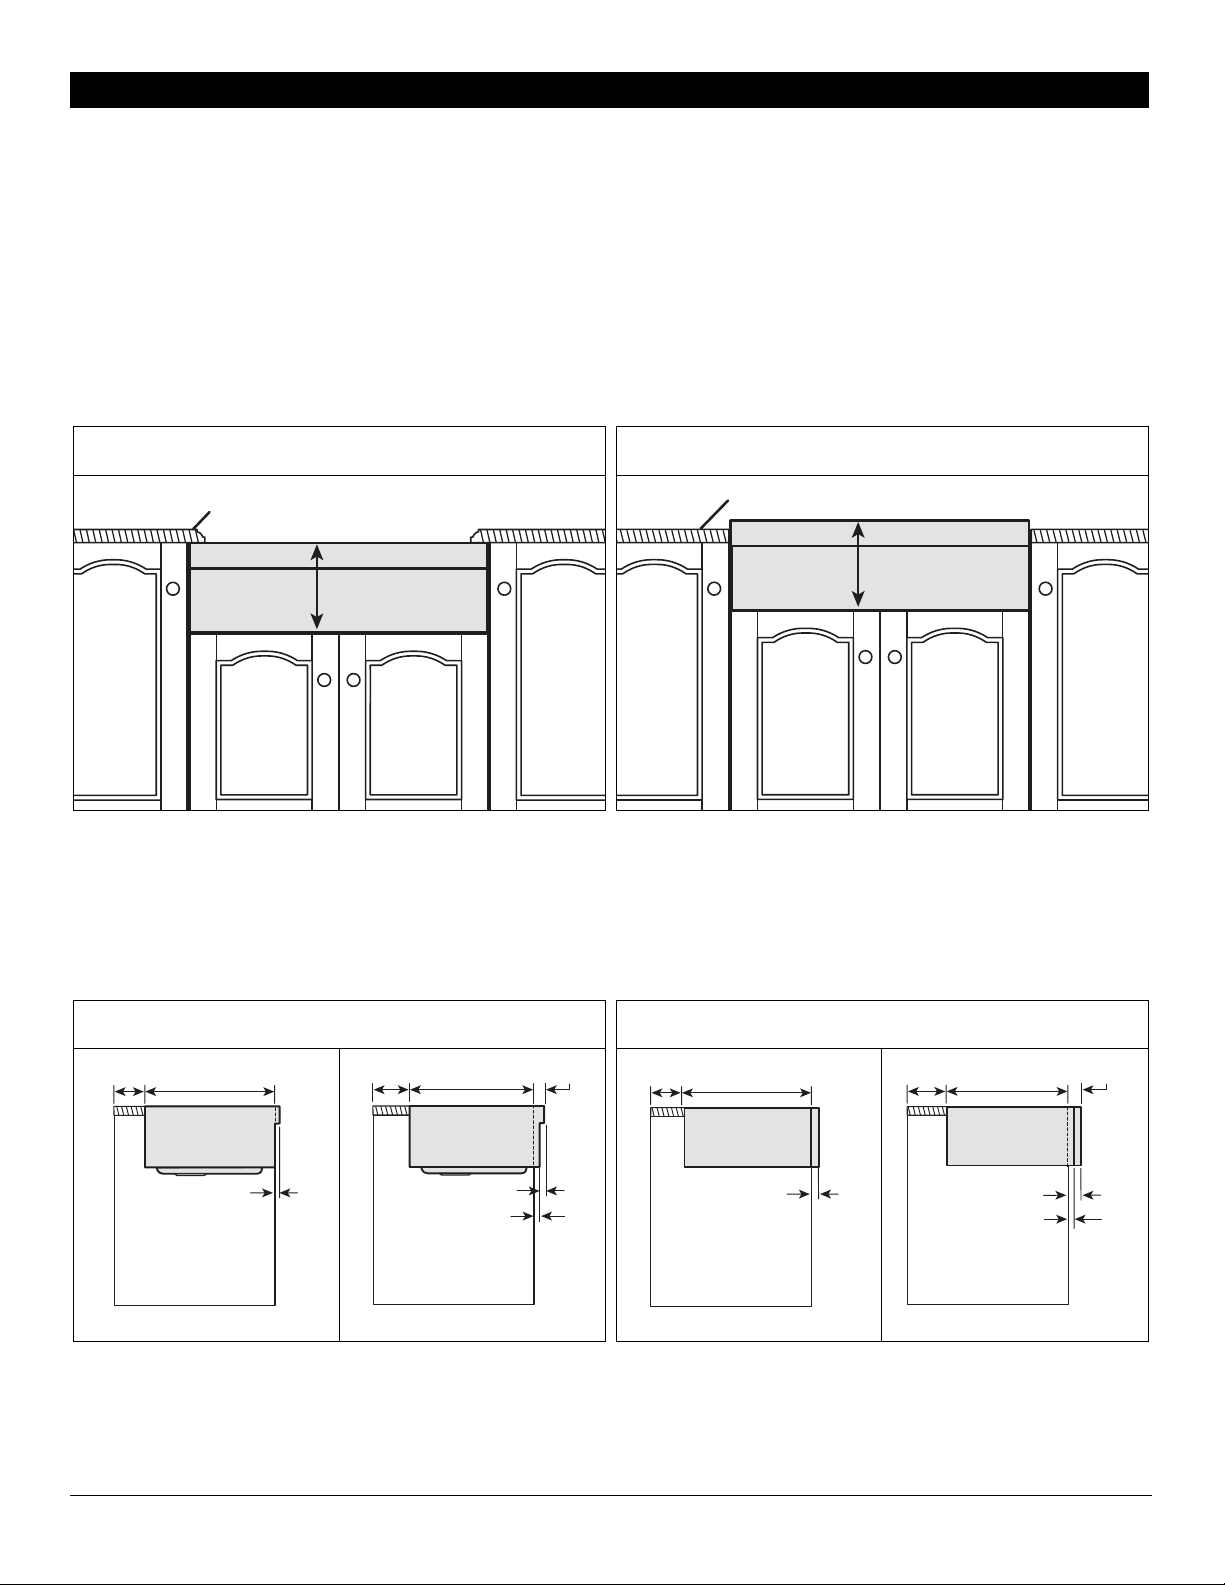
Kindred Farmhouse sinksmayalso be installed with the frontcornersof the apron flush to adjacentcabinets, or alternatively ,
the frontcorners of the apron mayextend outbeyond the face of adjacentcabinets byas much as1/2". We would c aution you
to make allowance for installation ofthe faucet. Position the sinkso that there is enough clearance behind the sinkto allow
for a backsplash, and fullmobility of the faucet lever.
The farmhouse sinkhas a 3/4" flange on the underside of the apron that will support the unit.
Dab silicone to the base cabinetframe that will contact the sink flange.
Then position the uniteither flush with the front face ofthe cabinet, or extend the unit up to 1/2" beyond the frontface ofthe
cabinet.
31216
2 1105
Countertop
9" Sink Apron
Countertop
9" Sink Apron
Flush Front
LINEAR
Extended Front
4" 20"
3/4"
24" Cabinet
4 1/2" 19 1/2" 1 1/4"
3/4"
1/2"
24" Cabinet
Flush Front
BOW
UNDERMOUNT SINKS BUILT-UP SINKS
Extended Front
4 5/8" 19 3/8"
5/8"
24" Cabinet
5 1/8" 18 7/8" 1 1/8"
24" Cabinet
5/8"
1/2"
31216
1105 3
FARMHOUSESINKS
24"
Cabinet
19 3/8"
Linear
20"
Bow
Finished Wall
4 5/8" Linear 4" Bow
Front Face
of Cabinet
5/8" Linear 3/4" Bow
24"
Cabinet
Front Face
of Cabinet
19 3/8"
Linear
20"
Bow
Finished Wall
4 5/8" Linear 4" Bow
Reference Point
for Location
of Masonite
Template
18 1/8"
Linear
18 3/4"
Bow
5/8" Linear 3/4" Bow
1 1/2"
2 1/2"
1 1/2"
20" 16"
19 3/8"
20" 16"
20"
5/8" 2 1/2" 3/4"
LINEAR FRONT BOW FRONT
FLUSH FRONT INSTALLATION
UNDERMOUNT SINK
FLUSH FRONT INSTALLATION
BUILT-UP SINK
31216
4 1105
UNDERMOUNT SINKS
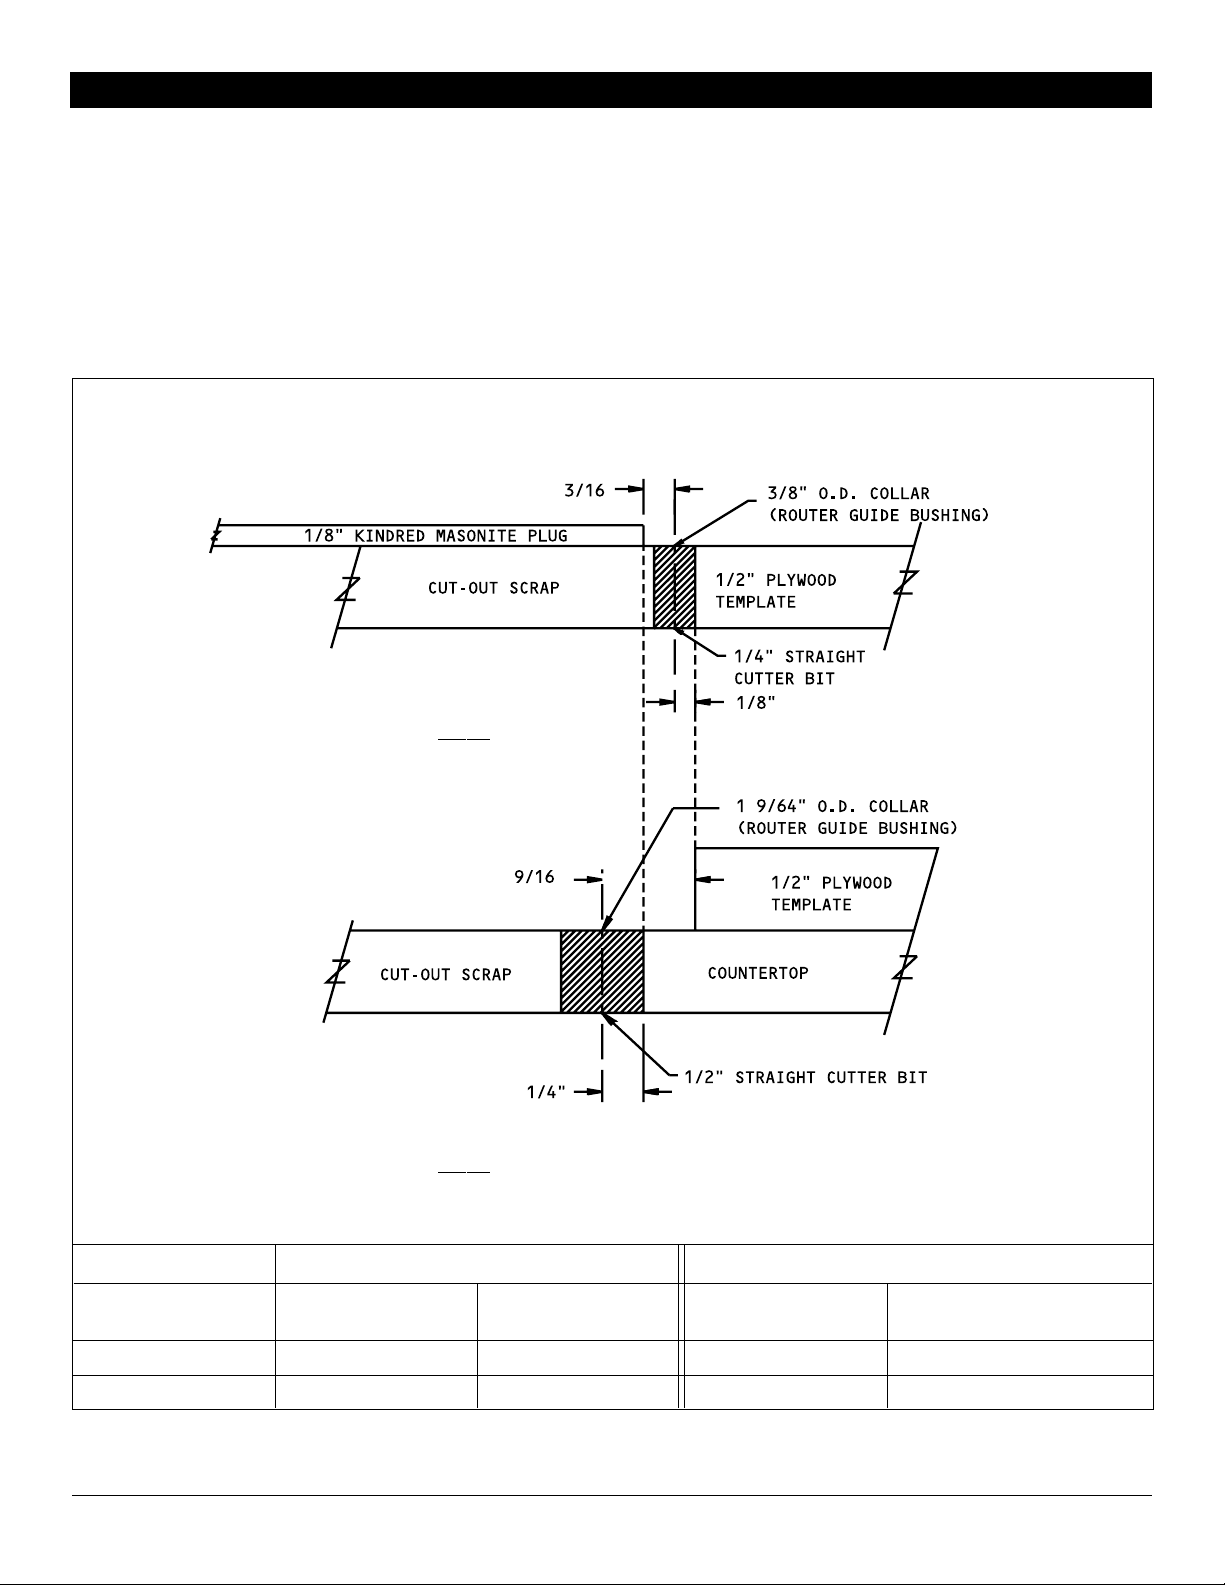
Fabricator Template Preparation
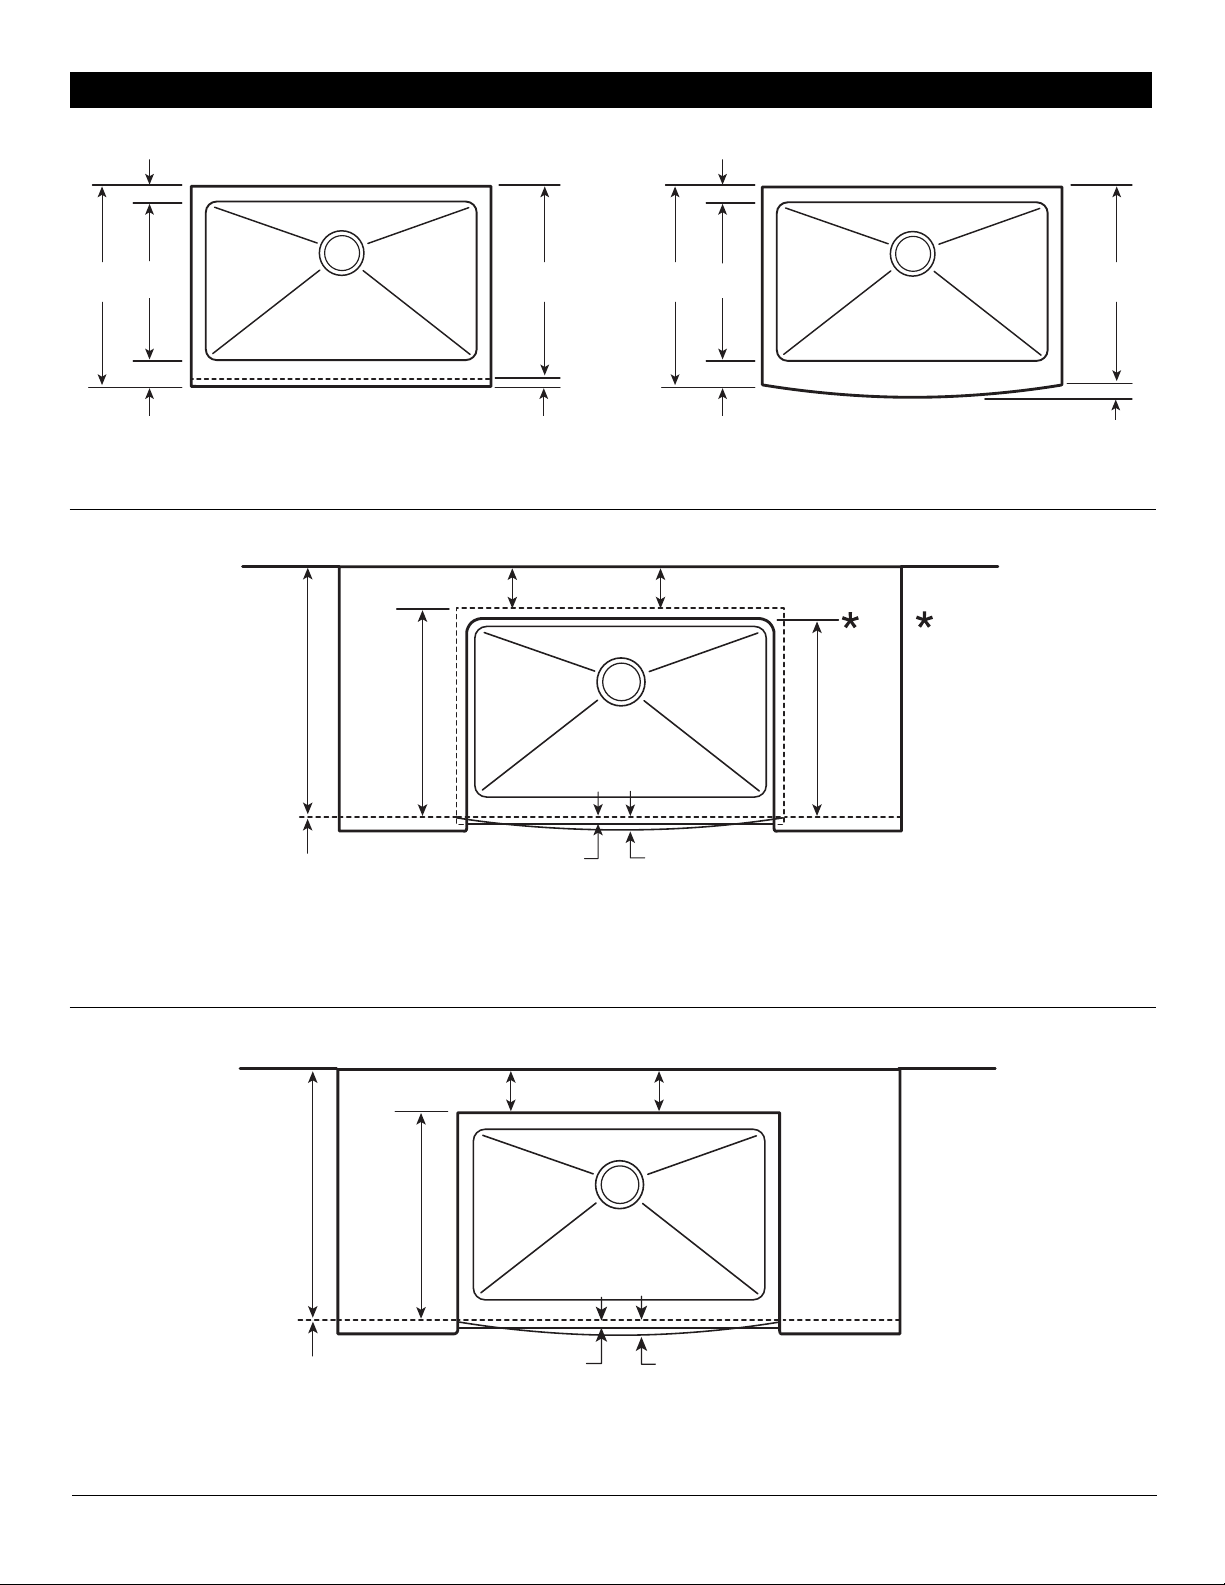
The masonite template supplied by Kindred has been machined to the exact size and shape of the countertop cut-out, and
will reveal approximately 1/4" of the sinkrim.
We recommend that this masonite template be used to create a female template from 1/2" plywood.
Use a router guide bushing and straightcutter bit to trace the masonite template onto 1/2" plywood, as indicated by Figure
1, Part A, Template Preparation.
Sand the cut edge clean and smooth.
Part A Part B
Router Guide
Cutter Bit
Router Guide
Cutter Bit
Bushing O.D. Bushing O.D.
Recommended 3/8” 1/4” 1 9/64” 1/2”
Alternate 1/2” 1/4” 1” 1/4”
Part A
P
art B
FIGURE 1
31216
1105 5
UNDERMOUNT SINK INSTALLATION ALTERNATIVE 1
Sink Installation Procedure
1. Clamp the 1/2" plywood female template on the top surface of the countertop, in the desired position. This
position will be determined by the relationship of the sink rim to cabinet gables, cabinet supporting
members, and deckmounted fittings.
2. Trace the edge of the template with the router guide bushing and straight cutter bit as indicated by
Figure 1, Part B, Template Preparation.
3. Finish the cut-out edge with the desired router bit(ie. chamfer, bullnose, Roman ogee).
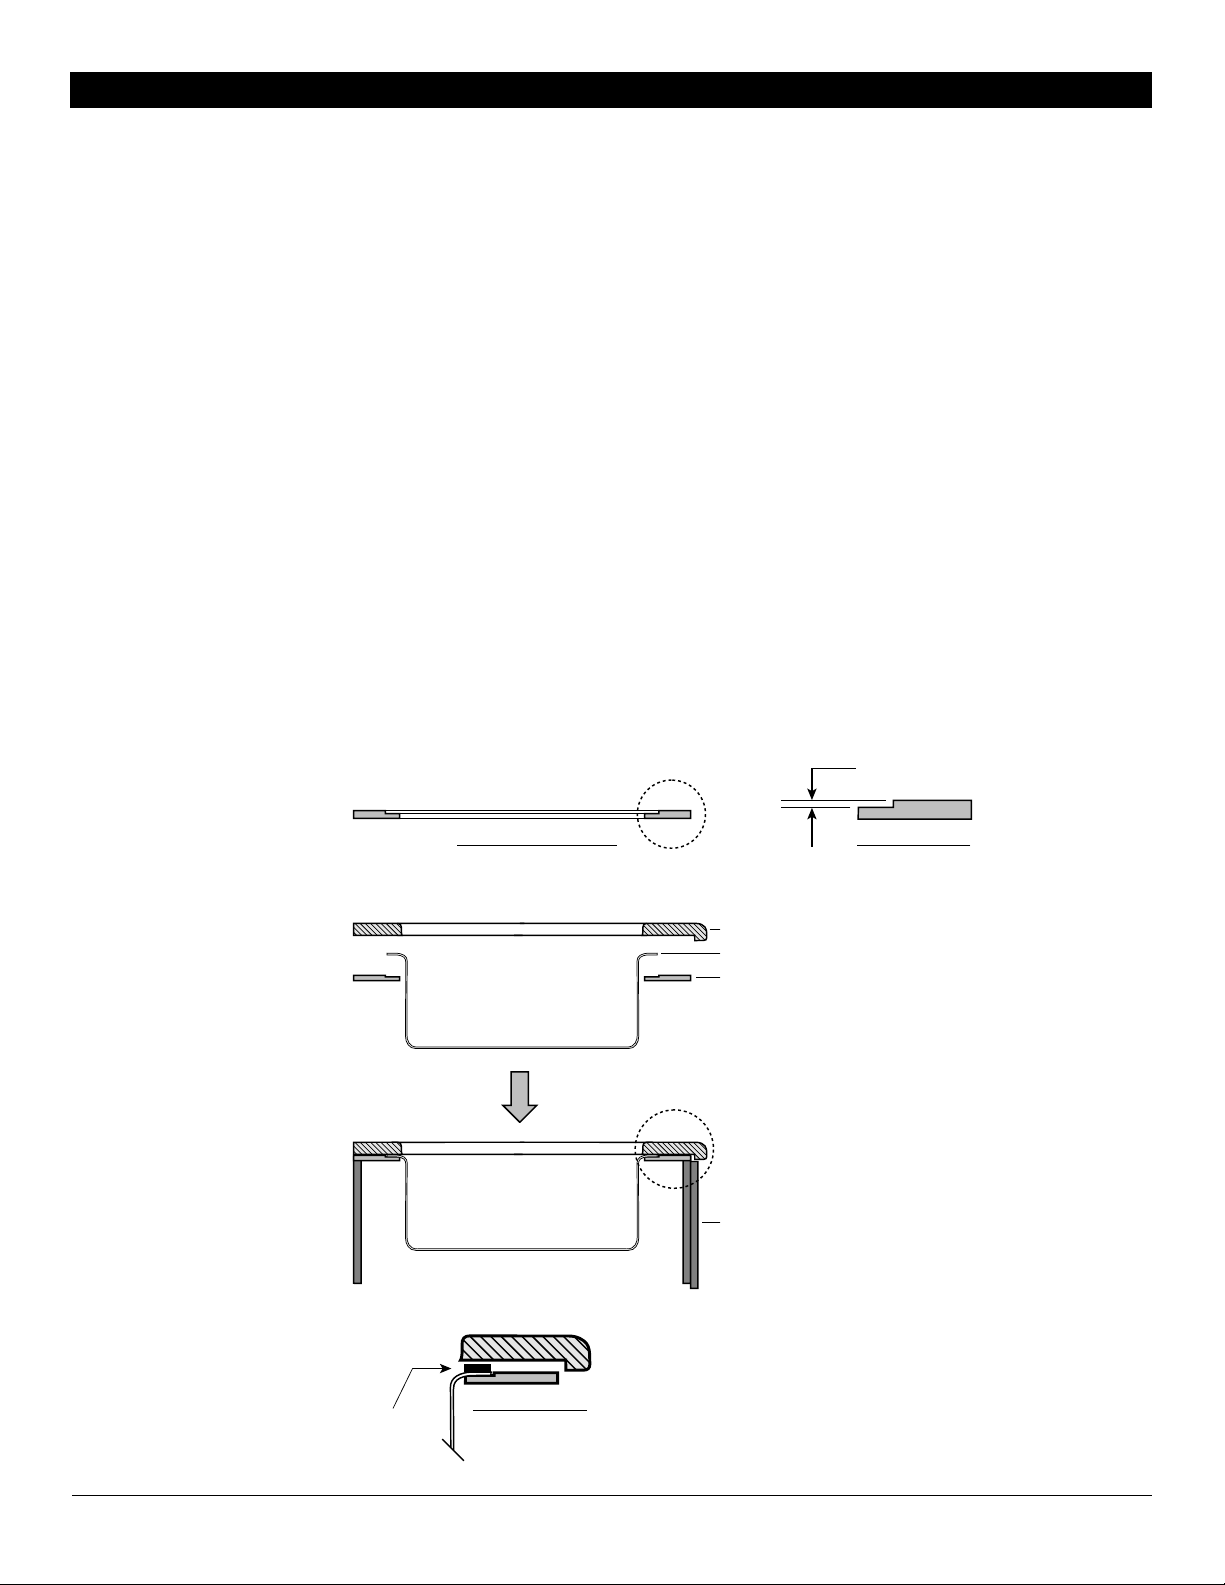
4. Prepare a plywood reinforcement sheet that is the same material thickness as the countertop built-up and
big enough to cover the sink base cabinet frame. Use the 1/2" plywood template described earlier, to
cut-out the reinforcement sheet to accept the sink. Using a router, recess the plywood by .050" to .060" for
approximately2" back from the cut-out, to accept the sink flange.
5. Place thisplywood reinforcement sheet on top of the sink base cabinet unit.
6. Assemble sinkstrainers to sink.
7. Clean sinkrim and countertop mating surface with solvent.
8. Lay sink in plywood reinforcement sheet and apply a continuous (translucent color) bead of silicone
around the sinkrim.
9. Lay the countertop on top of the cabinets and if necessary shift the sink so that it is centered within the
sink cut out.
10. Align the sink to the cut-out so that a uniform reveal of approximately 1/4" shows around the periphery of
the cut-out.
11. Use a non-abrasive cloth and solvent to remove excess silicone that has squeezed out beyond the
cut-out edge.
Countertop
.050" / .060"
1/2" Plywood
1/2" Plywood Sheet
Sink Rim
Cabinet Front
Section Detail
Section Detail
Silicone
 Loading...