

Kindle Voyage User Manual


Kindle Voyage User’s Guide
2
Contents
Contents
Chapter 1 Getting Started .................................................................................................. 5
Registering your Kindle .................................................................................................... 5
Kindle controls .................................................................................................................. 5
Onscreen actions ............................................................................................................... 6
Onscreen keyboard .............................................................................................................. 7
Tap zones ............................................................................................................................ 7
Toolbars............................................................................................................................... 9
Status indicators .............................................................................................................. 12
Wireless status indicators .................................................................................................. 12
Battery status indicator ...................................................................................................... 13
Activity indicator ............................................................................................................... 13
Parental Controls indicator ................................................................................................ 13
Setting up your Kindle Voyage ....................................................................................... 13
Network connectivity ......................................................................................................... 13
Special Offers and Sponsored Screensavers .................................................................. 14
Screensaver ........................................................................................................................ 14
Special Offer banners ......................................................................................................... 14
Recommended content ................................................................................................... 15
Chapter 2 Acquiring & Managing Kindle Content ........................................................ 16
Shop in the Kindle Store anytime, anywhere ................................................................ 16
Device and Cloud storage ............................................................................................... 16
Removing items from your Kindle ................................................................................. 17
Periodicals ......................................................................................................................... 17
Managing your Kindle Library ....................................................................................... 17
Using collections................................................................................................................ 18
Chapter 3 Reading Kindle Documents .......................................................................... 20
Understanding Kindle display technology .................................................................... 20
Customising your text display ........................................................................................ 20
Comic and manga books ................................................................................................. 20
Children's books .............................................................................................................. 20
Zooming in on images ..................................................................................................... 21
Panning over and zooming in on tables ........................................................................ 21
Interacting with your documents .................................................................................. 21
Dictionary .......................................................................................................................... 21
Search ................................................................................................................................ 22

Kindle Voyage User’s Guide
3
Contents
Notes and highlights .......................................................................................................... 22
Bookmarks ......................................................................................................................... 23
Footnotes ........................................................................................................................... 24
Before You Go... ................................................................................................................. 24
X-Ray ................................................................................................................................ 24
Vocabulary Builder .......................................................................................................... 24
Kindle FreeTime .............................................................................................................. 25
Setting up Kindle FreeTime................................................................................................ 25
Using Kindle FreeTime ...................................................................................................... 25
Goodreads on Kindle ...................................................................................................... 26
Time to Read .................................................................................................................... 27
Navigating a book............................................................................................................ 28
Kindle Page Flip ................................................................................................................. 28
Go To button ..................................................................................................................... 28
Chapter 4 Getting More From Your Kindle Voyage ..................................................... 30
Customising your Kindle settings .................................................................................. 30
The Settings contextual menu ........................................................................................ 32
Carrying and reading personal documents ................................................................... 32
Reading Kindle content on other devices ..................................................................... 33
Sharing comments via social networks ......................................................................... 33
Using your Kindle with your computer ......................................................................... 33
Using the Experimental Web Browser ........................................................................... 34
Web Browser Menu ........................................................................................................... 34
Bookmarks ......................................................................................................................... 34
Downloading files .............................................................................................................. 35
Chapter 5 Finding Additional Assistance ...................................................................... 36
Appendix A Product Information .................................................................................. 37
Safety and Compliance Information .............................................................................. 37
Maintaining Your Kindle Device .................................................................................... 37
Device Service .................................................................................................................. 37
Battery Safety ................................................................................................................... 37
Other Safety Considerations .......................................................................................... 38
Wireless Safety and Compliance .................................................................................... 38
Turn Off Wireless When Flying ...................................................................................... 38
Using Your Kindle Around Other Electronic Devices .................................................. 38
Steps to Minimise Interference ...................................................................................... 39
Look Out For Signs .......................................................................................................... 39

Kindle Voyage User’s Guide
4
Contents
FCC Compliance Statement ............................................................................................ 39
Information Regarding Exposure to Radio Frequency Energy .................................... 40
Canadian Compliance Statement ................................................................................... 40
IEEE 1725 Battery Safety Statement ................................................................................ 40
EU Conformity ................................................................................................................. 41
CE SAR Compliance ......................................................................................................... 41
Recycling Kindle Properly .............................................................................................. 41
Product Specifications .................................................................................................... 41
LEGAL TERMS .................................................................................................................. 42
ONE-YEAR LIMITED WARRANTY .................................................................................. 42
Warranty Provider ............................................................................................................. 43
Additional Information ...................................................................................................... 44
Patent Notices ................................................................................................................. 44
Copyright, Trademark and Other Notices ..................................................................... 44
Kindle Voyage User’s Guide
5
Chapter 1
Getting Started
Chapter 1
Getting Started
Welcome to your new Kindle Voyage. This short guide will familiarise you with all of the
features and functionality of your Kindle. Some Kindle features may not be available based
on your country of residence or location. Please visit www.kindle.com/support for more
information about specific features.
Registering your Kindle
If you bought your Kindle online using your Amazon account, it is already registered to you.
To verify, tap the Home button and look for your Amazon user name in the upper left
corner of the Home screen. If it says My Kindle or shows the name of a previous owner
instead of your own Amazon account name, you'll need to register it. See Setting up your
Kindle Voyage in this chapter for instructions on setting up and registering your Kindle.
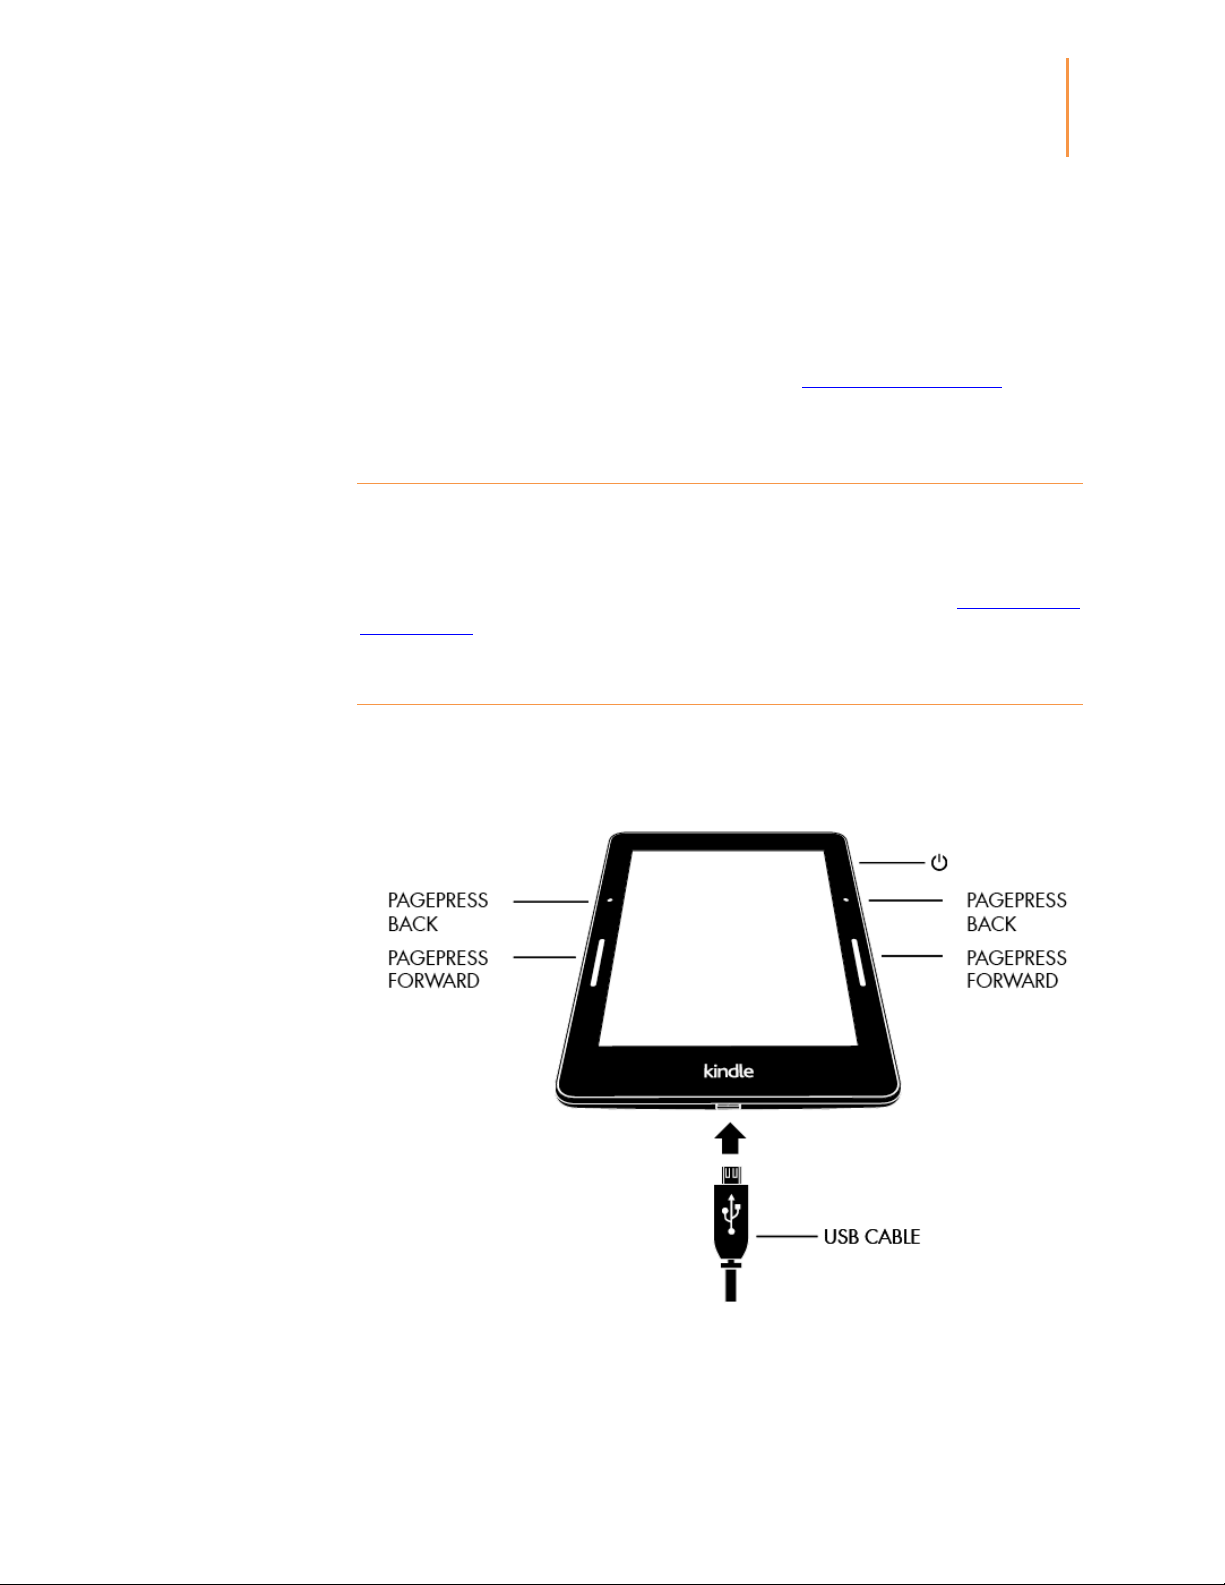
Kindle controls
You need to learn only a few simple controls to use your Kindle Voyage.
PagePress: To page forward or back in a book, squeeze either side of the screen. Use the
line to page forward, and the dot to page back. You can keep your right or left thumb
resting on the pressure-sensitive controls. To adjust the pressure required to turn a page, or

Kindle Voyage User’s Guide
6
Chapter 1
Getting Started
the feedback you receive when a page turns, go to Settings, Reading Options then
PagePress. You can also use PagePress to navigate your library on the Home screen.
Power button: To turn your Kindle on, press the Power button located on the back. If you
need to turn off your Kindle screen, press and hold the Power button for 7 seconds until the
Power dialogue displays and then select Screen Off.
Your Kindle will go into sleep mode automatically after a few minutes of inactivity and a
screensaver will display. This static screensaver uses no battery power. To put your Kindle
in sleep mode, press and release the Power button. To wake up your Kindle, press and
release the Power button.
If your Kindle does not power on or is unresponsive during use and you need to restart it,
press and hold the Power button for 7 seconds until the Power dialog displays, then select
Restart. If the Power dialog does not display, press and hold the Power button for 20
seconds.
Micro-USB/power port: You can use the USB cable supplied to connect your Kindle to a
computer for charging the battery and transferring files. To charge your Kindle from a
power outlet, you will need a compatible AC adaptor (sold separately) for the USB cable.
When your Kindle is charging, a lightning bolt appears on the battery icon at the top of the
Home screen. The indicator light on the bottom edge will turn amber while the battery is
charging and green when it is fully charged. Charging should take less than four hours using
a Kindle AC adaptor. Charging using 3rd-party adapters or via USB should take less than
four hours, but may take longer depending on the capability of the hardware.
You can still use your Kindle whilst it is connected to your computer and charging via USB.
To do so, dismount or eject it so that your Kindle exits USB drive mode.
Windows: Right-click on the "Safely remove hardware" icon in the lower right-hand corner
of the task bar and follow the onscreen instructions to remove your Kindle.
Mac OS X: Click the Eject button next to the Kindle in any Finder window, or drag it from
the Desktop to the Trash.
Your Kindle will then exit USB drive mode, but will continue to charge. If the charge
indicator light on the bottom edge of the Kindle does not come on, make sure that the USB
cable is fully inserted into your Kindle and into the USB port of the computer. If your Kindle
is still not charging, try another USB port or electrical outlet.
Note that if your Kindle is plugged into a low-powered USB port — such as those found on
some keyboards and older computers — it will not receive enough power to charge.
Onscreen actions
Your Kindle Voyage features a touchscreen interface that allows you to perform many tasks
with just a tap or swipe of a finger. To select an item, simply tap it. For example, tap a book
cover or title on your Home screen to open the book, or tap a button to perform that
button's action.

Kindle Voyage User’s Guide
7
Chapter 1
Getting Started
Onscreen keyboard
Your Kindle Voyage has an onscreen keyboard. When you tap within the Search field or
begin other actions that require you to type in information, the keyboard automatically
displays at the bottom of the screen. Tap the keys to enter your selection and use the
appropriate buttons to continue on to the next action. As you type, word suggestions based
upon your entries will appear above the keyboard. Tap the word you want to select. Tap the
key to enter numbers or symbols. Tap the to return to the regular keyboard.
Tap the Shift key to enter uppercase characters. Tap the Shift key twice to enter
all-caps mode, and tap it once to exit the mode. To select a keyboard for a different
language, on the Settings page select Device Options, then Language and Dictionaries.
Select the Keyboards option. If you have selected multiple keyboards, a Globe key is
added to your keyboard. To select a different keyboard, tap the Globe key.
Your Kindle supports the entry of diacritics and special characters using the keyboard. To
display these characters, press and hold the base letter's key. For example, press and hold
the "n" to display ǹ, ñ, or ň.
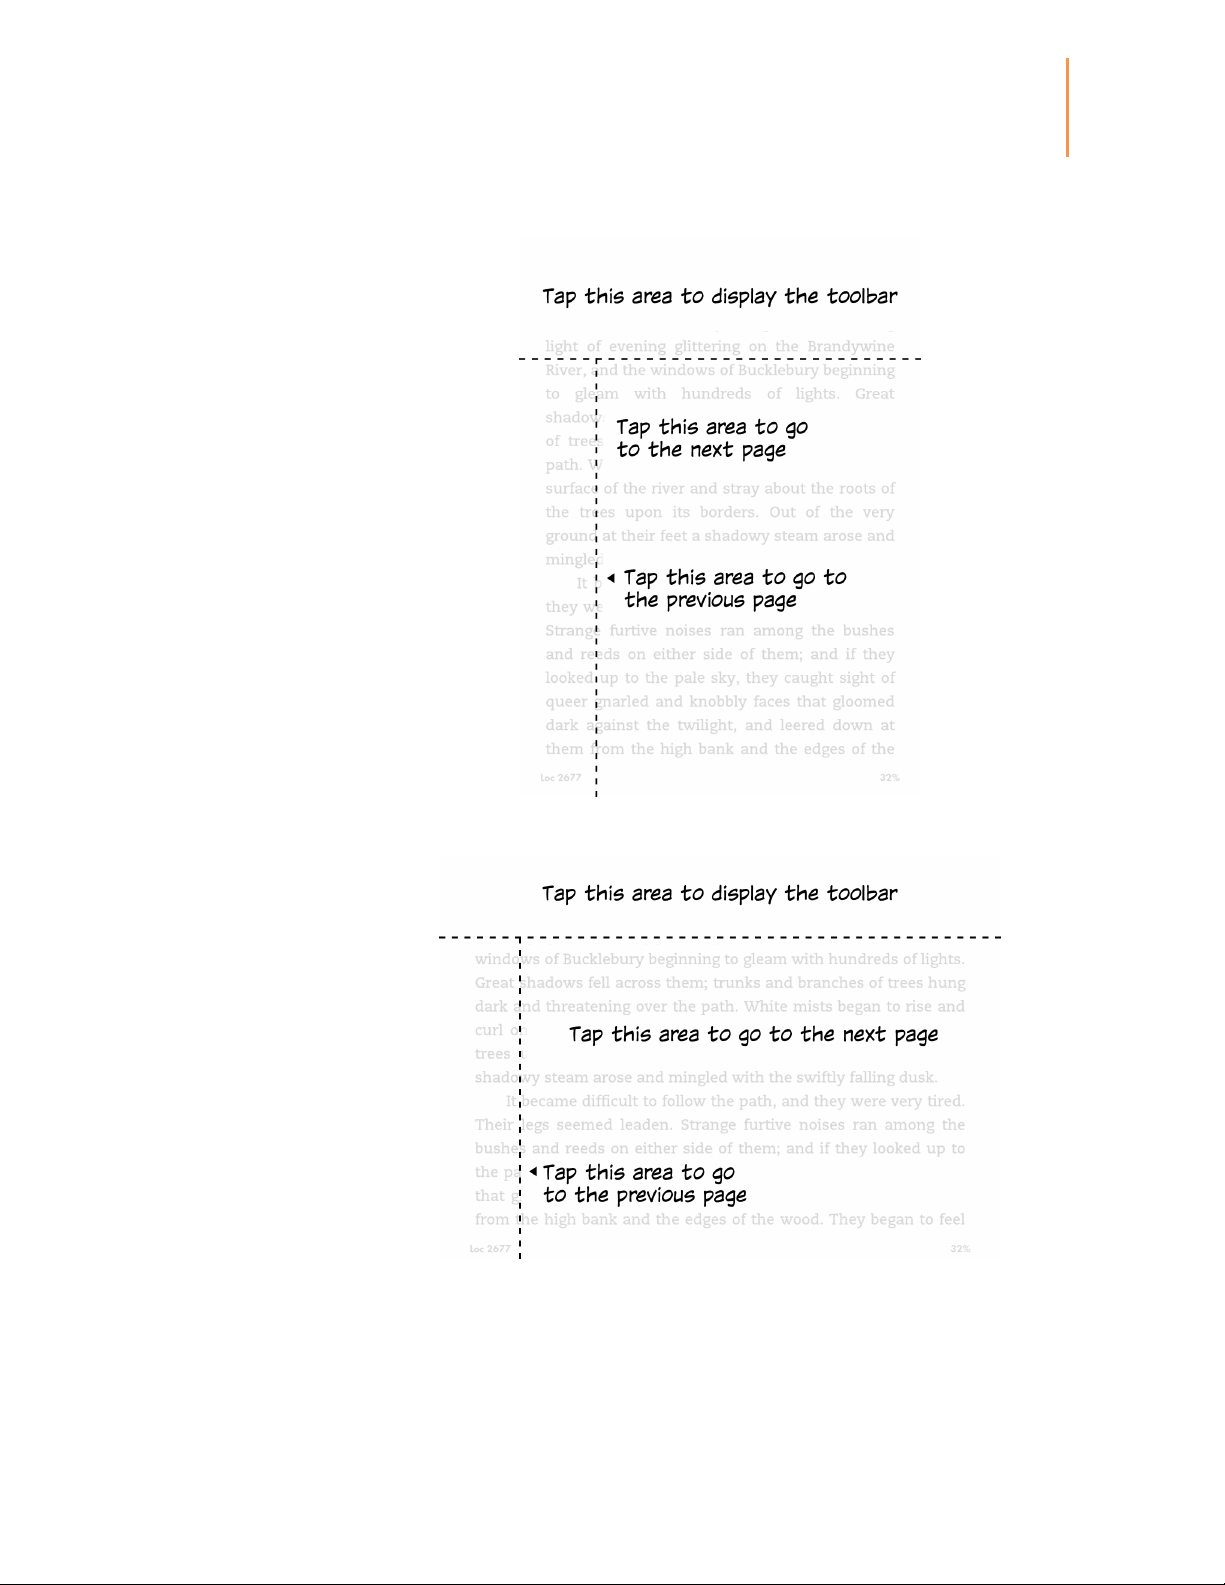
Tap zones
The EasyReach feature of your Kindle lets you effortlessly turn pages in a book or periodical
whilst holding the device with just one hand. Tapping almost anywhere in the display area
will take you to the next page; the area is large enough to be tapped whether you hold the
device with your left or right hand. Tap the left side of the screen to go to the previous page.
The EasyReach tap zones differ depending on whether your Kindle is in portrait or
landscape mode. When reading, you can change the screen orientation by tapping on the
Menu button and selecting Portrait or Landscape Mode. Note that the option displayed
depends on the current orientation of your Kindle.
Kindle Voyage User’s Guide
8
Chapter 1
Getting Started
Portrait Mode
Landscape Mode
If you prefer, you can change pages by swiping the screen with your finger. To go to the next
page, swipe your finger from the right to the left across the screen. To go to the previous
page, swipe your finger from the left to the right across the screen.
You can also turn pages using PagePress, by squeezing either side of the screen when in
Portrait Mode. Use the line to page forward, and the dot to page back.

Kindle Voyage User’s Guide
9
Chapter 1
Getting Started
Toolbars
EasyReach also lets you tap the top of the screen to display a toolbar. Toolbar options vary
depending on what you are viewing.
Standard toolbar
Home: Tap to return to the Home screen, where you'll find a list of books and other
content stored on your Kindle.
Back: Tap to retrace your steps. For example, you can follow a link from a book, then tap
the Back button to return to your place in the book.
Screen Light: Tap to access screen light controls. There are several ways to adjust screen
brightness:
Drag your finger along the slider until you reach the desired setting.
Tap anywhere on the slider to select a specific setting.
Tap the + sign to use a higher light setting, and tap the - sign to use a lower light setting.
Press and hold the "+" sign to select the maximum brightness setting. Press and hold the "-"
sign to choose the minimum brightness setting.
Select Auto Brightness to enable the screen light to automatically adjust based on
surrounding light. When Auto Brightness is enabled, you can still adjust the light using the
slider and your Kindle uses that adjustment in the future. When reading or using your
Kindle in the dark, use the Nightlight feature to gradually reduce the screen brightness over
time as your eyes adjust. To enable Nightlight, go to Settings, Device Options then Screen
Light.
Kindle Voyage User’s Guide
10
Chapter 1
Getting Started
Kindle Store: Tap to go to the Kindle Store. Your Kindle must have an active Wi-Fi or 3G
connection to use this feature.
Search: Tap to bring up the search field. To exit search, tap the X on the right side of the
search bar.
Goodreads on Kindle: Tap to connect to the Goodreads community on your Kindle to see
what your friends are reading, find book recommendations and keep track of what you’ve
read and want to read. For more information, see Goodreads on Kindle. The Goodreads
button will not display if:
It is not available in your country of residence or location.
Your device is not yet registered.
Menu: Tap to display a list of options. The menus are contextual, which means they change
to offer appropriate options depending on what you're currently doing with the device. For
example, on the Home screen of a Kindle with Special Offers, menu options may include
Shop Kindle Store, View Special Offers, Kindle FreeTime, Vocabulary Builder, Experimental
Browser, Settings, List or Cover View, Create New Collection and Sync and Check for Items.
Note that you can view content on the Home screen using the default cover view or by list
view.
When you're reading a book, menu items may include Notes, Portrait or Landscape Mode,
Book Description, About the Author, Reading Progress and Vocabulary Builder. Note that
About the Author is only available for books that support author profile.
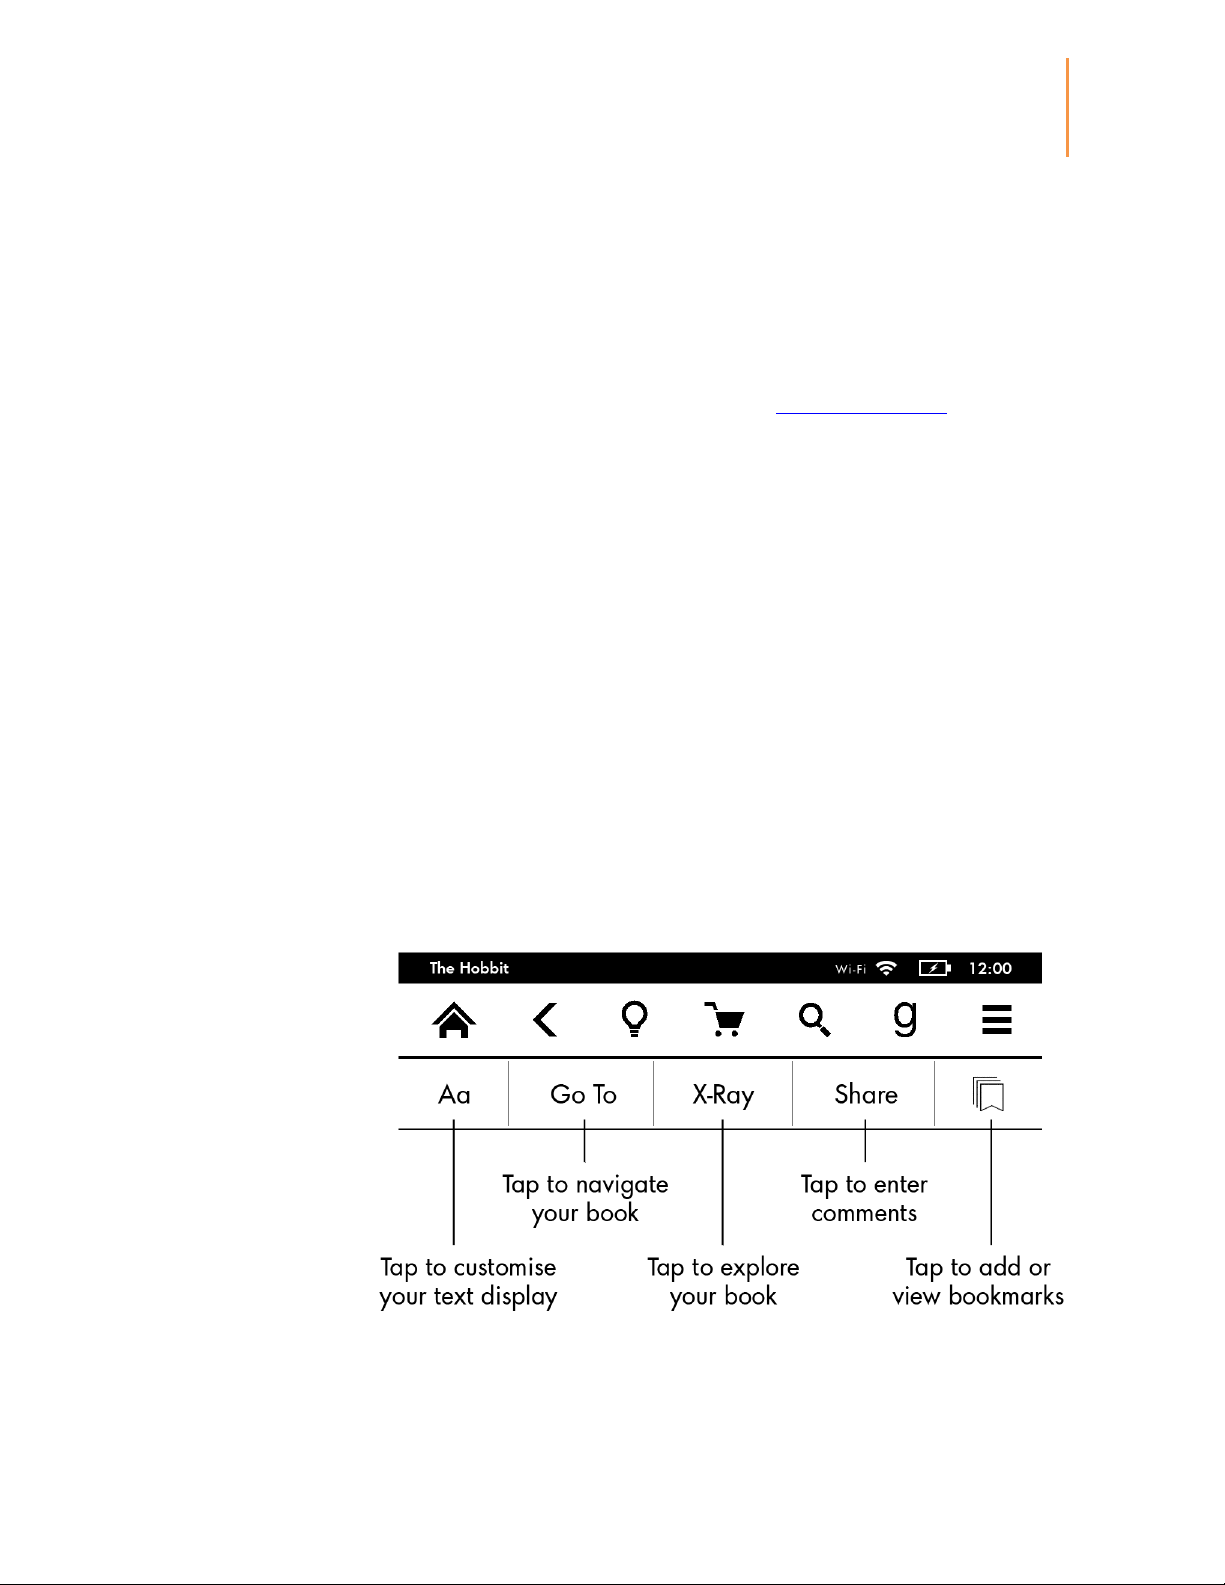
Reading toolbar
A secondary toolbar displays when you're reading a book and tap the top of the screen.
Text (Aa): Tap to display font and text options for your Kindle books, including font size,
typeface, publisher font, line spacing and margins.

Kindle Voyage User’s Guide
11
Chapter 1
Getting Started
Go To: The Contents tab displays the book's contents, including Beginning and chapter
titles. Use the Page or Location option to further navigate your book. The options displayed
will vary depending on the content you're reading. Tap the Notes tab to access your notes
and highlights. You can also view Popular highlights and Public notes by selecting the
corresponding options under the Notes tab.
X-Ray: The X-Ray feature lets you explore the "bones" of the book with a single tap. For
example, you can see all of the passages in a book that mention specific ideas, fictional
characters, historical figures, places or topics. If X-Ray is not available for a book, the button
will be disabled. For more information, see X-Ray.
Share: Tap to share your thoughts with friends on Goodreads on Kindle and other social
networks.
Bookmarks: Tap to add or delete a bookmark on the current page, and view previously
added bookmarks. The Bookmark button on the toolbar changes from white to black on
bookmarked pages. A preview pane displays when you tap a bookmark in the list. To go to
the selected location, tap the preview pane. To exit the bookmark feature, tap outside the
bookmark drop-down.
Reading Navigation toolbar
When reading, swipe up from the bottom of the page to display the Reading Navigation
toolbar.
Use this toolbar to navigate a book and preview a new page or location in the book. For
more information, see Navigating a book.
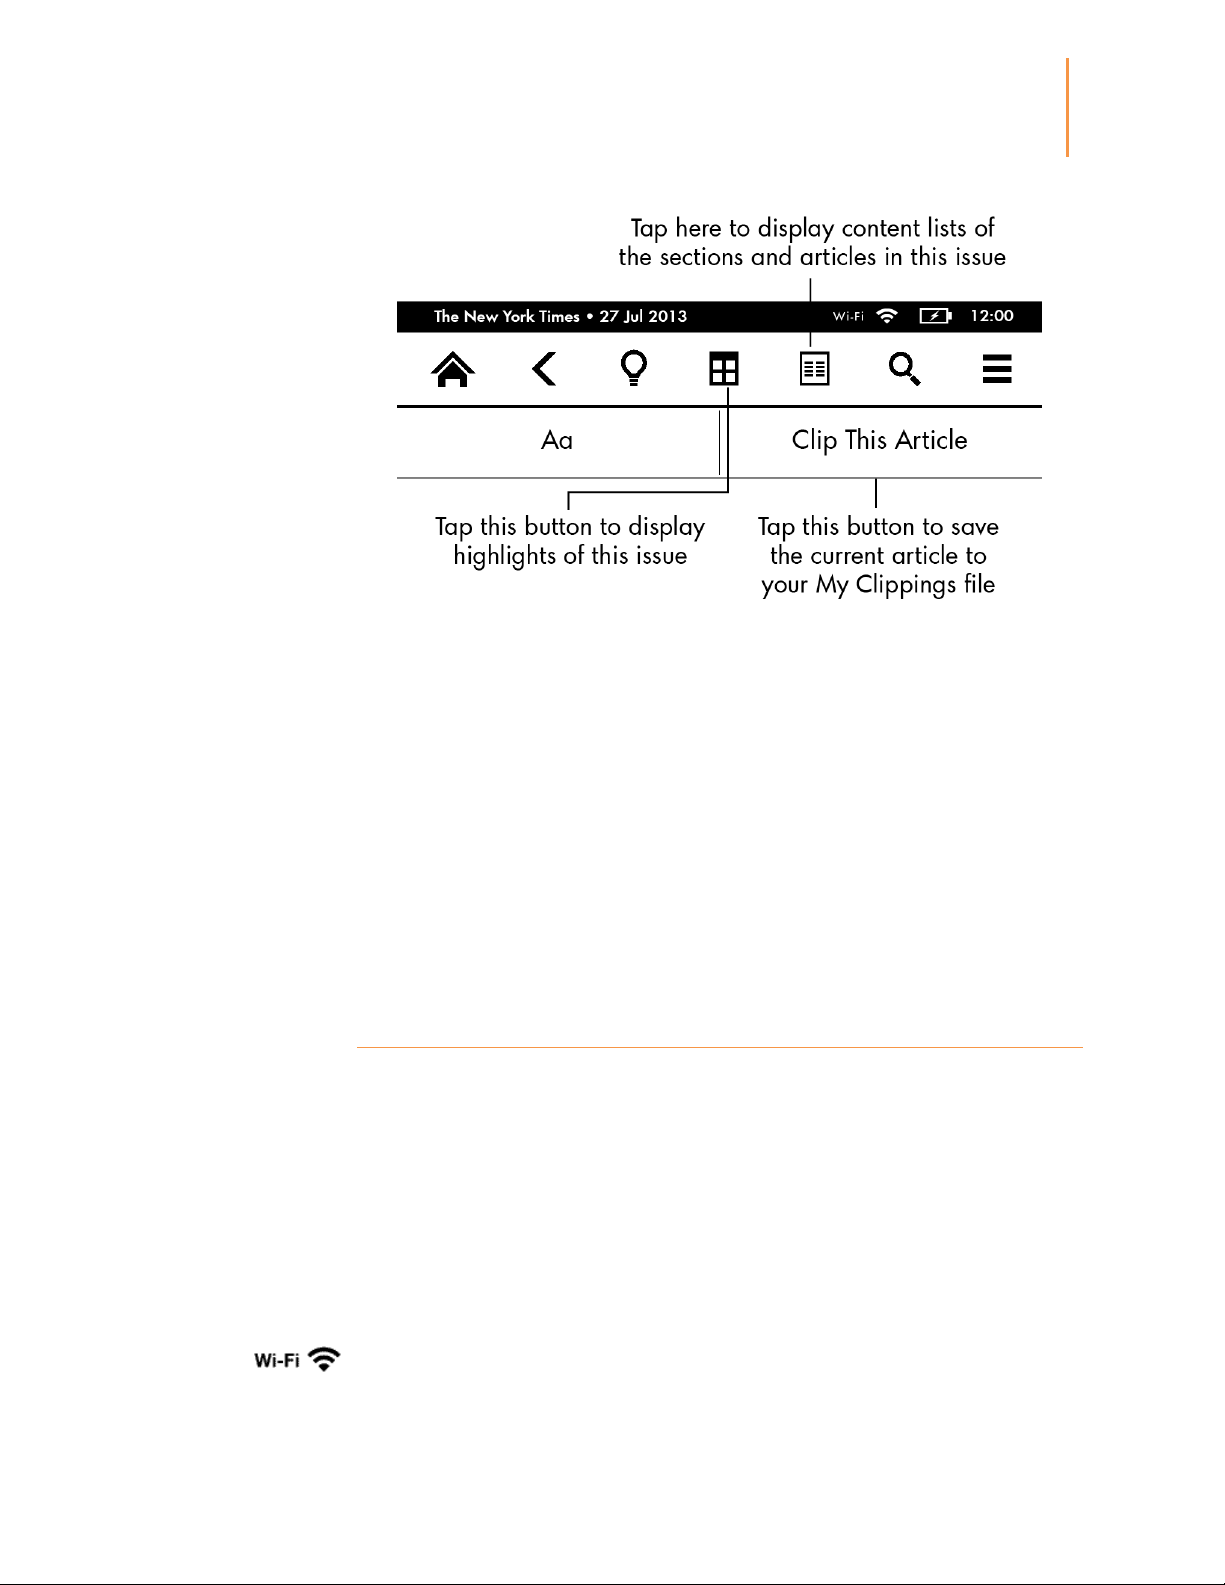
Periodicals toolbar
When you're reading a periodical, the toolbars are configured specifically for that purpose.
To display the toolbar, tap the top of the screen.
Kindle Voyage User’s Guide
12
Chapter 1
Getting Started
Periodical Home: Tap to display highlights of the issue you're reading.
Sections and Articles: Tap to go to the content list of sections and articles in a newspaper
or magazine. This option is not available in blogs.
A secondary toolbar is available when you're reading a periodical and are on the article
detail page. Options include:
Text (Aa): Tap to display font and text options for your periodicals, including font size,
typeface, line spacing and margins.
Clip This Article: Tap to clip an entire periodical article to the My Clippings file. The My
Clippings file is located on your Home screen and stores your notes, bookmarks, highlights
and clipped articles.
Status indicators
At the top of the Home screen, you'll see indicators that inform you about the status of your
Kindle Voyage. To view these indicators within a book or document, tap the top of the
screen to display the toolbars.
Wireless status indicators
The Amazon Whispernet service delivers content wirelessly to your Kindle whenever and
wherever you want it. Your Kindle can connect to Whispernet via its built-in Wi-Fi
capability; some models also include free 3G wireless connectivity to Whispernet. The more
bars on the Wi-Fi or 3G status indicator that are filled, the stronger the signal.
Your Kindle is connected to Whispernet using Wi-Fi.

Kindle Voyage User’s Guide
13
Chapter 1
Getting Started
Your Kindle is connected to Whispernet using a 3G mobile network. Alternatively, you may
see an icon for an EDGE or GPRS network next to the signal-strength bars (applies only to
Kindle 3G).
Your Kindle is in Aeroplane Mode and you have no wireless connectivity.
Battery status indicator
The Kindle battery indicator shows the various states of the battery as it discharges. When
your Kindle is charging, a lightning bolt appears on the battery icon. Note that a weak
wireless signal can increase power consumption.
Activity indicator
This indicator appears in the top left corner of your Kindle screen when it is scanning or
connecting to a network, busy downloading new content, syncing and checking for new
items, searching for an item, opening a large PDF file or loading a web page.
Parental Controls indicator
This indicator appears when Parental Controls are enabled, either because you have turned
on specific restrictions or because a Kindle FreeTime profile is active. For more information,
see Parental Controls.
Setting up your Kindle Voyage
If you're reading this guide, you've probably completed the Kindle setup process, which
includes selecting your device language, connecting to a wireless network, registering your
Kindle with your Amazon account, and optionally linking your Kindle to your social
network accounts. If you haven't done these steps yet, go to the Home screen now, select
Set Up Your Kindle, and follow the onscreen prompts. If you have difficulty connecting to
your wireless network, please contact your Network Administrator or the individual
responsible for maintaining the network you are trying to access. Once you have completed
the setup process, Set Up Your Kindle will no longer appear on your Home screen.
To register a Kindle that has been registered previously, from the Home screen tap the
Menu button and select Settings. On the Settings page, tap Registration and select the
appropriate option to begin the registration process.
Network connectivity
Books, magazines and other content are delivered directly to your Kindle via its built-in
network connectivity. If your Kindle offers both Wi-Fi and 3G connectivity, use Wi-Fi
whenever possible for faster downloads. You can connect to a Wi-Fi network at home or at
hotspots around the world.

Kindle Voyage User’s Guide
14
Chapter 1
Getting Started
To view available Wi-Fi networks, from the Home screen tap the Menu button, then
Settings. Select Wi-Fi Networks and the name of the network you want to use. If you see a
lock symbol next to the network name, it requires a password. Tap the Rescan button to
recheck for available Wi-Fi networks. Please note that your Kindle does not support
connecting to ad hoc (or peer-to-peer) Wi-Fi networks.
Your Kindle will recognise Wi-Fi networks with a WPS-compatible router. To connect via
WPS, from your Kindle select the wireless network you want to use. Next, press the WPS
button on your router, then select the WPS button on your Kindle during the Wi-Fi setup
process. Once you have connected to a network successfully, the Wi-Fi status indicator will
display the network's signal strength.
Kindle Voyage 3G models use the same technology as mobile phones, so they are dependent
on mobile coverage areas. By default, a 3G device will automatically connect to a 3G
network. If there isn't sufficient 3G signal strength, it will connect to a slower GPRS or
EDGE network. Your Kindle automatically turns off 3G when you connect using Wi-Fi. If
you disconnect from a Wi-Fi network or move out of Wi-Fi range, your Kindle will
automatically switch back to 3G.
To turn off wireless, from the Home screen tap the Menu button, select Settings, and enable
Aeroplane Mode. Any periodical downloads or other pending updates that require a
wireless connection will occur the next time you turn it back on. Turning on Aeroplane
Mode disables both 3G and Wi-Fi connections.
Special Offers and Sponsored Screensavers
For Kindle with Special Offers devices, you will receive Special Offers and Sponsored
Screensavers that display only on the Home screen or screensaver — not within a book.
Note that Special Offers and Sponsored Screensavers are not available in all countries.
Screensaver
When your device is sleeping, a Special Offer will be displayed on your screensaver. To see
more details on the offer, wake up your Kindle, then tap the "Tap for Details" area. To
unlock your Kindle without viewing offer details, swipe with your finger to unlock. Special
Offers and Sponsored Screensavers are updated regularly when your Kindle is connected to
a network.
Special Offer banners
Special Offer banners are displayed at the bottom of the Home screen. To view additional
details, tap the banner.
To view all available Special Offers:
1. Tap the Home button, then tap the Menu button.
2. Tap View Special Offers.
3. Tap on any available offer to view details about it.
 Loading...