

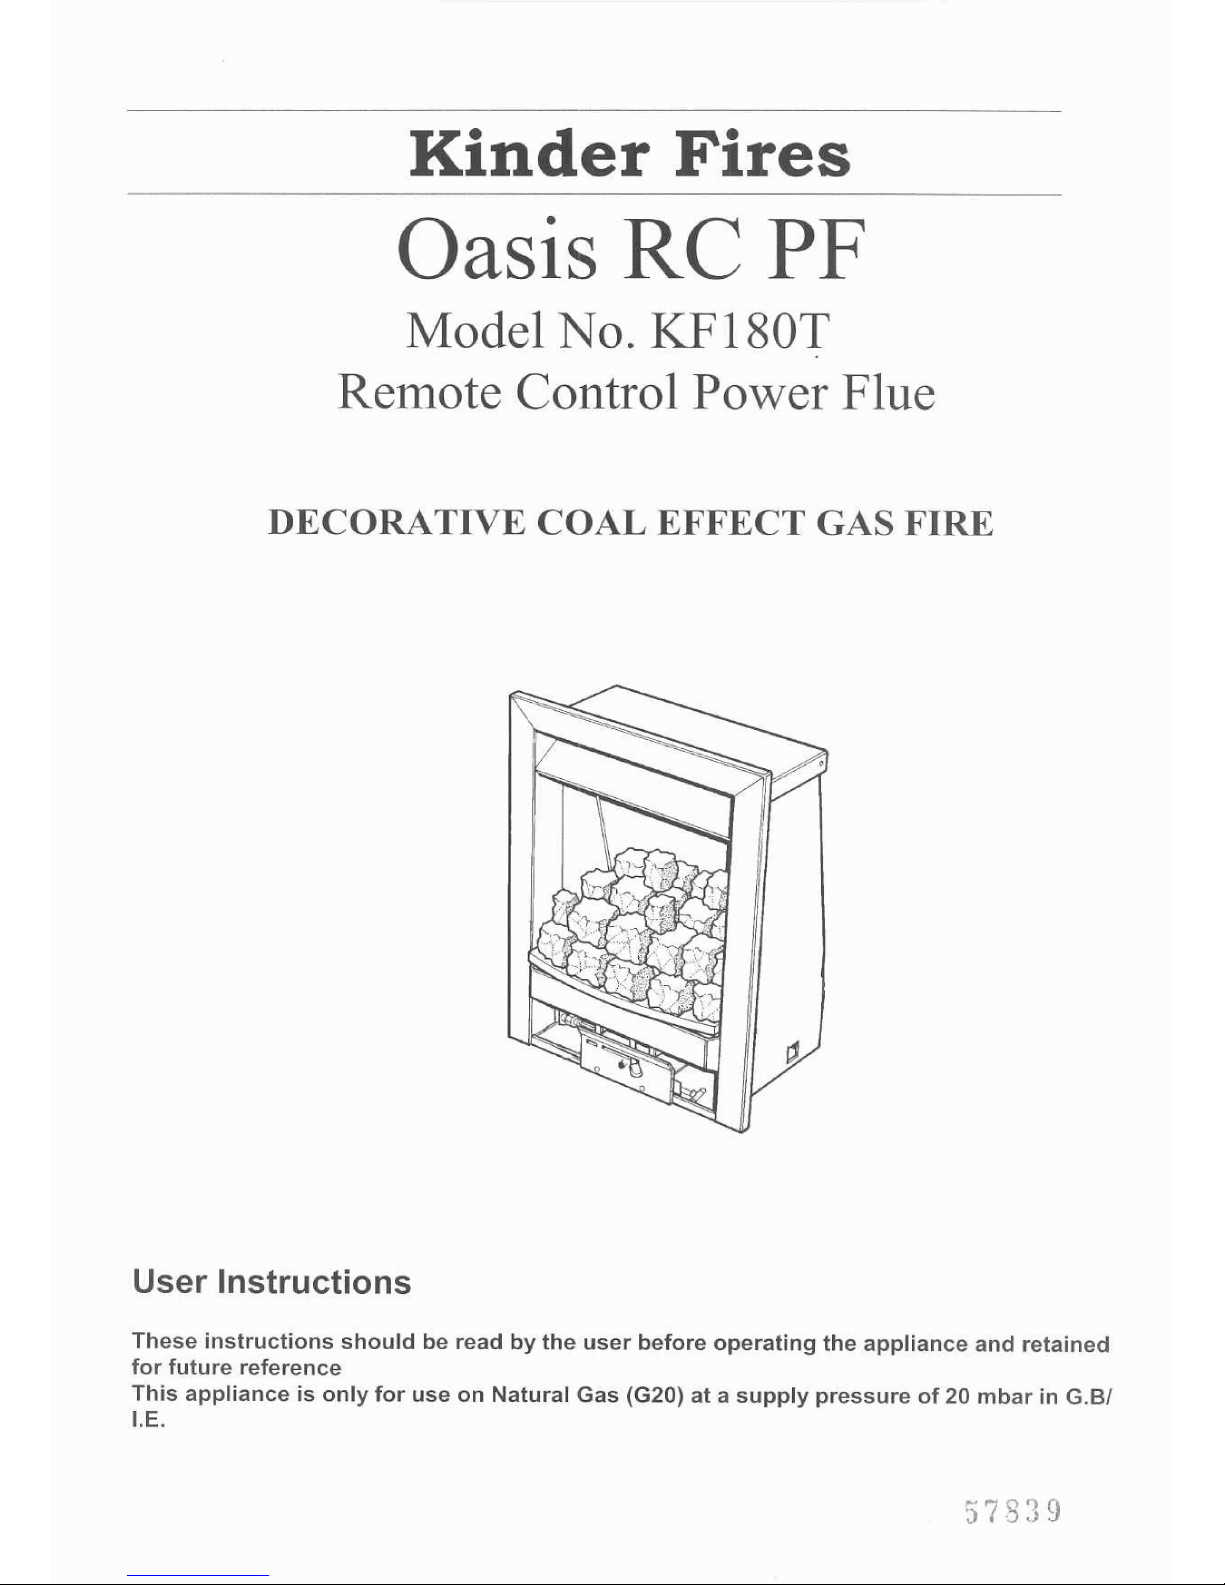
Minder Fires
Oasis
RC
PF
Model
No.
KF180T
Remote
Control
Power
Flue
DECOMTIVE
COAL
EFFECT
GAS
FIRE
User
Instructions
These
instructions
should
be
read
by
the
user
before
operating
the
appliance
and
retained
for
future
reference
This
appliance
is
only
for
use
on
Natural
Gas
(G20)
at
a
supply
pressure
of
20
mbar
in
G.61
1.
E.
llNSTAChATTON
INFORMATION
CONDlTlONS
OF
INSTALLATION
It
is
the
law
that
all
gas
appliances are
installed
only
'by
a
competent
{e.g.
CORGI
Registered)
Installer,
in
accordance
with
the
installation
instructions
and
the
Gas
Safety
(Installation
and
Use)
Regulations
1994
as
amended.
Failure
to
install appliances correctly could
lead
to
prosecution.
It
is
in
your
own
interest
and
that
of
safety
to
comply
with
the
law.
The
fire
may
be
fitted
below
a
combustible
shelf
provided
that
the shelf
is
at
least
1
50rnm
above
the
top
of
the
appliance and
the
depth
of
the shelf
does
not
exceed
150mm.
The
fire
may
be
installed
below
combustible
shelves
which
exceed
150mm
deep
providing that the
clearance
above
the
fire
is
increased
by
15mm
for
each
25mm
of
additional overhang
in
excess
of
150mrn.
No
additional
purpose
made
additional
ventilation
is
required
for
this
appliance when
installed
in
G.B.
When
installed
in
I.E.
please
consult
document
I.S.
86:3:1996
Domestic
gas
installation,
as
issued
by
the
National
standards
Authority
of
Ireland,
for
use
in
Northern
Ireland,
please
refer
to
local
building
regulations.
Any
purpose
made
ventilation
should
be
checked
periodically
to
ensure
that
it
is
free
from
obstruction.
If
this
appliance
is
fitted
directly
on
to
a
wall
without
the
use
of a fireplace
or surround. All
cornbustib!e
material
must
be
removed
from
behind
the
trim,
Soft
wall
coverings
such
as
wallpaper, blown
vinyl
etc.
could
be
affected
by
the
heat
and
may
discolour
or
scorch.
This
should
be
considered
when
installing or decorating.
All
electrica!
work
must
be
carried
out
by
a
competent
qualified
electrician.
The
Model
number
of
this
appliance
is
KFl80T
and
it
is
manufactured
by:-
CFM
Kinder
Limited
Trentham
Lakes
Stoke
on
Trent
Staffs
ST4
4TJ
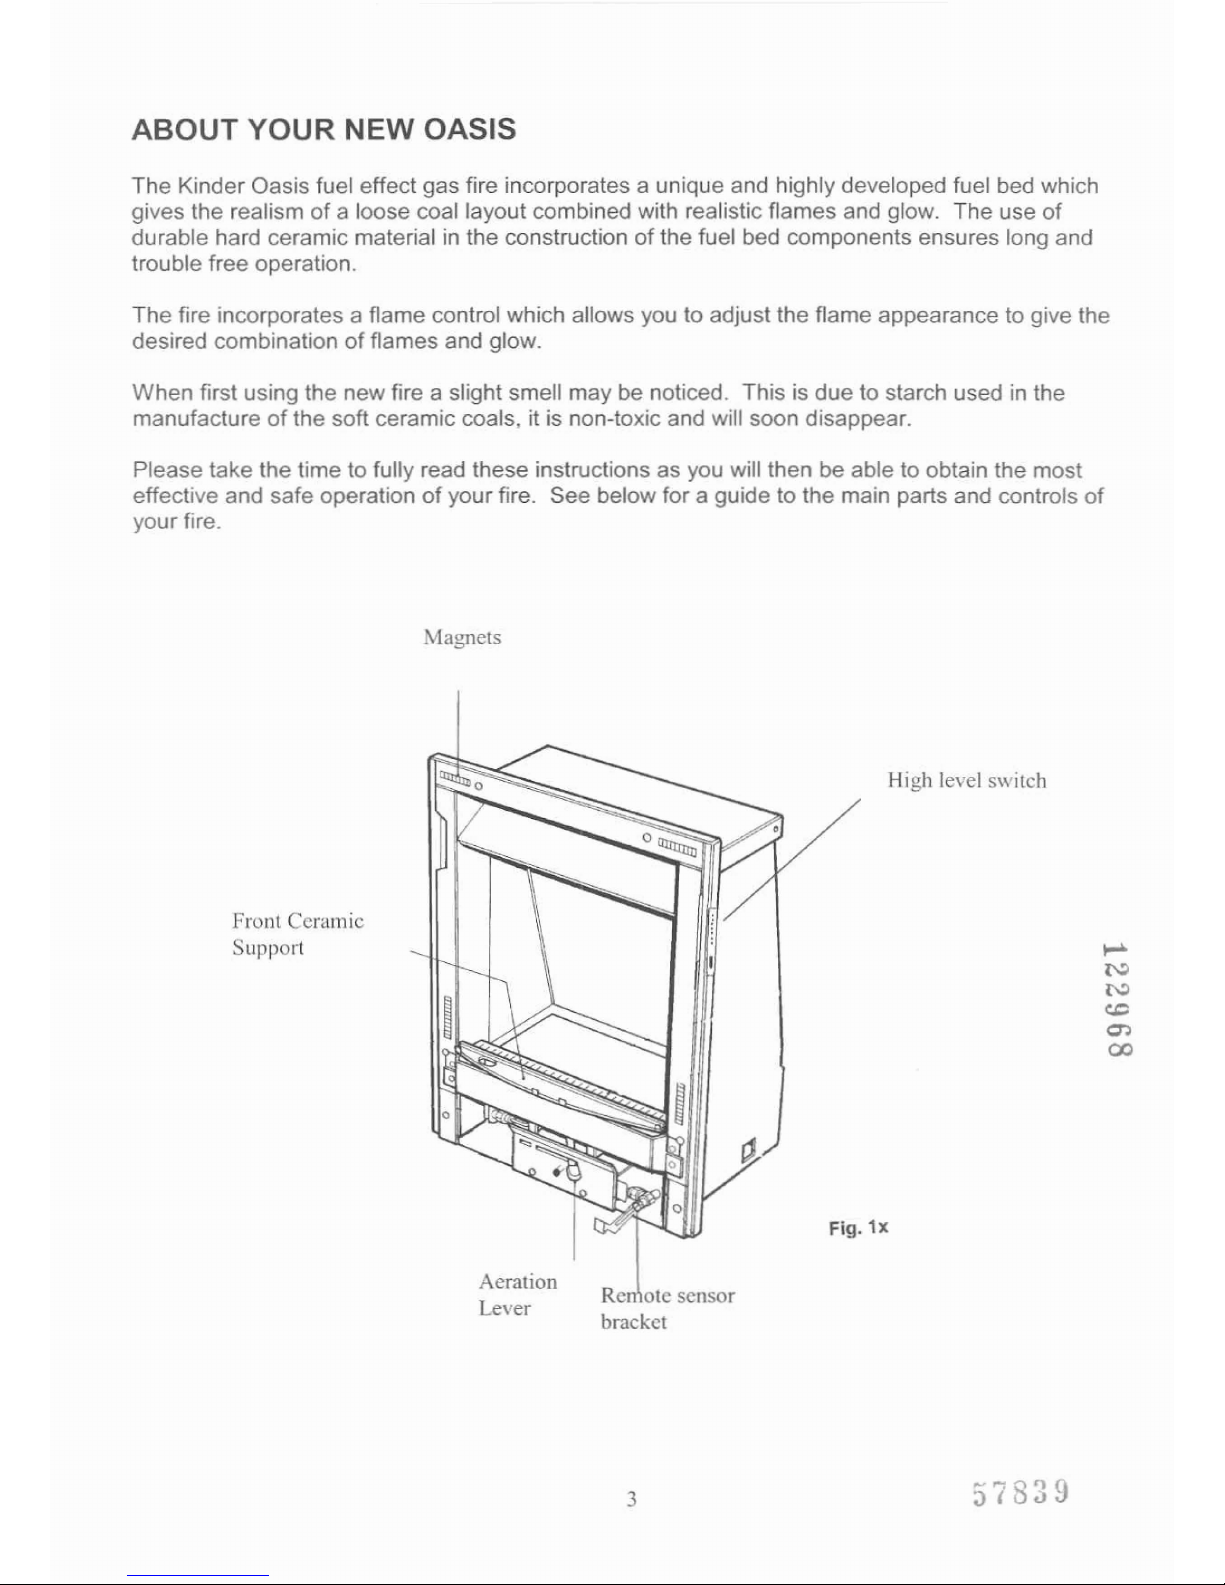
ABOUT
YOUR
NEW
OASIS
The
Kinder
Oasis
fuel
effect
gas
fire incorporates
a
unique
and
highly
developed
fuel
bed
which
gives
the
realism
of
a
loose
coal
layout
combined
with
realistic
flames
and
glow.
The
use
of
durable
hard
ceramic
material
in
the
construction
of
the
fuel
bed
components
ensures
long
and
trouble
free
operation.
The
fire
incorporates
a
flame
control
which
allows
you
to
adjust
the
flame
appearance
to
give
the
desired
combination
of
flames
and
glow.
When
first
using
the
new
fire
a
slight
smell
may
be
noticed.
This
is
due
to
starch
used
in
the
manufacture
of
the
soft
ceramic
coals,
it
is
non-toxic
and
will
soon
disappear.
Please
take
the
time
to
fully
read
these
instructions
as
you
will
then
be
ab'le
to
obtain
the
most
effective
and
safe
operation
of
your fire.
See
below
for
a
guide
to
the main
parts
and
controls
of
your
fire.
Fig.
lX
High
level
switch
Aeration
Rcn
otc
scnsclr
Lever
I
hrackct
IMPORTANT
SAFETY
INFORMATION
WARMING
This
appliance
has
a
naked
flame
and
as with
all
heating
appliances
a
fireguard
should
be
usecl
for
the
protection
of
children,
the
elderly
and
infirm.
Fireguards
should
conform
to
BS
6539
(1
984)
(Fireguards
for
use
with
solid
fuel
appliances).
Servicing
should
be
carried
out
annually
by
a
competent
person
such
as
a
CORGI
registered
engineer.
It
is
a
condition
of
CFM
Kinder
Lid
three
year
and
lifetime
guarantees
that
this
is
carried
out
by
a
competent
person
i.e
a
CORGI
registered
Engineer
in
accordance
with
these
servicing
notes
For
continued
safe
operation
of
the
spillage monitoring
system
the
oxy-pilot
assembly
must
be
replaced
at
the
annual
service.
These
are
available from
CFM
Kinder
L2d
at
a
specially
discounted price
to
encourage
routine
renewal
and
ensure
continued
safe
and
trouble
free
operation
of
the
spillage
monitoring
system.
Pilot
renewal
is
also a condition
of
the
above
guarantee
schemes,
The
condition
of
the
coals
should
be
checked
and
if
necessary
the
whole
set
should
be
replaced
with
a
genuine
replacement
set.
The
burner
assembly
is
designed
to
be
removed
as
a
complete
unit
for
ease
of
access.
After
any
servicing
work
a
gas
soundness
check
and
spillage
test
must
always
be
carried
out*
Rubbish
of
any
type
must
NEVER
be
thrown
onto
the
fuel
bed,
this
could
afTect
safe
operation
and
damage
the
fire.
Any
debris
or
deposits
should
be
removed
from
the fuel
bed
from
time
to
time.This
may
be
carried
out
by
referring
to
the
cleaning
section
as
described
later
in
this
book.
Only
the
correct
number
and
type
of
coals
must
be
used
and
only
complete
and
genuine
replacement
sets
must
be
used.
Always
keep
furniture
and
combustible
materials
well
clear
of
the
fire
and
never
dry
clothing
or
items
either
on
or
near
to
the
fire.
Never
use
aerosols
or
flammable
cleaning
products
near
to
the
fire
when
it
is
in
use.
The
hard
ceramic
fuel
bed
remains
hot
for a considerable
period
after
use
and
sufficient
time
should
be
allowed
for
the
fire
to
cool
before
cleaning
etc.
The
fire
must
only
be
operated
with the
brass
fender
and
ash
pan
cover.
These
must
always
be
in
position
when
the
fire
is
used.
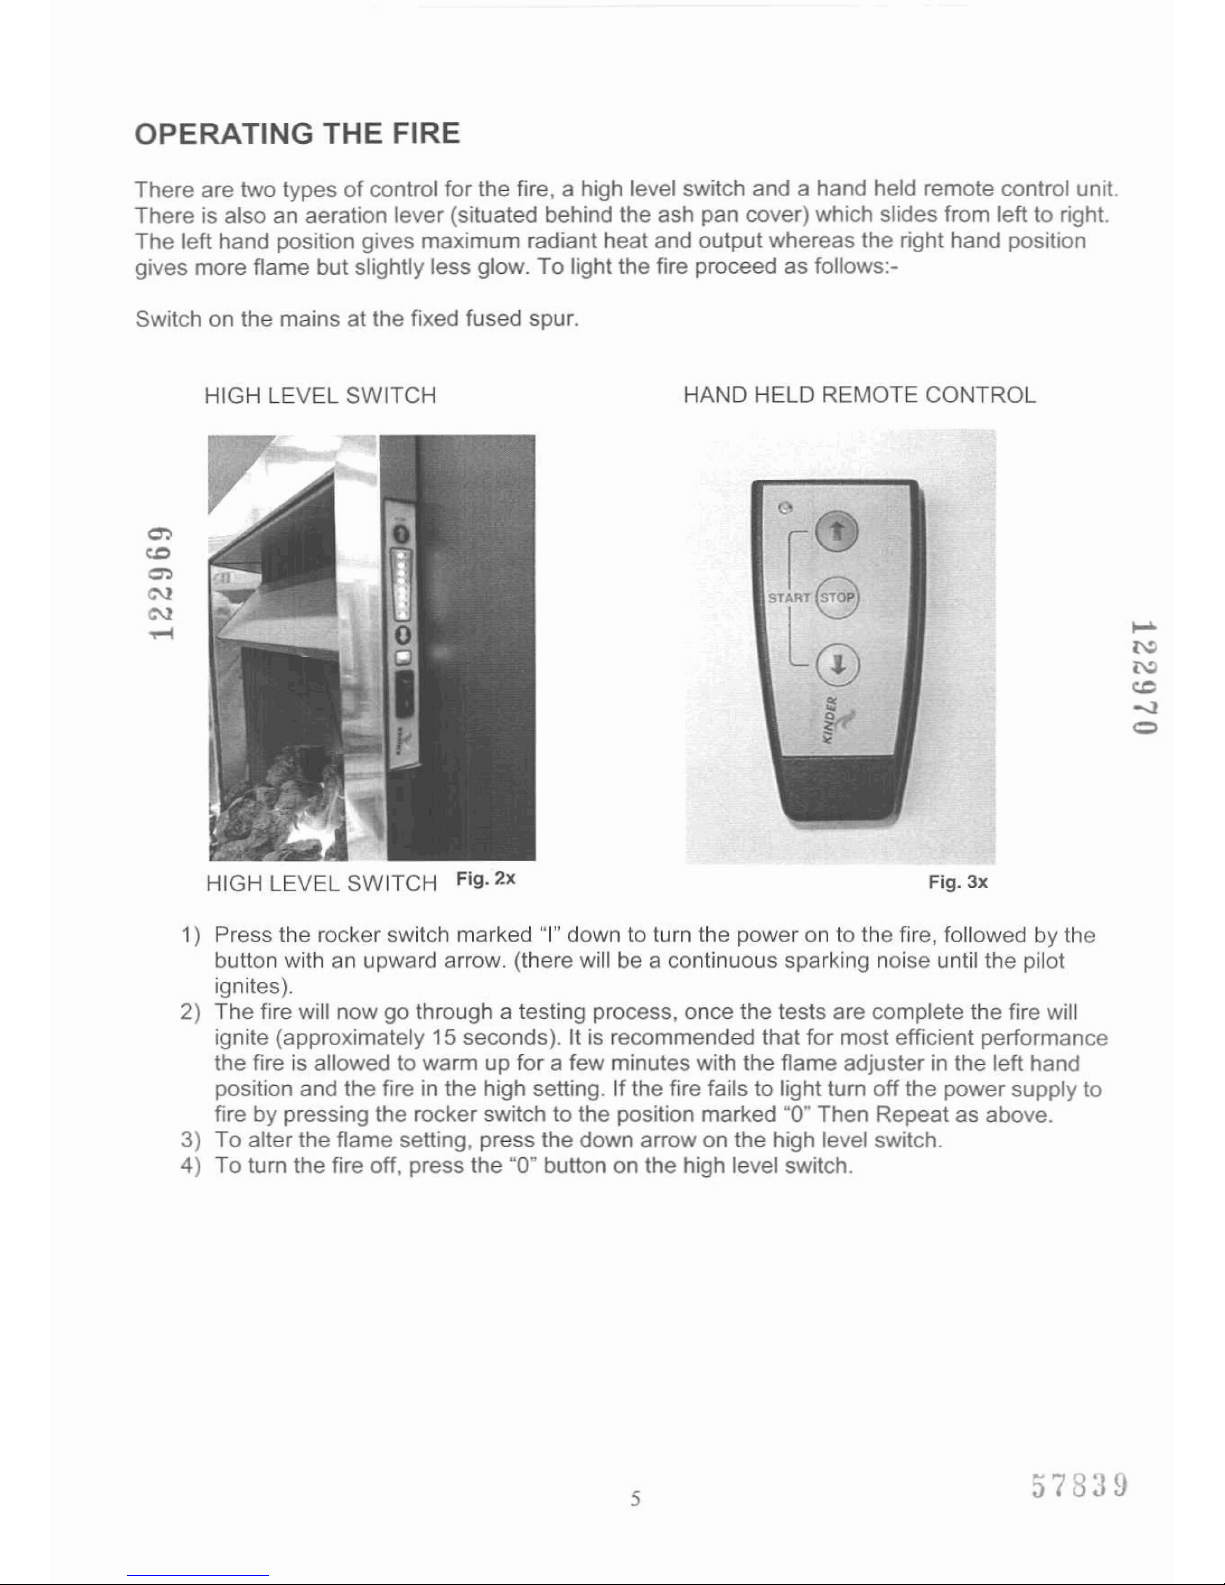
OPERATING
THE
FIRE
There
are
two
types
of
control
for
the
fire.
a
high
level
switch
and
a
hand
held
remote control
unit.
There
is
also
an
aeration
lever
(situated
behind
the
ash
pan
cover)
which
slides
from
left
to right.
The
left
hand
position
gives
maximum
radiant
heat
and
output
whereas
the
right
hand
position
gives
more
flame
but
slightly
less
glow.
To
light
the
Fire
proceed
as
follows:-
Switch
on
the
mains
at
the
fixed
fused
spur.
HIGH
LEVEL
SWITCH
HAND
HELD
REMOTE
CONTROL
l
--
HIGH
LEVEL
SWITCH
Fig.
3x
1)
Press
the
rocker
switch
marked
"I"
down
to
turn
the
power
on
to the
fire,
followed
by
the
button
with
an
upward
arrow.
(there
will
be
a
continuous
sparking
noise
until
the
pilot
ignites).
2)
The
fire will
now
go
through
a
testing
process,
once
the
tests
are
complete
the
fire will
ignite
(approximately
15
seconds).
It
is
recommended
that
for
most
efficient
performance
the
fire
is
allowed
to
warm
up
for
a
few
minutes
with
the
flame
adjuster
in
the
left
hand
position and
the
fire
in
the
high
setting.
If
the
fire
fails
to
light
turn
off
the
power
supply
to
fire
by pressing
the
rocker
switch
to
the
position marked
"0"
Then
Repeat
as
above.
3)
To
alter
the
flame
setting,
press
the
down
arrow
on
the
high
level
switch.
4)
To
turn
the
fire
off,
press
the
"0"
button
on
the
high
level
switch.

Within
the
electronic
controls
contained
in
this
appliance
is a temperature
sensor
which
is
used
to
control the
heat
input
between
the
high
(6.9kW)
heat
input
and
the
low
(4.2kW)
settings,
via
a
staged reduction
in
heat
input.
This
sensor
will
control
the
point
at
which
the
fire
regulates
between
the
high
and
low
settings,
but
the
point
at which
the
appliance
switches
between
high
and
low
is
dependent
upon
many
factors
such
as
room
temperature,
the
time
the
appliance
has
been
running,
flue
performance
etc.
If
all
8
L.E.D.s
are
illuminated
on
the
high
level
switch,
the
fire
will
always
run
at
the
high
rate
heat
input
{6.9kW),
irrespective
of
room
temperature
etc.
If
it
is
set
so
that
just
2
L.E.D.
is
illuminated,
it
will
always
run
on
the
low
rate
heat
input
(4.2kW)
again,
irrespective
of
room
temperature
etc.
The
point
at
which
the
fire
switches
between
"high'hnd
"low"
heat
inputs
via
the
number
of
L.E.D.s
illuminated
on
the
membrane
switch
is
dependent
upon
the
factors
stated
in the
first
paragraph
above,
therefore
we
recommend
that
the
fire
is
adjusted
via
the
remote control
or
the
high
level
switch
to
maintain
a
level
of
heat
input
&
temperature that
is
comfortable
for
the
persons
within
the
room
to
which
the
appliance
is
installed.
REMOTE
CONTROL
1)
Press
the
rocker
switch
marked
"I'
down
to
turn
the
power
on
to
the
fire.
2)
Fit
the
batteries
supplied
in
the loose
items
pack
into
the
remote
handset.
3)
Press
BOTH
arrow
buttons
simultaneously
on
the
remote
control
unit
whilst
pointing
at
the
fire
(there
will
be
a
continuous
sparking
noise until
the
pilot
ignites).
4)
The
fire
will
now
go
through a testing
process,
once
the
tests
are
complete
the
fire
will ignite
(approximately
15
seconds).
It
is
recommended
that
for
most efficient
performance
the
fire
is
allowed
to
warm
up
for
a
few
minutes
with
the
flame
adjuster
in
the left hand position
and
the
fire
in
the
high
setting.
If
the
fire
fails
to
light
turn
off
the
power
supply
to fire
by
pressing
the rocker
switch
to
the
position
marked
"0"
Then Repeat
as
above.
5)
To
alter
the
flame setting,
press
the
down
arrow
on
the
remote
control.
6)
To
switch
the
fire
off,
press
the
"STOP"
button
on
the
remote
control.
WARNING
if
the
fire
goes
out
for
any
reason
or
is
turned
off
and
it
is
necessav
to
relight
the
fire
it
is
important
to
allow
the
fire
to
cool
lfor
3
minutes
before
attempting
to
re-light
it.
1
SPILLAGE
MONITORING
SYSTEM
This
appliance
is
fitted
with
a
spillage
monitoring
system
which
shuts
down
the
fire
if
the
evacuation
of
combustion
products
from
the
fire
is
affected
by
a
partially
or
fully
blocked
flue.
If
this
system
operates
the
fire
will
go
out.
If
this
occurs,
leave
the
fire
for
at
least
three
minutes
then
follow
the
lighting
procedure
as
described
in
the
previous
section.
In
the
event
07
repeated
operation
a
specialist
must
be
called
to
investigate
and
rectify
the
cause.

CLEANING
WARNING
Before
attempting
any
cleaning
operation
ensure
that
the fire
has
been
allowed
to
fully
cool.
CLEANlNG
THE
BRASS
AND
PAINTED
METAL
PARTS
The
brass
trim
fitted
to
this
fire
is
anodised
and
may discolour
with
use. However, this
part
can
be
regularly cleaned using a damp cloth
and
will
then
retain its looks for
the
life of
the
fire.
The
fender
and cover
(if
supplied
with
the
fire)
are
solid
brass
and
may
be
cleaned
using
a
suitable
proprietary
metal polish. If
you
purchased
an
alternative
fender from
your
supplier
it
is important
to
find
out
whether
it
is
lacquered
before
cleaning
it.
Pn
this
case,
your
supplier will
be
able
to
advise
you
on
the
best
cleaning
method.
The
brass trim is
best
cleaned
by
removing
it
from
the
fire
and
placing it
face
up
on a flat
surface.
The
trim
is
easily
replaced
by
repositioning
it
on
the
fire
and
pushing
it
back
onto
the
magnets,
After
using
any
metal
polish
or
cleaners
the
fire should not
be
used
for
15
minutes
or
so
to
allow
any
cleaning
solvents
to
evaporate.
Black
painted
metal
parts
should
be
gently
cleaned
with
a
damp
cloth.
Abrasive
cleaners,
chemical
cleaning
agents
or
any
type
of
polish
must
never
be
used
as
damage
to
the
paint
may
result.
CLEANING
THE
FUEL
BED
We
do
not
recommend
cleaning
the
fuel
bed
other
than
at
annual
service
intervals.
If
carbon
or
soot
accumulates
on
the
coals
or
fuel
bed,
this
is
easily
and
best
removed
by
moving
the
aeration
control
to
the
left
hand
position
and
running
the
fire
on
maximum
for
approximately
one
hour.
This will effectively
burn
off
any
deposits
without
damaging
the
coals.
If
coals
are
found
to
be
very
dirty or
are
damaged
they
should
be
replaced with a complete
set
of
replacement
coals
of
the
correct type.
The
old coals should
be
placed
in sealed
plastic
bag
and
disposed
of
as
normal
household
waste.
Coals
are
made
from a form
of
refractory ceramic
fibre
and
should
be
handled
carefully
to
avoid
generating
dust,
as
this
may
be
harmful
if
in
haled.
As
with
some
other
fibrous
materials,
handling
coals
without
gloves
could
cause
skin
irritation.
None
of
the
fuel
bed
components
or
coals
must
be
washed
or
exposed
to
any
cleaning
agents
or
water.
Any
damaged
parts
must
be
replaced
by
contacting
your
dealer
or telephoning
CFM
Kinder
LTD
on
the
number
stated
on
the
rear
cover
of
this
book.
Coals
must
only
be
replaced
with
a
complete
and
genuine
replacement
set
and
the
fire
must
never
be
run
with
the
wrong
number
or
damaged
coals.
The
fuel
bed
must
be
carefully
reassembled
as stated
in the
following
section.

RE-ASSEMBLING
THE
FUEL
BED
ASSEMBLING
THE
CERAMICS
AND
FUEL
BED
a)
Place
the
insulation
mat
centrally
on
to
the
fuel
bed
base
plate
support
then
place
the
ribbed
hard
ceramic
fuel
bed
base
on
top
of
the
mat
and
pull
both
fully
forwards
to
the
burner.
Make
sure
that
the
fuel
bed
base
is
located
centrally
in
the
firebox.
Ensure
that
both
the
mat
and
fuel
bed
base
fit
fully
down
onto
the
fuel
bed
support
and
are
not
lodged
on
the
burner.
See
below.
1
I
Side
view
showing
fuel
bed
correctly
Located
behind burner.
Fig.
5x

b)
Piace
both
the
hard
ceramic
fuel
bed
sections
on
to
the
base
so
that
the
location
lugs
fit
snugly
into
the
recesses
on
the
fuel
bed
sections.
c)
Place
the
Front
Ceramic
Rails
centrally
onto
the
Semi-Circular
location
plate
situated at
the
front
of
the
burner.
Ensure
that
the
front
ceramic
rail
is
located
over
the
locating
lugs.
(see
below)
:
I
I
'l
Fig.
7x
d)
Select
five
of
the
large
coals
and
locate
each
one
centrally
into
the
depressions
in
the
Front
Ceramic
Rail.
Ensure
that
the
coals
are
equally
spaced
as
shown
below.

e)
Select
four
of
the
large
coals
and
two
small
coals,
and
place
them
on
the
front
of
the
fuel
bed
directly
behind
the
spaces
between
the
front
row
of
coals.
f)
Place
a
row
of
five
coals
to
occupy
the
spaces
behind
the
second
row
of coals.
Fig.
1Ox
g)
Place the
remaining
four
large
coals
as
shown
below
(Taking
care
not
to
allow
the
coats
to
be
trapped
behind
the
fuel
bed):-
h)
Finally.
place
the
remaining
three
small
coals
as
shown
below:-
10

The
exact
position
and
fit
of
the
coals
may
be
finely
adjusted
to
give
the
most
pleasing
and
random
appearance.
I
Fig.
12x
l
I
warning:
Use only
the
coals
supplied
with
the
fire.
When
replacing
the
coals
remove
the
old
1
l
1,
coals
and
discard
them.
Fit
a
complete
set
of
coals
of
the
correct
type. Do
not
fit
additional
coals
/
lor
any
coals
other
than
a
genuine
replacement
set.

TROUBLE
SHOOTING
This
fire
has a degree
of
built
in
fault
diagnosis.
The
main
purpose
would
be
to
allow
the
customer
to
report
the
exact
problem
before
the
visit
from
a
service engineer.
Various
fault conditions can
be
detected
and
indicated
by means
of
the bar
graph
display. On
detection
of
a
fault
you
will
here
three
beeps
and
the
fire will
shut
down
and
placed in
a
"locked
out"
state.
W
hiist
in
this state
the
red
L.E.D
will
be
illumina!ed
and
a
number
of
orange
bar graph
segments
will
be
lit,
one
at
a
time,
depending
on
the
nature
of
the
fault
condition.
These
detectable
conditions
and
their
corresponding
"error
codes"
are
set
out
in
the
table
below.
To
"unlock"
the
system
either
the
"decreasen
button
must
be
pressed
or
the
rocker
switch
must
be
moved
to
"off'.
NOTE:
If
faults
are
persistent
then
a
service
should
be
carried
out
by
a
suitable
CORGl
Registered
gas
installer.
A
list
of
serviceable
parts
are
available
on
the
previous
page.
This
table
continues
on
the
following
page.
I
I
detected
before
the
fan
is
turned
on
-.
/No
of
orange
1
L.E.D.s
lit
1
then
the
switch
is
assumed
to
be
faulty
and
the
fire
will
not
start.
Failed
to
establish
flue
pressure.
Fault
detected
Pressure
switch
stuck
'on'.
Flue
pressure
lost
Details
The
first
task
carried
by
the
controller
each
time
the
fire
is
started
is
to
check
I
I
If
flue
pressure
has
not
been
established
after
the
pre-purge
period
then
this
error
message
given
and
the
fire
will
no2
start.
The
likely cause
being
flue blockage
but
possibly fan
or
pressure
switch
failure.
This
could
indicate
flue
blockage
or
fan
l
failure.
the
pressure
switch.
If
flue
pressure
is
Failed
to
light
fire
If,
after a preset
number
of
ignition
attempts,
the
fire
is
not
alight
then
this
code
is
given.
The
most
likely
cause
being
lack
of
gas
supply
but
possibly
failure
of
ignition circuitry.
5
Pilot
flame
lost
This
most
likely
cause
would
be
the
pilot
1
assembly
is
faulty
and
needs
replacing
of
I
1
a
service
maybe
required.

USER
REPLACEABLE
PARTS
r
6
1
Pilot
thermocouple
,
failure
I
The
only
user
replaceable
parts
on
this
fire
are
the
fuel
bed
components
and
coals
which
may
be
replaced
as
described
in
the
above
section.
Replacement
of
any
other
pads
must
be
carried
out
by
a
competent
person
such
as
a
CORGl
regisfered
gas
installer.
I
Each
time
the
fire
is
started
the
I,
condition
of
the
thermocoupFe
is
checked.
If
a
pilot
flame
is
detected
~l
i
when the
fire
has
not
been
started
The
thermocouple
is
deemed
faulty
and
the
start-up
sequence
will
be
halted
immediately.
l
The
part
numbers
of
the
user
replaceable
parts
are
as
follows,
these
are
available
from
Kinder
Fires
who
may
be
contacted
at
the
address
shown
on
the
rear
cover.
Fuelbed
base
Left
Hand
Fuelbed
Right
Hand
Fuelbed
Replacement
Coal
Set
The
remote
handset
requires
two
AAA
sized
batteries.
To
replace
these,
simply
unscrew
the
pozi-
drive
screw
on
the
under
side
of
the
remote
control.
This
will
now
give
access
to
the
Zwo
batteries.

Fret
Requirements
In
order
to
maintain
the
efficient
and
safe
operation
of
the
fire
it
is
important
that
any
fret
which
is
used
must
comply
with
the
following
dimensions.
It
is
important
to
clean a f~et
in
accordance
with
the
instructions
provided
by
your
retailer
as
these
vary
depending
on
the
surface
finish
of
the
fret.
The
fret
should
not
block
I
cover
any
apertures
in
the
front
ceramic.
MINIMUM
TOTAL
OPEN
AREA OF
FRET
l l
0cm2
l
HEIGHT
21
Omm
F
n=
Fig.
13x
\--
TWO
AIR
SLOTS
EACH
OF
MINIMUM
AREA
19cm2

Due
to
our
policy
of
continual
improvement
and
development
the
exact
accuracy
of
descriptions
and
illustrations
cannot
be
guaranteed
Part
No.
18PT-
46720
Issue
2
CFM
Kinder
Ltd
Trentham
Lakes
Stoke
on
Trent
Staffs
ST4
4TJ
Tel
:
General Enquires
(0
1782)
339000
Service
(08700]
10
1
187
 Loading...