

KinAn XU0116, XM0108, XU0108, XM0116 User Manual
Rackmonut KVM Switch
(
8 Port / 16 Port
User Manual
)
http://www.kinankvm.com/
@all right reserved Shenzhen Kinan Technology Co., Ltd
Printing date:2017/04
Version:V2.0
- 1 -

8 Port /16 Port User Manual
Contents
Overview ...................................................................................................... 3
Descriptions .............................................................................................. 3
Features .................................................................................................... 3
Hardware Installation .................................................................................. 4
Rack Mounting .......................................................................................... 4
Appearance ............................................................................................... 4
KVM Rear View ......................................................................................... 5
Cables ....................................................................................................... 6
Installation Instruction ............................................................................... 7
Opening the Console .................................................................................. 8
LED Instructions ........................................................................................ 8
OSD Operation ............................................................................................ 9
OSD Overview .......................................................................................... 9
OSD Functions ........................................................................................ 10
F1-ADM ................................................................................................ 11
F2-Scan ............................................................................................... 14
F3-Set .................................................................................................. 15
F4-Tool ................................................................................................ 17
F6-Edit Port Name ............................................................................... 18
F7-Set Quick View Port (QV) .............................................................. 18
F8-LOUT.............................................................................................. 18
USB keyboard emulation ......................................................................... 20
Mac keyboard .......................................................................................... 20
Sun keyboard .......................................................................................... 21
Appendix .................................................................................................... 22
Specifications(USB Console) .................................................................. 22
Specifications(USB&PS/2 Console) ........................................................ 23
FAQ ......................................................................................................... 24
- 2 -

8 Port /16 Port User Manual
Overview
Descriptions
KVM switch is a control device which controls multiple computers from a single
console (keyboard, video and mouse), as many as 512 computers can be controlled
from the original console. There is no better way to save space, time and money than
with a KVM switch installation. By using the KVM switch to manage your installation,
you will gain below benefits: (1) eliminate the expense of purchasing separate
keyboards, monitors and mice; (2) save all the space those extra components would
take up; (3) save space that a keyboard, monitor and mouse would take with a
standard KVM switch; (4) save on energy costs; and (5) eliminate the inconvenience
and wasted effort involved in constantly having to move from on computer to another.
It is easy and fast to install the KVM switch, you just need to connect corresponding
cables to the right ports of the KVM.Since the KVM directly get the signal input from
the keyboard and mouse, there is no software setup or other complex installation, so
no worry about compatibility.
Easily access to any computer just via pushbuttons on the front panel or invoke OSD
menu. Convenient auto-scan allows you to auto-scan and monitor the selected
computer.
Features
Access and control up to 8 /16 computes form a single USB or PS/2 console
By daisy chaining up to 31additional Combo-KVM, as many as 512
computers can be controlled from the original KVM console which support 8
or 16 ports KVM seamless mixed cascade connection
Auto PS/2 and USB interface detection
Support wireless keyboard and mouse from different suppliers
Two level password security--only authorized users view and control
computers; up to four users and an administrator with a separate profile for
each
Users can set up different hot keys(【Scroll Lock】/【Caps Lock】/【F12】),
auto scanning time, port display time, user log out time, buzzer on/off and
touchpad on/off according to their different needs
Broadcast mode--operations simultaneously performed on all selected
computers
Multiplatform support--Windows2000/XP/Vista,Linux,Mac and Sun
Supports multimedia USB keyboard(PC,Mac and Sun)
Superior video quality--up to 2048×1536; DDC2B
USB or PS/2 keyboard emulation--computer boot even the console focus is
else where
Convenient computer switching via front panel pushbuttons, hotkeys, OSD
menu or mouse
Automatically show the computer position on the front panel LED screen
- 3 -
8 Port /16 Port User Manual
under daisy chaining connection without DIP set by hand.
Auto scan feature for monitoring user-selected computers
Hot pluggable --add or remove computers without having to power down the
switch
Quickly select your computer by naming the server or inputting SN number of
the server
It has reserved IP KVM extend slot for you to easily add/remove IP KVM
remote management function.
Standard 19” rack integrated in 1U height.
Hardware Installation
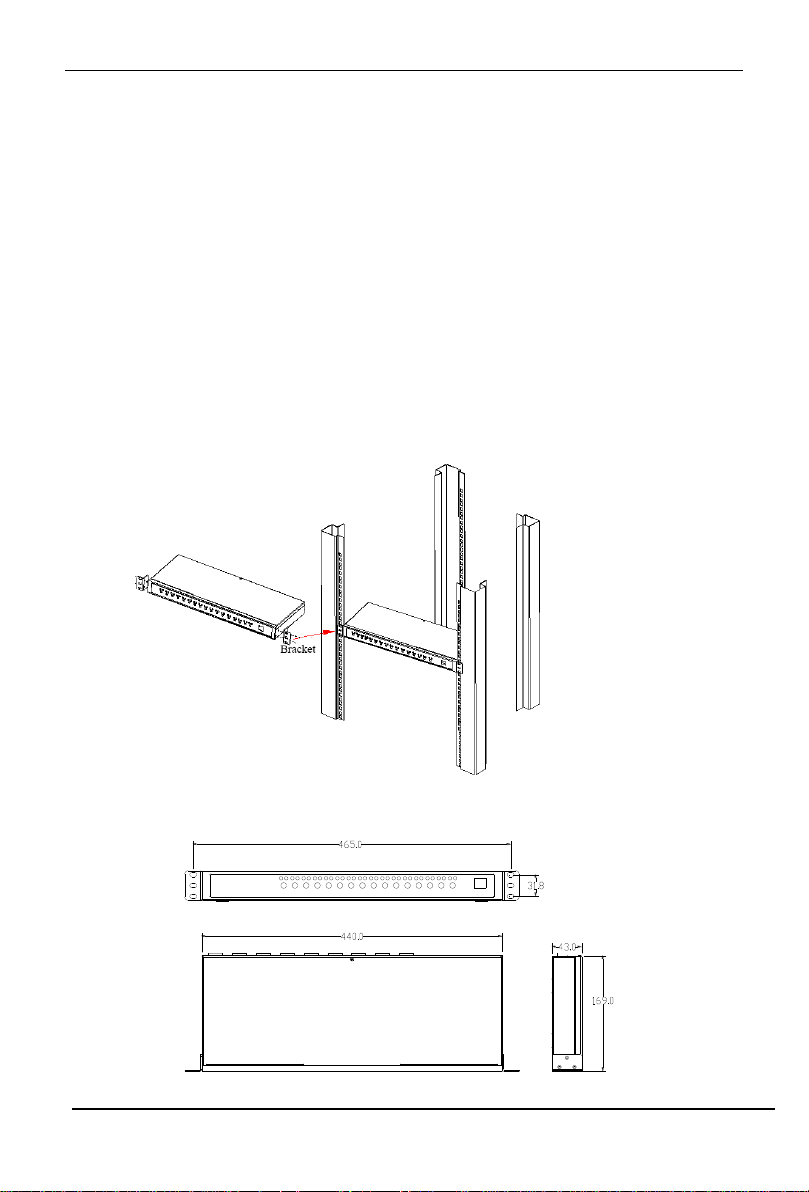
Rack Mounting
Make sure all the computers and external device are shut down before installation.
Put the KVM switch in place, screw the brackets to the two sides of the KVM to install
the KVM in the standard 19”rack.Pay attention to the cable length, to keep a certain
distance between the KVM and the computer.
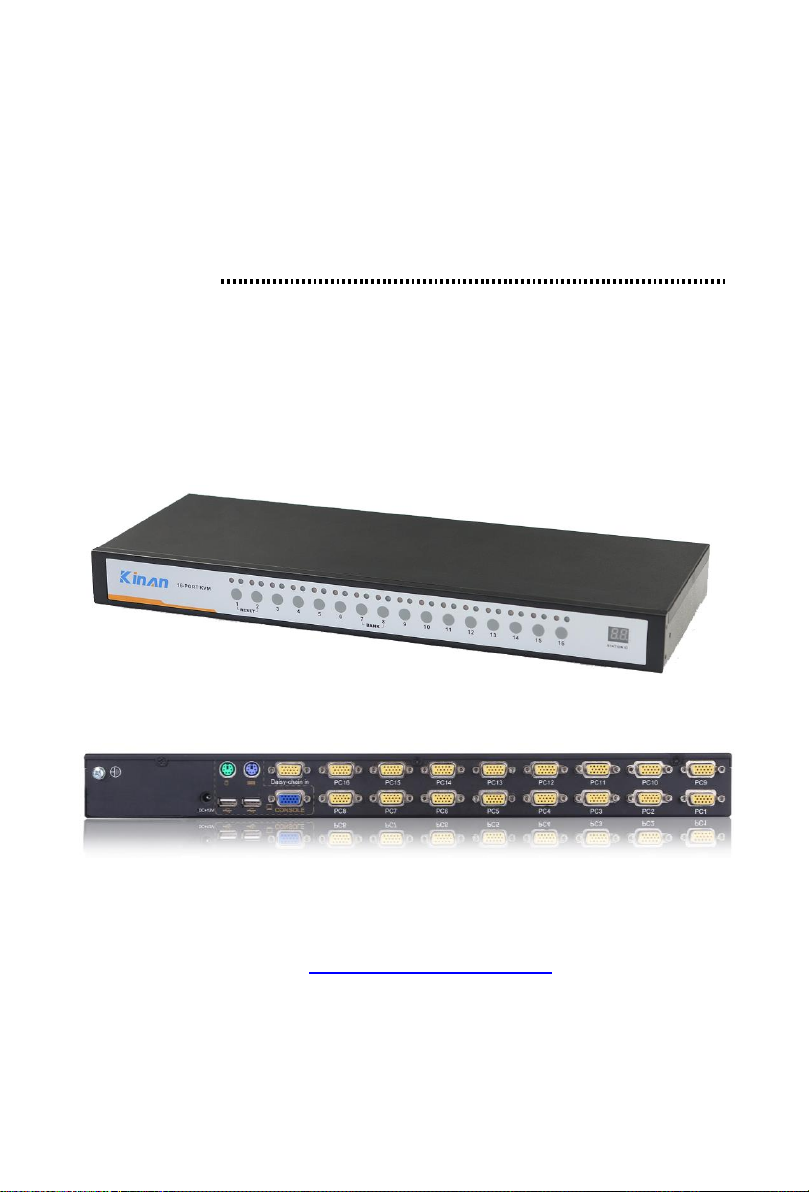
Appearance
- 4 -
8 Port /16 Port User Manual
5
4
3
2
1
DC+12V
PC8 PC7 PC6 PC5 PC4 PC3 PC2 PC1
chain in
CONSOLE
USB USB
PC9PC10PC11PC12PC13PC14PC15PC16
CONSOLE
chain in
PC1PC2PC3PC4PC5PC6PC7PC8
DC+12V
USBUSB
No.
Explanation
1
Ground connecting screws
2
Power adapter socket
3
Local console
4
KVM controlled port
5
Cascade port
KVM Rear View
Support USB console
Support PS/2 & USB console
Table 1.1
- 5 -
1.1 rear view
8 Port /16 Port User Manual
No.
Function
Model
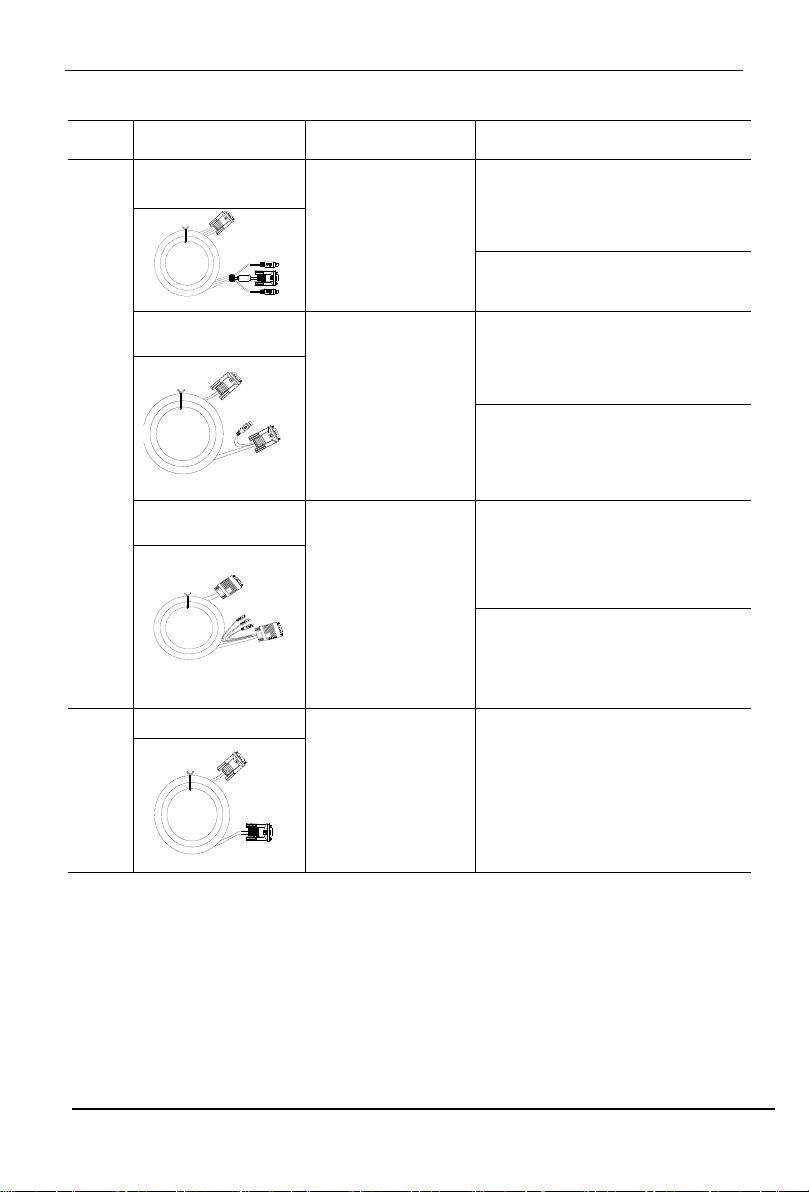
Cable Port
①
KVM signal cable
-PS/2
CH-1800P (1.8M)
CH-3000P(3M)
CH-5000P(5M)
PC or Server port:
Keyboard: 6 pin MIN-DIN male
Mouse: 6 pin MIN-DIN male
Monitor: 15 pin HDB male
KVM port
15 pin HDB male
KVM signal cable
-USB
CH-1802U (1.8M)
PC or Server port:
USB: USB A TYPE(female)
Monitor: 15 pin HDB male
KVM port
15 pin HDB male
KVM signal cable
-COMBO
CH-1801M (1.8M)
Note: USB port
can’t be
connected with
PS/2 port at the
same time
PC or Server port:
USB: USB A TYPE(female)
Monitor: 15 pin HDB male
Keyboard: 6 pin MIN-DIN male
Mouse: 6 pin MIN-DIN male
KVM port
15 pin HDB male
②
Cascade cable
CH-3000C ( 3M)
15 pin HDB male
Cables
Table 2-1.1 connecting cables
To ensure signal integrity and simplify cable layout, we strongly recommend you
using high quality cables with different length as shown in above table.
- 6 -
8 Port /16 Port User Manual
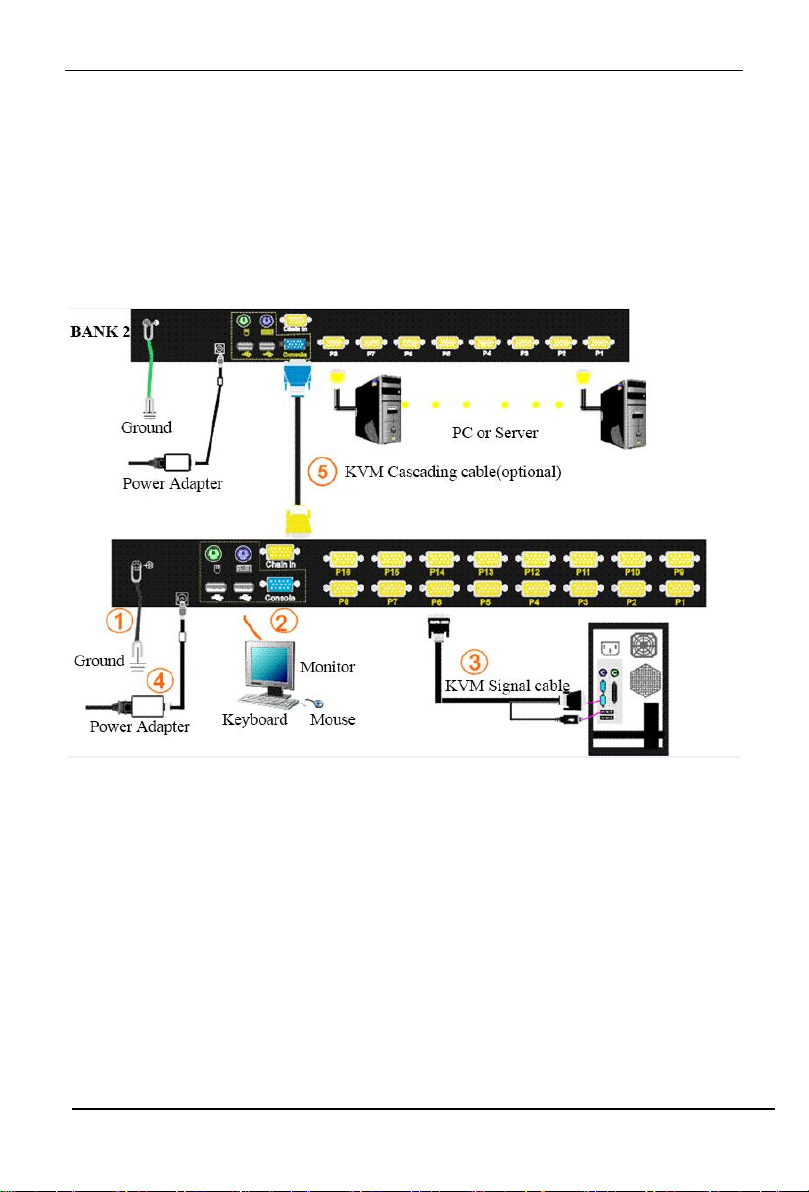
Installation Instruction
1. Make sure the KVM switch has been connected to the ground.
2. Connect local control keyboard, mouse and monitor (support USB and PS/2) to
the KVM switch.
3. Connect one port of KVM signal cable to the computer (make sure the keyboard,
mouse and VGA cables are correctly connected), connect the other port to the
KVM port.
4. Plug the 12V power adapter in the power port.
1.2 Install KVM components
5. Cascade installation (optional)
1) Plug the yellow port of daisy chaining cable in the yellow “Daisy-Chain in” DB 15
port on the KVM.
2) Plug the other blue port in the blue “Console” DB 15 port on the KVM.
3) Repeat above steps according to above diagram, it can maximum cascade up to
32 KVM switches.
- 7 -

8 Port /16 Port User Manual
No.
Components
Function
1
1-8 or
1-16
1) Switching freely from port 1 to port 8 /16
2) Press [1] and [2] at the same time resets the KVM.
3) Press [7] and [8] at the same time switches to next
stage level.
2
Port Selection
Buttons& LEDs
1)An online LED light(orange) indicates that the
KVM has connected to its corresponding computer
and power on.
2)A selected LED light(green) indicates that the
computer attached to its corresponding port is up and
running.
3
Station ID
Station ID shows the current stage level of the daisy
chain.
Opening the Console
The KVM makes two “beep” sounds and the LED flashes two times after power on.
Then below window appears for you to input user name and password.
The default password is “blank”, double click to 【Enter】 the OSD main menu to
operate the KVM.
LED Instructions
1.3 KVM front view
Table 1.2:
- 8 -
 Loading...