

KinAn KC2108, KC2116, KC2132 User Manual
Rack Mount CAT5 KVM Switch
(8 Port/16 Port/32 Port)
User Manual
www.kinankvm.com
@all right reserved Shenzhen Kinan Technology Co., Ltd
Printing date:2018/01
Version: V3.0
- 1-

8Port/16Port/32 Port User Manual
CONTENTS
Overview ...................................................................................................... 3
Description ................................................................................................ 3
Features .................................................................................................... 3
Hardware Installation .................................................................................. 4
Rack Mounting .......................................................................................... 4
Cables (KVM switching module) ............................................................... 6
Installation Instruction ............................................................................... 8
Operation ................................................................................................... 10
OSD Operation .......................................................................................... 12
OSD Functions ........................................................................................ 13
F1-ADM ............................................................................................... 14
F2-Scan ............................................................................................... 17
F3-Set .................................................................................................. 18
F4-Tool ................................................................................................ 20
F6-Edit port names .............................................................................. 21
F7-Set Quick View port ....................................................................... 21
F8-LOUT.............................................................................................. 21
Cascade Function ................................................................................... 22
USB Keyboard Emulation ........................................................................ 24
Mac keyboard .......................................................................................... 24
Sun keyboard .......................................................................................... 25
Appendix .................................................................................................... 26
Specifications .......................................................................................... 26
FAQ ......................................................................................................... 27
- 2 -

8Port/16Port/32 Port User Manual
Overview
Description
CAT5 KVM switch can control multiple computers form a set of console (monitor,
keyboard and mouse).
It is easy and fast to install the CAT5 KVM switch; you just need to connect
corresponding cables to the right ports of the CAT5 KVM and its module without
software configuration.
It’s easy access to any selected computer via front panel LEDs or OSD menu,
allowing convenient auto scan feature auto scanning and monitoring selected
computers.
CAT5 KVM switch can connect multiple computers with RJ-45 connector and CAT5
connecting cables. Transmission distance is up to more than 150M, so it doesn’t
need a KVM extender.
Features
Access and control up to 4 / 8 /16 /32 computes
Extending the transmitting distance between the console and the computer
--1600x1200@60Hz(50m), 1280x1024@60Hz(100m),1024x768@60Hz(150m)
Supports Multiple systems: PC,Mac, Sun etc.
Two level password security--only authorized users view and control computers;
up to four users and an administrator with a separate profile for each
Users can set up different hot keys(【Scroll Lock】/【Caps Lock】/【F12】/【Ctrl】),
auto scanning time, port display time, log out time, buzzer on/off and mouse
on/off according to their different needs
Convenient computer switching via mouse
Broadcast mode--operations simultaneously performed on all selected
computers
No software--switching port via front panel LEDs and OSD menu
Hot pluggable --add or remove computers without having to power down the
switch
Auto scan feature for monitoring user-selected computers
Keyboard and mouse emulation function.
- 3 -
8Port/16Port/32 Port User Manual
Hardware Installation
Rack Mounting
The Cat5 KVM switch will be installed in the front or rear rack cabinet. Make sure all
the connecting computers as well as external device are shut down.
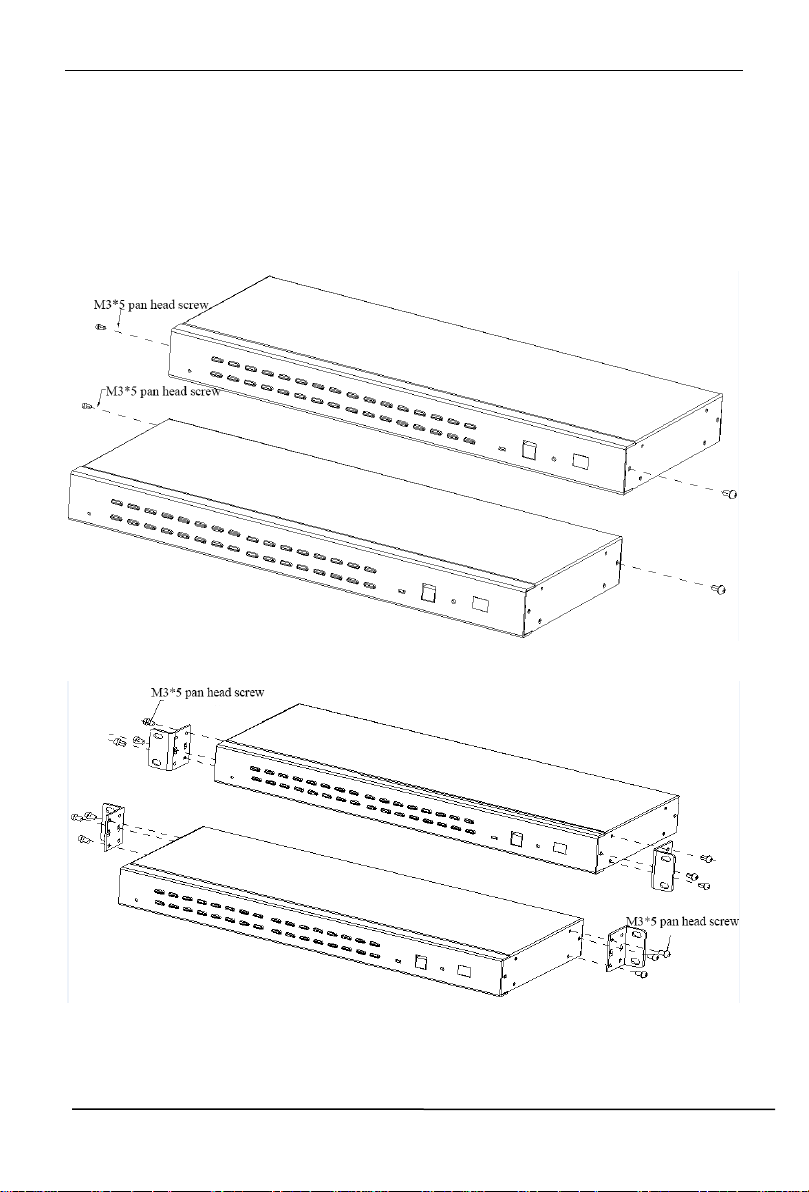
Installation instruction:
1) Remove the front or rear screw
2) Screw the bracket to the front or rear part of the KVM switch
- 4 -
8Port/16Port/32 Port User Manual
3) Screw the KVM device to the rack cabinet (front or rear part)
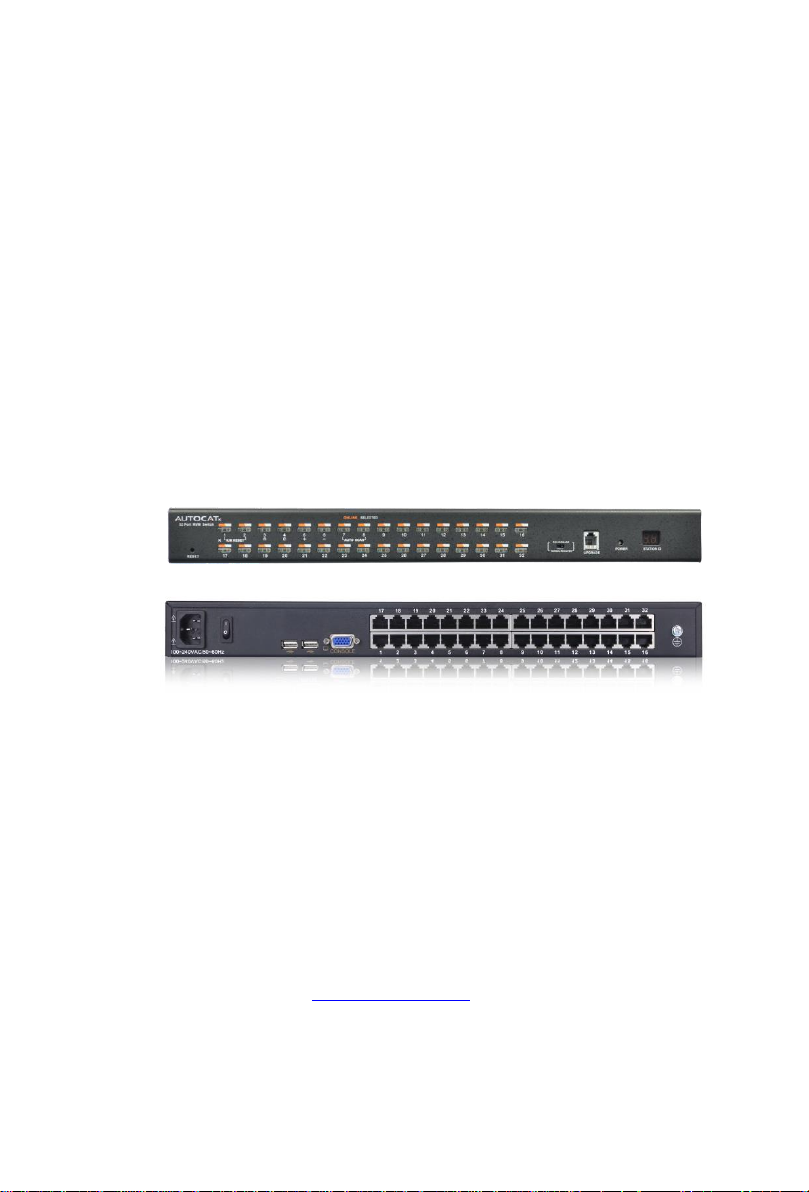
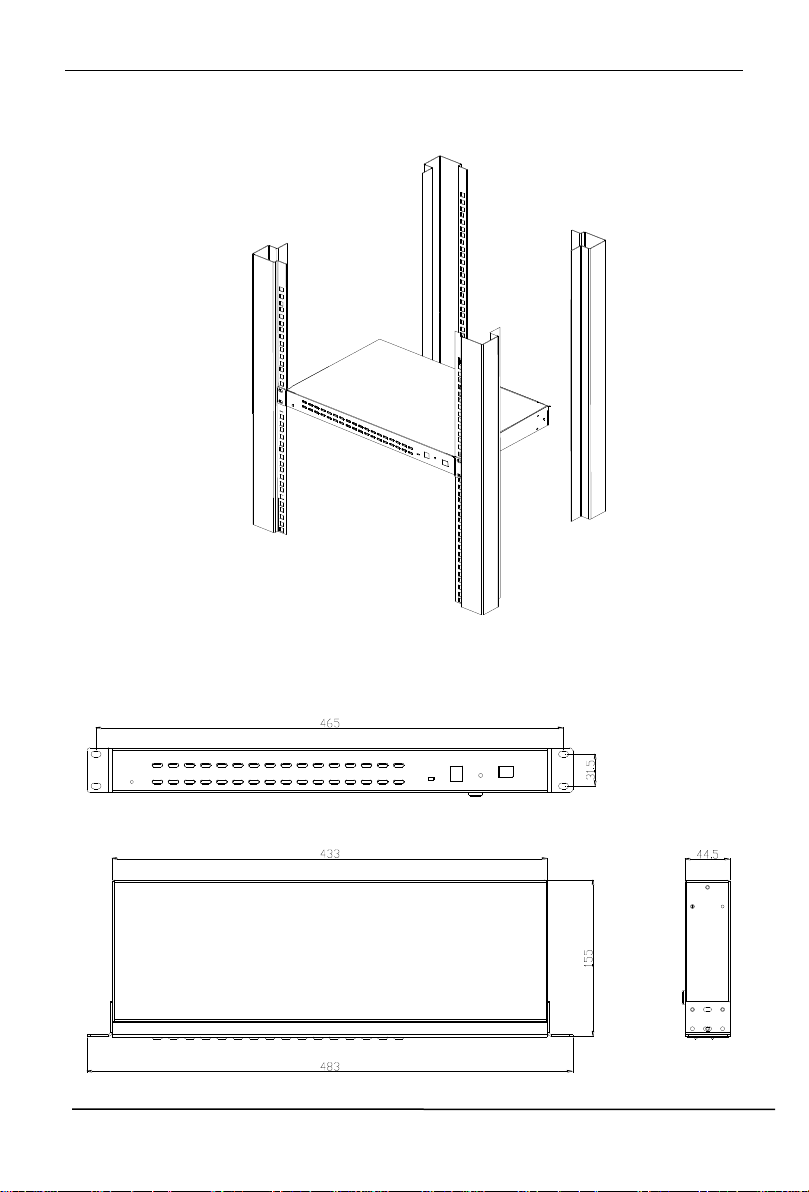
Structure and Size
- 5 -
8Port/16Port/32 Port User Manual
Components
Function
Power LED
Flashing green light
The module is power on
Green light keeps on
The module has been connected to the
KVM
Link LED
Quickly flashing
The module is communicating with the host
Orange light keeps on
The module has been selected by the KVM
switch
Function
Module
PS/2 module
CM-0906P
USB module
CM-0906U
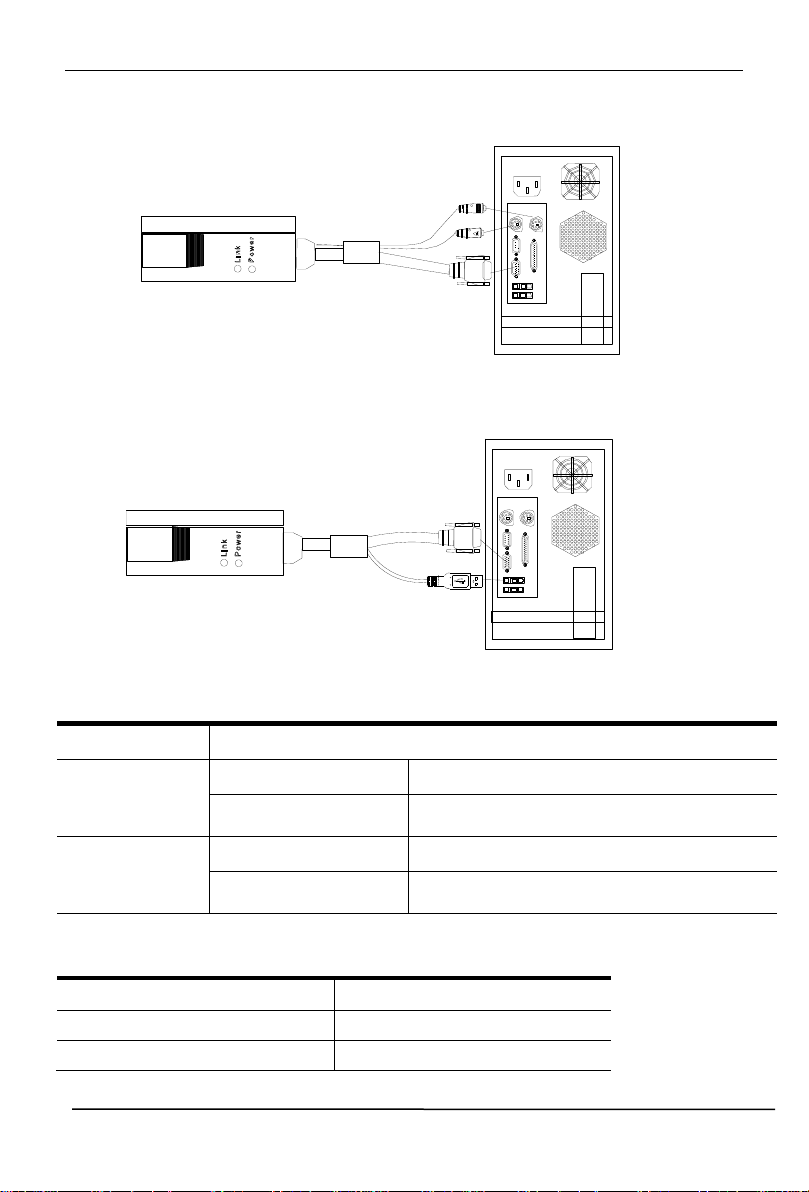
Cables (KVM switching module)
PS/2 CPU module
USB CPU module
Table 1.3: Module LEDs
Below KVM switching modules are needed:
- 6 -

8Port/16Port/32 Port User Manual
CONSOLE
5
4
CONSOLE
100V~240V AC/47~63Hz
2
3
1
100V~240V AC/47~63Hz
1615141312111091 2 3
4 5
6
7
8
1615141312111091 2 3
4 5
6
7
8
CONSOLE
5
4
CONSOLE
100V~240V AC/47~63Hz
2
3
1
100V~240V AC/47~63Hz
1 2 3
4 5
6
7
8
1 2 3
4
No.
Explanation
1
Ground connecting screws
2
Power Socket
3
Power Switch
4
Local Console
5
KVM Console
Rear View
- 7 -
8Port/16Port/32 Port User Manual
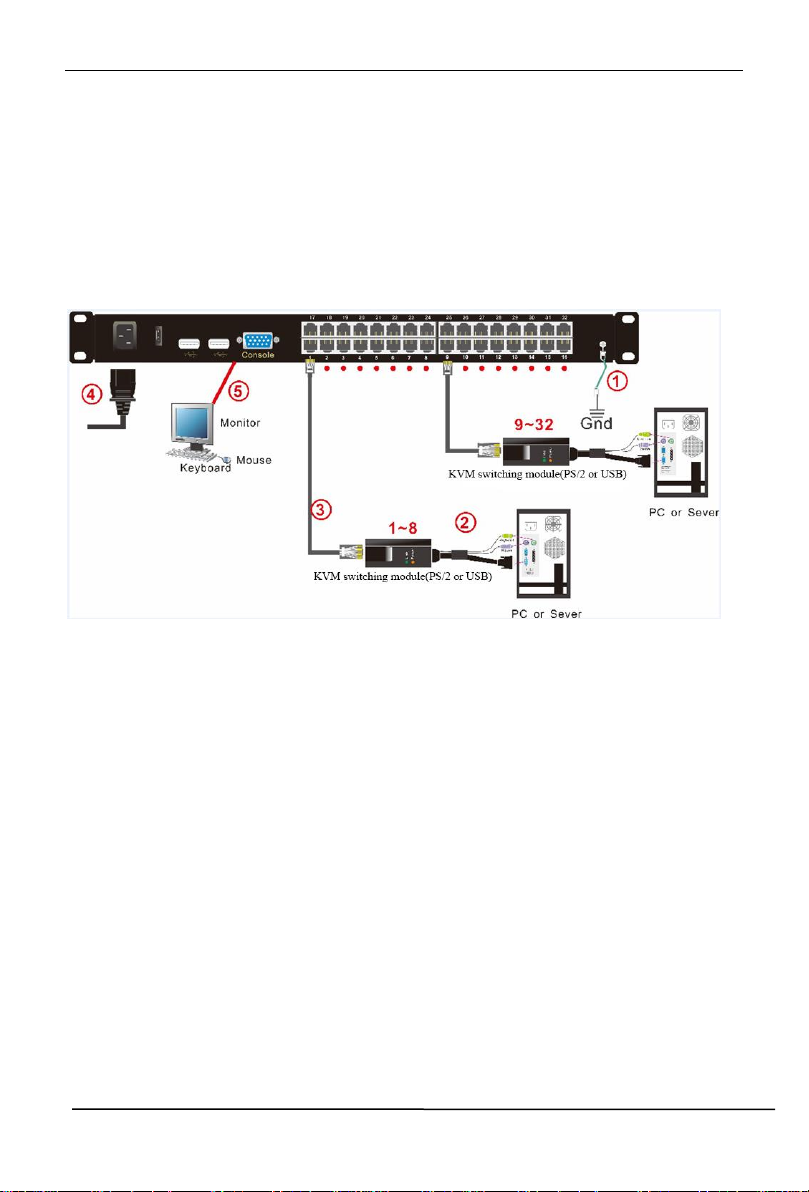
Installation Instruction
Installation steps:
1) Make sure the IP KVM has been connected to the ground.
2) Connect KVM switching module to the host computer.
3) Connect KVM switching module to any available KVM port with CAT5
cable.
4) Plug the female port of the power cable into the KVM power socket and the
male port into the 220V AC power socket.
5) Connect the local console (keyboard, monitor and mouse) to the console
port.
Diagram 2.4 Install KVM components
- 8 -
8Port/16Port/32 Port User Manual
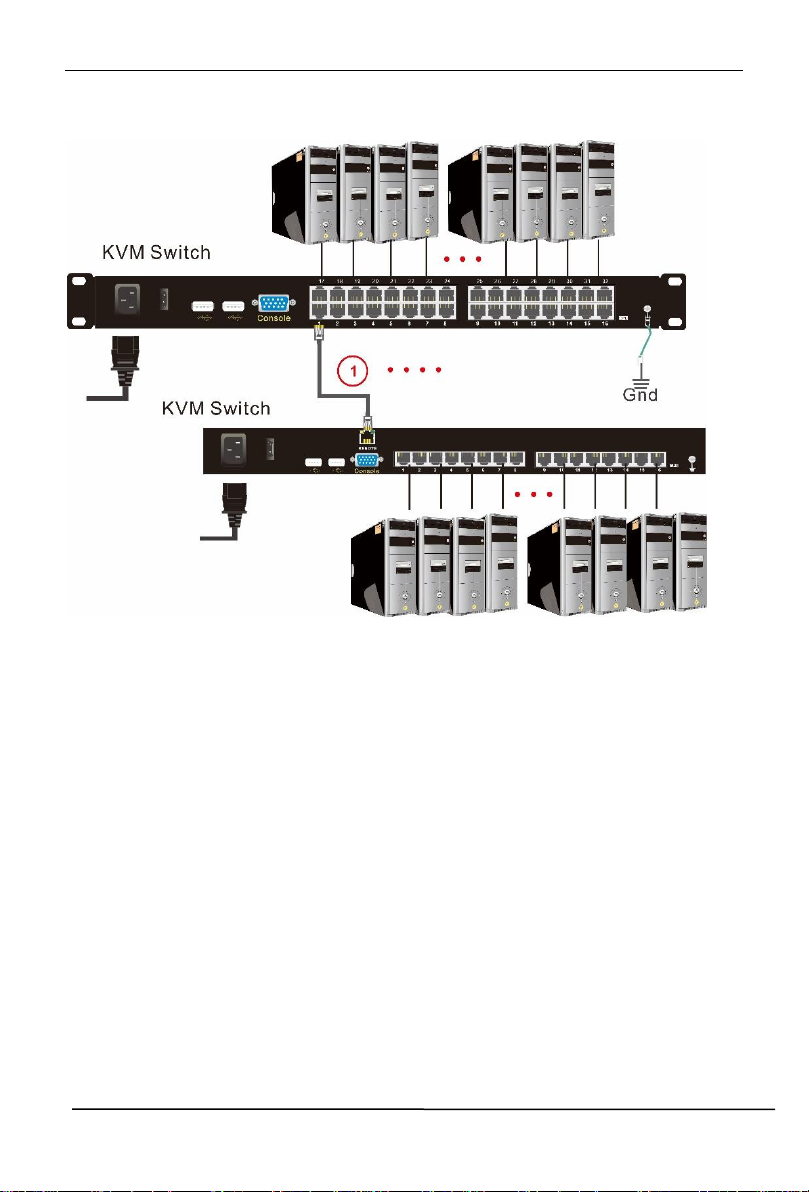
Cascade Installation
Explanation:
1. Connect one port of the CAT5 cable to any RJ45 port of KC11/12, and
connect the other port to the RJ45 port with “Chain in “of KC12 series.
2. Repeat above operation to cascade more KVM switches
4 Port: max cascade 4 KVM switches
. 8 Port: max cascade 8 KVM switches
16 Port: max cascade 16 KVM switches
32 Port: max cascade 32 KVM switches
3. Connect host computers according to 2-4.
- 9 -
 Loading...