

Kimoto Kimosetter 340 User Manual

2
IMPORTANT SAFETY INSTRUCTIONS
1. Read all of these instructions and save them for later reference.
2. Follow all warnings and instructions marked on the product.
3. Unplug this product from the wall outlet before cleaning. Do not use liquid or aerosol
cleaners. Use a damp cloth for cleaning.
4. Do not use this product near water.
5. Do not place this product on an unstable cart, stand or table. The product may fall, causing
serious damage to the product.
6. Slots and openings on the cabinet and the back or bottom are provided for ventilation. To
ensure reliable operation of the product and to protect it from overheating, do not block or
cover these openings. The openings should never be blocked by placing the product on a
bed, sofa, rug or other similar surface. This product should never be placed near or over a
radiator or heat register. This product should not be placed in a built-in installation unless
proper ventilation is provided.
7. This product should be operated from the type of power source indicated on the marking
label of the AC adaptor. If you are not sure of the type of power available, consult your
dealer or local power company.
8. Do not allow anything to rest on the power cord. Do not locate this product where the cord
will be walked on.
9. If an extension cord is used with this product, make sure that the total of the ampere
ratings on the products plugged into the extension cord do not exceed the extension cord
ampere rating. Also, make sure that the total of all products plugged into the wall outlet
does not exceed 15 amperes.
10. Never push objects of any kind into this product through cabinet slots as they may touch
dangerous voltage points or short out parts that could result in a risk of fire or electric
shock. Never spill liquid of any kind on the product.
11. Except as explained elsewhere in this guide, don’t attempt to service this product yourself.
Opening and removing those covers that are marked “Do Not Remove” may expose you
to dangerous voltage points or other risks. Refer all servicing on those compartments to
service personnel.
12. Unplug this product from the wall outlet and refer servicing to qualified service personnel
under the following conditions:
A. When the power cord or plug is damaged or frayed.
B. If liquid has been spilled into the product.
C. If the product has been exposed to rain or water.
D. If the product does not operate normally when the operating instructions are followed.
Adjust only those controls that are covered by the operating instructions since improper
adjustment of other controls may result in damage and will often require extensive
work by a qualified technician to restore the product to normal operation.
E. If the product has been dropped or the cabinet has been damaged.
F. If the product exhibits a distinct change in performance, indicating a need for service.

3
for Macintosh
for Windows
for Windows and Macint osh
About This Manual
This manual is your introduction to the Kimosetter 340, a Kimoto CTP printer.
Use the manual now to set up and begin working with your printer. Use it later as
a reference for everyday routines and as a guide for maintenance and
troubleshooting.
For your convenience, this manual is categorized into three groups, each indicated
by the tab along the right edge on the pages on the right-hand side.
For Win & Mac: Information applicable both to the Windows and the
Macintosh systems.
For Windows: Information applicable to the Windows 95/98 and Windows
NT/2000 systems.
For Macintosh: Information applicable to the Macintosh system.

4
Contents
About This Manual ............................................................................................ 3
Chapter 1 Major Functions and Operations ................................... 9
Getting Your Printer Ready ......................................................... 10
Getting Your Printer Ready ......................................................................... 10
Removing the outside packing materials .............................................................. 10
Opening the front cover ........................................................................................ 11
Removing the carriage packing material .............................................................. 11
Closing the front cover .......................................................................................... 12
Fitting the media support ...................................................................................... 12
Fitting the dust cover............................................................................................. 13
Locating the printer ............................................................................................... 14
Connecting Cables for Windows ................................................................. 15
Connecting the printer to your computer .............................................................. 15
Connecting USB Cables for Macintosh ...................................................... 16
Connecting the printer to your computer .............................................................. 16
Connecting SCSI Cables for Macintosh ..................................................... 17
How to attach the SCSI Adapter ........................................................................... 17
How to remove the SCSI Adapter ......................................................................... 18
Connecting the printer to your computer .............................................................. 18
Power cord connections ............................................................................. 19
Name and Function of Each Part of the Printer .......................... 20
Printer (Front View) ..................................................................................... 20
Inside the Printer ........................................................................................ 21
Printer (Rear View) ..................................................................................... 22
Printer (Rear View with Macintosh interface module) ................................. 22
Media Feed Switch ..................................................................................... 23
Control Panel .............................................................................................. 23
Installing Ink Cartridges .............................................................. 24
Identifying Ink Cartridge and Media Types ................................................. 24
Installing Ink Cartridges .............................................................................. 24
Exchanging Ink Cartridges ......................................................................... 26

5
Loading Media ............................................................................28
Notes and precautions about media ........................................................... 28
Loading Media in Automatic Feed Mode .................................................... 28
Turning the Power On or Off ....................................................... 30
Turning on the Power .................................................................................. 30
Turning off the Power .................................................................................. 30
Chapter 2 Installing the Printer Driver .......................................... 31
Installing the Printer Driver for Windows ..................................... 32
System Requirements ................................................................................ 32
Installing the Printer Driver (Except for USB Interface) .............................. 32
Installing the Printer Driver (for USB Interface) .......................................... 33
Printing Operations ..................................................................... 36
Printing ....................................................................................................... 36
Requirements ....................................................................................................... 36
Placing an ink cartridge in your printer ................................................................. 36
Loading the media in your printer ......................................................................... 36
Setting up the printer driver for printing ................................................................ 37
Installing the Printer Driver for Macintosh................................... 39
System Requirements ................................................................................ 39
Installing the Printer Driver ......................................................................... 40
Selecting the Printer Driver......................................................................... 40
Printing Operations ..................................................................... 42
Printing ....................................................................................................... 42
Requirements ....................................................................................................... 42
Placing an ink cartridge in your printer ................................................................. 42
Loading the media in your printer ......................................................................... 42
Setting up the printer driver for printing ................................................................ 43

6
Chapter 3 Printer Driver ............................................................... 45
How to Open the Printer Driver Setup Dialog Box ...................................... 46
Name and Functions of Each Item of the Printer Dialog Box ..................... 46
Settings in Tab ........................................................................... 47
Functions of the Printer Driver .................................................... 49
Using the Chooser ...................................................................................... 49
Page Setup Dialog Box ............................................................................... 51
Print Dialog Box .......................................................................................... 53
Using Background Printing ......................................................... 56
Desktop Print .............................................................................................. 57

7
Chapter 4 Appendix ..................................................................... 59
Cleaning the Printer .................................................................... 60
Cleaning the Main Unit ............................................................................... 60
Cleaning the Print Head ............................................................................. 62
Cleaning the Platen .................................................................................... 63
Cleaning the Feed Roller ............................................................................ 64
Cleaning the Transport Rollers ................................................................... 65
ready / insert Button Functions .................................................. 67
Indicator Lights Summary ........................................................... 67
Indicator light status.................................................................................... 67
Port Monitor Setup ...................................................................................... 68
Select the I/O Port Speed ..................................................................................... 68
Configure LPT port ............................................................................................... 69
Tips for Special Case (for Windows)........................................................... 69
DIP Switches .............................................................................................. 70
Transportation of the Printer ....................................................... 71
Specifications ............................................................................. 72
General Specifications................................................................................ 72
Printable Area ............................................................................................. 73
Available Supplies....................................................................... 74
Kimosetter 340 Supplies List ...................................................................... 74
Ink cartridges ........................................................................................................ 74
Print media............................................................................................................ 74
Options ................................................................................................................. 74

8
Chapter 5 Troubleshooting ........................................................... 75
Introduction ................................................................................. 76
Troubleshooting .......................................................................... 76
Power does not come on ............................................................................ 76
Clearing Paper Jams .................................................................................. 76
Ink Cartridge Stuck in the Carriage ............................................................ 78
How to Remove an Ink Cartridge from the Carriage .................................. 79
Printer makes strange noises ..................................................................... 80
Media is not feeding correctly or not ejecting correctly from the sheet feeder
............................................................................................................... 82
Problems with ink cartridges. ..................................................................... 83
Problems with print results. ........................................................................ 84
Printing is light, distorted, or has gaps ....................................................... 84
Troubleshooting for Windows ...................................................................... 85
Printer cannot be installed./Printing is not performed properly, even after the printer
installation ............................................................................................................. 85
Computer and printer cable may or may not support bidirectional communication86
Printer does not print or stops while printing ........................................................ 86
Printing is not working or is extremely slow .......................................................... 88
Connection Method............................................................................................... 89
Other problems and operations ............................................................................ 89
Troubleshooting for Macintosh .................................................................... 91
During installation a “File not found” error occurs or the installer is not found ...... 91
The icon does not appear in the Chooser............................................................. 91
The printer cannot be selected in the Chooser ..................................................... 92
Printer does not print or stops while printing ........................................................ 92
Printing is not working or is extremely slow .......................................................... 94
Connection Method............................................................................................... 94
Other problems and operations ............................................................................ 94
When Error Message Appears ................................................... 97
Error Message Appears.............................................................................. 97

Chapter 1 1
Learn the Major Functions and
Operations of Your Printer
This chapter describes how to set up your printer, the
name of each part of your printer and how it functions,
how to insert the cartridges and media. Read this chapter
before you use the printer for the first time to learn how to
set it up.
Chapter 1
Major Functions and
Operations
10
Chapter 1 - Major Functions and Operations
Getting Your Printer Ready
Set up your printer by performing the following steps:
• Getting your printer ready.
Remove the packing materials.
• Connecting cables.
Connect the printer to your computer with a printer cable and to a suitable AC
power source with the power cord.
Getting Your Printer Ready
Get your printer ready by removing the packing materials from inside and outside
the printer.
Caution
This printer is shipped with tape, spacers, and other packing
materials to prevent delicate parts from being damaged while in
transit. Remove these packing materials before using the printer.
If the printer is used while these packing materials are still
present, damage to the printer or malfunction may occur.
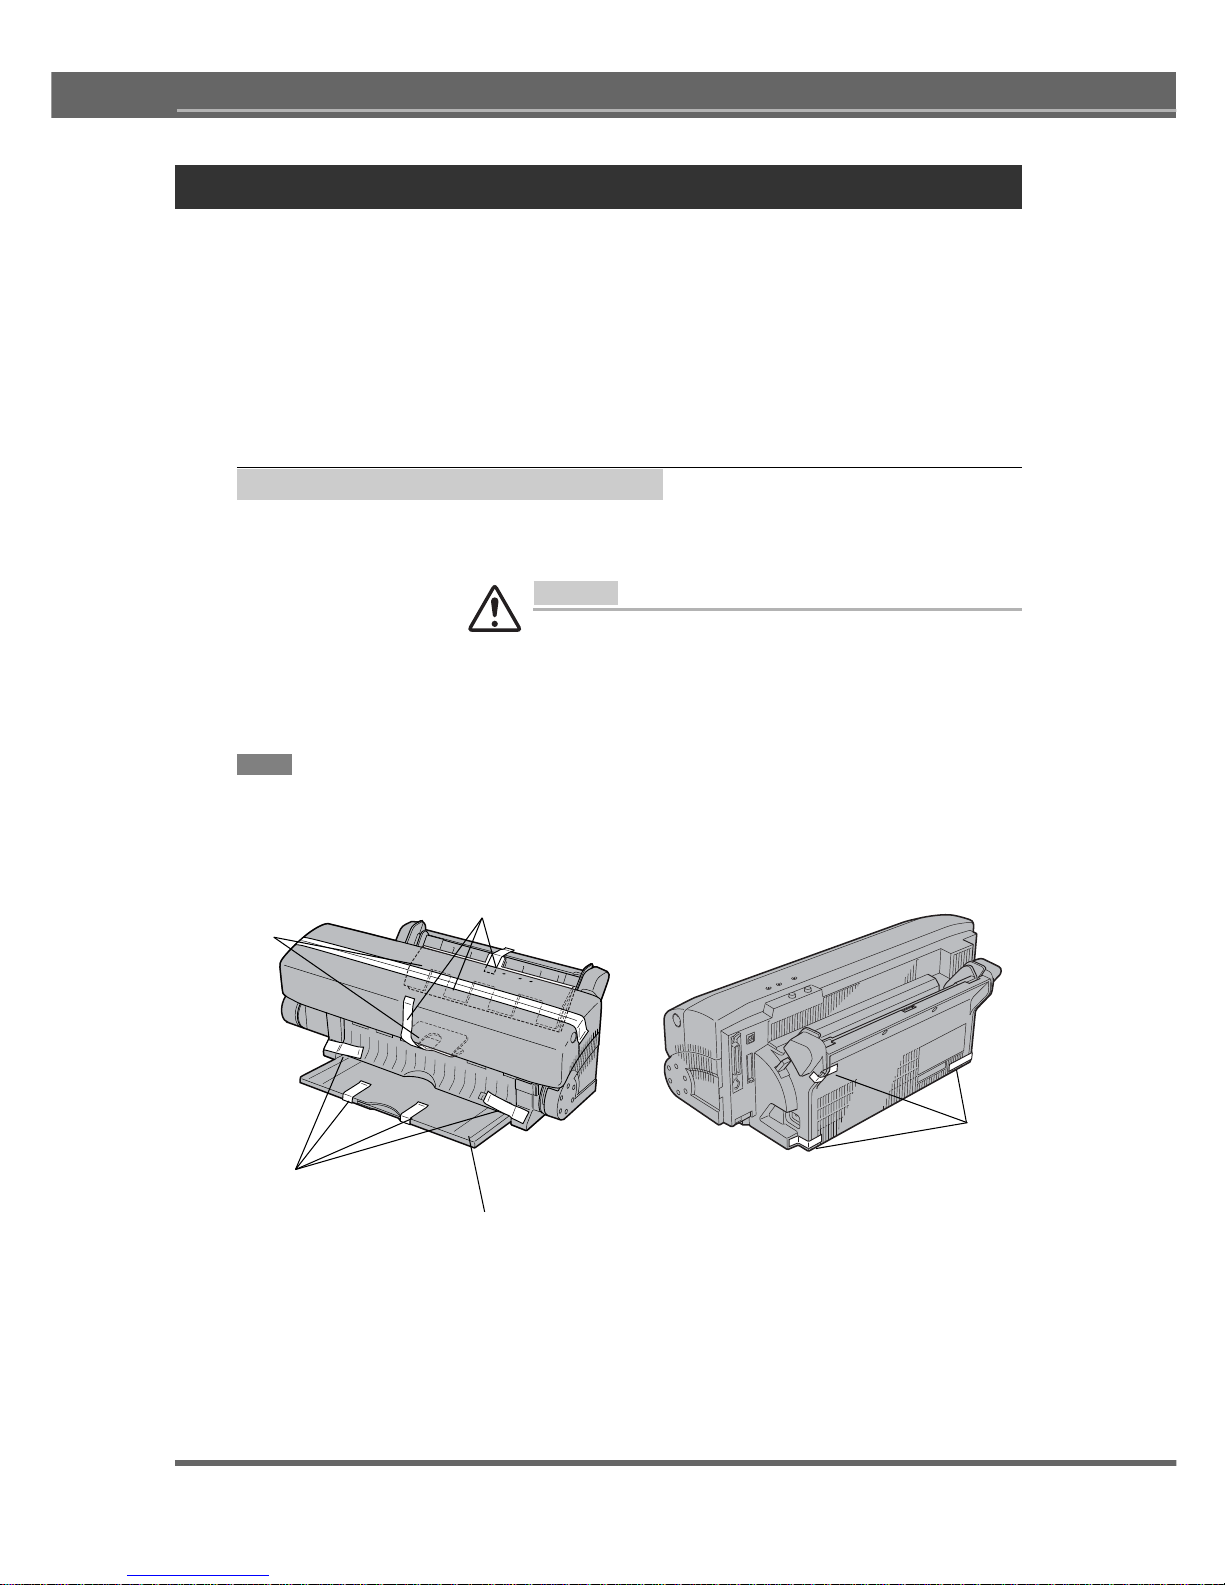
Removing the outside packing materials
The printer is shipped with packing materials to prevent damage during transit.
Remove the tape (seven locations in front, three locations in rear) and cardboard
(two locations in front) from the printer before using. Remove the tape from the
output tray, after pulling out the tray by grabbing the tip.
Tape
Tape
Tape
Cardboard
Output tray
11
for Windows and Macint osh
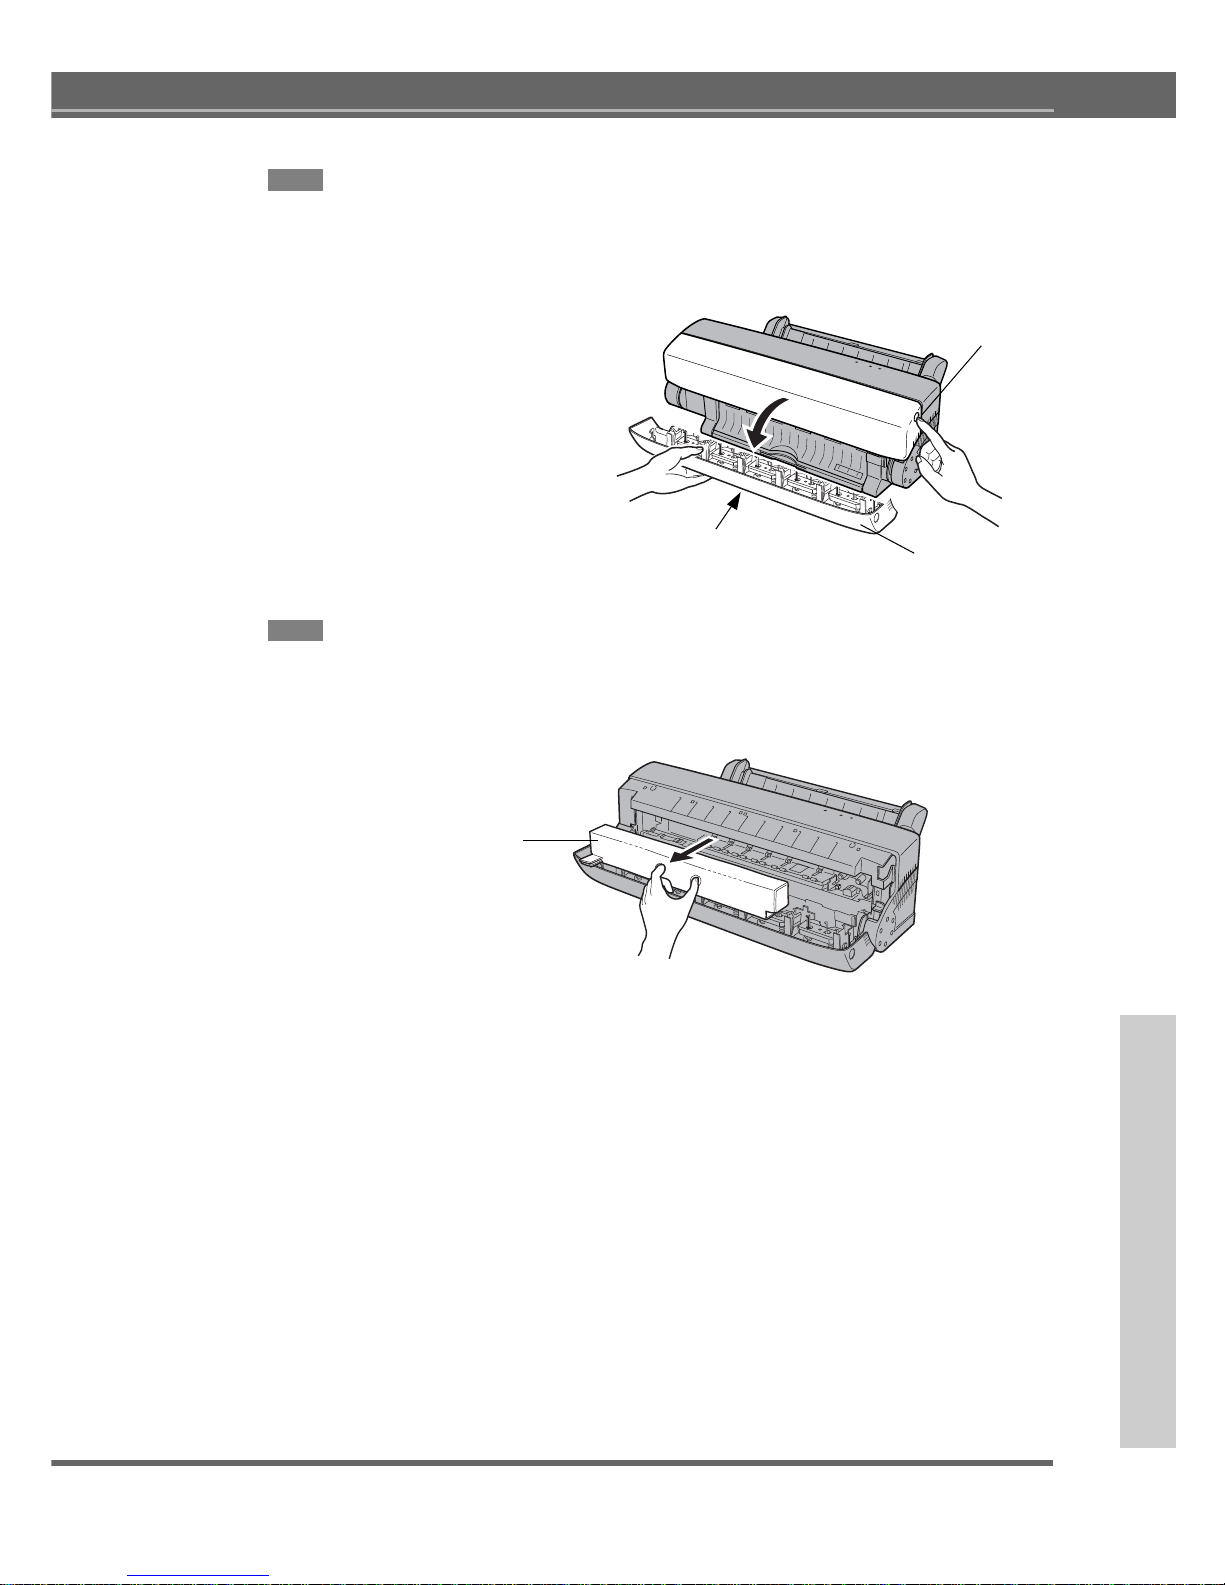
Opening the front cover
Open the front cover to remove the inside packing material.
To open the front cover, push the front cover release button to release the internal
lock. Gently lower the front cover with your hand.
Removing the carriage packing material
Remove the carriage packing material from inside the printer.
Using the printer without removing the packing materials may damage the printer.
Front cover
release button
Make sure nothing is
under the cover.
Carriage packing material
Front cover
12
Chapter 1 - Major Functions and Operations
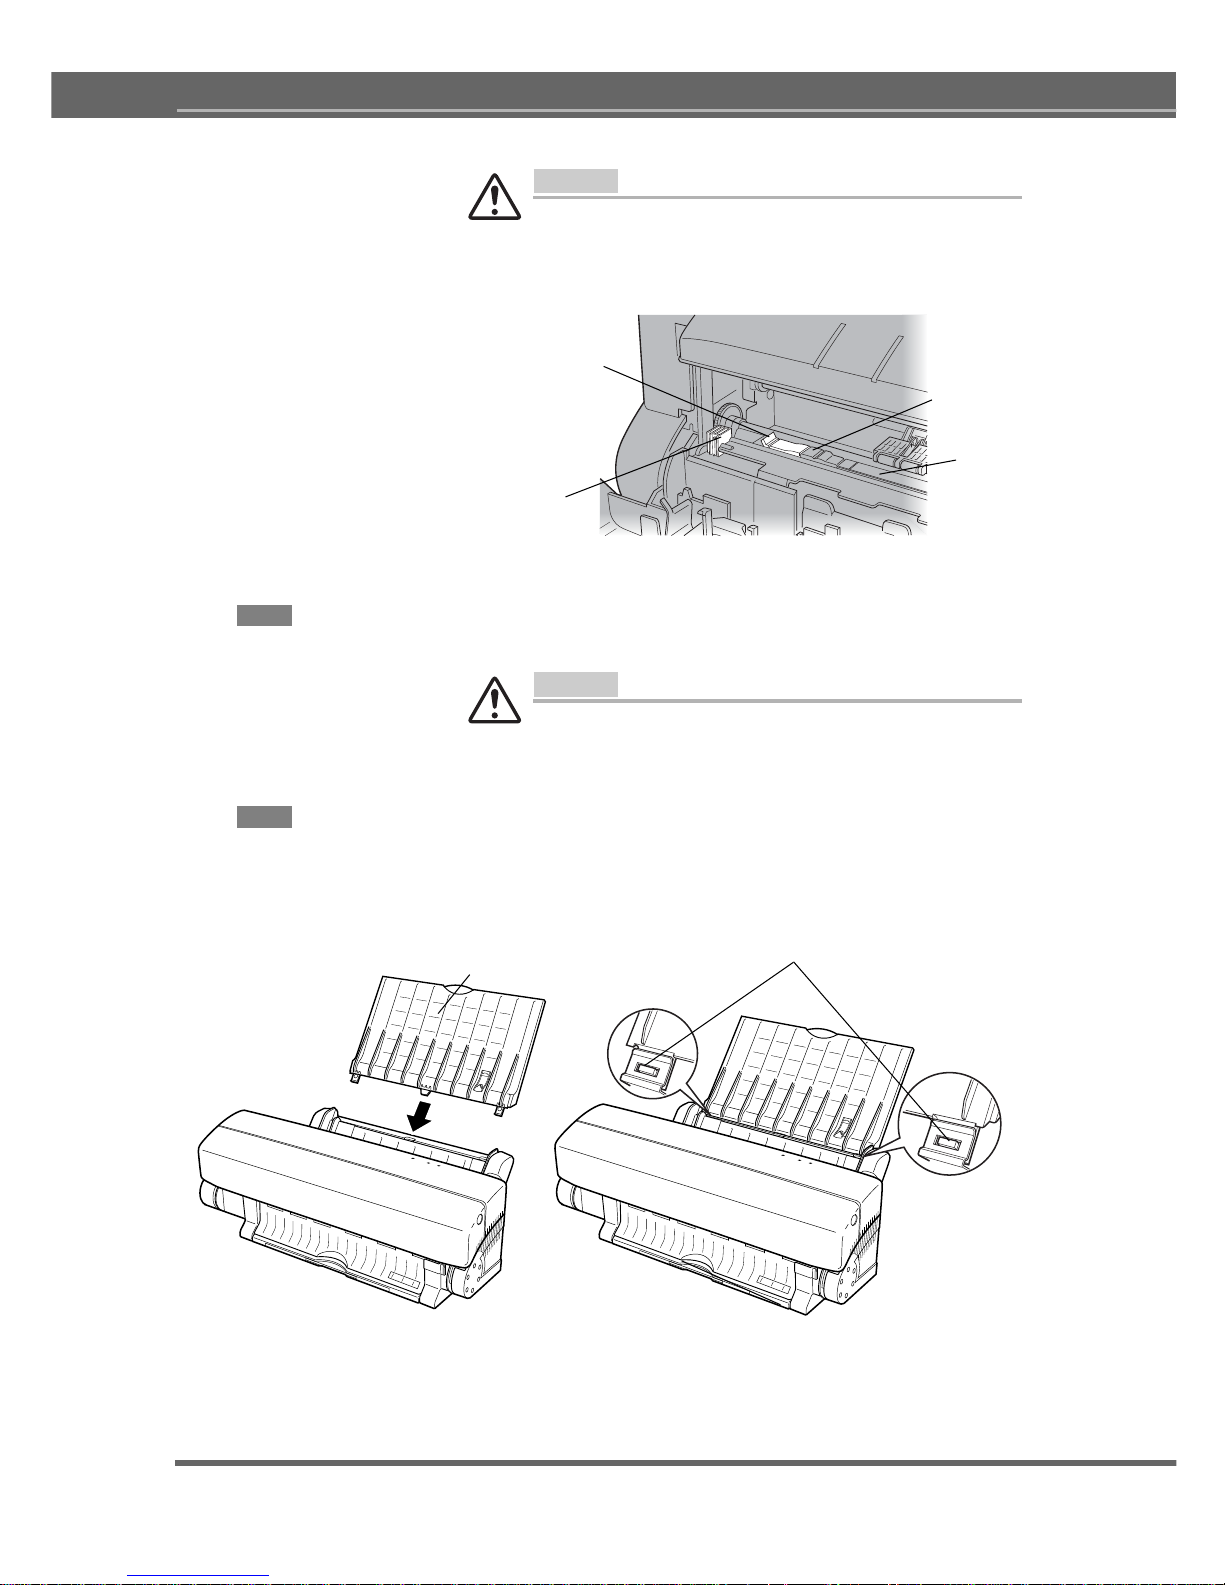
Caution
Do not remove the cleaning pad at the left end of the platen.
They are there to clean the print head. Removing them can cause
the printer to malfunction. Do not touch the cover open sensor,
which is located inside the printer on the left end.
Closing the front cover
Close the front cover after removing the carriage packing material.
Caution
When closing the front cover, never slam it shut. The ink
cartridges can become dislodged and damage to the printer may
result.
Fitting the media support
Fit the media support so that the media inserted in the printer does not bend
backwards. When fitting the media support, please make sure that the convex
part of the media support fits into the hollow section of the printer as shown in the
drawing.
Convex part of the media support
Media support
Cover open sensor
Platen
Cleaning pad
(orange)
Cleaning pad
(white)
13
for Windows and Macint osh
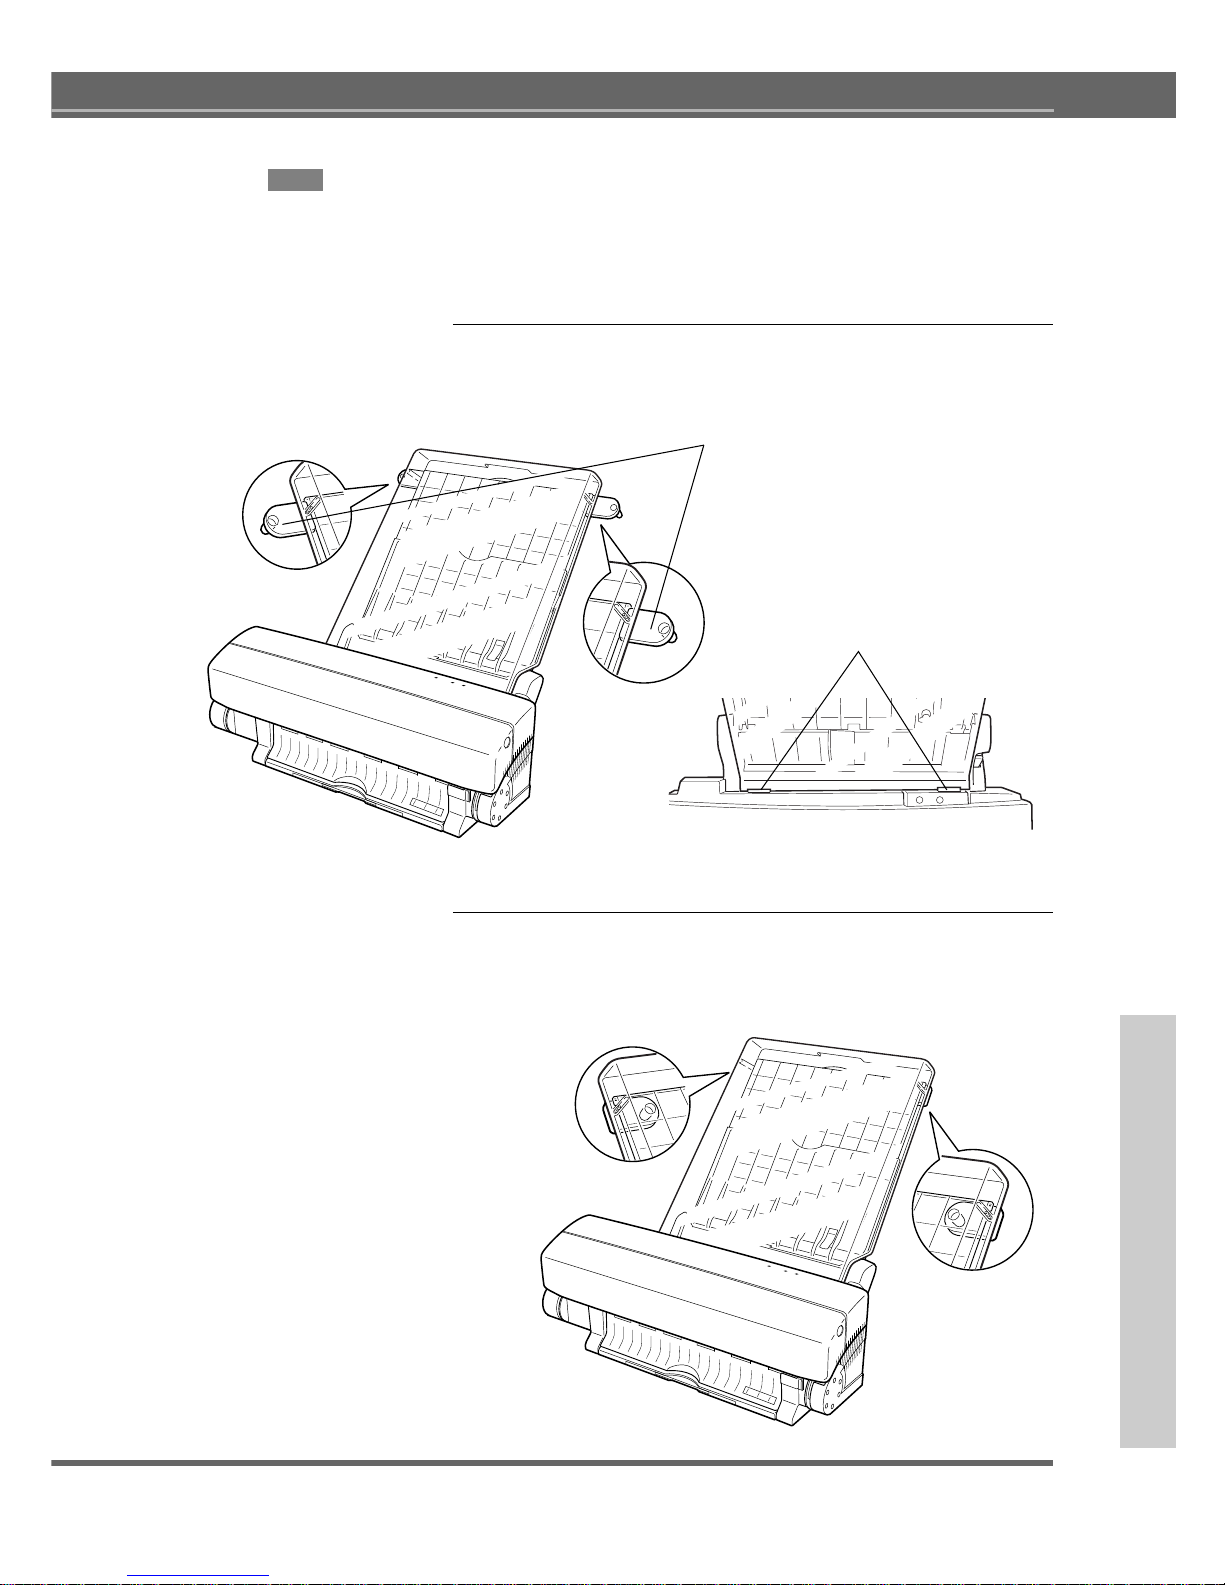
Fitting the dust cover
The dust cover is used when the printer is not used or is printing. The dust cover
prevents the media inserted in the printer, as well as the inside of the printer,
from getting dusty. Dust can cause not only poor printing quaity but also various
other problems.
1. Fit the dust cover on the printer with the two wings pulled
out. At this time, hook the dust cover onto the convex
part of the printer.
2. Fit the dust cover on the media support by pushing the
two wings of the dust cover in and insert the media support
between the dust cover and the wings.
Convex part of the printer
Two wings pulled out

14
Chapter 1 - Major Functions and Operations
Locating the printer
After removing the packing material from the outside and inside of the printer
and reading the section “IMPORTANT SAFETY INSTRUCTIONS”, position the
printer in an appropriate location. Ensure there is enough space to use your
printer easily.
Using the output tray
1. Pull out the output tray for printing operations. Grab the
tip of the tray, and gently pull out the tray to the full.
Between the printing operations, you may retract the tray
by gently pushing back the tip.
Caution
Do not allow the output tray hang over the edge of a table or to
protrude from the location of the printer in any way.
Output tray

15
for Windows and Macint osh
Connecting Cables for Windows
When your printer is properly set up, connect the printer to your computer with a
printer cable and to a suitable AC power source with the power cord.
• Connect the printer to your computer.
• Connect a power cord to the printer.
Connecting the printer to your computer
1. Make sure that the power to your computer is completely
turned off. If the computer is running, quit all running
applications, shut down the system, and turn off the power.
Caution
Power to the printer and computer must be completely
disconnected before connecting or disconnecting the printer
cable. (They must be unplugged.) Otherwise damage or
malfunction may result.
2. Connect the printer to the computer with a printer cable.
Secure the printer cable to the connectors on the printer
and on the computer.
Note
• When Using a printer buffer and/or a printer switcher can
cause the printer to malfunction.
• The SCSI interface connection with Windows PC is not
supported.
• When you change from the parallel interface to the USB, make
sure that the power to the printer and computer is turned off,
before changing any cable connection.
Bi-directional printer cable
Printer connector
Accessory connector for
SCSI Adapter

16
Chapter 1 - Major Functions and Operations
Connecting USB Cables for Macintosh
When your printer is properly set up, connect the printer to your computer with a
USB cable and to a suitable AC power source with the power cord.
• Connect the printer to your computer.
• Connect a power cord to the printer.
Connecting the printer to your computer
1. Make sure that the power to your computer is completely
turned off. If the computer is running, quit all running
applications, shut down the system, and turn off the power.
Caution
Power to the printer and computer must be completely
disconnected before connecting or disconnecting the printer
cable. (They must be unplugged.) Otherwise damage or
malfunction may result.
2. Connect the printer to the computer with a USB cable.
Secure USB cable to the USB interface connector on the
printer and the USB port on the computer.
Caution
Using an extension cord can affect the print results.
USB cable
Accessory connector for
SCSI Adapter
USB port
USB interface connector
17
for Windows and Macint osh
Connecting SCSI Cables for Macintosh
When your printer is properly set up, connect the printer to your Macintosh with a
SCSI cable and to a suitable AC power source with the power cord.
• Connect the printer to your computer.
• Connect a power cord to the printer.
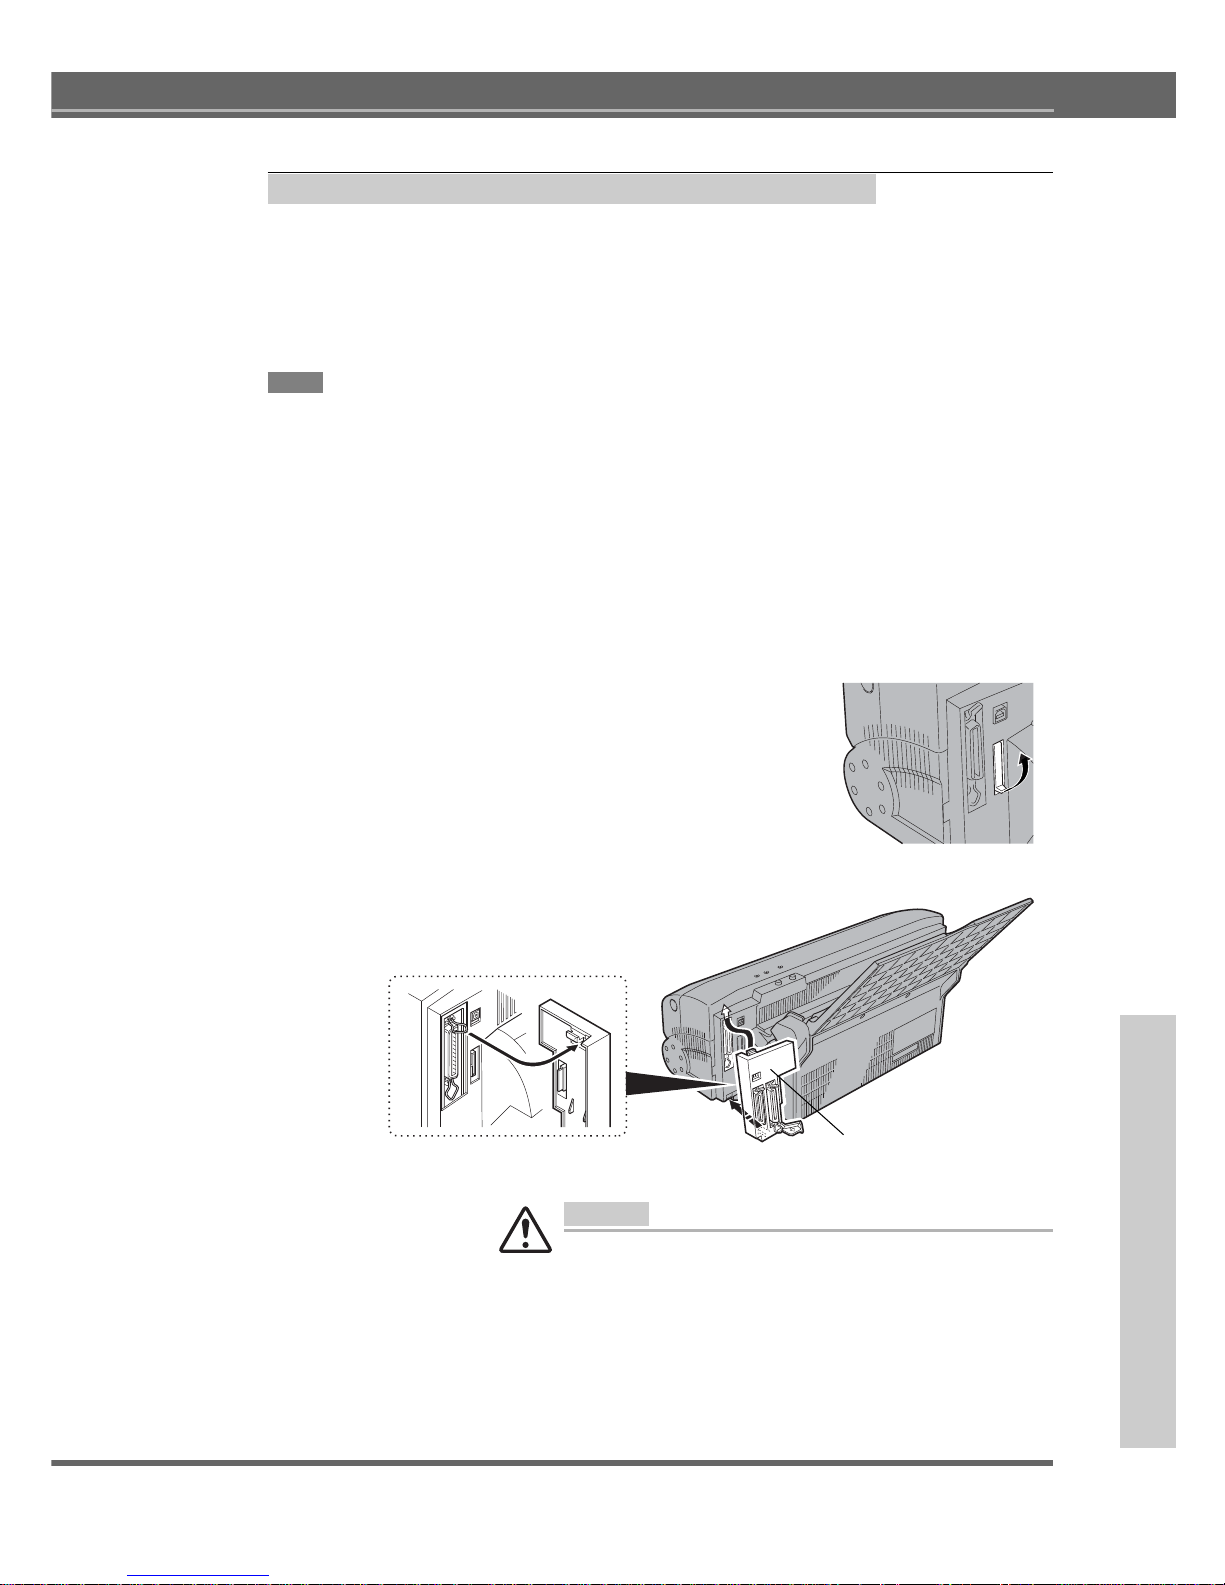
How to attach the SCSI Adapter
When using your printer with a Macintosh computer, connect the printer to the
computer using a SCSI Adapter as shown in the pictures below.
a) Remove the rectangular plastic connector cover that’s located to the right of
the printer connector. Grab the black tab at the bottom of the connector cover,
pull it up, and twist it until the cover breaks away.
b) Angle the SCSI Adapter so that the tab on top of the adapter slips under the
top edge of the PC printer cable slot. The top edge of the adapter should rest
against the frame of the printer.
c) Gently press the bottom of the adapter until it clicks into place.
Caution
When you connect the SCSI Adapter, make sure that the printer
power has been turned off. Never plug in the power cord before
connecting the adapter. Doing so can cause the printer to
malfunction.
SCSI Adapter
18
Chapter 1 - Major Functions and Operations
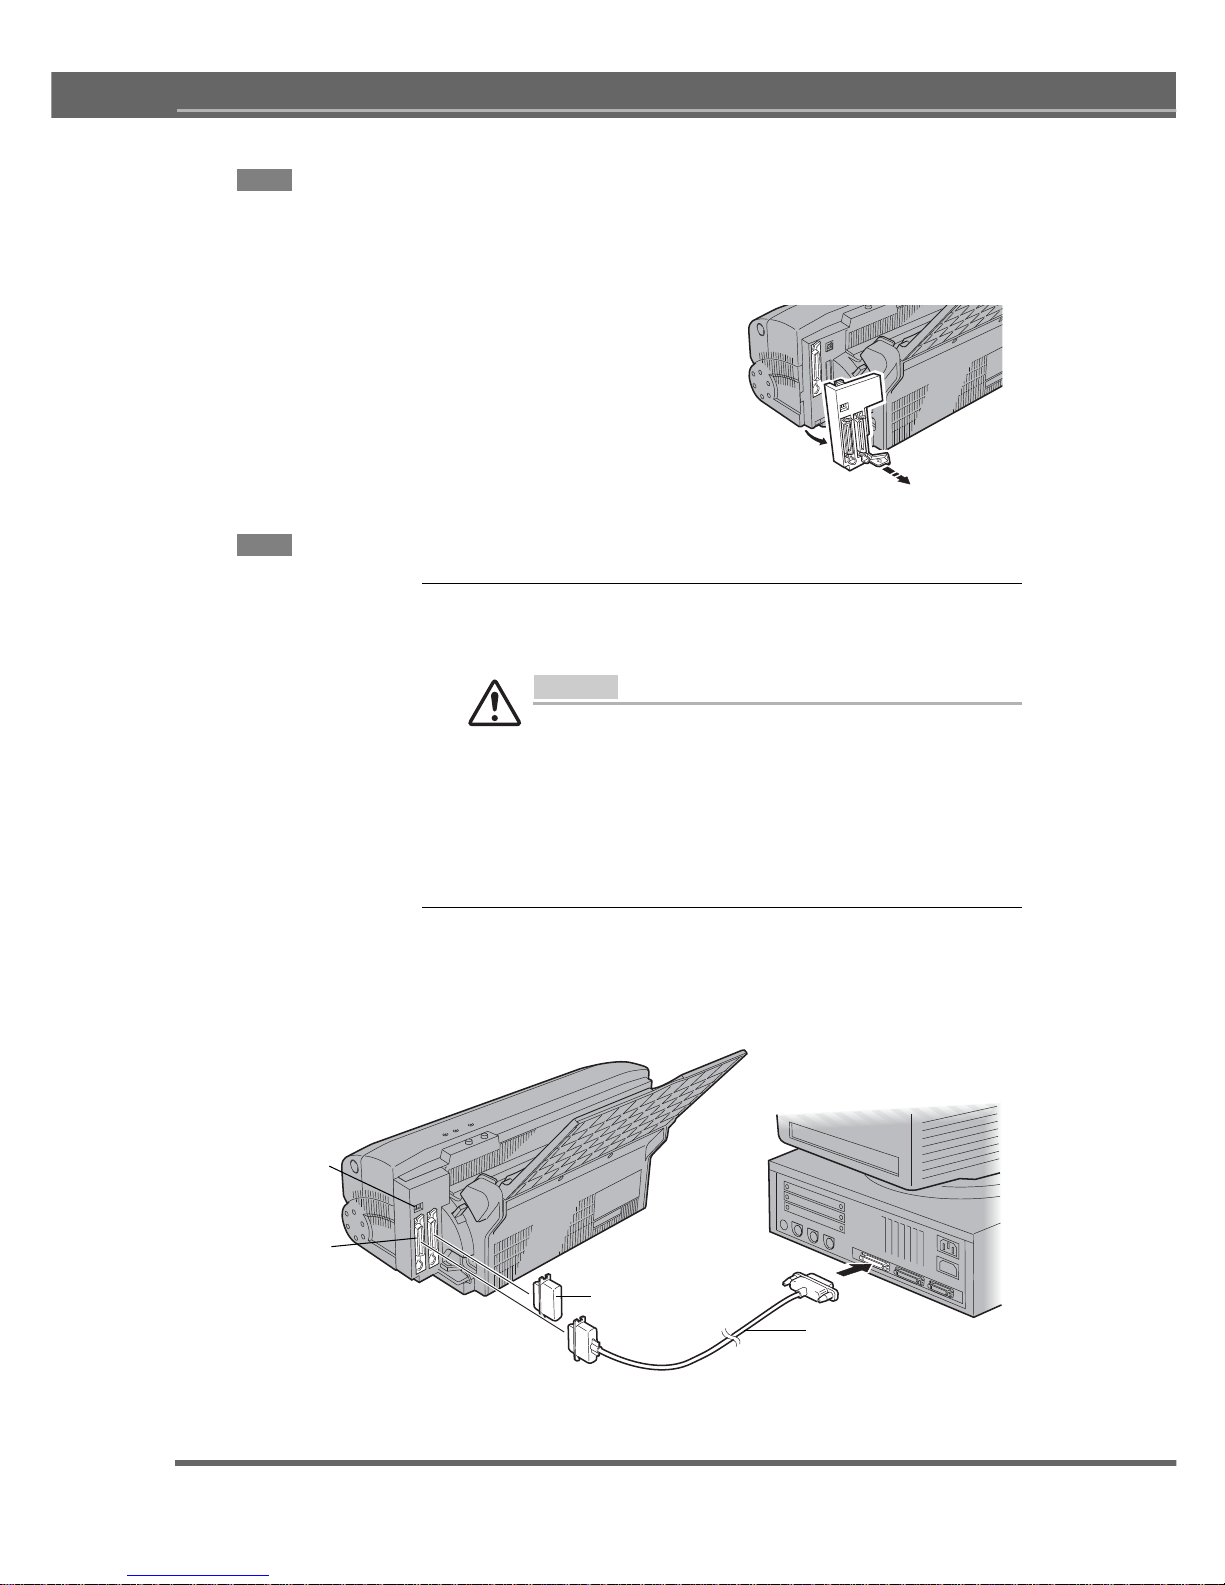
How to remove the SCSI Adapter
Turn off the power to your printer, computer, and all SCSI devices connected.
Unplug the power cord from the wall socket and the printer. Then remove the
SCSI Adapter by gently pulling the plastic handle at the bottom of the adapter as
shown in the picture and lifting the adapter away from the printer.
Connecting the printer to your computer
1. Make sure that the power to your computer is completely
turned off. If the computer is running, quit all running
applications, shut down the system, and turn off the power.
Caution
• Power to the printer and computer must be completely
disconnected before connecting or disconnecting the SCSI
cable or terminator. (They must be unplugged.) Otherwise
damage or malfunction may result.
• Use a high-impedance SCSI cable and an active terminator
for best results.
• Using other types of cables can cause the printer to
malfunction.
2. Connect the printer to the computer with a SCSI cable.
Secure the printer cable to the connectors on the printer
and on the computer.
Also, you must attach a terminator to the printer if the printer is
the last peripheral on the SCSI chain.
SCSI cable
SCSI interface
connector
DIP switches
Terminator

19
for Windows and Macint osh
Check the SCSI device number
Make sure the device number for the printer is set correctly.
Each SCSI device connected to the computer must have a
unique SCSI device number. If two devices have the same
device number, they will not work properly. (The printer device
number is set to 6 at the factory. To change the device number,
use the DIP switches next to the connector. For more details,
refer to “DIP switches” in the Chapter 4 - Appendix.)
Power cord connections
1. Plug the power cord into the power cord socket on the
printer. Make sure that the power cord is securely seated
in the socket.
2. Plug the free end of the power cord into a suitable AC
power source (such as a wall socket).
Caution
• When plugging the power cord into the printer, make sure
you push in the plug all the way, going beyond the halfway
point where the plug comes to a soft stop.
• Power to the printer is completely cut off only when the cord
is unplugged. Place the printer where you can easily unplug
it from the wall socket. Also, pull the plug and not the cord
when unplugging the printer.
Power cord socket
Power cord
20
Chapter 1 - Major Functions and Operations
Name and Function of Each Part of the Printer
This section explains the name and function of each part of the printer.
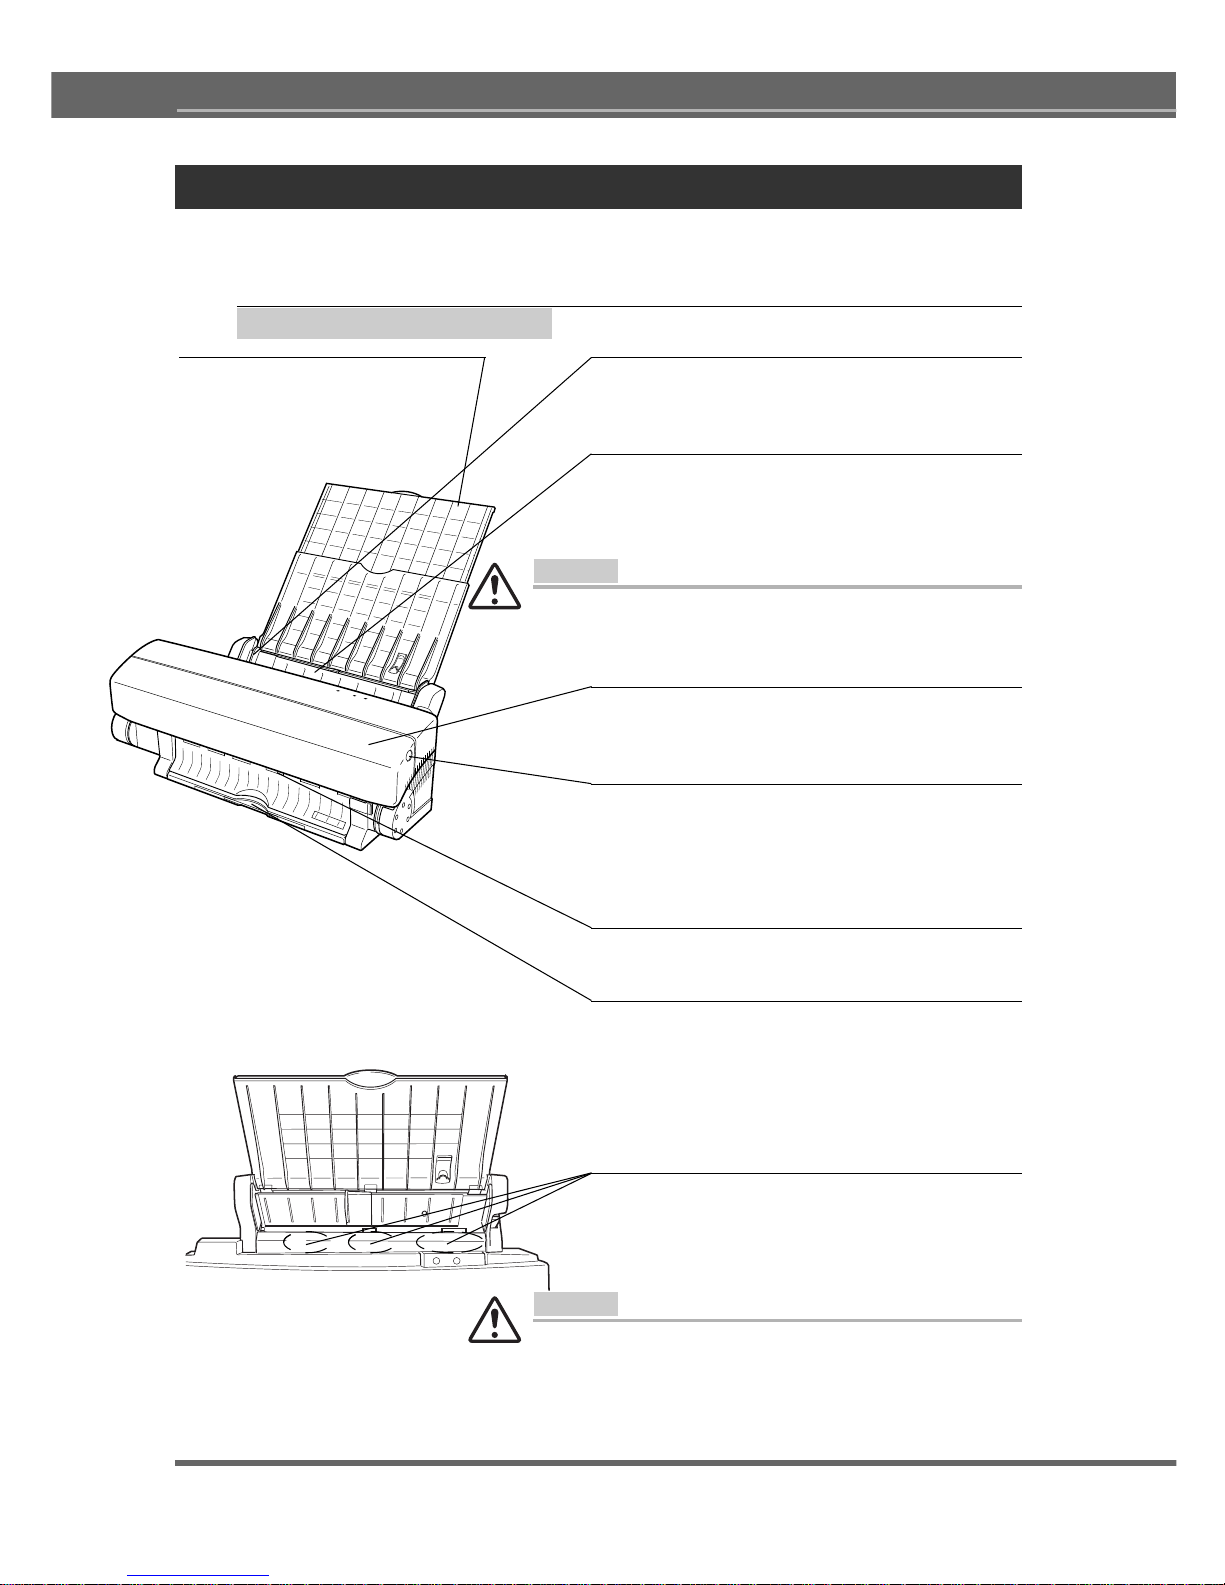
Printer (Front View)
Feed guide
This guide feeds the media into the printer.
Set the guide to match the media size being used
Sheet feeder
Media is fed either automatically. Place a stack
of not more than 20 sheets.
Caution
Never reach into the sheet feeder except for the cleaning
purposes. Doing so can cause injury. Inserting a foreign object
into the sheet feeder can cause the printer to malfunction.
Front cover
This cover protects the internal mechanisms of the
printer. This cover is closed during printing.
Front cover release button
Opens the front cover. The front cover is opened
when there is a paper jam or when changing ink
cartridges. Open the front cover gently, using both
hands.
Output slot
Media exits the printer through this slot.
Output tray
During printing, extend the output tray. Pull out
the output tray for printing operations. Grab the
tip of the tray, and gently pull out the tray to the
full. Between the printing operations, you may
retract the tray by gently pushing back the tip.
Transport rollers
The transport rollers for feeding sheets of media
loaded on the sheet feeder (at 5 places which
are enclosed in a wavyline box).
Caution
• Never reach into the printer while it is operating. Injury may
result.
• Opening the front cover in the middle of a printing operation
can cause the media in the printer to be creased, and/or an
ink cartridge to get out of place.
Media support
The media support provides
support to hold loaded media
upright. To extend the media
support, pull up on the top
edge.
21
for Windows and Macint osh
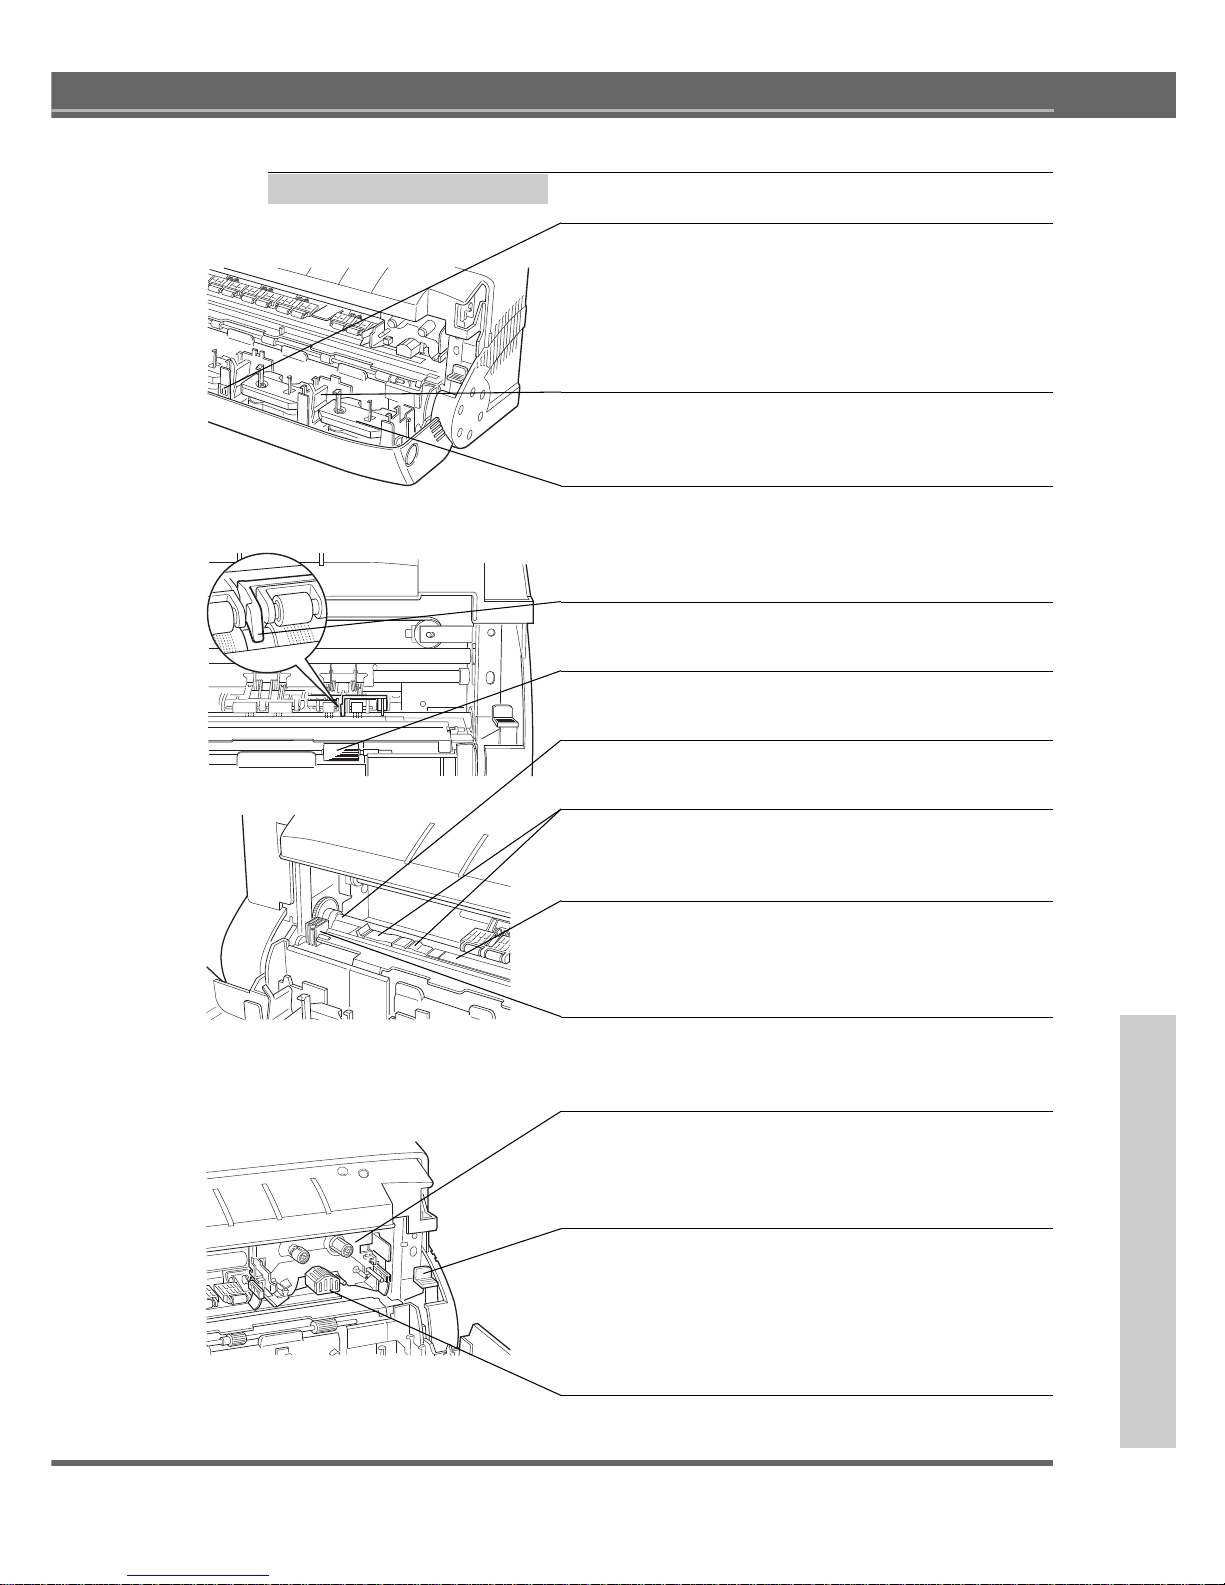
Inside the Printer
Marking sticker(black and silver)
This sticker is used for the
cartridge to confirm that the
carriage is in the standard position. Try not to smear
the face of the sticker. If it gets dirty, gently clean it
with a dry cotton swab. As you do so, be careful not to
peel it off.
Latch(the blue part)
This latch fixes the ink cartridge into the ink cartridge
holder.
Ink cartridge holder
This tray holds the ink cartridges. The five holders can
hold the two ink cartridges each. Maximum of nine ink
cartridges is allowed.
PE lever
This lever detects whether or not there is any media left.
Media eject roller
The media eject roller discharge sheets.
Feed roller (metal roller)
The feed roller feeds loaded sheets.
Cleaning Pad (Orange) / Cleaning Pad (White)
This pad is used for cleaning the print head. Do not remove
this pad.
Platen
This is a rubber plate which is pressed by the inkcartridge
head while printing. Dust on the platen may result in poor
printing quality.
Cover open sensor
The cover open sensor detects whether or not the front
cover is open.
Carriage
The carriage automatically picks up the specific ink
cartridge needed for printing and moves it to the printing
location. The carriage also contains the print head.
Release lever
This lever, located to the right of the carriage and platen,
is used to clear paper jams. Press the release level down
to remove the jammed material.
When you close the front
cover, the lever will automatically go back to its original
position.
Print head
The print head prints the image. Do not touch it.

22
Chapter 1 - Major Functions and Operations
Caution
Do not touch the print head or the carriage. Doing so can cause damage to the printer.
Also, never load an ink cartridge directly into the carriage. Malfunction or damage to
the printer may result.
RE sensor(at the Black part)
The RE sensor detects used-up ink cartridges.
HP sensor(two at the Black parts)
The HP sensor detects the type and standard position of
an ink cartridge.
Bobbin axis
Winds the ink cartridge around.
Printer (Rear View)
Media feed switch
This switch sets the media feeding method to
automatic feed mode or manual feed mode.
USB interface connector
The USB cable is connected to the USB
interface connector.
Parallel interface connector
The printer cable is connected to the parallel
interface connector.
Accessory connector
This connector is used to connect SCSI
Adapter. Make sure you remove the rectangular
plastic connector cover before connecting
either of these options.
Power cord socket
The power cord connects to the power cord
socket.
Printer
(Rear View with Macintosh interface module)
DIP switches
The DIP switches are used to set the SCSI
device number for the printer.
SCSI connector
The SCSI connectors are used for connecting
the computer and other SCSI devices.
23
for Windows and Macint osh
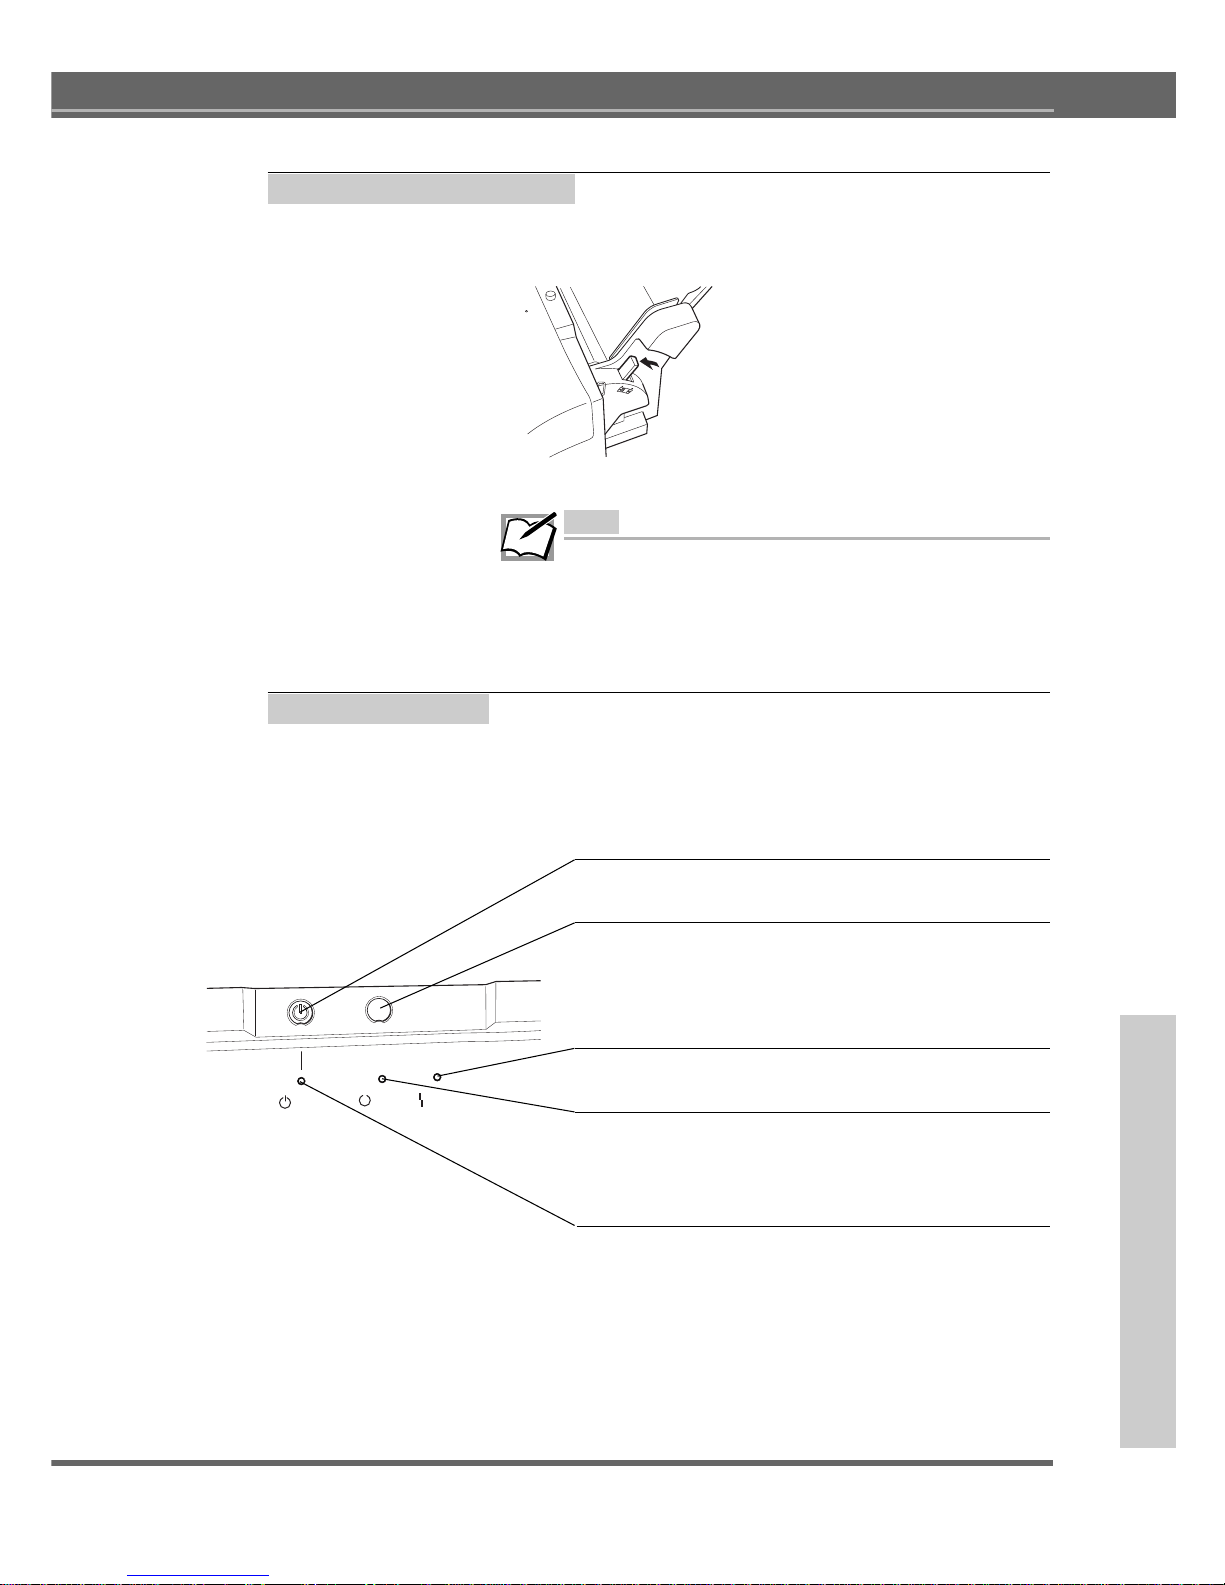
Media Feed Switch
For continuous printing using automatic feeding, set the media feed switch to
position “A”.
Media feed switch set to position “A”
Note
• Do not move the media feed switch while media is being fed.
Otherwise, the media may feed in incorrectly.
• Move the media feed switch until it clicks into position “A”.
Media will not feed properly unless the switch is correctly
set to “A”.
Control Panel
The top portion of the printer has two buttons and three LED indicator lights. By
pushing one of these buttons and looking at the lights, you can perform various
printer functions, such as ejecting media. This portion with the buttons and the
lights is called the control panel.
power
button
Use the
power
button to turn the printer on and off.
ready / insert
button
Use the
ready / insert
button to load and eject media.
When the media feed switch is set in position “M”,
this button is used to feed or eject media. Media is
not fed while the switch is in position “A”.
error
light
This light blinks when a printer error has occurred.
ready
light
When the light is lit, the printer is ready to print. The
light blinks slowly while printing. When it is not lit,
printing is paused.
power
light
Indicates whether the printer is on or off.
When the light is on, the printer is on. When the light is
off, the internal parts of the printer still have power. To
completely shut off power to the printer, unplug the power
cord from the socket.
power
ready/ insert
power
ready error

24
Chapter 1 - Major Functions and Operations
Installing Ink Cartridges
This section describes how to identify ink cartridge types and how to install and exchange
cartridges.
Identifying Ink Cartridge and Media Types
Listed below is the ink cartridge type designed for Kimoplate e2.
Ink for Kimoplate e
2
(Part number: KPE2-INK)
Installing Ink Cartridges
Install ink cartridges by following the steps below.
Note
The carriage can select and pick up the necessary ink cartridge
from any holder. You can put up to 9 cartridges of the same ink
cartridge in the holders to reduce the need to change ink
cartridges.
Caution
The ink cartridges may be put in any holder but DO NOT put ink
cartridges directly into the carriage. Doing so may result in
damage the printer.
Ink Amount Indicator
The Kimosetter 340 automatically checks the remaining amount
of the ink in each ink cartridge. The amount is checked each
time the power cord of the printer is unplugged and then plugged
in, and each time the front cover is opened and then closed.
Please note that an ink cartridge with the remaining amount of
20% will be indicated as 0% of ink available, and thus will need
to be replaced, after unplugging/plugging in the power cord, or
opening/closing the front cover.
For more economic use of the ink cartridges, we recommend to
avoid unplugging/plugging in the power cord and opening/
closing the front cover as much as possible, until the indicator
displays the “Out of ink” message.
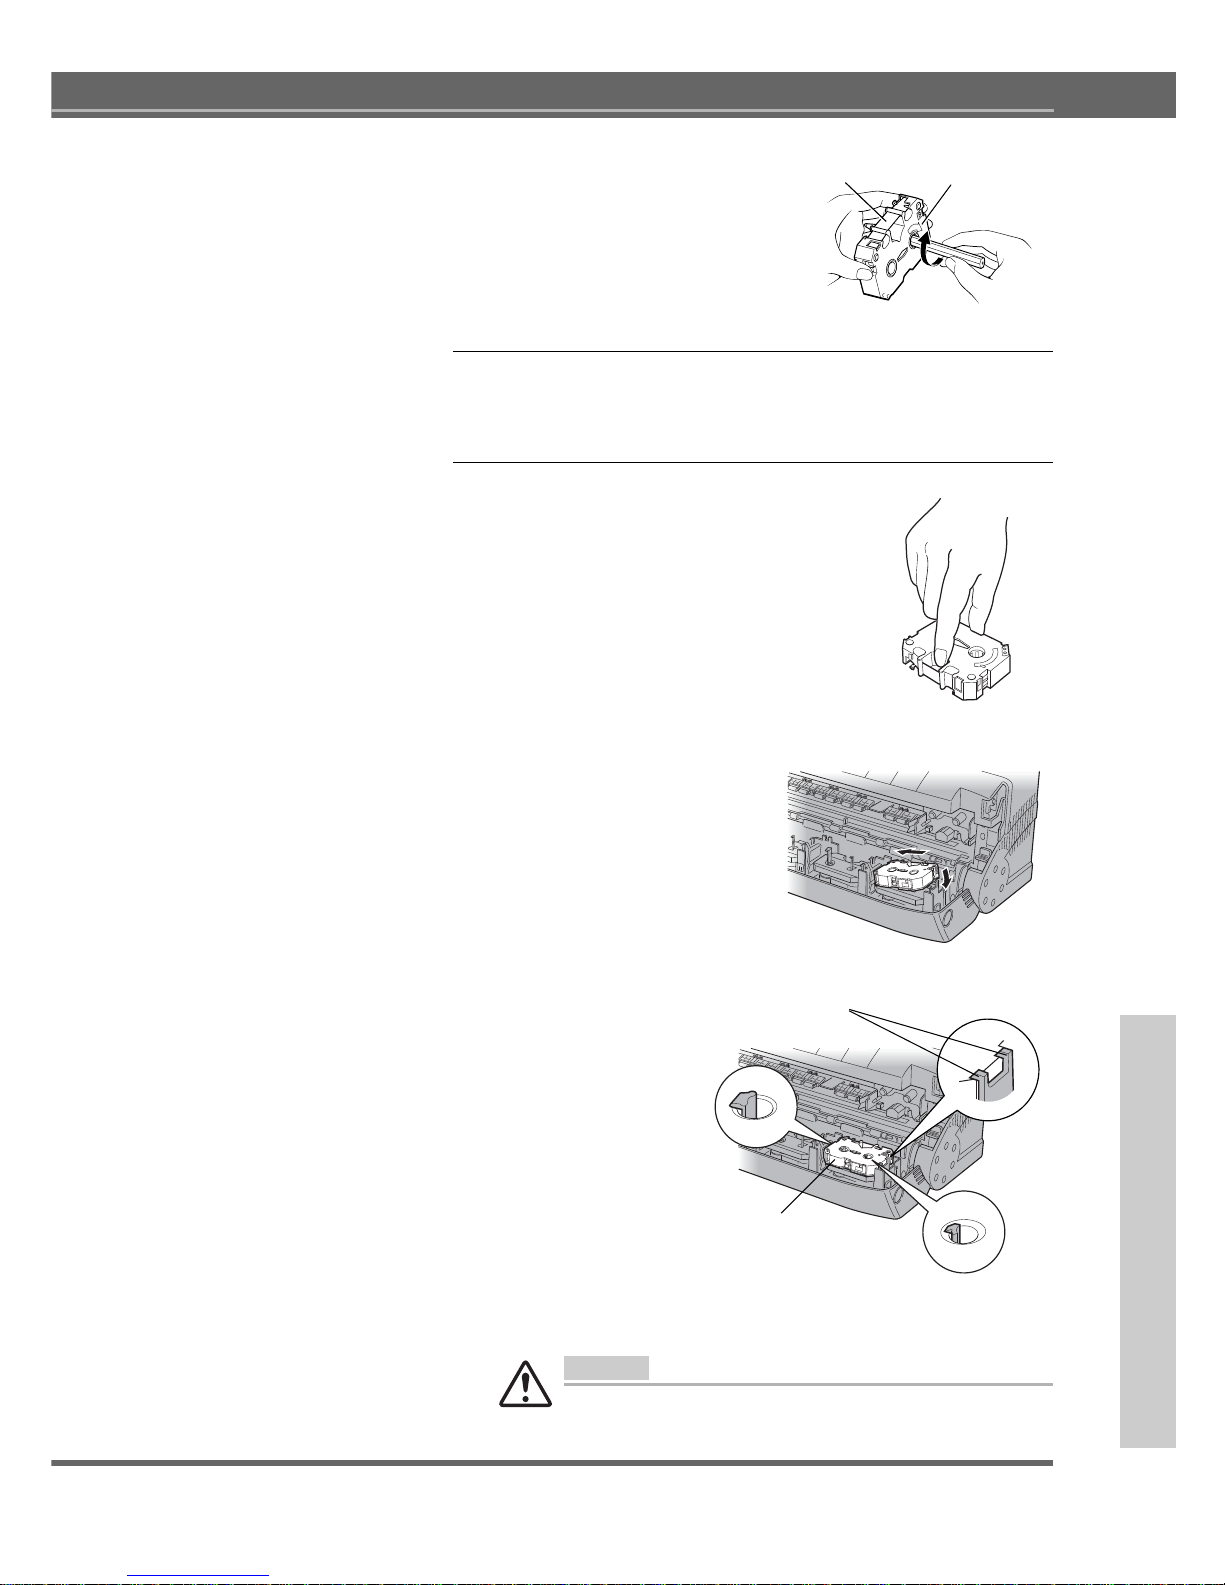
1. Remove the stopper from the ink cartridge.
First, remove the stopper from the ink cartridge.
2. Take up any slack in the ribbon.
Insert a pencil from the side marked “B” (the side with part
number). Turn the pencil slowly to take up any slack in the
ribbon.
Stopper (To prevent slack in the ribbon)
25
for Windows and Macint osh
W
I
N
D
3. Open the front cover.
Push the front cover release button to release the internal lock.
Gently lower the front cover with your hand.
4. Insert the ink cartridges.
• Hold the ink cartridge so that the side
with the letter “B” and the part number
faces upward, and the “B” is at the upper
right of the ink cartridge. Hold the center of the ink cartridge with your thumb
and index finger.
• Insert the left end of the ink cartridge,
while pushing the left side latch of the
ink cartridge holder slightly to the left with
the ink cartridge.
• Push down the right side of the ink cartridge.
Make sure that the ink cartridge is securely locked into the
holder, and that there is no slack in the ribbon.
Caution
Place the side marked “B” face up. If the ink cartridge is installed
upside down, the printer will not know it has been installed.
Ink cartridge
Ribbon
Make sure the ink cartridge is locked in place by the
two black latches on each side of the holder.
Push this side of the cartridge away from you as
much as possible.
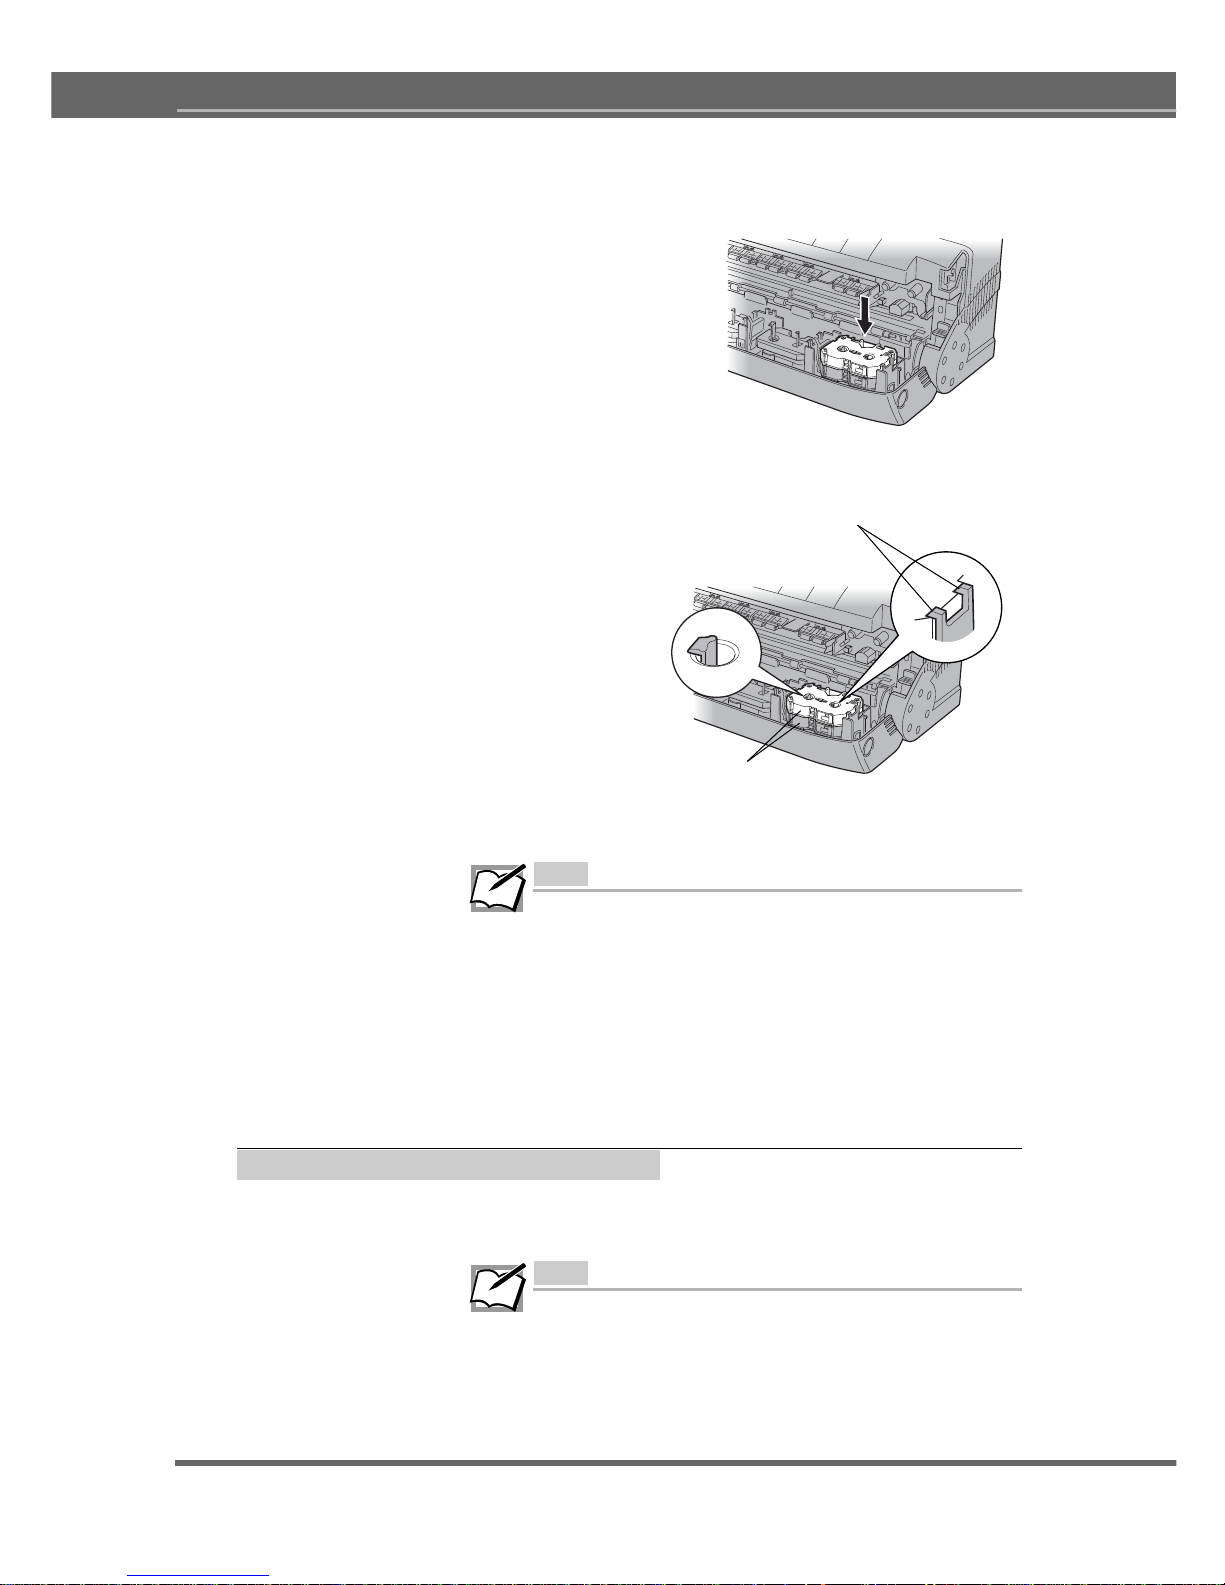
26
Chapter 1 - Major Functions and Operations
• Put the second ink cartridge on top of the ink cartridge
already installed.
Gently push down the center of the ink cartridges.
Make sure that the ink cartridge is securely locked into the
holder, and that there is no slack in the ribbon.
Note
• You must leave at least one cartridge holder empty for the
printer to operate properly. Do not install more than 9 ink
cartridges.
• The ink cartridges may be put in any holder but DO NOT put
ink cartridges directly into the carriage. Doing so may result
in damage the printer.
• Push the bar code side of each cartridge away from you, so
that the two stickers on the top and bottom cartridges are
aligned vertically. Failure to do so can result in an error in
the cartridge changing operation.
Exchanging Ink Cartridges
When you want to change ink cartridges or replace a cartridge whose ribbon has
been used up, exchange cartridges by following the steps below.
Note
• When an ink cartridge has been used up, a message will
appear on your display monitor, and the
error
light will start
blinking.
• Remove the used-up ink cartridge from the printer.
Make sure the ink cartridge is locked in place by the
two black latches on each side of the holder.
Push this side of the cartridge away from you as
much as possible.
27
for Windows and Macint osh
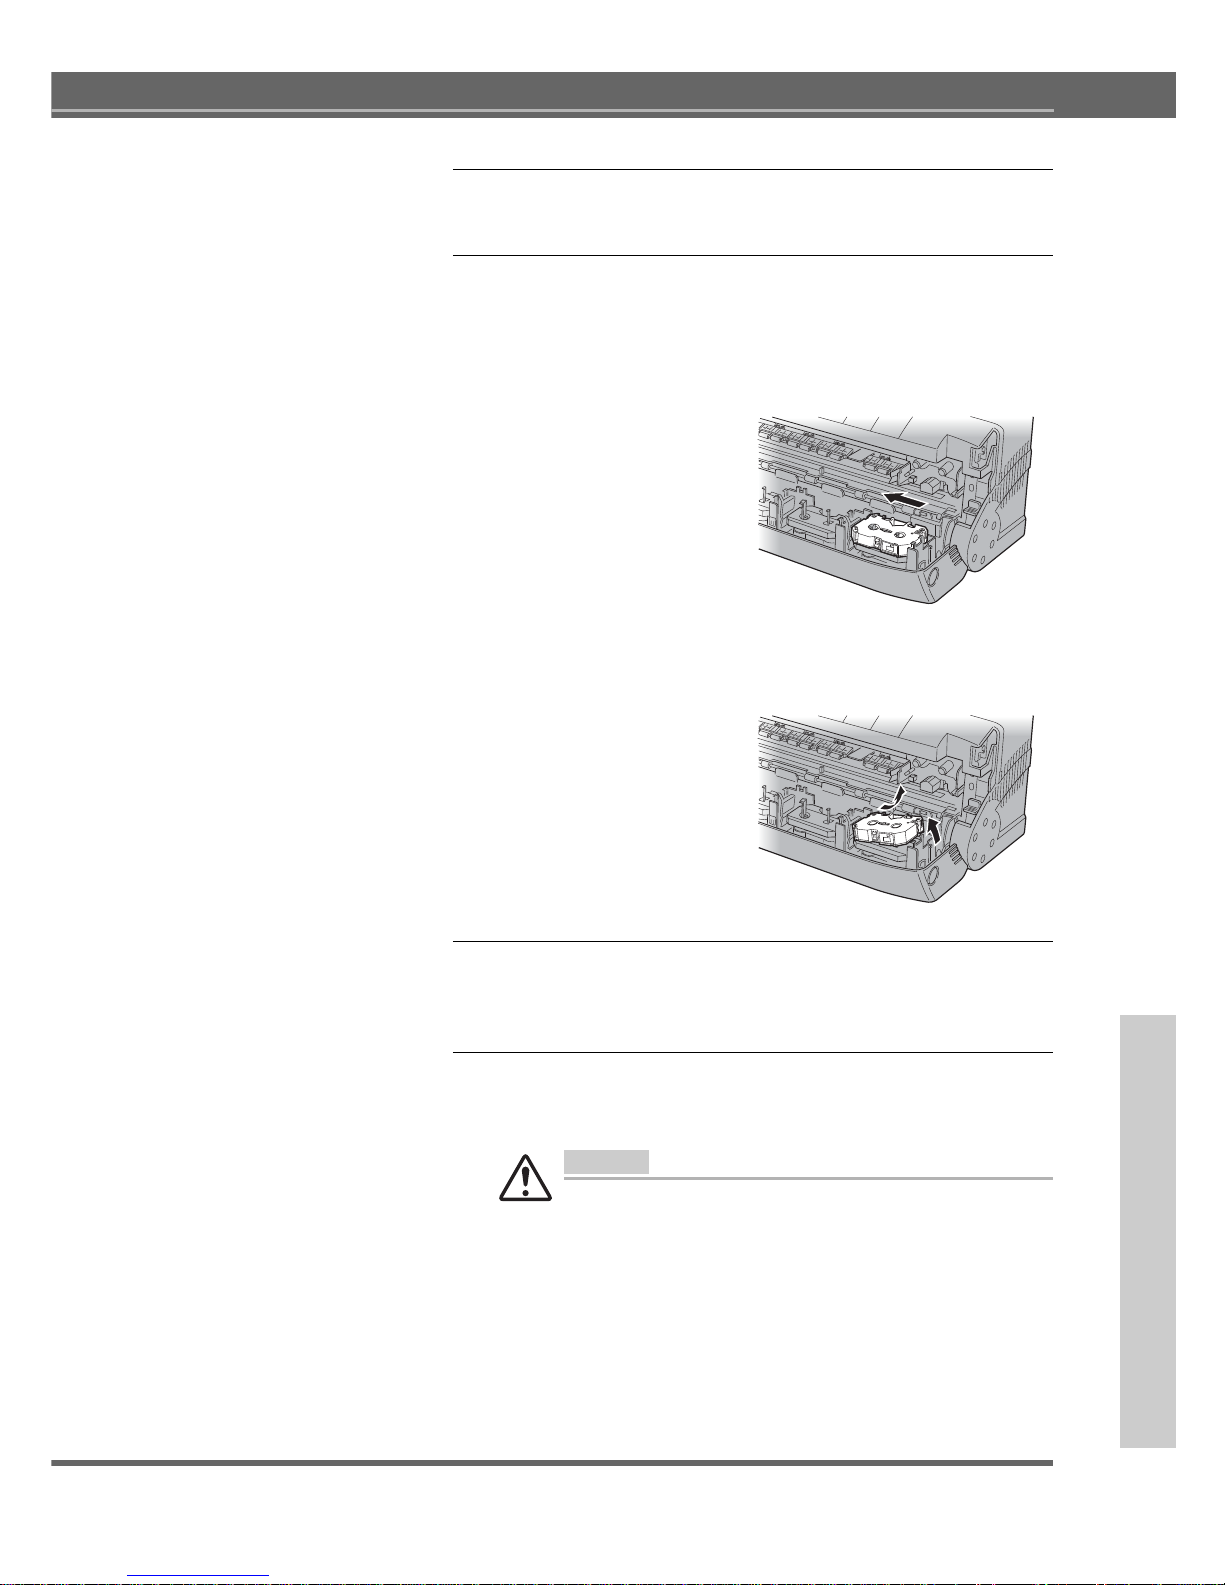
1. Open the front cover
Open the front cover by pushing the front cover release button.
2. Remove the ink cartridge
• Removing a cartridge is similar to installing it. Hold the
center of the ink cartridge with your thumb and index finger.
Push the left latch on the ink cartridge holder slightly to the
left with the cartridge.
• Lift up the right side of the cartridge, and then remove the
entire ink cartridge.
3. Install a new ink cartridge on the ink cartridge holder.
Insert an ink cartridge by following the steps described in the
previous section of “Installing Ink Cartridges.”
4. Checking ink cartridges for any slack.
Check each installed cartridge for any slack. Take up all the
slack by removing the cartridge from the holder.
Caution
Closing the front cover without taking up all the slack can cause
damage to the cartridge ribbon.
28
Chapter 1 - Major Functions and Operations
Loading Media
This section explains how to load media into the printer.
Notes and precautions about media
The printer’s sheet feeder can feed media to the printer automatically. It holds up
the 20 sheets of Kimoplate e2 at once.
Loading Media in Automatic Feed Mode
Use automatic feed mode to allow continuous printing.
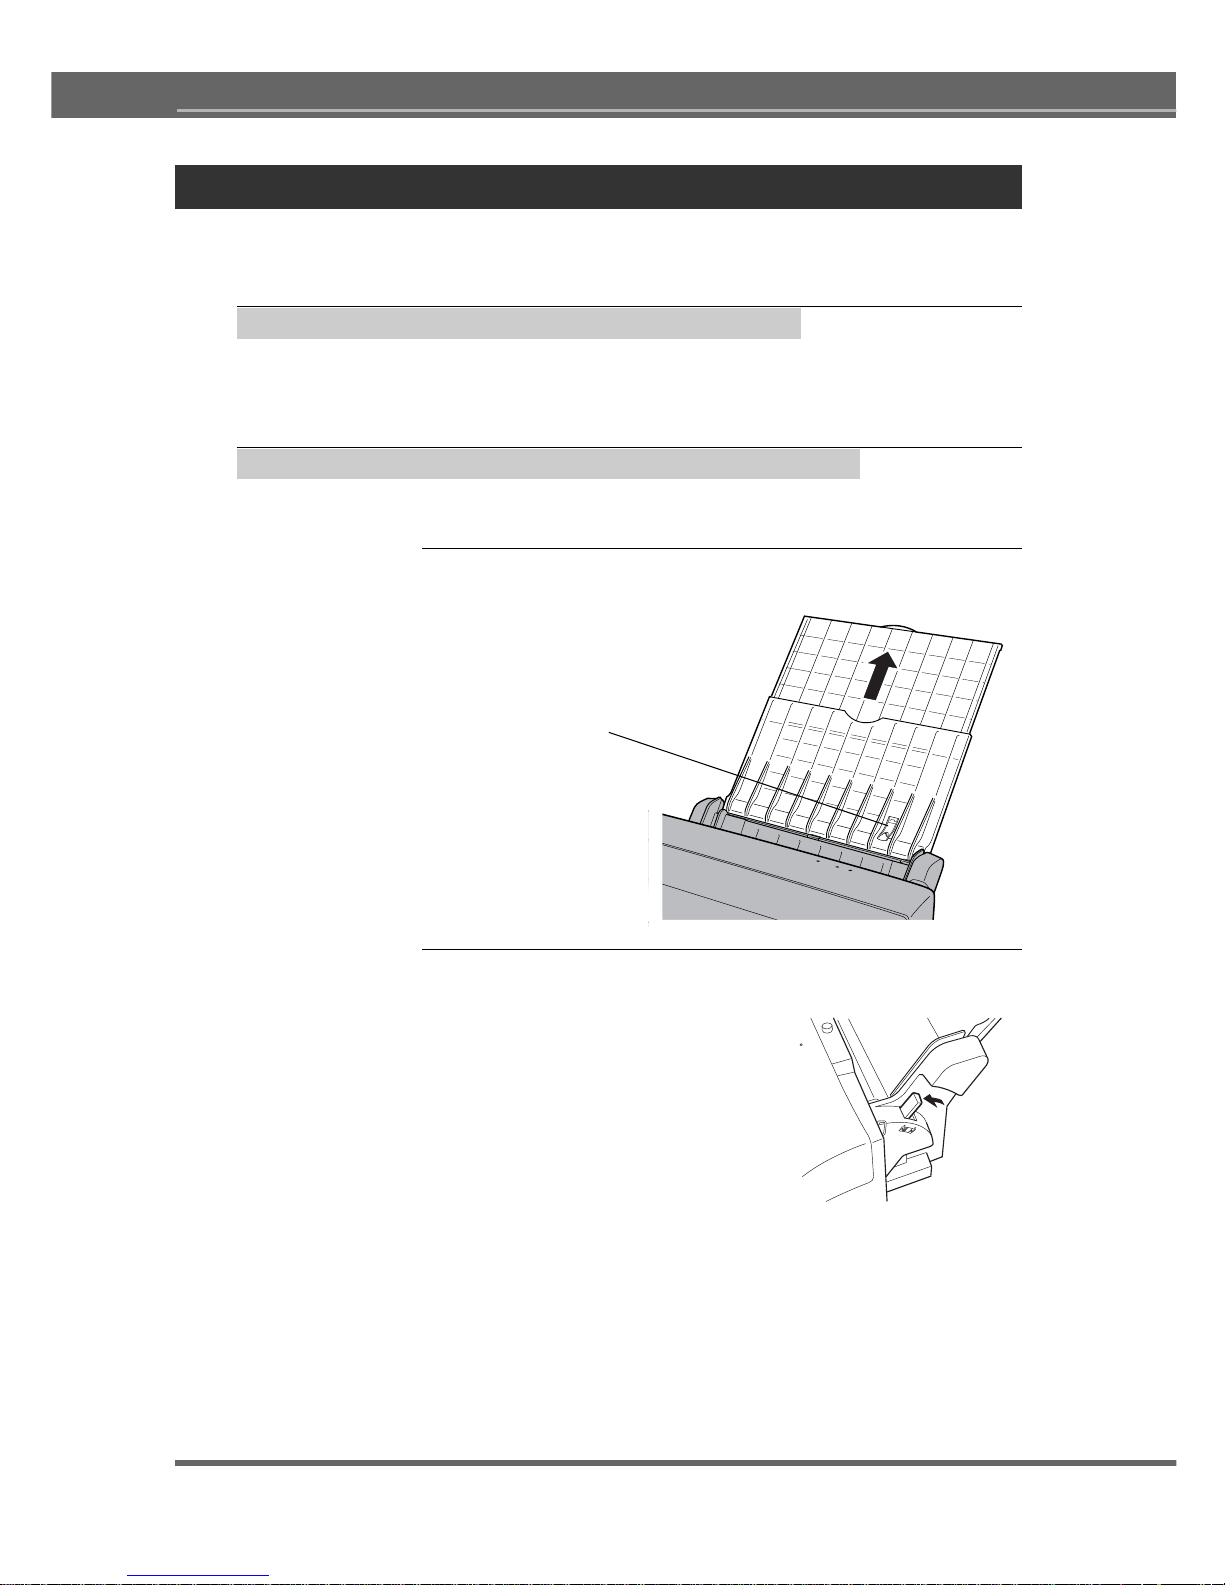
1. Pull up the media support.
Make sure that the media stopper is not lifted.
2. Switch the media feed mode.
Place the media feed switch in position “A”.
Media stopper

29
for Windows and Macint osh
3. Place the media in the sheet feeder.
Slide out the feed guide enough to insert the media along the
fixed edge of the sheet feeder. Load the media with the printing
side facing up. Note that the printing side has the matt surface.
Note
• Using creased or curled media can cause the media to
misfeed.
• Fan the media once before placing it in the sheet feeder. The
printer may feed two sheets together if the sheets are slightly
stuck together.
4. Adjust the media feed guide to the media size.
Pushing the feed guide too hard against the media can bend
the media. Adjust the position of the feed guide so that it just
touches the media.
5. Fit the dust cover.
The dust cover prevents the media inserted inthe printer, as
well as the inside of the printer, from getting dusty.

30
Chapter 1 - Major Functions and Operations
Turning the Power On or Off
Turn your printer and computer on or off by following the steps described below.
Turning on the Power
Turn on the power by performing the following steps.
1. Push the
power
button on the printer to turn it on.
2. Turn on your computer.
Turning off the Power
When you finished printing, turn off your printing devices by performing the
following steps.
1. Shut down your computer.
2. Push the
power
button on the printer to turn it off.

Chapter 2 1
This chapter describes how to install the printer driver.
Read this chapter before you use the printer for the first
time to learn how to set it up.
Chapter 2
Installing the Printer Driver
 Loading...