


R
Air velocity
Pressure
Humidity
Air flow
Temperature
CONSTRUCTEUR
DIRECTIONS FOR USE
SMART MULTI-FUNCTIONS
DEVICES
VT 300, 300 PRO and 300 ST
CLASS 300
w
w
w
w
e
e
e
e
N
N
N
N
VT
300

SUMMARY
TECHNICAL SPECIFICATIONS .....................................................
INTRODUCTION :
- Description
- Keyboard
- Connections
INTRODUCTION OF THE MENU
TEMPERATURE MENU
HOT-WIRE ANEMOMETRY MENU
VANE ANEMOMETRY MENU
HYGROMETRY MENU
TACHOMETER MENU
SUB-MENUS :
- Units
- Delta T
- Automatic average
- Point by point average
- Automatic point by point average
- Air flow
...........................................................................
.............................................................................
.........................................................................
..................................................
....................................................................
.................................................
.........................................................
.....................................................................
.....................................................................
....................................................................................
.................................................................................
................................................................
............................................................
............................................
................................................................................
1-2
2
3
3
4
4
4-5
5
6
6
6
7
7
7
7
7-8

SETTING :
- Date and hour
- Retro-lighting
- Contrast
- Keys beep
- Languages
- Automatic stop
......................................................................
.......................................................................
...............................................................................
............................................................................
..........................................................................
......................................................................
DATA RECORDING, PRINTING AND DELETING
.....................................................................................
- New
.....................................................................................
- Print
- Delete
GUARANTEE
CALIBRATION
..................................................................................
...................................................................................
.................................................................................
8
8
8
8
9
9
9
10
10
10
10
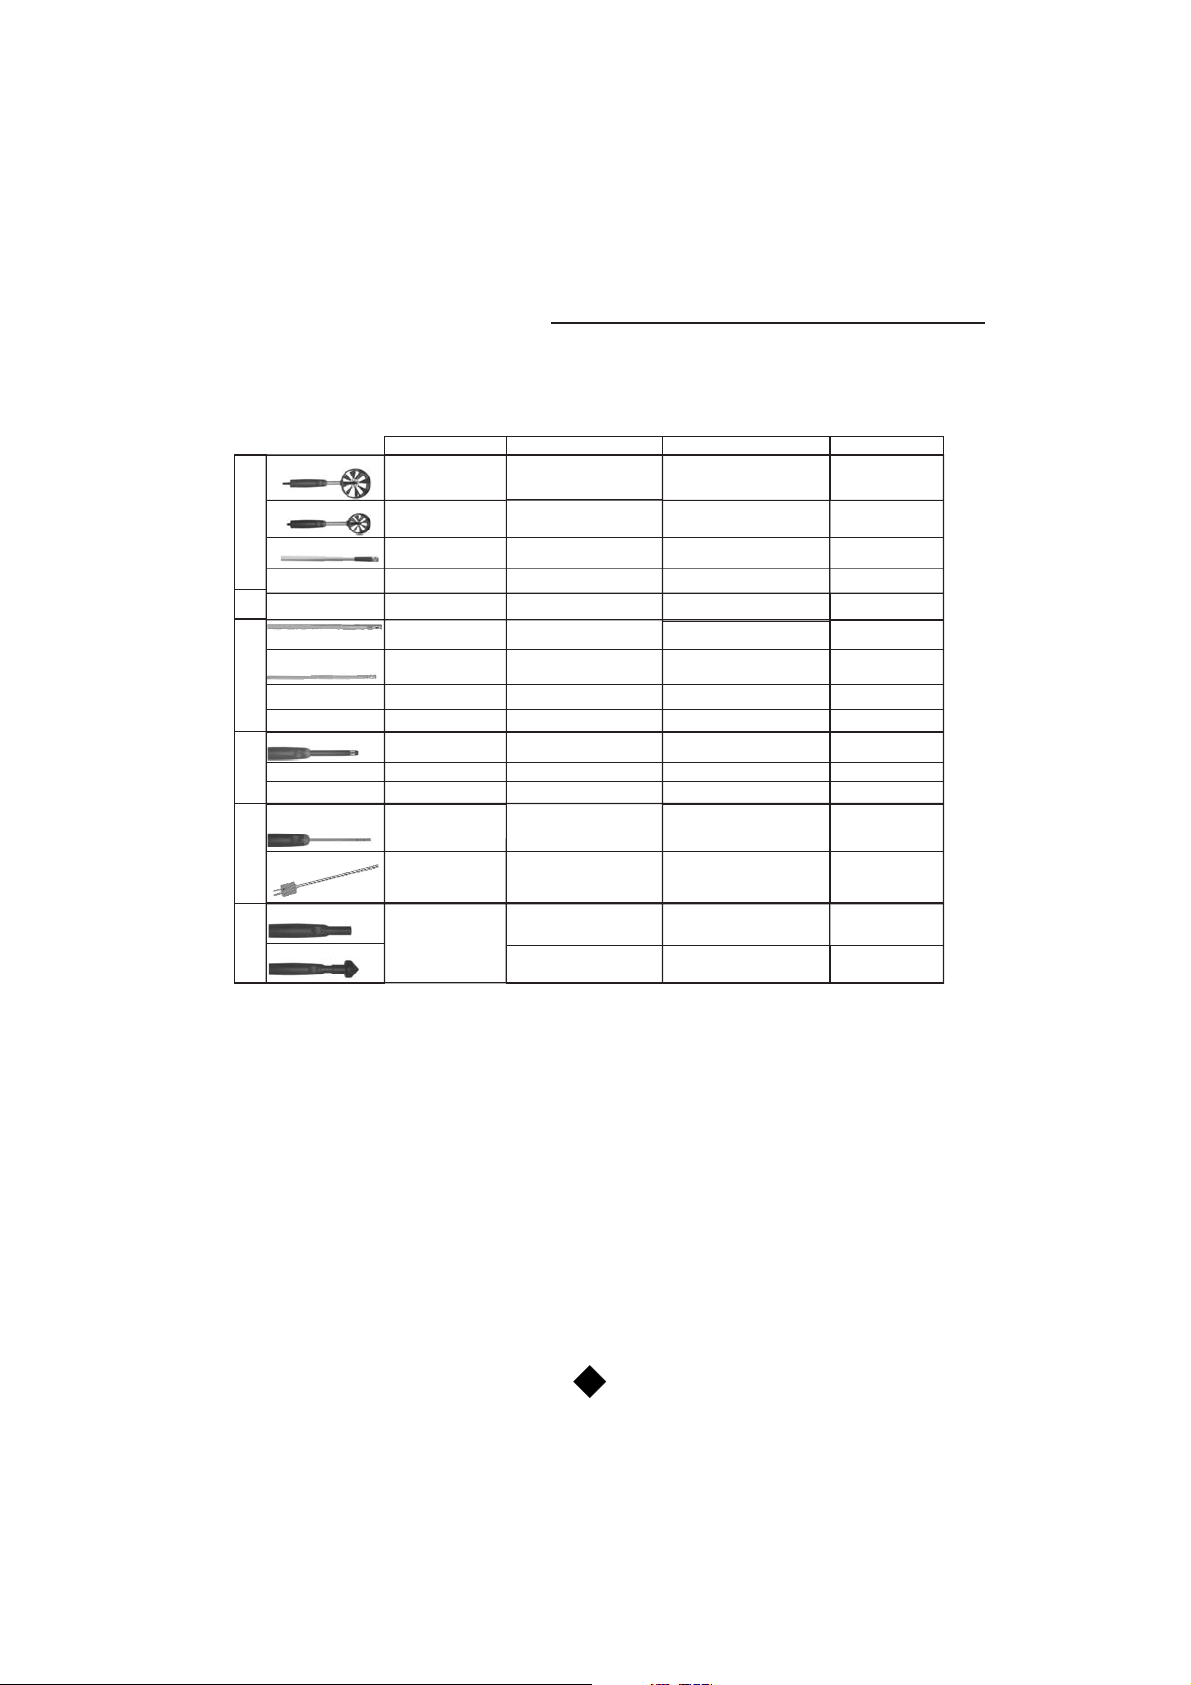
TECHNICAL SPECIFICATIONS
The VT 300 is a multi-function instrument, compatible with all SMART PRO probes, and with all thermocouple K temperature
probes. The SMART PRO probes are supplied with calibration or adjusting certificate (last calibration date display when
connected). They areautomatically recognized when connected, and arefully interchangeable.
Velocity vane Ø100mm
Velocity vane
Velocity vane Ø16mm
A HELICE
Ambient temperature
THERMO ANEMO
(except vane ø 16mm)
Ø70mm
Airflow m /h, cfm, l/s, m /s
Velocity hot-wire
Velocity telescopic
hot-wire
Ambient temperature °C, °F, K
A FIL CHAUD
THERMO ANEMO
Airflow
Humidity
Dew point °C, °F, K -20 to +80°C ±2% ±0,1°C 0,1°C
HYGRO
THERMO
Ambient temperature
Temperature PT 100
(2 channels) °C, °F, K of reading
Thermocouple K*
(2 channels)
THERMOMETRE
Optic
Contact
TACHY
Units of measure Measuring ranges Accuracies** Resolutions
m/s, fpm
0,20 to 3m/s ±2% ±0,06m/s 0,01m/s
3,1 to 35m/s ±2% ±0,2m/s 0,1m/s
of reading
of reading
m/s, fpm 0,3 to 35m/s ±2% of reading ±0,1m/s 0,1m/s
m/s, fpm
°C, °F, K
33
m/s, fpm
m/s, fpm
0,6 to 40m/s ±2% of reading ±0,1m/s 0,1m/s
-20 to +80°C ±2% ±0,1°C 0,1°C
0 to 65000m /h ±3% of reading ±10m /h 1m /h
333
0 to 3m/s ±3% ±0,03m/s 0,01m/s
3,1 to 30m/s ±3% ±0,1m/s 0,1m/s
0 to 3m/s ±3%
3,1 to 30m/s ±3%
of reading
of reading
of reading
of reading
±0,03m/s 0,01m/s
of reading
±0,1m/s 0,1m/s
-20 to +80°C ±2% of reading ±0,1°C 0,1°C
33 3 3 3
m /h, cfm, l/s, m /s 0 to 65000m /h ±3%
%RH, g/kg 3 to 98%RH ±1% ±1,5%RH 0,1%RH
of reading
±10m /h 1m /h
of reading
of reading
°C, °F, K
°C, °F, K
tr/min, rpm, m/min,
ft/min, In/min
-20 to +80°C ±2% of reading ±0,1°C 0,1°C
-100 to +400°C
-200 to -40°C
-39 to +999°C
+1000 to +1300°C ±1% 1°C
60 to 50000tr/min ±0,5% ±1tr/min 1tr/min
4 to 2500m/min
30 to 20000tr/min
±2% ±0,1°C 0,1°C
of reading
±1% ±1,2°C 0,1°C
of reading
±0,5% 0,1°C
of reading
±0,8°C
±1,2°C
of reading
±2% of reading ±1m/min
0,1m/min
1 tr/min
* The thermocouple K probes do not use the SMART PRO system.
* *Performed in laboratories conditions,accuracies mentioned in thisdocument will be guaranteed,subject to the sameconditions or to a
calibration balancing.
HYGROMETRY PROBE :
Maximum interval guaranteed* :
EMG (GAL) = ±2,70 %RH between 18 and 28°C (general field)
Range of measurement : 3 to 98%RH
Drift at short time : better than 1%RH / year
Response time : 10 seconds
* EMG = Et + Ehl + k (uet +ur +ud +us )1/2
As per the 2000/2001 hygrometer chart :
uet : uncertainty of calibration = ± 0,55%RH
ur : uncertainty of resolution = ± 0,003%RH
ud : uncertainty of manufacturing = ± 0,17%RH
us : repetition of comparison = 0,11%RH
Et : difference due to thermical deflection= ± 0,28%RH
Ehl : difference due to hysteresis and linearity = ± 1,25%RH
k : expansion factor = 2%RH
22 2 2
1

DISPLAY:
Graphic, with automaticbacklighting. Size 66 x 33 mm.
HOUSING :
Shock-proof, made of ABS/PC, with Elastomer edges.
KEYPAD:
Made ofElastomer :4 keys andone control knob.
CONNECTIONS
Connectors :
Thermocouple K connectors:
Numeric connectionoutput :
COMMUNICATIONMODE :
RS 232.
MEASURING ELEMENTS :
Vaneanemometer :
Hotwire anemometer :
Hygrometry :
Pt 100 temperature:
Thermocouple temperature :
Optical tachometry :
Contact tachometry :
:
mini-DIN securedplugs.
capacitive element
compensated miniatureplugs
USB.
Hall effect sensor
thermistance withnegative temperaturefactor.
Pt 100 classA
Thermocouple Kclass 1
optical detection(phototransistor)
ETC type adaptorfitting optical tachometry probe.
INTRODUCTION
Description :
CONFORMITY :
Electromagnetical compatibility(norm NFEN 61326-1)
POWER SUPPLY:
4 Alcalinebatteries 1,5V LR6
WORKING ENVIRONMENT :
Neutral gas
WORKING TEMPERATURE :
From 0 to50°C.
STORAGE TEMPERATURE:
From 0 to50°C.
DIMENSIONS :
183 x100 x40 mm
WEIGHT :
450 g
LANGUAGES AVAILABLE :
French, English, Spanish,Portuguese, Italian, German, Dutch.
Battery load
Scrolling down menu
Connection of the
battery charger
VT
300
Elastomer protection
2
Graphic display
System of probes
fixing

Keyboard :
2
3
Connections :
1. ON/OFF : Switch on / switch off the instrument.
1
ESC : Return to the previous page or on the last
validated data.
2. Press 1 time : HOLD function, freeze the current
measure.
Press 2 times : show the values minimum and
maximum measured.
Press 3 times : return to the current menu
measure.
3. Recording : allow to memorize data.
4. Press on the control knob to validate.
B
4
5
rowse the menu by scrolling down the knob.
5. Print out of data on a printer.
thermocouple K
USB port for connection
input
(T2)
to the printer and
joining to a PC
Thermocouple K
input
(T1)
-:Channel 1 (C1) Connection of the hot-wire air velocity, vane air
-:
-:
Channel 2 (C2)
Channel 1 (C1)
DISPLAY SIDE
velocity, hygrometry, tachometry (optic or contact), and Pt 100
temperature probes.
Channel 2 (C2)
T1 and T2
Connection of a second PT100 probe.
Connection of thermocouple K probes
3

INTRODUCTION OF THE MENU
To switch on theinstrument, press the key“ON/OFF”.
The screen shows the name of the device, its serial number, its calibration date, the date and hour (see photo
below).
To access to one menu, connect the corresponding probe. If this one
uses the SMART PRO system, the screen shows the type of the
connected probe, and its calibration or adjusting date. To access to the
menu press on the knob. To return to the homepage, disconnect the
probe.
To switch off theinstrument, press some seconds on the “ON/OFF”key.
TEMPERATURE MENU
When youconnect your probe(s) (see connections p. 3), the screen shows itscharacteristics. It is possible to
connect up to 2 probesPT100 and 2 probes thermocoupleK at the same time. Press then on theknob to enter
in the menu temperature, the measured value is shown in the screen and the following menu appears on the
last line (by browsing the menu by scrolling down the knob):
To validate a function,press on the knobwhen the wished function isshown on thescreen.
- Units
- Delta T (only if 2 probes of identical technology areconnected)
Display : T1 and T2:thermocouple K probes
C1 and C2 : PT100 probes
Units :
See p. 6
Delta T :
See p. 7
HOT-WIRE ANEMOMETRY MENU
When you connect a hot-wire probe,the screen shows its characteristics (do not forget to slide below the
protective tube on a level of the sensitive element). Press then on the knob to enter in the menu hot-wire
anemometry, the screen shows the measured values in air velocity and in temperature, and the next menu
appears on the last line (by browsing the menu by scrollingdown the knob) :
To validate a function,press on the knobwhen the wished function isshown on thescreen.
- Units
- Automatic average
- Point / point average
- Automatic point / point average
- Airflow (rectangular, circular, ariflow cones)
- Delta T (only if one PT100 probe is connected onC2)
4

Units :
See p. 6
Automatic average :
See p. 7
Point / point average :
See p. 7
Automatic point / point average :
See p. 7
Airflow :
See p. 7
Delta T :
See p.7
VANE ANEMOMETRY MENU
When you connect a vane probe,
menu vane anemometry, the screen shows the measured values in air velocity and in temperature
Ø16mm vane probe, only the air velocity appears) and the next menu appears on the last line (
menu by scrolling down the knob
o validate a function, press on the knob when the wished function is shown on the screen.
T
- Units
- Automatic average
- Point / point average
- Automatic point / point average
- Airflow (rectangular, circular, cone : only for the vane Ø100 mm )
- Delta T (only if one Pt100 probe is connected on C2 and if you use a vane probe Ø70 or
100mm)
Units :
See p. 6
Automatic average :
See p. 7
Point / point average :
See p. 7
Automatic point / point average :
See p. 7
Airflow :
See p. 7
Delta T :
See p.7
the screen shows its characteristics.Press then on the knob to enter in the
by browsing the
):
probe
5
(for the

HYGROMETRY MENU
When you connect a hygrometry probe,the screen shows its characteristics. Press then on the knob to enter
in the hygrometry menu, the screen shows the measured values in humidity, temperature, absolute humidity
and dew point temperature and the next menu appears on the last line (
the knob) :
To validate a function,press on the knobwhen the wished function isshown on thescreen.
- Units
- Psychrometry
- Contact dew point temperature (only if a PT100 probe isconnected)
- Delta T
Units :
See p. 6
Psychrometry :
When you access to the sub-menu “Psychrometry”, the display shows the temperature, the humid
temperature (Tw), the humidity, the absolute humidity ( v) and the enthalpy (i). To come out of the
psychrometry menu, press on “ESC”.
Contact dew point temperature :
When you enter to this sub-menu, the screen shows the temperature of the PT100 probe (external), the
temperature of the contact dewpoint (Td), the humidity and thetemperature integrated in the hygrometry
probe. To come out of the dew point temperature menu, press on “ESC”.
Delta T :
See p. 7
(only if a PT100 probe is connected)
browse the menu by scrolling down
TACHOMETRY MENU
When you connect a tachometry probe, the screen shows its characteristics. Press then on the knob to enter
in the tachometry menu. B , then select the typeof the tachometry
probe you have connected (optic o contact). If you use an optical probe, it is necessary to mark the turning
part with a little piece of reflective tape. The screen showsthe measuredvalue and the next menu appears on
the last line :
- Units
To validate this function,press on the knob.
Units :
See p. 6
rowse the menu by scrollingdown the knob
SUB-MENUS
Units :
Browse thedifferent available units validate pressingon the knob. When
you have the choice between various parameters (velocity and temperature, for example), you have to
validate each unit of measure.
by scrollingdown the knob and
6

Delta T :
When 2 PT100 probes or 2 thermocouple K probes are connected, you have the possibility of calculate
the Delta T which corresponds to the difference between the temperature measured by C1 (or T1) and
C2 (or T2). If 2 PT100 probes and 2 thermocouple K probes are connected at the same time, the screen
shows 2 delta T. To come out ofthis function, press the touch " ESC ".
Reminder: possible only between 2 probes of identical technology.
Automatic average :
This function allows to calculate the average value that the device measured in an interval of chosen
time. When "Departure" appears on the screen, press on the knob to start the calculation. The screen
registers the sold time. To stop and reach the result, press again on the knob. The results are registered
on the screen: average (s), minimum value (s), maximum value (s), standard deviation(s) as well as the
duration ofthe calculation. Press on " ESC " to return to theprevious page (by pressing on the knob, you
begin a new calculation).
Point / point average :
This function allows to calculate the average value of various points which you will have validated. The
crolling down menu
s allows to validate a point or to reach the average of points previously validated. To
validate a point, press on the knob. Validate as many points as necessary, then by means of the knob,
choose "Average" andvalidate. The screen shows then:average(s), count ofvalidated points, minimum
value(s), maximum value(s) and . To show the values of the various points, press
on the knob. Press then on " ESC ": once to return to the previous display, twice to begin another
calculation and three times to go out of the menu "point/ point average".
Automatic point / point average :
This function allows to calculate the average value of various points, calculated themselves on a
duration beforehand defined.
It is necessary to choose at first the duration on which will be calculated each of the points;
figures by scrolling down the knob
duration validated, the scrolling down menu gives you access to the validation of points and to the
average. Proceed then in the same way as for the calculation of "average point / point" (previous
paragraph).
standard deviation(s)
browse the
and validate every number by pressing on the knob. Once the
Airflow :
When you enter in this menu, it is necessary to begin by selecting the type of diffuser : rectangular,
circular or cone (with hot-wire probe and vane Ø100 mm )
- Rectangular :
the length of the diffuser.Browse each figure by scrolling down the knob and validate pressing on the
knob ( to return to the previous figure, press on “ESC”).Proceed in the same wayfor the width.
You haveaccess to anew scrolling down menu:
browse then the units of measurement by scrolling down the knob and
- Units (see p. 6)
- Automatic average (see p. 7)
- Point/point average (see p. 7)
- Automatic point/point average (see p.7)
probe by scrolling down theknob
validate. Enter
7

- Circular : browse then the units of measurement by scrolling down the knob and validate. Enter the
diameter of the diffuser. Browse each figures by scrolling down the knob and validate pressing on the
knob. You have accessto a new scrolling down menu :
- Cones (for hot-wire and vane Ø100mm anemometry) :
- : Select the reference of the cone used (K35, K75,...) by the means of the
- : The screen displays “K25 cone”. Validate, the measure appears
- Units (see p. 6)
- Automatic average (see p. 7)
- Point/point average (see p. 7)
- Automatic point/point average(see p. 7)
For hot-wire anemometry
knob, then the mode of ventilation (exhaust or supply). Validate, the measure appears and the screen
shows the following menu :
- Units (see p.6)
For vane Ø100 mm anemometry
and the screen shows the following menu :
- Units (see p.6).
SETTINGS
To reach the varioussettings, switch on thedevice (do not connect aprobe). Press then on "ON/ OFF".
The following scrolling down menu appears :
To validate a function,press on the knobwhen the wished function isshown on thescreen.
- Date and hour
- Retro-lighting
- Contrast
- Keys Beep
- Languages
- Automatic stop
Date and hour :
Use the knob to settle each figures of the date and of the hour, and validate at each time pressing on the
knob. To return to a figure previously validated, press on" ESC ".
Retro-lighting :
It is possible to activate or to deactivate the retro-lighting of the display : by means of the knob choose
"ON", " OFF " or "automatic" andpress to validate. To go outof this menu,press on " ESC ".
Contrast :
By the means of the knob, adjust the contrast of the screen from 0 to 7 and validate by pressing on
the knob.
Keys beep :
It is possible to activate or to deactivate the tone of keys. Validate the chosen option by pressing on
the knob.
8

Languages :
By the means of the knob, browse the different available languagesand validate pressing on the knob.
Automatic stop :
It is possible to cancel the automatic stop of the device or to settle it. For that purpose, use the scrolling
down knob and choose " OFF " to cancel the automaticstop or choose a value(by slice of15 minutes).
When you restore data on PC, the automatic stop does not work, but at the end of the load, the
device goes out automatically.
DATA RECORDING, PRINTING AND DELETING
Before enter in the menu"recording", it is necessary toconnect the probes that willbe used. Enter in themenu
which you wish to record.Press the key "Recording" (see p.3) to reach the menu "Datalogger ". At the bottom
of the screen appears the following scrolling down menu:
It is thus possible to print data, to record or to delete them.
- New
- Print.
- Delete
New :
This functionallows to register a new campaign of measures. It is necessary to enter firstof all the name
of the file (12 characters at most). B and validate every
character by pressing on the knob or by choosing the symbol if you enter less than 12 characters.
Choose then if you wish a manual or automatic recording ofthe data (by meansof the knob).
rowse the letters by scrolling down the knob
- Manual recording :
registered points is indicated on the last line). Press on the key "Recording" tostop therecording. If you
really wish to stop, choose "Yes" and tocontinue to registerpoints, click on "No"(by means of the knob).
- Automatic recording: By means of the knob, choose the interval of time between the recording of
each of the points (theminimum is of 5 seconds).Choose then the duration on whichpoints are going to
be registered (validate the number of days, hours and minutes) then validate. The recapitulative
appears on the screen. To begin the recording, press twice on the knob. Once the ended recording, the
device switches of. To stop the current recording, press on "Recording". If you really wish to stop,
choose "Yes" and tocontinue the recording, click on "No" (bymeans of the knob).
To restore the data registered on a PC, s (without any probe)and connect the cordon
on the port USB (see p. 3). During therecordings, the automatic stop of the device does not work,
but at the end of the procedure,it will switch off automatically.
validate as many points as you wish by pressing on the knob (the number of
witch on thedevice
9

Print :
When "Print" is validated, by means of the knob, choose the campaign which you wish to print and
validate by pressing on the knob. Go out of the menu"printing" by pressing on" ESC ".
Delete :
This function allows to delete the campaigns of measure stored in the device. To enter in the menu
“delete”, validate by pressing on the knob. Then, always by means of the knob, choose to cancel or to
confirm the demand.
GUARANTEE
KIMO provides a one-year guarantee, starting from the date on which the appliance was originally
purchased, that any new appliance will be free of any manufacturing or structural defects. This guarantee
does not cover defects resulting from incorrect handling or from any repairs which may been made by
persons other than the manufacturer.
Any defects covered by this guarantee will be repaired free of charge. An estimate will be provided for any
damage not covered by this guarantee. The customer’s prior approval will be requested before any repairs
are done.
KIMO will see to the replacement of any constituent parts ofthis appliance.
Any appliance, whether under guarantee or not, must be returned carriage paid. A letter detailing the faults
defected should be sent with the appliance whenever possible.
CALIBRATION
All KIMOdevices are calibrated in our premises and supplied with a calibrationcertificate, as per the AFNOR
FD X 07-012 norms, in accordance with the National Standards.
In order to comply with standards of Quality Assurance, measuring devicesshould be checked annualy.
10

www.kimo.fr
@
EXPORT DEPARTMENT
Boulevard de Beaubourg
Emerainville - BP 48
77312 MARNE LA VALLEE CEDEX 2
Tel : 33.1.60.06.69.25
Fax : 33.1.60.06.69.29
Ref. NT Ang - VT 300 - 11/02 C
 Loading...