

Kimberley KRB04 Fitting Instructions Manual
Concealed Waste Bin - 30L
Model: KRB04
FITTING INSTRUCTIONS
Please retain this sheet for future reference.
PARTS LIST:
• 1x Plastic Bin—30 Litres
• 1x Shaft Assembly
• 1x Lid Assembly (including LH & RH Hinge Plate)
• 1x Split Pin (for lid)
• 10x Wood Screw 8x16mm Countersunk
(for bracket mounting)
• 1x Elastic Retaining Band (for liner)
• 1x Assembly Instruction Booklet
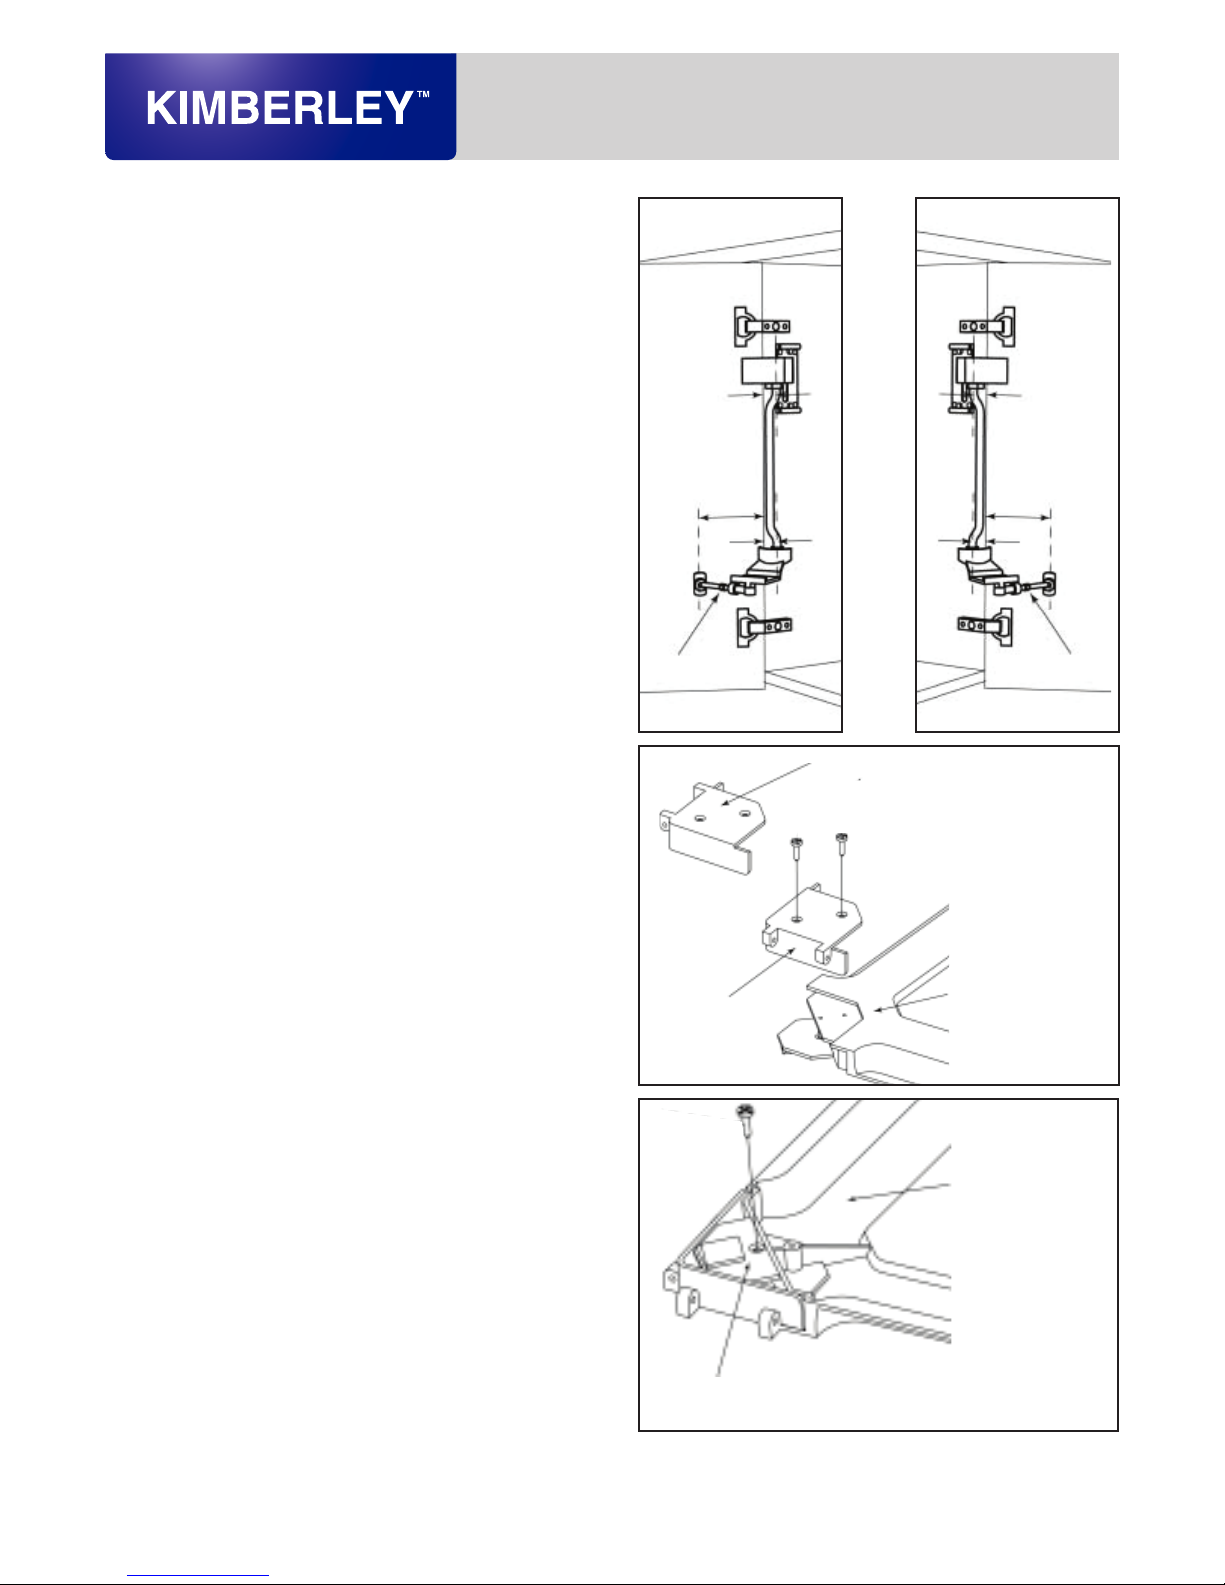
SHAFT ASSEMBLY (Refer Fig. 1 & 2)
The shaft assembly is supplied partially complete ready
to install to suit Left Hand (LH) or Right Hand (RH) door
openings. Refer to Fig. 1 & 2 for orientation and bracket
position.
1. Place Bottom Bracket (B) on shaft to suit either LH or
RH Door.
2. Place Top Bracket (A) on shaft to suit LH or RH door
opening as per Fig. 1 & 2.
3. Position bin in cabinet allowing 120mm (min.) clearance
for lid to open. Mark the screw holes to x Bottom
Bracket (B) to side of cupboard. Make sure the centre of
the shaft is 40mm from the inside edge of the cupboard,
in positions shown in Fig. 1&2.
4. Fix Top Bracket (A) in place. Ensure the complete shaft
assembly brackets are seated correctly on shaft.
5. Secure toggle bracket (C) to door a minimum of
120mm from inside edge of door. Ensure slotted side of
bracket faces inside cabinet.
Note: As there are many types of door hinges, place the
bin in position and open and close the door to
determine the best position to secure bracket (C).
LID ASSEMBLY (Refer Fig. 3 & 4)
1. The lid has been factory assembled for LEFT HAND
installation. For RH installation replace Hinge Plate
KRB04-06 with KRB04-07 (included in the kit).
2. Locate Lid on top of Bracket (A) and lock in place
with split pin provided (Fig. 5). Flair ends of split
pin slightly to secure. The bin lid should open
automatically as the cupboard door opens and lower
as the door closes.
3. Open and close door to check that the lid opens
smoothly as door opens. Adjust as required by turning
the adjustment screw on Bracket (C) (Fig. 1 & 2).
Kimberley Products Pty Ltd
ABN 34 004 518 012
5 Abbotts Rd Dandenong South Vic 3175
Ph: (03) 9768 5777 Fax: (03) 9768 5788
Em: kimprod@kimprod.com.au Web: www.kimprod.com.au
© 2015 Kimberley Products. All rights reserved. In an ongoing commitment to product
quality we reserve the right to change specications without notice. E&OE.
D/N: SKRB04-211015
LEFT HAND
INSTALLATION
Bracket (A)
Bracket (B)
Bracket (C)
Adjustment Screw
Bracket (C)
Adjustment Screw
LH HINGE PLATE
KRB04-06
CAM PLATE
BIN LID
TOP VIEW
BIN LID
UNDERSIDE VIEW
RH HINGE PLATE
KRB04-07
Bracket (B)
40mm
120mm
40mm 40mm
120mm
40mm
Bracket (A)
RIGHT HAND
INSTALLATION
Fig. 1 Fig. 2
Fig. 3
Fig. 4
How to Care for your New Kimberley
Waste Bin
1. Please make sure you thoroughly read and under-
stand the installation instructions and follow them
carefully.
2. For best results and longevity, always use a bin liner
inside your waste bin.
3. Always make sure the liner is installed without
obstructing any of the waste bins moving parts.
4. Do not overload your waste bin.
5. Do not push the rubbish down to try to compact your
waste.
6. Do not place heavy items on top of the bin lid. There
is a Wire Basket (KWB01) available to suit Waste Bin
Models: KRB06, KRB06D, KRB08, KRB14, KRB14D,
KRB15 & KRB15D.
7. Never try to close your waste bin with your feet.
8. Never force the waste bin closed.
9. Use a soft cloth and warm mild soapy water to regularly
clean the interior and exterior of the waste bin. Do not
use harsh detergents.
10. When washing the waste bin, use a soft cloth to dry
the waste bin.
11. Be careful to thoroughly dry any areas of metal to
avoid rust and damage.
12. Do not use the bin outside or expose it to the
weather.
13. Do not place waste bin near a heater or hot device.
Kimberley Products Pty Ltd
ABN 34 004 518 012
5 Abbotts Rd Dandenong South Vic 3175
Ph: (03) 9768 5777 Fax: (03) 9768 5788
Em: kimprod@kimprod.com.au Web: www.kimprod.com.au
© 2015 Kimberley Products. All rights reserved. In an ongoing commitment to product
quality we reserve the right to change specications without notice. E&OE.
D/N: SKRB04-211015
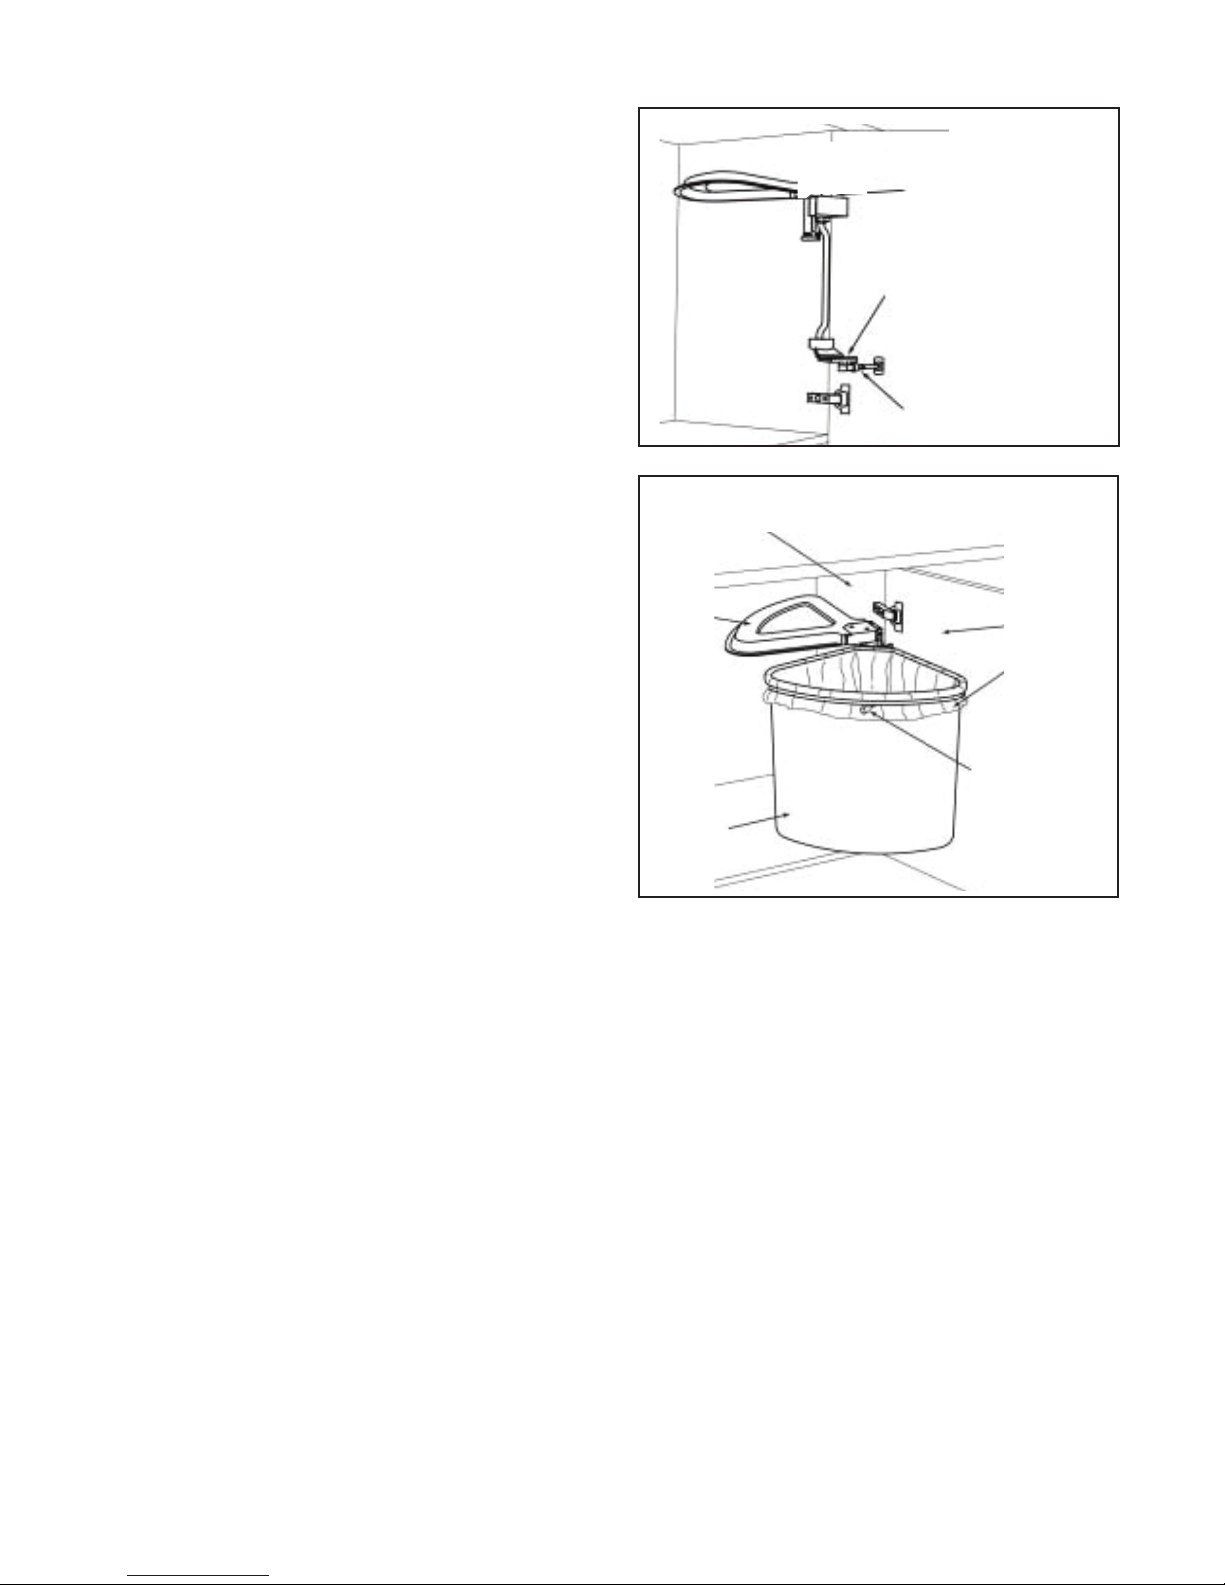
BIN PLACEMENT (Fig. 5 & 6)
1. Open the door sufciently to clip the bin onto top bin
support.
2. Hold bottom of bin out slightly while locating bin lip on
top bracket. Then push bottom of bin in until it snaps
into the bottom retainer.
A plastic liner should be used and it can be held in
position with the elastic cord supplied. All large size plastic
liners are suitable.
PUSH IN
PIVOT POINT
CAM PLATE
BOTTOM BIN
SUPPORT
ADJUSTMENT
TOGGLE
BIN LINER
ELASTIC CORD
LID
BIN
CABINET
DOOR
CABINET
Fig. 5
Fig. 6
 Loading...