

Kiloview N Series, N1, N2 User Manual
N Series·Wireless NDI®Video Encoder
Changsha KILOVIEW Electronics CO.,LTD.
USER MANUAL

Legal Notices
Subject to the receiving of this document from Changsha Kiloview Electronics Co., Ltd.,(Hereinafter
referred to “Kiloview”), the following terms are understood and agreed. Or else, please stop using this
document.
This document is copyright of Kiloview, all rights reserved. The document covers the proprietary
information of the company. No company or individual may copy, transmit, distribute, use or disclose the
document and any images, forms, data and other information contained in the document without the
prior written permission of the company.
is the registered trademark of Kiloview. The name and logo are the trademarks or registered
trademarks of the company. Other products or company names mentioned in this document may be the
trademarks or registered trademarks of their respective owners. The reading of this document without the
prior written consent of the company or the third party rights holder does not imply that the reader is
given any right to use any of the marks appearing in this document by implication, non-evidence or
otherwise.
This product complies with the design requirements related to environmental protection and personal
safety. The storage, usage and disposal of the product shall be in accordance with the product manual,
relevant contract or relevant national laws and regulations.
This document is provided "as is" and "only in this state". Products and technical updates are subject to
change without prior notice.
For matters not covered in this document, please visit our website www.kiloview.com for information and
technical support.
NDI®is a registered trademark of NewTek, Inc..

CONTENTS
1 PRODUCT INTRODUCTION................................................................................................................................................. 1
1.1 ADVANTAGES
1.2 PARAMETERS
2 OPERATION GUIDANCE.......................................................................................................................................................3
3 PACKING LIST AND INTERFACE DESCRIPTION
3.1 PACKING LIST........................................................................................................................................................................ 4
3.2 INTERFACE DESCRIPTION....................................................................................................................................................... 4
3.3 SIGNAL INDICATOR................................................................................................................................................................ 5
4 INSTALLATION AND CONNECTION
4.1 POWER CONNECTION..............................................................................................................................................................6
4.2 VIDEO SIGNAL CONNECTION.................................................................................................................................................. 6
4.3 NETWORK CONNECTION......................................................................................................................................................... 6
5 LOGIN AND NETWORK CONFIGURATION
5.1 LOGIN TO THE DEVICE THROUGH ETHERNET.........................................................................................................................8
5.2 LOG IN TO THE DEVICE THROUGH THE WIFI HOTSPOT.......................................................................................................... 9
5.3 NETWORK CONFIGURATION................................................................................................................................................... 9
5.3.1 Ethernet
5.3.2 WIFI network
5.3.3 Convenient management functions
.........................................................................................................................................................................
.........................................................................................................................................................................
..........................................................................................................
.................................................................................................................................
......................................................................................................................................
.......................................................................................................................................................................
................................................................................................................................................................
.............................................................................................................................
10
11
13
1
1
4
6
8
6 NDI DISCOVERY AND CONFIGURATION
6.1 NDI|HX DRIVER INSTALLATION
6.2 NDI DISCOVER AND CONNECTION
6.3 MODIFY NDI DEVICE NAME AND CHANNEL NAME
6.4 MODIFYING NDI BIT RATE
7 PARAMETERS CONFIGURATION.................................................................................................................................... 17
7.1 DASHBOARD
7.2 BASIC SETTINGS
7.3 CHANGE WEB LOGIN PASSWORD
7.3.1 Location and time
7.3.2 Restore factory settings
7.3.3 Firmware upgrading
7.4 VIDEO&AUDIO ADJUSTMENTS
7.4.1 Video source choice and adjustments
7.4.2 Video preprocessing
7.4.3 Audio signal source
7.5 ENCODING & STEAM
7.5.1 Audio encoding parameter setting
7.5.2 Encoding and stream settings
........................................................................................................................................................................
...................................................................................................................................................................
........................................................................................................................................................
......................................................................................................................................................
...........................................................................................................................................................
..........................................................................................................................................
.......................................................................................................................................
.................................................................................................................................................
........................................................................................................................................
...............................................................................................................................................
....................................................................................................................................................
.............................................................................................................................................
.....................................................................................................................................................
......................................................................................................................................
......................................................................................................................
..............................................................................................................
..........................................................................................................................
...............................................................................................................................
14
14
15
16
16
17
18
18
19
20
20
21
21
21
22
23
23
24

7.5.3 Streaming media service
7.6 LOCAL RECORDING
..............................................................................................................................................................
7.7 NETWORK STORAGE(NAS)
7.8 TEXT/ IMAGE/TIME OVERLAY
7.8.1 Overlay Image Management
7.8.2 Overlay function
7.9 SERVICE CONFIGURATION
...........................................................................................................................................................
...................................................................................................................................................
7.9.1 Web Service Configuration
7.9.2 Onvif Service Configuration
7.9.3 Telnet Service Configuration
7.10 SERIAL PORTS AND PTZ
7.10.1 Serial Ports
7.10.2 PTZ Setting
................................................................................................................................................................
................................................................................................................................................................
7.10.3 Control Panel
....................................................................................................................................................
..............................................................................................................................................................
7.11 QUICK RESET AND REBOOT
7.11.1 Quick Reset
7.11.2 Reboot
7.12 LOGS AND DEBUG
................................................................................................................................................................
........................................................................................................................................................................
.............................................................................................................................................................
..............................................................................................................................................
.............................................................................................................................................
...............................................................................................................................................
.......................................................................................................................................
..........................................................................................................................................
.........................................................................................................................................
........................................................................................................................................
..............................................................................................................................................
26
30
34
35
35
36
38
38
38
38
39
39
39
40
40
40
40
40

N Series Encoder·User Manual
1
1 Product introduction
Model No.
N1、N2
Input
SDI(N1)、HDMI(N2)
Network Support
Enhanced WIFI (Enhance 5.0GHz frequency+PA), USB-extend Ethernet
Media transmission
protocols
NDI-HX/RTMP/TS over UDP/HLS
Video resolution
Up to 1080P60Hz:1080p23.98/24/25/29.97/30; 1080p50/59.94/60; 1080i50/59.94/60;
720p23.98/24/25/29.97/30; 720p50/59.94/60
Video encoding
H.264/ AVC High/ Main/ Baseline profile (up to Level 5.3) ; Motion-JPEG ; NDI HX
Audio encoding
AAC/G.711
Latency
End-to-end by cable is about 150 ms
Image and text overlay
Custom text, image overlay function, can be superimposed to any position on the screen
Recording
SD/TF card slot, local recording, NAS network storage
N series NDI video encoder is a professional device designed for NDI video production field. It
compresses and encodes SDI or HDMI video source into NDI stream, transmit video via wired or WIFI
for any systems, device and software on your network.
1.1 Advantages
Portable design, small compact and stable NDI Wireless transmission
Built-in 5.0GHz WIFI realizes stable NDI Wireless transmission, or USB-extend Ethernet transmission.
Built-in large-capacity lithium battery, supports 5-16v external mobile power supply, no need to consider
wired power supply.
Internal cooling fan makes it adapts to high temperature conditions, stable and reliable operation
115*75*35mm, 380g only, hot shoe mountable makes it easy to install on the camera for portable
application.
Authorized by NewTek, compatible with other NDI® hardware and software products
Available as sources for other NDI compatible systems and software, no cables everywhere anymore.
Ultra low-latency, mutual identification and communication of multiple data streams.
Smart connection, discovered and connected by other NDI devices automatically
Powerful encoding function, dual stream output, customized graphic overlay, voice intercom,
local recording
Wide adjustable code rate (64kbit/s to 40Mbit/s).
Dual stream output, the main code rate up to 1080p60Hz, and the sub-stream supports 720p60Hz video
encoding.
Capable with customized text and image overlay function, which can be at any position on the screen.
With SD/TF card slot, it supports local recording, and supports NAS network storage.
1.2 Parameters
Version 1.0 © Changsha KILOVIEW Electronics CO.,LTD. All rights reserved

N Series Encoder·User Manual
2
Management
Web
Hot shoe
Removable
Battery capacity
3.7V 6800mAh(29.6Wh
)
Power supply/Consumption
DC 12V 1A / 6.5W
Size/ Weight
115*75*35mm / 380g
Working temperature
-20℃~45℃
Version 1.0 © Changsha KILOVIEW Electronics CO.,LTD. All rights reserved

N Series Encoder·User Manual
3
2 Operation guidance
Installation and connection of the device
Connect the power and video input source correctly, power on the device.
Network Connection and Configuration
The simplest way is that the encoder accesses the network by wired mode, and the device automatically
gets an IP address from the network. Without any settings for the device, the encoder can be
automatically found and pulled by other NDI devices in the network.
If you want to set up the network manually, when using wired connection mode, you can use the device
failsafe IP address (192.168.1.168) to log on to the WEB page for setting up; at the same time, for
convenience of operation, you can also connect the device's own WiFi hotspot to configure device
through other WiFi terminal,such as mobile phone or pad. If you use the wireless network push flow, you
must first log on to the device web Page to set up WiFi.
NDI Pulling stream
NDI has the function of automatic discovery. After the encoder is normally connected to the network,
other NDI-supporting playback tools (such as Newtek studio monitor, OBS, vMix) can be used to
automatically discover the encoder and pull its NDI video stream directly.
Other streaming service
If necessary, you can also configure the device to push video streams such as RTMP, UDP, HLS, etc..
Version 1.0 © Changsha KILOVIEW Electronics CO.,LTD. All rights reserved

N Series Encoder·User Manual
4
3 Packing list and interface description
Name
Unit
Quantity
Note
NDI® Encoder
set
1
N1:SDI Input; N2: HDMI Input
WIFI Antenna
pcs
2
DC12V/1A power adaptor
pcs
1
USB-DC cable
pcs
1
USB-RJ45 converter
pcs
1
Hot shoe rack
pcs
1
Hot shoe bracket
pcs
1
Quick start guide
pcs
1
Certificate/Warranty card
pcs
1
3.1 Packing list
Please check the parts and accessories you received are exactly
3.2 Interface description
1、SDI/HDMI input 2、Battery capacity/charge indicator 3、 Power Supply 4、SDI/HDMI indicator
5、Streaming indicator 6、Streaming switch 7、Power indicator 8、Power switch
Version 1.0 © Changsha KILOVIEW Electronics CO.,LTD. All rights reserved
Note:5 and 6 are only for customized functions
N Series Encoder·User Manual
5
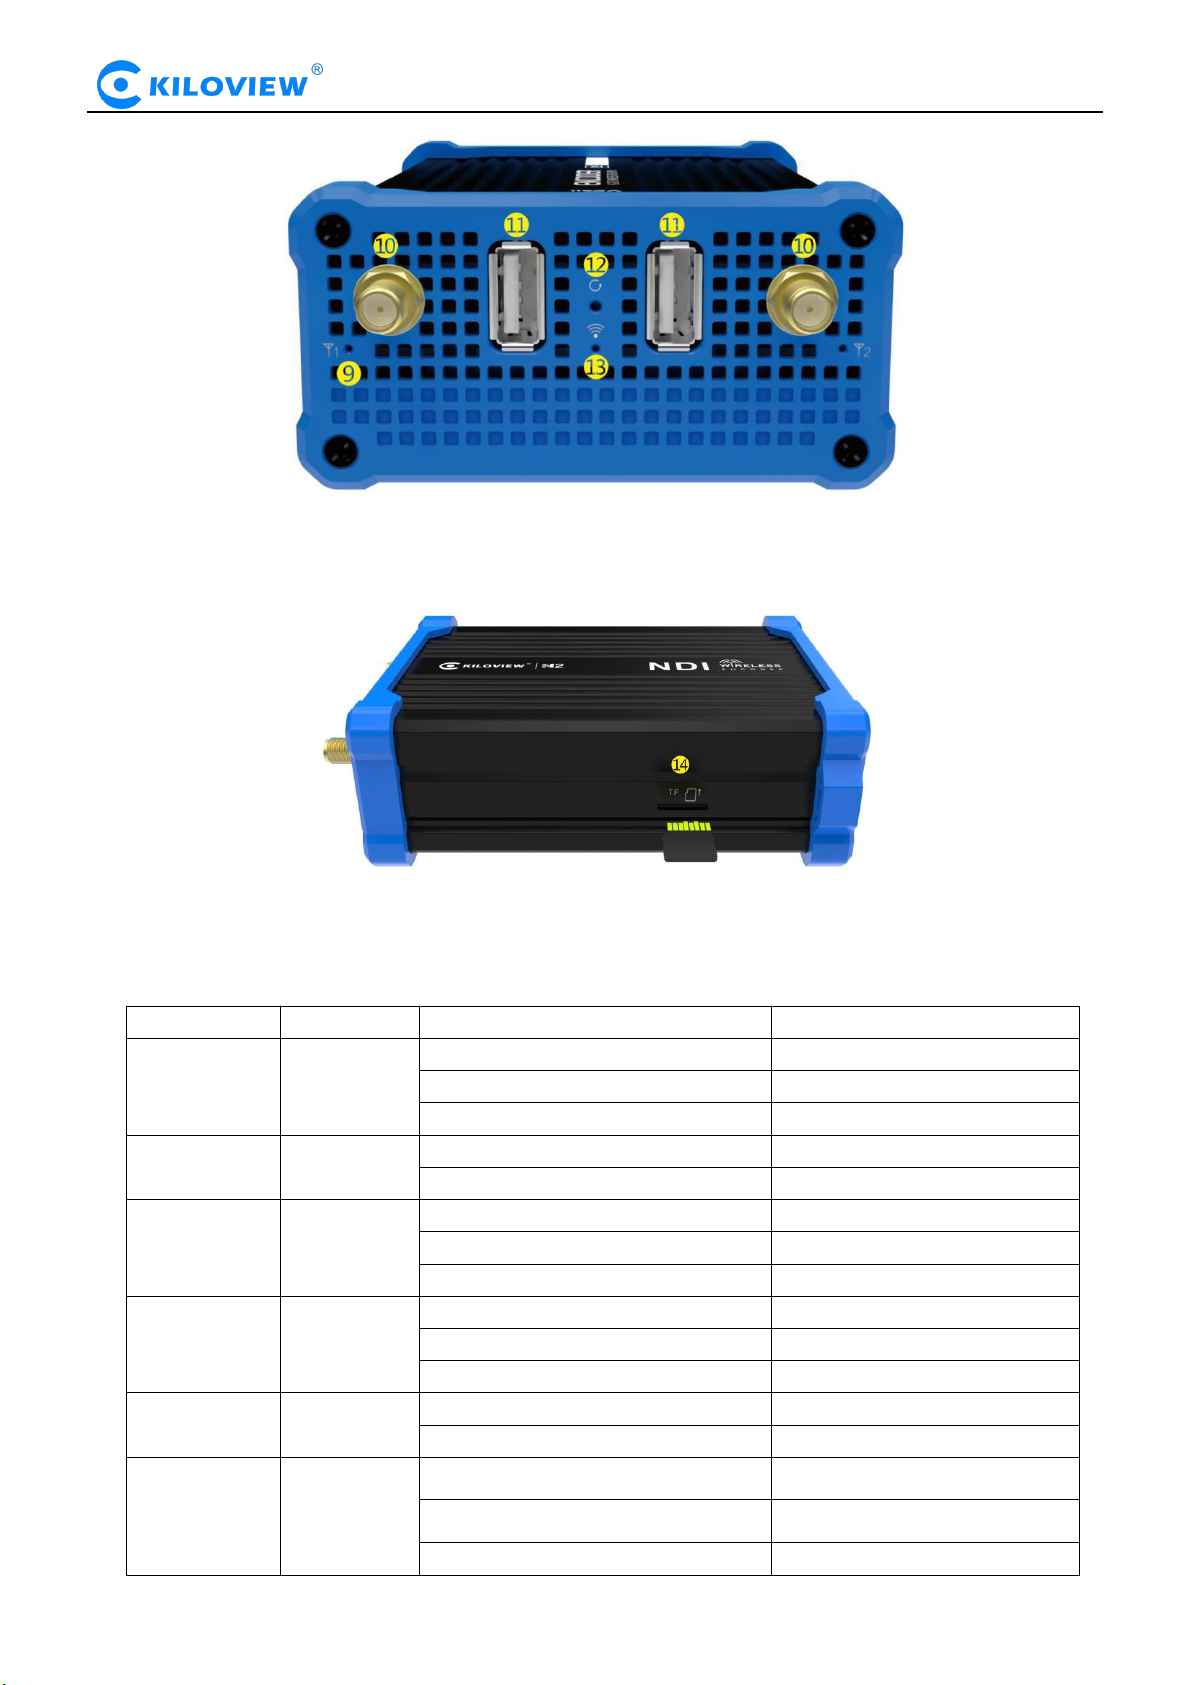
9、Antenna gain light 10、WIFI antenna interface 11、USB port 12、Reset 13、WIFI status Indicator
Name
color
Status
Description
Power light
White
Flashing
Starting
Always on
Working
Off
Power off
SDI/HDMI
status light
White
Always on
SDI Signal Locked
Off
No SDI Signal
Battery status
light
White
Charging status (flashing)
Charging
Always on
Working
Off
Power off
Push flow
status light
White
Always on
Working
Flashing
Connecting
Off
Stop streaming
WIFI status
light
Red
Always on
Working
Off
WIFI disconnect
Antenna gain
light
Red
Always on
Working
Flashing
Connecting
Off
Disconnect
14、TF Card slot
3.3 Signal indicator
Version 1.0 © Changsha KILOVIEW Electronics CO.,LTD. All rights reserved
N Series Encoder·User Manual
6
4 Installation and connection
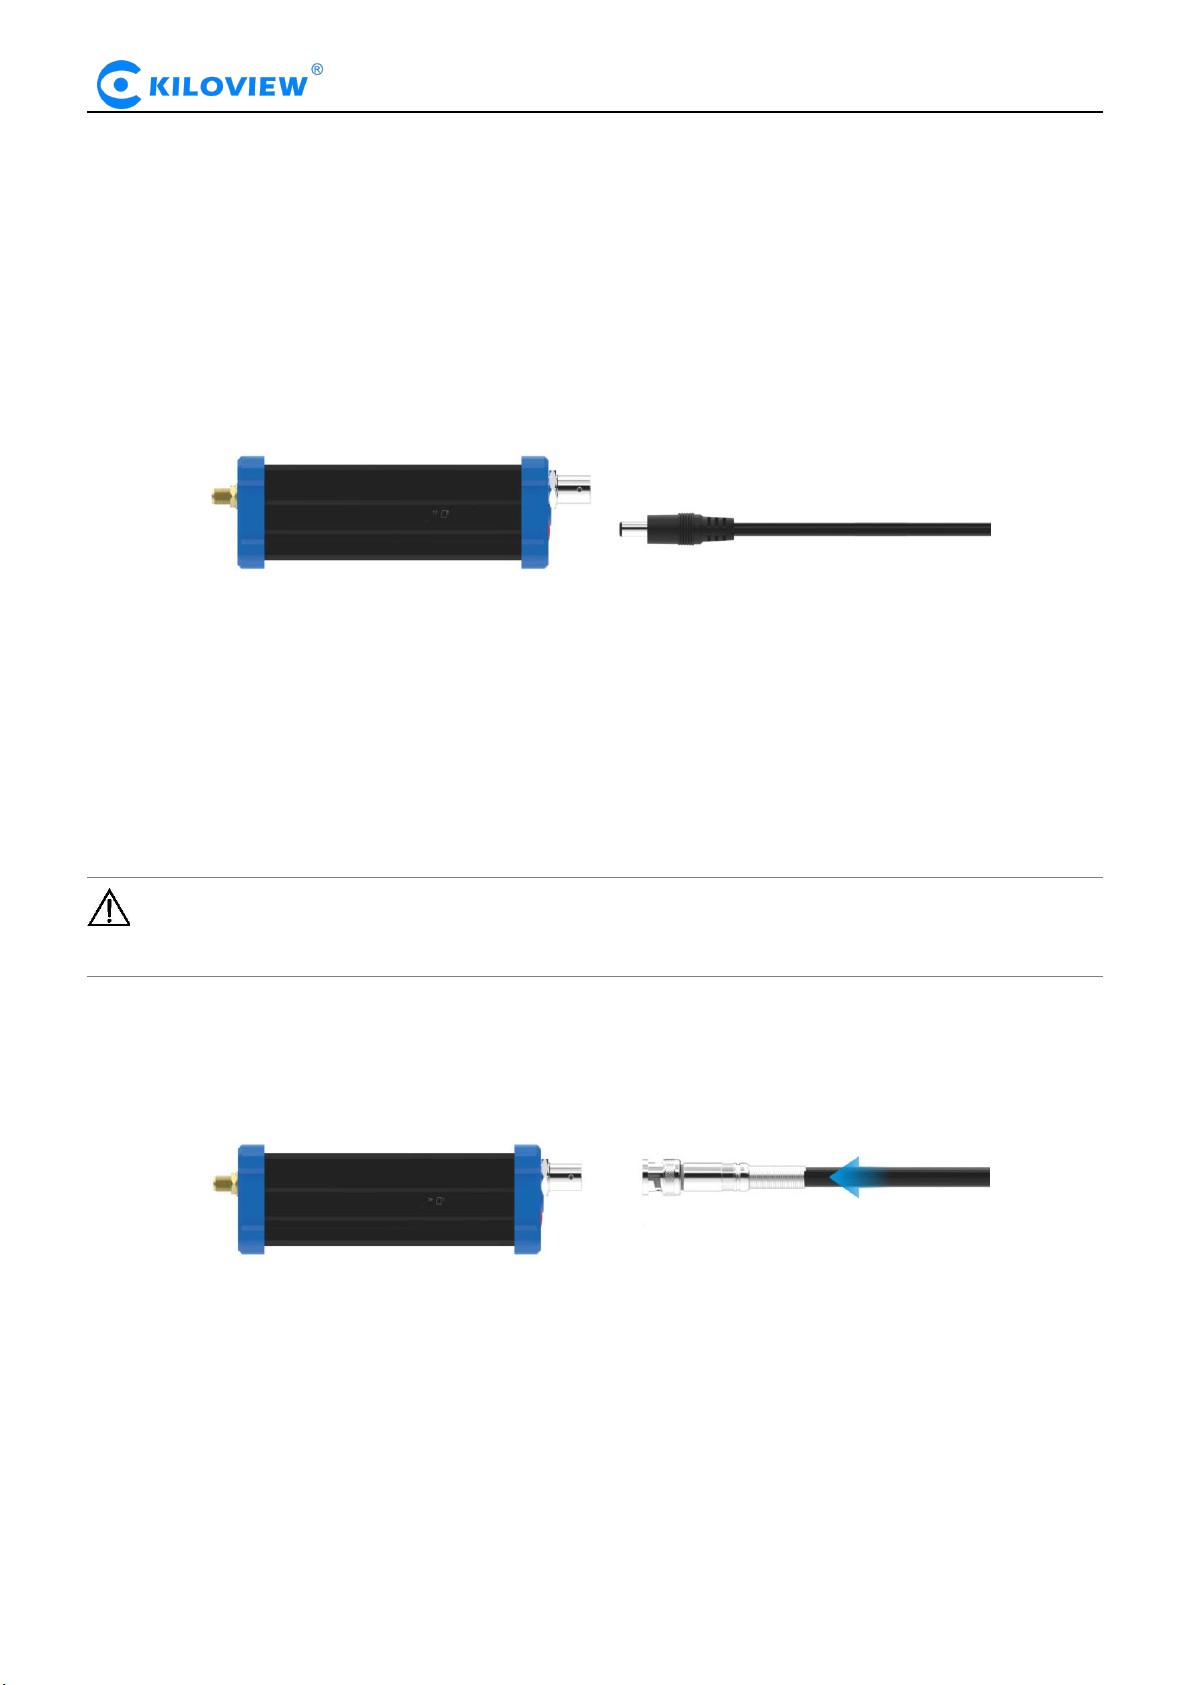
4.1 Power connection
Use the standard power adapter (DC 12V) to connect the device, after power on, the device charges the
built-in battery. Press the power switch on the device for more than 3 seconds. The power light flashes
and the device starts up.
If it is used in the mobile status, it can be powered by the built-in battery directly. Press the power switch
to start working (the built-in battery can last for about 4 hours).
About built-in battery:
1. While the device is powered on, connected with the power adapter, the device is powered by the
adapter. The battery is not charging.
2. While the device is powered off, connected with the power adapter, the battery will be charging.
About fan
1. While the device is powered on, the fan will start working when reaches a certain temperature.
While the device is powered off, the fan is working while charging.
2.
Note: Please use the standard power adapter provided. Using other unqualified power
supplies may damage the device.
4.2 Video signal connection
Connect the SDI/HDMI signal from a source (such as a camera) to the input port of the device through a
cable.
N1: SDI input; N2: HDMI Input
4.3 Network connection
Plug the USB to RJ45 adaptor into the USB port of the device. The network port is connected to the
switch, or it can be directly connected to the computer network.
Version 1.0 © Changsha KILOVIEW Electronics CO.,LTD. All rights reserved

N Series Encoder·User Manual
7
Version 1.0 © Changsha KILOVIEW Electronics CO.,LTD. All rights reserved

N Series Encoder·User Manual
8
5 Login and network configuration
5.1 Login to the device through Ethernet
First connect the USB to RJ45 Ethernet port of the NDI encoder and the computer to the same switch, or
connect the encoder directly to the computer network port. Then configure the encoder and computer to
the same network segment so that the computer can access to the web page of the encoder.
The default management IP address of the encoder is 192.168.1.168(This is the failsafe address of the
device. Generally, do not modify this IP address.). If the IP address of the computer is not in the network
segment of 192.168.1.*, please set the IP address of the computer network port to 192.168.1.*.
Open the WEB browser, directly input the encoder's IP address (default is 192.168.1.168) or the URL
http://192.168.1.168 and press Enter to open the login interface. After opening the page, an authentication
dialog will pop up, please fill in the username and password, the default username is admin, the default
password is admin, and then click "Login".
Note: Due to the browser compatibility issues, it may cause the web page display abnormal, it is
recommended to use Chrome and Firefox.
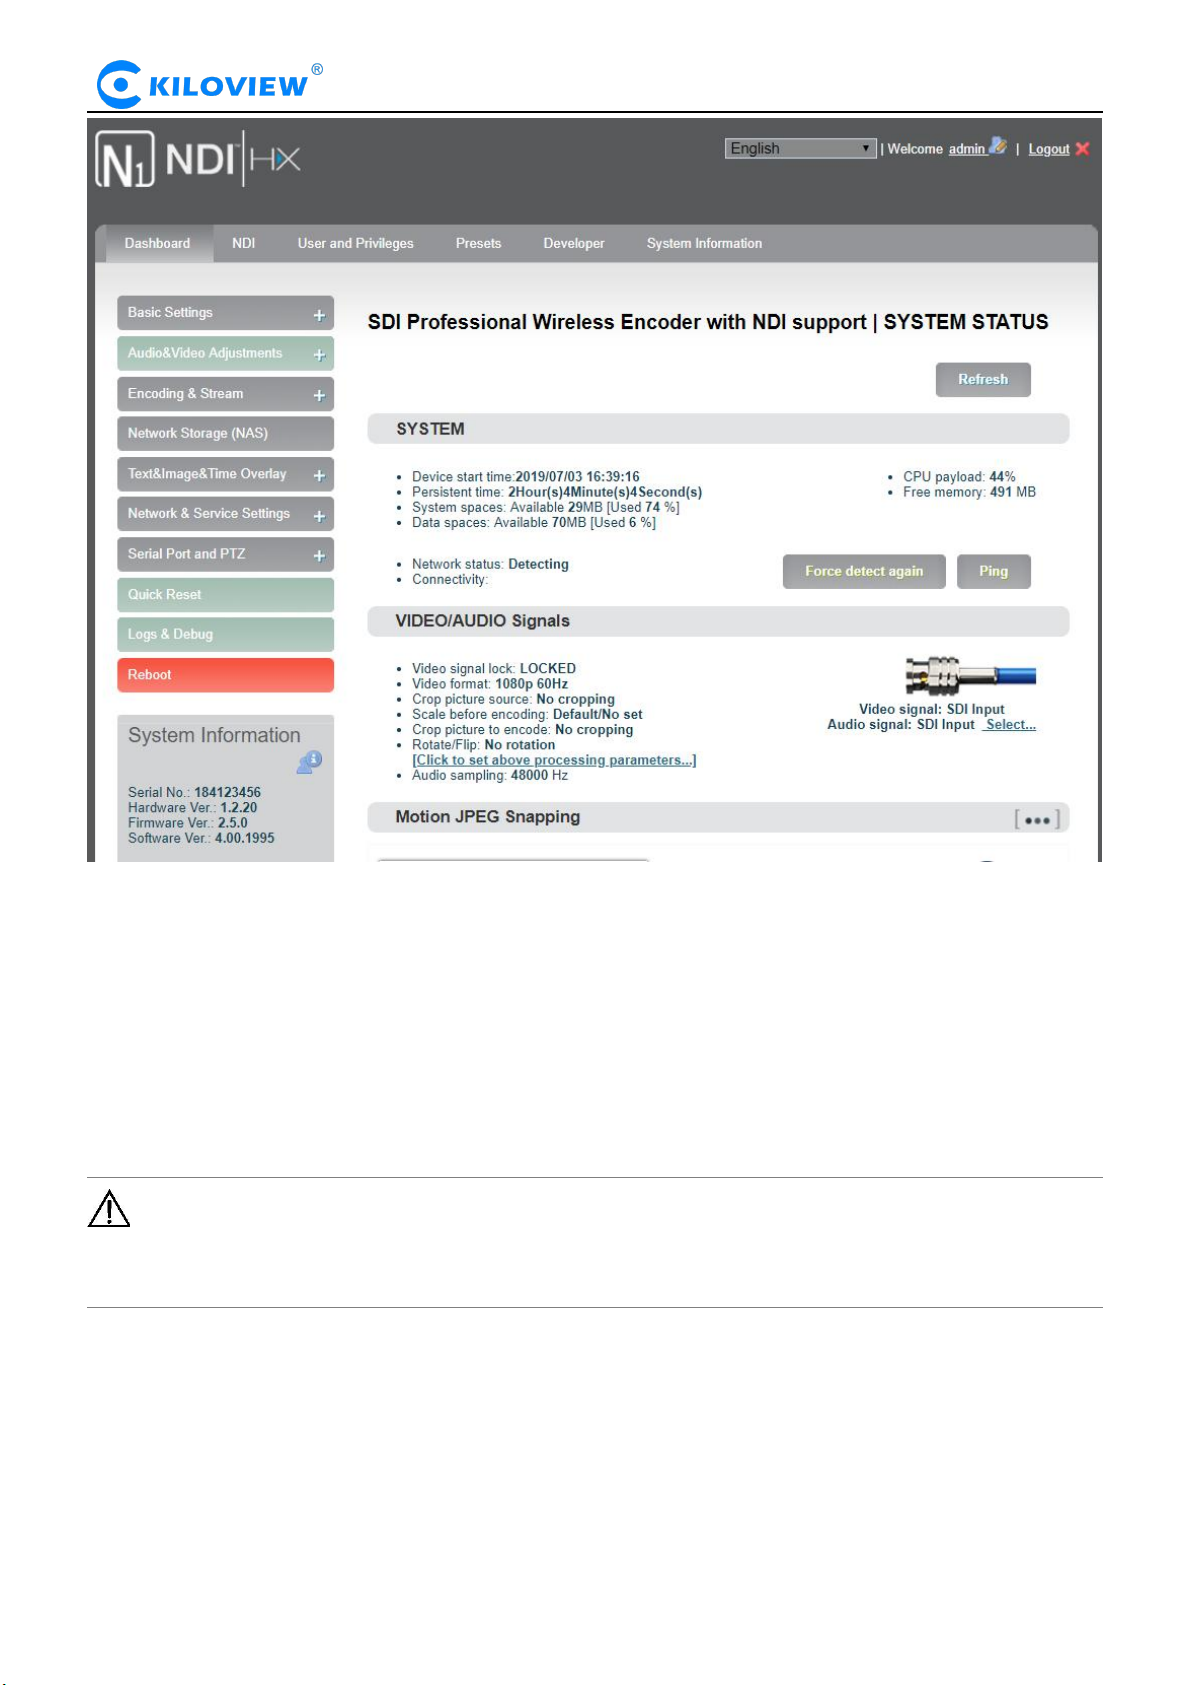
After login, the encoding and function parameters can be set on the encoder management web page. The
page is shown as below:
Version 1.0 © Changsha KILOVIEW Electronics CO.,LTD. All rights reserved
N Series Encoder·User Manual
9
5.2 Log in to the device through the WiFi hotspot
In order to facilitate user management, the user can also connect to the device through WiFi terminal .
The device comes with a WiFi hotspot by default. Hotspot name is “CAST_AP” and the hotspot
password is “12345678”. You can use a WiFi terminal such as a mobile phone or laptop to connect to this
hotspot to log in and manage the encoder device. After connecting to this hotspot, you can log in to the
management interface of the encoder by entering http://192.168.250.254 in the browser of your mobile
phone or laptop.
Note: The WiFi hotspot function is recommended only for starting use and for convenient log in
to the device. In the process of streaming with WiFi, Please do not to use the hotspot function to avoid
affecting the streaming.
5.3 Network configuration
The encoder supports both Ethernet and WIFI. The two networks use separate network cards, which can
be configured with IP addresses. The configured IP addresses can be used for network streaming and
management of encoders. The specific configuration of the two networks is described in detail below.
Version 1.0 © Changsha KILOVIEW Electronics CO.,LTD. All rights reserved
N Series Encoder·User Manual
10
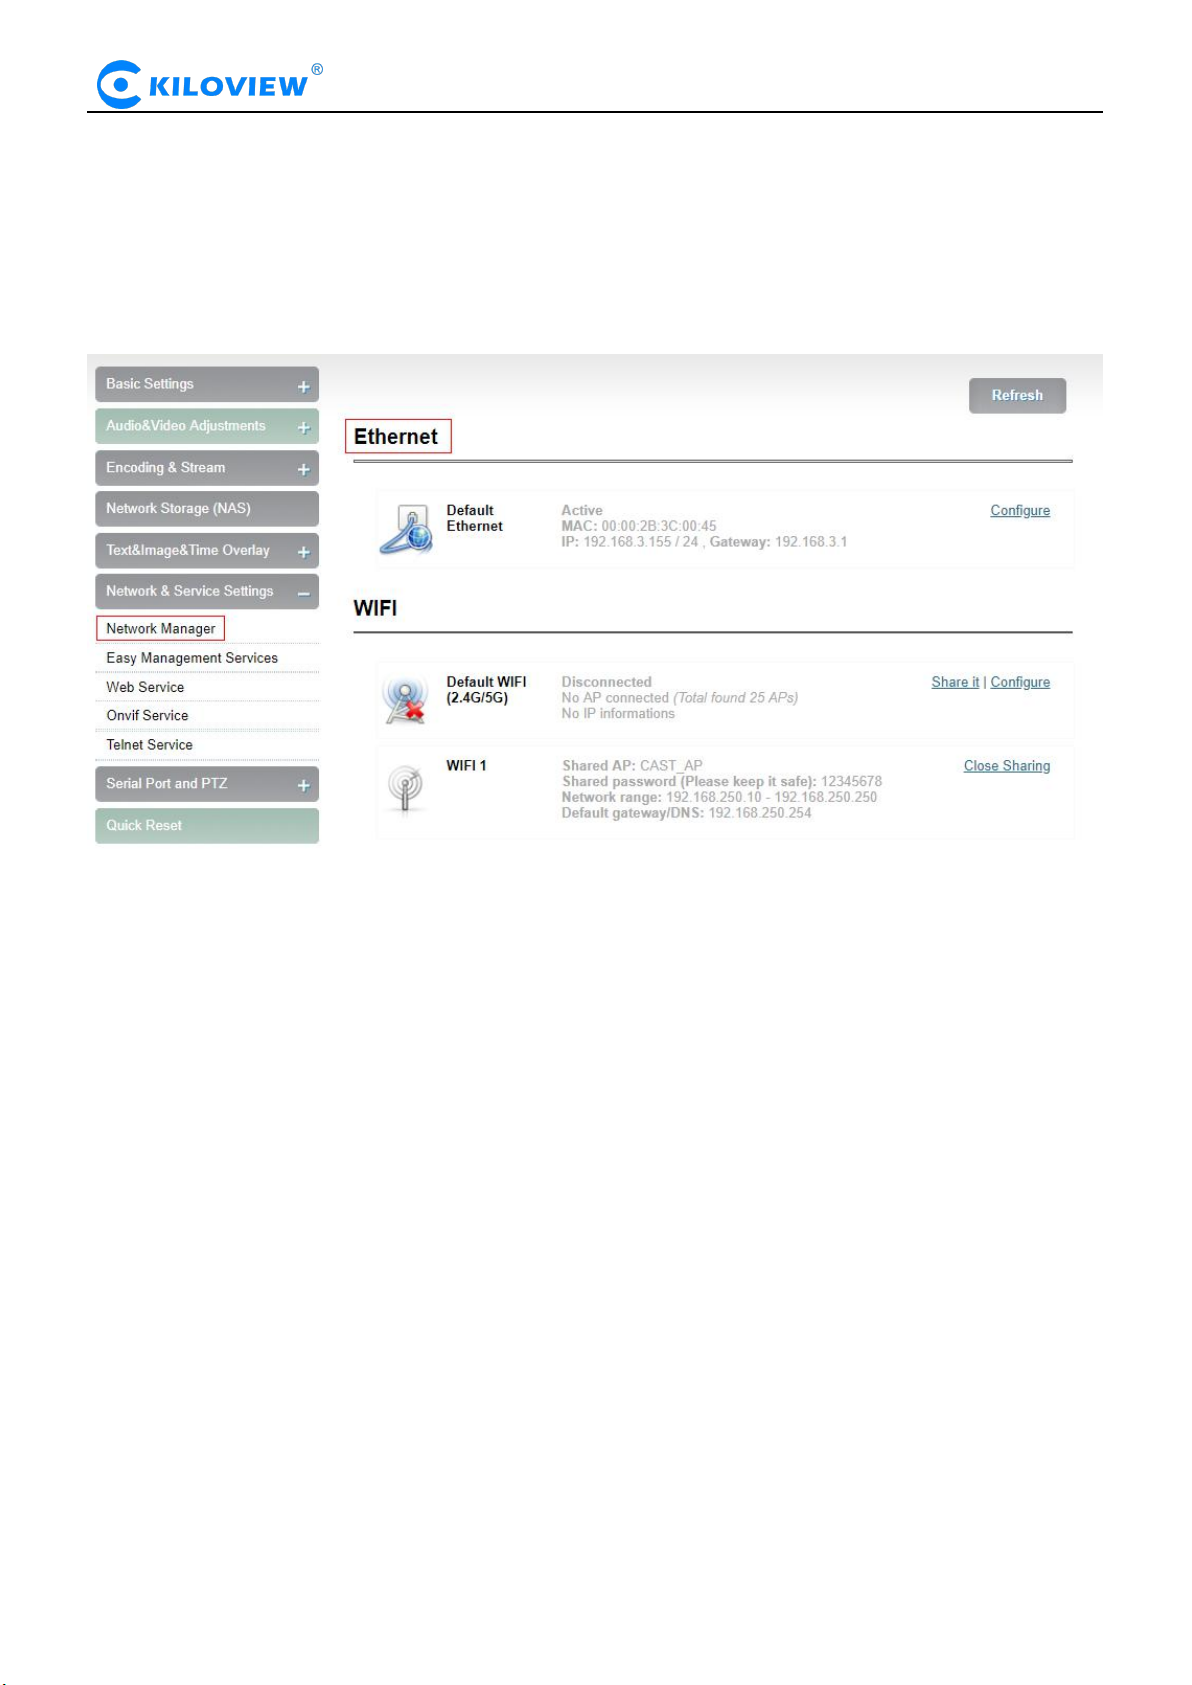
5.3.1 Ethernet
The encoder can provide an Ethernet access through a USB to RJ45 converter. This port can be
configured with an IP address and default setting is DHCP . It will automatically get a complete IP
address, gateway and DNS according to this LAN.
Click "Network & Service Settings", click "Network Manager" to enter the following interface, you can
see the IP address with Ethernet.
In addition to the way of DHCP , the encoder also supports manual IP assignment. To change the IP of
the wired network, click “Configure” button in the Ethernet to enter the interface for configuring the IP.
There are two ways to get the address, one is DHCP, and the other is to manual. To use DHCP to
automatically obtain IP, you must first ensure that the router or switch has enabled the DHCP service.
This method is simple and convenient, but the IP obtained by DHCP changes continuously, and you
cannot directly know what IP address the encoder gets. To use manual, you need to enter a fixed IP to the
encoder, and this IP address is fixed as long as the encoder does not restore the factory settings, this
method is more stable. Therefore, the two methods have their own advantages, and can be selected
accordingly.
Version 1.0 © Changsha KILOVIEW Electronics CO.,LTD. All rights reserved
 Loading...