

Page 1

KillDisk Systems — User's Manual
Page 2

Contents
Legal statement......................................................................................................... 4
KillDisk overview......................................................................................................5
Erasing confidential data...................................................................................................................................... 5
International standards in data removal............................................................................................................... 6
Security hardware................................................................................................................................................. 6
Advanced data recovery systems......................................................................................................................... 6
KillDisk station overview.........................................................................................7
What's in the box?.............................................................................................................................................. 11
Utility software and external tools.....................................................................................................................12
Menu and navigation.......................................................................................................................................... 12
Boot Menu.......................................................................................................................................................... 14
| Contents | 2
Getting started with KillDisk................................................................................ 15
KillDisk installation and distribution................................................................................................................. 15
Navigating through the application.................................................................................................................... 15
Disk Explorer view.............................................................................................................................................17
Disk Bays view.......................................................................................................................................17
Disk Bays tree view............................................................................................................................... 18
Local Disks tree view.............................................................................................................................19
Property views.................................................................................................................................................... 20
Using KillDisk......................................................................................................... 23
Processing options and features......................................................................................................................... 23
Disk erase options...................................................................................................................................23
Disk examination options....................................................................................................................... 23
Disk copy options................................................................................................................................... 24
Error handling......................................................................................................................................... 24
XML reports............................................................................................................................................25
Examine disks physical integrity........................................................................................................................26
Disk erasure........................................................................................................................................................ 27
Processing summary........................................................................................................................................... 29
Reports, Certificates and Labels.........................................................................................................................30
Erase certificate.......................................................................................................................................30
Reports.....................................................................................................................................................31
Erase labels............................................................................................................................................. 32
Preferences...............................................................................................................37
General preferences............................................................................................................................................ 37
Disk erase preferences........................................................................................................................................39
Disk examination preferences............................................................................................................................ 41
Certificate preferences........................................................................................................................................ 42
Error handling preferences................................................................................................................................. 44
Page 3

Erase labels preferences......................................................................................................................................46
KillDisk station preferences............................................................................................................................... 47
Advanced tools........................................................................................................ 48
File Browser........................................................................................................................................................48
Hexadecimal Viewer...........................................................................................................................................49
SMART Monitor.................................................................................................................................................51
Troubleshooting, Backup and System Recovery................................................. 53
Hardware diagnostic file.....................................................................................................................................53
System Recovery - Reset to Factory Settings....................................................................................................53
System Recovery - Reinstallation with a bootable disk.................................................................................... 54
Application log........................................................................................................ 55
Appendix.................................................................................................................. 56
Glossary...............................................................................................................................................................56
Erase methods..................................................................................................................................................... 57
File name tags.....................................................................................................................................................59
| Contents | 3
Page 4

Legal statement
Copyright © 2016, LSOFT TECHNOLOGIES INC. All rights reserved. No part of this documentation may be
reproduced in any form or by any means or used to make any derivative work (such as translation, transformation, or
adaptation) without written permission from LSOFT TECHNOLOGIES INC.
LSOFT TECHNOLOGIES INC. reserves the right to revise this documentation and to make changes in content from
time to time without obligation on the part of LSOFT TECHNOLOGIES INC. to provide notification of such revision
or change.
LSOFT TECHNOLOGIES INC. provides this documentation without warranty of any kind, either implied or
expressed, including, but not limited to, the implied warranties of merchantability and fitness for a particular purpose.
LSOFT may make improvements or changes in the product(s) and/or the program(s) described in this documentation
at any time.
All technical data and computer software is commercial in nature and developed solely at private expense. As
the User, or Installer/Administrator of this software, you agree not to remove or deface any portion of any legend
provided on any licensed program or documentation contained in, or delivered to you in conjunction with, this User
Guide.
| Legal statement | 4
Active@ KillDisk, the Active@ KillDisk logo, KillDisk, KillDisk for Industrial Systems, KillDisk Desktop and
Erasers Software are trademarks of LSOFT TECHNOLOGIES INC.
LSOFT.NET logo is a trademark of LSOFT TECHNOLOGIES INC.
Other brand and product names may be registered trademarks or trademarks of their respective holders.
Page 5

KillDisk overview
KillDisk is a powerful software that delivers the following main features:
• Erase data on the entire hard disk drive surface, supports parallel erasing up to 5 disks;
• Destroy data permanently with a choice of dozens of international disk sanitizing standards;
• Sanitize external disks (USB drives, external HDD/SSD) connected to USB 2.0, USB 3.0 and eSATA ports;
• Examine disk integrity and overall stability, disk verification and detect bad sectors;
• Auto-erase mode sanitizes disks and prints certificates without of any user interaction;
• Hot-swap operations are fully supported, erase could be auto-initiated upon HDD plug-in;
• Complete system control from LCD panel with push button navigation;
• Additional peripheral devices and monitor could be also connected for a GUI interface and convenient system
control;
• Visual indication of current actions on LCD panel and LED lights for disk processes;
• Browse file systems on disk volumes and inspect particular sectors Hex Viewer on a low level;
• Issue customizable certificates and detailed reports for disk erase and examination;
• Print different types of labels to be attached to hard disks after erase completion;
• Provides enhanced information about disks and their attributes including S.M.A.R.T. monitoring;
• Network accessible - Reports and Certificates may be stored on a network share, network printer compatible and
access to built-in internet browser.
• and more...
| KillDisk overview | 5
KillDisk maintains the highest standards in disk erasure, and with that, provides extensive documentation options for
its' operations through Reports, printable Erase certificate on page 30 and Erase labels on page 32.
KillDisk Desktop
KillDisk Desktop is the complete hardware disk erase solution - a workstation that is ready and configured to erase
drives right out of the box. Without the need for additional peripherals, KillDisk Desktop come configured with
everything you need to examine and erase HDD's, SSD's, USB's and any other attached memory storage devices,
with printer and internet support for documentation and reporting. Designed specifically to be ready out of the box,
KillDisk Desktop is the best KillDisk hardware solution on the market.
Erasing confidential data
Modern methods of data encryption are deterring unwanted network attackers from extracting sensitive data from
stored database files. Attackers who want to retrieve confidential data are becoming more resourceful by looking into
places where data might be stored temporarily. A hard drive on a local network node, for example, can be a prime
target for such a search. One avenue of attack is the recovery of data from residual data on a discarded hard disk
drive. When deleting confidential data from hard drives, removable floppies or USB devices, it is important to extract
all traces of the data so that recovery is not possible.
Most official guidelines around disposing of confidential magnetic data do not take into account the depth of today’s
recording densities, nor the methods used by the operating system when removing data. For example, the Windows
DELETE command merely changes the file name so that the operating system will not look for the file. The situation
with NTFS is similar.
Removal of confidential personal information or company trade secrets in the past might have used the FORMAT
command or the DOS FDISK command. Ordinarily, using these procedures give users a sense of confidence that the
data has been completely removed.
When using the FORMAT command, Windows displays a message like this:
Important:
Page 6

Formatting a disk removes all information from the disk.
The FORMAT utility actually creates new FAT and ROOT tables, leaving all previous data on the disk untouched.
Moreover, an image of the replaced FAT and ROOT tables are stored, so that the UNFORMAT command can be
used to restore them.
As well, FDISK merely cleans the Partition Table (located in the drive's first sector) and does not touch anything else.
International standards in data removal
KillDisk for Industrial Systems conforms to four international standards for clearing and sanitizing data. You can be
sure that once you erase a disk with KillDisk for Windows, sensitive information is destroyed forever.
KillDisk for Industrial Systems is a quality security application that destroys data permanently from any computer
that can be started using a bootable CD or DVD-ROM. Access to the drive's data is made on the physical level via
the BIOS (Basic Input-Output Subsystem), bypassing the operating system’s logical drive structure organization.
Regardless of the operating system, file systems or type of machine, this utility can destroy all data on all storage
devices. It does not matter which operating systems or file systems are located on the machine
Security hardware
| KillDisk overview | 6
KillDisk authorization provided by external or internal removable USB key with license and user information. This
USB key must be inserted all the time to make KillDisk software operable.
Advanced data recovery systems
Advances in data recovery have been made such that data can be reclaimed in many cases from hard drives that have
been wiped and disassembled. Security agencies use advanced applications to find cybercrime related evidence. Also
there are established industrial spy agencies adopting sophisticated channel coding techniques such as PRML (Partial
Response Maximum Likelihood), a technique used to reconstruct the data on magnetic disks. Other methods include
the use of magnetic force microscopy and recovery of data based on patterns in erase bands.
Although there are very sophisticated data recovery systems available at a high price, data can easily be restored with
the help of an off-the-shelf data recovery utility like Active@ File Recovery, making your erased confidential data
quite accessible.
Using KillDisk for Industrial Systems, our powerful and compact utility, all data on your hard drive or removable
device can be destroyed without the possibility of future recovery. After using KillDisk, disposal, recycling, selling or
donating your storage device can be done with peace of mind.
Page 7

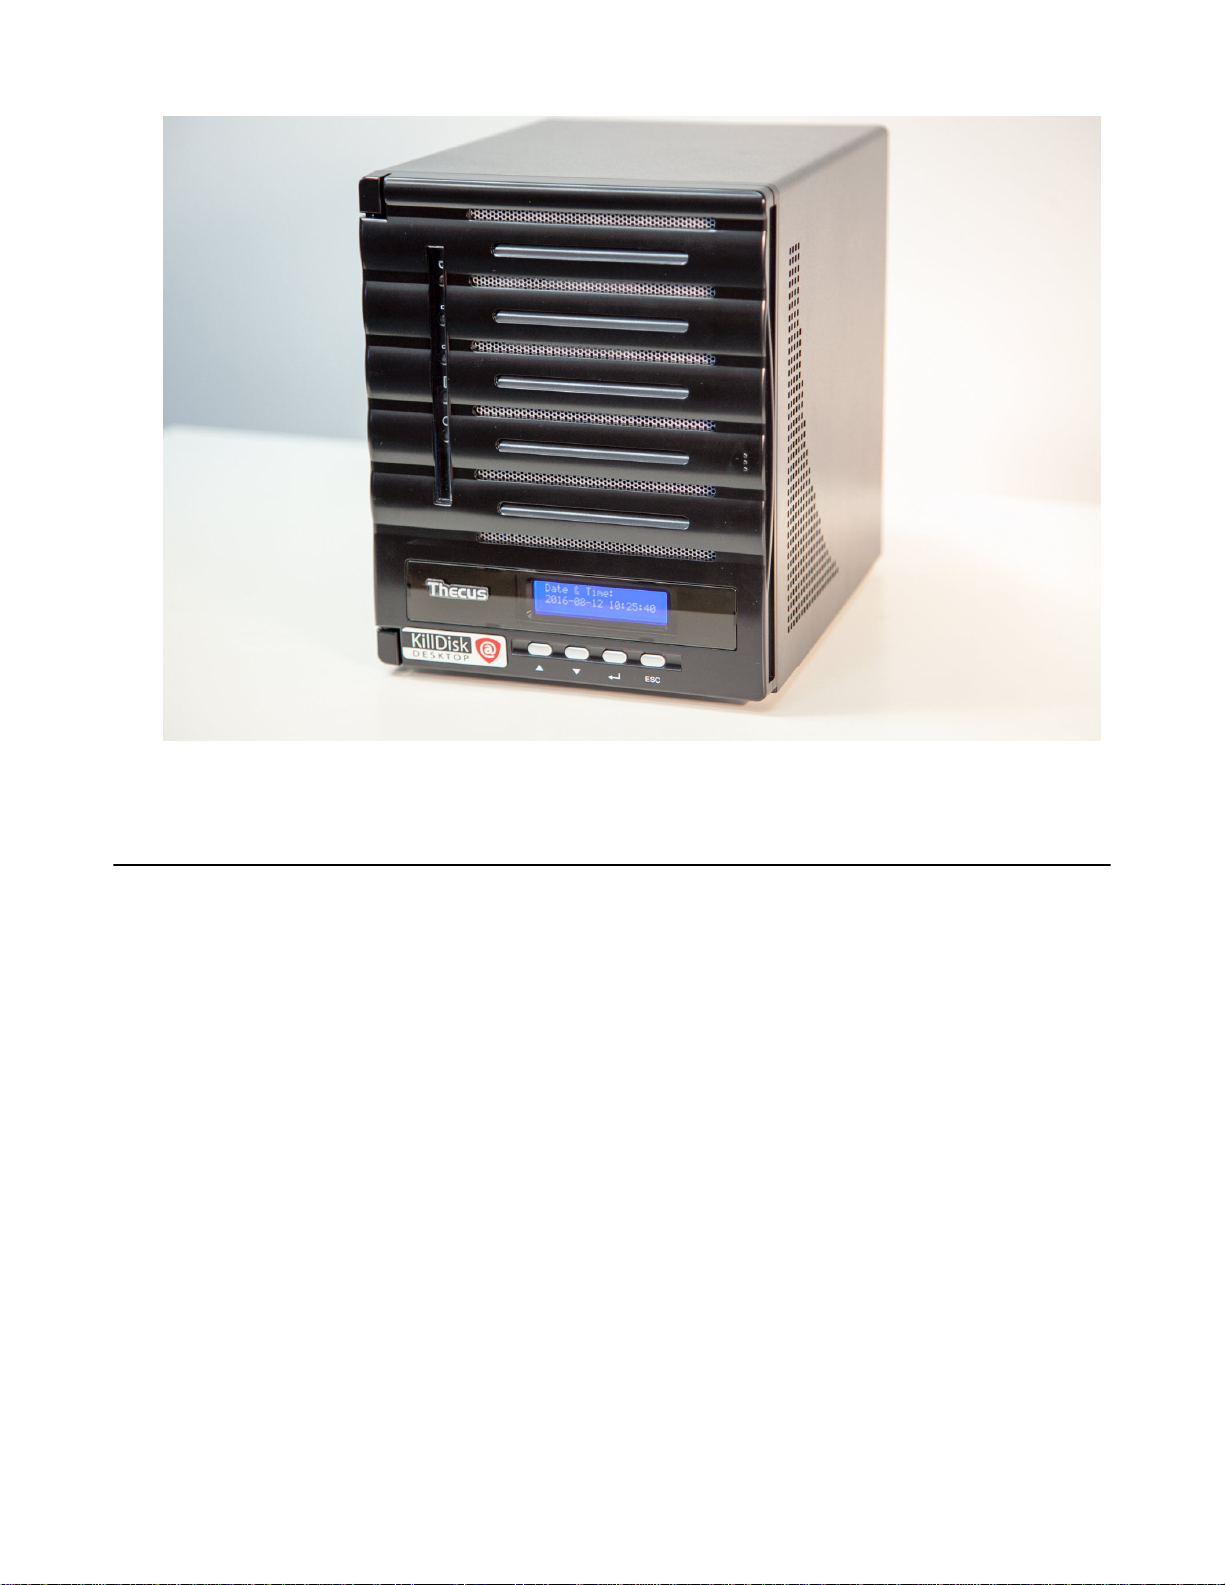
KillDisk station overview
| KillDisk station overview | 7
Figure 1: Thecus chassis for five disk bays, open
Thecus chassis components (front)
5 x HDD bays
The chassis has 5 disk slots with removable bays for the system to perform actions on up to 5 hard drives at
a time. The bays support 2.5" and 3.5" SATA disks for use with standard HDD's and SSD's. They are also
physically lockable using the keys included in the system.
Disk status LEDs
Each disk bay contains two status LEDs to monitor the bay status and activity.
USB 3.0 port
Connect USB devices to KillDisk Desktop with high-speed USB 3.0 support.
5 x LED light indicators
5 LED indicators are used to give feedback to the user on KillDisk oeprations
Power button
Powers on the Thecus hardware unit.
Reset button
Resets the hardware unit.
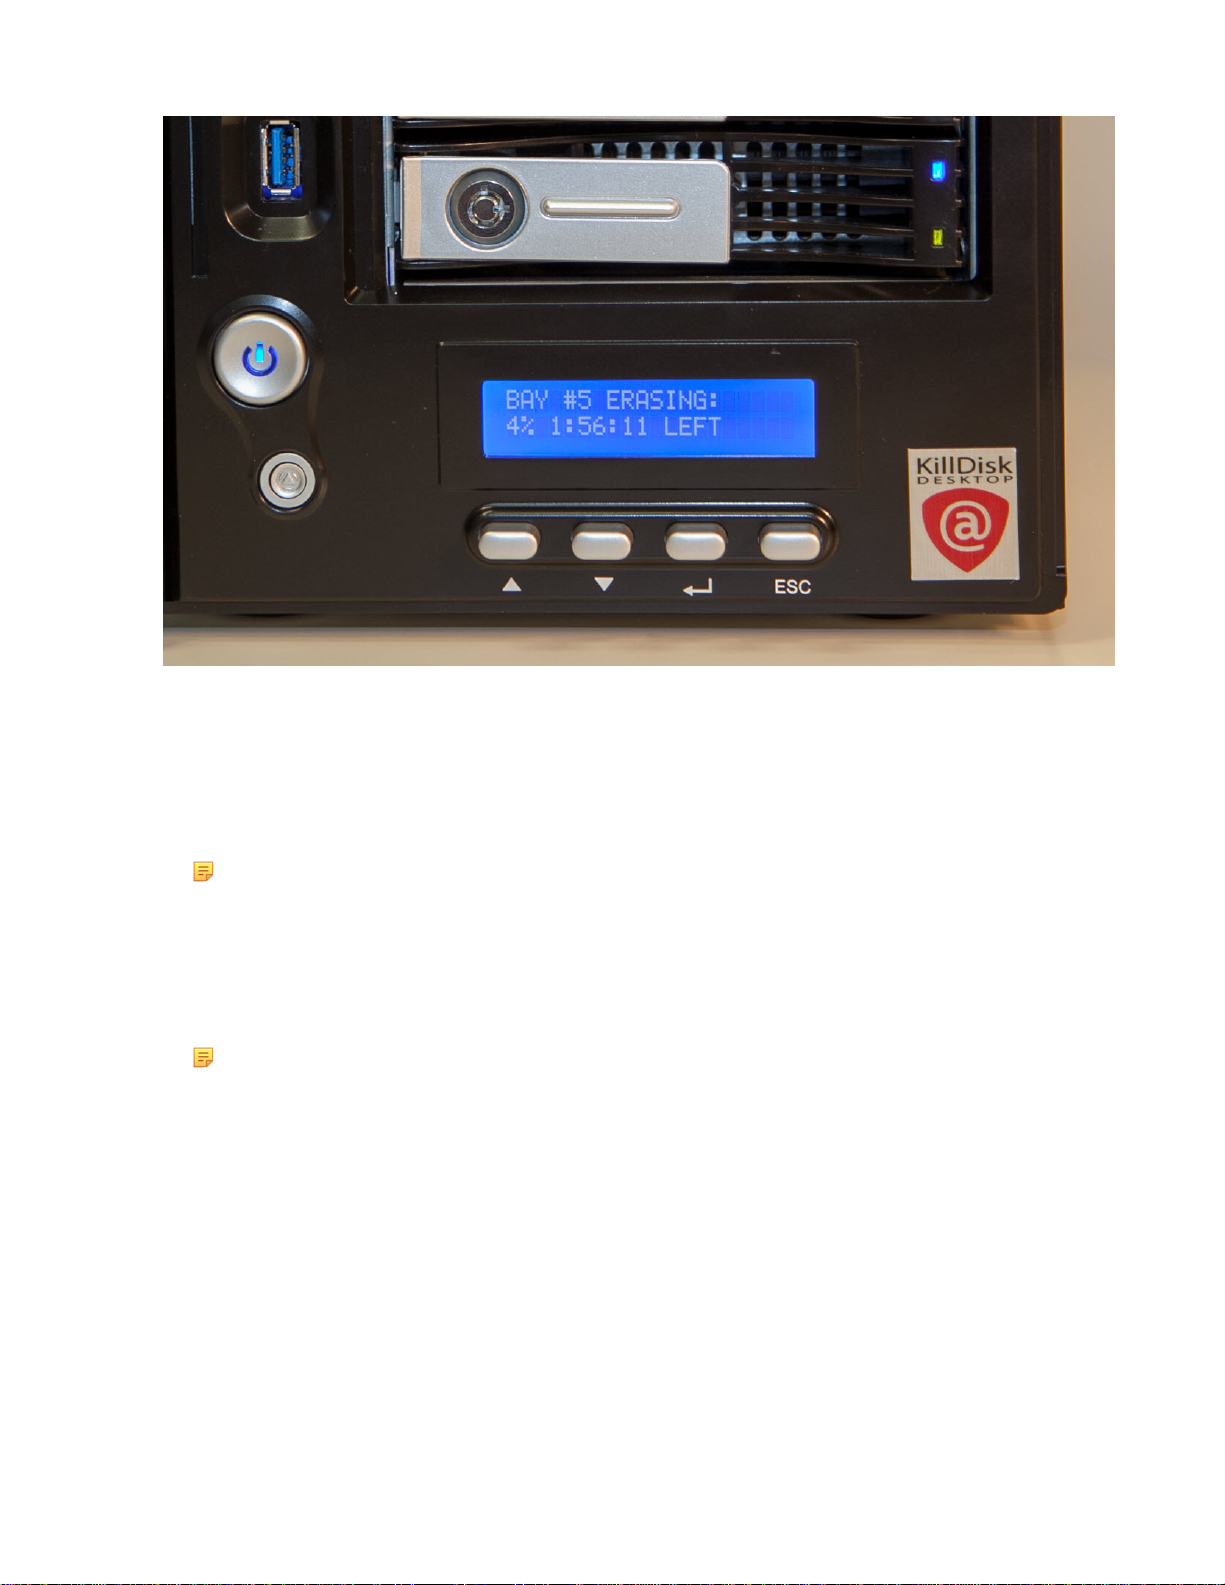
LCD display
Describes current process, allows user to navigate and access KillDisk menus, initiate processes and see progress.
Page 8

Navigation buttons
Buttons allow user to navigate menus on the LCD display, built into the hardware.
| KillDisk station overview | 8
Figure 2: Reverse side of Thecus chassis
Thecus chassis components (back)
Power switch
Master power switch for the unit.
Power cable connector
Connector for a NEMA 5-15-P, 3 pronged power cable.
Audio and microphone connectors
Standard connectors. Not necessary for any KillDisk operations.
1 x eSATA port
Standard, high performance eSATA port for connecting drives to the KillDisk Desktop hardware.
Page 9

| KillDisk station overview | 9
4 x USB 2.0 ports
Standard USB 2.0 ports. May be used for connecting storage devices or peripherals (i.e. mouse and keyboard) to
the system.
1x HDMI port
Standard HDMI port. May be used to connect an external monitor to the KillDisk Desktop system.
1 x VGA port
Standard VGA port. May be used to connect an external monitor to the KillDisk Desktop system.
2 x Ethernet port
Ethernet ports for networking with the system.
Thecus Lights and Indicators
The system has two main areas with lights and indicators: the chassis and the individual hard drive bays. This section
will outline what these indicators represent.
Figure 3: Thecus LED indicators
Chassis Indicators
The chassis has 5 LED indicators along the left side of the hardware unit, each indicating toward different states of the
system.
Table 1: Chassis light indicators
Item Description
1 - Activity Indicator Flashes during any KillDisk active process, such as
Erase, Examine, loading, etc.
2 - LAN 1 Indicator Lights up when the LAN 1 port is used.
3 - LAN 2 Indicator Lights up when the LAN 2 port is used.
4 - Not used -
5 - Critical Error Indicator Lights up in red when a critical error occurs in the
system.
Page 10

| KillDisk station overview | 10
Disk Bay Indicators
Disk bays have their own LEDs that are utilized to give the user information on the current status of the individual
bay (or disk using the bay).
Table 2: Chassis light indicators
Item Description
6 - Active Disk Indicator
7 - Disk Status Indicator
Green, solid when disk bay is being used.
Green, flashing - Read/write activity
Red, solid - erase finished
Red, flashing - read/write error
Figure 4: Thecus chassis for five disk bays, disk swapping
Page 11
| KillDisk station overview | 11
Figure 5: Thecus chassis for five disk bays, front panel controls and display
What's in the box?
Included in the box:
KillDisk Desktop Hardware unit
Thecus chassis hardware, completely configured as a KillDisk Desktop system.
Power Cable
Standard grounded 3-plug power cable. Standard 2-pronged grounded cable for European customers.
KillDisk Desktop CD-ROM
Contains Quick-setup guide, documentation and clean installation image for KillDisk Desktop.
Ethernet cable
Standard ethernet cable.
Disk bay keys
Two sets of two keys to lock disk bays.
Additional screws
Screws for mounting hard drives in the disk bays.
Product Manual
Killdisk Desktop instructions and how-to guide.
Acronis True Image Backup CD-ROM
Create image backups of your latest KillDisk Desktop configuration using Acronis True Image. Can be used to
revert configuration changes or system recovery.
Page 12

Utility software and external tools
KillDisk for Desktop provides several essential tools for unit maintenance and support:
File Manager
File manager for browsing local files and devices;
Terminal
Simplified terminal given ability to access additional features of Linux core;
Text Editor
Plain text editor
Web Browser
Web browser - compact software for retrieving information resources from world wide web. Preliminary network
configuration is required;
These tools available from main Tools menu.
Menu and navigation
| KillDisk station overview | 12
Most KillDisk Desktop operations can be performed straight out of the box, with no additional peripherals using
the interface included in the system. This interface consists of four buttons and an LCD display. This section will
introduce you to KillDisk's built-in interface.
Note: Only basic operations are initiated through KillDisk Desktop's LCD interface. For more advanced
settings and configuration, connect a set of computer peripherals to the device to access the Linux GUI.
Basic Navigation
Press Up and Down buttons on front panel to change active menu item and use ENTER button to select or open submenu.
Press ESC button to cancel selection or to step up in menu hierarchy.
Page 13
| KillDisk station overview | 13
Figure 6: Thecus chassis for five disk bays, front panel controls and display
Main Menu
Erase
From this select all or specific idle disks to initiate erase process. Use Up and Down buttons to make a selection
and press ENTER button to start.
Note:
Use Erase Method menu to select erase method or use software Disk erase preferences on page 39
and Chassis preferences pages to select additional erase methods and attributes.
Examine
From this select all or specific idle disks to initiate examination process. Use Up and Down buttons to make a
selection and press ENTER button to start.
Note:
Use the software's Disk examination preferences on page 41 dialog to select default examination
algorithm and other options.
Erase Method
From front panel menu you can select only limited but most used number of erase methods. For advanced erase
methods and other options please use: Disk erase preferences on page 39 page in application preferences
dialog.
Automatic Mode
Automatic mode implies that disk erasure or disk examination (or both if set) will start automatically as soon as
disk is inserted in one of the bays.
Print Label
Select whether or not to print erase labels when erasing process is finished. For exact options use: Erase labels
preferences on page 46.
Page 14

| KillDisk station overview | 14
Print Certificate
Select whether or not to print erase certificates when erasing process is finished. For exact options
use:Certificate preferences on page 42.
Note:
To use certificate or label printing features you have to have local printer attached or network printer
available and configured.
Boot Menu
Upon powering on the system, KillDisk Desktop loads an initial boot menu, visible in the GUI. This menu gives you
several boot options to choose from:
Load KillDisk Desktop
This option simply boots into the configured KillDisk desktop environment. This option is automatically selected and
will commence upon pressing the Enter key, or automatically after 5 seconds if no other option is selected.
Reset to factory settings
Resets KillDisk Desktop to its' original settings. This formats all user data, logs and configurations.
Command line
Allows you to specify command-line option for booting up the KillDisk Desktop system.
Page 15

| Getting started with KillDisk | 15
Getting started with KillDisk
This section outlines the essential features of KillDisk and explains basic functionality to get you started, including:
•
Installation
•
Launching the application
•
Navigating the application
•
Disk Bay Layouts
•
Disk Views
•
Property Views
•
Hardware diagnostics
KillDisk installation and distribution
KillDisk Desktop distribution overview
Included in the KillDisk Desktop system are two distributions of the system: the hardware and the software
distribution. Though the hardware distribution contains everything required for the system to be fully functional, the
software distribution is also included as a recovery environment for quick and easy disaster recovery of the system.
Hardware distribution
KillDisk Desktop is distributed as a fully-configured hardware solution using the Thecus chassis - a robust multi-disk
platform for disk erasure. Simply connect the system to power and the unit is ready to perform all Killdisk functions
without any additional setup required.
Attention:
Number of disk bay slots may very depending on exact Thecus model and configuration.
Software distribution
The distribution package contains a CD-ROM with a complete bootable image containing KillDisk that can be used
to restore your installation to factory (default) settings. This may be used for crash recovery, system restoration or last
resort option to repair the KillDisk Desktop system. Though you will not need this image when you initially receive
the system, store it in a safe place for future use.
KillDisk Industrial distribution overview
KillDisk Industrial is distributed as a software solution. Simply install the application into your data erasure
workstation environment and configure it to your system.
Navigating through the application
Once the KillDisk application is launched, you will be presented with the main KillDisk application dashboard. From
here you can use any of KillDisks' tools with your system. This section will outline the main components of the
application. The full functionality and features of these components are discussed in their corresponding sections later
in this documentation:
Page 16
| Getting started with KillDisk | 16
Figure 7: KillDisk application dashboard
File menu bar
The file menu bar contains can be manipulated to perform nearly any operation in KillDisk, such as accessing
elements of the program such a settings and help, changing views and what is visible in the dashboard, opening
tools, and navigating between KillDisk's windows.
Tabbed Windows
Here, you may move between KillDisk tabbed windows, the main windows being Disk Explorer, Application Log
etc..
Command Toolbar
The command toolbar is a dynamic toolbar that allows the user to perform Tabbed Window-specific actions,
depending on what window the user is in and what element is selected.
View Selection
Only available in the Disk Explorer View, this View Selection allows you to manipulate how the bays are
displayed in the Windowed view, manipulating the type of graphics used to show the bays and the cardinality of
the bays in the Disk Bay View.
Windowed view
Contains the window that is currently open.
Output window
Contains the log of operations KillDisk has performed.
Batch control window
The Batch control window is an easily accessible interface to create, delete and manipulate disk batches.
Advanced tool tabs
These tabs allow for navigation between the different advanced tool windows.
Advanced tool window
This window shows the data for the Advanced tool selected. The window can be moved, popped out and re-sized.
Page 17
| Getting started with KillDisk | 17
To browse through each of these views, click on each tab in turn. You may also open a view from the View menu.
To close the current view at any time, press CTRL+F4. To open any closed view, select it from the View menu.
The status bar, at the bottom of the workspace shows the current status of the application or status of the activity in
progress.
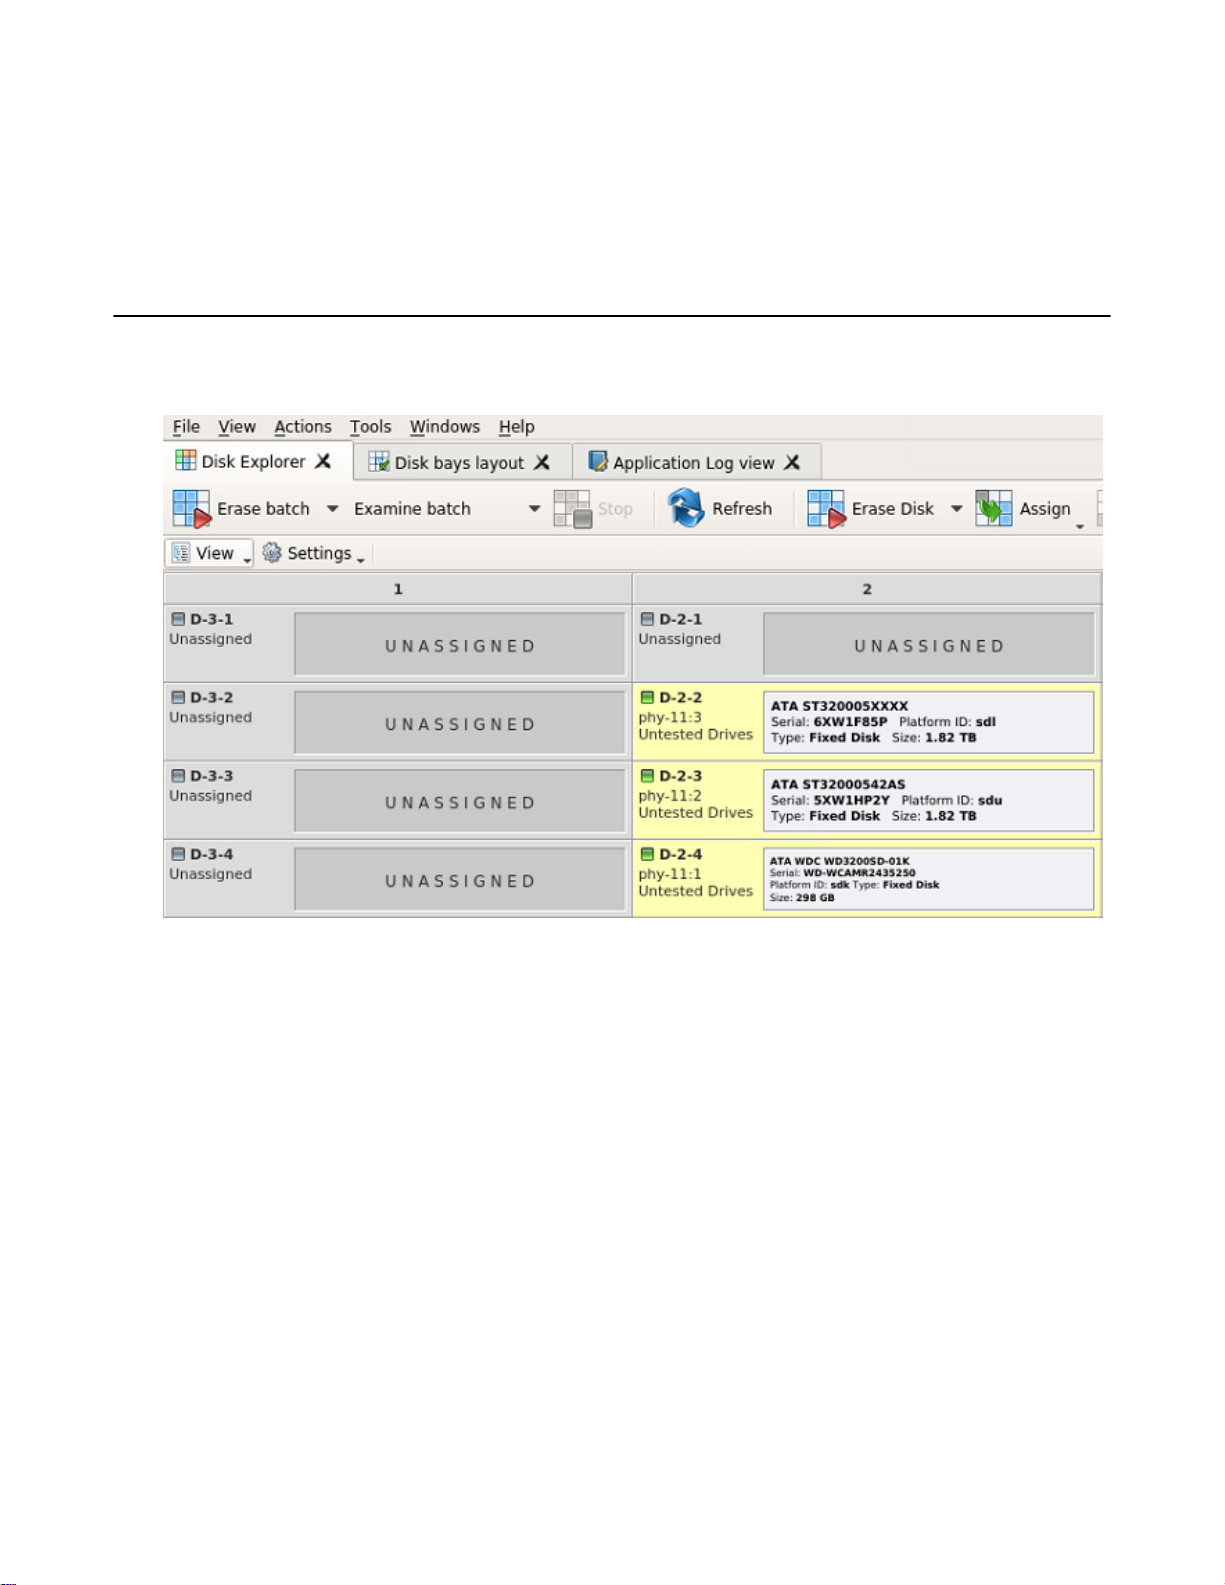
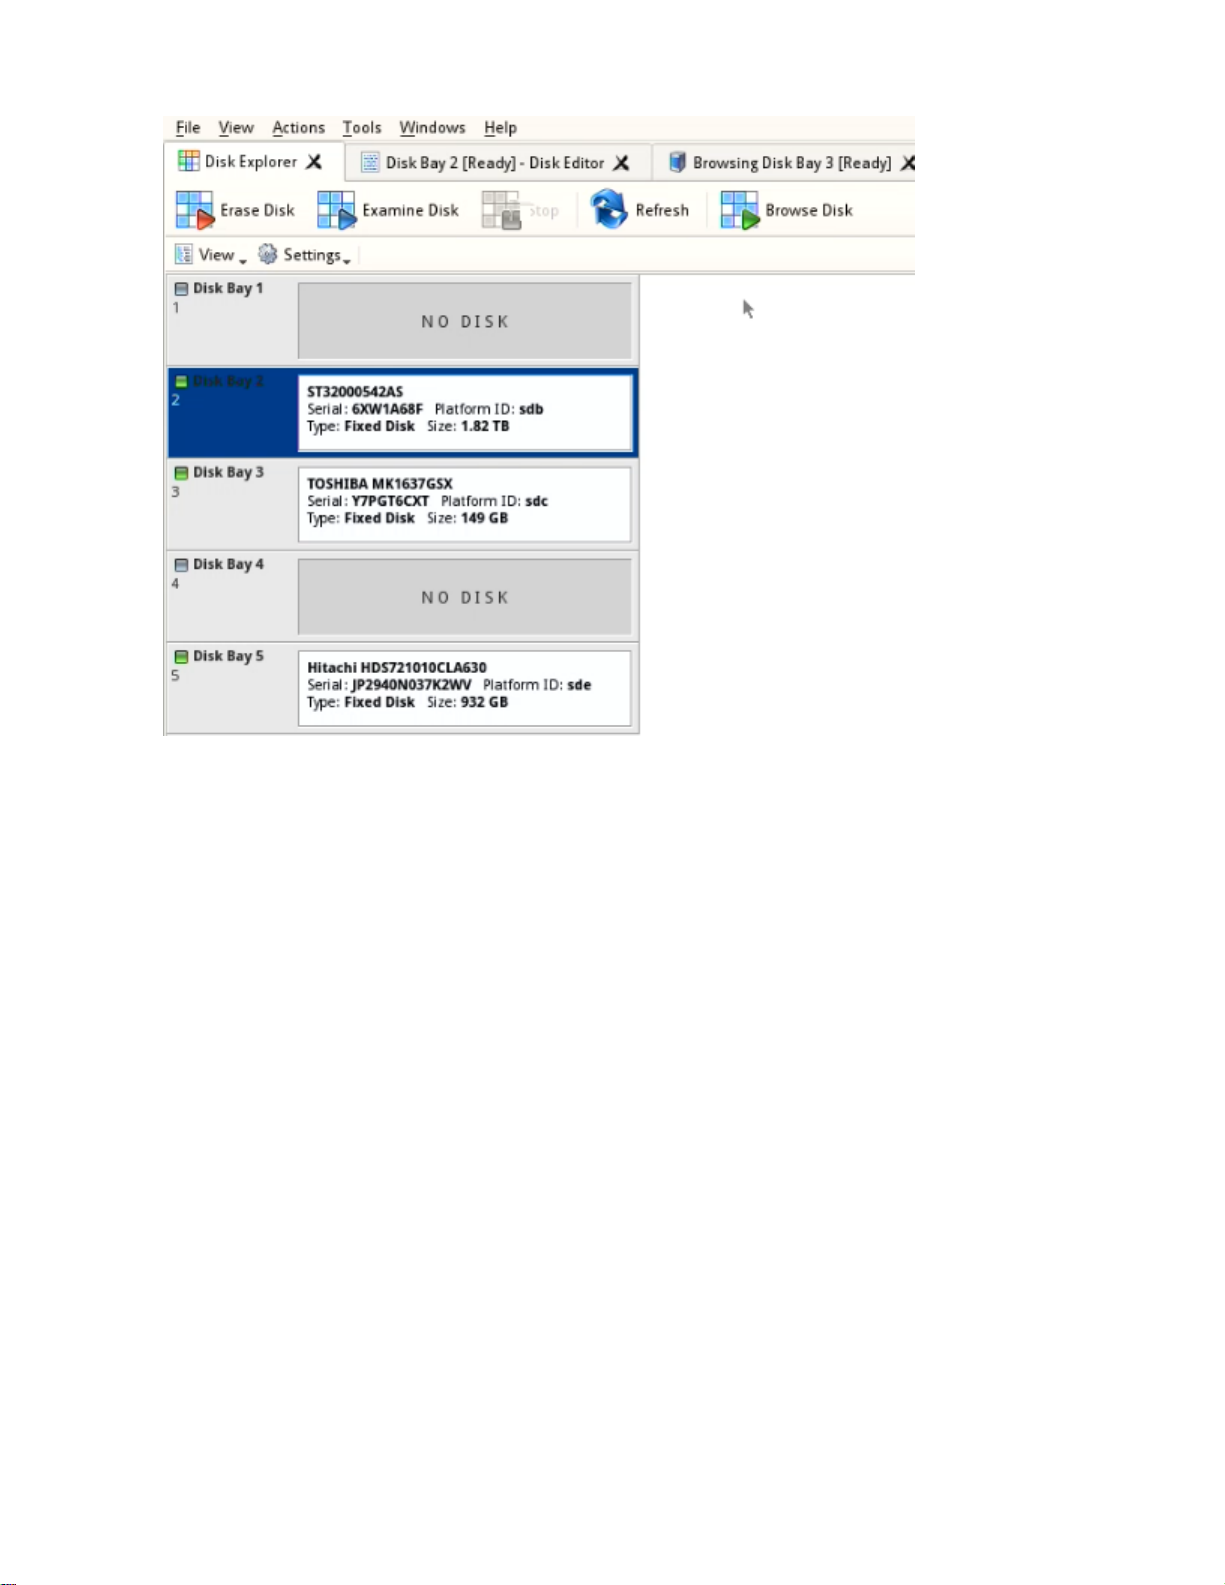
Disk Explorer view
The Disk Explorer view is the main interface for the KillDisk application. Here, disks are visualized, can be selected
and manipulated. The status of any procedures performed on the disks can be seen here, new procedures like cloning
and erasure can be initiated, and drives can be organized into batches to be managed together.
Figure 8: Disk explorer view
View
The disk explorer supports a range of different views to use when performing KillDisk's actions, each with their
own customizable settings for different use cases.
Settings
View settings will let you customize appearance for better experience and specific for each view.
Disk Bays view
This view visually displays the disks configured in the disk bay layout. The bays are grouped by their row, colored
by the batch color, and show the current status of the disk. If any operations are being performed on the disk, the
operation and progress are displayed.
Page 18
| Getting started with KillDisk | 18
Figure 9: Disk Bays view
Settings menu
Detailed view
Toggle between detailed and simplified view of disk bay controls.
Show removable devices
Show or hide additional layout row for removable devices.
Rows as Columns
This setting can be toggled on/off to display the rows (defined by the disk bay layout) as columns in the Disk
bays view.
Vertical Bays
This setting can also be toggled to change the orientation of the bays to vertical.
Disk Bays tree view
The disk bays tree view presents the disk bay layout in a standard list form, much like the disks would be shown in
an explorer. Disk bays are grouped by row and colored according to their batch color. Information such as disk status,
serial number, partitioning are shown in list form next to their respective disk bays.
Page 19

| Getting started with KillDisk | 19
Figure 10: Disk Bays Tree view
Settings menu
Show inserted devices
Displays all devices that are detected by the system device manager.
Show partitions
Displays all partitions on the disks.
Show live volumes
Displays live volumes detected.
Group by chassis rows
Displays the groupings of the disk bays by rows, as defined in the disk bays layout.
Show unplugged bays
Displays bays that are not connected to a disk.
Local Disks tree view
Local Disks view shows all disks recognized by the system and available for application in hierarchical tree view:
Page 20

Figure 11: Local disks view
Settings menu
Show partitions
Displays all partitions detected on the local disks.
Show volumes
Displays all volumes detected on the local disks.
| Getting started with KillDisk | 20
Property views
To show detailed information about any subject of an application, such as disk, partition, volume, file etc., KillDisk
uses information views. When open, they follow selected changes and show information about the selected item
automatically. Besides only displaying valuable data, they also allow you to copy that information onto a clipboard by
using context menu commands.
Copy Value
Copy only value of selected field in the information view.
Copy Field
Copy formatted name and value field pair.
Copy All
Copy all information as formatted set of name and value pairs.
Figure 12: Example of copied information about file
Page 21

Property view
To show property view for selected item do one of the following:
• Click View > Windows > Properties
• Click F4 keyboard short cut or
• Use context menu command Properties for the same effect
| Getting started with KillDisk | 21
Figure 13: Property view example
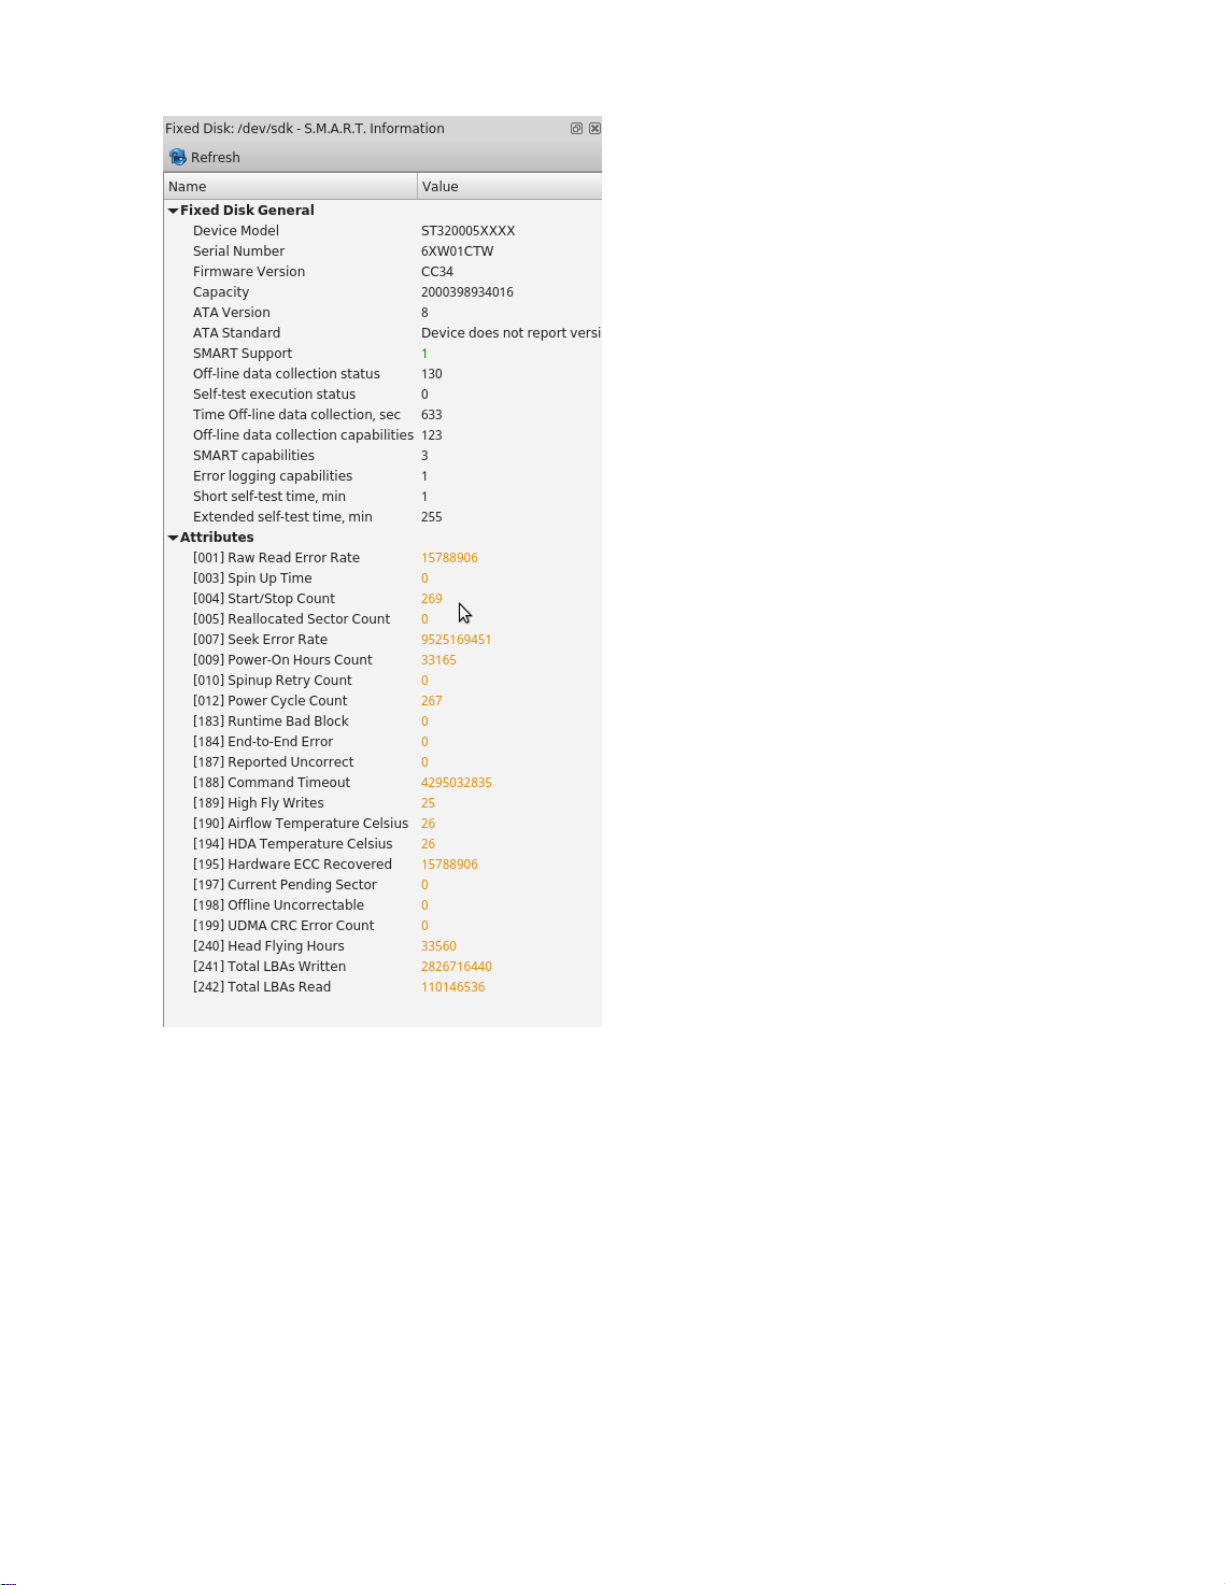
S.M.A.R.T. Information
This is another information view, displaying SMART (Self-Monitoring, Analysis and Reporting Technology) data of
the selected hard drive, if the device supports it. To show this view:
• Click View > Windows > SMART Info
• Use context menu command SMART Info for the same effect
Page 22
| Getting started with KillDisk | 22
Figure 14: SMART information for physical device example
Page 23

Using KillDisk
KillDisk Data Center is a powerful industrial tool to provide disk erasure solutions for large workstations with many
disks. The features in this software are built with this goal in mind. This section outlines the key features of KillDisk
and how they are used to erase single disks to large batches. Much of the software is highly customizable and this
guide will help get you started with configuring KillDisk for your particular system, and using KillDisk to its' full
potential.
Processing options and features
Each action in KillDisk starts with confirmation dialog where you can adjust starting parameters specific for
executing task, such as disk erasure or disk cloning.
For batch processing, the same dialog will appear with options to customize the settings for the batch operation.
In this section we outline the configurable aspects of KillDisks' operations, looking at:
•
Erase Options
•
Wipe Options
•
Examination Options
•
Clone Options
•
Error Handling Configuration
•
XML Reports
| Using KillDisk | 23
Disk erase options
The same erase options for each batch could be set through Edit disk batch attributes dialog
Erase method
One of the supported by KillDisk erase methods.
Erase verification
Percentage of disk to be verified after disk was erased.
Initialize after erase
Formats the disk to be ready to use after erasure.
Write fingerprint
Writes disk erase information to the first sector of the disk after erasure completion.
Each disk erase actions could be protected by additional confirmation dialog. You can turn this protection off using
application preferences dialog.
See also XML reports on page 25 for information about erase report.
Disk examination options
KillDisk offers several different disk examination options, depending on user needs. Each examination type has its'
own strengths and weaknesses, mainly tradeoffs between time and thoroughness. Any of the examination types can be
performed on an entire disk, or a selected segment.
Examination options are required for disk integrity examination and optional for disk erasure but can be used to sort
away faulty disk from following processing in sequence.
To examine disk integrity the following three algorithms are used:
Partial Examination
Examines a percentage of the disk, equally segmented in a selected area.
Page 24

Partial Random Examination
Examines a set number of randomly distributed sections of the disk within the selected area.
Read Each Sector in Selected Area
Examines the entirety of a selected area, set for examination. Because this reads every sector in the selected area,
this is the most lengthy, but thorough of the disk examination procedures.
Disk copy options
Note: This feature is only available when working with a Disk Batch, after an erase. Operations on single
disks will not be able to use these option.
Copy disk image
When selected, this enables the copy feature. This will copy a disk image from a selected source to all disks that
were erased in the batch.
Use file image
Allows you to specify a disk image file to write to the other disks.
Use physical disk
Allows you to specify one disk from the batch to act as the "master disk". This disk will not be erased, but rather
be cloned to the other disks in the batch after they are erased.
Start copy to sector
You can specify which sector the copy starts from on the source disks. If you don't know what this is for, leave as
0.
| Using KillDisk | 24
Error handling
KillDisk has a broad capabilities to handle errors encountered during continues disk processing. These options could
be set through global application preferences dialog or changed each time when disk processing starts.
Error handling attributes
At first, KillDisk allows you to select one of three ways to handle Read/Write Errors:
Abort entire disk group processing
This means that if you're running a batch erase and one of the disks has errors, the erase process for ALL the
disks in the batch will be terminated.
Abort only failed disk from group processing
This is the suggested setting. Failed disks will return an error and terminate the erase process, but other disks in
the batch will not be interrupted from completing the erase operation.
Ignore error for disk grouping
Ignores the read/write error and continues erasing wherever is possible on the disk. No active or forth going
operations are terminated.
In addition:
Number of Read/Write attempts
Sets the number of attempts KillDisk make to perform an operation when an error is encountered.
Sectors to skip after detection of a bad sector
Sets the number of sectors ignored by the software when bad sectors are found.
Do not show Read/Write error messages
Toggle whether or not read/write errors trigger messages to the user.
Use disk lock
Locks disks from being used by any other applications
Page 25

Ignore disk lock errors
Errors encountered with KillDisk not being able to access locked disks are ignored.
Ignore read/write errors
Toggle whether errors should appear for read and/or write errors.
XML reports
KillDisks XML report contains the following parameters:
Table 3: XML Report Parameters
Type of Information Specific data
| Using KillDisk | 25
Company Information
System Information
Erase Attributes
Error Handling Attributes
Name
License
Location
Phone
Disclaimer
OS version
Platform
Kernel
Erase Verify
Passes
Method
Verification passes
Errors terminate
Skip interval
Number of Retries
Lock
Disks
Source?
Ignore Write?
Read?
Lock?
Device Size
Device Type
Serial Number
Revision
Product Number
Name
Geometric Information
Page 26

Type of Information Specific data
Partitioning Scheme
| Using KillDisk | 26
Additional Report Attributes
Result
Fingerprint Information
Initialize disk?
Bay
Time and Date Started
Disk Information
Status
Result
Time Elapsed
Errors
Name of operation
Examine disks physical integrity
The disk examination feature is designed to scan the physical integrity of the disks selected for this operation.
To examine disks:
1.
Select a disks for examination
Use Disk Explorer view on page 17 to select disk bays.
2.
Open Examining disks integrity dialog
•
Click the Examine command in the action toolbar
• Click Actions > Disk Examine command from main menu
• Click Disk Examine command from context menu
3.
Confirm examination options
Use tabbed views to adjust examination options if necessary. Available options:
•
Disk examination options on page 23
•
Error handling on page 24
•
XML reports on page 25
Note:
If only one disk was selected for examination than you can specify boundaries of examined area for
selected disk.
Click OK button to begin examination process.
4.
Observe examination process
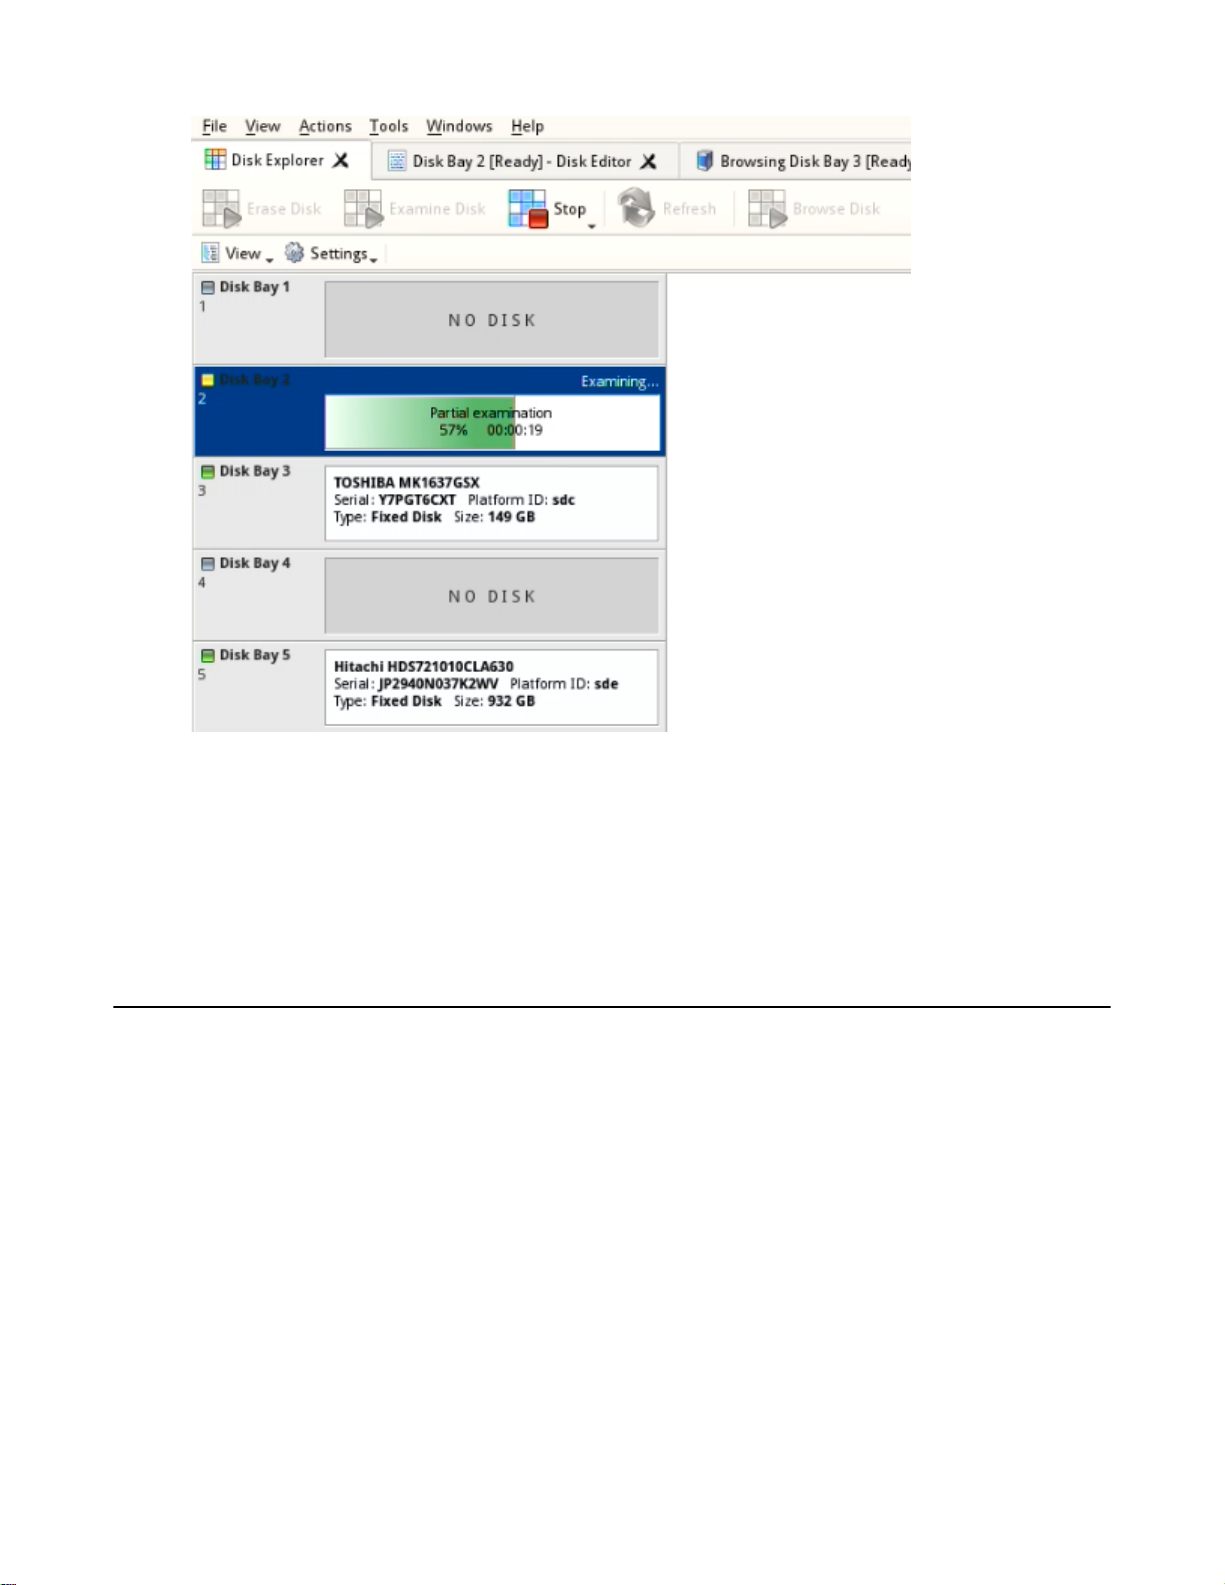
In the Disk Explorer view on page 17, you will see the progress of the examination in the slot of the drive being
operated on. The progress will be shown as a progress bar, seen below:
Page 27
| Using KillDisk | 27
Figure 15: Disk examination progress
As seen in the image above, the green progress bar will fill the virtual drive slot in the KillDisk application. The
percentage of the examination completed and the estimated completion time will also be shown in the slot. Once
this process completes, the word "Examined" will flash in yellow in the slot space and the Erase procedure will
begin.
When erasing completes you can review results for the processed disks.
Disk erasure
KillDisk is an extremely powerful tool for secure disk erasure. Individual disks or batches of disks can be erased to
any desired standard with just a few clicks. The process to achieve this is outlined in this section.
1.
Select a disks for erasure
Use Disk Explorer view on page 17 to select disk bays.
2.
Open Erase disks dialog dialog
• Click the Erase command in the action toolbar
• Click Actions > Disk Erase command from main menu
• Click Disk Erase command from context menu
3.
Confirm erasure options
Use tabbed views to adjust disk erasure options if necessary. Available options:
•
Disk examination options on page 23
•
Disk examination options on page 23 [optional]
•
Error handling on page 24
•
Page 28

•
XML reports on page 25 [optional]
•
Disk copy options on page 24
Note:
If only one disk was selected for erasure than you can specify boundaries of erased area for selected disk.
Click OK button to begin disk erase process.
4.
Observe erase process
If Disk examination options on page 23 was selected then disk examination will started first. Depending on
examination outcome at second stage - disk erase begins.
Once the Erase procedure begins, you will see the green progress bar turn red. At this point, the bay will show the
erase method and progress. The progress bay here represents the percentage of data left to erase on the drive, with
the corresponding percentage shown. As the procedure progresses, the percentage will decrease, and the red bar
will get smaller.
The remaining time will also be seen and progress in the operation will be displayed, as shown below:
| Using KillDisk | 28
Figure 16: Disk erasure
If Disk copy options on page 24 was selected then after erase the final stage of this task begins - clone data
from source to all successfully erased disks.
When erasing completes you can review results, print Erase certificate on page 30, Erase labels on page 32
for processed disks.
See: Processing summary on page 29
Page 29

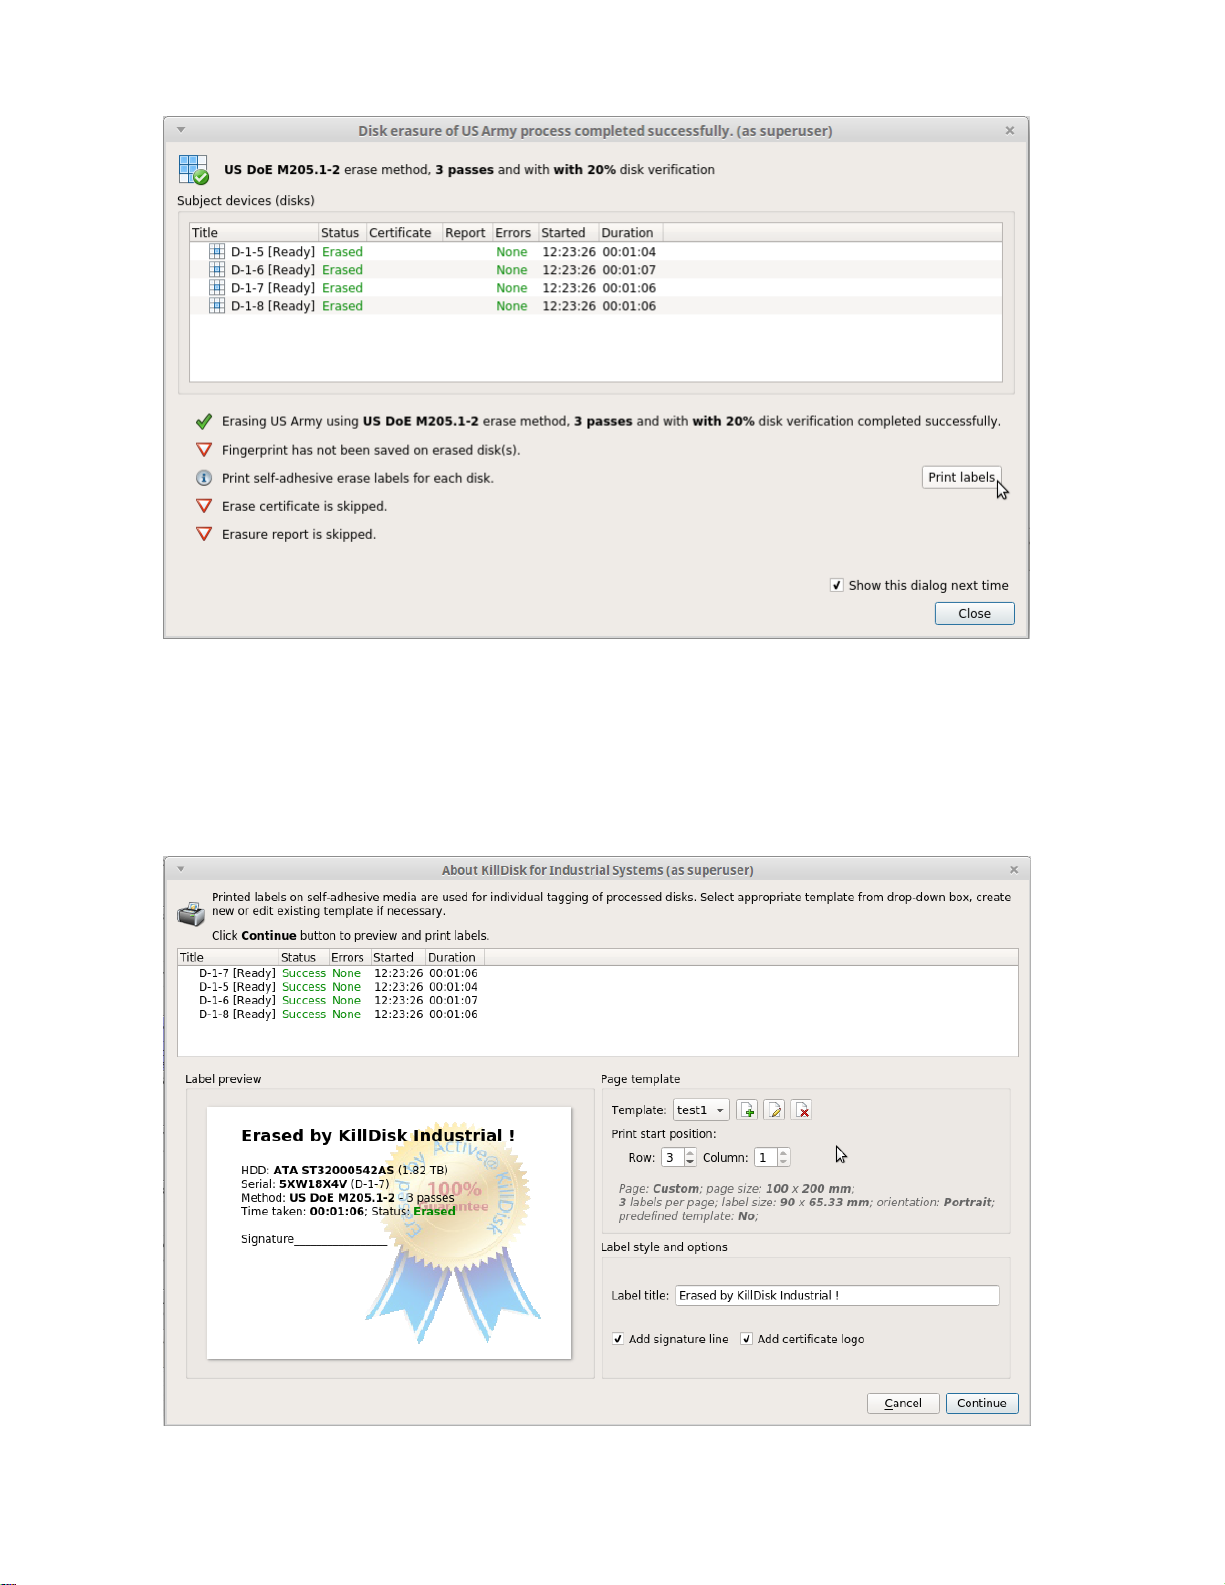
Processing summary
Once KillDisk's finishes processing any task, such as disk erasure or disk examination, a task complete dialog will
appear with a summary of the task, containing all of the information pertaining to the operation. For example, this
includes information like disks operated on, status of erasure and all associated certificates and reports.
| Using KillDisk | 29
Figure 17: Example of task complete dialog after disk erasure
The successful erasure window contains the features of the successful erasure, discussed further in this section.
Devices
All devices erased are displayed with their erasure status in list format at the top of the notification.
Disk Examination Status
Specifications of the examination procedure are listed and the status of the examination is reported.
Disk Examination Report
Verifies that the examination report has been saved and specifies the path to the saved report. Allows user to
examine the .xml examination report by pressing the Browse button.
Disk Grade Assignment Status
Confirms the inclusion of the disk grade assignment operation, based on disk integrity examination results.
Erasure Status
Details the status of the disk erase operation showing the erasure specifications and status with which the erasure
was completed.
Disk Erasure Certificate
Verifies that the erasure PDF certificate has been saved and specifies the path to the saved report. Allows user to
examine the certificate by pressing the Open button.
Disk Erasure Report
Verifies that the erasure report has been saved and specifies the path to the saved report. Allows user to examine
the .xml erasure report by pressing the Browse button.
Page 30

Reports, Certificates and Labels
KillDisk maintains the highest standards in disk erasure, and with that, provides extensive documentation options for
its' operations through Reports, Certificates and Labels. This section will discuss these features in length.
Erase certificate
Overview
KillDisk provides PDF certificates of erasure upon the completion of data erase operations. These certificates may
be customized to include company-specific information and notes specific to the particular procedure. Configuring
these custom settings is outlined in the Certificate Preferences section of this guide. A sample of the certificate is
shown below:
| Using KillDisk | 30
Figure 18: Disk Erase Certificate.
Page 31

Certificate Elements
Company Information
Displays all company information provided in the preferences. The user in the above example only provided their
business name, but other company information may also be included in the certificate.
Technician Information
Displays the technician information provided in the preferences. Namely, this section is for the name of the
operator and any notes they may want to include in the certificate report.
Erasure Results Information
Displays information pertaining to the erasure procedure conducted on the hard drive(s). Type of erasure
algorithm, custom settings, date and time started and duration of the erasure are all listed here.
Disk
Uniquely identifies the disk that was operated on by the KillDisk application. Includes information like Name,
Serial Number, Size and Partitioning Scheme.
System Information
Provides details on the system used to run KillDisk, such as the Operating System and architecture.
Note: The system information here only applies to the system running KillDisk, not the system that
was erased by the application! Provided KillDisk remains on one workstation, this information will
stay consistent with all systems that the workstation erases.
| Using KillDisk | 31
Reports
KillDisk gives you the option to save XML reports for any major operation it performs on a disk, such as
Examination and Erasure. These reports contain all the information pertaining to the KillDisk procedure. The contents
of the report are outlined below.
Company Information
• Name
• License
• Location
• Phone
• Disclaimer
System Information
• OS version
• Platform
• Kernel
Erase Attributes
• Erase verify
• Passes
• Method
• Verification passes
Error Handling Attributes
• Errors terminate
• Skip interval
• Number of Retries
• Lock Source?
• Ignore Write?
• Read?
• Lock?
Page 32

Disks
• Device Size
• Device Type
• Serial Number
• Revision
• Product Number
• Name
• Geometric Information
• Partitioning Scheme
Additional Report Attributes
• Fingerprint Information
• Initialize disk?
Result
• Bay
• Time and Date Started
• Disk Information
• Status
• Result
• Time Elapsed
• Errors
• Name of operation
| Using KillDisk | 32
Erase labels
Along with the PDF certificate, KillDisk allows you to print labels to place on erased disks with its Print Label
features. These labels may be completely customizable to print on any sized sheet with any dimension. Simply specify
the parameters and KillDisk will prepare the printable labels for you. The procedure is outlined in this section.
Accessing the Print Labels Option
Upon the completion of a major KillDisk operation, you will see a report dialog. In the list of completed tasks, you
will see the Print Labels button, depicted below. Click it to enter the Print Label dialog.
Page 33
| Using KillDisk | 33
Figure 19: Opening to Print Label dialog.
Print Label dialog
This dialog will allow you to configure the labels and prepare them for printing. The top of the dialog will show you a
list of the drives that will have labels generated for them. At any point in the operation, a sample of the label is shown
in the Label Preview window on the left side. The right side of the dialog has the styling and template configuration
options.
Figure 20: Print label dialog.
Page 34

| Using KillDisk | 34
Page template options
The print label dialog gives you access to a number of predefined standard templates and any custom templates you
may create. These template may be easily selected without opening any additional dialogs and the details of the
selected template will be displayed below the selection box. If your specific labels differ from any of the templates
available, the button allows you to create a custom template with your own specifications. Additionally, the
button allows you to modify an existing template and the button deletes the selected template.
Creating a new template
Upon clicking the button, the following template editor window will appear. Descriptions of the template editor
options are listed below.
Figure 21: Template editor window.
Template Title
Here you may create a custom title for your template. This is the name that will reference this template when
selecting it in the Print Label dialog.
Page
Here you may specify the dimensions of the page used to print the labels. This may be selected from the list of
standard sizes, or defined using exact measurements.
Page margins
Here, page margins are defined for the top, bottom, left and right sides of the page.
Page 35

| Using KillDisk | 35
Label Layout
These settings define how the labels appear on the page. You may define the spacing in between labels on the
page and the dimensions of the label grid. Once you've put in the proper measurements, KillDisk will take care of
the formatting.
Unit size
The units of measurement may be manipulated between millimeters, inches, pixels and points. If a value in
entered in one measurement and the unit size is changed, the appropriate conversion will take place.
Print Start Position
The print start position section of the dialogue allows you to select what label on the page the labels start printing
from. As you use labels, the labels won't always start from the 1x1 position, so you can adjust this setting accordingly.
Label Style and options
These option allow you to change the styling on the labels with the following options:
Label Title
Allows you to set a title to be printed in bold at the top of the labels. This can be company name, batch name or
any other descriptors you may consider useful to identify the operation.
Add signature line
Toggling this on places a line at the bottom of the label for the technician to sign off on upon completion of the
wipe.
Add certificate logo
Includes the logo used in the certificate as a watermark background of the label.
Print Preview and Printing
Once all the settings are configured, you may see the print preview by clicking the Continue button. The preview
displays what the print is going to look like and from here the print job can be sent to a printer that is configured with
the system.
Page 36

| Using KillDisk | 36
Figure 22: Example of a print preview.
Page 37

Preferences
The KillDisk Preference window is the central location where KillDisk features can be configured. These features
are split up into several tabs.
To open Preferences dialog:
• From main menu choose File > Preferences... or
• Use F10 keyboard shortcut at any time
Preferences dialog could be open from other task dialogs to change related settings.
The process and functionality of the preferences for each of these features will be outlined in this section.
General preferences
The General preferences options allow the user to configure general application settings, as well as the visual aspects
of the application.
| Preferences | 37
Figure 23: General preferences
Page 38
Environment
These are configurable options pertaining to the applications user interface and user experience.
Device signaling delay, sec
When a process finishes, KillDisk displays a message, overlaying the disk. In the disk bays view This setting
configures the delay of this notification when the process finishes.
Use sound notifications
Toggles sound being used for notifying the user of the completion of a task, errors and notification during an
operation.
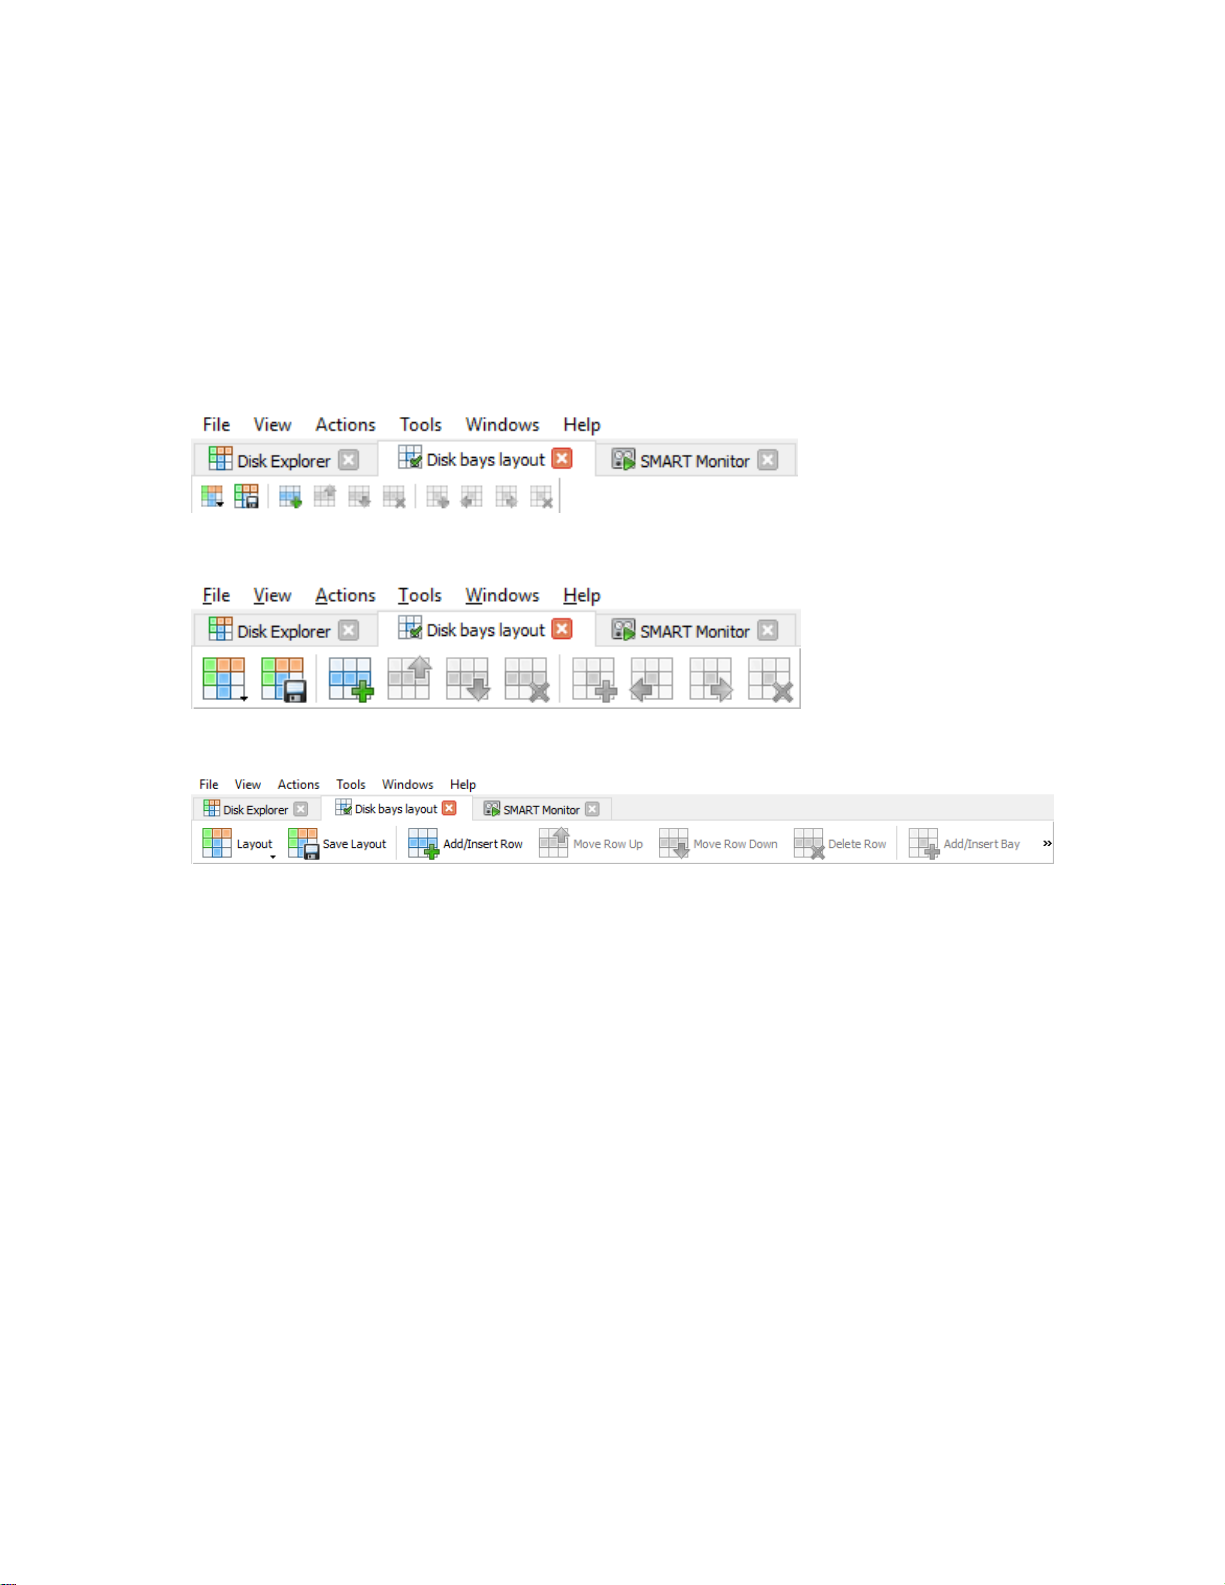
Toolbar style
Configures how icons are shown in the toolbar (Figures below).
Figure 24: Small icons no text
| Preferences | 38
Figure 25: Large icons no text
Figure 26: Large icons with text
Application log file settings
These settings apply to the log file, automatically generated by the application. Not to be confused with the erasure
report or certificate. All operations performed in a KillDisk Data Center session will be saved in this log.
Log file location
Allows the user to specify where the application log file is saved. By default, this is set to KillDisk's root
directory.
Erase log each time when application starts
This setting configures whether KillDisk generates a new log file for every session (erasing the log of the
previous session), or appends new sessions to one log file.
Event detail level
Allows the user to configure how much detail about KillDisk's operations the log retains.
• Low
• Normal
• High
Hexadecimal Viewer
Allows user to set hexadecimal view settings, font and interaction.
Page 39

Disk erase preferences
The Erase Preferences tab allows for users to configure settings for the KillDisk erase procedures.
| Preferences | 39
Figure 27: Erase preferences
Settings:
Initialize disk(s) after erase
When checked, this setting formats the disk(s) once an erase operation has been completed, initializing them for data
storage. Otherwise, the erased disks will simply remain unformatted.
Write fingerprint to first sector
This feature will write the specified fingerprint to the first sector of the erased drive. If a machine is booted from this
drive, the user will see this fingerprint as a message on the screen.
Erase confirmation
As a safety precaution to prevent accidental destruction of hard drives, KillDisk has the user type a keyphrase before
the erase procedure is initiated (Figure 3.1.6). By default this precaution is set with the keyphrase "ERASE-ALLDATA". This keyphrase can be modified, set as a randomly generated set of characters, or disabled in these settings.
Page 40

Figure 28: Sensitive action confirmation dialog
Save XML erasure reports
Report location
User may configure where XML erasure reports are saved.
File Name template
| Preferences | 40
Here you may specify the name template for the XML reports. Because every erase operation will generate a
separate report, KillDisk saves the date and time in the default settings to keep reports. The main tags available
are:
Table 4: File name template tags:
Available file name element: Tag:
Serial ID {Serial ID}
Erasure Status {Status}
Date of Erasure {Date(YYYY-MM-DD)}
Time of Erasure {Time(HH-mm-ss)}
To see additional file name tags available, see the File name tags section in the Appendix.
Include system and hardware info
Ensures that the system-specific information is saved in the XML report, such as:
• Operating system
• Kernel version
• Platform name
• Device attributes
• Disk geometry
• Partitioning information
• Active partitions
Include technician information
Optionally place the technician information (defined in the Certificate Preferences) into the XML erasure report
Create separate report for each disk for batch operations
By default batches are treated as one unit, so XML reports will include the report information for all the disks in
a batch. This option allows for the user to create separate reports for each of the disks pertaining to a batch, so the
Page 41

disk records can be handled separately. This is useful when disk reports are required immediately for each disk;
the batch does not need to complete before the report is issued.
Disk examination preferences
The Disk Examination tab allows the user to configure the settings for KillDisk's examination procedure, namely the
colors used to represent first, second and third grade disks and the examination XML report settings.
| Preferences | 41
Figure 29: Examination Preferences
• Disk grade settings
For each grade, you may select the Green, Yellow, or Red to represent the disk grade visually. Multiple grades
may share the same color.
• Maximum read errors
Defined under the second grade disks section, the maximum read errors settings allows the user to define the
maximum read error tolerance before a disk is categorized as a third grade disk. Third grade disks are the worst
grade level, and are considered unreliable for use.
Page 42
Save XML erasure reports
Report location
User may configure where XML examination reports are saved.
File Name template
Here you may specify the name template for the XML reports. Because every erase operation will generate a
separate report, KillDisk saves the date and time in the default settings to keep reports. The main tags available
are:
Table 5: File name template tags:
Available file name element: Tag:
Serial ID {Serial ID}
Erasure Status {Status}
Date of Erasure {Date(YYYY-MM-DD)}
Time of Erasure {Time(HH-mm-ss)}
To see additional file name tags available, see the File name tags section in the Appendix.
Include system and hardware info
| Preferences | 42
Ensures that the system-specific information is saved in the XML report, such as:
• Operating system
• Kernel version
• Platform name
• Device attributes
• Disk geometry
• Partitioning information
• Active partitions
Include technician information
Optionally place the technician information (defined in the Certificate Preferences) into the XML erasure report
Create separate report for each disk for batch operations
By default batches are treated as one unit, so XML reports will include the report information for all the disks in
a batch. This option allows for the user to create separate reports for each of the disks pertaining to a batch, so the
disk records can be handled separately. This is useful when disk reports are required immediately for each disk;
the batch does not need to complete before the report is issued.
Certificate preferences
These preferences allow the user to customize the erasure certificates with company specific information, technician
information, and additional certificate options.
Page 43

| Preferences | 43
Figure 30: Certificate Preferences
Company information
This section allows for the user to customize company features like:
• Licensed name
• Business name
• Location
• Phone
• Disclaimer
• Signature field for a company supervisor (optional)
Additionally, custom logos can be added by clicking Set and selecting an logo through the file explorer. The
logo will be previewed in the Company logo space above.
Technician Information
This section allows for the user to customize company features like:
• Licensed name
• Business name
• Location
Page 44

• Phone
• Disclaimer
• Signature field for a company supervisor (optional)
Report location
User may configure where XML examination reports are saved.
File Name template
Here you may specify the name template for the XML reports. Because every erase operation will generate a
separate report, KillDisk saves the date and time in the default settings to keep reports. The main tags available
are:
Table 6: File name template tags:
Available file name element: Tag:
Serial ID {Serial ID}
Erasure Status {Status}
Date of Erasure {Date(YYYY-MM-DD)}
Time of Erasure {Time(HH-mm-ss)}
| Preferences | 44
To see additional file name tags available, see the File name tags section in the Appendix.
Include detailed information about chassis hardware
Ensures that the system-specific information is saved in the XML report, such as:
• Operating system
• Kernel version
• Platform name
• Device attributes
• Disk geometry
• Partitioning information
• Active partitions
Create separate report for each disk for batch operations
By default batches are treated as one unit, so XML reports will include the report information for all the disks in
a batch. This option allows for the user to create separate reports for each of the disks pertaining to a batch, so the
disk records can be handled separately. This is useful when disk reports are required immediately for each disk;
the batch does not need to complete before the report is issued.
Error handling preferences
This is an advanced preference that allows for the configuration of KillDisk's error handling of continuous processes.
Page 45

| Preferences | 45
Figure 31: Error Handling Preferences
Read/Write Error Handling
KillDisk allows you to select one of three ways to handle Read/Write Errors:
Abort entire disk group processing
This means that if you're running a batch erase and one of the disks has errors, the erase process for ALL the
disks in the batch will be terminated.
Abort only failed disk from group processing
This is the suggested setting. Failed disks will return an error and terminate the erase process, but other disks in
the batch will not be interrupted from completing the erase operation.
Ignore error for disk grouping
Ignores the read/write error and continues erasing wherever is possible on the disk. No active or forth going
operations are terminated.
Number of Read/Write attempts
Sets the number of attempts KillDisk make to perform an operation when an error is encountered.
Sectors to skip after detection of a bad sector
Sets the number of sectors ignored by the software when bad sectors are found.
Page 46
Do not show Read/Write error messages
Toggle whether or not read/write errors trigger messages to the user.
Use disk lock
Locks disks from being used by any other applications
Ignore disk lock errors
Errors encountered with KillDisk not being able to access locked disks are ignored.
Ignore read/write errors
Toggle whether errors should appear for read and/or write errors.
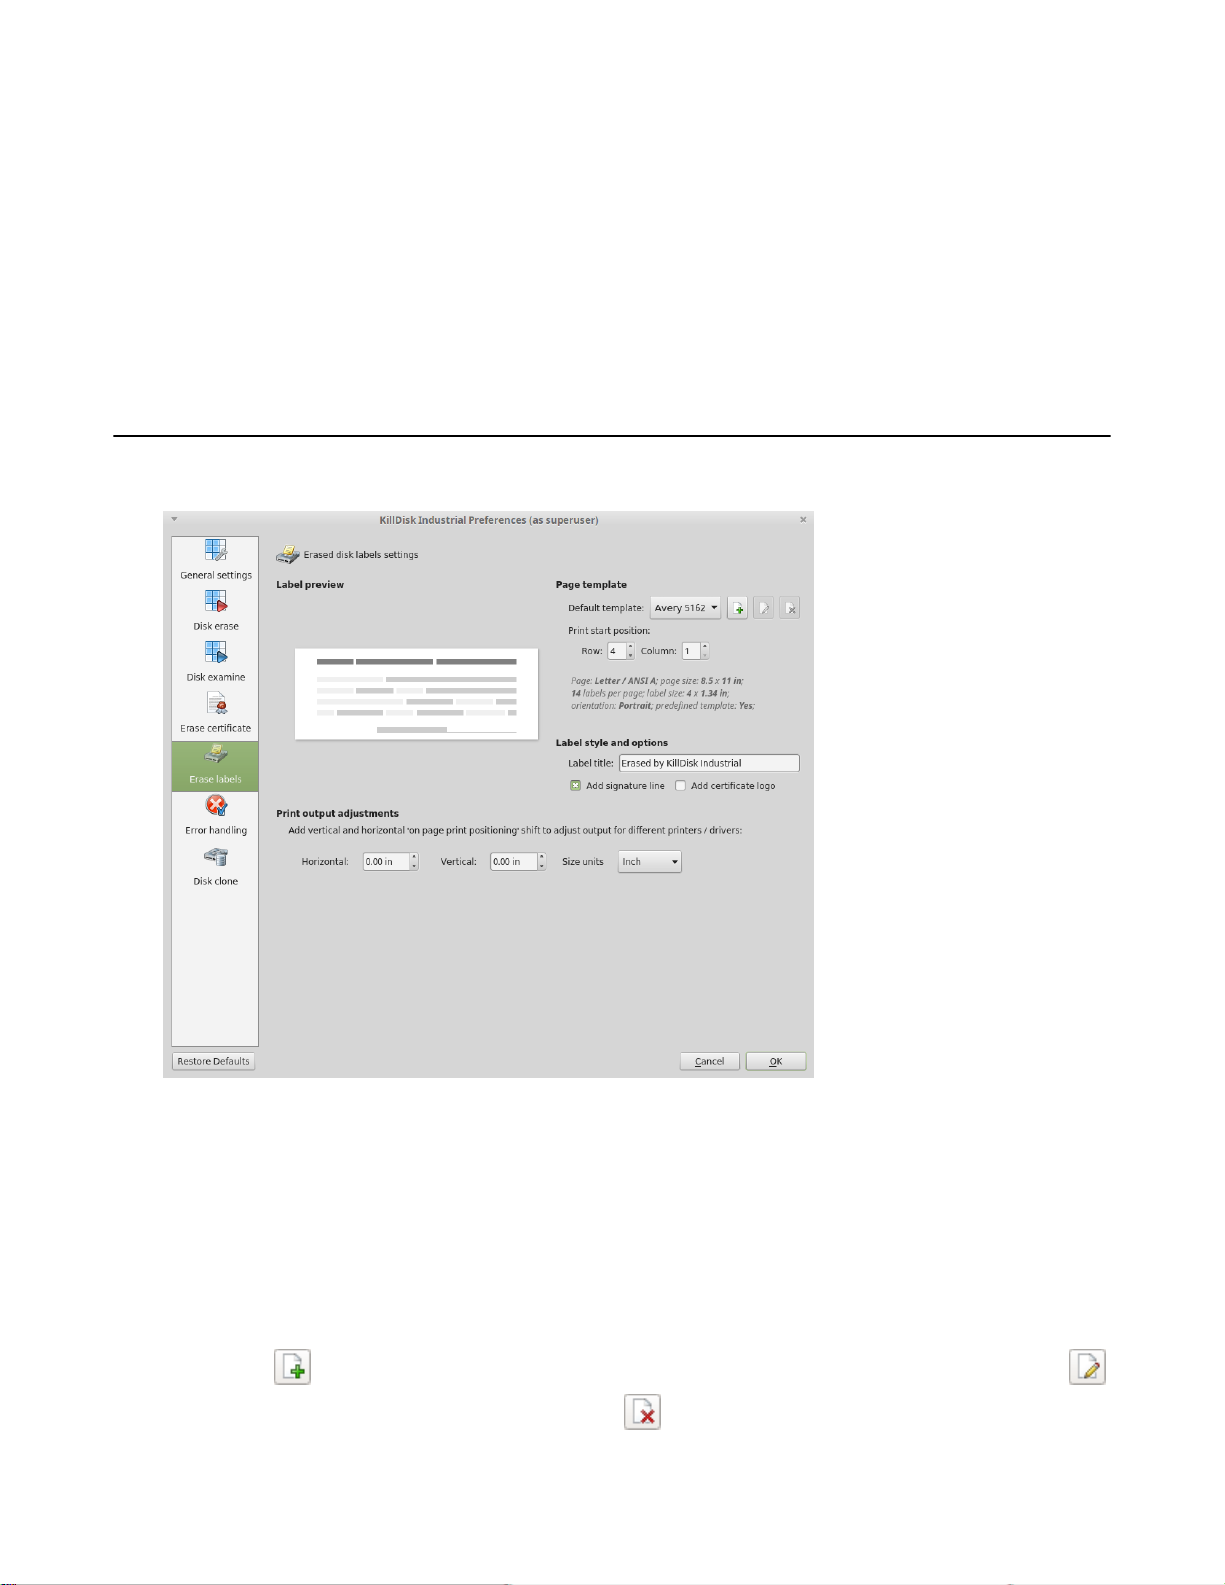
Erase labels preferences
These preferences help you globally adjust label settings for the KillDisk system. These labels may be configured to
any printer, page or label type using KillDisk's highly customizable labels features.
| Preferences | 46
Figure 32: Erase label preferences dialogue
Label preview
Displays a preview of one label, given the current inputted settings. Refreshes as adjustments are made to the settings.
Page template options
The print label dialog gives you access to a number of predefined standard templates and any custom templates you
may create. These template may be easily selected without opening any additional dialogs and the details of the
selected template will be displayed below the selection box. If your specific labels differ from any of the templates
available, the button allows you to create a custom template with your own specifications. Additionally, the
button allows you to modify an existing template and the button deletes the selected template.
Page 47

| Preferences | 47
Creating a new template
Upon clicking the button, the following template editor window will appear. Descriptions of the template editor
options are listed below.
Template Title
Here you may create a custom title for your template. This is the name that will reference this template when
selecting it in the Print Label dialog.
Page
Here you may specify the dimensions of the page used to print the labels. This may be selected from the list of
standard sizes, or defined using exact measurements.
Page margins
Here, page margins are defined for the top, bottom, left and right sides of the page.
Label Layout
These settings define how the labels appear on the page. You may define the spacing in between labels on the
page and the dimensions of the label grid. Once you've put in the proper measurements, KillDisk will take care of
the formatting.
Unit size
The units of measurement may be manipulated between millimeters, inches, pixels and points. If a value in
entered in one measurement and the unit size is changed, the appropriate conversion will take place.
Print Start Position
The print start position section of the dialogue allows you to select what label on the page the labels start printing
from. As you use labels, the labels won't always start from the 1x1 position, so you can adjust this setting accordingly.
Label Style and options
These option allow you to change the styling on the labels with the following options:
Label Title
Allows you to set a title to be printed in bold at the top of the labels. This can be company name, batch name or
any other descriptors you may consider useful to identify the operation.
Add signature line
Toggling this on places a line at the bottom of the label for the technician to sign off on upon completion of the
wipe.
Add certificate logo
Includes the logo used in the certificate as a watermark background of the label.
Print output adjustments
The print output adjustments section of the dialogue allows you to vertically or horizontally displace the position of
the print to adjust to different printers.
KillDisk station preferences
Configure Network
System tool to configure local network settings;
Configure Timezone
System dialog that let you to configure Timezone, Date and Time;
Configure Printer
Local or network printer configuration utility
Page 48

Advanced tools
KillDisk offers a number of advanced tools to work in conjunction with the software to make operations easier to
perform and the disks easier to navigate. KillDisk give you the power to browse through disks on both a file level
and a low, HEX level, as well as analyze disk health with its' SMART monitor. This section describes each of these
features at length:
•
File Browser
•
Hexadecimal Viewer
•
SMART monitor
File Browser
KillDisk also includes a built-in file browser for examining the contents of disks for verification purposes of
the procedure and that correct hard drives are being selected. Details on using this feature will be discussed in this
section.
| Advanced tools | 48
Opening the browse view
To browse the contents of a specific disk from the Disk Bay layout view, simply select the desired disk and click
Browse Disk in the action toolbar. This action can be found in the disk action list shown below.
Figure 33: Launching the file browser
This will launch the file browser window, seen below.
Page 49

| Advanced tools | 49
Figure 34: File Browser window
The file browser window displays the disk selected. The Expand All button at the top left expands all the partitions
on the disk in the Navigator Pane, while the Collapse All button hides them. The file explorer windowed view may
also be manipulated by navigating to the Settings button at the top. Here, you can you have options to manipulate the
elements below.
Advanced
Toggles advanced disk information being shown.
Show Partitions
Toggles the disk partitions being shown.
Navigator Pane
Toggles the Navigator Pane view on and off.
Hexadecimal Viewer
KillDisk's hexadecimal viewer allows users to view the contents of connected drives in a Hex Editor view.
Page 50

| Advanced tools | 50
Figure 35: KillDisk's built-in disk editor
To make it easier to navigate the Hex Editor view, KillDisk also offers a list of templates to help display the
organization of the sectors on the disk by colored sections.
Figure 36: KillDisk's disk editor templates
Page 51

SMART Monitor
KillDisk also supports displaying SMART information pertaining to the disks it sees. This is done simply by
navigating to the file menu bar and selecting Tools > Open SMART Monitor. This will open the SMART Monitor
window shown below.
| Advanced tools | 51
Figure 37: KillDisk's SMART monitor
SMART Information
The SMART Monitor displays a list of all discovered disks and shows the SMART information next to them in table
format. The following SMART information is shown as separate columns:
• Display name
• Device model
• Serial number
• Firmware version
• Raw read error rate
• Reallocated sector count
• Spinup retry count
• Command timeout
• Reallocated Event Count
• Current Pending Sector
• Reported Uncorrect
• Soft Read Error Rate
• Read Error Retry Rate
Configurable settings
In the settings tab, these are the parameters that can be configured:
Monitored disks
Here you have the option to either display all disks seen by the system, or only the active (processing) disks.
Page 52

| Advanced tools | 52
Refresh Rate
This specifies the interval in seconds between updates to the SMART information displayed when the SMART
Monitor is running.
Running the SMART monitor
The SMART monitor can either be refreshed manually or run to keep the information current. To run the SMART
monitor, simply click the Start button in the action toolbar. To pause or stop auto-refreshing sequence click Pause or
Stop buttons in view's toolbar respectively.
Page 53

| Troubleshooting, Backup and System Recovery | 53
Troubleshooting, Backup and System Recovery
In the event that you encounter technical difficulties with KillDisk Desktop, you may choose to either troubleshoot
the system or recover the system. This section explains how each can be performed and measures you can take to
ensure swift recovery from any catastrophic failure.
Troubleshooting
KillDisk Desktop is covered by 1 year of free support and updates by LSoft Technologies Inc. If you experience any
issues with the system, be sure to contact us by phone and email and we will help resolve your issue. For technical
issues, be sure to email us your hardware diagnostic file, detailed in this section.
System Backup
Once the system has been fully configured, this configuration may be imaged using the included Acronis True image
application. This will create a restoration point to recover the system to its' ideal configuration in the future in the case
of system failure or configuration changes.
System Recovery
System recovery can be performed in one of three ways, depending on the goal of the recovery and available
restoration data. They will be outlined in this section as:
• Reset to factory settings
• Clean installation using bootable media
• Rollback to previous configuration using Acronis True Image
Hardware diagnostic file
If you want to contact our technical support staff for help, a file that contains a summary of your local devices is
helpful.
KillDisk allows you to create a summary listing file in XML format. This data format is “human-readable” and
can help our technical support staff analyze your computer configuration or point out disk failures or abnormal
behavior.
Create a hardware diagnostic file from the File menu by clicking the Save Hardware Info As... command.
Note: To save time when contacting our technical support staff, we highly recommend that you provide us
with a hardware diagnostic file.
System Recovery - Reset to Factory Settings
This feature requires several hardware components, not included with the KillDisk Desktop system. Make sure these
peripherals are properly connected to the system before proceeding:
• Monitor
• USB keyboard
This feature is built into the KillDisk Desktop system and may be accessed at any time to restore the system to
original settings, erasing all user data, logs and configurations.
1.
Starting from a "Powered off" state, power on the KillDisk Desktop hardware unit.
2.
In the first few moments of launching the system, you will see the KillDisk boot menu. From the boot options,
navigate to Restore to Factory Settings using the arrow keys on the keyboard and press the Enter key
Page 54

| Troubleshooting, Backup and System Recovery | 54
3.
Follow the directions to reset the system to factory settings.
KillDisk Desktop should now be reset to its' initial settings. All prior user data is now erased and clean version of
KillDisk is on the system.
System Recovery - Reinstallation with a bootable disk
This feature requires several hardware components, not included with the KillDisk Desktop system. Make sure these
peripherals are properly connected to the system before proceeding:
• A Windows system that can run the KillDisk CD-ROM
• A blank USB drive, at least 200MB in size or Blank CD/DVD and external CD/DVD read/write peripheral
• Computer monitor
• Keyboard
KillDisk includes a CD that can be used to create a recovery CD or USB for the system. This process will re-install
KillDisk on the system during disaster recovery or need for a reinstall.
1.
Run the KillDisk CD on the separate Windows machine. Launch it to access the Boot Disk Creator
2.
Insert the blank USB or connect the external CD peripheral with blank CD inserted
3.
Depending on Step 2, select the appropriate device in the Select Media Option list
4.
Follow the prompts to complete the Booable Disk creation process
5.
Boot KillDisk Desktop from the USB by inserting the USB device into the unit and powering it on
6.
Follow prompts to complete the recovery
KillDisk Desktop should now be reset to its' initial settings. All prior user data is now erased and clean version of
KillDisk is on the system.
Page 55

Application log
This log view monitors each action taken by the application and displays messages, notifications and other service
information. Use the messages in this screen to observe and further understand the flow of the recovery process.
To open and activate Application log view do one of the following:
• From main menu choose View > Application Log or
• Use F8 keyboard shortcut at any time
It is best to save the log file to a physical disk that is different from the disk that holds the deleted data. By doing this,
you reduce the risk of writing over the data that you are trying to recover.
Log filter
Show or hide specific entry types in log view:
Show warning entries
Show non-critical warning entries
Show advanced entries
Show advanced entries related to application behavior and data analysis
Show console entries
Duplicate console entries into main log view
Show system entries
Show entries related to operating system activity and state
Font size
Change size of mono-space font used in log view for better experience
Write log on Disk
Writes log entries in dedicated file on disk, located in application directory. Off by default.
Expand and Collapse
Expand or collapse all log entries respectively
Clear
Clear log for current application sessions
| Application log | 55
Tip: We recommend that you attach a copy of the log file to all requests made to our technical support group.
The entries in this file will help us resolve certain issues.
Console view
Additional log view (pane) to show log entries related to active feature view to display active process (erasure, disk
examination etc.) entries and urgent (critical) messages.
To open console panel use:
• From main menu choose View > Output or
• Use Ctrl+O keyboard shortcut at any time
Page 56

Appendix
Glossary
BIOS settings
Basic Input Output Subsystem. This programmable chip controls how information is passed to various devices in the
computer system. A typical method to access the BIOS settings screen is to press F1, F2, F8, F10 or ESC during the
boot sequence.
boot priority
BIOS settings allow you to run a boot sequence from a floppy drive, a hard drive, a CD/DVD-ROM drive or a USB
device. You may configure the order that your computer searches these physical devices for the boot sequence. The
first device in the order list has the first boot priority. For example, to boot from a CD/DVD-ROM drive instead of a
hard drive, place the CD/DVDROM drive ahead of the hard drive in priority.
compressed cluster
When you set a file or folder property to compress data, the file or folder uses less disk space. While the size of the
file is smaller, it must use a whole cluster in order to exist on the hard drive. As a result, compressed clusters contain
"file slack space". This space may contain residual confidential data from the file that previously occupied this space.
KillDisk can wipe out the residual data without touching the existing data.
| Appendix | 56
cluster
A logical group of disk sectors, managed by the operating system, for storing files. Each cluster is assigned a unique
number when it is used. The operating system keeps track of clusters in the hard disk's root records or MFT records.
(See lost cluster).
file slack space
The smallest file (and even an empty folder) takes up an entire cluster. A 10- byte file will take up 2,048 bytes if that
is the cluster size. File slack space is the unused portion of a cluster. This space may contain residual confidential data
from the file that previously occupied this space. KillDisk can wipe out the residual data without touching the existing
data.
free cluster
A cluster that is not occupied by a file. This space may contain residual confidential data from the file that previously
occupied this space. KillDisk can wipe out the residual data.
deleted boot records
All disks start with a boot sector. In a damaged disk, if the location of the boot records is known, the partition table
can be reconstructed. The boot record contains a file system identifier.
ISO
An International Organization for Standardization ISO-9660 file system is a standard CD-ROM file system that
allows you to read the same CD-ROM whether you're on a PC, Mac, or other major computer platform. Disk images
of ISO-9660 file systems (ISO images) are a common way to electronically transfer the contents of CD-ROMs. They
often have the filename extension .ISO (though not necessarily), and are commonly referred to as "ISOs".
Page 57

lost cluster
A cluster that has an assigned number in the file allocation table, even though it is not assigned to any file. You can
free up disk space by reassigning lost clusters. In DOS and Windows, you can find lost clusters with the ScanDisk
utility.
MFT records
Master File Table. A file that contains the records of every other file and directory in an NTFS-formatted hard disk
drive. The operating system needs this information to access the files.
root records
File Allocation Table. A file that contains the records of every other file and directory in a FAT-formatted hard disk
drive. The operating system needs this information to access the files. There are FAT32, FAT16 and FAT versions.
sector
The smallest unit that can be accessed on a disk. Tracks are concentric circles around the disk and the sectors are
segments within each circle.
unallocated space
Space on a hard disk where no partition exists. A partition may have been deleted or damaged or a partition may not
have been created.
| Appendix | 57
unused space in MFT records
The performance of the computer system depends a lot on the performance of the MFT. When you delete files, the
MFT entry for that file is not deleted, it is marked as deleted. This is called unused space in the MFT. If unused space
is not removed from the MFT, the size of the table could grow to a point where it becomes fragmented, affecting
the performance of the MFT and possibly the performance of the computer. This space may also contain residual
confidential data (file names, file attributes, resident file data) from the files that previously occupied these spaces.
KillDisk can wipe out the residual data without touching the existing data.
Windows system caching
Windows reserves a specified amount of volatile memory for file system operations. This is done in RAM because it
is the quickest way to do these repetitive tasks.
Windows system records
The Windows registry keeps track of almost everything that happens in windows. This enhances performance of the
computer when doing repetitive tasks. Over time, these records can take up a lot of space.
Erase methods
One Pass Zeros or One Pass Random
When using One Pass Zeros or One Pass Random, the number of passes is fixed and cannot be changed. When the
write head passes through a sector, it writes only zeros or a series of random characters.
US DoD 5220.22-M
The write head passes over each sector three times. The first time with zeros (0x00), second time with 0xFF and the
third time with random characters. There is one final pass to verify random characters by reading.
Canadian CSEC ITSG-06
The write head passes over each sector, writing a Random character. On the next pass, writes the compliment of
previously written character. Final pass is Random, proceeded by a verify.
Page 58

Canadian OPS-II
The write head passes over each sector seven times (0x00, 0xFF, 0x00, 0xFF, 0x00, 0xFF, Random). There is one
final pass to verify random characters by reading.
British HMG IS5 Baseline
Baseline method overwrites disk's surface with just zeros (0x00). There is one final pass to verify random characters
by reading.
British HMG IS5 Enhanced
Enhanced method - the write head passes over each sector three times. The first time with zeros (0x00), second time
with 0xFF and the third time with random characters. There is one final pass to verify random characters by reading.
Russian GOST p50739-95
The write head passes over each sector two times. (0x00, Random). There is one final pass to verify random
characters by reading.
US Army AR380-19
| Appendix | 58
The write head passes over each sector three times. The first time with 0xFF, second time with zeros (0x00) and the
third time with random characters. There is one final pass to verify random characters by reading.
US Air Force 5020
The write head passes over each sector three times. The first time with random characters, second time with zeros
(0x00) and the third time with 0xFF. There is one final pass to verify random characters by reading.
Navso P-5329-26 RL
RL method - the write head passes over each sector three times (0x01, 0x27FFFFFF, Random).
There is one final pass to verify random characters by reading.
NCSC-TG-025
The write head passes over each sector three times (0x00, 0xFF, Random). There is one final pass to verify random
characters by reading.
NSA 130-2
The write head passes over each sector two times (Random, Random). There is one final pass to verify random
characters by reading.
NIST 800-88
Supported three NIST 800-88 media sanitization standards:
1. The write head passes over each sector one time (0x00).
2. The write head passes over each sector one time (Random).
3. The write head passes over each sector three times (0x00, 0xFF, Random).
For details about this,the most secure data clearing standard, you can read the original article at the link below:http://
csrc.nist.gov/publications/nistpubs/800-88/NISTSP800-88_with-errata.pdf
German VSITR
The write head passes over each sector seven times.
Page 59

Bruce Schneier
The write head passes over each sector seven times (0xFF, 0x00, Random, Random, Random, Random, Random).
There is one final pass to verify random characters by reading.
Peter Gutmann
The write head passes over each sector 35 times. For details about this, the most secure data clearing standard, you
can read the original article at the link below:
http://www.cs.auckland.ac.nz/%7Epgut001/pubs/se%0Acure_del.html
User Defined
You indicate the number of times the write head passes over each sector. Each overwriting pass is performed with a
buffer containing random characters.
File name tags
Sequence number
| Appendix | 59
Sequential number, used for group (batch) processing.
{Sequence #}
{Sequence 0#}
{Sequence 00#}
{Sequence 000#}
Date
Date file name tag uses current date in most cases in different formats:
{Date(YYYYMMDD)}
{Date(YYYY-MM-DD)}
{Date(YYMMDD)}
{Date(YYYY)}
{Date(YY)}
{Date(Month)}
{Date(MM)}
{Date(DD)}
Time name tags
{Time(HHmmss)}
{Time(HH-mm-ss)}
{Time(HH)}
{Time(mm)}
{Time(ss)}
Page 60

Disk name tags
Values for these name tags retrieved from context device:
{Serial ID}
Disk serial number, retrieved from OS or from SMART attributes
{Platform ID}
Disk platform identification (may be vary due to OS format);
{Product ID}
Disk manufacturer id
{Model}
Disk model name (if available);
{Size}
Disk size in gigabytes
{Sectors}
Disk size in sectors
Processing attributes
| Appendix | 60
Disk processing attributes based on execution conditions:
{BatchName}
Batch name, if part of a batch processing.
{BayName}
Label of disk bay (slot).
{Status}
Overall completion status for group processing or separate disk processing status.
 Loading...