

Killbros 112, 114, 115 Owner's Manual

OWNER’S MANUAL
Part #: 104936
Hydraulic Box Auger
MODELS 112, 114, & 115
(All D-Series SN Up To D-1940)
PLEASE PROVIDE MODEL
AND SERIAL NO.
WHEN ORDERING PARTS
KILL BROTHERS
24325 St. Rt. 697W
DELPHOS, OHIO 45833
PHONE: 419-695-2060
FAX: 419-695-6875
INTRODUCTION
This manual covers operation, service,
assembly, and parts for your HYDRAULIC BOX
AUGER. Read and study this manual
completely before attempting to operate this
product. Take this manual to the field for handy
reference when operating, adjusting, or servicing
your machine.
This symbol identifies important safety
messages. When you see it, read the message
that follows, and be alert to the possibility of
personal injury.
Remember safety instructions stated in this
manual are for your protection. Read them
carefully and follow closely when working around
or using this machine.
REMEMBER:
THINK SAFETY
A CAREFUL OPERATOR IS THE
BEST INSURANCE AGAINST AN
ACCIDENT!
No accident-prevention program can be successful without the whole-hearted cooperation of the
person who is directly responsible for the operation of the equipment.
To read accident reports from all over the country is to be convinced that a large number of
accidents can be prevented only by the operator anticipating the result before the accident is caused and
doing something about it. No power-driven equipment whether it be transportation or processing, whether
it be on the highway, in the harvest field, or in the industrial plant, can be safer than the person who is at
the controls. If accidents are to be prevented--and they can be prevented--it will be done by the operators
who accept the full measure of their responsibility.
It is true that the designer, the manufacturer, and the safety engineer can help; and they will help,
but their combined efforts can be wiped out by a single careless act of the operator.
It is said that, “The best kind of a safety device is a careful operator.” We, at Kill Brothers ask
that you be that kind of operator.
Thank-You!
Kill Brothers
THANK YOU FOR YOUR PURCHASE!
2
Please fill out and retain this portion for your records. For warranty consideration, please contact dealer
notice.
where purchased.
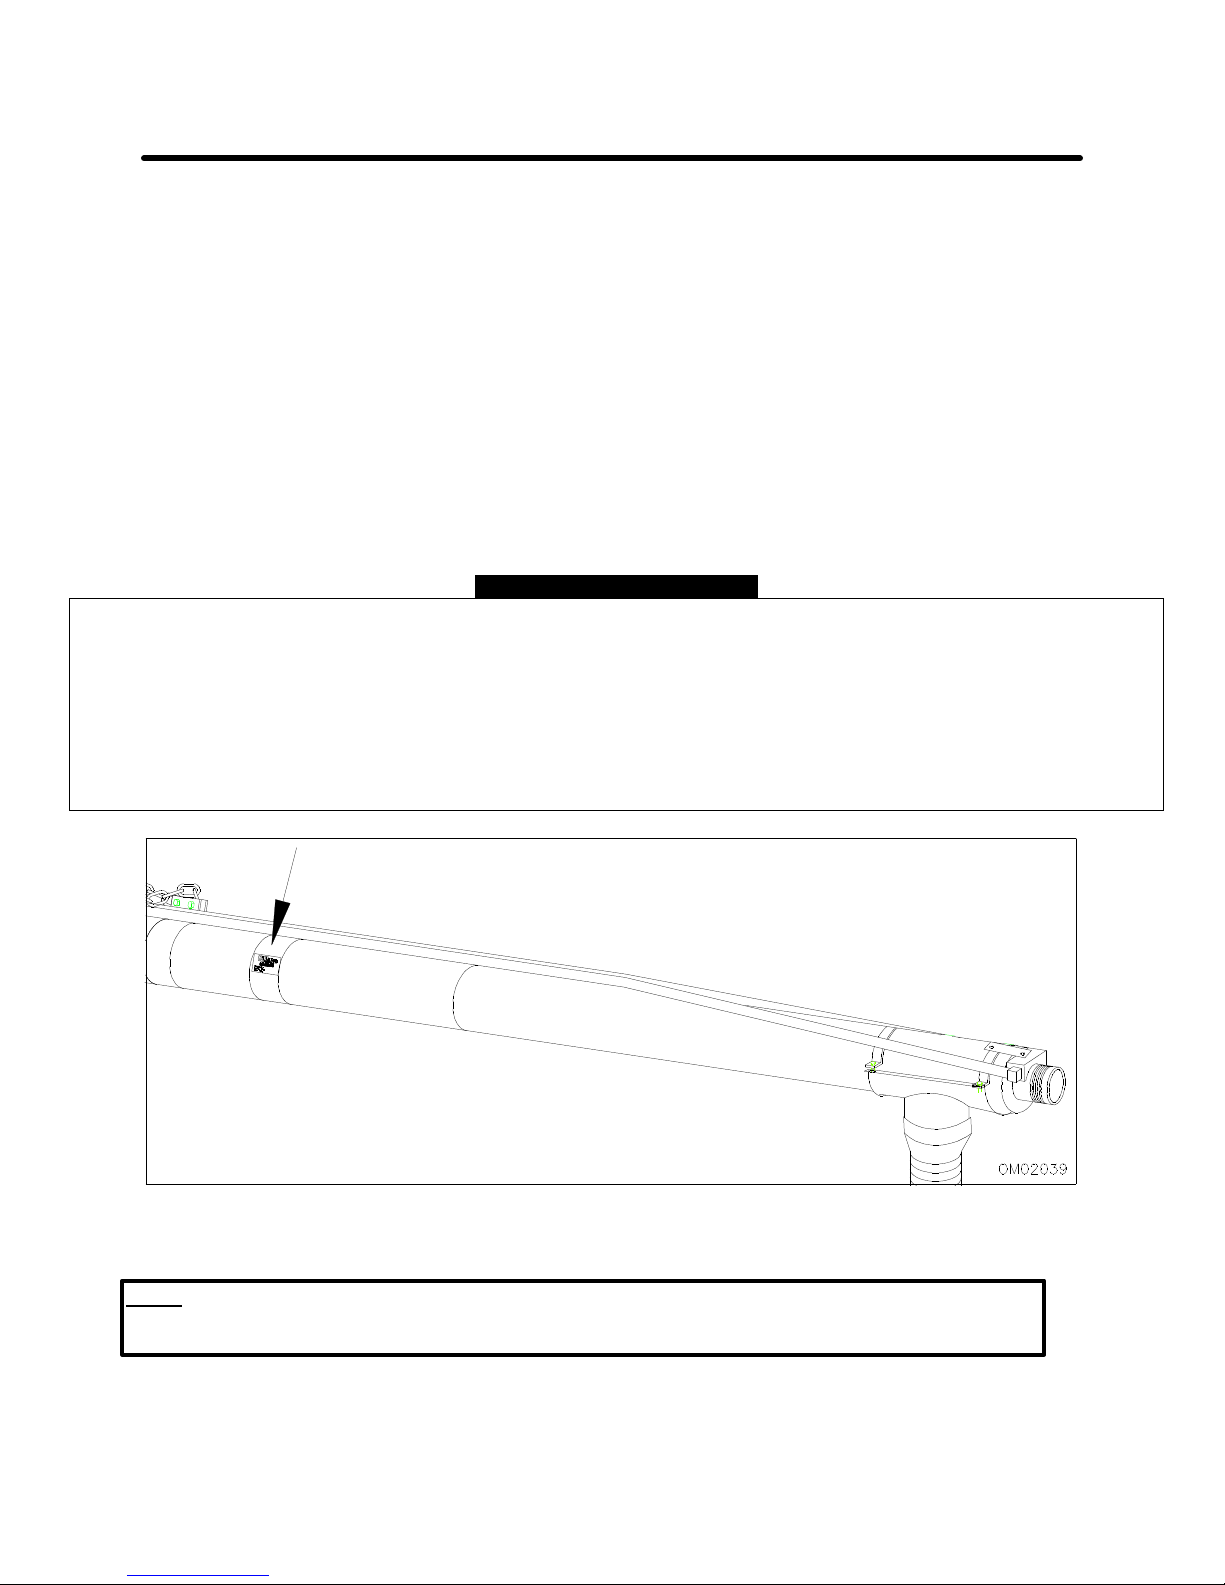
The serial number plate is located on the support band just above where the safety chain is attached to
the auger.
Product ______________________________________________________________________________
Serial Number ________________________ Date of Purchase ________________________________
Dealer ________________________ City ________________ State _______________ Zip __________
Please supply this information when you have questions or when ordering repair or replacement parts.
Your dealer needs this information to give you prompt, efficient service.
PRE-OPERATION CHECKLIST
! Wheel bolts tightened (re-check after initial use) ! Safety and operating procedures reviewed
! Tire Pressure checked ! Field adjustment information reviewed
! Hardware Tightened ! Lubrication procedures reviewed
! Machine lubricated ! Warranty information reviewed
! Guards and shields in place ! Hydraulic hoses properly routed/fittings tight
NOTE: Due to continuing improvements in the design and manufacture of Killbros products, and
normal changes in the marketplace, all specifications contained herein are subject to change without
3

TABLE OF CONTENTS
INTRODUCTION................................2
SAFETY..............................................5
AVOID POSSIBLE INJURY............6
BEFORE OPERATING...................6
DURING OPERATION................... 6
BEFORE TRANSPORTING........... 6
DURING TRANSPORT.................. 6
SECTION I -- OPERATIONS
PREPARING HYDRAULIC SUPPLY..9
CONNECTING GRAVITY BOX
TO TRANSPORT VEHICLE...........9
PREPARING AUGER.........................9
TRANSPORTING...............................10
BEFORE TRANSPORTING........... 10
DURING TRANSPORTING............10
SECTION II -- SERVICE
LUBRICATION................................... 13
STORAGE / MAINTENANCE.............13
TROUBLE SHOOTING...................... 13
FASTENERS......................................15
SECTION III -- INSTALLATION
GENERAL AUGER INSTALLATION..16
WINCH ASSEMBLY...........................22
ELECTRONIC VALVE ASSEMBLY....23
SECTION IV -- PARTS
PERFORMANCE................................10
HYDRAULIC AUGERS.......................26
OPTIONS........................................... 30
4
6

SAFETY
AVOID POSSIBLE INJURY
Always use safety precautions. Most accidents are a result of failure to practice safety. Accidents cause lost time and suffering.
Do not operate AUGER without reading this manual thoroughly.
Follow all safety precautions as outlined in this manual and in gravity box operator’s manual.
All machinery should be operated only by those who are experienced and responsible and have been delegated to do so.
BEFORE OPERATING
Lock brakes on truck or tractor to prevent movement of your gravity box during operation.
Be sure that the auger is secured properly to the side of the gravity box, and be sure that all hardware is in place and properly secured.
Check the winch and safety cables for wear and abrasions. If cables are worn or damaged, replace before using auger.
Keep children and all unauthorized personnel clear of work area. Before starting hydraulic supply, be sure that all power (electrical
and hydraulic) to the box auger is in the off position.
Do not allow anyone to ride on the equipment. Make sure everyone is clear before operating the machine or tractor.
Always shut tractor engine off when working on the unit.
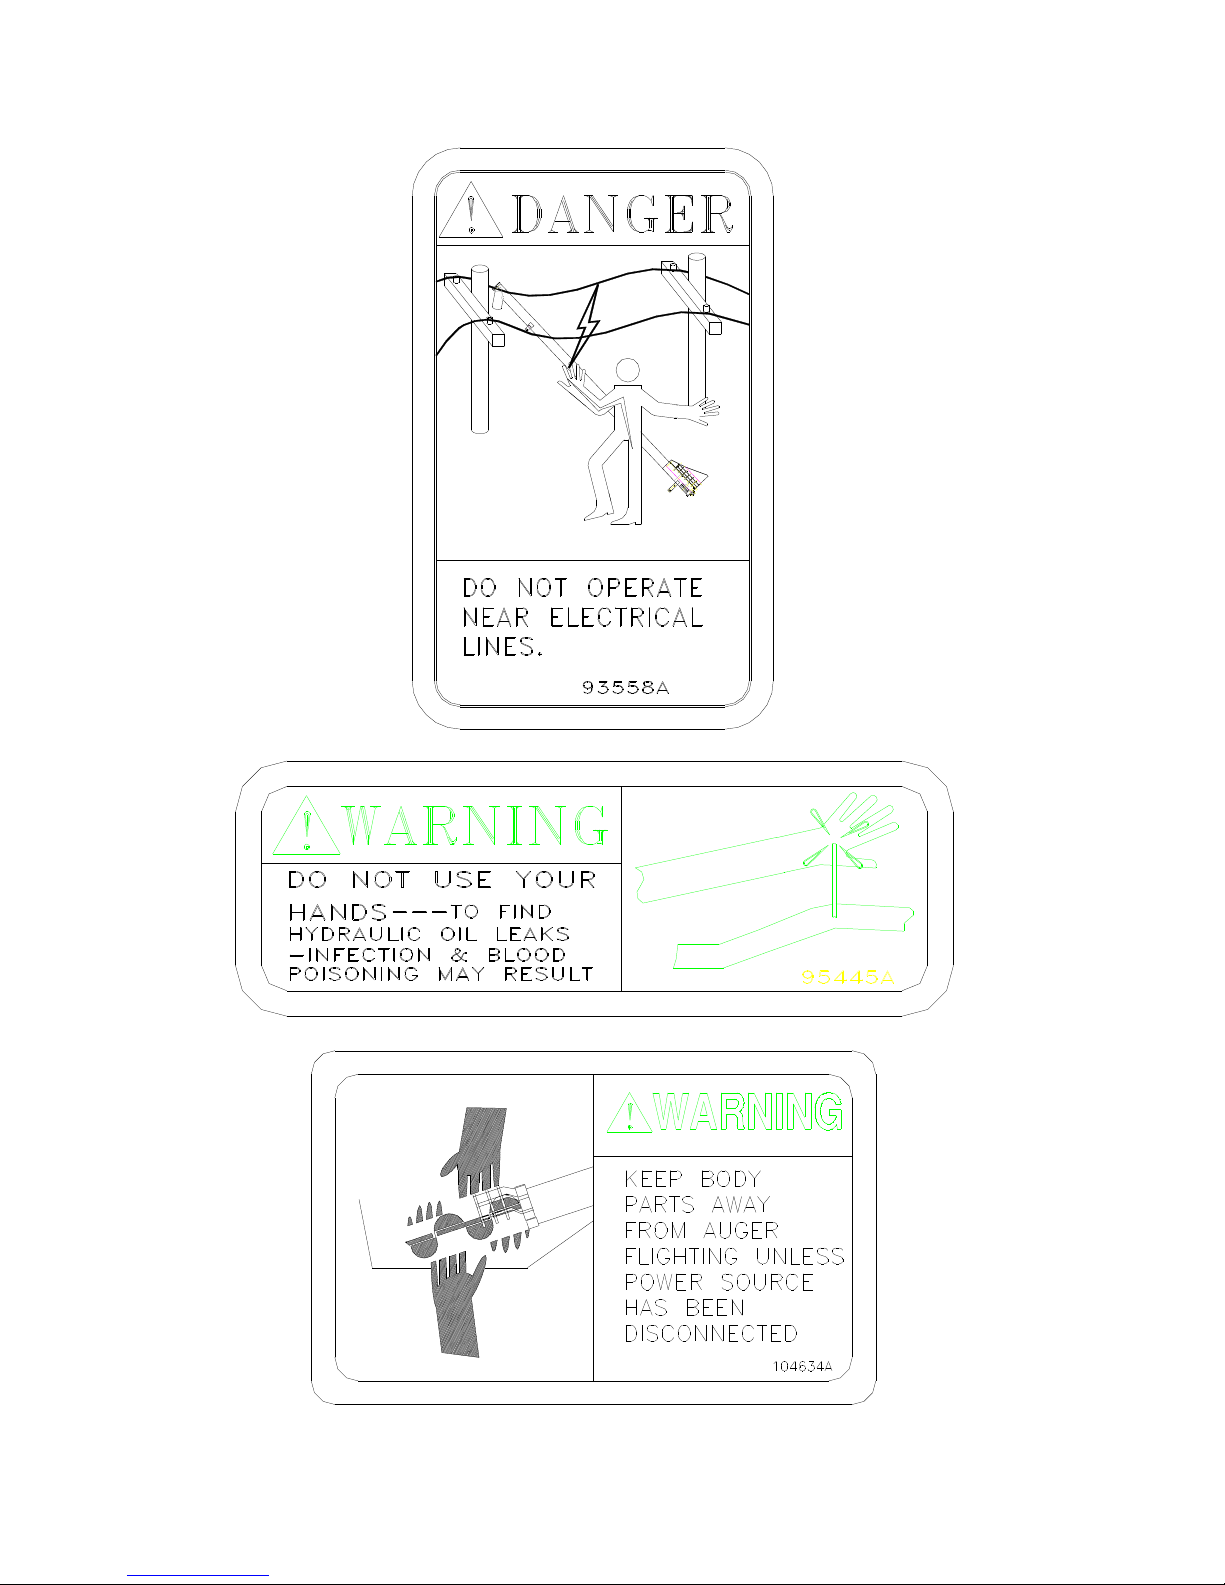
The box auger is not insulated. Keep away from all electric lines and devices. Electrocution can occur without direct contact.
Be sure that all safety shields are in place, and the clean-out door is closed and securely latched.
Keep body, hair, and clothing away from moving parts.
IF INJURED BY ESCAPING HYDRAULIC OIL, SEE A DOCTOR AT ONCE. SERIOUS INFECTION OR REACTION CAN DEVELOP
IF PROPER TREATMENT IS NOT ADMINISTERED IMMEDIATELY.
Use a piece of cardboard or wood to detect leaks of hydraulic oil under pressure.
DURING OPERATION
Keep children and all unauthorized personnel clear of work area.
Do not operate with safety shields removed, or clean-out door open.
Lower HYDRAULIC AUGER to transport position at completion of operation, or when not in use. Do not transport with the auger in
raised position.
Be sure that the auger tube is empty before placing in transport position.
When placing the auger into transport position, ensure that all personnel are clear.
Do not attempt to move any objects away from moving parts.
Keep hands, feet, clothing, and objects away from moving parts.
Do not grease or oil equipment when in operation.
BEFORE TRANSPORT
Empty auger and secure into the transport position before transporting.
7

Make sure that all safety decals and reflectors are clean and in place on the machine.
Comply with all state and local laws governing highway safety when moving machinery.
Use accessory lighting or warning lights when transporting at night to adequately warm operators of other vehicles.
DURING TRANSPORT
Use good judgment when transporting implements on highways. Maintain complete control at all times. Regulate speed to road conditions.
Drive at speeds slow enough to insure your safety as well as others.
Regulate speed during off road travel. Do not travel faster than 10 m.p.h.
Due to the height of the implement, use extra caution on highways, farm lanes, and when approaching low clearances.
COMPLY WITH ALL SAFETY WARNINGS AND CAUTION IN THIS MANUAL, AND IN TRUCK AND TRACTOR OPERATOR MANUALS.
8

SECTION I
OPERATIONS
9
Read this “Operations” section thoroughly. Acquaint
yourself with the adjustments required to obtain
efficient and trouble-free operations.
PREPARING HYDRAULIC SUPPLY
IMPORTANT: Know and understand safety rules
before operating or servicing this machine. Review
“SAFETY” section in this manual if necessary.
1. Before operating unit, be sure that you refer to
tractor’s or the hydraulic supply’s operating
manual on proper operating procedures of the
hydraulics.
2. Be sure to check the hydraulic reservoir for
proper levels of fluid.
CONNECTING GRAVITY BOX TO TRANSPORT VEHICLE
4. Be sure to hitch tractor or truck to gravity box
securely. Use safety chains and SMV signs
during on-road use.
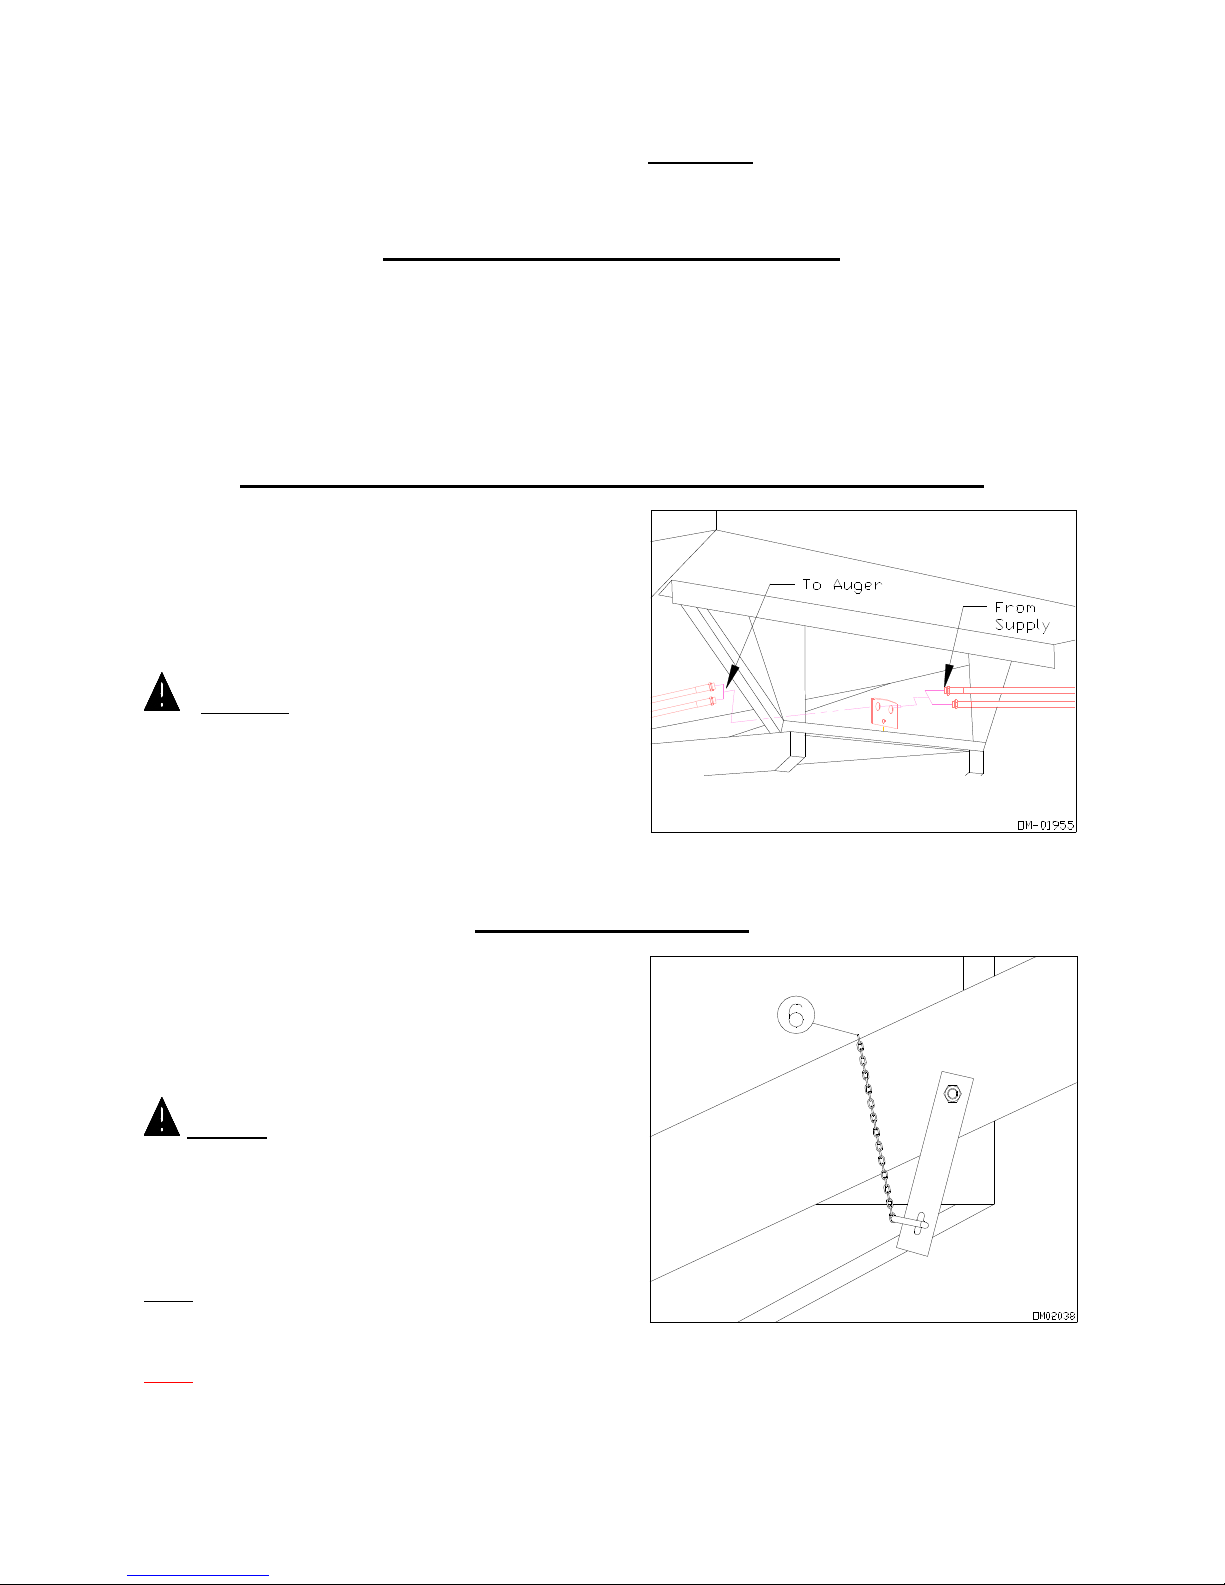
5. Connect hydraulic supply lines to auger
hydraulic lines by using a sealant tape and
tighten securely. Be sure that the auger control
is in the off position (Fig. 1-1).
WARNING! DO NOT DISCONNECT
HYDRAULIC COUPLERS WHEN HYDRAULIC
SYSTEM IS PRESSURIZED. BE SURE TO
RELIEVE ALL HYDRAULIC PRESSURE BEFORE
DISCONNECTING ANY LINES BETWEEN THE
AUGER AND THE HYDRAULIC SUPPLY.
FAILURE TO DUE SO COULD RESULT IN
SERIOUS BODILY INJURY.
3. Be sure that hydraulic system meets the
specifications outlined under “Performance” later
in this section.
FIG. 1-1
PREPARING AUGER
6. Remove transport chain (Fig. 1-2) which
secures auger to transport bracket and raise
auger to clear bracket. Be sure to securely
brace the auger when raising out of transport
bracket because auger will tend to drop towards
the center.
CAUTION! BE SURE TO MAINTAIN A FIRM
GRIP OF THE WINCH HANDLE AT ALL TIMES
WHEN LOWERING AUGER TUBE. BE SURE TO
ENGAGE RATCHET PAW (ON WINCH) INTO
POSITION WHEN WINCHING IS COMPLETE, OR
AUGER WILL DROP SUDDENLY WHEN HANDLE
IS RELEASED.
NOTE: Always check that the safety cable and
winch are connected securely and are not damaged.
Also, be sure clean out door is closed.
NOTE: Refer to winch and cable installation, see
“Winch Assembly“ in Section III.
FIG. 1-2
7. Position auger over area to be filled and turn
control valve to the ON position. Be sure that
auger is rotating in the forward direction. If the
10

auger is not, switch incoming hydraulic lines or
refer to assembly instructions.
gravity box into the hopper for optimum
performance.
WARNING! BE SURE THAT ALL CLEAN-OUT
DOORS ARE CLOSED WHEN OPERATING. KEEP
HANDS, LOOSE CLOTHING, ETC. FROM MOVING
PARTS; FAILURE TO DO SO COULD RESULT IN
SERIOUS BODILY HARM.
8. Once the auger has begun to rotate, open
hopper door. Be sure to regulate flow from
TRANSPORTING
BEFORE TRANSPORTING
Be sure to completely empty auger by closing gravity
box door and allowing auger to run. Turn the auger
off and raise into position over transport bracket and
lower into position, while securely holding the winch
handle. Once in place, lock the winch and tighten
cable so that it is taut. Finally, reposition safety chain
around auger and secure.
NOTE: Auger must be empty before transporting,
failure to do so voids warranty.
DURING TRANSPORTING
IMPORTANT: Before transporting, be sure that auger
is securely mounted in transport bracket.
Use caution when traveling, do not attempt to
transport unit under low hanging tree branches
NOTE: To achieve optimum performance, test by
placing auger at different angles. The position of the
auger depends on the type of material being handled.
NOTE: Use pressurized water to washout auger and
hopper after using fertilizer. See SERVICE section.
overhead telephone wires or electrical wires. Be
aware of transport height of unit or damage could
occur.
Comply with all state and local laws governing
highway safety and regulations when moving
equipment on public roads.
CAUTION! USE APPROVED LIGHTS,
REFLECTORS, AND DEVICES WHEN
TRANSPORTING AT NIGHT AND DURING
PERIODS OF POOR VISIBILITY.
WARNING! ALWAYS TRAVEL AT A SPEED
WHICH PERMITS COMPLETE CONTROL OF
EQUIPMENT.
PERFORMANCE
MAXIMUM OPERATING PRESSURES:
• Continuous 1500 psi (min. 1000 psi).
• Peak (10% of Duty Cycle) 2250 psi.
• Back Pressure 1000 psi.
• Maximum Oil Flow 12 GPM (min. 10 GPM).
• Recommended Oil Viscosity Range 100-200 S.S.U.
• Maximum Operating Temperature 180 degrees.
• Recommended Filtration 10 micron or finer.
NOTE: For hydraulic systems that exceed the recommended peak pressure or have greater than 12 GPM oil flow, a flow
control valve is recommended to bring the system down to the peak performance of the auger. The control valve will extend the
otherwise short life of the seals and motor of the auger. Contact your Killbros dealer for more information.
WARNING! BE SURE THAT THE OIL RESERVOIR OF THE HYDRAULIC SYSTEM IS REFILLED TO ITS PROPER
LEVEL AFTER AUGER IS PUT IN OPERATION.
AVOID:
• Large contamination particles in fluid such as machining chips or sand.
• Extreme high fluid temperatures that cause the motor to operate slowly and reduce the motor’s capability to lubricate
properly.
11
 Loading...