


Model P4480
Kill A Watt® Graphic Timer Operation Manual
Thank you for purchasing the P4480 Kill A Watt® Graphic Timer. This operating manual will provide an overview of the product, safety
instructions, a quick guide to operation, and complete instructions for correct usage. Take the time to completely review these instructions as
well as safety warnings to ensure your best use of the product.
Now you can protect your valuable electronics and find out what they are actually costing you. Simply connect your appliance to the Graphic
Timer and it will assess how efficient they are. Electricity consumption is tracked and displayed in Kilowatt Hours. You can then program
ON/OFF periods to save electricity and money.
The unit combines advantages of traditional mechanical and electronic timers. It is easy to program the quarter-hour ON/OFF periods for 7
days and 24 hours as you would program traditional mechanical timer. With the Graphic Timer, you are not limited to one day only – the unit
allows unique programs for each of the 7 days of the week. The easy-to-read LCD display allows you to review and adjust your ON/OFF
programs easily. Measurements and programming are stored in memory and retained during power outages. A Backup battery (3X AAA
batteries – not included) allow programming even when not plugged in.
Advanced features also included:
Surge, over current, over voltage, and under voltage protection provide clean safe power to your expensive equipment.
Zero power crossing switch provides a spike free ON/OFF relay control to prolong your appliances life.
LED powered LCD backlight.
Check the quality of your power by monitoring Voltage, Amperage, KWH and more.
Now you’ll know how much power your appliances are using, and save power by graphic timer. With the innovative Kill A Watt® Graphic
Timer you’ll have peace of mind in more ways than one.
Safety Instructions:
The operating voltage is limited to +/- 10% of Line voltage 120Vac. Do not use for any other voltage rating.
The maximum output current is 15A.
To reduce the risk of electric shock, do not remove cover. No user-serviceable parts inside. Refer servicing to qualified
service personnel.
Warning:
To reduce the risk of fire or electric shock, do not expose this appliance to rain or moisture. Do not use outdoors.
Feature Locations:
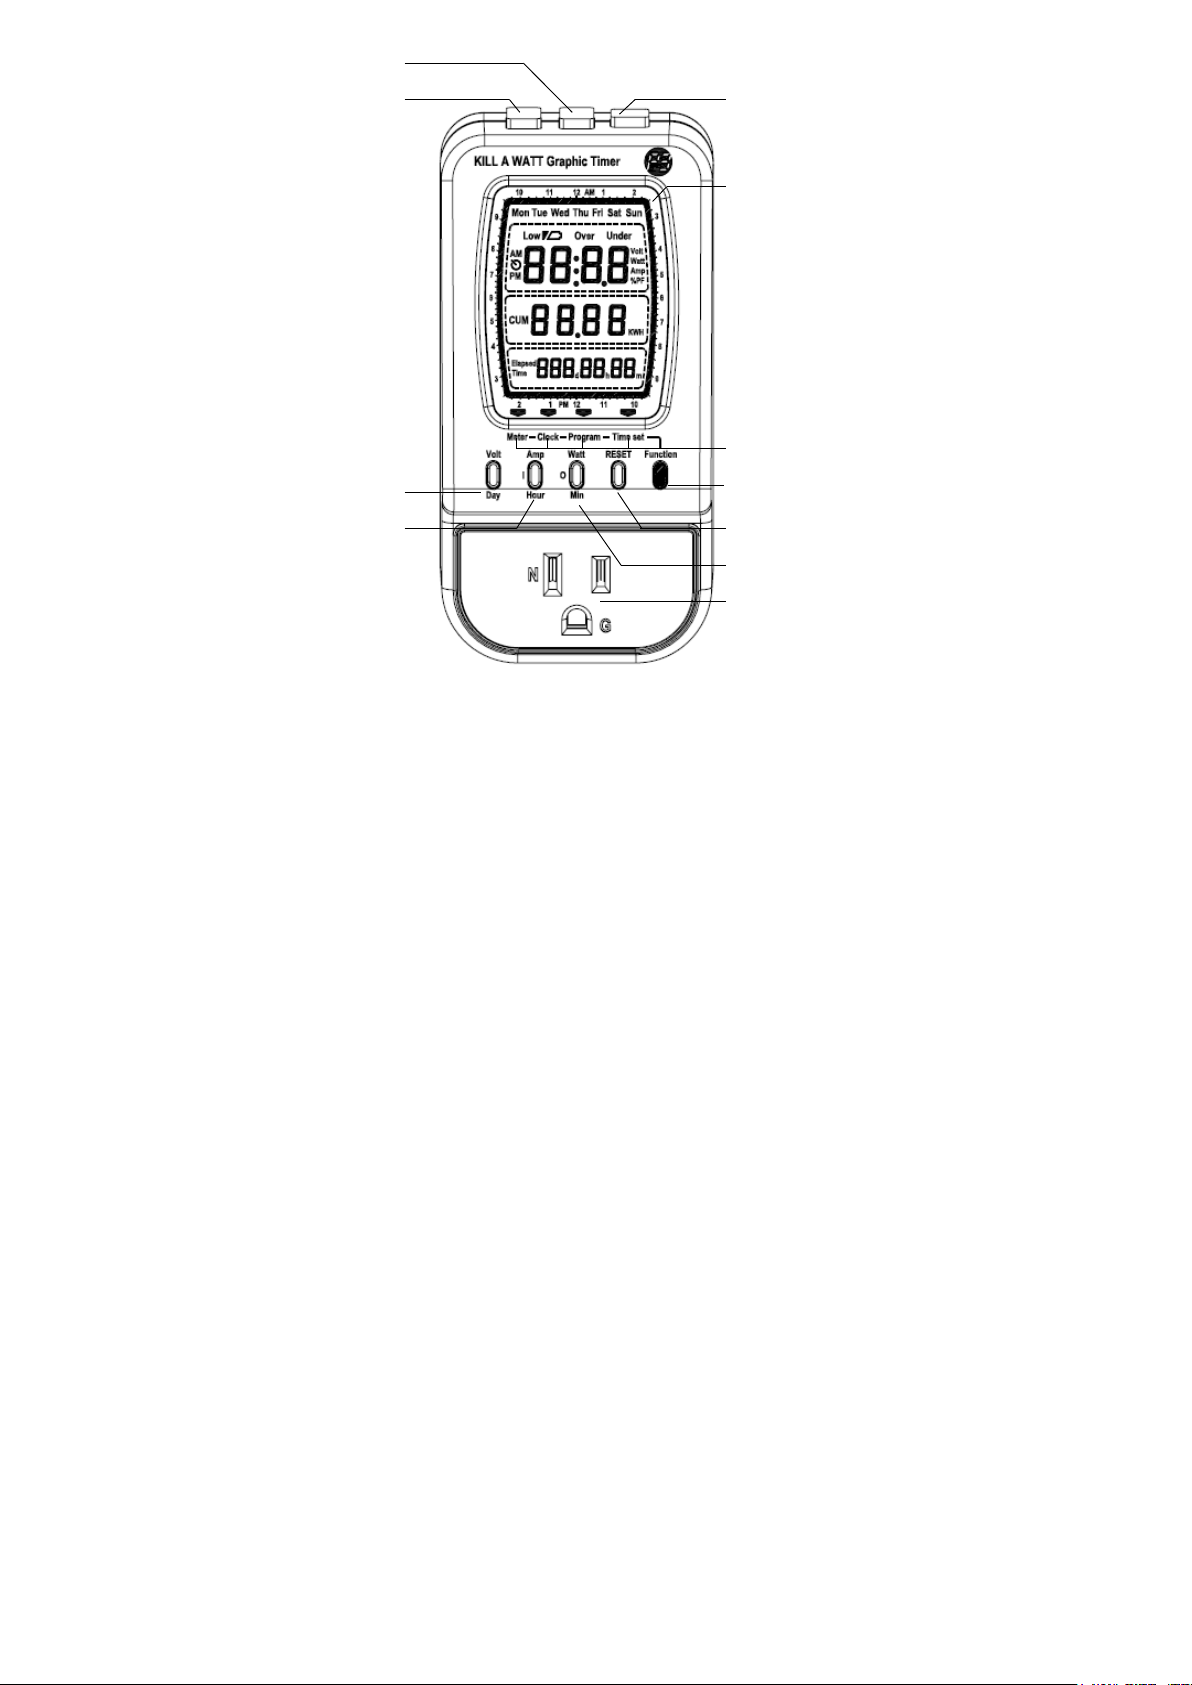
Outlet
Reset Key
Watt/PF and Min/0 Key
Function Key
Volt and Day Key
Amp Hour/I Key
Function Indicator
LCD Display
With Backlight (Orange LED)
Auto Key with orange LED
ON Key with green LED
OFF Key with red LED

Display Panel:
Function Indicator
LCD Display
With Backlight (Orange LED)
Elapsed Time
Cumulative KWH
Main Display
Weekly Day Icon
Program Setting Indicator
Meter Unit
AM/PM, countdown Icon
Low Battery, Over / Under Icon
Meter Clock Program Time set
Quick Start Guide:
Use these quick start instructions to get up and running in just a few minutes. Be sure to review all the operating instructions later to ensure
full enjoyment of the product.
1. Using the appropriate flat screwdriver open the battery cover on the back of the unit, and insert 3 new AAA batteries with the correct
polarity. When the batteries are in place, return the battery cover back into its original position. Now you can operate the unit by
battery power, allowing programming while held in your hand (rather than plugging it in).
2. Clock mode is the initial mode, the main display will be the clock (flashing).
3. Press the Function key to cycle through the Meter, Clock, Program and Time set mode. The current mode is indicated by a
marker on the LCD above the mode name.
4. Press the Function key to choose Time set mode, the main display will show the clock, press the Day key to choose the current
day of the week. Press Hour and Min key to set the time clock.
5. Press the Function key to choose Program mode, one segment of the outer LCD ring will flash, and main display will show Mon.
Press Day key to select programming for Mon, Tue, Wed, Thu, Fri, Sat, or Sun.
6. Each segment of the outer LCD ring represents a 15 minute period. When the segment is on, the connected appliance will be
switched on, and vice-versa. Press the 0 key (Watt/Min) to switch the selected time segment off and move to the next time segment.
Press the I key (Amp/Hour) to switch the selected time segment on and move to the next segment.
7. Pressing and holding the 0 or I key will rapidly advance the time segments and switch them all off or on respectively.
8. Press the Day key to lock in your changes and select the next day. Continue programming as above.
9. Connect the Kill A Watt® Graphic Timer unit to the outlet and the appliance to the unit.
10. Press the OFF key. The OFF key will illuminate red.
11. Press the ON key. The ON key will illuminate green and the attached appliance will be powered. Turn on the appliance.
12. Press the Function key to choose Meter mode, the main display will show voltage (Volt).
13. Press the Amp key, main display will show current (Amp); press Watt key, main display will show active power (Watt), press Volt
key, main display will show voltage (Volt).
14. Press the AUTO key to begin automatic timer mode. The AUTO key will illuminate orange.
15. When any key is pressed the orange LCD backlight will be lit for around 5 seconds (when plugged in).
16. Review the complete operating instructions to familiarize yourself with all features.
Installation:
1. Using the appropriate flat screwdriver open the battery cover on the back of the unit, and insert 3 new AAA batteries with the correct
polarity. When the batteries are in place, return the battery cover back into its original position. Now you can operate the unit by
battery power, allowing programming while held in your hand (rather than plugging it in).
2. Turn off the appliance before connection to the unit and remove the power cord from the outlet. Connect the Kill A Watt® Graphic
Timer unit to the outlet and appliance to the unit.
3. The main display of LCD will be flashing in Clock mode. This is normal when the unit connected to power the first time. Please refer
to Time set mode to set clock time.
4. Press the ON key, and Turn the appliance back on and confirm normal operation. If the appliance does not function, please recheck
your installation.
ON, OFF and Auto key function:
1. Pressing the OFF key will turn off power to the outlet at once. The OFF key will illuminate in red. The unit will continue to measure

power (e.g. Voltage, Time, clock) and the function keys and LCD display will continue to operate.
2. Pressing the ON key will turn power on to the outlet at once. The ON key will illuminate in green. The unit features a spike-free
switch function which activates at zero-crossing and will provide clean power to your connected appliance. The unit will measure
power and the function keys and LCD display will operate.

3. Pressing the Auto key activates Auto mode. The Auto key will illuminate in orange. It will turn the connected appliance
Now is AM 10:10
Corresponding Cursor
(1/8 duty flash)
Monday
Meter Clock Program Time set
automatically ON or OFF according to the Program. If the Program is ON, the unit will be ON at once no matter the current manual
ON/OFF status. If the Program is OFF, the unit will be OFF at once no matter the current manual ON/OFF status.
Pressing the Auto key again to Manual mode disables the auto ON or OFF function and the Auto key LED will be dark.
Time set mode: (Function key Clock Program Time set Day key, Hour key, or Minute key can adjust Clock).
1. Press Function until Time set is selected. The current mode is indicated by a marker on the LCD above the mode name.
2. Press the Day key. The main display will flash. Press Day key again to cycle through Mon, Tue, Wed, Thu, Fri, Sat and Sun.
3. Press the Hour key. The main display will flash. Press Hour key again to advance the set hour.
4. Press the Min key. The main display will flash. Press Min key again to advance the set hour..
5. The Main display flashing indicates the clock can be re-set. If the main display is stable and you want to re-set the clock, press
Function key to choose Time set mode. Or press Day, Hour or Minute key to set when it is in Time set mode.
Program mode: (Function key Program Day key, I key, 0 key or Reset key can program Timer ON/OFF in 7 days 24 hours).
1. Press Function until Program is selected. The current mode is indicated by a marker on the LCD above the mode name. The main
display will show the current time. The corresponding segment of the outer LCD will be flashing. The segment represents a 15
minute period.
2. Pressing the Day key will cycle through Mon, Tue, Wed, Thu, Fri, Sat, and Sun. Please select the desired program day.
3. Press the I key (Amp/Hour) to switch the selected time segment on and move to the next segment.
4. Press the 0 key (Watt/Min) to switch the selected time segment off and move to the next time segment.
5. Pressing and holding the 0 or I key will rapidly advance the time segments and switch them all off or on respectively.
6. Pressing the Reset key will cause the main display and all 96 segments of the outer LCD to flash. Holding the Reset key for over
one second will reset the clock to zero and all segments off.
7. The Auto key has no function under Program mode.
Example: Monday AM 06:00 to AM 08:00 is ON,
PM 07:00 to PM 10:00 is ON,
The others periods OFF.
Function key Program Day key to Mon 0 key until main display to AM 06:00 I key until main display to AM 08:00 0 key
until main display to PM 07:00 I key until main display to PM 10:00 Function key Clock.
Example: Saturday AM 08:00 to AM 10:00 is ON,
PM 12:00 to PM 01:00 is ON,
PM 06:00 to PM 11:00 IS ON,
The others is OFF.
Function key Program Day key to Sat 0 key until main display to AM 08:00 I key until main display to AM 10:00 0 key until
main display to PM 12:00 I key until main display to PM 01:00 0 key until main display to PM 06:00 I key until main display to
PM 11:00 Function key Clock.

Saturday
Now is PM 05:40
Corresponding Cursor
(1/8 duty flash)
Meter Clock Program Time set
Auto Copy Function:
It is possible to copy your programmed ON/OFF periods from Monday to the other days of the week. This can save programming time
if you wish the Graphic Timer to run the same ON/OFF programs every day. After you copy programming from Mon to the other days
of the week, you can still modify each day individually. This can save programming time if you wish the Graphic Timer to run the same
or similar ON/OFF programs most days. Adjust the other days accordingly following instructions for the Program mode after you follow
the below instructions to copy your programs.
1. While in Program mode, First reset all programming by holding the Reset key for 3 seconds. All segments in the outer LCD display
with switch off and the clock display will reset to Mon 12:00 AM. Wait about 4 seconds for the single segment at 12:00 AM to begin
flashing.
2. Begin setting your program for Monday following instructions for the Program Mode. When you have completed your Mon
programs, Press the Day button. All programs from Mon will be copied to the other six days of the week.
3. If desired, you can modify each day’s programming individually by following the instructions for Program mode.
Meter mode: (Function key Meter Volt key, Amp key or Watt key can show Voltage, Current, and Wattage).
1. Press Function key until Meter mode is selected. The current mode is indicated by a marker on the LCD above the mode name.
The main display will show the currently measured AC line voltage (in Volts).
2. Press the Amp key, main display will show the currently measured load current (in Amps).
3. Press the Watt key main display will show the currently measured appliance power consumption (in Watts).
4. Press the Volt key, main display will show the currently measured AC line voltage (in Volts).
5. If you press the Reset key, the cumulative appliance power consumption (in Kilowatt Hour-KWH) and Elapsed Time (in Days :
Hours : Minutes) will flash. If you then hold the Reset key for over one second, the unit will clear the cumulative KWH measurement
and will reset the elapsed time counter to zero. Be sure you have taken note of KWH measurements (if desired) before you reset as
they cannot be retrieved once reset.
KWH display (Meter mode):
1. The unit displays the total cumulative appliance power consumption in Kilowatt Hours (KWH). This is the unit your utility uses to
charge you for electricity. The unit will display KWH from 0.01 KWH to 9999 KWH. The decimal point will shift to accommodate a full
reading as the KWH measurement accumulates (as the connected appliance consumes power over time).
2. If you press the Reset key, the cumulative appliance power consumption (in Kilowatt Hour-KWH) and Elapsed Time (in Days :
Hours : Minutes) will flash. If you then hold the Reset key for over one second, the unit will clear the cumulative KWH measurement
and will reset the elapsed time counter to zero. Be sure you have taken note of KWH measurements (if desired) before you reset as
they cannot be retrieved once reset.
Elapsed Time display (Meter mode):
1. The unit displays the total cumulative elapsed time the appliance has been connected (since last reset) in Days: Hours: Minutes.
Time will be displayed from 000:00:00 to 999:23:59.
2. If you press the Reset key, the cumulative appliance power consumption (in Kilowatt Hour-KWH) and Elapsed Time (in Days :
Hours : Minutes) will flash. If you then hold the Reset key for over one second, the unit will clear the cumulative KWH measurement
and will reset the elapsed time counter to zero. Be sure you have taken note of KWH measurements (if desired) before you reset as

they cannot be retrieved once reset.
Night light function: (Function key clock I key, 0 key).
1. Press Function until Clock is selected. The current mode is indicated by a marker on the LCD above the mode name, press I key
to turn on the night light, press the 0 key to turn off the night light.
Protection Functions:
1. Abnormal Voltage mode: When the voltage presented at the wall outlet if over or under the normal voltage range, the unit will
switch to Abnormal Voltage mode. The power will be switched off to the outlet. The OFF key will illuminate in red. The main display
will flash the protected voltage value. The Abnormal Voltage icon Over/Under will display and the audible alarm will sound. When
the AC line voltage delivered by the wall outlet returns to a normal range and is stable for at least 2 seconds, the unit will switch
back to normal mode and restart power immediately. The unit will enter Abnormal Voltage mode if the AC line voltage is over
normal by 13% or under normal by 18%. The unit will switch back to normal mode when the AC line voltage returns to +10% to
-15% normal.
2. Over Current mode: When the current load presented by the connected appliance exceeds the max. Current (15A), the unit will
switch to Over Current mode. The power will be switched off to the outlet. The OFF key will illuminate in red. The main display will
flash the protected current value. The Over icon will display and the audible alarm will sound. Remove the appliance; press the
Reset key to turn off the audible alarm and erase the main display protected current value and Over icon. Then press ON key to
turn the power back on.
Battery backup function:
1. When power to the unit is interrupted, the internal power supply will be switched to battery backup mode immediately. The battery
will sustain the unit’s operation except the Protection functions and LED backlight. Since there is no AC line power to monitor,
Protection functions are not necessary in this condition.
2. The battery backup function allows the user to take unit anywhere to set and program. It is more convenient for the user to set and
program the unit while it is handheld, rather than when it is plugged into the wall outlet location. However, the unit can still be
programmed when plugged in if desired.
3. When the unit is plugged back in or AC line power is restored, the internal power supply will be switched back to AC line power. The
backup battery returns to stand-by. Be sure to keep the unit plugged in to avoid depleting the backup battery.
4. When the backup battery is low, the low battery indicator will appear on the LCD display. Discard of exhausted batteries properly.
5. To replace the backup batteries, use the appropriate flat screwdriver to open the battery cover on the back of the unit, and insert 3
new AAA batteries with the correct polarity. When the batteries are in place, return the battery cover back into its original position.
Retained measurements:
1. When power to the unit is interrupted, cumulative power consumption KWH and Elapsed Time will be retained automatically in
EEPROM memory regardless of battery backup status. User programmed Timer ON/OFF settings are retained in EEPROM memory.
Timer ON/OFF settings will be retained during a power outage..
2. When the AC power is restored, cumulative power consumption KWH and Elapsed Time will be retrieved automatically.

Specifications:
Item
Range
Resolution
Accuracy
Remark
Typ.
Max.
RMS voltage
108.0~132.0 Vrms
0.1V
0.1%
0.4%
RMS current
0.00~15.00 Arms
0.01A
0.5%
1%±0.1A
Active power
0~1980 Watt
0.1W
1%
2%±5W
KWH
0.00~9999 KWH
0.01
1%
2%±5W
Elapsed Time
000Day/ 00Hour/ 00Min.~
999Day/ 23Hour/ 59Min.
1 min
30 ppm
Over Current
Output Off : >15.38A (15A+2.5%)
---
0.5%
1%±0.1A
Manual recovery by pressing
Reset key.
Over Voltage
Output Off : >135.6V (120Vrms+13%)
Then On if Vac:<132V (120Vrms +10%)
---
0.1%
0.4%
Auto Restore
Under Voltage
Output Off : <98.4V(120Vrms -18%)
Then On if Vac:>102V (120Vrms -15%)
---
0.1%
0.4%
Auto Restore
Clock
7 Day, 12 Hour (AM/PM)
1 min
30 ppm
Timer(Program)
7 Day, 12 Hour (AM/PM)
15 min
30 ppm
Back-Light
3 LED (Orange)
---
---
.
Output Control
Manual or Auto
Condition Indicator : LED,
ON : Green, OFF : Red, AUTO : Orange
---
---
Output Outlet
3-prong grounded plug and receptacle.
---
---
Spike free switch
ON/OFF on zero power
---
---
Increasing connected appliance
and switch usage life.
Surge Protection
Maximum energy
Dissipation (Joules)
(L-N, L-G & N-G)
224 J (L-N)
---
---
Maximum Clamping
Voltage
395 V
---
---
Maximum Surge Current
15000A
---
---
Buzzer
Key:1 short sound
Abnormal:continuous short sound
Delay OFF 3 sec:3 short and 1 long sound
---
---
no function if AC line power is
interrupted.
Battery
AAA3
---
---
Low Battery indicator
Measurement
time
1 Sec
---
---
ENVIRONMENT CONDITIONS
INDOOR USE ONLY
ALTITUDE : UP TO 2000M
OPERATION TEMPERATURE : 0℃ ~ 50℃, Max. R.H. 90%
NON OPERATION TEMPERATURE : -10℃ ~ 60℃ Max.R.H. 95%
OPERATION VOLTAGE IS LIMITED TO ±10% OF LINE VOLTAGE
POLLUTION DEGREE : 2
CAT II
GENERAL SPECIFICATIONS
POWER RATING
120 Vrms ± 10%, 50/60Hz
POWER CONSUMPTION
Max. 0.8 Watt
Ratings
15Amp (1980 Watts) Resistive and Inductive,
600 Watts Tungsten, 1/3 H.P. 120V.A.C.
L/W/H
72mm x 73.4mm x 139.5mm
WEIGHT
Around 245g
Note: 1. The specification is based on sine wave and resistance load.
Troubleshooting:

Item
Symptoms
Action
Description
1
The main display flashes when the unit is
connected to wall outlet.
Clock setting
1. This normal operation, Clock is not set
yet.
2. New unit connect to AC line or battery
change will reset clock
2
Over icon display and Amp value is
flashing, audible alarm is sounding.
Output is off and OFF key illuminated
red.
Check and remove the appliance which
is drawing over current to the unit, press
Reset key and ON key to restart the unit.
This is over current protection function
indicating the total power consumption is
larger than the max. by 2.5%.
3
Over/Under icon display and Volt value is
flashing, audible alarm is sounding.
Output is off and OFF key illuminated
red. ,
The unit will restart automatically when
the AC power line voltage returns to
normal voltage within 2 seconds. If
condition persists call a qualified
technician.
This is thenabnormal voltage (too high or
too low) protection function.
4
LCD displays low battery icon
Battery change.
This is a normal condition.
5
No display in the LCD, no response from
pressing keys.
1. Check that the unit connected to an
energized AC wall outlet or battery.
2. Request technical support.
When the unit is not connected to an
energized AC power and the battery is
depleted, there will be no display in the
LCD, no response from pressing keys.
Otherwise replace unit..
Maintenance
Protect the meter from adverse weather conditions. The meter is not waterproof. Do not expose the LCD display to direct
sunlight for long periods of time. Do not use outdoors.
CAUTION: To avoid damage to the meter, do not expose it to sprays, liquids, or solvents.
Clean the exterior of the meter by removing dust with a lint-free cloth.
Use care to avoid scratching the clear plastic display filter.
For further cleaning, use a soft cloth or paper towel dampened with water. You can use a 75% isopropyl alcohol solution for more
efficient cleaning.
CAUTION: To avoid damage to the surface of the meter, do not use abrasive or chemical cleaning agents.
P3 INTERNATIONAL CORPORATION
LIMITED WARRANTY
P3 INTERNATIONAL CORPORATION ("P3") warrants to the original retail purchaser only, that its product is free from defects in
material or workmanship under the condition of normal use and service for a period of six (6) months from the date of purchase. In
the event that a defect, malfunction or failure occurs or is discovered during the warranty period, P3 will repair or replace at its option
the product or component part(s) which shall appear in the reasonable judgment of P3 to be defective or not to factory specifications.
A product requiring service is to be returned to P3 along with the sales receipt or other proof of purchase acceptable to P3 and a
statement describing the defect or malfunction. All transportation costs shall be borne by the owner and the risk of loss shall be upon
the party initiating the transportation. All items repaired or replaced thereunder shall be subjected to the same limited warranty for a
period of six (6) months from the day P3 ships the repaired or replaced product. The warranty does not apply to any product that has
been subject to misuse, tampering, neglect, or accident or as a result of unauthorized alterations or repairs to the product. This
warranty is void if the serial number (if any) has been removed, altered, or defaced. This warranty is in lieu of all warranties
expressed or implied, including the implied warranties of merchantability and fitness for a particular purpose which are expressly
excluded or disclaimed. P3 shall not be responsible for consequential, incidental or other damages, and P3 expressly excludes and
disclaims liability for any damages resulting from the use, operation, improper application, malfunction or defeat of any P3 product
covered by this limited warranty. P3's obligation is strictly and exclusively limited to the replacement or repair of any defective product
or component part(s). Some states do not allow the exclusion or limitation of incidental or consequential damages, so the above
limitation or exclusion may not apply to you. P3 does not assume or authorize anyone to assume for it any other obligation
whatsoever. Some states do not allow limitation on how long an implied warranty lasts, so the above limitations may not apply to you.
It is the owner/user's responsibility to comply with local, state, or federal regulations, if any, that may pertain to P3 products or their use.
This warranty gives you specific legal rights, and you may also have other rights which vary from state to state.
If you experience difficulty in the operation of your unit, or if your unit requires repair please contact:
P3 INTERNATIONAL CORPORATION
TECHNICAL SUPPORT
Tel: 212-741-7289
Fax: 212-741-2288
Email: techsupport@p3international.com Rev. 0609
 Loading...