

Kikusui PMX32-3TR, PMX32-3DU, PMX32-3QU User Manual

PMX32-3DU
PMX32-3TR
PMX32-2QU
User’s Manual
Multiple-output Regulated
DC Power Supply
PMX Series (Multiple-output)
Contents 5
Component Names 8
Installation 13
Basic Functions 26
External Control 60
Parallel Operation and Series
Operation 67
Maintenance 77
Specifications 85
Appendix 96
PART NO. IB032411
Jul. 2018

These manuals provide an overview of the product and
About Manuals
HTMLHTML
紙紙
紙紙
notes on usage. They also explain how to configure it,
operate it, perform maintenance on it, and so on. Read
these manuals thoroughly before use, and use the product
properly.
Intended readers
These manuals are intended for users of this product and
their instructors. The manuals assume that the reader has
knowledge about power supplies.
Manual construction
Copyright
Reproduction and reprinting of this operation manual,
whole or partially, without our permission is prohibited.
Both unit specifications and manual contents are subject to
change without notice.
© Copyright 2018 Kikusui Electronics Corporation
• User’s manual (this manual)
This document is intended for first-time users of this
product. It provides an overview of the product, notes on
usage, and specifications. It also explains how to connect the product, configure the product, operate the
product, perform maintenance on the product, and so
on.
• Communication Interface Manual (partially in PDF)
This document contains details about remote control.
The interface manual is written for readers with sufficient
basic knowledge of how to control power supplies using
a PC.
• Packing list
The packing list shows the included accessories.
• Safety Information
This document contains general safety precautions.
Keep them in mind and make sure to observe them.
PDF and HTML files are included in the accompanying
CD-ROM. You can view the PDF files using Adobe
Reader.
Microsoft Internet Explorer or Google Chrome is required
to view the HTML files.
PDFPDF
PDFPDF
PDFPDF
Firmware versions that this manual covers
This manual applies to products with firmware versions
1.0X.
For information on how to check the firmware version, see
“Turning the POWER switch on” (p.21).
When contacting us about the product, please provide us
with:
The model (marked in the top section of the front panel)
Firmware version (p.21)
The serial number (marked on the rear panel)
Trademarks
Microsoft is a registered trademark or trademark of Microsoft Corporation in the United States and/or other countries.
Other company names and product names used in this
manual are generally trademarks or registered trademarks
of the respective companies.
2 User’s Manual PMX_MULTI
The PMX series (multiple-output) is a compact multiple-
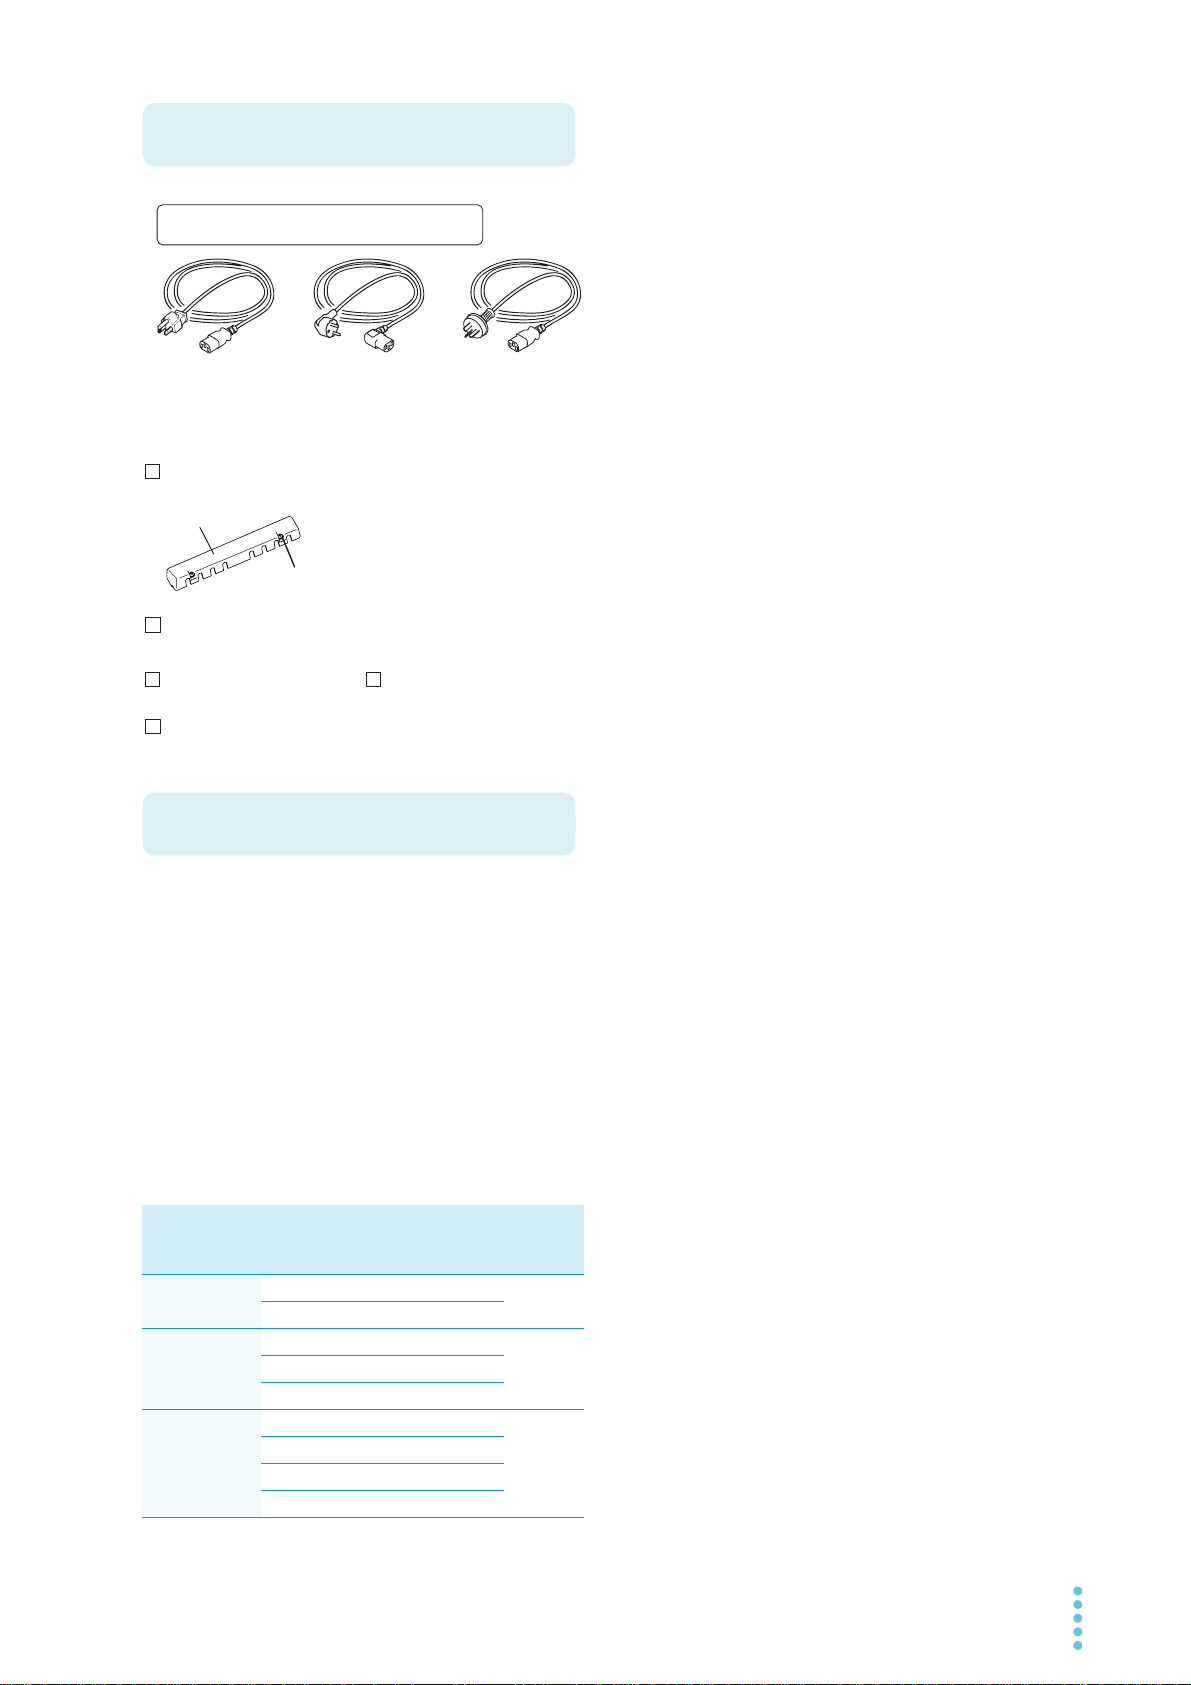
Accessories
or or
With screws (2 pcs.)
[M8-600-024]
[Q1-500-214]
Rating: 125 Vac/10 A
Plug: NEMA5-15
Length: approx. 2.5 m
[85-AA-0004]
Rating: 250 Vac/10 A
Plug: CEE7/7
Length: approx. 2.5 m
[85-10-1070]
Rating: 250 Vac/10 A
Plug: GB1002
Length: approx. 2.5 m
[85-10-0791]
Power cord (1 pc.)
CD-ROM (1 disc)
Packing list (1 copy)
Output terminal cover set (1 set)
Safety Information (1 copy)
The attached power cord varies depending on the
shipment destination.
Product Overview
output DC power supply whose outputs are isolated from
each other.
There are three models (types): two-output model (DU),
three-output model (TR), and four-output model (QU).
Because the PMX series comes standard with RS232C,
USB, and LAN (LXI compatible) communication functions,
it can easily be incorporated into a wide range of inspection systems.
It is best suitable for use in research and development and
production lines.
PMX series (multiple-output) model con-
figurations
Model Output
PMX32-3DU
(2CH)
PMX32-3TR
(3CH)
PMX32-2QU
(4CH)
terminal
CH1 32V 3A 192W
CH2 32 V 3 A
CH1 32V 3A 222W
CH2 32 V 3 A
CH3 6 V 5 A
CH1 32V 2A 218W
CH2 32 V 2 A
CH3 18 V 2.5 A
CH4 18 V 2.5 A
Rated
Output
Voltage
Rated
Output
Current
Rated
Output
Power
Features
In addition to basic constant current and constant voltage,
the PMX series (multiple-output) offers a variety of other
functions.
Each output isolated
Each output is isolated and safe.
High-resolution display
Display is possible with a high resolution at 1 mV or
1 mA, regardless of the output rating.
Output on/off for each channel
The output of each channel can be turned on or off, not
just all channels at once.
Switch between series connection and parallel connection with a single key
CH1 and CH2 can be connected in series or parallel.
Tracking control
The output of each channel can be simultaneously
changed to the same width or ratio (%).
On/off delay of each output
You can set the delay (DELAY TIME) from when the
OUTPUT ALL key is turned on or off to when the output
actually turns on or off. This is useful when you want to
turn the output on or off by setting a delay according to
the load characteristics.
Memory
You can save up to three sets of output settings (the
combination of the voltage, current, OVP, OCP, ondelay, and off-delay). You can simply select a memory
entry that you want to use rather than specifying the output value every time.
Simultaneous display of all channel statuses
In addition to voltage or current, output on/off and other
statuses are displayed for each channel.
Sensing function
Remote sensing stabilizes the output voltage across the
load by reducing the influence of voltage drops and
other effects caused by the load cable resistance.
Color liquid crystal display (LCD)
Allows easy-to-see display in color. The display shows
the voltage, current, operation, and status.
Standard RS232C, USB, and LAN (LXI compatible)
communication functions
Simultaneous remote control is possible through the
three available interfaces.
This makes it easy to incorporate the product into various inspection systems.
PMX_MULTI User’s Manual 3

• In this manual, the PMX32-3DU, PMX32-3TR, and
Notations Used in This Manual
WARNING
CAUTION
Safety Precautions
Precautions Concerning Installation Location
PMX32-2QU multiple-output regulated DC power supplies are referred to as the PMX series (multiple-output)
or the PMX.
• The term “PC” is used to refer generally to both personal
computers and workstations.
• The screen captures and illustrations used in this text
may differ from the actual items.
• The following markings are used in this manual.
DANGER
Indicates an imminently hazardous situation which, if
ignored, will result in death or serious injury.
Indicates a potentially hazardous situation which, if
ignored, could result in death or serious injury.
Indicates a potentially hazardous situation which, if
ignored, may result in slight injury or damage to the
product or other property.
Indicates information that you should know.
Indicates a reference manual (CD-ROM) containing
detailed information.
When installing this product, be sure to observe the precautions provided in the Safety information manual. Items
specific to this product are given below.
• The rear panel may become hot during operation. If you
touch it, you may burn yourself.
When installing this product, be sure to observe the “Precautions When Choosing the Installation Location” in the
Safety information manual. Items specific to this product
are given below.
• When installing this product, be sure to observe the temperature and humidity ranges indicated below.
Operating temperature range: 0 °C to 40 °C
Operating humidity range: 20 %rh to 85 %rh (no condensation)
• When storing this product, be sure to observe the temperature and humidity ranges indicated below.
Storage temperature range: -25 °C to 70 °C
Storage humidity range: 90 %rh or less (no condensation)
• Do not install the product vertically.
It may cause injury to the operator or damage to the
product when it falls down.
>
Indicates the hierarchy of items you need to select. The
item to the left of this symbol indicates a higher level
item.
CFxx: x
“CF” indicates that this is a CONFIG parameter. The two
digits after CF indicate the CONFIG parameter number.
The value after the colon indicates the selected setting.
SHIFT+key name
Indicates an operation that requires you to press a key
while holding down SHIFT.
4 User’s Manual PMX_MULTI

Contents
About Manuals ...................................................2
Accessories ........................................................3
Product Overview ...............................................3
Notations Used in This Manual...........................4
Safety Precautions .............................................4
Precautions Concerning Installation Location ....4
Component Names ............................................8
Installation
Connecting the Power Cord .............................13
Load Considerations ........................................14
Selecting the Load Cables ...............................16
Output Terminal Insulation ...............................17
When the output terminal is not grounded (floating).
17
When the output terminal is grounded.................. 18
Connecting to the Output Terminals.................19
Checking Whether the Power Is On or Off .......21
Turning the POWER switch on............................. 21
Turning off the POWER switch.............................22
Sensing Function..............................................23
Local sensing........................................................ 23
Remote sensing.................................................... 23
Basic Functions
Locking the Panel Controls (Key Lock) ............54
Tracking Function.............................................54
Remote Control ................................................59
External Control
CONTROL TERMINAL ....................................61
Connecting the CONTROL TERMINAL ............... 61
Pin arrangement of the CONTROL TERMINAL ... 62
Output On/Off Control ......................................63
Alarm Input .......................................................65
External monitoring of the operating status......66
Parallel Operation and
Series Operation
Overview of Parallel Operation ........................67
Parallel Operation Functions ................................ 67
Connections for parallel operation........................ 69
Configuration for parallel operation ...................... 70
Starting parallel operation .................................... 70
Overview of Series Operation ..........................72
Series Operation Functions.................................. 72
Connection for series operation ...........................74
Configuration for series operation ........................ 75
Starting series operation ...................................... 75
Panel Display ...................................................26
Panel Operations..............................................28
Output Operation ..............................................29
Output on/ off setting at power-on ........................29
Output-on startup state parameter .......................29
output-on delay/ off delay .....................................30
CV Power Supply and CC Power Supply.........34
Using the PMX as a CV or CC Power Supply36
Protection Functions and Alarms......................37
Alarm occurrence and clearing alarms .................37
Setting and displaying the protection functions ....38
CONFIG Settings .............................................42
CONFIG parameter details................................... 45
Memory Function..............................................52
Saving settings ..................................................... 52
Recalling settings .................................................53
PMX_MULTI User’s Manual 5
Maintenance
Calibration Overview ............................................ 77
Connection ........................................................... 78
Calibration procedure ........................................... 79
Connection (series operation and parallel operation)
82
Calibration procedure (series operation and parallel
operation) ............................................................. 83

Specifications
AC input ................................................................85
Output ...................................................................86
Display function .....................................................88
Protection function ................................................89
Signal output .........................................................89
Control functions ...................................................90
Sensing .................................................................90
Parallel operation and series operation.................91
Other functions......................................................92
Interface ................................................................93
General specifications...........................................94
External dimensions ..............................................95
Appendix
Factory Default Settings .................................. 96
Options ............................................................ 97
Rack mounting options..........................................97
Troubleshooting............................................... 99
Index.............................................................. 103
6 User’s Manual PMX_MULTI

This page is intentionally blank.
PMX_MULTI User’s Manual 7
Component Names
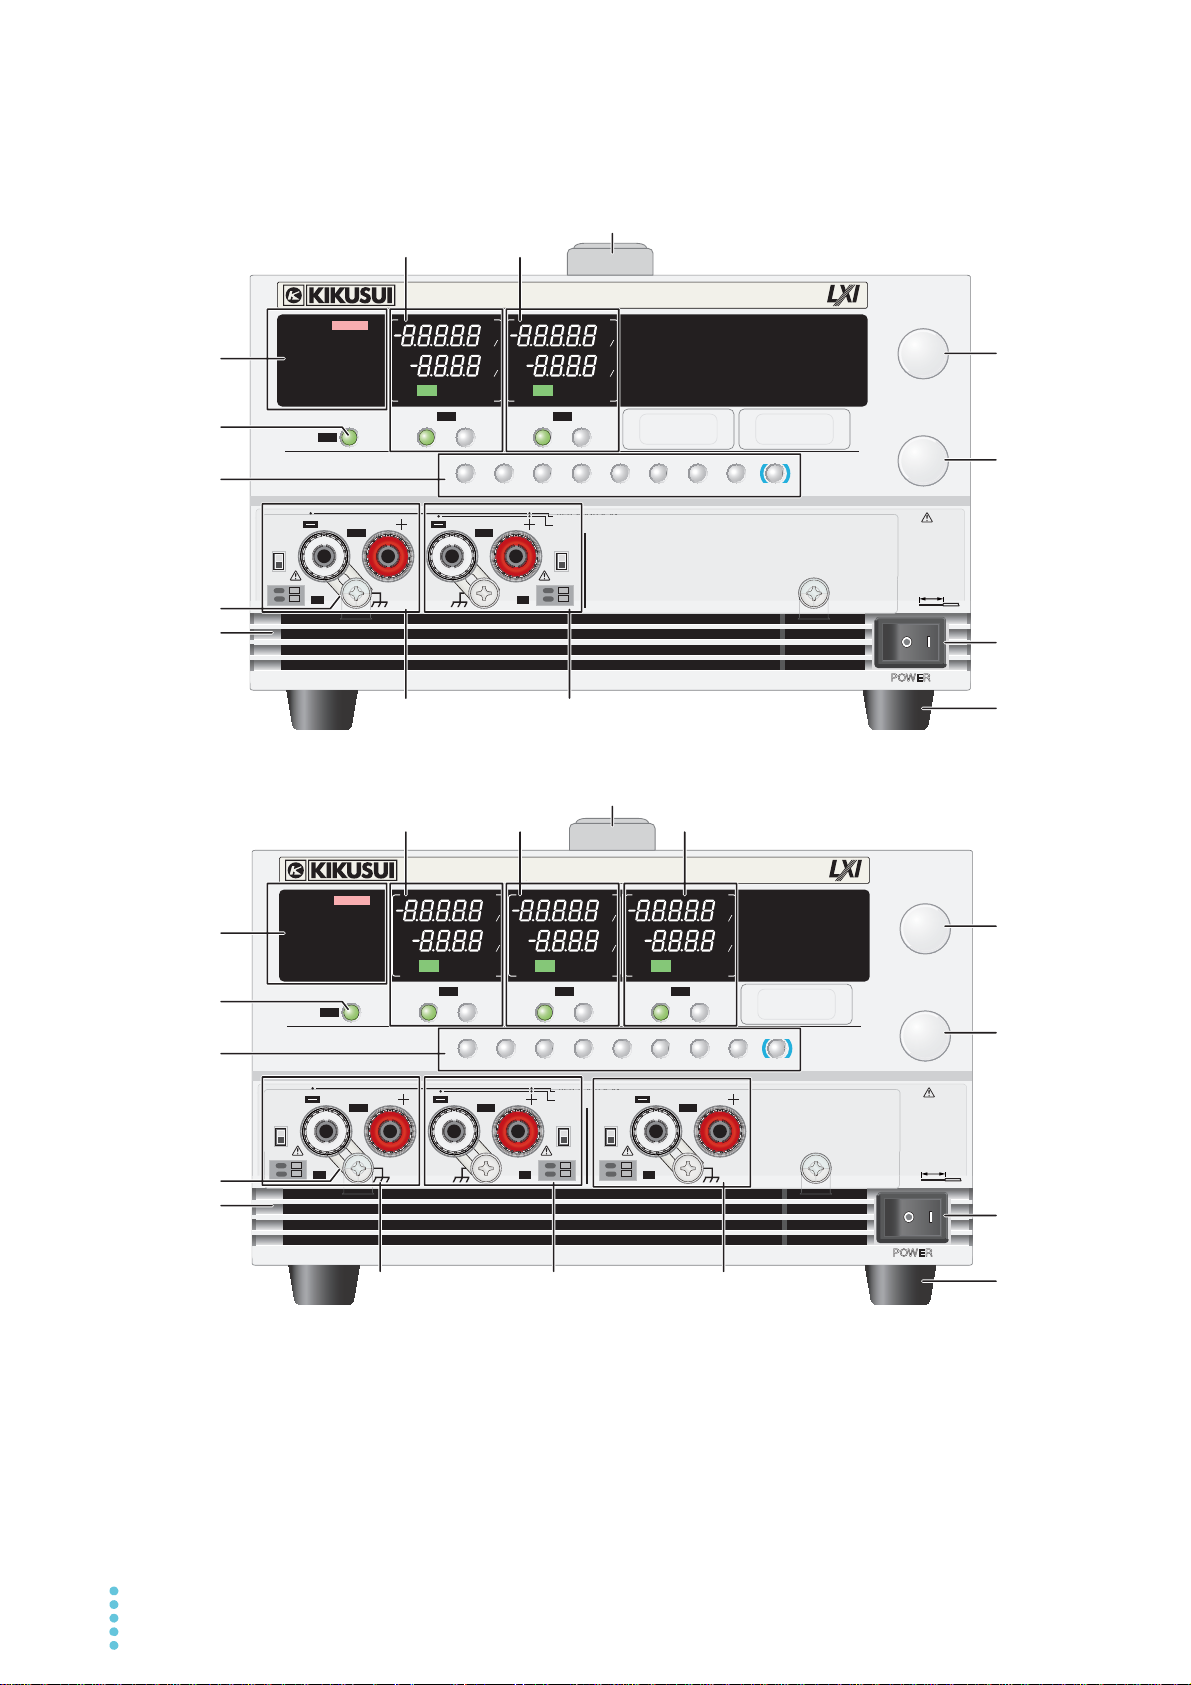
PMX32-3TR
PMX32-3DU
9
8
7
4
3
2
Controls
2
Controls
CH1
Display
CH2
Display
CH1
Display
CH2
Display
CH3
Display
CH1
Output terminal area
CH2
Output terminal area
CH3
Output terminal area
CH1
Output terminal area
CH2
Output terminal area
5
1
1
6
9
8
7
4
3
5
6
POWER
FINE
FINE
TRACK DELAY
CBA
ALM CLR
DELAY SETTRACK SET
PRLSER
OVP࣭OCP
SET LOCKCONFIG
SELECTOUTPUT SELECTOUTPUT SELECTOUTPUT
CH3
SELECTOUTPUT
CH4
OUTPUT
PMX32-3DU
0-32V 2A
CURRENT
VOLTAGE
LOCAL
SHIFT
MULTIPLE OUTPUT DC POWER SUPPLY
CV
V
s
OFF
CC
A
s
ON
PRLSER
TRACKING 12
LOCK
REMOTE
LAN LAN
DEL AY
DEL AY SET
SET OVP࣭OCP
PRESET A BC
ALARM
CV
V
s
OFF
CC
A
s
ON
PRLSER
TRACKING 12
CV
V
s
OFF
CC
A
s
ON
PARASERI
TRACKING 12
CV
V
s
OFF
CC
A
s
ON
PARASERI
TRACKING 12
%%%%
%%%%
AWG 20-28
STRIP
-
GAUGE
8mm
DC
OUTPUT
SER
PRL
0
-
32V 0-6A
0
-
64V 0-3A
0-32V 0-3A 0-32V 0-3A
SENSE 2
SENSE 1
OFF
ON
OFF
ON
-
S
+
S
-
S
+
S
POWER
FINE
FINE
TRACK DELAY
CBA
ALM CLR
DELAY SETTRACK SET
PRLSER
OVP࣭OCP
SET LOCKCONFIG
SELECTOUTPUT
CH1
SELECTOUTPUT
CH2
SELECTOUTPUT
CH3
SELECTOUTPUT
CH4
OUTPUT
ALL
PMX32-3TR
0-32V 2A
CURRENT
VOLTAGE
LOCAL
SHIFT
MULTIPLE OUTPUT DC POWER SUPPLY
CV
V
s
OFF
CC
A
s
ON
PRLSER
TRACKING 12
LOCK
REMOTE
LAN LAN
DEL AY
DEL AY SET
SET OVP࣭OCP
PRESET A BC
ALARM
CV
V
s
OFF
CC
A
s
ON
PRLSER
TRACKING 12
CV
V
s
OFF
CC
A
s
ON
PRLSER
TRACKING 12
CV
V
s
OFF
CC
A
s
ON
PARASERI
TRACKING 12
%%%%
%%%%
AWG 20-28
STRIP
-
GAUGE
8mm
DC
OUTPUT
SER
PRL
0
-
32V 0-6A
0
-
64V 0-3A
0-32V 0-3A
CH1
0-32V 0-3A
CH2 CH3
0
-
6V 0-5A
SENSE 3
-
S
SENSE 2
SENSE 1
OFFONOFF
ON
OFF
ON
+
S
-
S
+
S
-
S
+
S
CH1 CH2
ALL
CH1 CH2
Front panel
8 User’s Manual PMX_MULTI
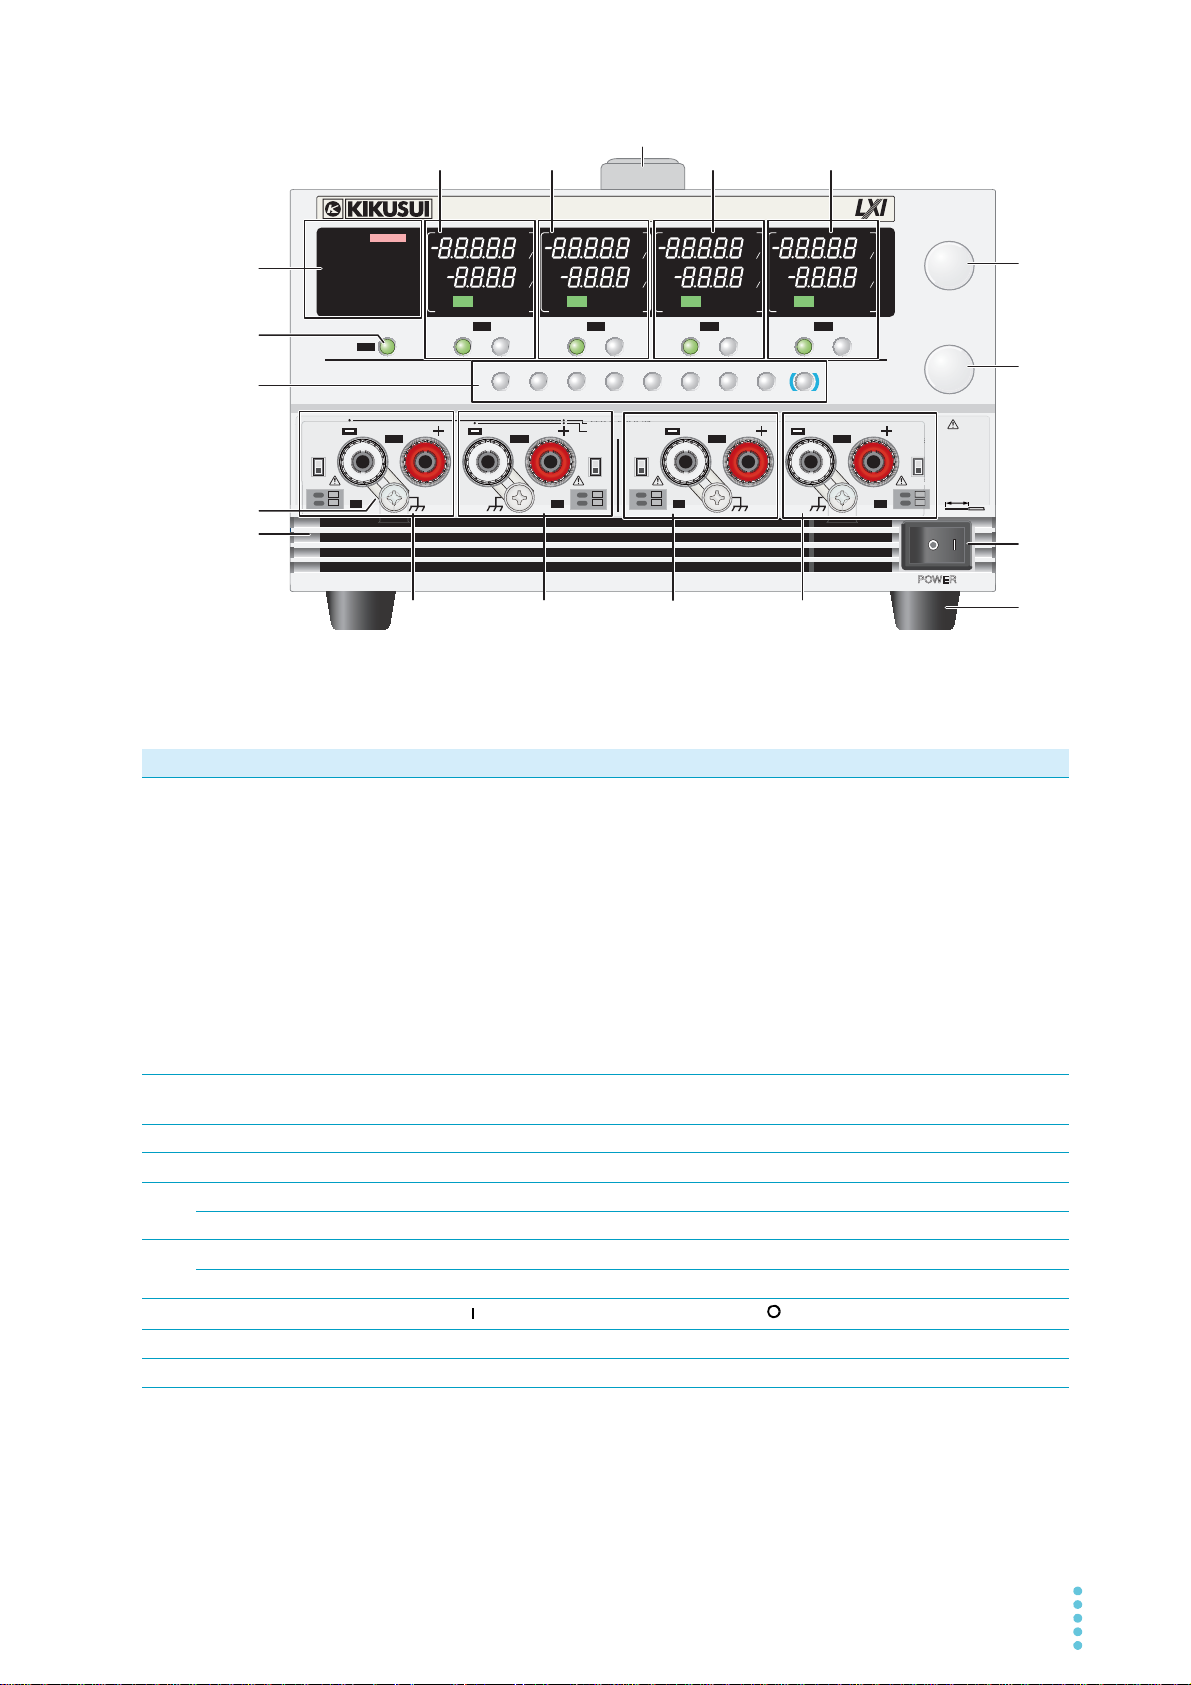
PMX32-2QU
9
8
7
4
3
5
1
6
CH1
Display
CH2
Display
CH3
Display
CH4
Display
CH1
Output terminal
area
CH2
Output terminal
area
CH3
Output terminal
area
CH4
Output terminal
area
2
Controls
POWER
TRACK DELAY
CBA
ALM CLR
DELAY SETTRACK SET
PRLSER
OVP࣭OCP
SET LOCKCONFIG
SELECTOUTPUT
CH1
SELECTOUTPUT
CH2
SELECTOUTPUT
CH3
SELECTOUTPUT
CH4
OUTPUT
ALL
PMX32-2QU
0-32V 2A
MULTIPLE OUTPUT DC POWER SUPPLY
CURRENT
FINE
FINE
VOLTAGE
LOCAL
SHIFT
CV
V
s
OFF
CC
A
s
ON
PRLSER
TRACKING 12
LOCK
REMOTE
LAN
LAN
DEL AY
DEL AY SET
SET OVP࣭OCP
PRESET A BC
ALARM
CV
V
s
OFF
CC
A
s
ON
PRLSER
TRACKING 12
CV
V
s
OFF
CC
A
s
ON
PRLSER
TRACKING 12
CV
V
s
OFF
CC
A
s
ON
PRLSER
TRACKING 12
%%%%
%%%%
0-32V 0-2A
CH1
0-32V 0-2A
CH2 CH3
0
-
18V 0-2.5A
CH4
0
-
18V 0-2.5A
SENSE 3
-
S
AWG 20
-
28
STRIP
-
GAUGE
8mm
SER
PRL
DC
OUTPUT
0-32V 0-4A
0
-
64V 0-2A
SENSE 2
SENSE 1 SENSE 4
OFF
ON
OFF
ON
OFF
ON
OFF
ON
+
S
-
S
+
S
-
S
+
S
-
S
+
S
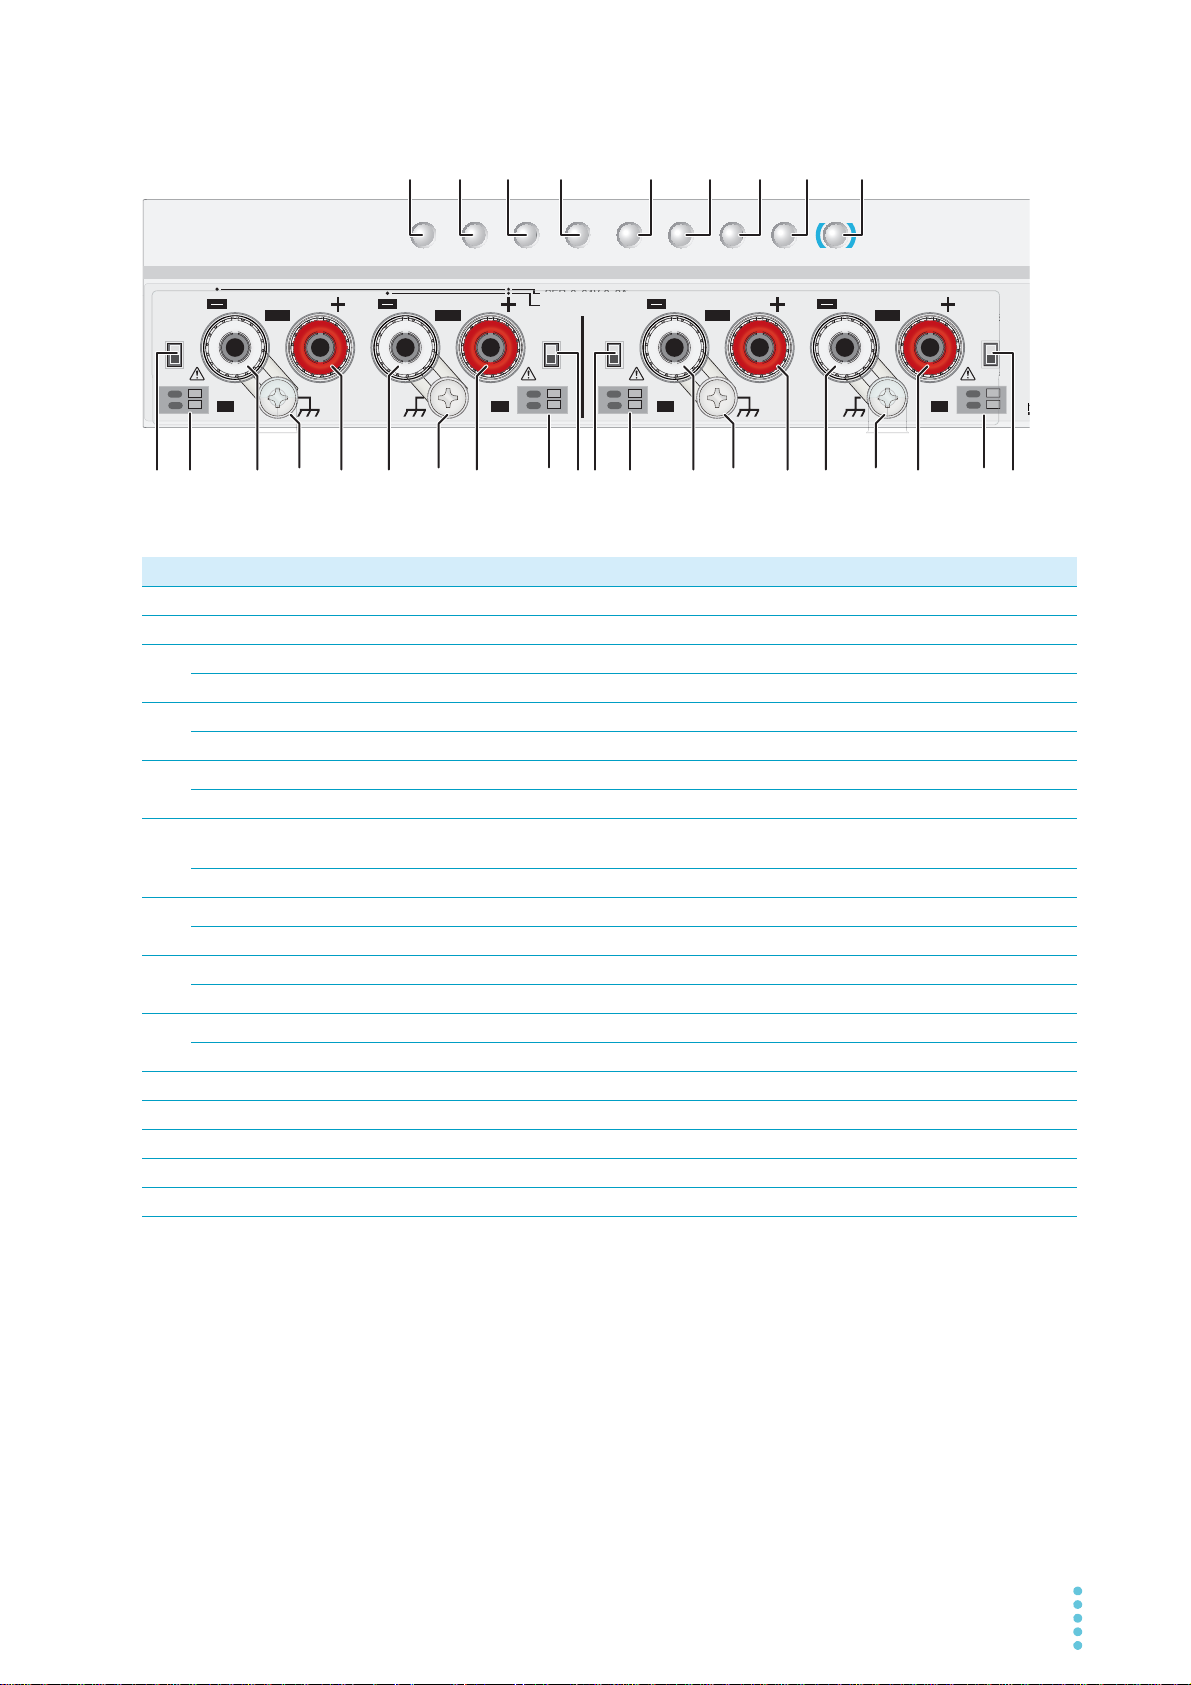
No. Name Function See
1 Status display area ALARM: Appears in red when a protection function is activated.
—
SET: Appears when setting or viewing the output voltage or output current.
OVP•OCP: Appears when the overvoltage protection (OVP) or overcurrent pro-
tection (OCP) trip point is being set.
DELAY: Appears when output-on delay/ off delay is in progress. Blinks when
delay is in progress.
DELAY SET: Appears when output-on delay/ off delay is being set.
PRESET A/ B/ C: Appears when memory A, B, or C is being recalled or saved.
LOCK: Appears when the key lock is enabled.
REMOTE: Appears when the product is being controlled remotely.
LAN (green): Appears in the no fault state. Blinks in the identify state.
LAN (red): Appears in the fault state. Blinks in the standby state.
2 OUTPUT ALL key Turns the output on or off on all channels simultaneously. Starts the output-on
p.29
delay/ off delay.
3 Short bar Connects the output terminal to the chassis terminal. —
4 Air inlet Inlet holes for cooling. —
5 VOLTAGE knob Used to set the voltage value or change the value of a CONFIG parameter. p.28
6 CURRENT knob Used to set the current value or change the value of a CONFIG parameter. p.28
7 POWER switch
8 Feet Four casters attached to the bottom of the product. p.98
9 Handle Handle for carrying the product. p.98
FINE Used to make fine voltage value adjustments. p.28
FINE Used to make fine current value adjustments. p.28
Press the ( ) side to switch the power on, and the ( ) side to switch the power off.
p.21
PMX_MULTI User’s Manual 9
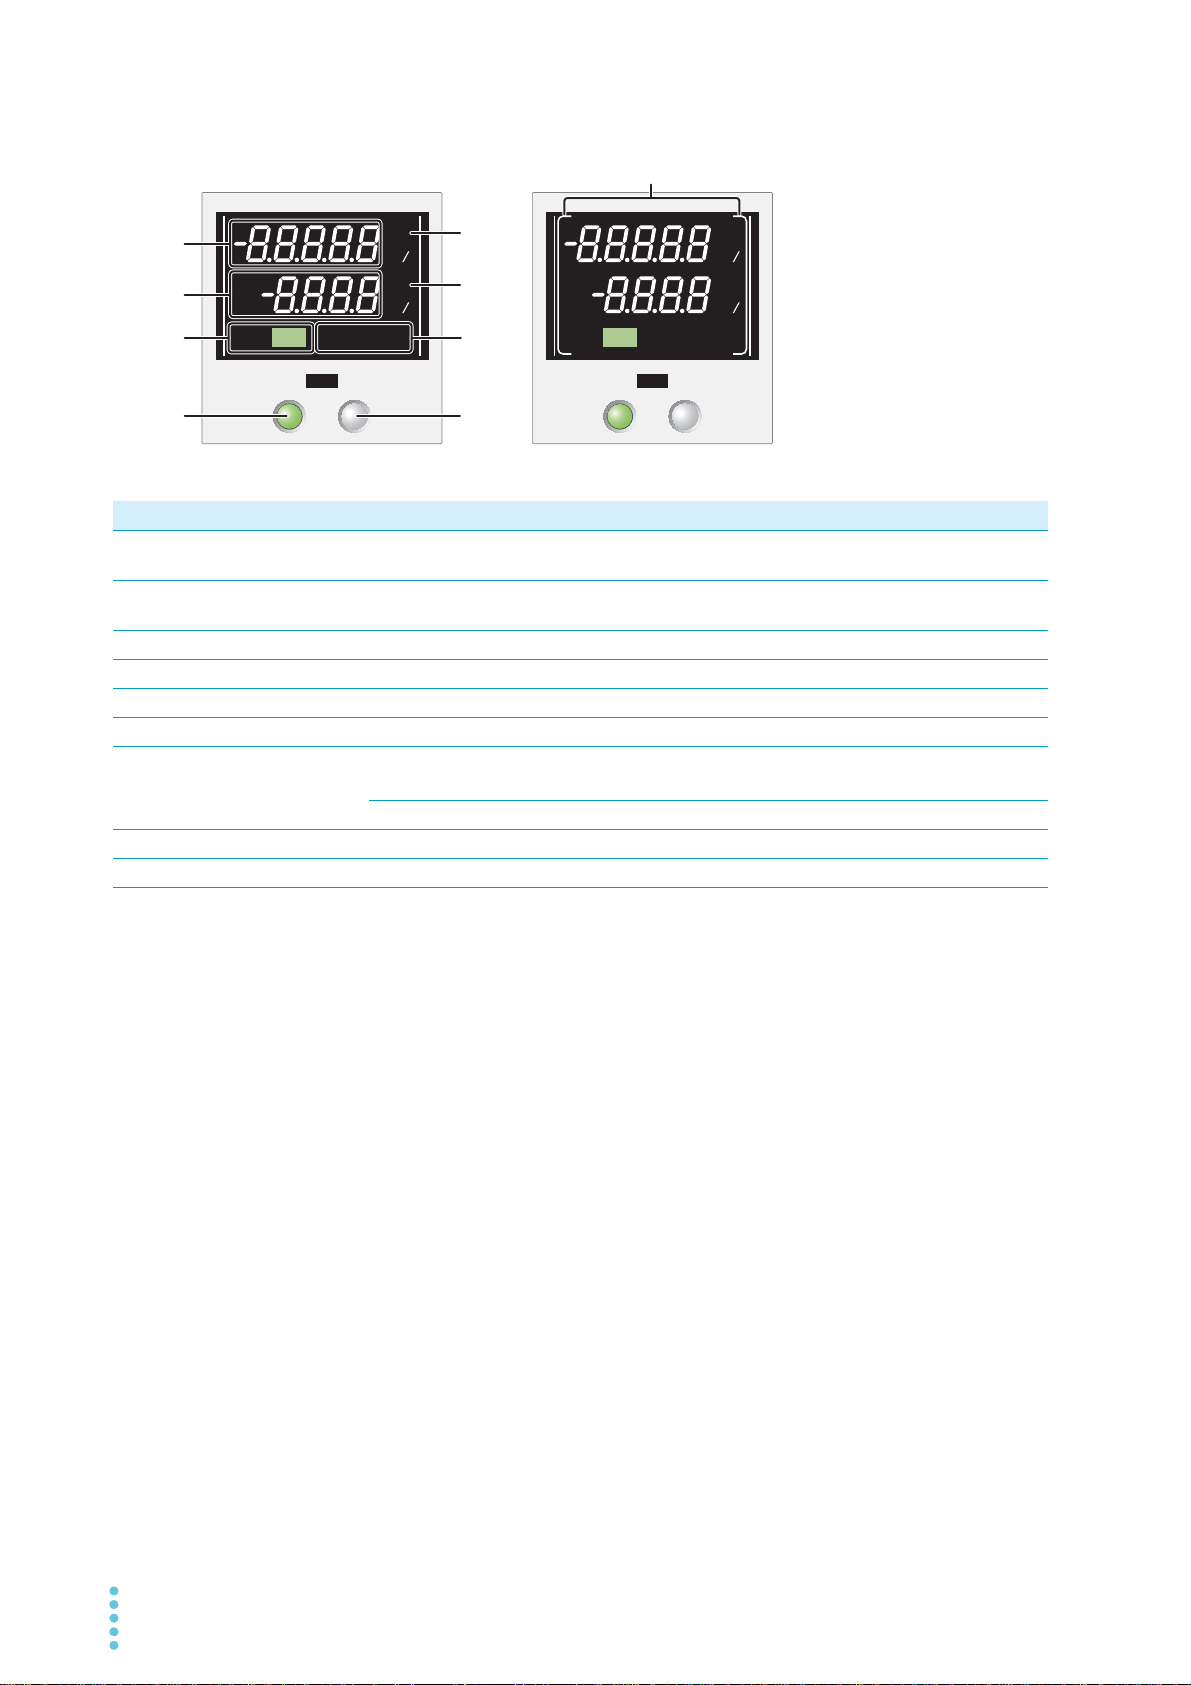
CH1/CH2/CH3/CH4 display area
SELECTOUTPUT
CHX
SELECTOUTPUT
CHX
CV
V
s
OFF
CC
A
s
ON
PRLSER
TRACK ING12
%
%
CV
V
s
OFF
CC
A
s
ON
PRLSER
TRACK ING12
%
%
1
2
3
4
5
6
7
8
9
No. Name Function See
1 Voltmeter Displays the voltage, CONFIG parameter number, alarm, output-on delay time, or
the amount of voltage change of tracking function 2.
2 Ammeter Displays the current, CONFIG parameter value, cause of alarms, output-off delay
time, or the amount of current change of tracking function 2.
3 Output display OFF: appears when output is off, ON: appears when output is on (green) p.29
4 OUTPUT key Turns on or off the output of each channel. p.29
5 CV Appears in constant voltage mode. p.36
6 CC Appears in constant current mode. p.36
7 Status indicators SER: Appears during series operation.
PRL: Appears during parallel operation.
TRACKING12: Appears when tracking function 1 or tracking function 2 is in use. p.54
8 SELECT key Selects the channel. —
9 Selection display Appears when selected with the SELECT key. —
p.26
p.26
—
10 User’s Manual PMX_MULTI
Control area and output terminal area
TRACK DELAY
CBA
ALM CLR
DELAY SETTRACK SET
PRLSER
OVP࣭OCP
SET LOCKCONFIG LOCAL
SHIFT
0-32V 0-2A
CH1
0-32V 0-2A
CH2 CH3
0
-
18V 0-2.5A
CH4
0
-
18V 0-2.5A
SENSE 3
-
S
A
S
SER
PRL
O
0-32V 0-4A
0
-
64V 0-2A
SENSE 2
SENSE 1 SENSE 4
OFF
ON
OFF
ON
OFF
ON
OFF
ON
+
S
-
S
+
S
-
S
+
S
-
S
+
S
1234 5 678 9
10 11 12 1413
11 10 1012 1413 1112 141310 11 12 1413
No. Name Function See
1 SER key Turns on or off parallel operation. p.75
2 PRL key Turns on or off series operation. p.70
3 TRACK key Turns on or off the tracking function. p.54
TRACK SET key Switches between tracking function 1 and tracking function 2. p.54
4 DELAY key Turns on or off the delay function. p.33
DELAY SET key Used to set or display the output-on delay/ off delay time. p.32
5 SET key Used to set or display the output voltage or output current. p.26
ALARM CLR key Releases the activated state (alarm) of protection functions. p.37
6 OVP•OCP key Used to set or display the overvoltage protection (OVP) or overcurrent protection
(OCP) trip point.
A Recalls or saves memory A values. p.52
7 CONFIG key Used to configure various operating conditions (CONFIG). p.42
B Recalls or saves memory B values. p.52
8 LOCK key Turns on or off the key lock. p.54
C Recalls or saves memory C values. p.52
9 LOCAL key Switches between local mode and remote mode. p.59
SHIFT key Used to enable the functions that are written in blue characters below the key. —
10 SENSE switch Used to turn remote sensing on and off. p.23
11 Sensing terminal Terminals to connect the sensing cables to. p.24
12 DC OUTPUT− Negative output terminal p.19
Chassis terminal A connector for grounding the output. —
13
DC OUTPUT+ Positive output terminal p.19
14
p.38
PMX_MULTI User’s Manual 11
Rear Panel
50-60Hz
AC INPU T
KIKUSUI ELECTRONICS CORP. MADE IN CHINA
LINE
VOLTAGE
100V
117V
200V
217V
234V
SETTING
SUPPLY
RS232C USBLAN
S1
17813
CONTROL TERMINAL
1. CH1 OUT ON STATUS
2. CH2 OUT ON STATUS
3. CH3 OUT ON STATUS
(
TR QU
)
4. CH4 OUT ON STATUS
(
QU
)
8. CH1 OUT ON
/
OFF CONTROL
9. CH2 OUT ON
/
OFF CONTROL
10. CH3 OUT ON
/
OFF CONTROL
(
TR QU
)
11. CH4 OUT ON
/
OFF CONTROL
(
QU
)
AWG 20-28
STRIP GAUGE
8mm
1
5
6
4
2
3
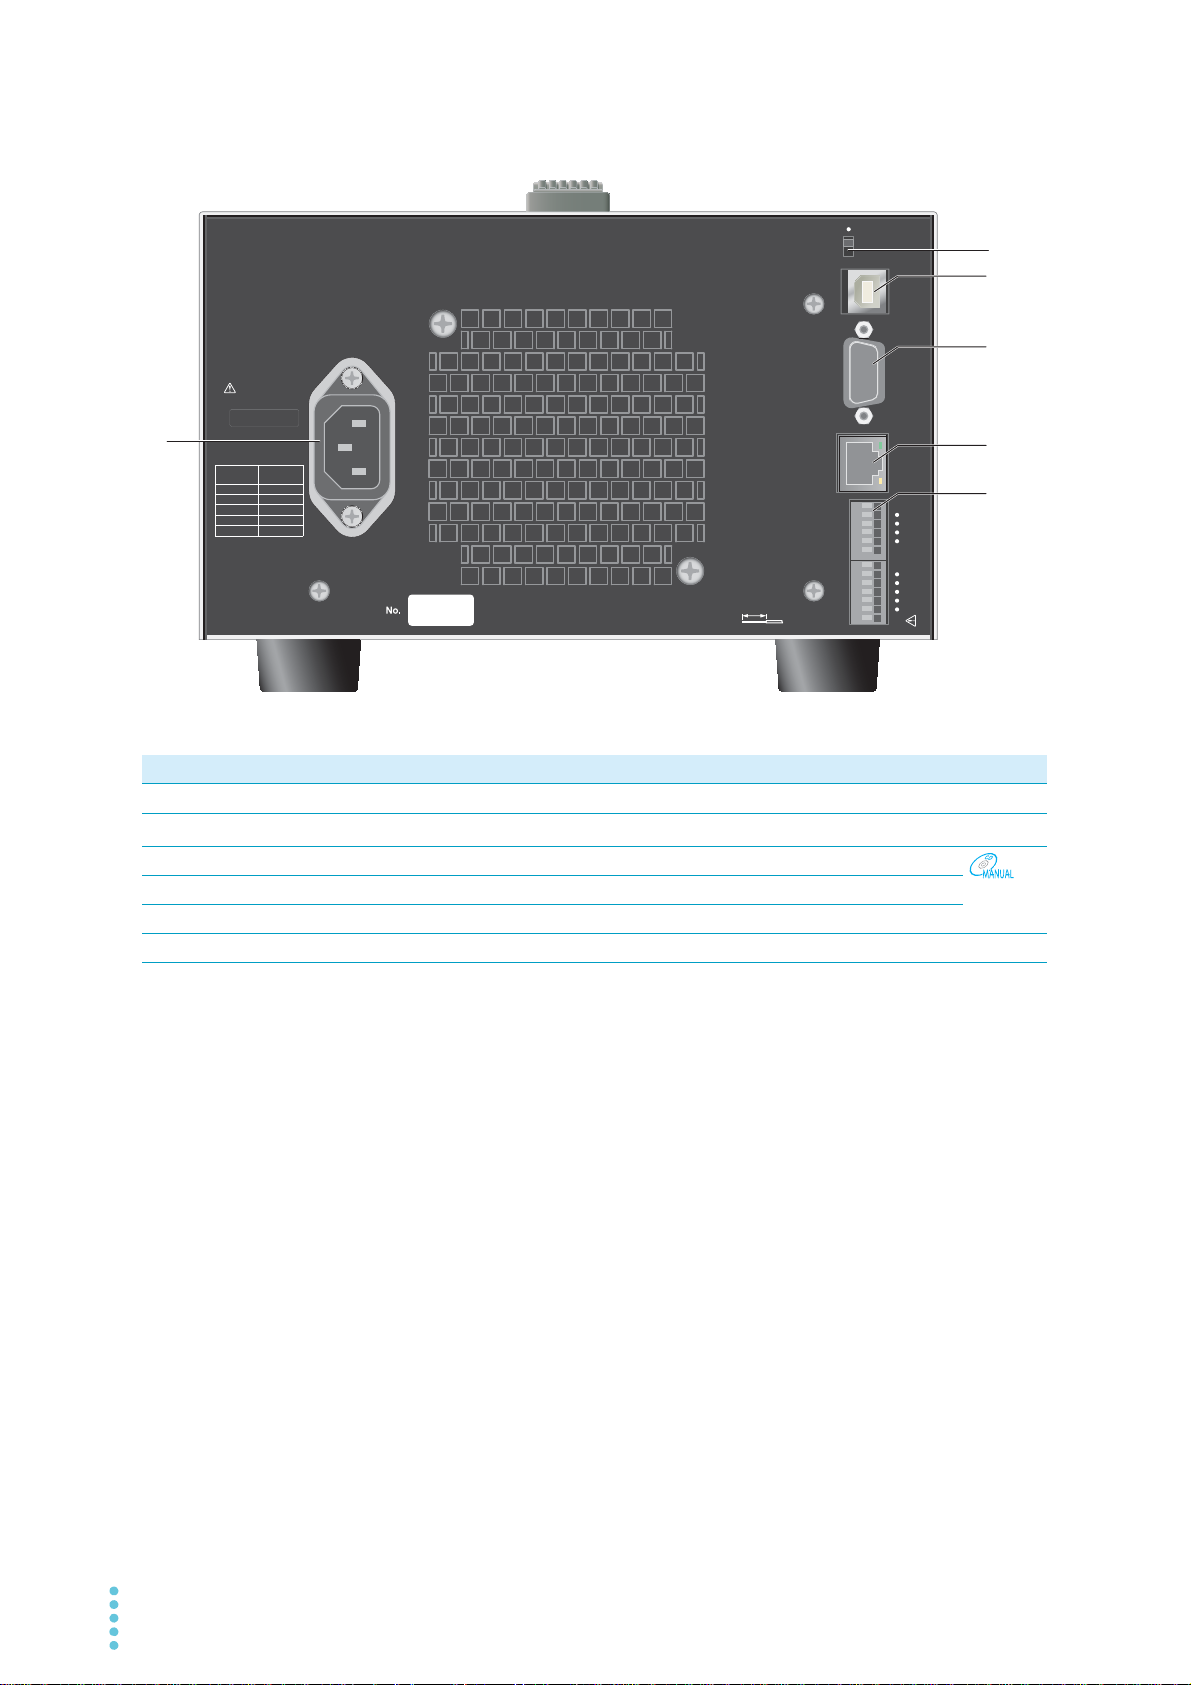
No. Name Function See
1 AC INPUT AC inlet p.13
2
S1 switch
*1
Maintenance switch. —
3 USB port USB port for remote control.
4 RS232C port RS232C port for remote control.
5 LAN port LAN port for remote control.
6 CONTROL TERMINAL External control terminal block.
*1. Kikusui service engineers use this switch only during maintenance and servicing. Normally, the switch is on the
side of ●.
12 User’s Manual PMX_MULTI
Interface
manual
p.61
Installation
50-60Hz
LINE
VOLTAGE
100V
117V
200V
217V
234V
SETTING
SUPPLY
Connecting the Power Cord
This product is designed as an equipment of IEC Overvoltage Category II (energy-consuming equipment
supplied from a fixed installation).
Protective conductor current (at 257.4 Vac, 60 Hz) : Approx. 1 mA.
WARNING
Check that the AC power line meets the nominal input rating of the product.
1
The product can receive a nominal power supply voltage of 100 Vac, 117 Vac, 200 Vac, 217 Vac,
or 234 Vac at a frequency of 50 Hz or 60 Hz.
Risk of electric shock.
• This product is IEC Safety Class I equipment (equipment with a protective conductor terminal). To prevent electric shock, be sure to connect the protective conductor
terminal of the product to electrical ground (safety ground).
• The product isp grounded through the power cord ground wire. Connect the protective conductor terminal to earth ground.
• Use the supplied power cord to connect to the AC line.
If the supplied power cord cannot be used because the rated voltage or the plug shape is
incompatible, have a qualified engineer replace it with an appropriate power cord that is 3
m or less in length. If obtaining a power cord is difficult, contact your Kikusui agent or distributor.
• The power cord with a plug can be used to disconnect the product from the AC power line
in an emergency.
• Secure adequate space around the power plug. Do not insert the power plug to an outlet
where accessibility to the plug is poor. And, do not place objects near the outlet that would
result in poor accessibility to the plug.
• Do not use the supplied power cord with other instruments.
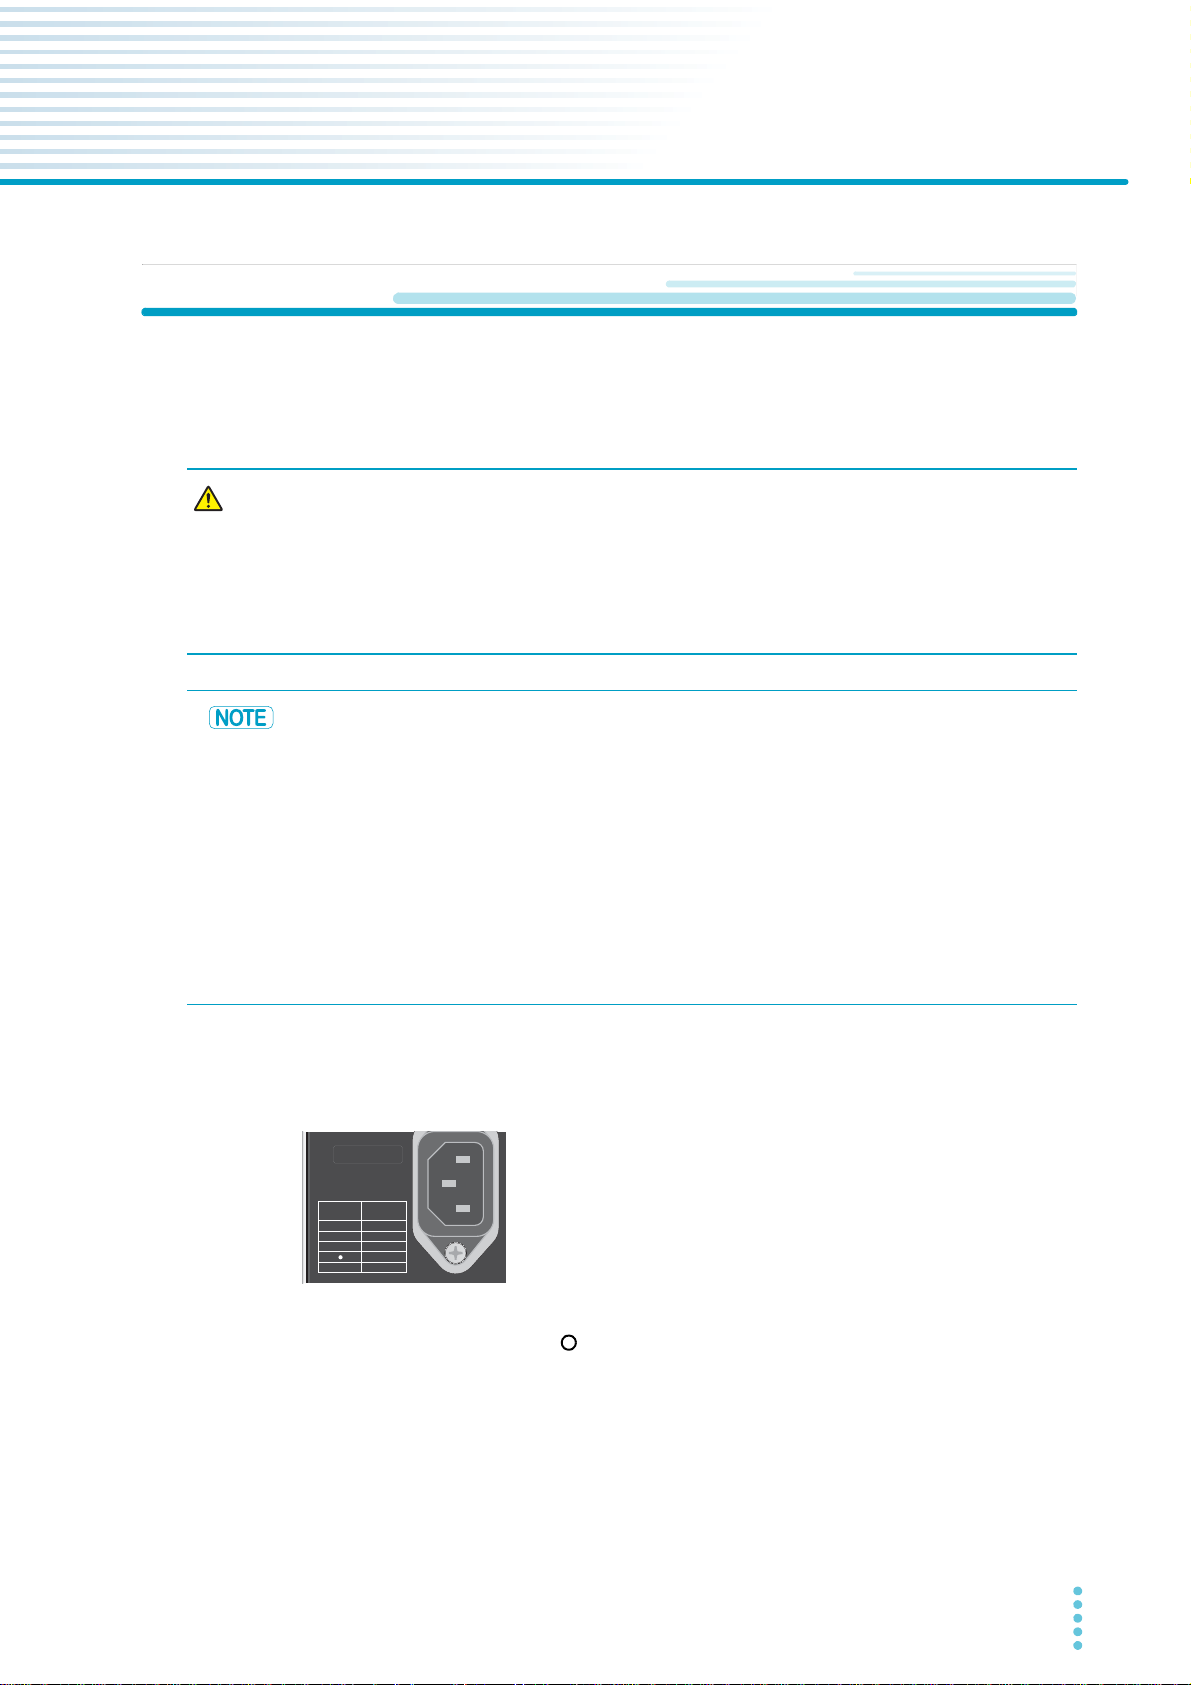
The supply voltage is set before factory shipment by a Kikusui service engineer. A mark is indicated to the left of the appropriate voltage.
Be sure to check the nominal input rating before connecting the
power cord.
Example of 217 Vac supply voltage
Turn the POWER switch off ( ).
2
Connect the power cord to the AC INPUT inlet on the rear panel.
3
Connect the power cord plug to an outlet with a ground terminal.
4
This completes the connections.
PMX_MULTI User’s Manual 13
Installation
Constant current setting
Ammeter reading (mean value)
Constant current setting
Ammeter reading (mean value)
O
RD
EO
Equivalent circuit of the product
Regenerative load
Load
+
0
waveform
+IO
Irp
RD>ȍ@
EO>9@
Irp[A]
RD: Reverse current bypass dummy load
E
O: Output voltage
I
rp: Maximum reverse current
CAUTION
Load Considerations
Note that the output will become unstable if the following types of loads are connected.
Loads with peak current or pulse-shaped current
The product only indicates mean values. Even when the indicated value is less than or equal to the set
constant current, the peak values may exceed the set constant current. If this happens, the product is
instantaneously put into constant-current mode, and the output voltage drops.
For these types of loads, you must increase the set constant current or increase the current capacity.
Load current with peaks Pulse-shaped load current
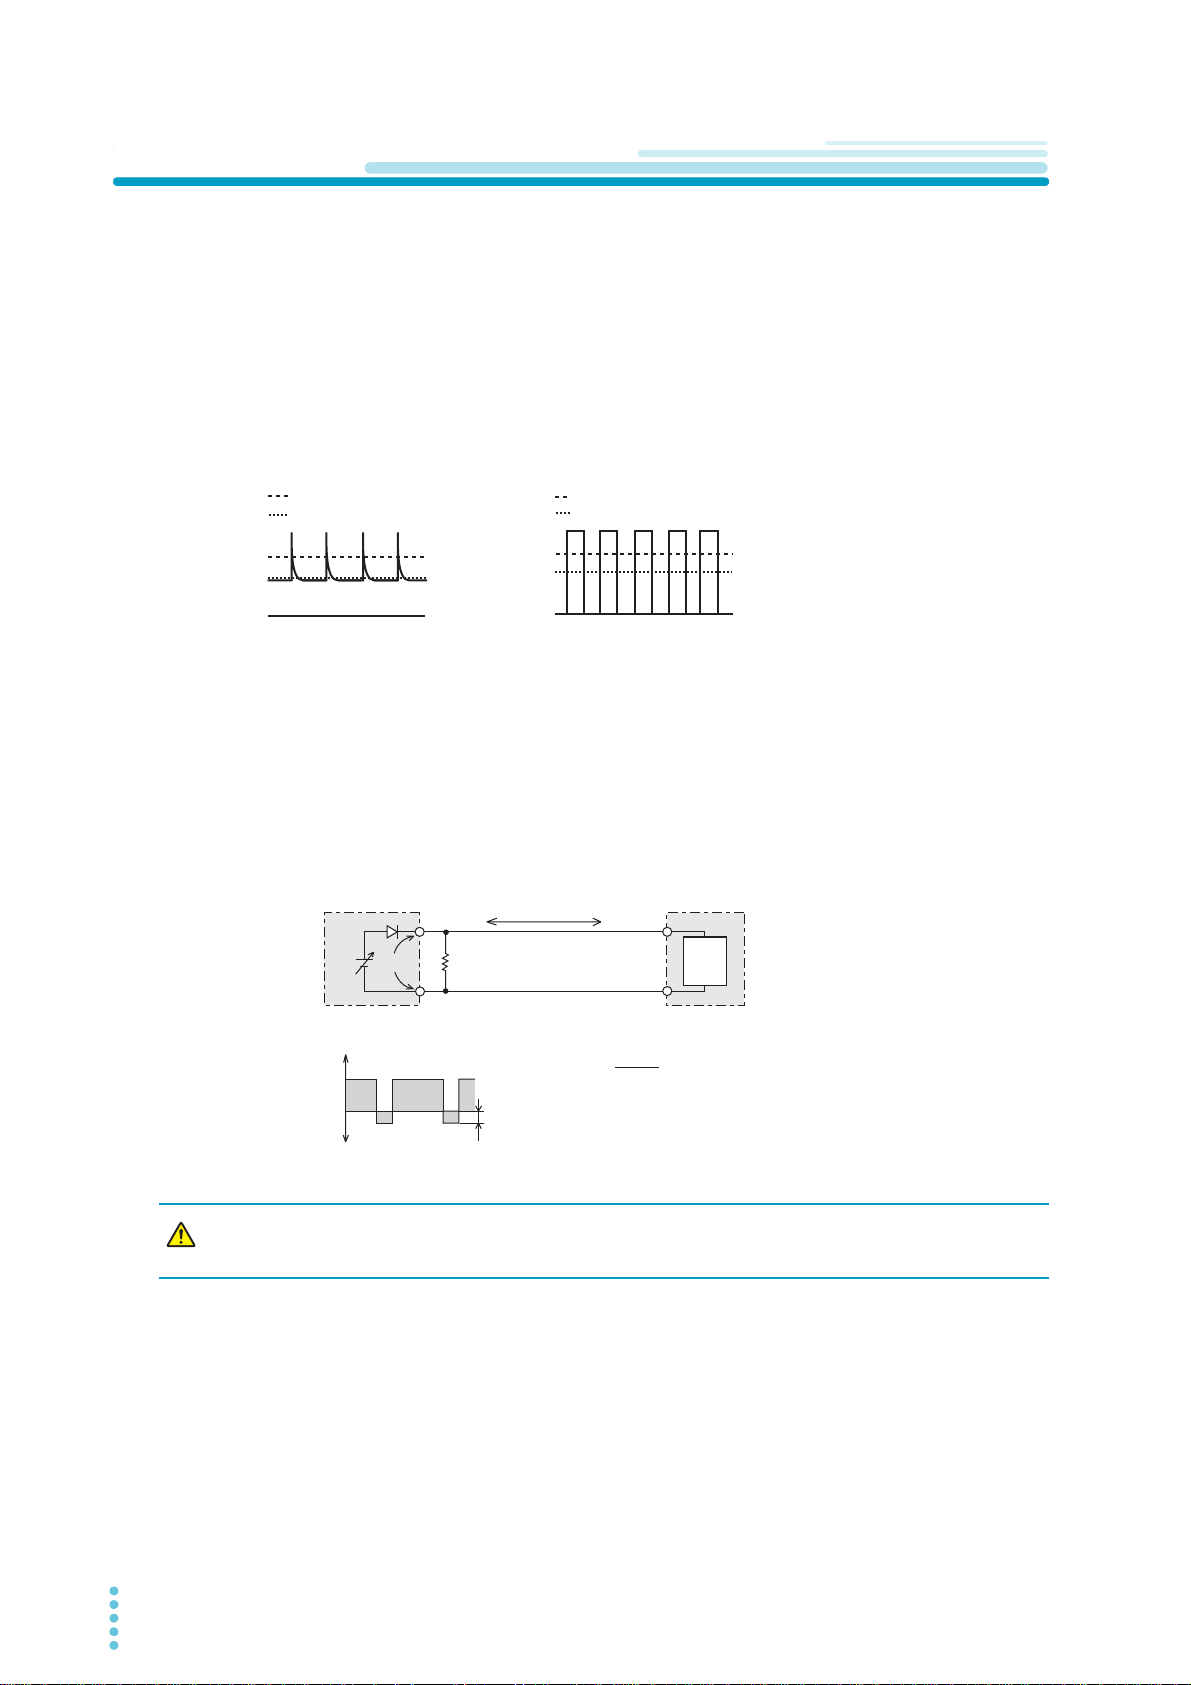
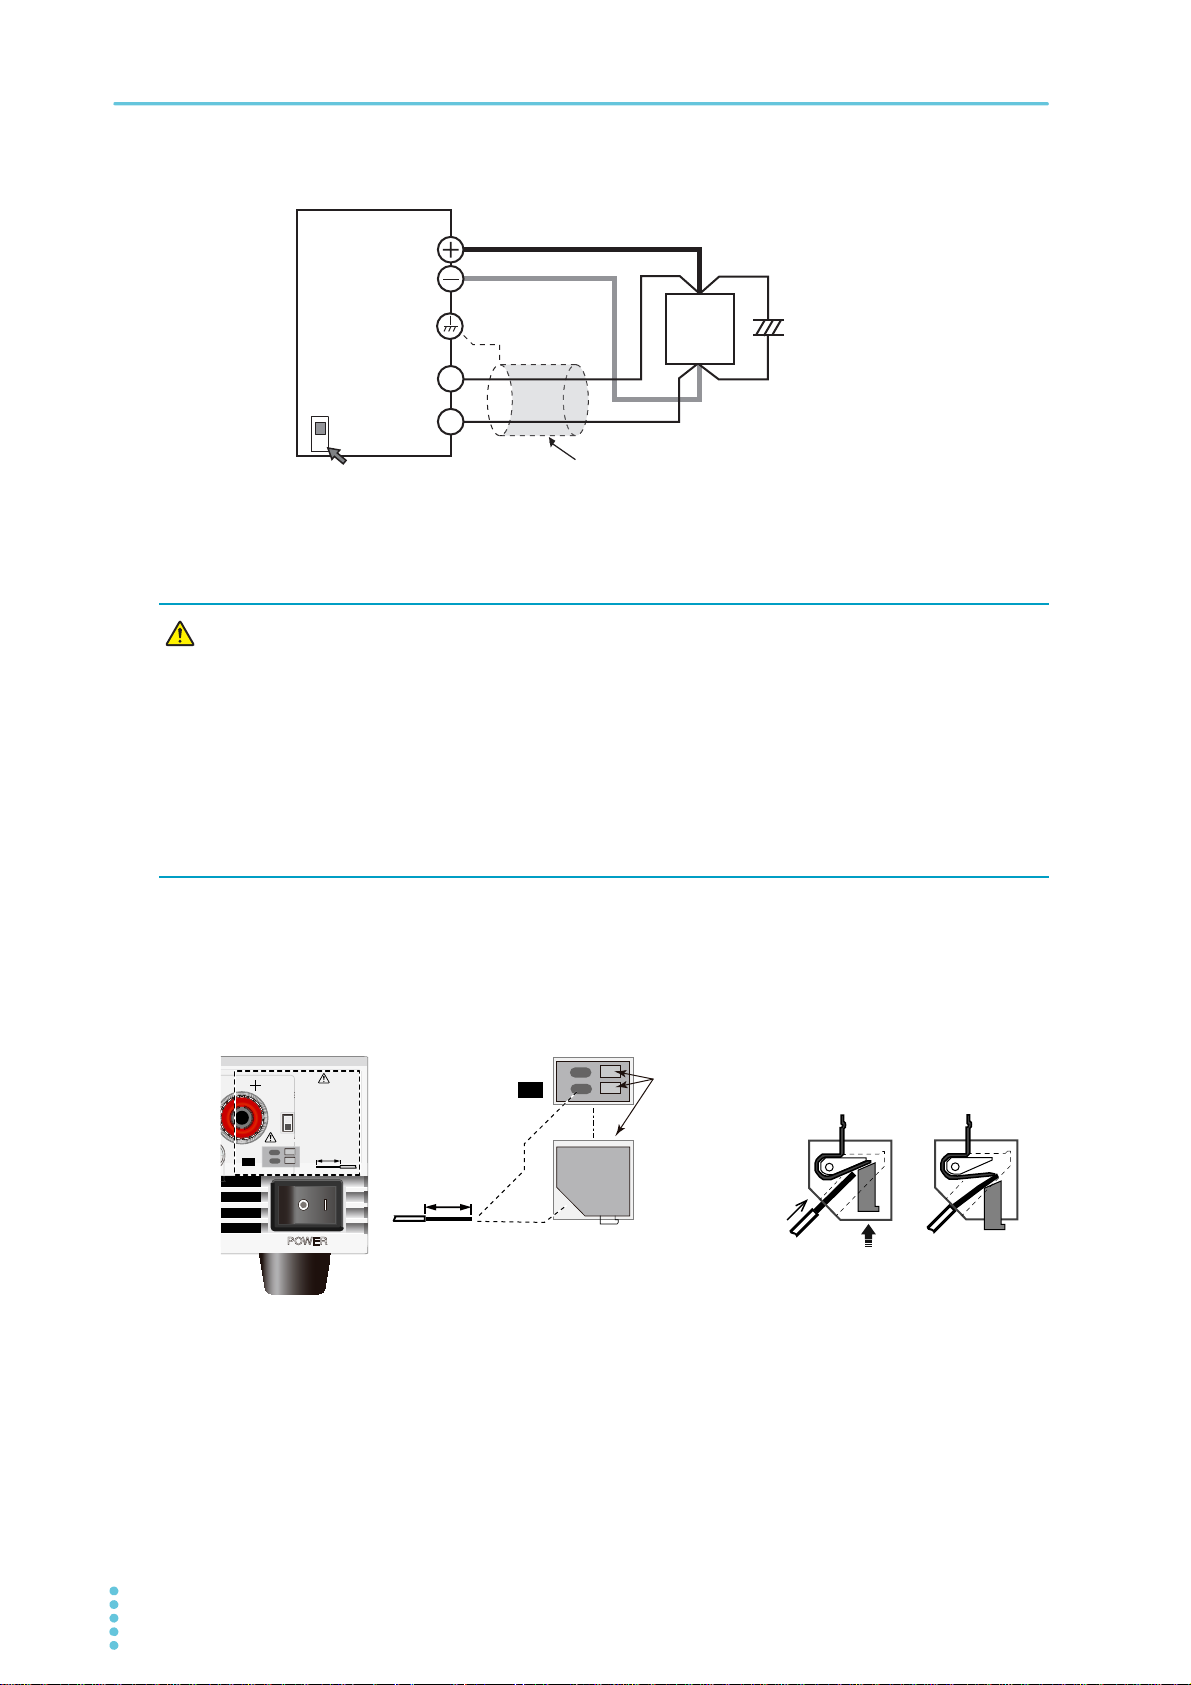
Loads that generate reverse current to the power supply
The product cannot absorb reverse current from the load. Therefore, if a regenerative load (such as an
inverter, converter, or transformer) is connected, the output voltage increases and becomes unstable. This
can cause a malfunction.
For these types of loads, connect a resistor (R
current. However, the amount of current to the load decreases by Irp.
Output current
-IO
Reverse current
Use a resistor with sufficient rated power for RD. If a resistor with insufficient rated power for
the circuit is used, resistor R
D) as shown in the following figure to bypass the reverse
I
D will burn out.
14 User’s Manual PMX_MULTI
Installation | Load Considerations
PMX
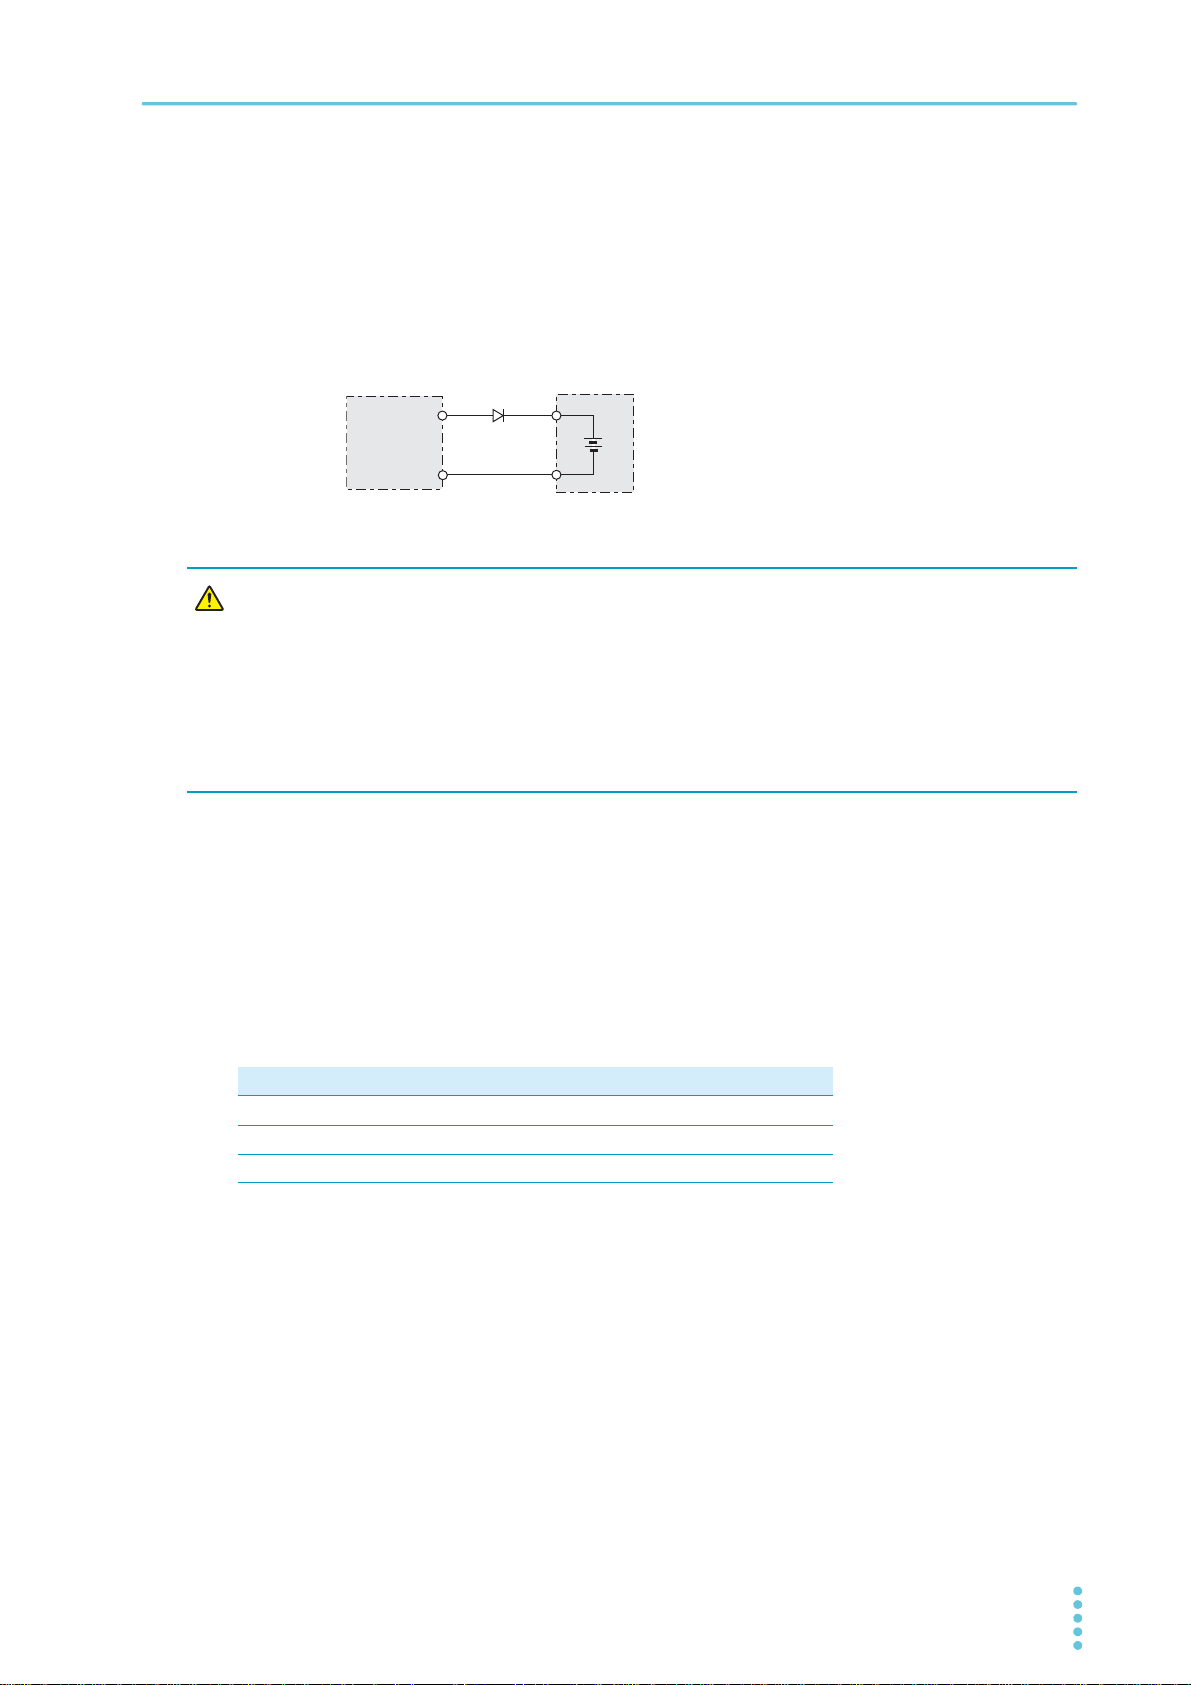
Load with accumulated energy
DRP: Reverse-current-protection diode
D
RP
CAUTION
Loads with accumulated energy
Connecting a load with accumulated energy, such as a battery, to the product may cause current to flow
from the load to the internal circuit of the product. This current may damage the product or reduce the life
of the load.
For this type of load, connect a reverse-current-prevention diode (D
in series as shown in the following figure.
This cannot be used in conjunction with remote sensing.
• To protect the load and the product, use a DRP that conforms to the following specifications.
Reverse voltage withstand capacity: At least twice the rated output voltage of the
product.
Forward current capacity: 3 to 10 times the rated output current of the product.
A diode with small loss.
• Be sure to take into account the heat generated by D
heat dissipation.
RP) between the product and the load
RP. DRP will burn out with inadequate
Sink current from an external voltage source
The current varies depending on the voltage of the external voltage source.
The sink current is reduced at a low output terminal voltage. Hardly any sink current flows near 0 V.
The sink current indicated here is the value obtained when an external voltage with the same value as the
rated voltage is connected.
Sink current (TYP)
Model CH1 CH2 CH3 CH4
PMX32-3DU 43 mA 43 mA − −
PMX32-3TR 43mA 43mA 27mA −
PMX32-2QU 43mA 43mA 36mA 36mA
PMX_MULTI User’s Manual 15

Installation
WARNING
CAUTION
Selecting the Load Cables
Risk of fire.
• Use load cables whose capacity is adequate for the product’s rated output current.
• The output connector and its surrounding area become hot. Use cables whose covers have heat resistance at 85 °C and higher.
Risk of electric shock.
• Use load cables with a voltage rating that meets or exceeds the product’s isolation
voltage. For details on the product’s isolation voltage, see 「Specifications」 (p.85).
• Use load cables with a core diameter that is appropriate for the amount of current being
used and with sturdy, flame-resistant insulation.
Current capacity of load cables
A wire’s temperature is determined by the resistive loss based on the current, the ambient temperature,
and the wire’s external thermal resistance. The following table shows the current capacity of heat-resistant
vinyl wires that have a maximum allowable temperature of 60 °C when one of the wires is separated and
stretched out horizontally in air in an ambient temperature of 30 °C. The current must be reduced under
certain conditions, such as when vinyl wires that have a low heat resistance are used, when the ambient
temperature is 30 °C or greater, or when wires are bundled together and little heat is radiated.
Nominal cross-sec-
tional area (mm
0.9 18 (0.82) 17 4
1.25 16 (1.31) 19 6
2 14 (2.08) 27 10
3.5 12 (3.31) 37 -
5.5 10 (5.26) 49 20
*1. * Excerpt from Japanese laws related to electrical equipment.
AWG (reference cross-sec-
2
)
tional area; mm
2
)
Allowable current*1 (A)
(Ta = 30°C)
Kikusui-recommended current (A)
Taking measures against noise
When connecting wires that have the same heat resistance, separating the wires as much as possible to
increase heat radiation enables a greater amount of current to flow. However, wiring the + (positive) and (negative) output wires of the load cable side by side or bundling them together is more effective against
unwanted noise. The Kikusui-recommended currents shown in the above table are allowable currents that
have been reduced in consideration of the potential bundling of load cables. Use these values as a guideline when connecting load cables.
Limitations of the remote sensing function
All wires have resistance. As the wire becomes longer or the current becomes larger, the voltage drop in
the wire becomes greater. This results in a smaller voltage being applied at the load end. This product has
a sensing function that compensates for this voltage drop up to approximately 0.6 V for a single line (p.23).
If the voltage drop exceeds this level, use wires that have a greater cross-sectional area.
16 User’s Manual PMX_MULTI
Output Terminal Insulation
+
–
+
+S
–S
–
+
–
10
11
12
13
6
7
5
4
3
2
1
8
9
AC
INPUT
DC
OUTPUT
J1
SENS
L
N
Isolated from the chassis
terminal and output
terminal
Chassis electric potential
Load
PMX
Installation
WARNING
Risk of electric shock. For safety reasons, even if the output terminal is grounded,
make sure that the insulation capacity of the output terminal (including the sensing
terminal) is greater than or equal to the isolation voltage of this product.
For details on the isolation voltage of each model, see 「Specifications」 (p.85).
If you cannot obtain a cable with sufficient rated voltage, secure adequate withstand
voltage by passing the cable through an insulation tube with a withstand voltage
greater than the isolation voltage of the PMX seres (multiple-output).
The cable and load that are connected to the output terminal (including the sensing terminal) must have an
insulation capacity that is greater than or equal to the isolation voltage of the PMX seres (multiple-output)
with respect to the chassis. Isolation voltage indicates the maximum allowed voltage that appears across
the output terminal of the power supply unit and the protective conductor terminal (chassis terminal).
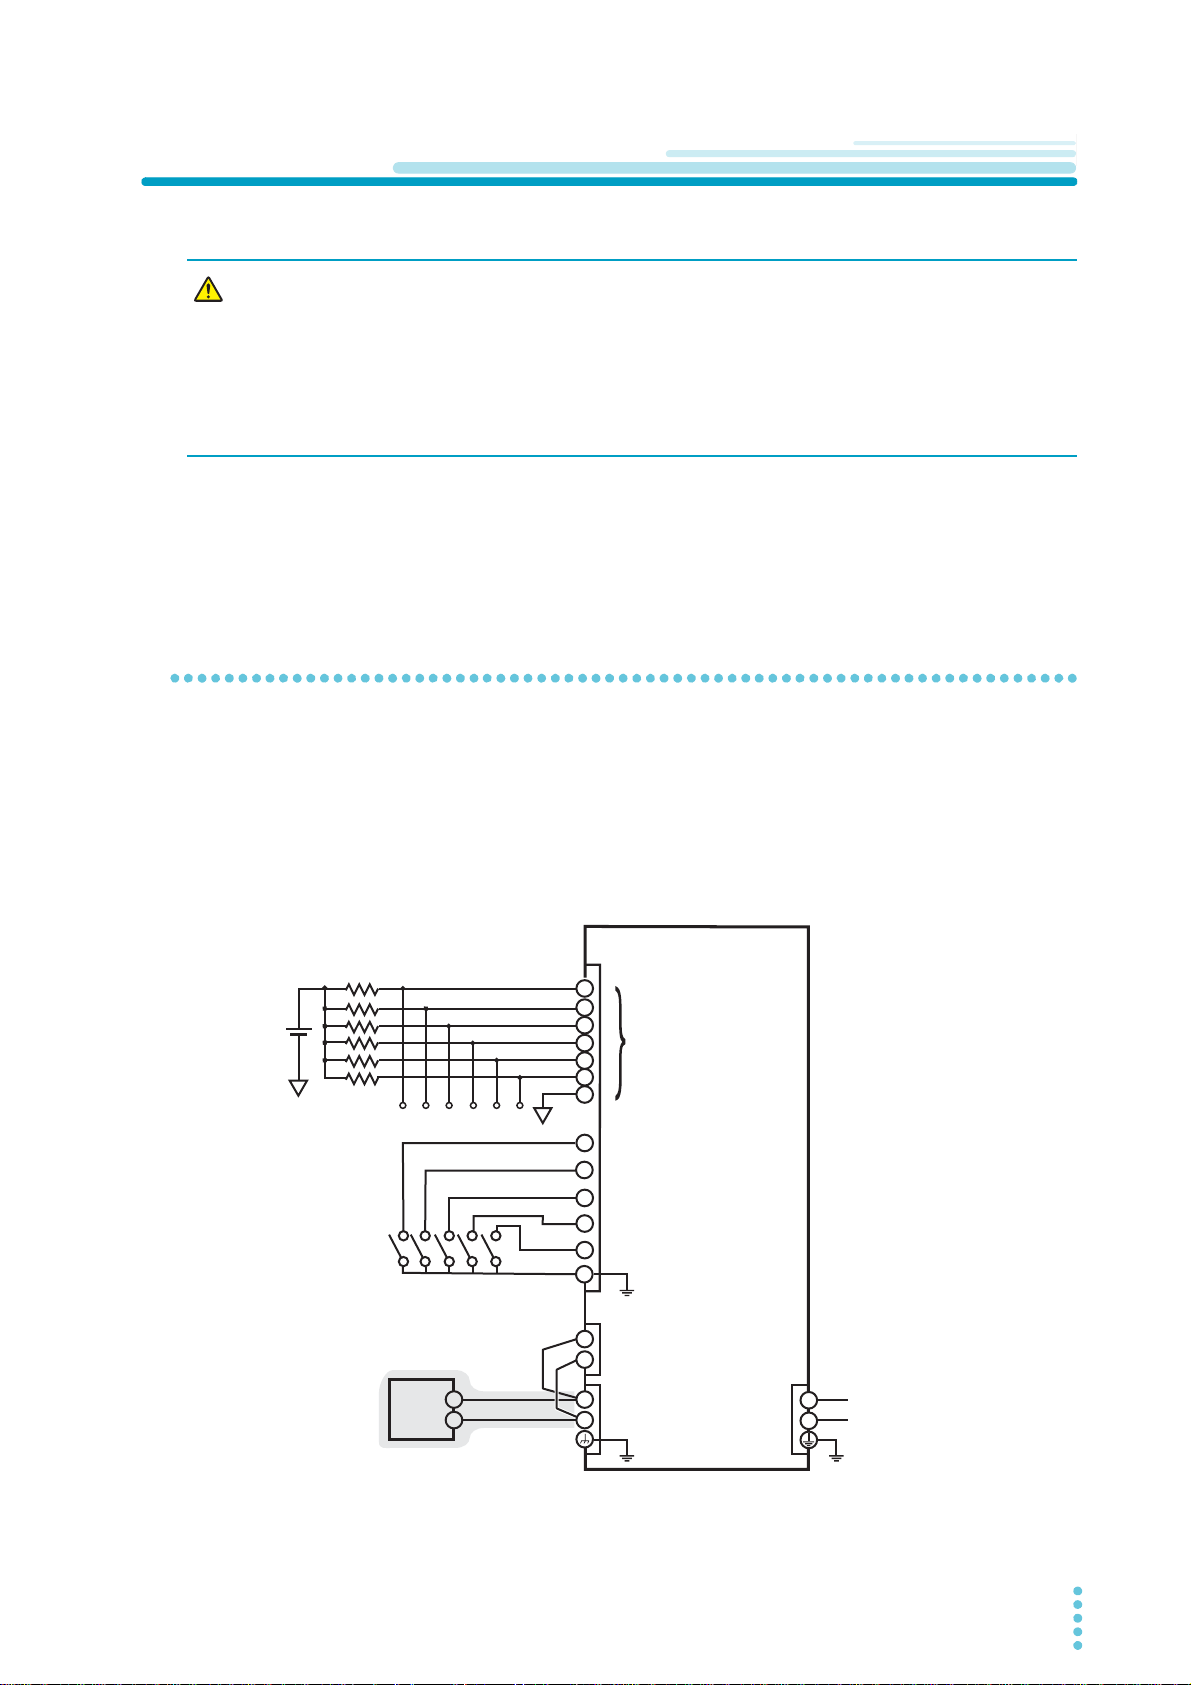
When the output terminal is not grounded (floating)
The output terminal of the PMX seres (multiple-output) is isolated from the protective conductor terminal. If
you connect the GND wire of the power cord to the ground terminal of the switchboard, the chassis of the
product is set to ground potential.
Pins 1 to 7 of the CONTROL TERMINAL on the rear panel are isolated from the chassis terminal and output terminal of this product. Cables and devices that are connected to these pins must have an insulation
capacity greater than or equal to the isolation voltage of the PMX seres (multiple-output).
Vex t
PMX_MULTI User’s Manual 17

Installation | Output Terminal Insulation
+
–
+
+S
–S
–
+
–
10
11
12
13
6
7
5
4
3
2
1
8
9
AC
INPUT
DC
OUTPUT
J1
SENS
L
N
Isolated from the chassis
terminal and output
terminal
Chassis electric potential
Load
PMX
Vex t
Short bar
When the output terminal is grounded
If the positive output terminal is connected to the chassis terminal, the positive output terminal is at ground
potential. The cable and load that are connected to the output terminal (including the sensing terminal) will
only require an insulation capacity that is greater than or equal to the maximum output voltage of the PMX
seres (multiple-output) with respect to the chassis.
The same holds true when the negative terminal is connected to the chassis terminal. The cable and load
require an insulation capacity that is greater than or equal to the maximum output voltage of the PMX
seres (multiple-output).
For safety reasons, connect one of the output terminals to the chassis terminal unless your application
requires the output terminals to be floating.
18 User’s Manual PMX_MULTI

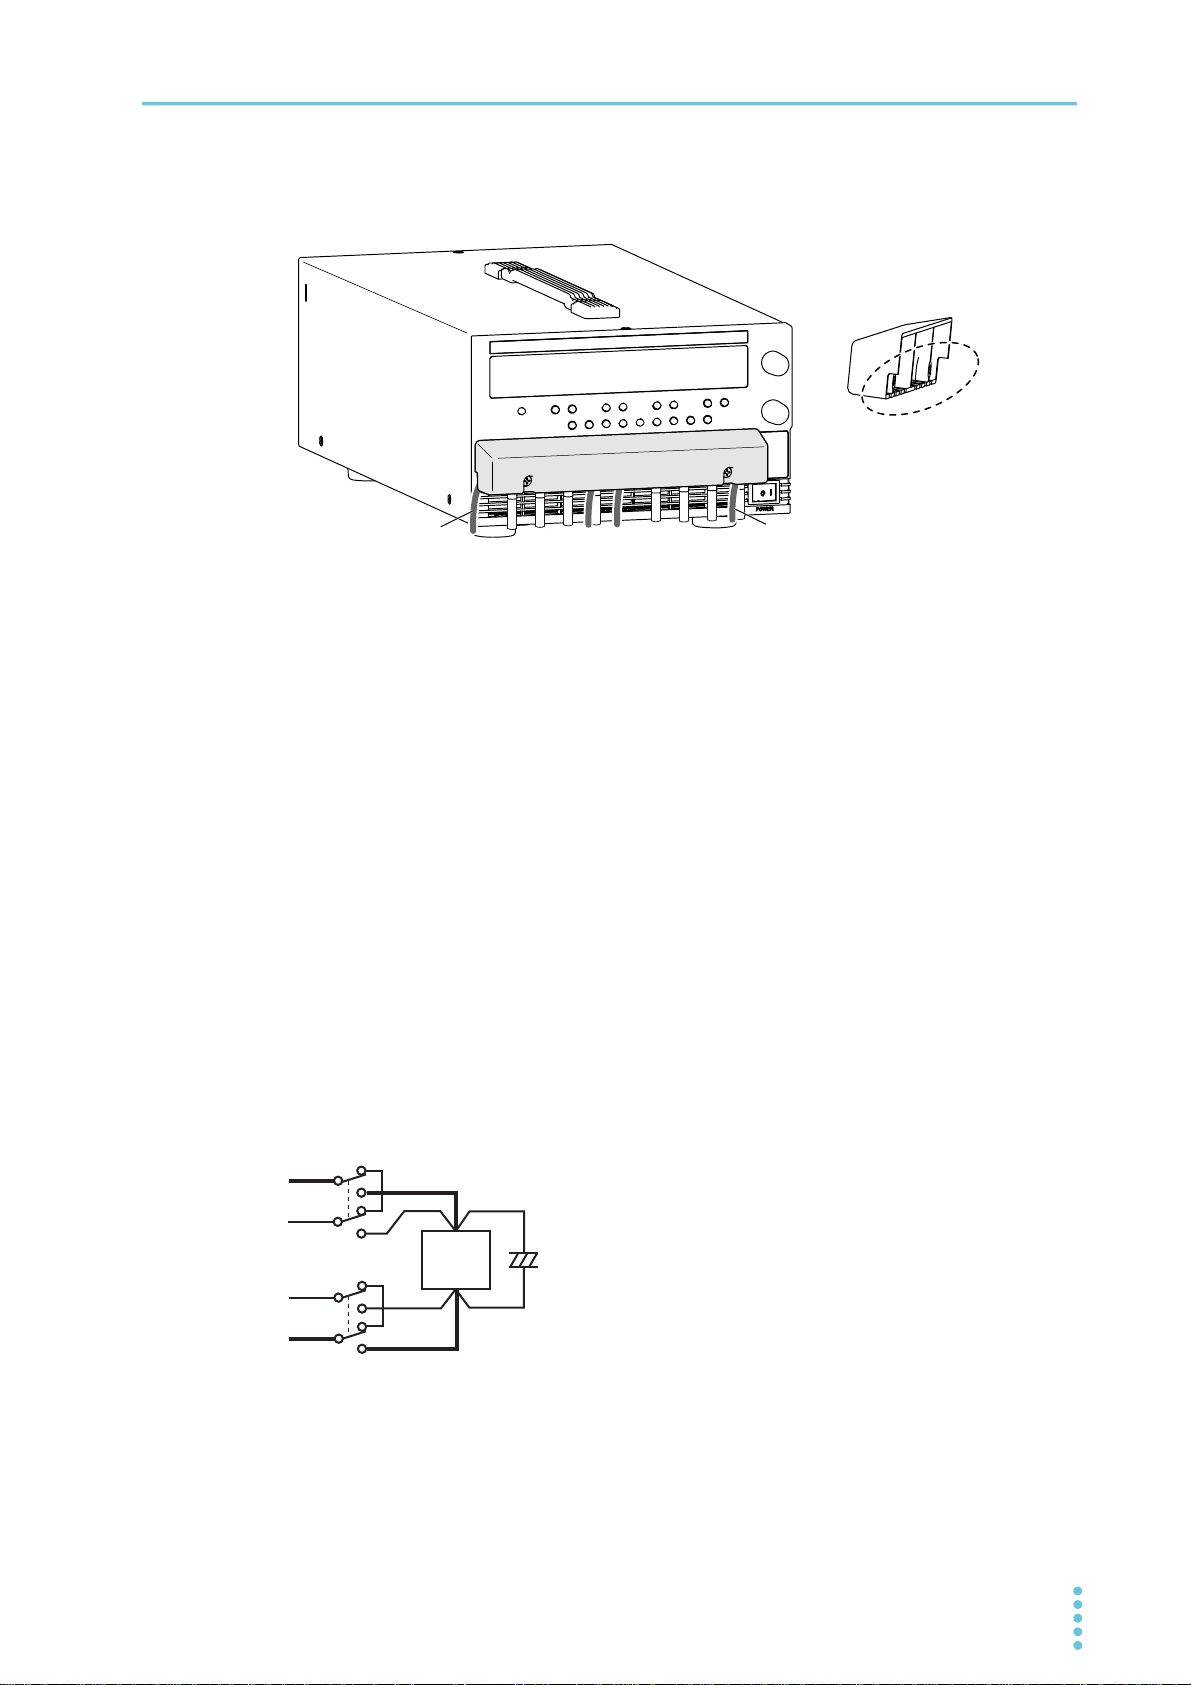
Connecting to the Output Terminals
M6
Crimping terminal
Output terminal knob
Example of PMX32-2QU
To attach the output terminal cover,
remove these screws.
Example of PMX32-2QU
Installation
WARNING
When using the sensing function, connect the sensing cables before connecting the load cables to the output terminals.
1
2
3
Risk of electric shock.
• Turn the POWER switch off before you touch the output terminals.
• Regardless of whether load cables are connected to the output terminals, be sure to
attach the output terminal cover before turning the POWER switch on.
Turn the POWER switch off.
Attach crimping terminals to the load cables.
Remove the knobs once, and attach the load cables to the output terminals.
Connect the short bar to the negative or positive output terminal.
If you are not grounding the output terminal (leaving it floating), follow the instructions in see “When
the output terminal is not grounded (floating)” on page 17 before use.
To reduce the influence of noise on the output, keep the cables as short as possible. If possible,
twist the positive and negative load cables.
To attach the output terminal cover, remove the chassis terminal screws on the out-
4
sides.
PMX_MULTI User’s Manual 19

Installation | Connecting to the Output Terminals
Output terminal cover
Output terminal cover screw
Example of PMX32-2QU
Attach the output terminal cover.
5
Attach the output terminal cover using the screws included with the output terminal cover.
This completes the connections.
20 User’s Manual PMX_MULTI
Installation
CAUTION
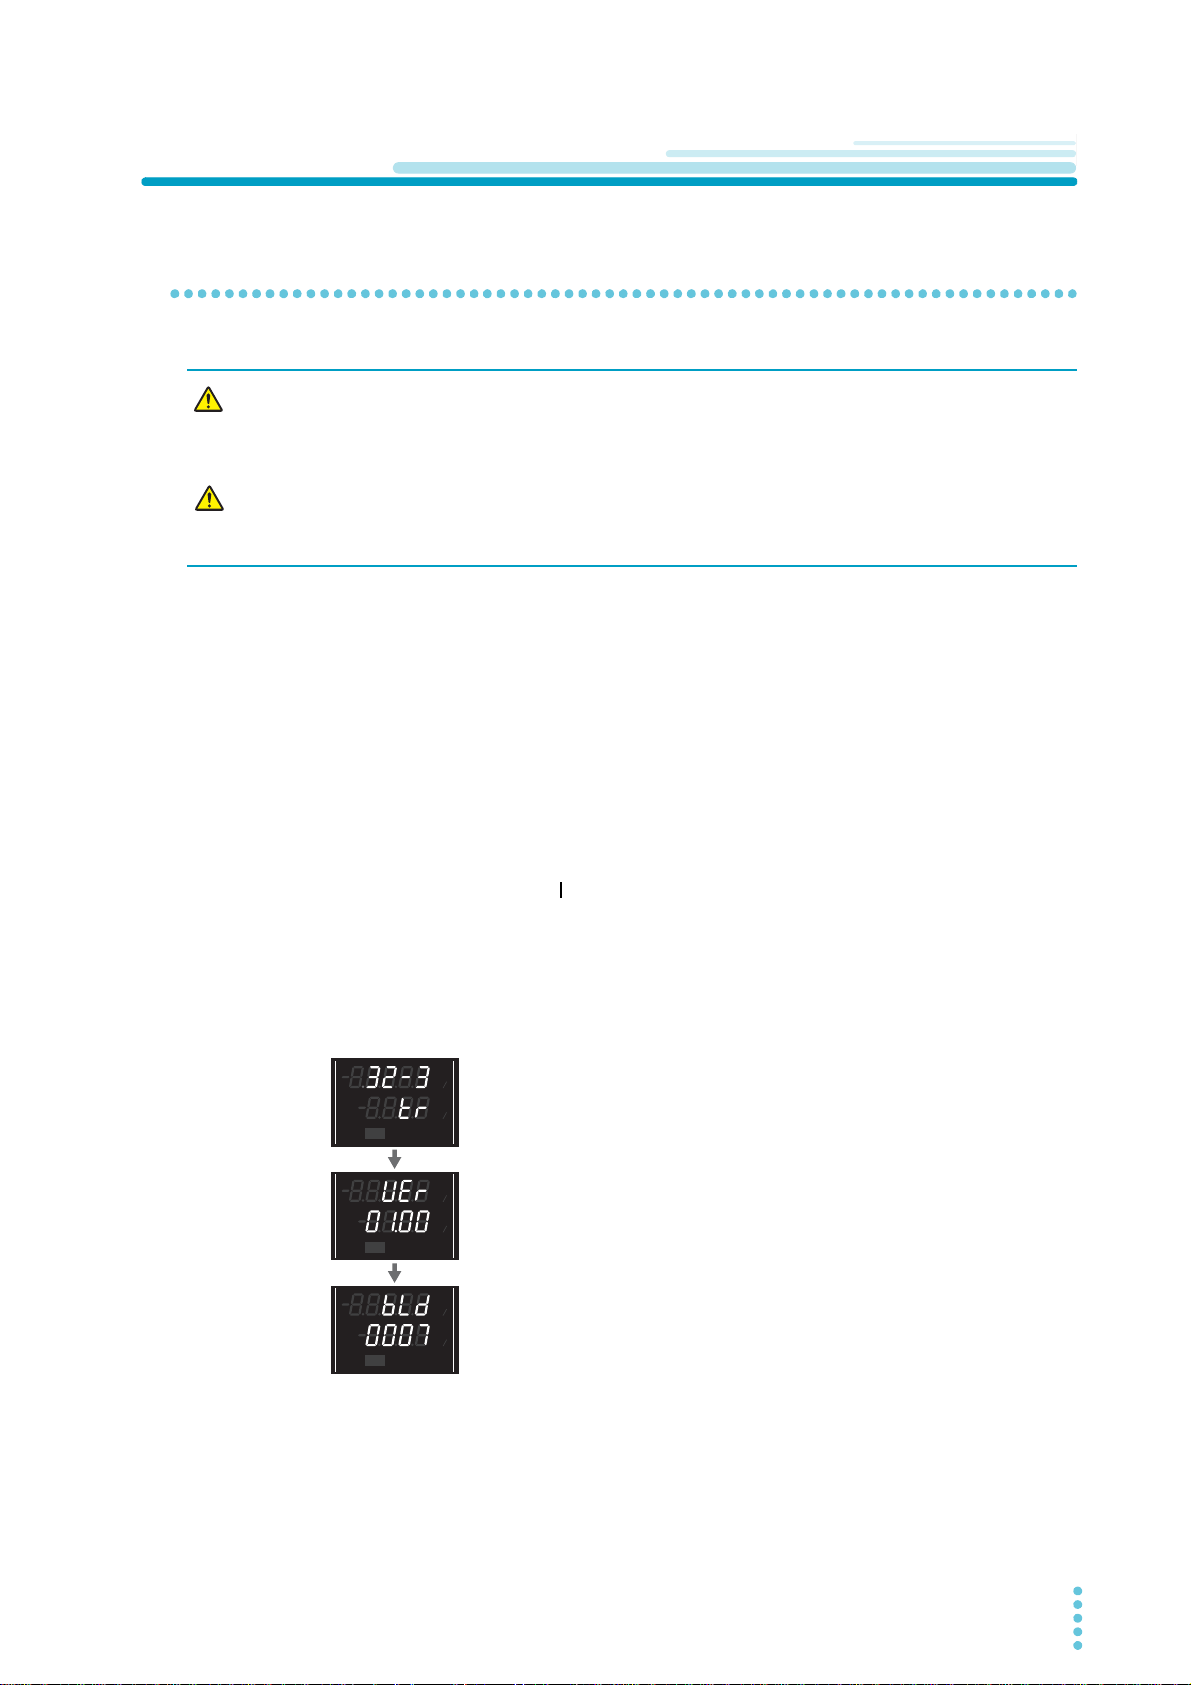
Firmware version
(Version 1.00 in this example)
Rated voltage, rated current, and type
(Example of PMX32-3TR)
Build number
(Build number BLD 0007 in this example)
CV
V
s
OFF
CC
A
s
ON
PARASERI
TRACKING 12
%
%
CV
V
s
OFF
CC
A
s
ON
PARASERI
TRACKING 12
%
%
CV
V
s
OFF
CC
A
s
ON
PARASERI
TRACKING 12
%
%
Checking Whether the Power Is On or Off
Turning the POWER switch on
WARNING
Risk of electric shock. Regardless of whether load cables are connected to the output
terminals, be sure to attach the output terminal cover before turning the POWER
switch on.
Risk of damage to load.
If the product is configured to turn on the output when the POWER switch is turned on in
CONFIG settings, set an appropriate OVP or OCP value before connecting a different load.
If the POWER switch is turned on for the first time after purchase, the product starts in the factory default
condition (p.96 ). Subsequent times that you turn the product on, it starts with the panel settings (excluding
the output on/off setting) that were in use immediately before the POWER switch was turned off.
You can use the CONFIG settings (CF01) to select the output state of the product when the POWER
switch is turned on (p.45).
Check that the power cord is connected correctly.
1
Check that the output terminal cover is attached (p.19).
2
When the product is shipped from the factory, the output terminal cover is not attached.
Turn the POWER switch on ( ).
3
All the indicators on the front panel turn on, and then the CH2 voltmeter and ammeter display the
following information in sequence: the rated voltage, rated current, and type, the firmware version
number, and then the build number. Each item is displayed for approximately 1 second.
After a few seconds, the product enters the operation standby state (the measured value is displayed).
PMX_MULTI User’s Manual 21

Installation | Checking Whether the Power Is On or Off
CAUTION
Inrush current
When the POWER switch is turned on, an inrush current flows. Check that sufficient current capacity is
available in the AC power line or the switchboard, particularly if you are using multiple units and turning on
their POWER switches simultaneously. For the inrush current of each model, see “Specifications” (p.85).
Turning off the POWER switch
Turn the POWER switch off ( ).
This product saves the panel settings (except the output on/off setting) that were in use immediately
before the POWER switch was turned off.
You can use the CONFIG settings (CF01) to select the output state of the product when the POWER
switch is turned on (p.45).
If the POWER switch is turned off immediately after the settings have been changed, the last settings may
not be stored.
If you want to turn the POWER switch back on, wait at least 10 seconds after the panel display turns off. Repeatedly turning the POWER switch on and off at short intervals can cause
damage to the internal circuit. Furthermore, this will shorten the service life of the POWER
switch and the internal input fuse.
In some cases, the keys may become uncontrollable or a malfunction may occur in the alarm
indicators or the like. Turn the POWER switch off once and then back on.
22 User’s Manual PMX_MULTI
Sensing Function
Sensing
switch
OFF
ON
+
–
+S
-S
Output terminal
Chassis terminal
Sensing terminal
PMX
Load
OFF position
There are two types of sensing: local sensing and remote sensing.
By factory default, the product is set to local sensing (the SENSE switch is set to off).
Local sensing
Use local sensing when the cable to the load is short.
Local sensing does not compensate for the voltage drop in the load cable, so use this method when the
load current is small or when you do not need to consider the load regulation voltage.
The sensing point during local sensing is the output terminal.
Installation
Remote sensing
Use remote sensing when the cable to the load is long.
Remote sensing is a function that stabilizes the output voltage across the load by reducing the influence of
voltage drops and other effects caused by the load cable resistance.
You can use the product remote sensing feature to compensate up to 0.6 V for a single line. Select a load
cable that has sufficient current capacity to prevent the voltage drop in the load cable from exceeding the
compensation voltage.
When you perform remote sensing, keep the output terminal voltage from exceeding the rated output voltage. If you are performing remote sensing with the voltage close to the maximum output voltage, the output is limited by the maximum output voltage (105 % of the rated output voltage). Electrolytic capacitors
may be required at the sensing point (across the load).
To reduce the effect of noise, use twisted-pair cables or 2-core shielded cables. When you use shielded
cables, connect the shield to the product or the load grounding terminal.
PMX_MULTI User’s Manual 23
Installation | Sensing Function
+
+
–
–
C
+S
-S
Sensing
switch
OFF
ON
Connect an
electrolytic capacitor
across the load as
necessary.
Output terminal
Chassis terminal
Sensing terminal
PMX
Load
Shielded cable
ON position
WARNING
AWG20-28
STRIP
-
GAUGE
8mm
-
S
+
S
POWER
AWG 20-28
STRIP
-
GAUGE
8mm
DC
OUTPUT
SENSE 4
OFF
ON
-
S
+
S
While pressing here with a screwdriver,
insert the wire at an angle towards the right.
Insert the wire
from this direction.
Pressed down Not pressed down
Example of PMX32-2QU
Connecting the sensing cables
• Never wire the sensing terminals while the POWER switch is turned on.
• For sensing cables, use cables with a voltage rating that is higher than the product’s isolation voltage. Protect the uncovered sections of the shielded cable by
using insulation tubes whose withstand voltage is greater than the product’ isolation voltage.
• Insert the cables so that the wire strands do not touch the chassis when they stick
out of the sensing terminal. Also, insert the cables so that the stripped wires do not
stick out of the terminal.
Be sure to attach the output terminal cover before turning the POWER switch on.
When using the sensing function, connect the sensing cables before connecting the load cables to the output terminals.
If the sensing cables come loose, the output voltage will fluctuate. Because it may increase several tens of
volts higher than the specified value, be sure to set an appropriate OVP trip point.
If you are not going to use remote sensing, return the product to local sensing mode.
Turn the POWER switch off.
1
24 User’s Manual PMX_MULTI
Remove 8 mm of the wire covering. Connect the negative sensing cable to -S that
2
will be used for remote sensing and the positive sensing cable to +S.
Insert the sensing cable towards the right according to the angle of the sensing terminal.
Turn on the SENSE switch on the front panel.
3
Pull out the sensing wires from the side of or from below the output terminal cover,
Sensing wire
Example of PMX32-2QU
Load
+
–
+
–
–
+
–
4
and attach the output terminal cover.
Sensing wire
This completes the connections.
Electrolytic capacitor to connect across the load
Installation | Sensing Function
If the wiring inductance component is large, the following symptoms may appear.
• Oscillation
If the wires used to connect to the load are long, the wiring inductance and capacitance can cause
phase shifting at a level that cannot be ignored. This may lead to oscillation.
• Output fluctuation
If the load current changes drastically in a pulse-shaped pattern, the output voltage may become large
due to the wiring’s inductance component.
You can reduce the inductance component by twisting the load cables, which stabilizes the voltage. However, if this does not correct the problem, connect an electrolytic capacitor across the load.
Electrolytic capacitor to use
Capacitance: 0.1 µF to several 100 µF
Withstanding voltage: At least 120 % of the rated output voltage of the product
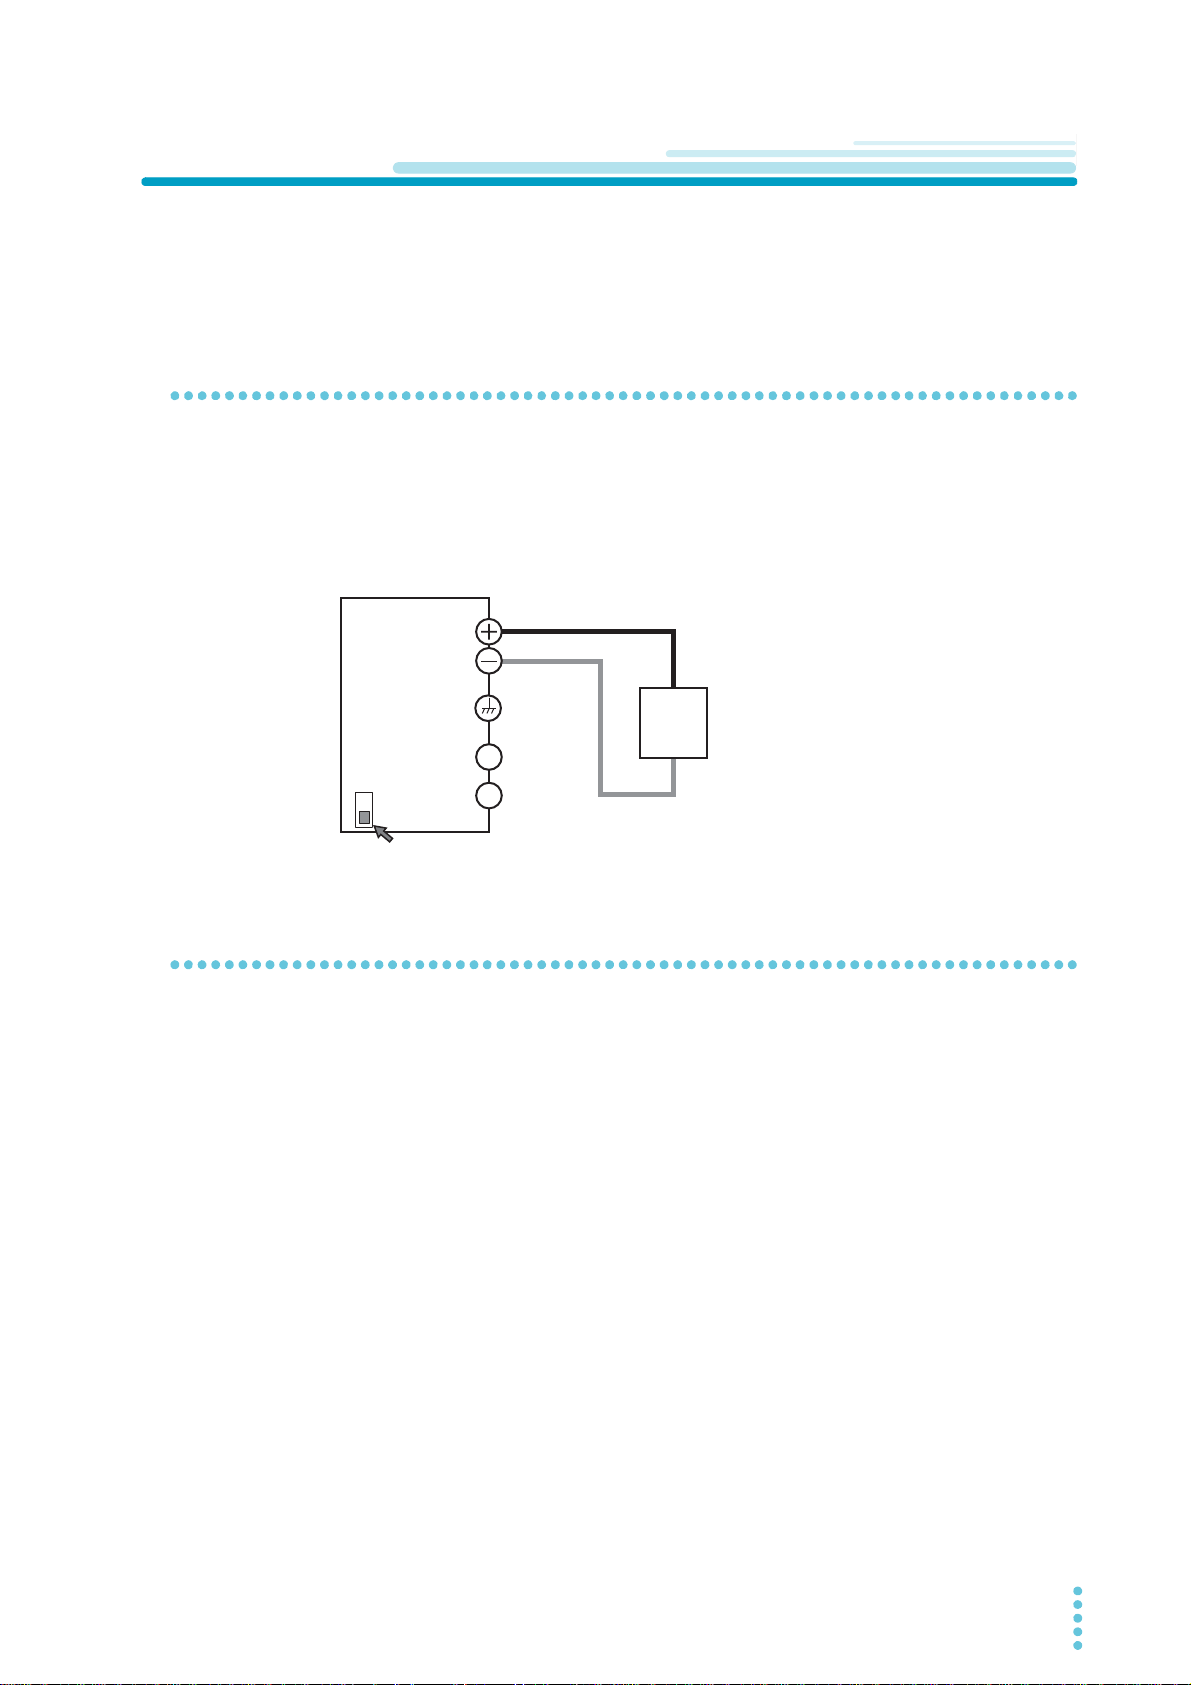
If you are inserting a mechanical switch between the product and the load
S
+S
S
If you want to connect and disconnect the load using a
mechanical switch that is inserted between the product and
the load, be sure to include switches in the sensing cables as
shown in the following figure and turn on and off the load
cable and the sensing cables simultaneously. Before you
C
turn the mechanical switch on or off, be sure to turn off the
OUTPUT key.
PMX_MULTI User’s Manual 25
Basic Functions
SELECTOUTPUT
CH1
OUTPUT
ALL
CV
V
s
OFF
CC
A
s
ON
PRLSER
TRACKING 12
LOCK
REMOTE
LAN LAN
DEL AY
DEL AY SET
SET OVP࣭OCP
PRESET A BC
ALARM
%
%
SELECTOUTPUT
CH1
OUTPUT
ALL
CV
V
s
OFF
CC
A
s
ON
PRLSER
TRACKING 12
LOCK
REMOTE
LAN LAN
DEL AY
DEL AY SET
SET OVP࣭OCP
PRESET A BC
ALARM
%
%
SELECTOUTPUT
CH1
OUTPUT
ALL
CV
V
s
OFF
CC
A
s
ON
PRLSER
TRACKING 12
LOCK
REMOTE
LAN LAN
DEL AY
DEL AY SET
SET OVP・OCP
PRESET AB C
ALARM
%
%
OCP
Trip
point
OVP
Trip
point
Panel Display
The voltage and current displays have the following two states.
• Measurement display
• Setting display
In addition to voltage and current, the display area shows the OVP/OCP value, system configuration set-
tings, alarms, output-on delay/ off delay time, tracking, and SCPI communication errors (when CF23 is set
to ON).
Select the channel that you want to configure by pressing the SELECT key. Brackets “[ ]” appear in the display area of the selected channel.
Items that can be set separately for each channel are shown in the display area of each channel, and
items common to all channels or items set to the same value for all channels are shown in the display area
of CH2.
SCPI communication errors are also shown in the display area of CH2 (when CF23 is set to ON).
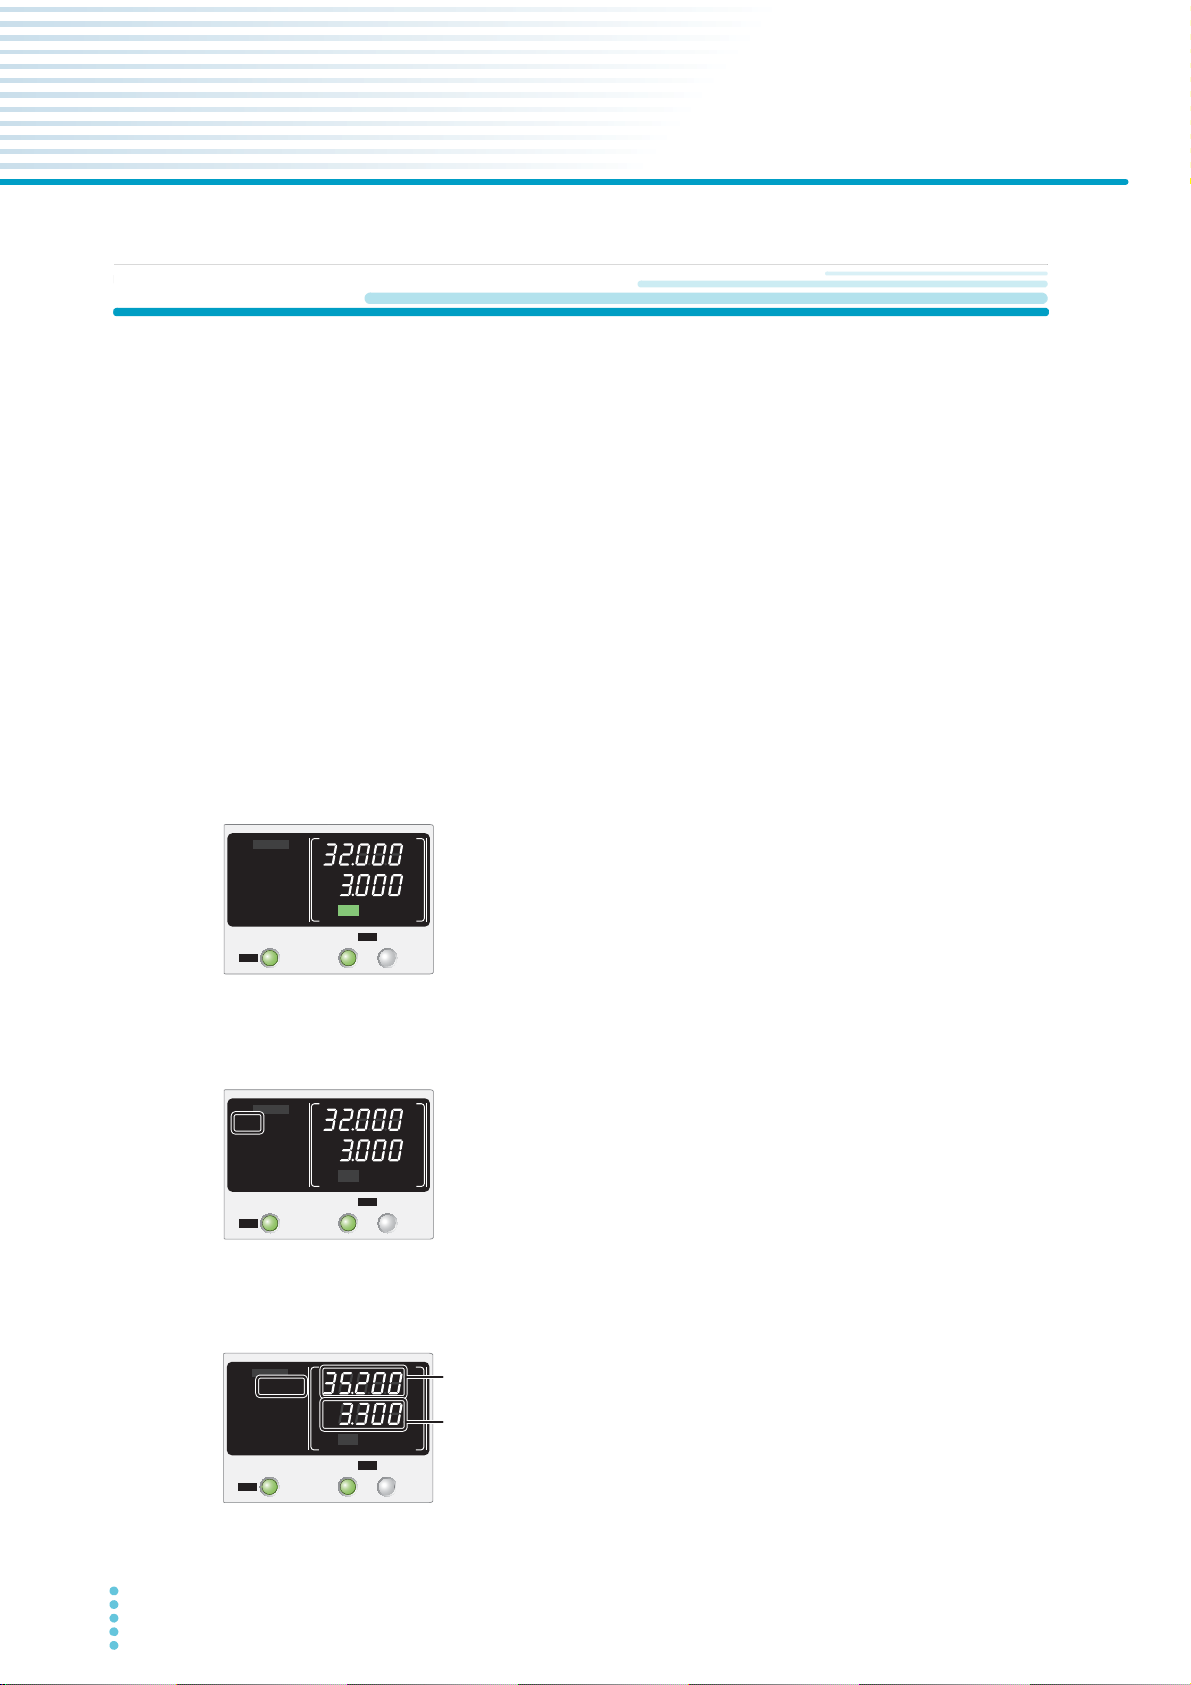
Measurement display
The present output voltage and output current are displayed. The “SET”
indicator in the display area is off. If the outputs of all channels are set off
and you turn the VOLTAGE or CURRENT knob, the “SET” indicator
appears, and the setting display appears.
Setting display
When you press SET, the “SET” indicator appears in the display area, and
the present output voltage and output current settings are displayed.
When you press SET again, the “SET” indicator disappears, and the measurement display appears.
Overvoltage protection and overcurrent protection setting display
When you press OVP•OCP, the “OVP•OCP” indicator appears, and
the present overvoltage protection (OVP) and overcurrent protection
(OCP) settings are displayed.
When you press OVP•OCP again, the “OVP•OCP” indicator disappears, and the measurement display appears.
26 User’s Manual PMX_MULTI
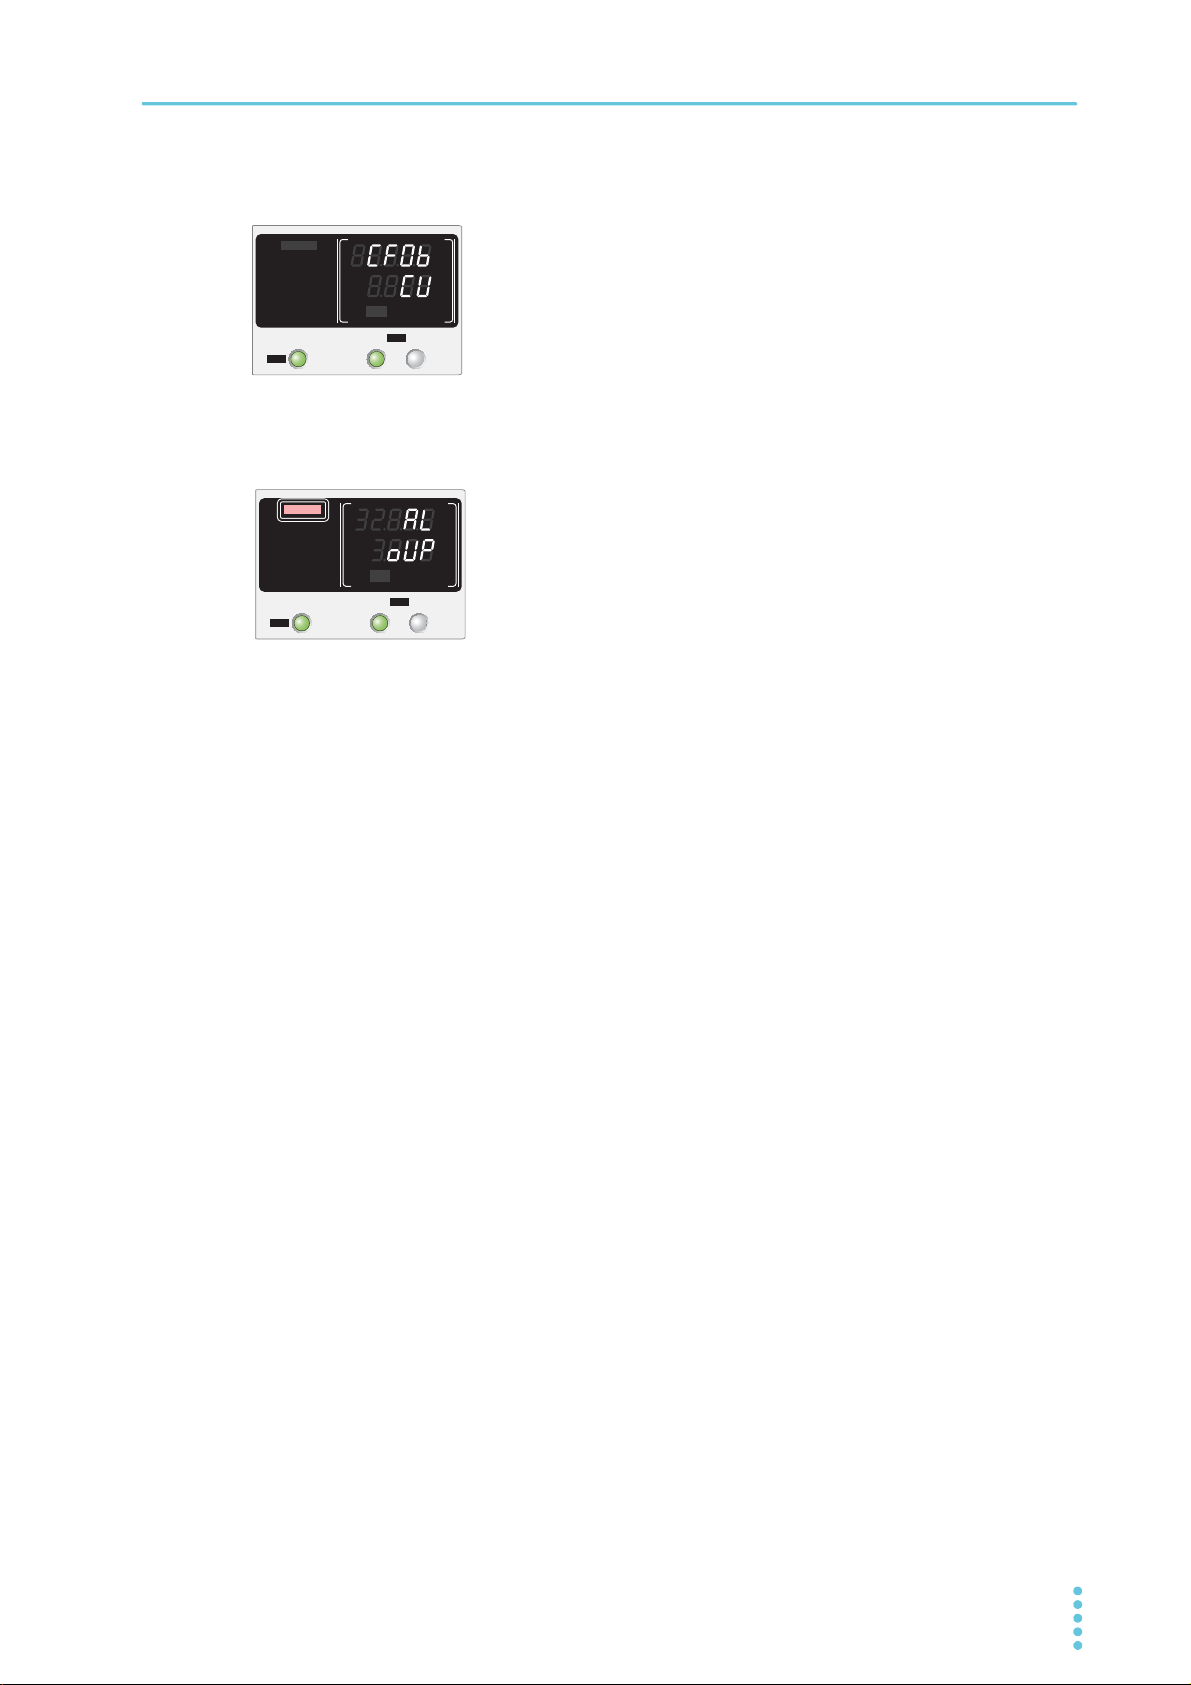
System configuration setting display
SELECTOUTPUT
CH1
OUTPUT
ALL
CV
V
s
OFF
CC
A
s
ON
PRLSER
TRACKING 12
LOCK
REMOTE
LAN LAN
DEL AY
DEL AY SET
SET OVP࣭OCP
PRESET A BC
ALARM
%
%
SELECTOUTPUT
CH1
OUTPUT
ALL
CV
V
s
OFF
CC
A
s
ON
PRLSER
TRACKING 12
LOCK
REMOTE
LAN LAN
DEL AY
DEL AY SET
SET OVP࣭OCP
PRESET A BC
ALARM
%
%
When you press CONFIG, the present system configuration settings are
displayed.
Parameters set to the same value for all channels are shown in CH2. For
items that can be set separately for each channel, the same parameter
number is displayed for all channels.
Alarm display
When an alarm is activated by a protection function, the “ALARM” indicator
(red) and the cause of the alarm are displayed.
Basic Functions | Panel Display
PMX_MULTI User’s Manual 27

Basic Functions
FINE
CURRENT
FINE
VOLTAGE
SELECTOUTPUT
CH1
CV
V
s
OFF
CC
A
s
ON
PRLSER
TRACKING 12
%
%
IncreaseDecrease
IncreaseDecrease
Panel Operations
Measurement display, setting display, and OVP/OCP value display
Fine adjustment (FINE)
You can change the resolution of the VOLTAGE and CURRENT knobs. Hold down SHIFT while you turn
the VOLTAGE knob or CURRENT knob to make small changes to the value (FINE mode).
The following table shows the resolutions that can be specified. The specified resolution may not neces-
sarily be applied to the actual output.
Select the channel that you want to configure by pressing the
SELECT key.
Turn the VOLTAGE knob to change the voltage. Turn the CURRENT knob to change the current.
If the outputs of all channels are set off and you turn the VOLTAGE
or CURRENT knob, the setting display appears, and you can
change the values. When the output is on, you can press SET to
switch to the setting display, and then change the output while you
view the actual voltage or current settings.
• Output voltage setting resolution
PMX32-3DU PMX32-3TR PMX32-2QU
Resolution CH1 100 mV 100 mV 100 mV
CH2 100 mV 100 mV 100 mV
CH3 − 20 mV 100 mV
CH4 − − 100 mV
FINE mode 1mV 1mV 1mV
• Output current setting resolution
PMX32-3DU PMX32-3TR PMX32-2QU
Resolution
CH1
CH2
CH3
CH4
10 mA 10 mA 10 mA
10 mA 10 mA 10 mA
− 20mA 10mA
−−10mA
FINE mode 0.1 mA 0.1 mA 0.1 mA
28 User’s Manual PMX_MULTI

Output Operation
SELECTOUTPUT
CH1
CV
V
s
OFF
CC
A
s
ON
PRLSER
TRACKING 12
%
%
CAUTION
The output turns on and off each time that you press OUTPUT. When the output is
on, the “ON” indicator (green) appears in the display area. When the output is off,
the “OFF” indicator appears.
An OUTPUT key is available for each channel. You can turn on or off the output of
each channel by pressing the OUTPUT key of each channel. You can control the
output of all channels simultaneously using the OUTPUT ALL key. If the output on/
off state of each channel is different, the output of all channels will be turned off
once, and then all the channels will be controlled simultaneously.
When the output is on, output is generated at the present set values.
If you change the settings while the output is on, the changes are applied almost immediately to the output. If the output of all channels is off, the setting display will appear (the “SET” indicator will appear) as
soon as you change a value.
You can set the rise time (speed) that is applied when you change a value. Using CONFIG setting CF07,
select 100 ms (CF07:SLOW) or 10 ms (CF07:FAST) (p.46). (The factory default setting is 100 ms.)
You can use external control to turn the output on and off (p.63).
Basic Functions
Output on/ off setting at power-on
By factory default, the product starts with the output turned off when the power is turned on. Using CON-
FIG setting CF01, you can set the output state at power-on (p.45).
If the output is set so that it is on at power-on, be sure to check the OVP and OCP trip point
settings (p.38 , p.39 ) before you turn off the POWER switch. If the OVP or OCP trip point is
not set properly when the load is changed, the load could be damaged.
Output-on startup state parameter
You can set whether to start in CC mode or CV mode when the output is turned on. Using CONFIG parameter CF06, select prioritize CV (CF06: CV) to start the product as a constant voltage (CV) power supply or
prioritize CC (CF06: CC) to start the product as a constant current (CC) power supply (p.46). (The factory
default setting is prioritize CV.)
PMX_MULTI User’s Manual 29
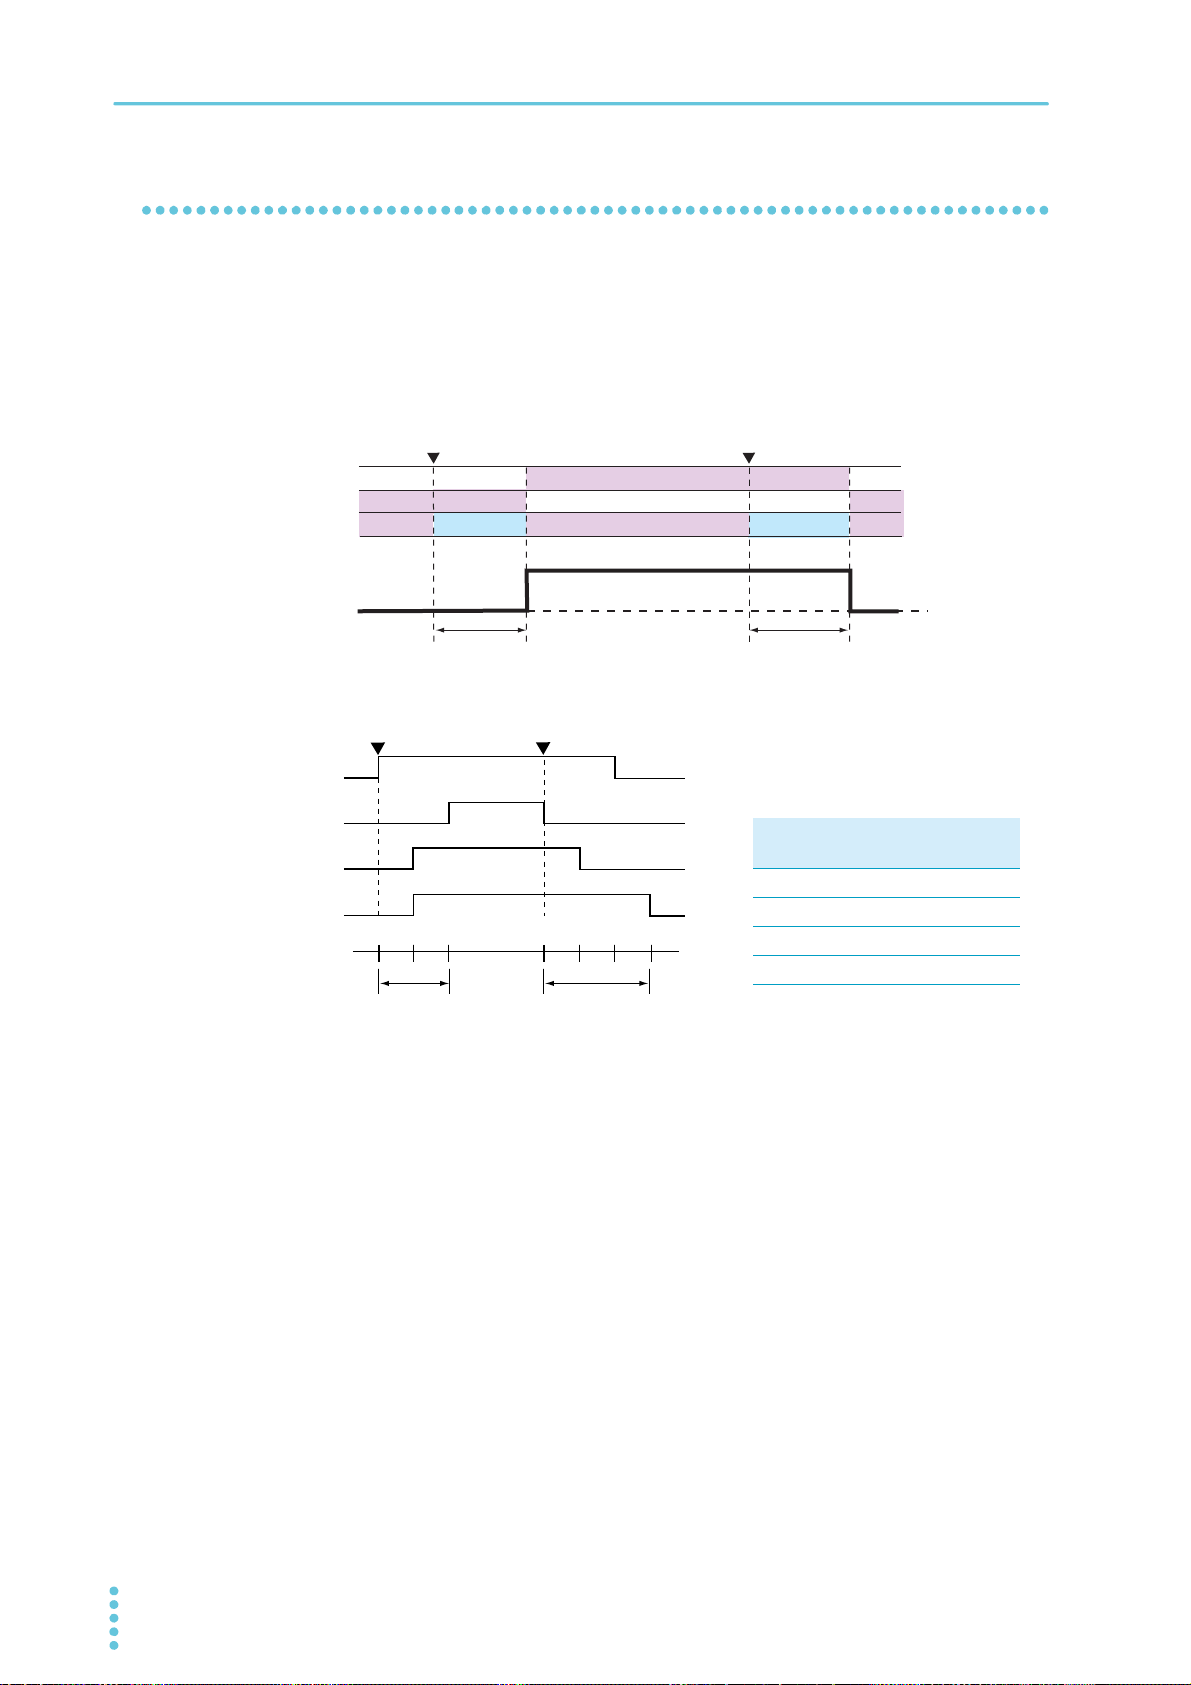
Basic Functions | Output Operation
CH1
CH2
CH3
CH4
204 2046
SET value
Delay time
(s)
On-delay time
Off-delay time
źLVZKHQWKH287387$//NH\LVSUHVVHG
2XWSXWRQ
2XWSXWRII
Hidden
Hidden
Hidden
Shown
Hidden
Shown
Blinking
Blinking
Shown
Shown
Hidden
Shown
Shown
Shown
Shown
DelayDelay
On
Off Off
ON display
OFF display
DELAY display
PMX output
źLVZKHQWKH287387$//NH\LVSUHVVHG
Parameter On-delay
value
Off-delay
value
CH1 0s 4s
CH2 4s 0s
CH3 2s 2s
CH4 2s 6s
Output-on delay/ off delay
You can set a delay from when the OUTPUT ALL key is pressed to when the output actually turns on or
off. This is a useful function when you want to turn the output on or off by setting a delay according to the
load characteristics.
When set, “DELAY SET” appears in the display area. When in operation, “DELAY” appears.
During the delay time until the output turns on or off, the "DELAY" indicator blinks in the display area.
30 User’s Manual PMX_MULTI
 Loading...