

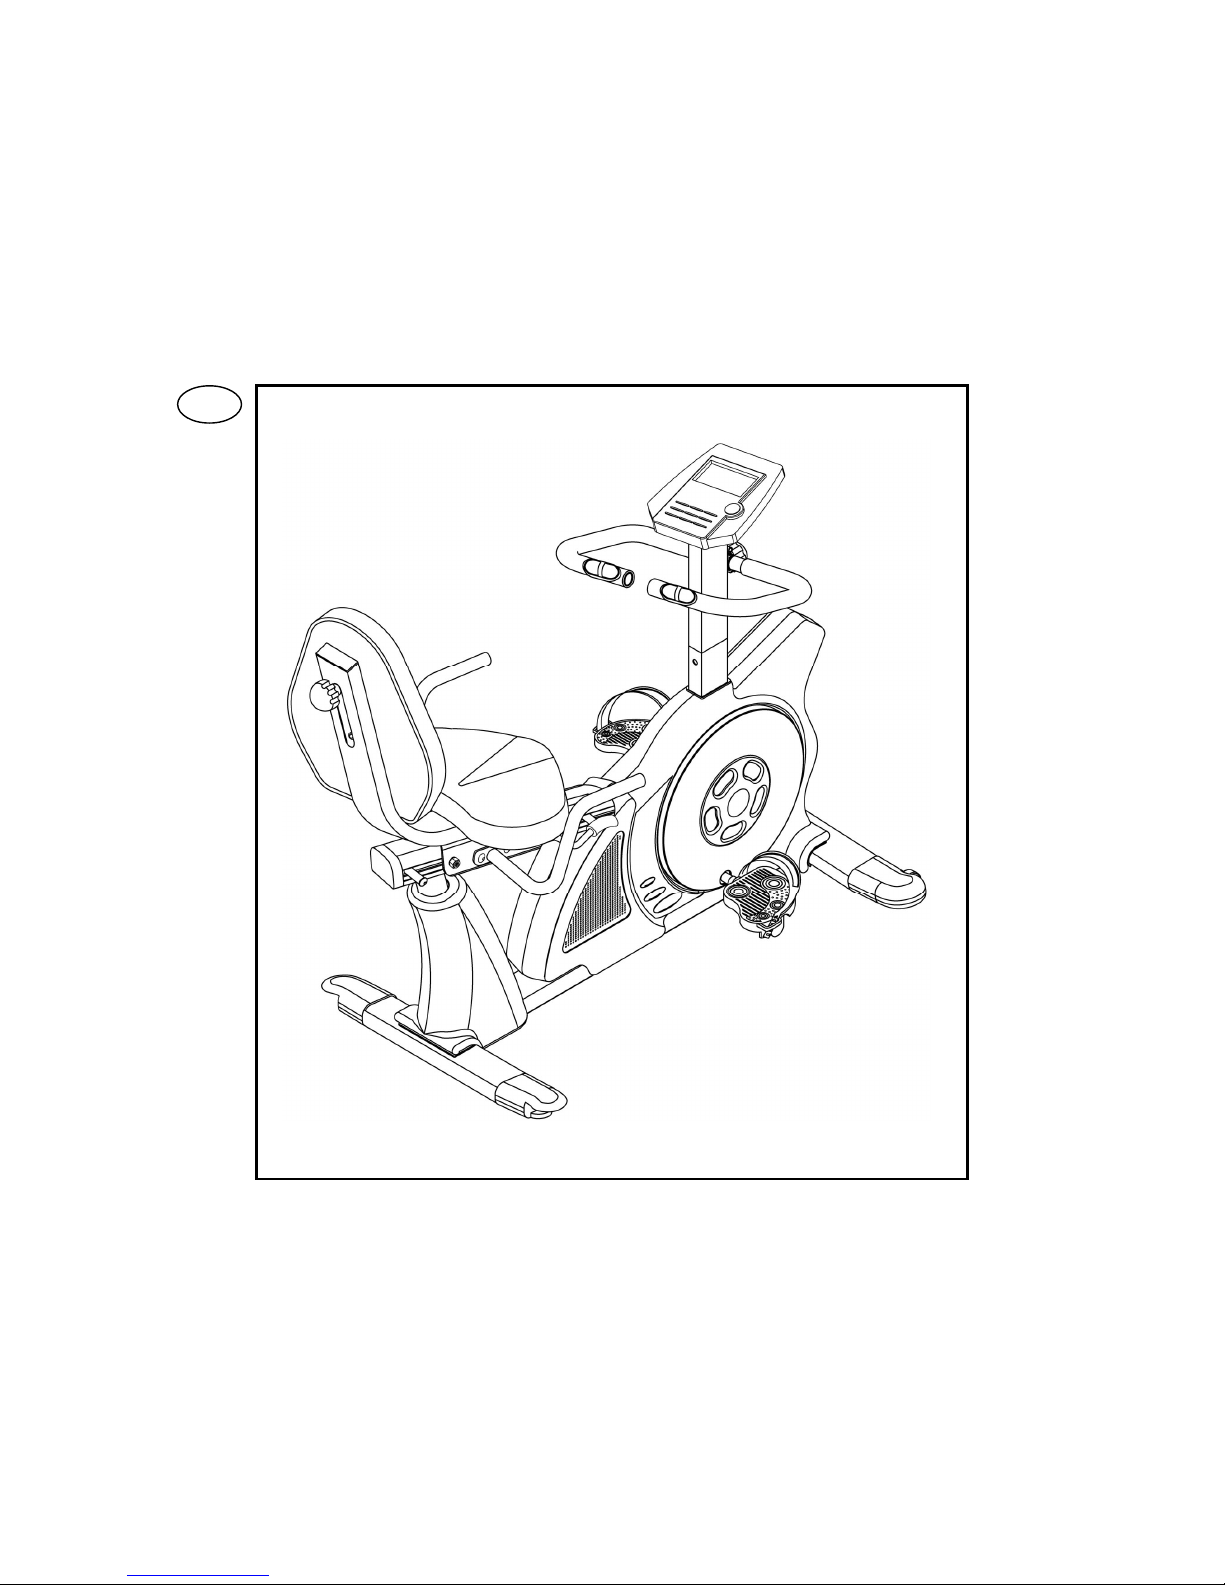
Kikos HM-9090M User Manual
GB
PROGRAMMABLE
MAGNETIC
RECUMBENT BIKE
USER’S MANUAL

This quality product is designed, manufactured, tested and certified for enhanced Fitness
Training.
Dear Customer,
We want to thank you for having chosen a PROGRAMMABLE RECUMBENT BIKE product and wish you a
lot of fun and success during training.
Please note and follow the enclosed safety and assembly instructions carefully.
If you have questions please do not hesitate to contact us.
Table of Content:
1. Safety Instructions .............................. P. 2
2. Assembly Instructions ........................ P. 3
3. Computer Instructions.......................... P. 6
4. Training Instructions ............................ P. 10
5. Exploded Drawing ............................... P. 11
6. Parts List ............................................. P. 12
7. Training pulse rate .............................. P. 14
Safety Instructions
Before you start training on your home RECUMBENT BIKE, please read the instructions carefully.
Be sure to keep the instructions for information, in case of repair and for spare part delivery.
The HM-9090M is made for home use only and
tested up to a max.body weight of 100 kgs.
Follow the steps of the assembly instructions
carefully.
Use only original parts as delivered.
For assembly use only suitable tools and asks for
assistance with assembly if necessary.
Place the bike on an even, non-slippery surface.
Because of possible corrosion, the usage of the
home exercise bikes in moist areas is not
recommended.
Check before the first training and every 1-2 month
that all connecting elements are tight fitting and are
in the correct condition.
Replace defective components immediately and/or
keep the equipment out of use until repair.
For repairs, use only original spare parts.
In case of repair please ask your dealer for advice
Avoid the use of aggressive detergents when
cleaning the home exerciser.
Ensure that training starts only after correct
assembly and inspection of the item.
For all adjustable parts be aware of the maximum
positions to which they can be adjusted/tightened
to.
The home exerciser is designed for adults. Please
ensure that children use it only under the
supervision of an adult.
Ensure that those present are aware of possible
hazards, e.g. movable parts during training.
Consult your physician before starting with any
exercise programme. He can advise on the kind of
training and which impact is suitable.
Warning: incorrect/excessive training can cause
health injuries.
Please follow the advice for correct training as
detailed in training instructions.
The load/work level can be adjusted by turning the
UP/DOWN knob on the computer.
GB
- 2 -

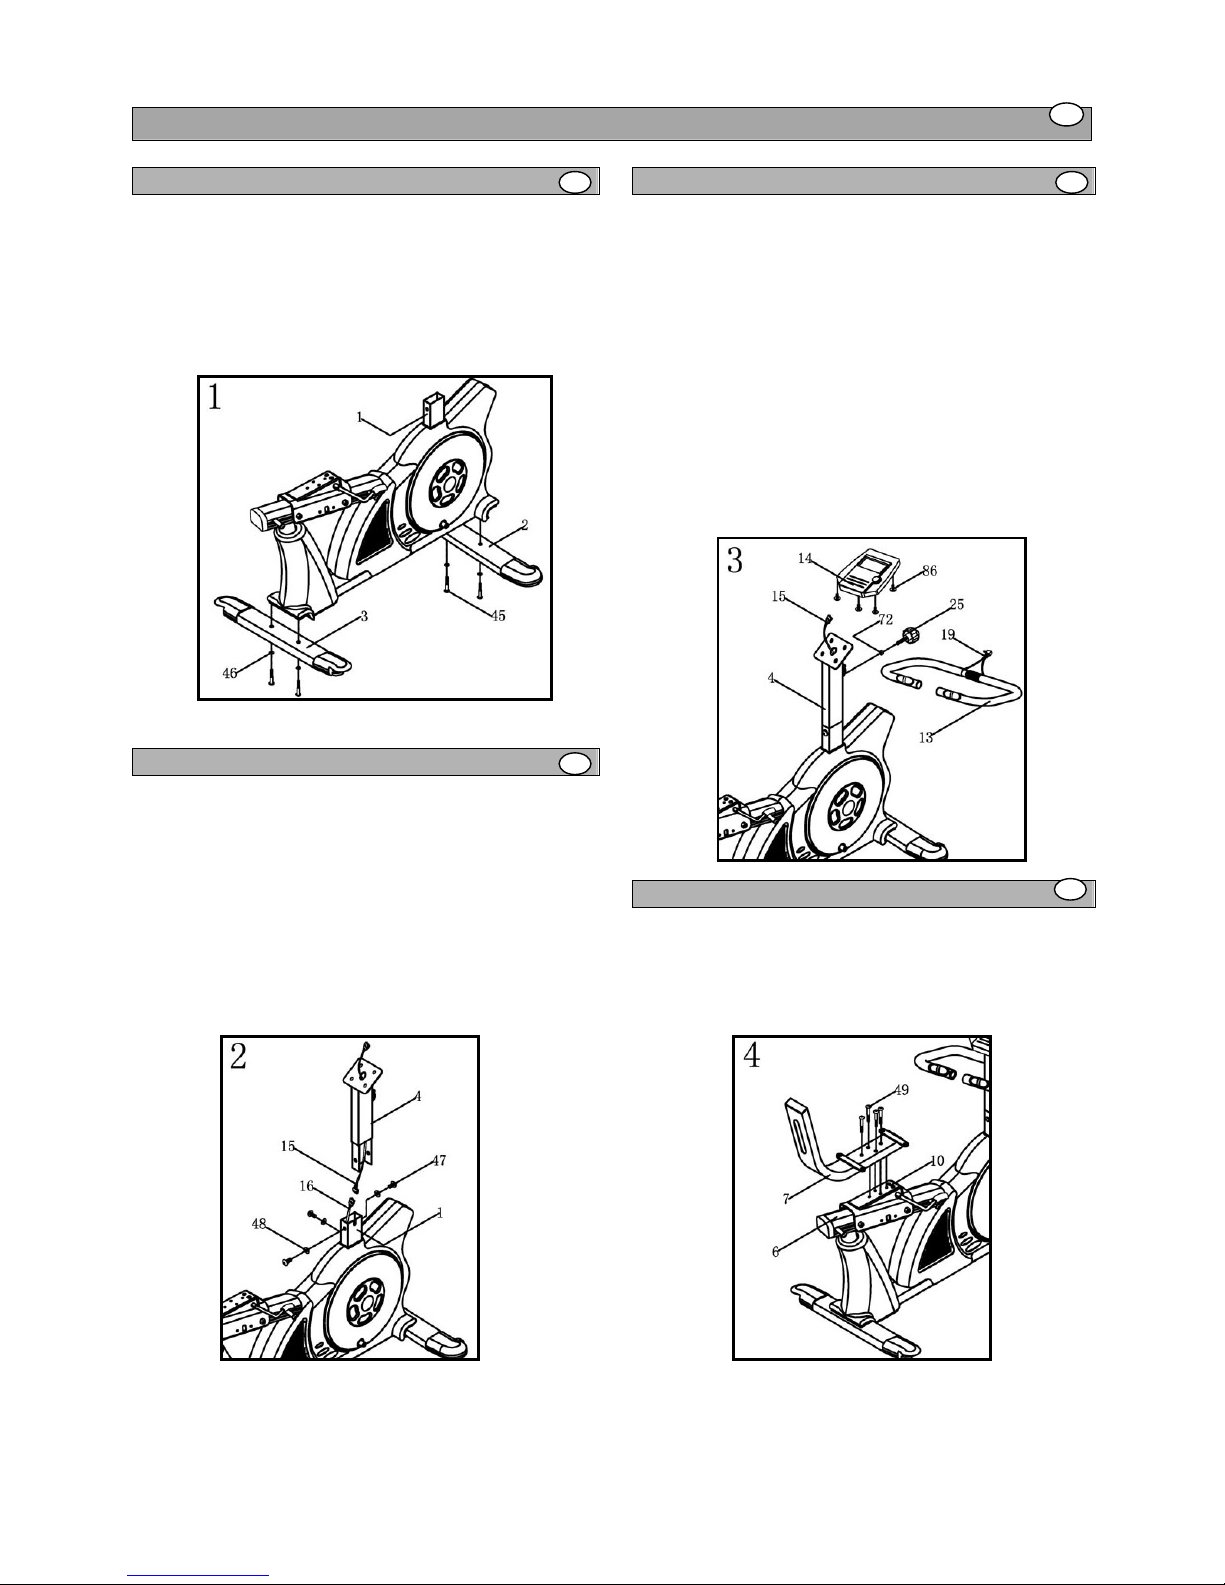
Assembly Instruction
Step 1
1. Fasten front stabilizer (2) and rear stabilizers (3) each
with 2 carriage bolts (45) from the underside of
stabilizers. Secure with 2x- washers (46) to main
frame (1).
Step 2
1. Connect the upper computer cable (15) with lower
computer cable (16) securely.
2. Unscrew the pre-assembled 3 hex. Bolts (47) &
washers (48). Put the handlebar post (4) into the
main frame (1) and fix it with 3 hex.bolts (47) &
washers (48).
Step 3
1. Plug the computer cable (upper) (15) with cable at
back of computer (14). Slide computer (14) and fix it
onto the bracket at top of handlebar post (4) by 4
bolts (86).
2. Release knob (25) from fastener at back of
handlebar post (4). Open up the fastener and attach
handlebar (13) into fastener of handlebar post (4).
Select the desired position for handlebar (13), fasten
the knob (25) with washer (72) securely.
3. Plug hand pulse sensor wire (19) to jack at back of
computer (14).
Step 4
1. Attach seat post (7), to the seat bracket (10). Secure
with 4 bolts (49) tightly.
GB
GB
GB
GB
GB
- 3 -
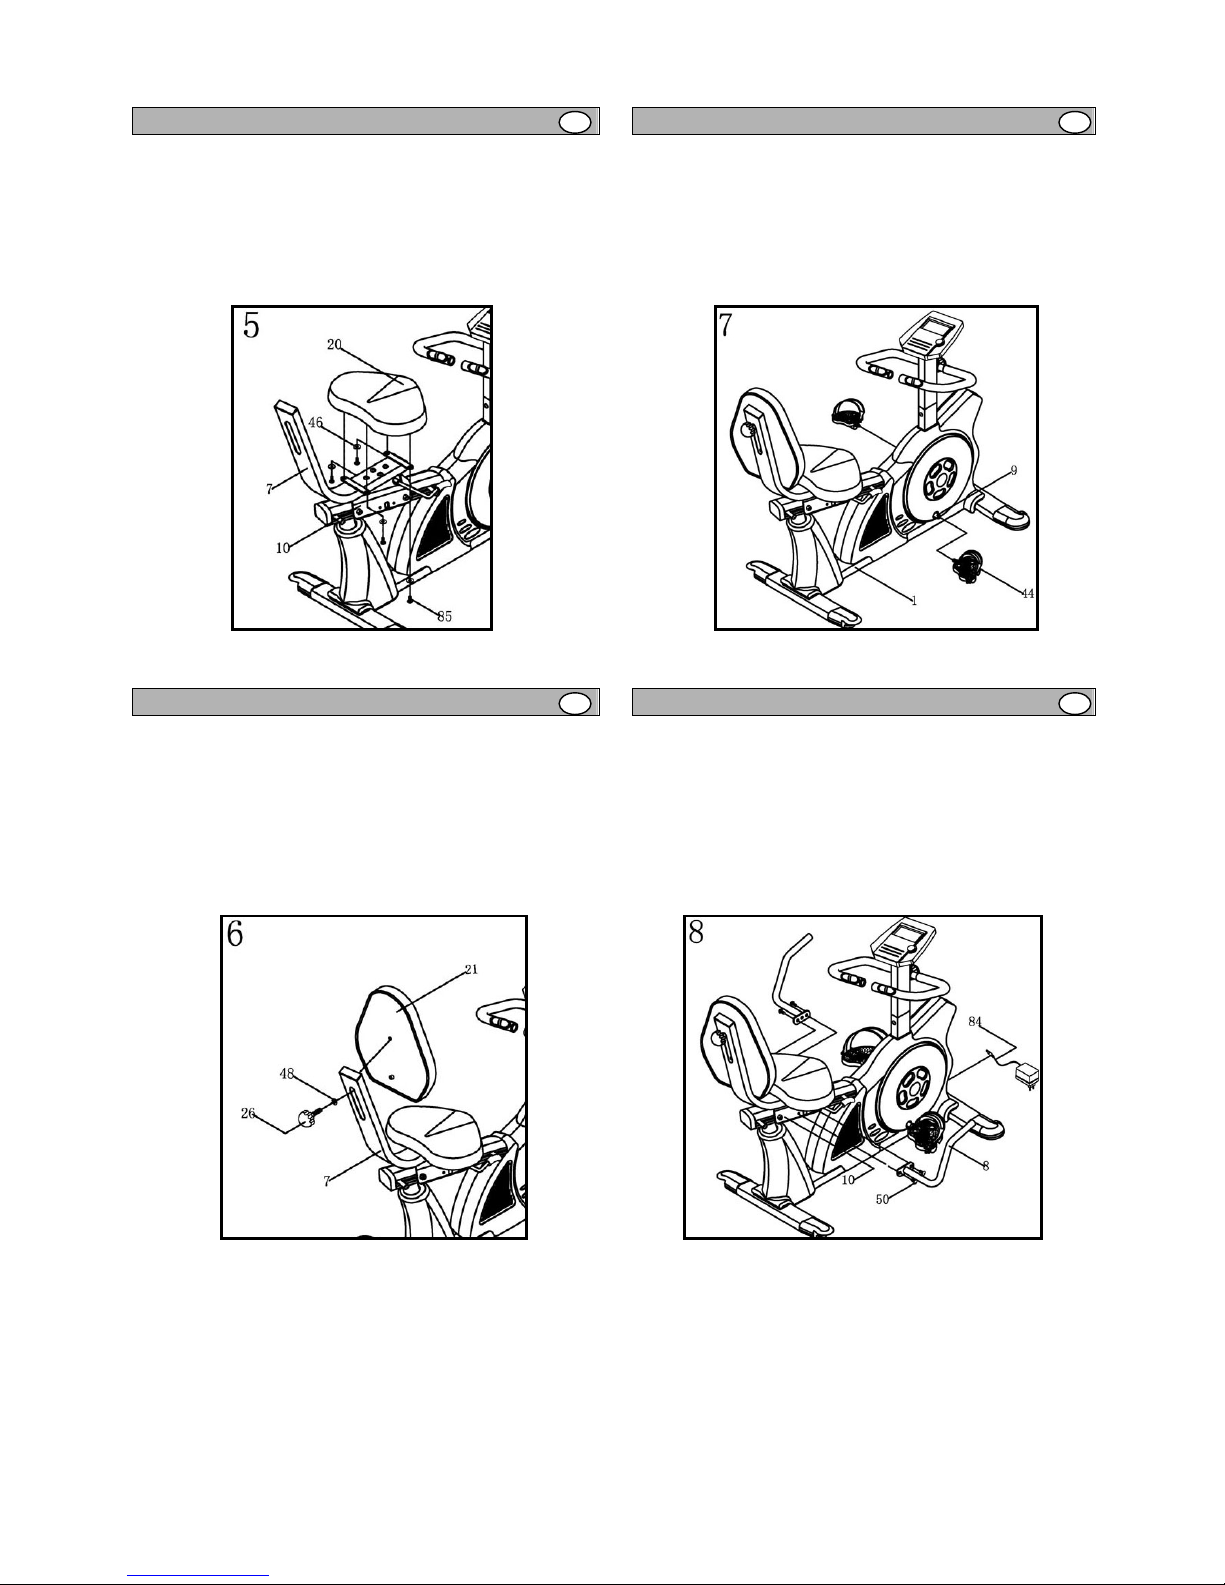
Step 5
1. Unscrew 4 preassembled bolts (85) & washers (46)
from the back of seat (20). Attach the seat (20) to
the seat post (7), secure 4 bolts (85) with
washers (46) from underside to seat.
Step 6
1. Attach backrest (21) to seat post (7). Fasten the
backrest (21) firmly with knob (26) & washer (48)
from the back side of the seat post (7) .
Step 7
1. Screw pedal (44) onto the crossbar crank (9). The
pedals are marked with R and L at the screw.
Tighten the left pedal counter-clockwise, the right
pedal clockwise.
Step 8
1. Connect right handlebar post (8) with seat
bracket (10) by 2 bolts (50) tightly.
2. Proced the same to the left handlebar (8).
3. Attach adaptor (84) to DC wire (17) at back of main
frame (1).
GB
GB GB
GB
- 4 -
 Loading...