

KIDZTECH TOYS 6203C 27MTX User Manual
5F6203C
Battery Requirement
1. Vehicle: 1 x 11.1V Lithium-ion rechargeable battery pack
2. Transmitter: 1 x 9V Battery
11.1V
Rechargeable
Battery Pack
11.1V
Charger
SAFETY PRECAUTIONS (Keep manual for future reference)
This vehicle is not recommended for children under the age of 8 years.
Please read all of the instructions before operating this vehicle.
Always follow general safety rules while operating vehicle: avoid hitting pets, furniture or people.
Do not pick up vehicle while it is in motion, keep hands,
hair and clothing away from this vehicle when
the power switch is turned to the “ON” position. Remove battery pack when vehicle is stored.
Avoid tire contact on painted or varnished surfaces.
The HyperDrive3.0 is built with an automatic shut-off function if the
vehicle reaches excessive temperature during operation.
If the vehicle stops after prolonged period of operation, turn off vehicle and controller,
remove battery from vehicle and cease operation for ten (10) minutes.
Reinsert battery and resume play.
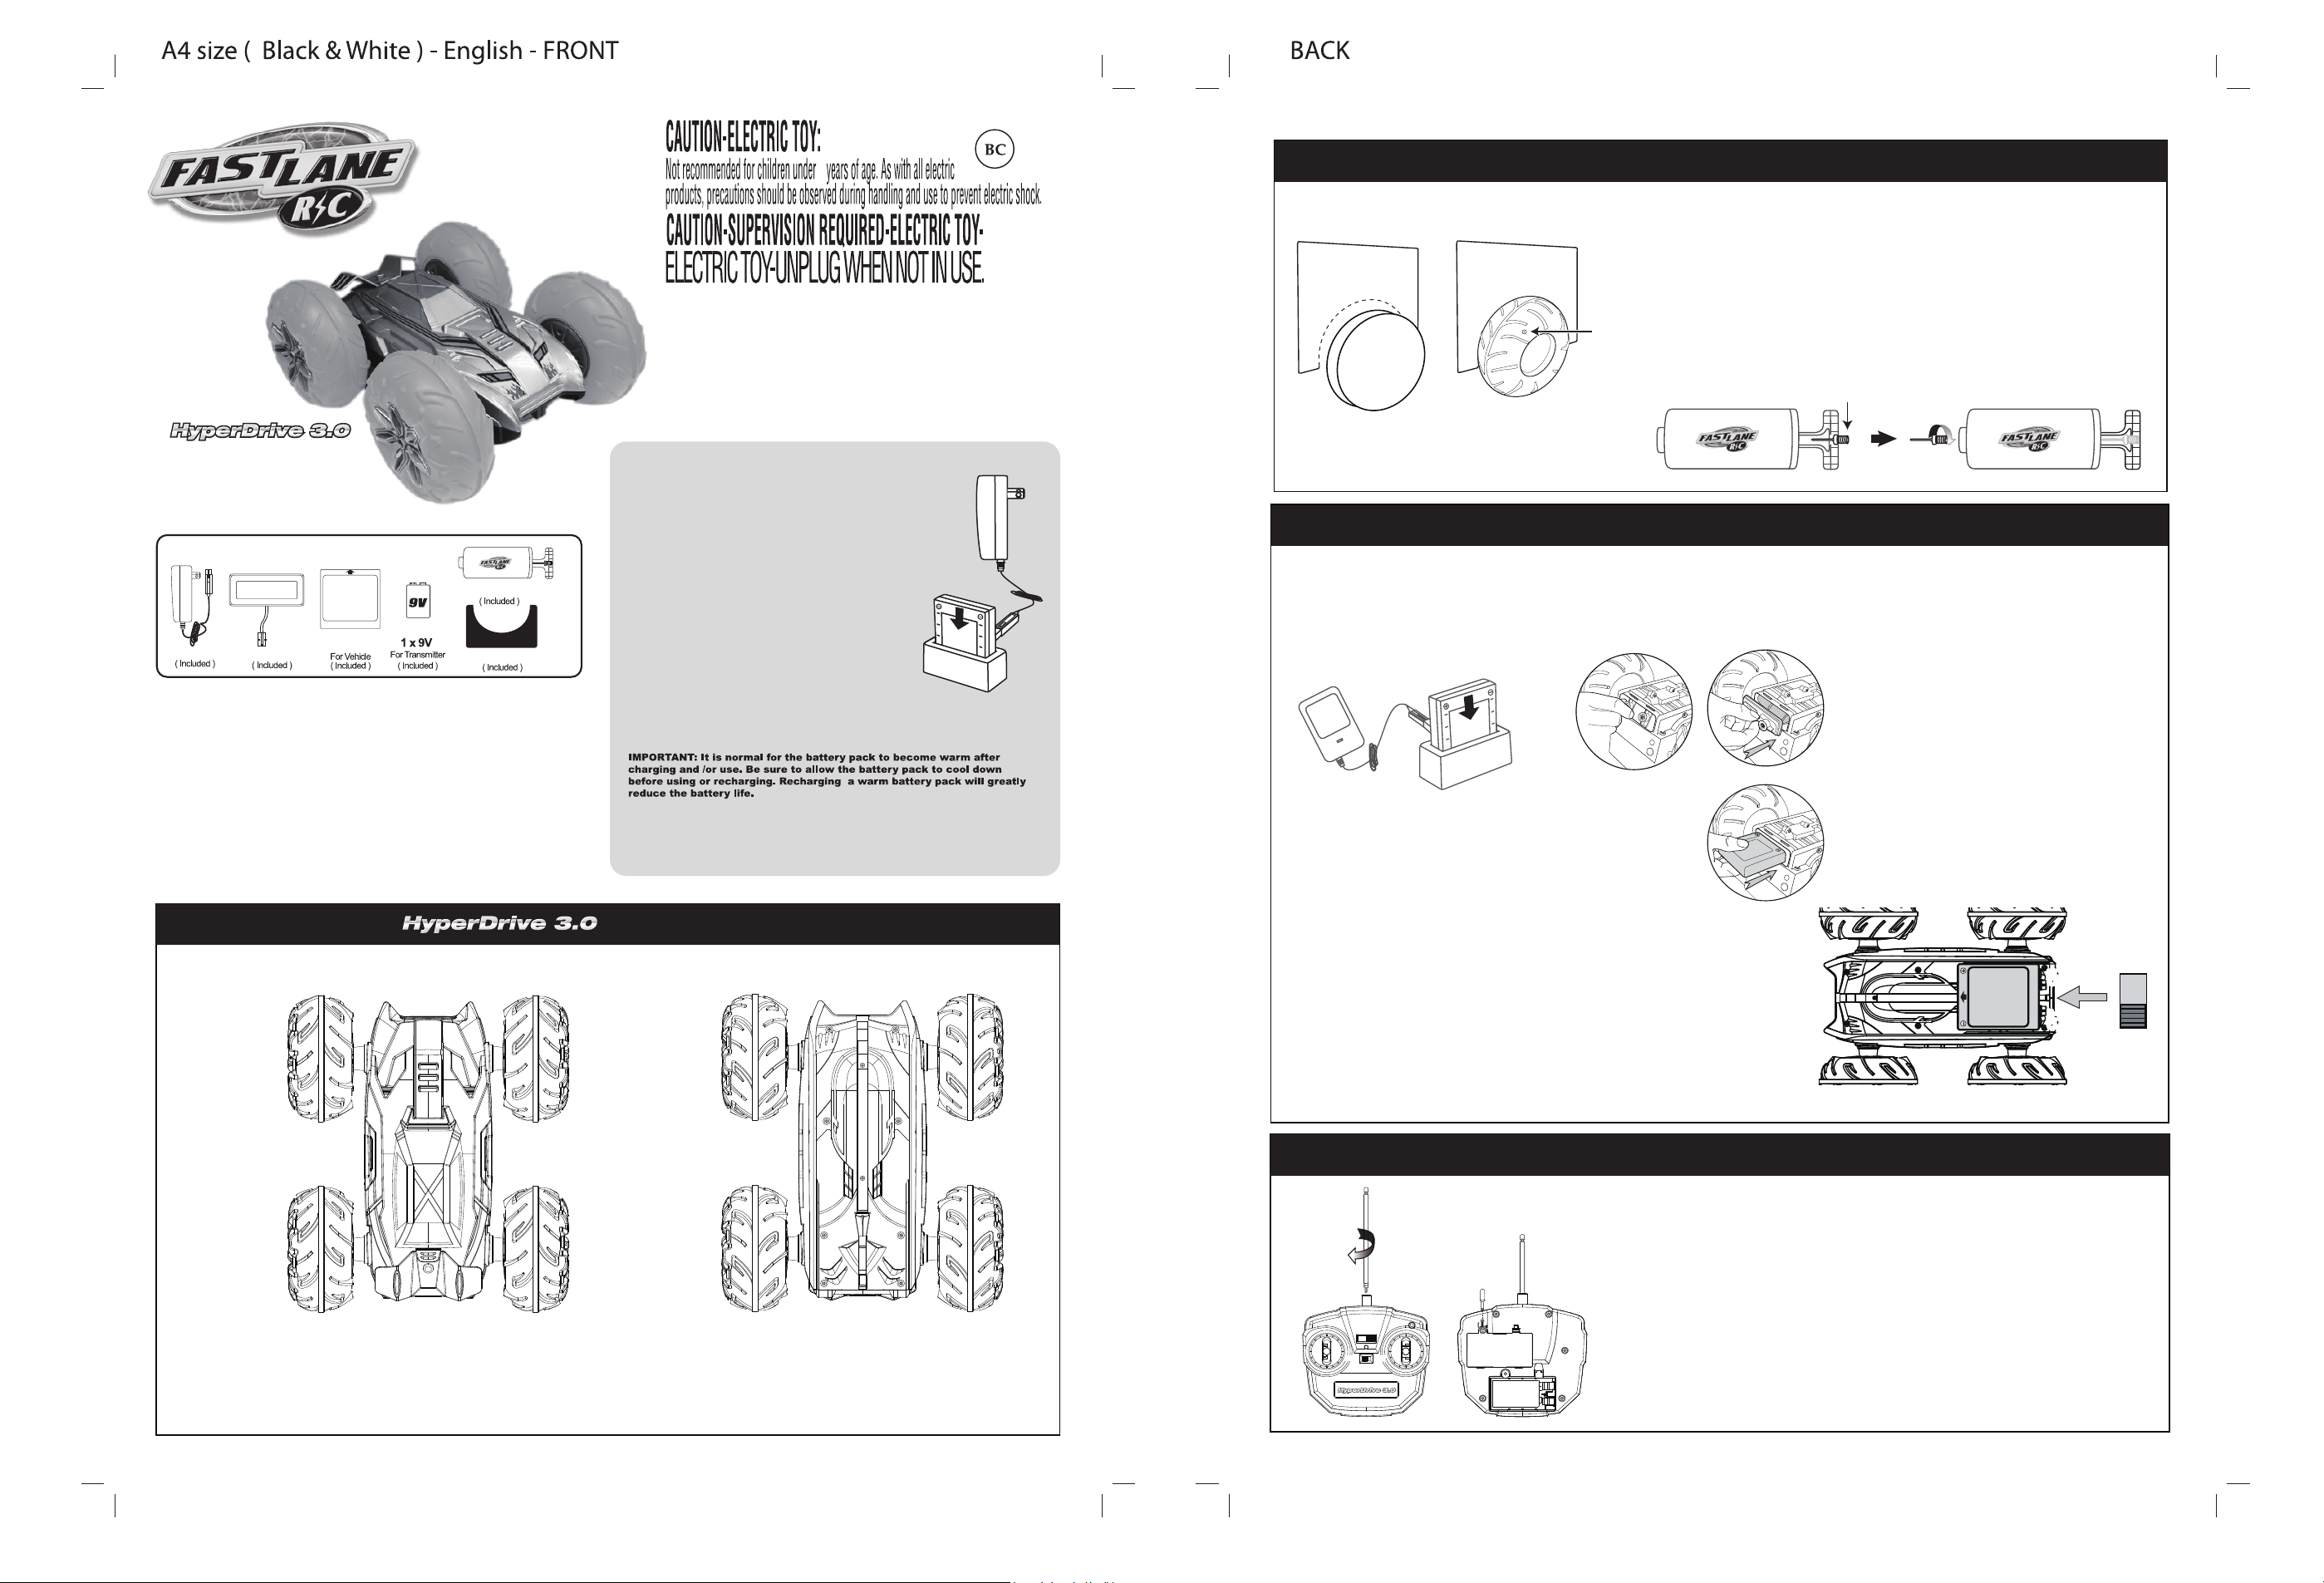
Docking
1500mAh
Air Pump with needle
Tire Gauge
2-SIDED BODY DESIGN
SIDE A SIDE B
8
INPUT: 120V~60Hz 300mA OUTPUT:12V=750mA
WARNING: Charger that is supplied with the toy should be
regularly examined for potential hazards, such as damage
to the plug, enclosure, or other parts. In the event of such
damage, the charger or toy must not be used until that damage
has been properly repaired. DO NOT use any other charger
other than one supplied.
The Included 11.1V rechargeable battery pack is NOT
charged prior to shipment and must be charged at
least 8 hours befotr the first use.
Charging the 11.1V Rechargeable Battery
Pack for the Vehicle:
1. Plug the Docking to the Charger.
2. Insert 11.1V rechargeable battery pack securely into
the charger (as shown).
Be sure the arrows are properly matched.
3. Allow battery to charge for a minimum of 8 hours on the
initial first charges. Susequent charges require only 4 hours.
4. Play time approximately 15 minutes depending on
terrain and driving style.
5. The Charger is intended to be correctly orientated in a
vertical or floor mount position.
6. When charging is completed. unplug the charger form
the AC socket.
7. Releases the 11.1V rechargeable battery pack form the
battery charger.
ATTENTION FOR PARENTS:
The Charger & 11.1V Battery Pack need to be periodically examined
for potential hazards. Any potentially hazardous parts need to be
repaired or replaced.
ACTION FEATURES
HARDENED STEEL
AXLES FOR
ADDED STRENGTH
Fig.1
TYRE INFLATION INSTRUCTIONS
Fig.2
1. Locate and remove the inflation needle that is attached to the air pump.
2. Attach the inflation needle to the air pump. DO NOT USE PUMPS
WITH COMPRESSED AIR!
3. Make sure inflation needle is clean. Moisten it and slowly insert it straight
into the tire inflation hole. (Fig.2)
4. Continually check the tire size by placing the tire inside the gauge.
Inflation
Hole
DO NOT OVERINFLATE. Once tire is the proper size (fits perfectly in gauge),
you are ready to run your vehicle. Keep tire pattern for future use.
5. This is NOT a toy. This is a tool and should not be used by a child without
parent supervision.
Needle
IMPORTANT: TIRES MAY DEFLATE DURING
SHIPPING OR STORAGE
BATTERY REQUIREMENTS/INSTALLATION FOR VEHICLE
Recharging -
1. Insert the battery pack to the charger with docking.
2. Plug the charger into an electrical outlet.
3. Charge the battery for approximately 4 hours.
4. After charging is complete, detach the charger.
from the outlet and disconnect the battery
from the charger.
Insert the battery pack to the charger
Caution
• Do not charge battery pack immediately following
use - allow battery pack to cool down.
• Avoid short circuits - they can cause overheating,
burning and other damages to the battery and charger.
• The battery charger should only be used to recharge
the specified battery pack. Only charge one battery at a time.
• Do not use the charger as an outlet for other electrical appliances.
• Keep the battery pack and charger out of the hands of infants and
small children while in use.
• Do not charge near fire, hot temperatures, or wet damp areas.
• Charger may become warm while in use, allow sufficient space during this time.
• If the battery pack remains weak after proper charging techniques, dispose of
it correctly and replace with a new battery.
• Disconnect the supply before making/breaking the battery connection.
• Only use this battery charger for the included battery.
To operate your vehicle, you will need a 11.1V Battery Pack (included).
PLEASE NOTE: The battery pack will become hot during use,
so care should be taken whenever you handle it.
1. Fully charge battery pack following
manufacturer’s instructions. Rotate
battery cover latches on rear of vehicle
to the open position. Lift to remove cover.
2. Insert 11.1V battery pack.
3. Replace cover. Rotate latches to closed position.
ON
ON
11.1V
Battery Pack
Rechargeable
OFFOFF
OFF ON
4. Turn power switch to the ON position.
HIDDEN INTERNAL
ANTENNA FOR
LONG RANGE
ACTION
DUAL AND
MEGATORQUE
ACTION
• FULL- THROTTLE, MAXIMUM-SPEED OPERATION
• SCALE SPEEDS OVER 225 MPH
• UP TO 60-FEET EFFECTIVE RANGE
6.5-INCH INFLATABLE
TIRE FOR MASSIVE
SUPERBOUNCE ACTION!
SUPER-GRIP TIRE
TREAD FOR
BETTER
OFF- ROAD
TRACTION
BATTERY REQUIREMENTS/INSTALLATION FOR TRANSMITTER
To operate your transmitter you will need a 9 Volt battery (included).
1. Remove battery cover as shown and install a new 9 Volt battery. Replace cover. Move power
button ON and the red LED light will come on. This will show you that the battery is good and
the transmitter is ready for operation.
OFFOFF ONON
9 V
Battery
I
+
PLEASE NOTE: Vehicle power switch must be in the ON position to receive commands from
the transmitter.
2. Insert antenna into hole in the transmitter and screw it in clockwise.
3. Please change the battery to fresh one when LED is dim
• Non-rechargeable batteries are not to be recharged;
• Rechargeable batteries are only to be charged under adult supervision;
• Rechargeable batteries are to be removed from the toy before being charged;
• Different tires of batteries or new and used batteries are not to be mixed
• Batteries are to be inserted with the correct polarity(+ and -);
• Do not mix alkaline, standard (carbon-zinc), or rechargeable (nickel-cadmium) batteries.
• Exhausted batteries are to be removed from the toy;
• The supply terminals are not to be short-circuited.
• Only use the batteries recommended by the manufacturer or
batteries of an equivalent tire;
• Please remove from the toy if it is not to be used over a longer period;
• Protect the environment: Bring used batteries to a special collecting point! Thank you!
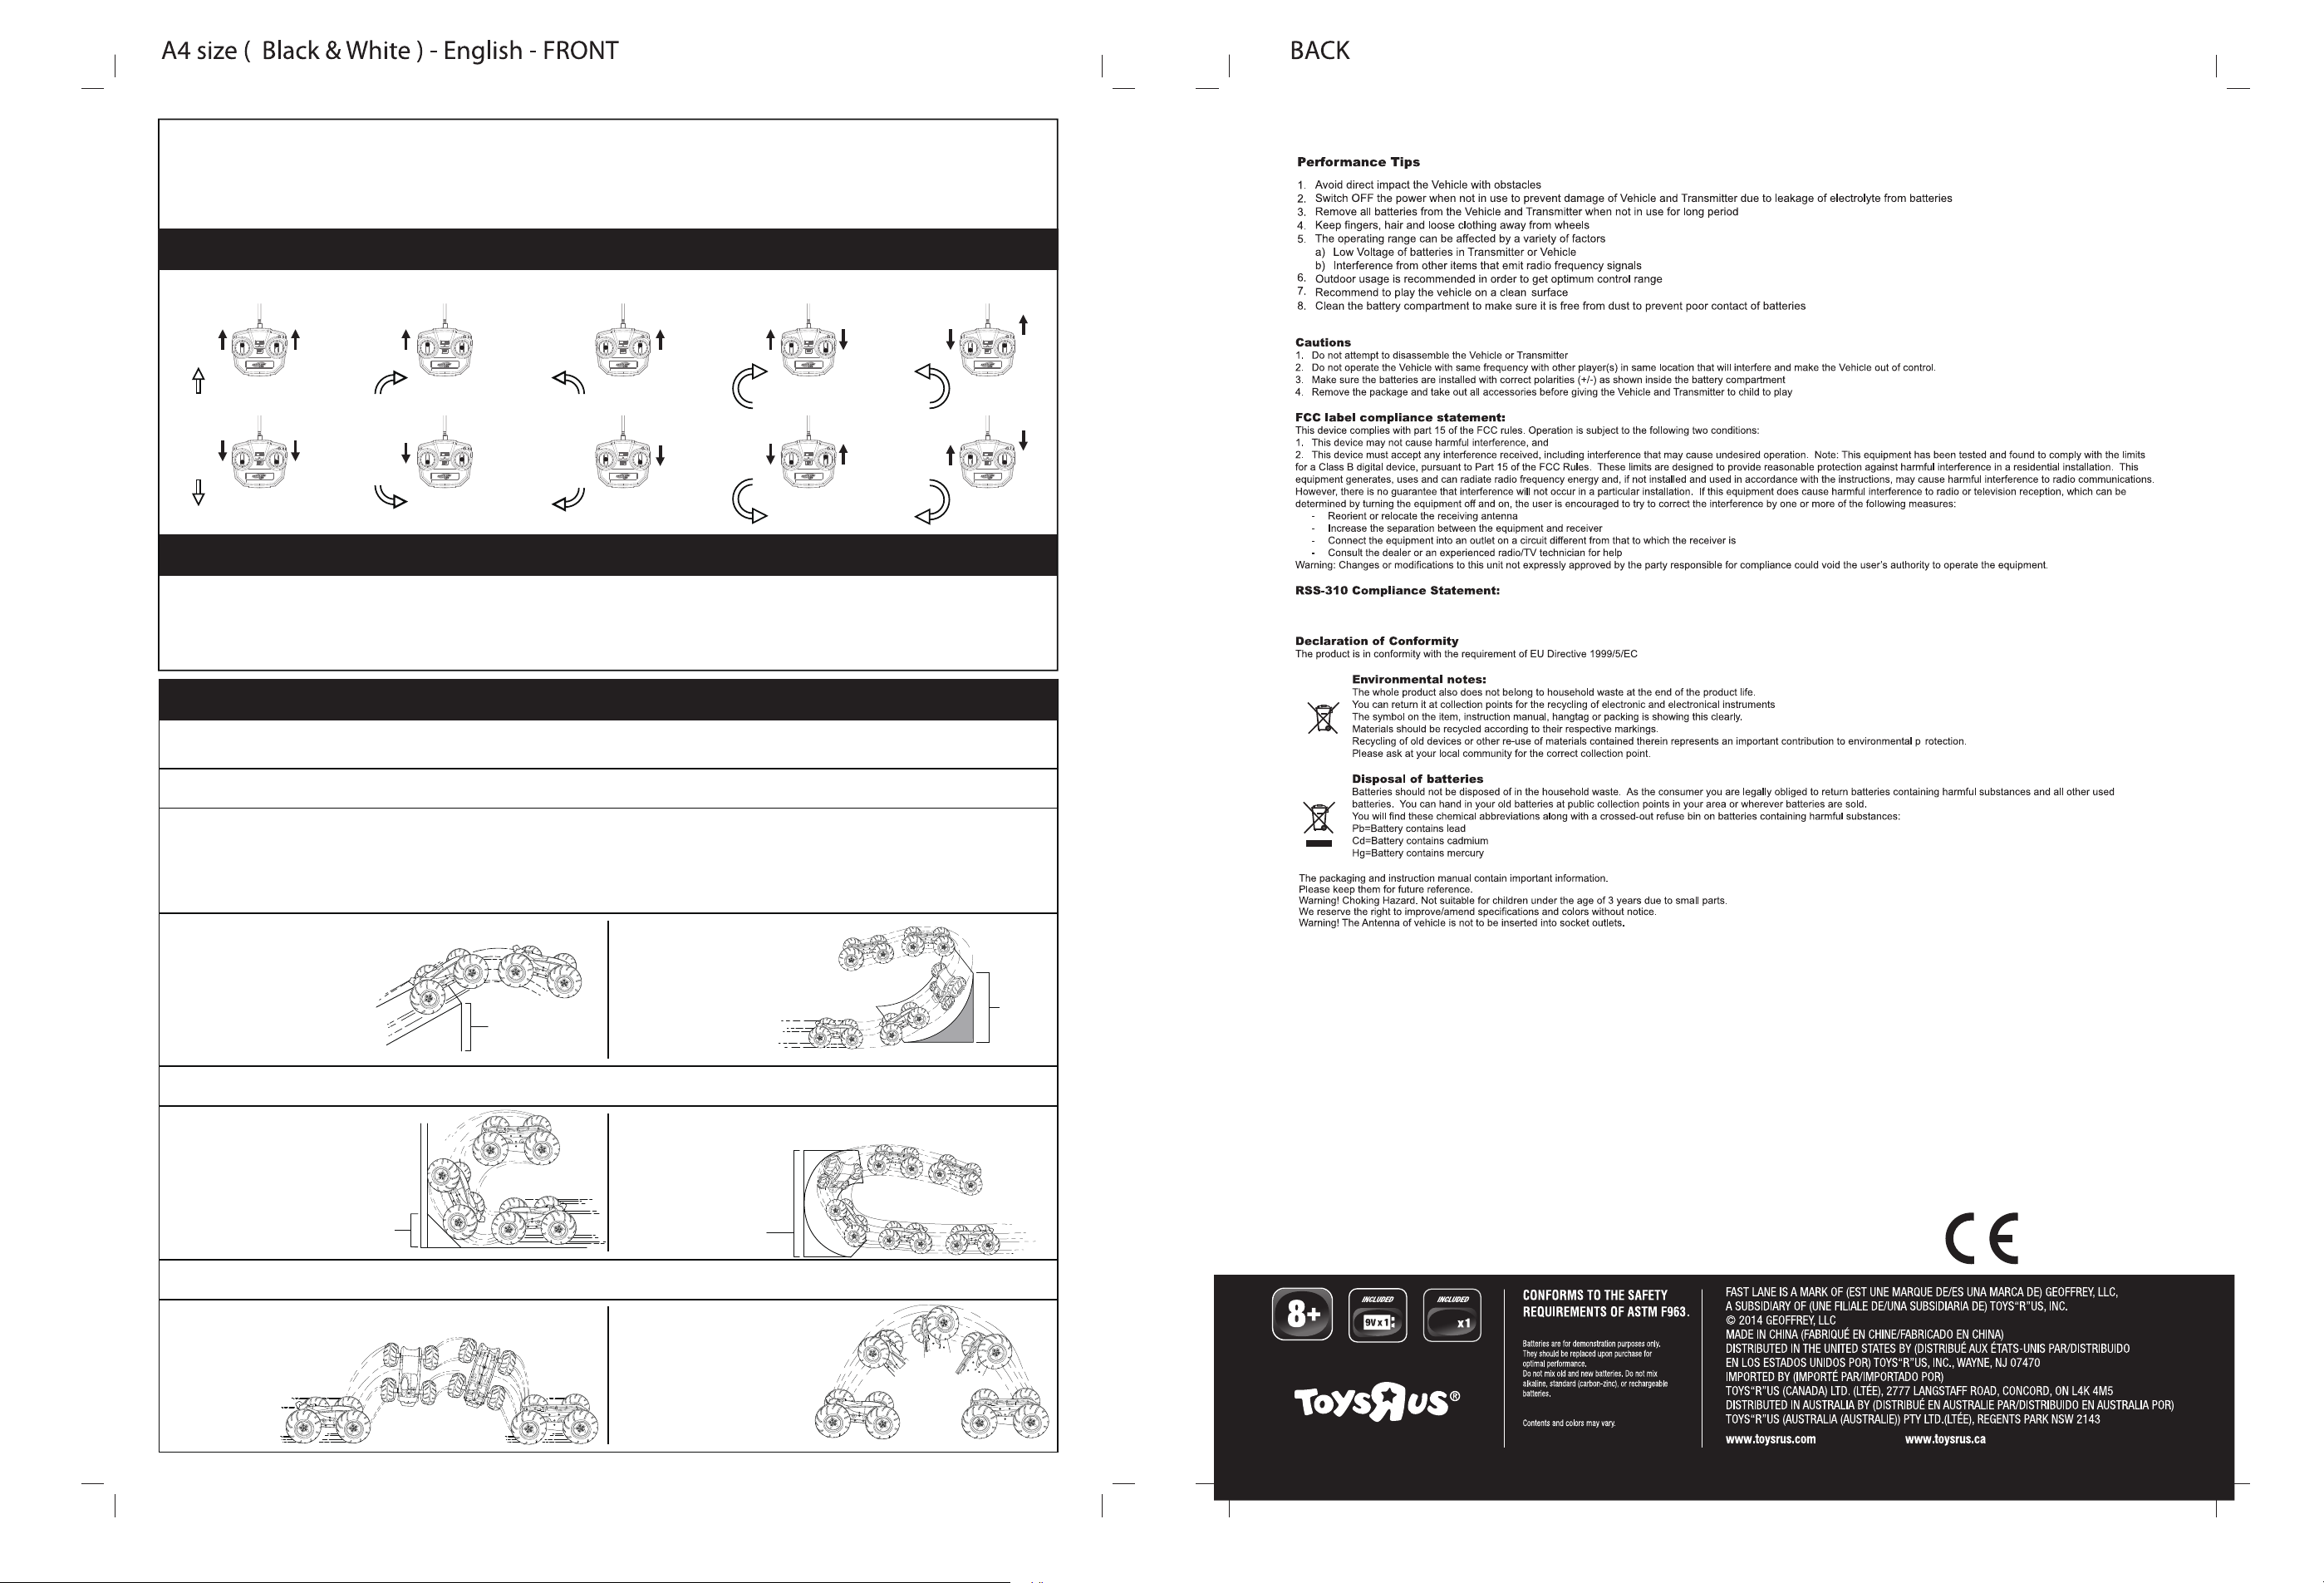
DIRECTION CONTROLS
Move joystick(s) as indicated by solid arrows. Vehicle will move in direction as indicated by outlined arrow, if putting side “A” upside on the ground.
Fig.3
FORWARD
REVERSE
SLOW
RIGHT TURN
FORWARD
SLOW
RIGHT TURN
BACKWARD
SLOW
LEFT TURN
FORWARD
SLOW
LEFT TURN
BACKWARD
HARD
RIGHT TURN
FORWARD
HARD
RIGHT TURN
BACKWARD
PROPER OPERATION AND STORAGE OF YOUR VEHICLE
1. Best operation of vehicle is on a textured paved surface.
2. Always operate your vehicle within a range of 60 feet from you.
3. Always operate your vehicle away from cars and other large vehicles.
4. Always store your vehicle in a cool, dry place and off of painted or
varnished surfaces.
5. Avoid operating around CB radios, high voltage electrical wires and large steel-reinforced
concrete buildings.
6. Avoid running your vehicle and another vehicle on the same frequency.
7. DO NOT use in salt water.
8. Transmitter is not waterproof. Do not immerse in water.
TRICKS AND STUNTS (for outdoors only)
Here are a few of the exciting tricks and stunts you can do. The following tricks and stunts take practice and skill. Attempt simple skill level tricks before going on to more
advanced tricks. Remember you will need to practice to achieve these stunts.
SIMPLE SKILL LEVEL:
Safety
To ensure that your radio control vehicle performs at its peak performance, it is recommended that you follow these simple guidelines:
• Always select a safe area to operate your radio control vehicle, free of traffic and other obstacles.
• Periodically inspect the vehicle, transmitter, charger and battery to ensure that wires, leads, and/or other parts are not exposed that may cause injury to children.
• Periodically check the battery contacts. Ensure that they are clean and free of debris.
• DO NOT USE CHEMICAL CLEANERS ON THE VEHICLE!
HARD
LEFT TURN
FORWARD
HARD
LEFT TURN
BACKWARD
connected
This device complies with Industry Canada Licence-exempt RSS-310. Operation is subject to the following two conditions: (1) this device may not cause interference, and
(2) this device must accept any interference, including interference that may cause undesired operation of the device.
STANDARD RAMP JUMP
1. Drive car up a ramp no
higher than 30 inches.
MODERATE SKILL LEVEL:
WALL FLIP
3. Run car up a 5 inch high ramp
and onto a wall causing the car
to flip.
MAXIMUM
RAMP HEIGHT
5”
EXPERT SKILL LEVEL:
BARREL ROLL
5. While driving the car straight at
full speed, make a sudden turn
causing the car to roll. Too
sharp of a turn will
cause the car
to spin instead
of roll.
MAXIMUM
RAMP HEIGHT
30”
VERT RAMP
2.1/4 Pipe Verticle Ramp.
REVERSE RAMP FLIP
4. Build a semi-circular ramp
36 inches high and run the
car through it.
MAXIMUM
RAMP HEIGHT
36”
WHEELIE FLIP
6. While running the car
with the drive wheels in front,
quickly reverse both joy sticks.
This should cause the car to flip.
(To identify drive wheels, hold car
off of ground. Move joy sticks and
drive wheels will spin.)
24”
0979
11.1V
 Loading...