

Page 1

Dinner Tray - User manual AUS
Page 2

IMPORTANT! RETAIN THESE INSTRUCTIONS FOR
FUTURE REFERENCE AND READ CAREFULLY
2
Page 3

INDEX
Congratulations (EN)
Warnings/Safety measures/Maintenance
Parts
Assembly
Use
Warranty (EN)
4
4
5
5
6
6
3
Page 4

KIDSMILL DINNER TRAY UP!
CONGRATULATIONS
Congratulations on the purchase of this Kidsmill Up! Dinner tray. This product
meets the most stringent safety requirements and is approved according to the
Australian Standard AS 4684:2009. Using this tray can only be safe when used
according to these instructions. Please read this instruction manual carefully
and store it for future reference. The safety of your child may be aected if these
instructions are not followed.
WARNINGS
WARNING – Follow the manufacturer's instructions.
WARNING – Do not leave your child unattended.
WARNING – Do not use this dinner tray unless all components are correctly tted
and adjusted.
WARNING – Position the high chair away from solid structures and benches to avoid
injuries caused by falls and by acces to dangerous items.
SAFETY MEASURES
• Do not use the dinner tray if any part is broken, torn or missing.
• Keep out of child’s reach when not in use or make sure the tray is locked
correctly.
• Be aware of the risk of open res and other sources of strong heat, such as
electric bar res, gas res, etc. in the near vicinity of the tray.
MAINTENANCE
• We recommend cleaning this dinner tray using a damp cloth.
• Never use aggressive or abrasive cleaning agents because these can aect the
tray or and can also be detrimental to the health of your child.
• Ensure all locking devices work correctly and check the locks and ttings
regularly.
4
Page 5
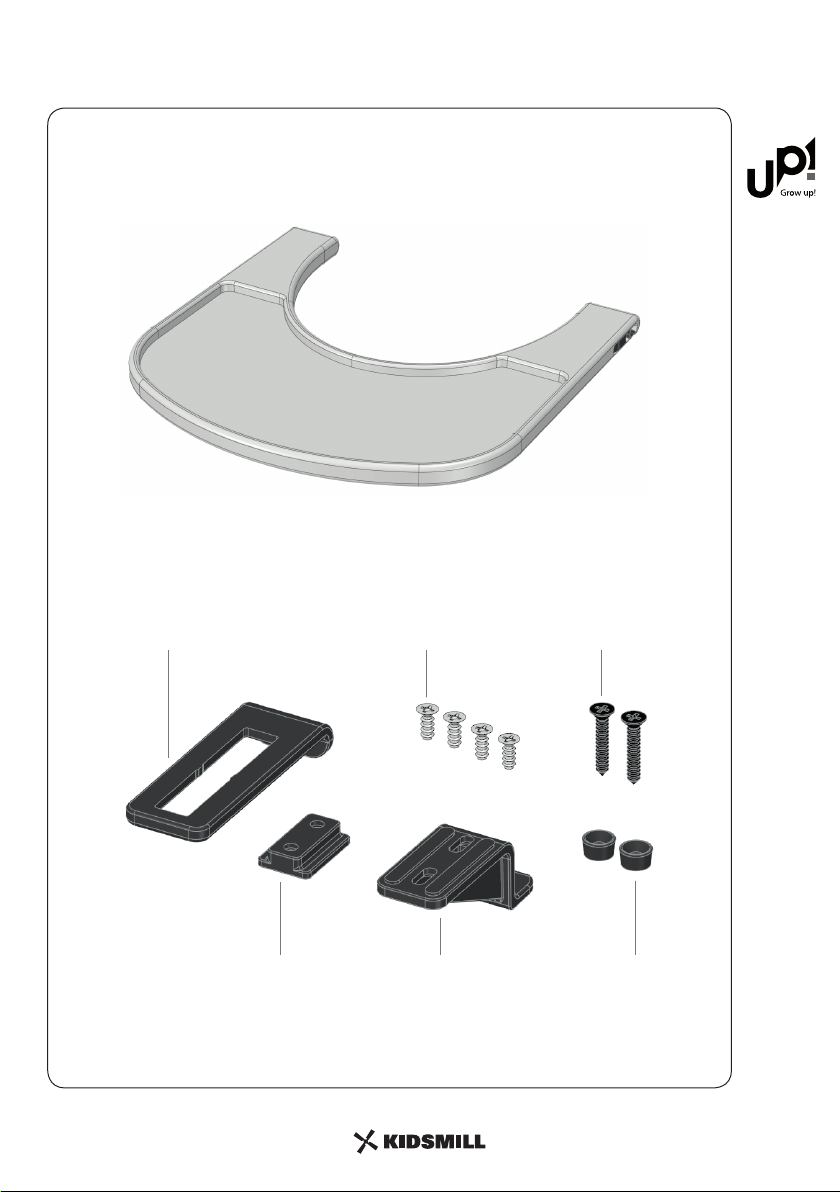
PARTS
Screw D3x10,5 (4x) Screw ST4,2x25 (2x)Sliding Hook
Sliding hook mounting bracket Clip safety bar Hinge Bush
5
Page 6
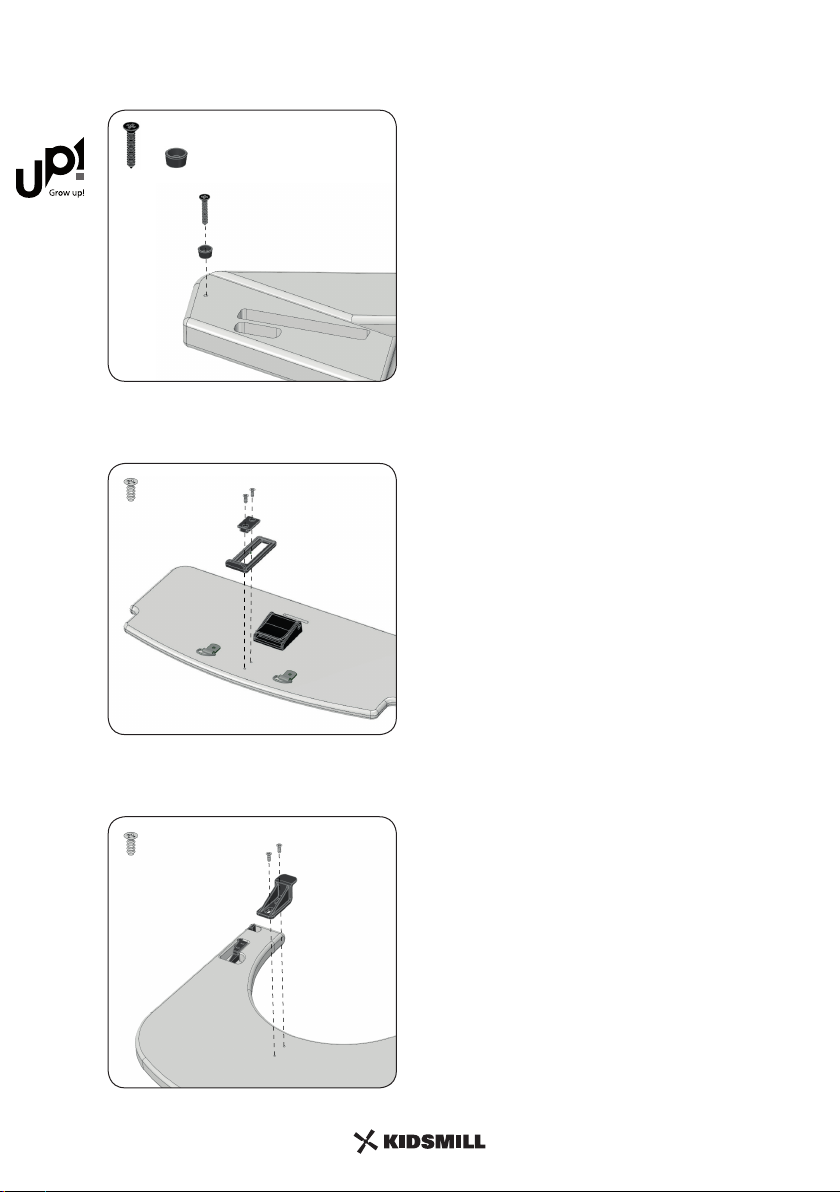
ASSEMBLY
2x
2x
2x
Step 1: Screw the hinge bushes to the
(disassembled) legs. If the chair is already
assembled, remove only one leg at the time.
Step 2: Screw down the sliding hook at the
bottom of the seat.
Step 3: Attach the clip for the safety bar to
2x
6
the bottom of the dinner tray. Do not fully
tighten the screws yet.
Page 7
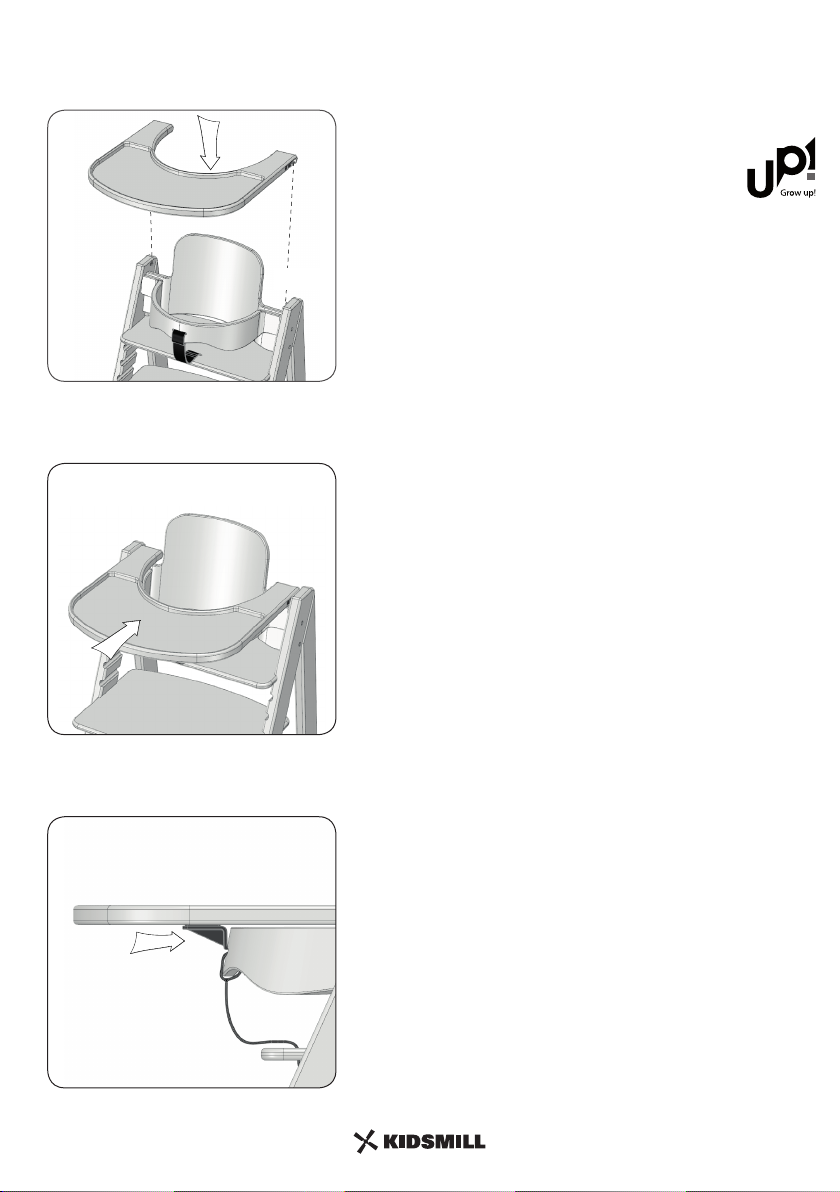
ASSEMBLY
´Click´
´Click´
Step 4: Click the dinner tray onto the hinge
bushes of the high chair.
´Click´
Step 5: Now lock the dinner tray, slide it
rmly backwards until you hear a clear 'Click'
on both sides.
´Click´
Step 6: Slide de clip against the safety bar
and tighten the screws so the clip is xed.
7
Page 8
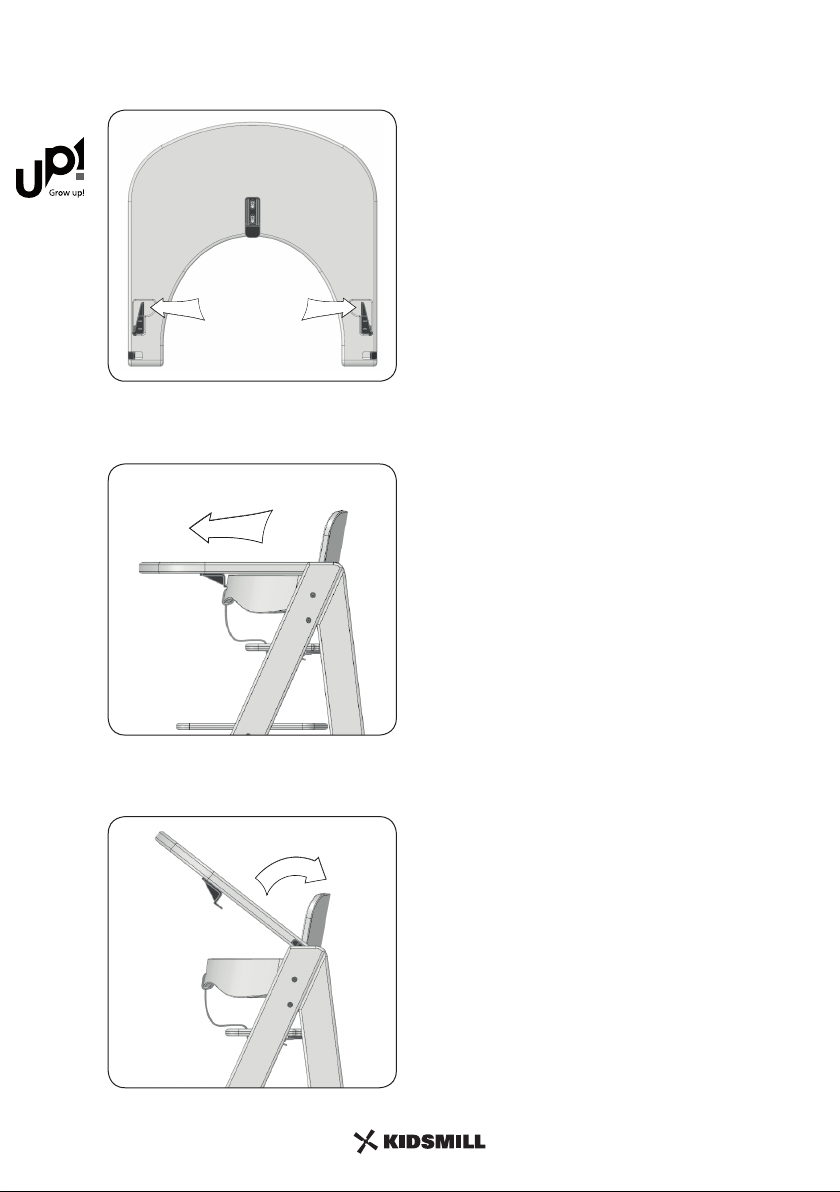
USE
Step 1 and 2: Placing and locking the dinner
tray, see 'Installation' step 4 and 5.
Step 3: Unlock the dinner tray by pinching
the two release buttons, located at the
bottom of the dinner tray, at the same time.
Step 4: Pull the dinner tray to the front. Keep
the buttons pinched to remove the dinner
tray or release them to turn the tray to the
back of the chair.
Step 5: U can now rotate the dinner tray to
the rear for storage. Caution! First, remove
your child from the chair before rotating the
dinner tray to the rear.
8
Page 9
USE
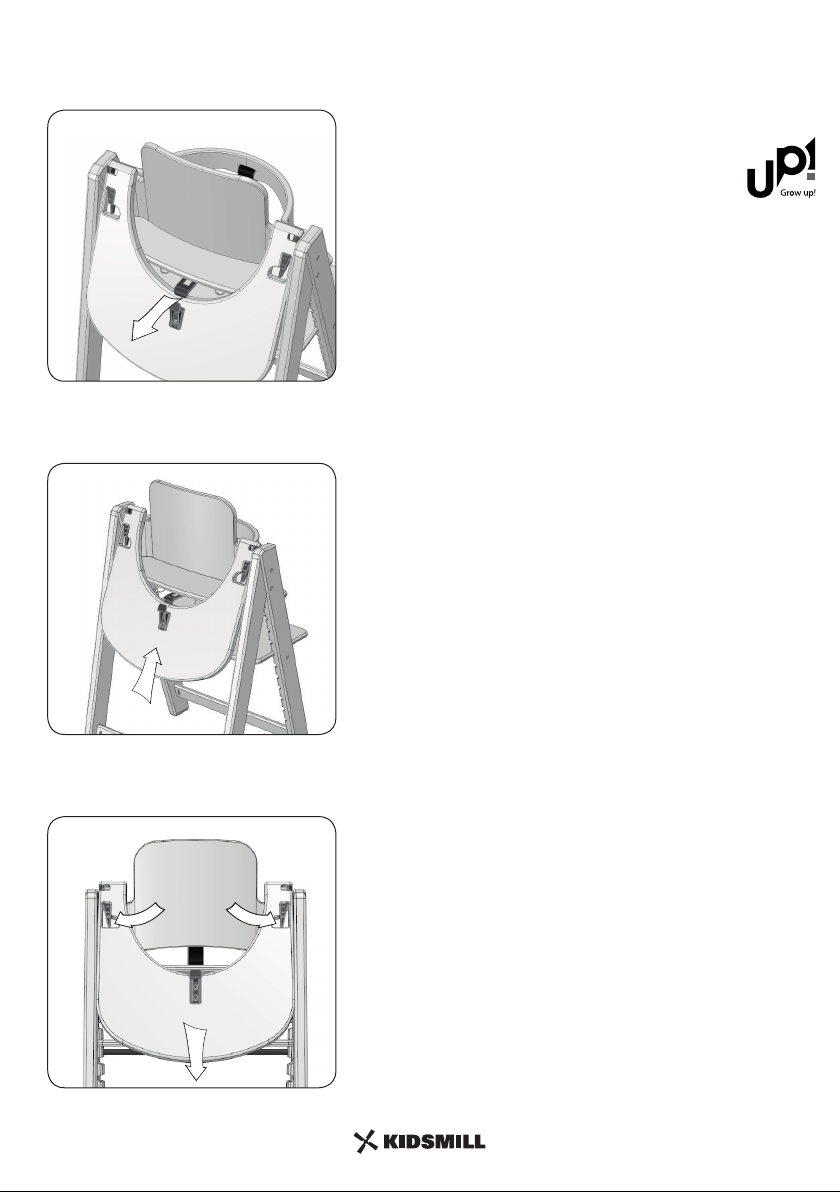
Step 6: To lock the dinner tray, rst pull out
the sliding hook from underneath the seat.
´Click´
´Click´
Step 7: Now push the dinner tray up into
the lock until you hear a clear 'Click' on both
sides.
Step 8: Unlock the dinner tray by pinching
the release buttons and pushing it down.
Attention! This lock only works with the seat
in the highest position.
9
Page 10

WARRANTY
Validity: 2 years from date of purchase.
The warranty is only valid in conjunction with proof of purchase. The warranty covers
the replacement of the entire product or parts when there a manufacturing defect. After
the expiration of the warranty there are costs attached to any repairs. The supplier takes
no responsibility for any damage or injury to persons, animals and belongings due to
misuse of the harness or by failure to follow the accompanying instructions.
Exclusion
All rights in respect of the guarantee and the responsibility of the supplier shall lapse if
the product:
• Is dismantled by unauthorized persons;
• Is not properly used or stored.
Furthermore, all external damage to the product that does not aect the proper
functioning is excluded from the warranty.
10
Page 11
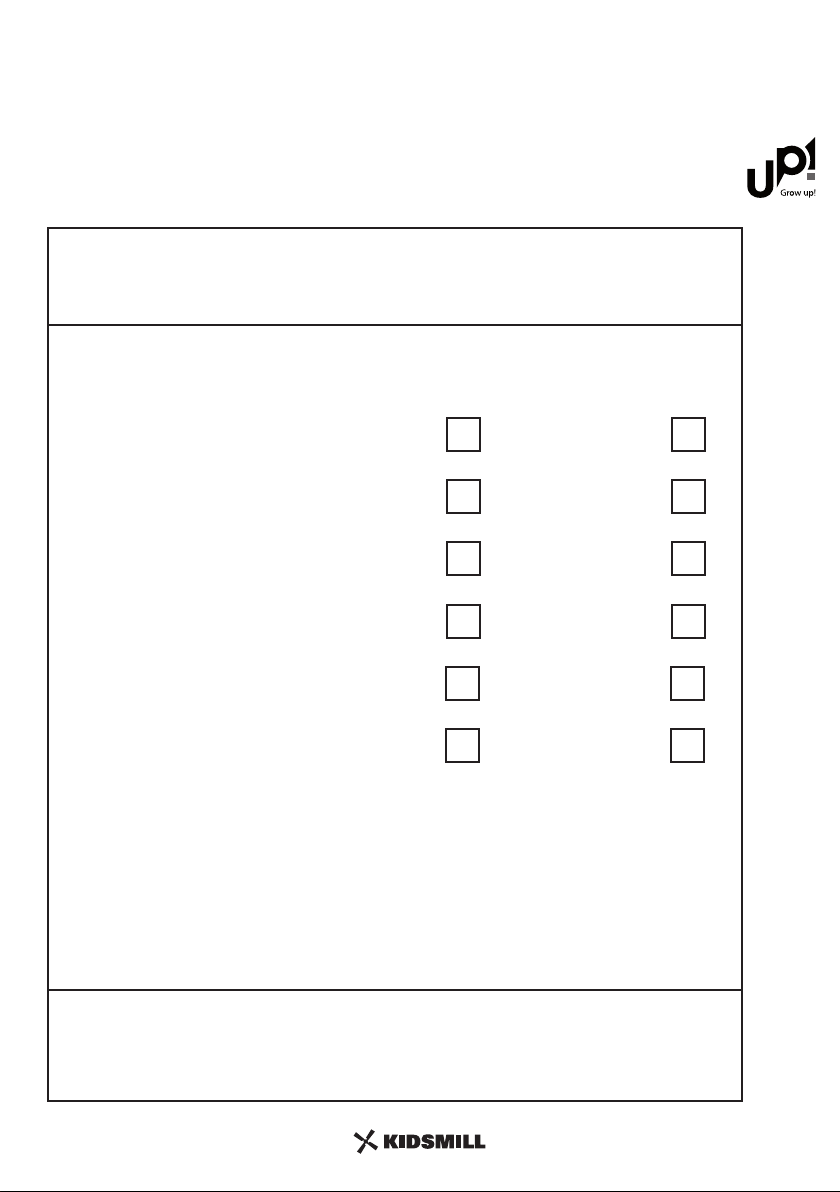
WARRANTY FORM
EN - In case of damaged or missing parts, please ll in this form and send
to the following E-mail address:
Product:
Article number:
Serial number:
Part number (p. 4)
...................
...................
Quantity Damaged Missing
...................
...................
..................................................................
...................................................................
...............................................................
................... ...................
................... ...................
...................
...................
Anstel Nominees Pty Ltd
Service department
...................
Notes: ....................................................................................................................................................
...................
.................................................................................................................................................................
.................................................................................................................................................................
.................................................................................................................................................................
Customer name: ........................................................................................................................................................
Order number: ............................................................................................................................................................
11
Page 12

The information contained herein is subject to change without notice. Timgro BV shall not be
liable for technical errors or omissions contained herein. The purchased product may dier from
the product as described in this user guide.
Anstel Nominees Pty Ltd
36 Sunline Drive
Truganina VIC 3029
Australia
e-mail: [email protected]
Version: August 2018
 Loading...