

1.
Willz Carrycot
Carrycot for the Willz Travel System
Suitable for children from
birth up to 15kg.
Instructions: Please read
carefully and keep for future
reference. Your child’s safety
may be affected if you do
not follow these instructions
This product is tested to: BS EN
1888:2003 (A1-A3:2005)
kiddicare
User guide

1.
be attempted. Remove your child
from the pushchair for easy carrying
to negotiate such hazards, or simply
avoid them.
WARNING: Never assume a driver can
see you or your child.
WARNING: If your pushchair is to be
used by someone who is unfamiliar
with it, e.g. grandparents, then show
them how it works before letting them
use it.
WARNING: This pushchair is not suitable
for running or skating.
WARNING: Hold onto your pushchair
when close to moving vehicles and
trains as the draught from the vehicles
may move the pushchair even with
the brakes on.
WARNING: The carrycot is suitable from
birth until the child can sit up unaided.
This is suitable for a child who cannot
sit up by itself, roll over and cannot
push itself up on it’s hands and knees.
Maximum weight of the child: 9kg.
WARNING: This product is designed to
carry only one child at a time.
WARNING: Do not use a mattress
other than the one supplied with the
carrycot. Only use replacements
approved by the manufacturer. The
total thickness must not be more than
the 35mm mattress supplied with the
carrycot.
WARNING: This product is designed to
carry only one child at a time.
This product is tested to: BS EN
1888:2003 (A1-A3:2005)
Safety comes rst
WARNING: To avoid injury ensure that
your child is kept away when unfolding
and folding this product.
WARNING: Do not let your child play
with this product.
WARNING: Never leave your child
unattended.
WARNING: Ensure that all the locking
devices are engaged before use.
WARNING: Parcels, accessories and
other items (e.g. hand bags, shopping
bags, etc) that are placed on the
handles, back of the backrest or sides
of the pushchair will affect the stability
of the pushchair.
WARNING: Do not lift and carry the
pushchair with a child in it.
WARNING: Do not use pushchair
on steep slopes, stairs, escalators,
beaches, mud, etc.
WARNING: Check that the pram body
or seat unit attachment devices are
correctly engaged before use.
WARNING: Ensure that children are
clear of moving parts before making
adjustments.
WARNING: Never leave raincovers,
hoods and aprons on indoors or in hot
weather as your child might overheat.
WARNING: Do not use replacement
parts or accessories other than those
approved by the manufacturer as
others may render the product unsafe.
WARNING: Do not load the basket with
a weight in excess of 2kg.
WARNING: Always apply the brakes
when the pushchair is stationary, and
when placing and removing children.
WARNING: Taking children up or
down stairs, escalators, steps, steep
slopes and muddy/rough terrain
could be dangerous and should not

3.
2.
Ride-on platform attachments
This product has not been tested
with a ride-on platform. Consult
your retailer for suitability if you
are considering getting a ride-on
platform. Any damage resulting from
the use of a ride-on platform will not
be covered by the warranty.
Other attachments
The Willz chassis is designed to
be compatible with the Willz seat
unit, the Willz carrycot and Willz
car seat. Do not attempt to t any
other attachments. Any damage
resulting from use of a non-approved
attachment will not be covered by
the warranty.
Hello
Thank you for purchasing the Willz
Carrycot.
Please read the instructions and
warnings carefully before use
to ensure safe and satisfactory
operation of this product.
Your child’s safety is your responsibility.
If you have a query with this product
or require replacement parts, please
email hello@kiddicare.com
Care and maintenance
• Clean minor spills and stains on
cloth, vinyl or plastic surfaces
with cold water and mild soap.
Air dry.
• Any plastic and metal parts may
be sponged clean with warm
water and mild detergent.
• Always allow to dry thoroughly
before using or storing.
• Do not leave the carrycot in
direct sunlight for prolonged
periods as fabrics may fade.
• Never use abrasives, ammonia,
bleach or spirit based cleaners.
• Always store your carrycot in a
dry place.
• Regularly inspect the carrycot
for damage or wear, paying
particular attention to the
handle xings and locks, chassis
attachment points and harness
(if tted). Discontinue use if any
part is broken, torn or missing.
• WARNING: Mattress must be fully
dry before storage or usage.
• WARNING: Mattress may not
soak up vomit.
3.
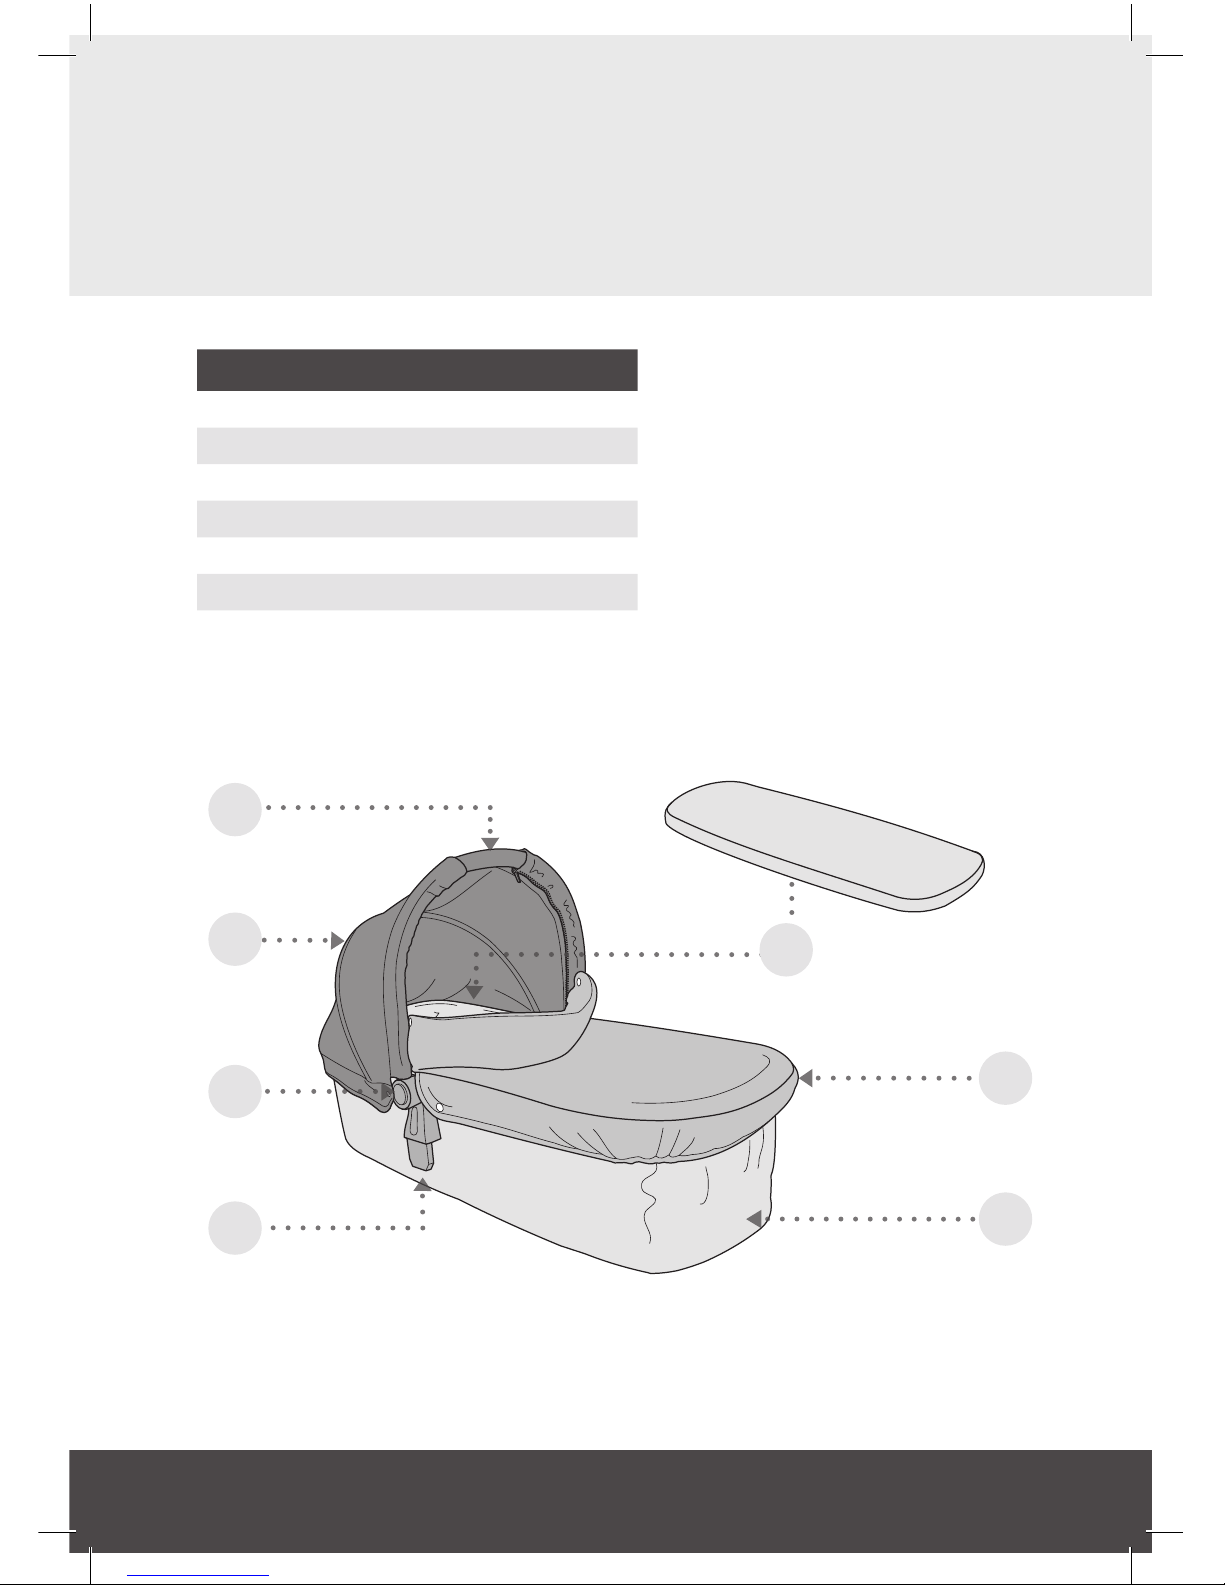
Part checklist
NO. Part
1 Handle
2 Hood
3 Hood adjuster
4 Adaptors
5 Carrycot
6 Apron
7 Mattress
5
1
7
6
3
4
2

5.
4.
Assembling the carrycot
Remove the apron (A) by undoing
the press studs.
Unfasten the harness strap (B)
and pass it through the slots in the
mattress.
Remove the mattress (C).
Lift up the rim of the carrycot (D).
Holding straps (E), pull the bars in the
direction shown until the bars locate
in slots (F).
Insert the mattress.
D
D
B
A
C
E
E
F
F

5.
Folding the carrycot
Remove the apron (A)
Unfasten the harness strap (B)
and pass it through the slots in the
mattress.
Remove the mattress (C).
Press both hood adjuster buttons (D)
on the outside of the carry handle
and fold the hood back.
Holding the straps (E), pull the bars
into the centre of the carrycot and
allow the body of the carrycot to
collapse down.
Replace the mattress.
E
E
A
B
D
C
D

7.
6.
Using the harness
To release the harness, press in each
side of the clip (A) and pull the strap
from the buckle.
To fasten, push the two halves of the
buckle together (B) until they click
into place.
The t of the harness can be adjusted
by sliding the webbing (C) through
the buckle.
‘D’ rings (D) are tted on each side
of the carrycot should you wish
to attach an alternative harness
complying to BS EN 13210.
B
D
“click”
A
A
C

7.
The hood
To remove: With the handle in the
upright/carrying position, unfasten the
press studs (C) on each side of the
hood and unzip both zips (D) on the
inside of the hood.
To attach: Reverse the above process,
making sure that the zips are aligned
along the rear edge of the handle.
To open: Pull the carrycot hood/
handle into the vertical position until it
clicks into place (A).
To close: Press both adjuster buttons
(B) on the outside of the carry handle
and fold the hood back.
“click”
A
B
C
D

9.
8.
Fitting the apron
Removing the mattress
Place the apron over the carrycot
and connect the press studs on the
apron with the press studs on the
carrycot sides (A) and the inside of
the carry handle (B).
B
A
To remove the mattress, unfasten the
harness strap (A) and pass it through
the slots in the mattress.
A

9.
Attaching the carrycot to the
travel system chassis
Note: The carrycot should only
be attached in the parent-facing
position as illustrated. DO NOT attach
the carrycot in the forward-facing
position.
Hold the carrycot so that it is facing
the stroller handle. Position the
carrycot adaptors (A) above the
mounting points (B) and push the
carrycot downwards until it clicks into
place. Lift the carrycot to ensure it is
rmly attached to the stroller chassis.
A
B
“click”

10.
Removing the carrycot
Grip the carrycot on both sides and push the release button (A) down whilst at the
same time lifting the carrycot from the chassis.
A

K
1 Club Way, Cygnet Park, Hampton, Peterborough, Cambridgeshire, PE7 8JA
Email: hello@kiddicare.com
 Loading...