

Page 1

1
Your assembly instructions and user guide
for the Kiddicare
Compact Cot
IMPORTANT! READ CAREFULLY AND
KEEP FOR FUTURE REFERENCE.
You will need these instructions after you have assembled the Cot.
Contents
1. Parts List ........................................................................................................ 2
2. Assembly instructions .................................................................................... 3
3. Choosing the mattress ................................................................................... 4
4. Guide for safe use .......................................................................................... 4
5. Cleaning instructions ...................................................................................... 5
6. Maintenance .................................................................................................. 5
Kiddicare.com
Club Way, Hampton,
Peterborough,
Cambridgeshire,
PE7 8JA
Page 2
2
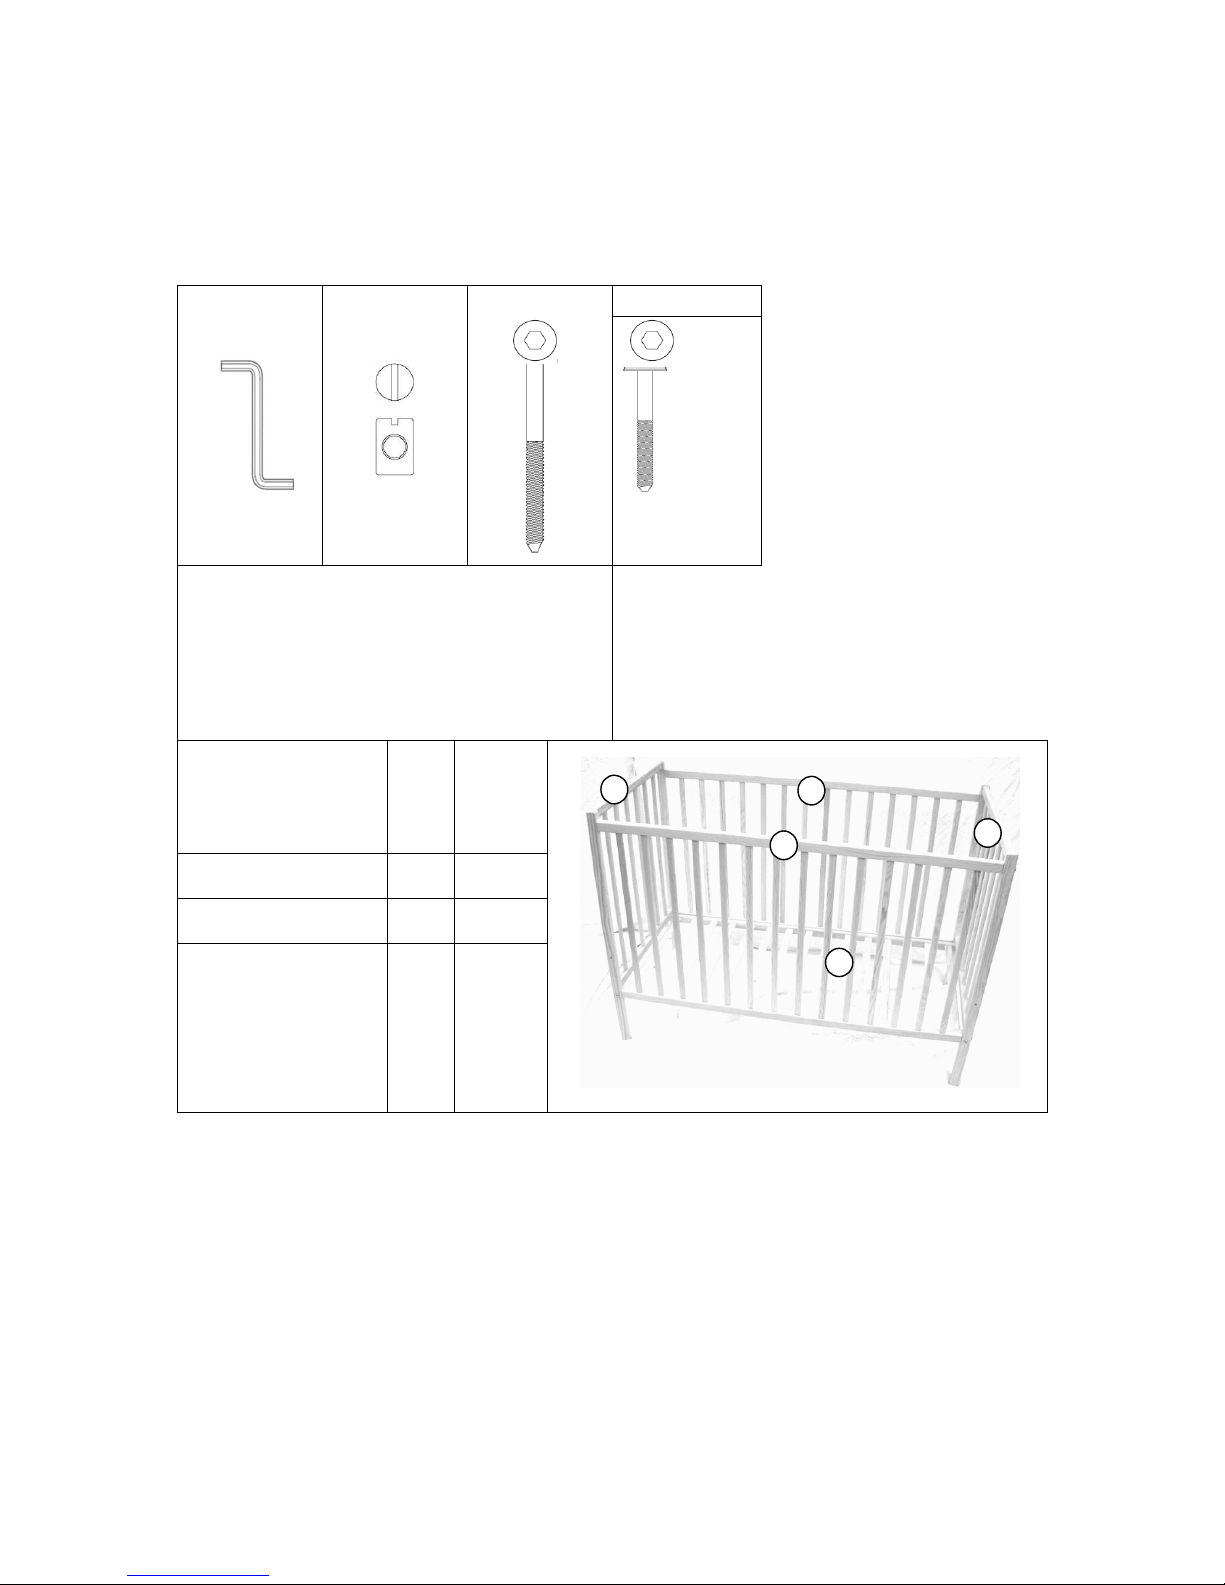
1. Parts List
All the parts you need to assemble the Cot are provided.
Before assembling the Cot check that you have all the parts listed below.
If any parts are missing please contact your retailer or phone 01952 461148.
A B C D
Part Qty
A – Allen wrench
1
B – Barrel nut
12
C – Large Fixing bolt
8
D – Small Fixing bolt
4
Part Name Qty Part No
1 – Cot Ends 2
2 – Cot Sides 2
3 – Mattress Base 1
1
1
3
2
2
Page 3

3
2. Assembly instructions
Tools required: Allen wrench (provided), Flat head screw driver.
Note: It is recommended that assembly and dismantling is carried out by two persons, one person to
hold the parts in position the other to screw in the fixings.
WARNING. Keep young children away from the area you are using to assemble or
dismantle the Cot. Some of the parts are heavy and could fall on the child.
Some of the fixings are a choking hazard to young children.
WARNING Incorrect assembly or failure to follow these instructions could result in
serious injury or death.
ATTACHING THE MATTRESS BASE TO THE COT ENDS
The mattress base has 2 mattress base height positions. We recommended that the lowest position is
used as this is the safest. You must use the lowest position if the child is able to sit up.
Attach the Mattress base (3), to [the inside faces of] the Cot end (1) at your chosen height, using the
Small Fixing bolt (D) and the Barrel nut (B).
Using a screwdriver align the threaded hole of the barrel nut in the corner of the mattress base and
insert the fixing bolt, through one of the mattress base support holes (depending on the chosen
mattress height setting) in the end and into the drilled holes in the ends of the mattress base.
Use the Allen wrench (A) to screw the fixing bolts into the barrel nuts – DO NOT TIGHTEN.
Follow these steps for each corner of the mattress base – DO NOT TIGHTEN.
ATTACHING THE COT SIDES
Attach the COT SIDES (2) to the ends (1) using the Long Fixing bolts (C) and the Barrel nuts (B), as
shown.
NOW TIGHTEN ALL OF THE BOLTS.
C
B
B
C
A
A
Attaching
the cot sides
1
3
Attaching the mattress base
1
2
Page 4

4
DISASSEMBLING THE COT
Using the Allan wrench (A) loosen all the Fixing bolts (C). Start by removing the top fixing and work
down. Remove the fixed side by unscrewing the top fixings, followed by the lower ones. Finally
unscrew each of the base fixings. Store all parts not required safely, out of reach of children.
3. Choosing the mattress
A mattress is not supplied with the Cot.
We recommend that you use a 90 cm by 54 cm mattress with the Cot.
Any mattress used with the Cot must have a length between 92.5 cm and 89.5 cm and a width
between 53 cm and 55 cm. Babies can become trapped in gaps between the cot sides and a mattress
that is too small and may suffocate.
The thickness of the mattress when used in the cot must not be more than 100 mm. The maximum
height of the mattress when the mattress base is in the raised position is indicated on the cot by a
notch marked on the inside of each corner post. When the mattress base is in its lowest position the
distance between the top of the mattress and the top of the cot side must not exceed 500 mm.
WARNING: Do not use more than one mattress in the cot. A child’s head or torso may
become trapped between the side of the cot and the mattress or they may
become wedged between the mattresses.
4. Guide for safe use
The cot is suitable for children from birth. The cot should be used with the base set to the lowest
position as soon as the baby is old enough to sit up. The child has outgrown the cot when it is able to
climb out (approximately 18 months of age). To prevent injury from falls the Cot should no longer be
used for the child.
Babies can suffocate on soft bedding. Never use a pillow, comforter or padding in the cot.
To reduce the risk of SIDS, paediatricians recommend healthy babies be placed on their backs to
sleep, unless otherwise advised by your doctor.
WARNING: Do not place the Cot near heat sources. Be aware of the risk of open fire
and other sources of strong heat, such as electric bar fires, gas fires, etc. in
the vicinity of the cot.
WARNING: Do not leave anything in the cot or place the cot close to another product,
which could provide a foothold or present a danger of suffocation or
strangulation, e.g. strings, blind/curtain cords, etc.
WARNING: Do not use the Cot if any part is broken, torn or missing.
Page 5

5
5. Cleaning instructions
The Cot may be cleaned by wiping with a damp cloth and drying with a soft clean cloth.
Do not use abrasives, bleach, alcohol or ammonia-based household polishes.
6. Maintenance
All assembly fittings should always be tightened properly and checked regularly and retightened as
necessary. Loose fixings may snag a child’s clothing or pinch fingers or flesh.
Spare or replacement parts can be obtained by phoning 01952 461148. It is recommended that any
additional parts are obtained from the manufacturer or distributor.
WARNING: Do not use the Cot if any part is broken torn or missing. Use only spare or
replacement parts approved by the manufacturer.
Cot Conforms to BSEN 716-1:2008+A1:2013
 Loading...