

Page 1
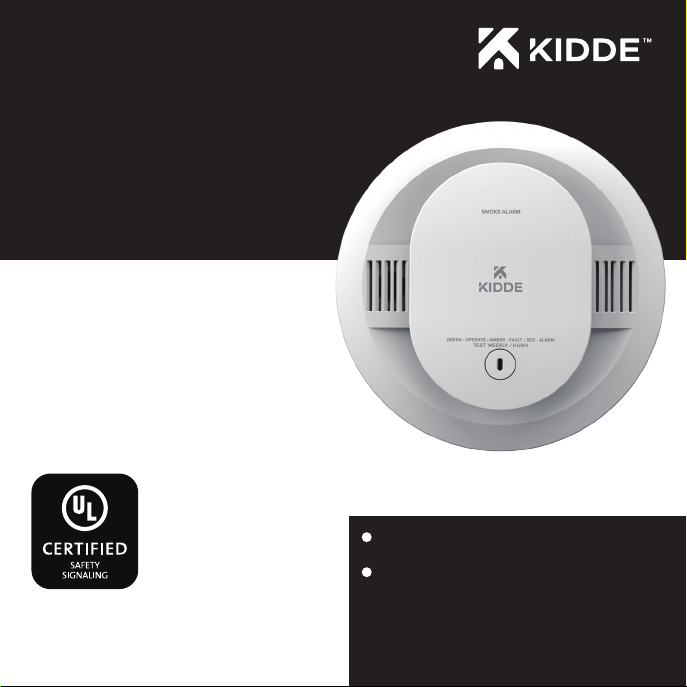
User Guide
Nuisance Alarms
Photoelectric Smoke Alarm
Model 20SDR
Helps Reduce Cooking
SMOKE ALARM
AA BATTERY
SELF-TESTING (SEE SECTION 9)
P/N: G-000007-00 Rev. A
1
Page 2

Thank You for Purchasing this Kidde Alarm
This model is powered by t wo replaceable AA batteries. It also contains HUSHTM to temporarily
silence nuisance alarms, and “self-testing” features (see section 9).
Teach children how to respond to the alarm and that they should never play with the unit.
This alarm is a multi-cri teria device designed to detect smoke from any source of combus tion in a
residential environment. It is not designed for use in a recreational vehicle (RV) or boat.
NOTE: Please thoroughly read this user guide and save the document for future reference and to
pass on to any subsequent owner. Images are representative only. Actual product may vary slightly.
The National Fire Protection Association (NFPA) and the manufacturer recommend replacing this
alarm after ten years.
Product Support: 1- 800-880-6788
Please write down the below information
and have this at hand when you call.
Date Code (on back ): _________________
Date of Purchase: _________________
Where Purchased: _________________
2
Date to Replace: _________________
Page 3

Contents
1. Smoke Alarm: What To Do When The Alarm Sounds . . . . . . . . .4
2. Other Alarm Visual And Audible Indicators . . . . . . . . . . . . 5
3. Troubleshooting Guide . . . . . . . . . . . . . . . . . . .6
4. Introduction, Product Features And Specifications . . . . . . . . .7
5. Limitations Of Smoke Alarms . . . . . . . . . . . . . . . . . 8
6. Recommended Locations For Smoke Alarms . . . . . . . . . . .9
7. Locations To Avoid . . . . . . . . . . . . . . . . . . . .12
8. Installation and Activation . . . . . . . . . . . . . . . . . .13
9. Operation And Testing . . . . . . . . . . . . . . . . . . .15
10. Recognizing Nuisance Alarms . . . . . . . . . . . . . . . .16
11. Batteries . . . . . . . . . . . . . . . . . . . . . . . . 17
12. Cleaning Your Alarm . . . . . . . . . . . . . . . . . . .18
13. Good Safet y Habits . . . . . . . . . . . . . . . . . . . . 19
14. Ser vice And Warrant y . . . . . . . . . . . . . . . . . . .22
3
Page 4

1. Smoke Alarm: What To Do When The Alarm Sounds
The smoke alarm pattern is three long beeps, a 1.5 second pause, and three long beeps repeating.
The red LED blinks in time with the alarm pat tern.
• Alert small children in the home as well as anyone else that might have difficulty recognizing the
importance of the alarm sounding or that might have difficulty leaving the area without help.
• Plan two ways out! Leave immediately by your escape plan. Don’t waste time getting dressed or
picking up valuables.
• While leaving, don’t open any inside door without first feeling i ts surface. If hot , or if you see
smoke seeping through cracks, don’t open that door! Instead, use your alternate exit. If the inside
of the door is cool, place your shoulder agains t it, open it slight ly and be ready to slam it shut if
heat and smoke rush in.
• If the escape route requires you to go through smoke, stay close to the floor where the air is
cleaner. Crawl if necessary, and breathe shallowly through a cloth, wet if possible.
• Once outside, go to your selec ted meeting place and make sure everyone is there.
• Call the fire depar tment or 91 1 from your cell phone outside, or from your neighbor’s home -not
from yours!
• Don’t return to your home until the fire off icials say that it is all right to do so.
NOTE: See Section RECOGN IZING NUISANCE ALARMS, for nuisance alarm situations.
4
Page 5

2. Other Alarm Visual And Audible Indicators
Operational Mode Visual Indications Audible Indications Action/Note
Normal (standby) Green L ED blinks approx every
60 sec.
Test (button press when
no alarm condition is
present)
(Note: Test i s very l oud,
stand a f ew feet away.)
Smoke Alarm Memory
(unit has experienced a
smoke event.)
Smoke Al arm Hush
Mode
TM
Red LED b links in time w ith
alarm pattern.
Red LED blinks
ever y 15 sec .
Red LED b links ever y 2 sec. Afte r but ton pus h, smo ke alarm
• Single beep.
• 3 long be eps, p ause, 3 l ong
beeps.
patt ern stops. ( If the re is too much
smoke to allow Hu sh
alarm pattern continues.)
TM
, smoke
Perform button p ress on ce a week
to verify proper alarm operation.
NOTE: Alarm memory is only
retained for 24 hr s. Pus h but ton to
clear Alarm Memory.
This fea ture is t o be used only
when a known al arm con diti on,
such as smoke from cooking,
acti vate s the ala rm. Pu sh but ton
TM
during Hush
perform a tes t.
to clear HushTM and
5
Page 6

3. Troubleshooting Guide
If you require further information please contact Product Support at 1 -800-880-6788 or write us at:
Kidde, 1016 Corporate Park Drive, Mebane, NC 27302. Our internet address is www.kidde.com
Trouble Condition
Low Bat tery Amber LED blinks every
Smoke Sensor Fault Amber LED blinks every
Fatal Fault Amber LED blinks 3
End of Unit Life Amber LED bli nks 2
MCU Failure None Constant Tone * Remove alarm, dispose unit, and
Stuck Button Amber LED blinks 4 times
Visual Indications Audible Indications Action
60 sec.
60 sec.
times e very 60 sec.
times e very 60 sec.
every 60 sec.
Chirp e very 60 sec. * Push bu tton once to si lence for 24 hrs.
3 chirp s ever y 60 sec .
3 chirp s ever y 60 sec . * Push bu tton once to at tempt to reset t he
2 chirp s ever y 60 sec . * Push but ton once to silence for 24 hrs.
3 chirps every 60 sec. * Push bu tton to dislodge it from be ing
(Push b utt on agai n to clea r HushTM and
perform a tes t.)
Note: 7 da ys af ter Low Battery be gins, the
notifications cannot be silenced.
* Replace bat terie s as soon a s poss ible.
* See Cle aning Your Alarm sect ion.
* Push bu tton once to at tempt to reset t he uni t.
* If erro r continues , remove alarm ,
dispo se unit, and replace as soon a s
possible.
unit.
* If erro r continues , remove alarm , disp ose
unit , and rep lace as s oon as p ossib le.
(Push b utt on agai n to clea r Hush
perform a tes t.) Note: 7 day s after End of
Unit Life beg ins, t he notifications c annot
be silenced.
* Remove a larm, dispo se uni t, and replace as
soon as p ossible.
replace as soon as possible.
stuck. If bu tton canno t be uns tuck , remove
alarm , dispose uni t, and replace as soon
as possible.
6
TM
and
Page 7

4. Introduction, Product Features And Specifications
Introduction
This alarm detects products of combustion using a photoelectric sensor.
Ten (10) years after the unit was installed, powered up, and tested, this unit will automatically alert you
that it is time to replace t he unit. This is called “End of Unit Life” mode. See Troubleshooting G uide.
To help identify the date to replace the unit, a label has been af fixed to the side of the alarm. Write t he
“Install date” in the space provided, and then write in the “Replace by” date (10 years f rom initial power
up) in permanent marker on the label prior to installing the unit.
Product Features and Specifications:
• Powered by two A A bat teries
• Reduced nuisance alarms
• Self-testing (see section 9)
• Easy installation
• Smoke Alarm Hush
• Smoke Sensor: Photoelectric
• Temperature Operating Range: 40°F (4.4°C) to 100°F (37.8°C)
• Humidity Operating Range: up to 95% RH non-condensing
• Audible Alarm: 85+ dB at 10’, 3.0 to 3.5 KHz pulsing alarm
TM
7
Page 8

5. Limitations Of Smoke Alarms
WARNING: PLEASE READ CAREFULLY AND THOROUGHLY
• Life safet y from fire in residential occupancies is based primarily on early not ification to occupant s of the
need to escape, followed by the appropriate egress ac tions by those occupants.
• There are situations where a smoke alarm may not be ef fective to protect agains t fire as stated in the
NFPA Standard 72. For ins tance:
a) smoking in bed
b) leaving children home alone
c) cleaning with flammable liquids, such as gasoline
• Fire warning systems for dwelling units are capable of protecting about half of the occupants in poten-
tially fatal fires. A smoke alarm may not be ef fective in some situations, such as during incendiary f ires
where the fire grows so rapidly that an occupant’s egress is blocked even with properly located smoke
alarms, or when victims are intimate with the fire (for example, when a person’s clothes catch fire while
cooking), too old or young, or physically or mentally impaired such that they cannot escape even when
warned early enough that escape should be possible. For these people, additional strategies such as
protec tion-in-place or assisted escape or rescue are necessary. *
• This model meets the latest residential smoke alarm standards, which includes enhanced resistance
to nuisance alarms from cooking. Industry experts recommend t hat both ionization and photoelec tric
smoke alarms be installed to help ensure optimal detection of the various types of f ires that can occur
within the home. Ionization sensing alarms may detect invisible fire particles (associated with fast flaming
fires) sooner than photoelectric alarms. Photoelectric sensing alarms may detect visible fire particles
(associated with slow smoldering fires) sooner than ionization alarms.
• A batter y powered alarm must have a battery of the specif ied type, in good condition and installed
properly (this model includes two AA replaceable batteries).
• This device requires a continuous supply of electrical power from a healthy batter y or AC connection,
depending on the model. It will not work without power.
• Smoke alarms mus t be tested regularly to make sure t he bat ter y and the alarm circuits are in good
operating condition.
• Smoke alarms cannot prov ide an alarm if smoke does not reach the alarm. Therefore, smoke alarms may
not sense fires starting in chimneys, within walls, on roofs, on the other side of a closed door or other
obstructions.
• If the alarm is located ou tside the bedroom or on a dif ferent floor, it may not wake up a sound sleeper.
• The use of alcohol or drugs may also impair one’s ability to hear the smoke alarm. For optimal detection,
a smoke alarm should be installed in each sleeping area on ever y level of a home.
This alarm is not intended to alert hearing impaired individuals.
* Reference National Fire Protection Association (NFPA) standard 72
8
Page 9
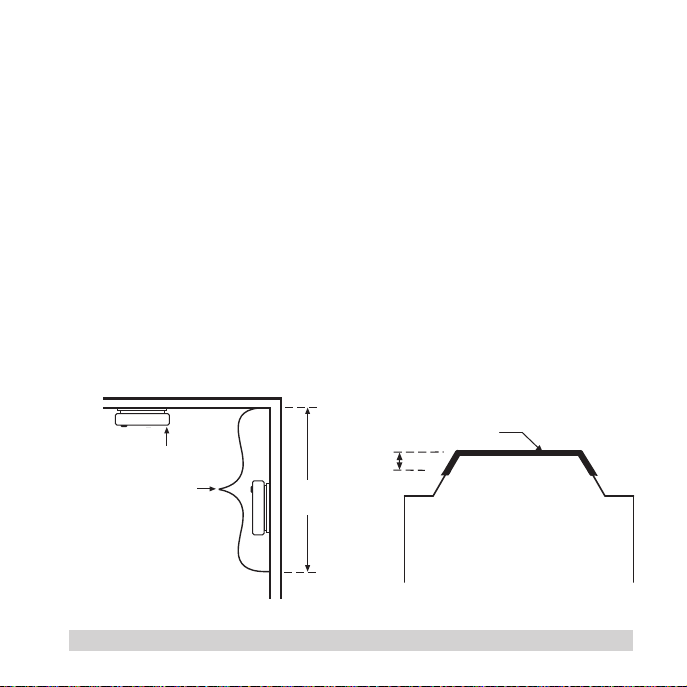
6. Recommended Locations For Smoke Alarms
Note: measurements shown
are to the closest edge
of the alarm.
12”
(30.5 cm)
ANYWHERE ALONG
THIS BOLD SURFACE
Locations permitted for smoke
alarms and smoke detectors
on tray-shaped ceilings.
• Locate smoke alarms in all sleeping areas. Try to monitor the exit path as t he bedrooms are usually
farthest from the exit . If more than one sleeping area exist s, locate additional alarms in each
sleeping area.
• Locate additional alarms in stairways, because stairways act like chimneys for smoke and heat.
• Locate at least one alar m on ever y floor level.
• Locate an alarm in every bedroom.
• Locate an alarm in every room where electrical appliances are operated (i.e. portable heaters or
humidifiers).
• Locate an alarm in every room where someone sleeps wi th the door closed. The closed door may
prevent an alarm not located in that room from waking the sleeper.
• Smoke, heat, and combustion products rise to the ceiling and spread horizontally. Mounting the
smoke alarm on the ceiling in the center of the room places it closest to all points in the room.
Ceiling mounting is preferred in ordinary residential construction.
• For all alarm locations, be sure to choose a flat, solid surface for mounting , with no holes or gaps
under the mounting bracket.
CEILING
ANYWHERE ALONG
ACCEPTABLE
TOP OF ALARM
ACCEPTABLE HERE
12’’
(30.5 cm)
MAXIMUM
SIDE
WALL
Figure 6-A
THIS BOLD SURFACE
12”
(30.5 cm)
Locations permitted for smoke
alarms and smoke detectors
on tray-shaped ceilings.
9
Page 10
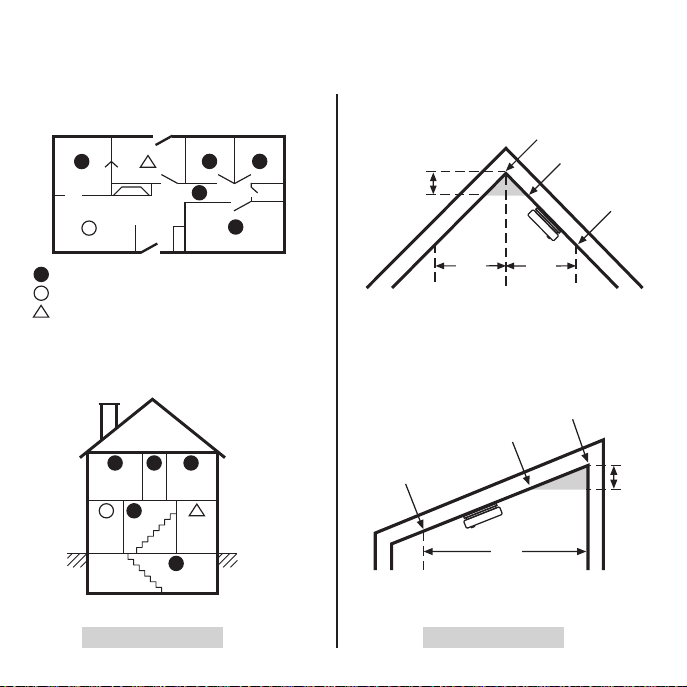
NFPA 72 states: “Smoke alarms in rooms with ceiling slopes greater than 1 f t in 8 ft (0.3m in 2.4 m)
ACCEPTABLE
TOP OF ALARM
ACCEPTABLE HERE
CEILING
Note: measurements shown
are to the closest edge
of the alarm.
12’’
(30.5 cm)
MAXIMUM
SIDE
WALL
12”
(30.5 cm)
ANYWHERE ALONG
THIS BOLD SURFACE
Locations permitted for smoke
alarms and smoke detectors
on tray-shaped ceilings.
BEDROOM
LIVING
ROOM
BASEMENT
BEDROOM
HALL
KITCHEN
MULTIPLE
FLOOR PLAN
12”
(30.5 cm)
ANYWHERE ALONG
THIS BOLD SURFACE
Locations permitted for smoke
alarms and smoke detectors
on tray-shaped ceilings.
Locations permitted for smoke
alarms and smoke detectors
on tray-shaped ceilings.
BEDROOM
LIVING
ROOM
BASEMENT
BEDROOM
HALL
KITCHEN
MULTIPLE
FLOOR PLAN
4”
(102 mm)
(102 mm)
BEDROOM
LIVING
ROOM
BASEMENT
BEDROOM
HALL
KITCHEN
MULTIPLE
FLOOR PLAN
NOT
IN THIS
AREA
ANYWHERE
IN THIS
AREA
3’
(0.9 m)
(0.9 m)
3’
(0.9 m)
horizontally shall be located on the high side of the room.” NFPA 72 states: “A row of detectors shall be
spaced and located within 3 ft (0.9m) of the peak of the ceiling measured horizontally.”
SINGLE FLOOR PLAN
KITCHEN
BEDROOM
LIVING ROOM
Smoke Alarms for Required Detection
Smoke Alarms for Additional Detection
Not within 6 feet of appliances
MULTIPLE
FLOOR PLAN
BEDROOM
LIVING
ROOM
HALL
BEDROOM
BEDROOM
BEDROOM
BEDROOM
KITCHEN
4”
(102 mm)
3’
(0.9 m)3’(0.9 m)
ANYWHERE
IN THIS AREA
NOT
IN THIS
AREA
ANYWHERE
IN THIS
AREA
NOT
IN THIS
AREA
3’
4”
BASEMENT
Figure 6-B Figure 6-C
10
Page 11

• For mobile home installat ion, select locations carefully to avoid thermal barrier s that may form at
the ceiling. For more details, see MOBILE HOM E INSTALLATION section.
• When mounting the alarm on the wall, use an inside wall with the top edge of the alarm at a
maximum of 12” (30.5 cm) below the ceiling.
• Put smoke alarms at both ends of a bedroom hallway or large room if t he hall way or room is more
than 30 feet (9.1 m) long.
• Install Smoke Alarms on sloped, peaked or cathedral ceilings at or wit hin 3f t (0.9m) of the highest
point (measured horizontally).
This equipment should be installed in accordance with the National Fire Protection Association’s 72
(National Fire Protection Association, Batter ymarch Park, Q uincy, MA 02269).
Mobile Home Installation
Modern mobile homes have been designed and built to be energy eff icient. Install smoke alarms as
recommended above. In older mobile homes that are not well insulated compared to present stan-
dards, extreme heat or cold can be transferred from the outside to the inside through poorl y insulated
walls and roof. This may create a thermal barrier which can prevent the smoke from reaching an alarm
mounted on the ceiling. In such units, install the smoke alarm on an inside wall wi th the top edge of the
alarm a maximum of 12” (30.5 cm) below the ceiling.
If you are not sure about the insulation in your mobile home, or if you notice that the outer walls and
ceiling are either hot or cold compared to the room air temperature, install the alarm on an inside wall.
NFPA 72 (National Fire Protection Association) requires smoke alarms be installed in each sleeping
area.
WARNING: TEST YOUR ALARM OPE RATION AFTER MOBILE HOME HAS BEEN IN STOR
AGE OR UNOCCUPIED, AND AT LEAST ONCE A WEE K DURING USE.
11
Page 12

7. Locations To Avoid
(See Figures 6 -A , 6- B, & 6 -C for recommended locations)
• In the garage. Produc ts of combus tion are present when you start your automobile.
• Normal cooking may cause nuisance alarms. If a kitchen alarm is desired, it should have an alarm
silence feature and should not be installed within 6 ft of cooking appliances.
• Do not install within 6 ft of heating appliances.
• Less than 4” (10 cm) from the peak of an “A” frame t ype ceiling.
• In an area where the temperature may fall below 40ºF or rise above 100ºF, such as garages and
unfinished attics.
• In dusty areas. Dust par ticles may cause nuisance alarms or a failure to alarm.
• In very humid areas (above 95% RH , non-condensing) as moisture or steam can cause nuisance
alarms.
• In insect-infested areas.
• Smoke alarms should not be installed within 3 ft (0.9m) of the door to a bathroom containing a tub
or shower, forced air supply ducts used for heating or cooling, ceiling or whole house ventilating
fans, or other high air f low areas.
• Near lights. Electronic “noise” generated by the lights may cause nuisance alarms.
• Do not install near vents, flues, or chimneys.
• Do not install near fans, doors, windows or areas directly exposed to the weather.
• Do not install DC (bat ter y only) alarms on top of AC electrical junc tion boxes.
• Avoid installing where the unit will be exposed to direct sunlight.
NOTE: Smoke alarms are not to be used w ith detector guards unless the combination (alarm and
detector guard) has been evaluated and found suitable for that pur pose.
12
Page 13
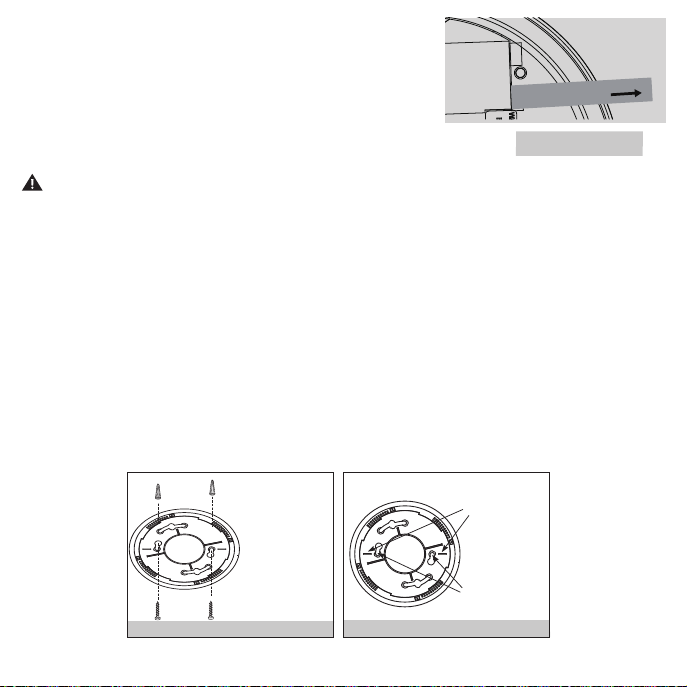
PULL OUT TAB TO ACTIVATE BATTERIES.
SAQUE LA LENGÜETA PARA
ACTIVAR LAS BATERÍAS.
8. Installation and Activation
NOTE: A dust cover has been installed on the alarm. Keep the dus t
cover on until all construc tion has been completed for at least 24 hours
(drywall, painting, varnishing, mounting plate install, etc). Retain the dust
cover and re-install it to protect the alarm during future cons truction
projects. Construction dust and chemicals can cause contamination and false alarms.
WARNING: DUST COVER MUST BE REMOVED FOR A LARM TO OPERATE.
NOTE: Pull out t he bat ter y pull tab first to activate the batteries (see Figure 8-A). Battery ac tivation is conf irmed
with a beep. If t he beep does not occur when the battery pull tab is removed, remove the batteries and reinstall
them. Confirm the battery activation beep.
• K idde alarms are not designed, agency tested or cer tified for recessed mounting and should not be installed
in this manner. Recessed mounting impedes smoke entry into the smoke chamber, which may prevent the
alarm from sounding in a timely manner. This could endanger the lives of occupants in the residence. Kidde
alarms are designed, tested and cer tif ied for wall (if applicable) and ceiling surface mount only.
• After selecting the proper location for your alarm, attach the mounting bracket to the wall or ceiling. To en
sure aesthetic alignment of the alarm with the hallway, or wall, the “A” line on the mounting bracket should be
parallel with the hallway when ceiling mounted, or horizontal when wall mounted (Figures 8-B and 8-C).
Figure 8-A
-
When mounting
in a hallway,
the "A" line should
be parallel with the
hallway. When wall
AA
mounting, the "A"
line should be
horizontal.
Figure 8-B
Alignment Marks
(”A” Line) on
Mounting
Bracket
AA
Mark and drill
two 3/16" (5mm)
holes for wall
anchors.
Figure 8-C
13
Page 14
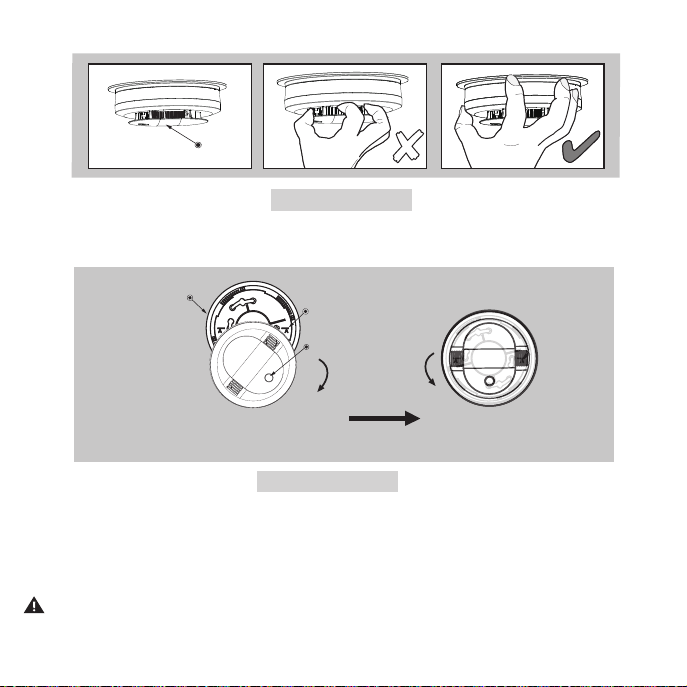
NOTE: Do not grab the shield to install or remove the alarm. Grab the alarm by the outside of the enclosure. (Figure 8-D).
Shield
✘
Figure 8-D
NOTE: If either battery is missing, the alarm cannot mount on the mounting bracket.
Mounting Bracket
To ensure aesthetic alignment, orient
the unit as shown on the mounting
bracket and rotate the unit completely until it stops.
• Install the alarm fully on the mounting bracket by rot ating the alarm in a clockwise direction (Figure 8 -E ).
NOTE: The alarm will mount to the bracket in 4 positions (every 90 degrees).
The alarm is now activated! After installation / activation, test your alarm as described in Operation and
Testing section.
WARNING: FAILURE TO PROPERLY INSTALL AND ACTIVATE THIS ALARM WILL PREVENT
PROPER OPERATION OF THIS ALARM AND WILL PREVENT ITS RESPONSE TO FIRE HAZARDS.
14
Note orientation
of "A" line.
LED
Install
Figure 8-E
Remove
After fully installed
(The button should
be at the bottom.)
Page 15

9. Operation And Testing
This model meets the latest residential smoke alarm standards, which includes enhanced resistance to
nuisance alarms from cooking.
Operation
The alarm is operating once it is activated and tes ting is complete (see “ TESTING” below). When
products of combustion (smoke) are sensed, the unit sounds a loud alarm. See Section 1 for alarm
signal descriptions.
Testing
WARNING: Do not attempt to test this unit with retail “canned smoke” produc ts. Those
products are intended for use by trained professionals and produce inconsistent results
when misused. Over-application of canned smoke can permanently damage the alarm.
Self-Testing
This model is equipped with internal, self-testing components that are always checking to ensure the device is operating as expected. (Weekly manual testing is still required. See below.)
Manual Testing
NOTE: When pushing the Test but ton, use only your finger or thumb. Using any other inst ru-
ment(s) (such as a broom handle) is strictly prohibited, as it may damage the alarm.
Test your alarm weekly by pressing and releasing the but ton quickly. A quick beep will confirm the
button has been pushed followed by the test sequence. See O ther A larm Visual and Audible
Indicators t able. The alarm will sound if the electronic circuitr y, horn, and bat teries are working.
If the alarm does not sound, or gives erratic or low volume sound, the unit must be replaced.
WARNING: DUE TO THE LOUDN ESS OF THE ALARM, A LWAYS STAND ABOUT 2.5 FEET
AWAY FROM THE UNIT OR USE EAR PROTECTION WHEN TESTING.
WARNING: DO NOT USE AN OPEN FLAME TO TEST YOUR ALARM, YOU COULD DAMAGE
THE ALARM OR IGNITE COMBUSTIBLE MATERIALS AND START A STRUCTURE FIRE.
Chirping
When End of Unit Life or Low Battery chirping begins, you can temporarily silence these chirps
by pressing the button. Other fault/error chirps cannot be silenced. Take appropriate action as
described in the Troubleshooting Guide.
WARNING: REPLACE UNIT AS SOON AS POSSIBLE WHE N IN END OF UNIT LIFE. SEVEN 7
DAYS AFTER END OF UNIT LIFE BEGINS, THE NOTIFICATIONS CANNOT BE SILENCED, AND
SMOKE DETECTION CANNOT BE GUARANTEED. REPLACE IMMEDIATELY!
15
Page 16

10. Recognizing Nuisance Alarms
Smoke Nuisance
This model meets the latest residential smoke alarm standards, which includes enhanced resistance to
nuisance alarms from cooking.
TM
: If you know why the alarm is sounding, and you can verif y that it is not a life threatening sit-
HUSH
uation, you can push the but ton on the init iating unit to silence the alarm for 8 -10 minutes. If the smoke
is not too dense, that unit will silence. After the Hush
and sound the alarm if particles of combustion are still present. You can use Hush
the air has been cleared of the condition causing the alarm.
NOTE: Dense smoke will override Hush
TM
check to see if one of the reasons listed in “ Locations to avoid” may have caused the alarm. If a
fire is discovered, get out and call the fire depar tment or 911 .
Cigarette smoke will not normally cause the unit to alarm, unless the smoke is blow n direc tly into the
alarm. Combustion par ticles from cooking may set of f the alarm if it is located too close to a cooking
appliance. Large quantities of combustible particles are generated from spills or when broiling. Using
the fan on a range hood which vents to the outside (non-recirculating type) will also help prevent nuisance alarms from occurring by removing these combustible products from the kitchen.
TM
period, the smoke alarm will automatically reset
TM
repeatedly until
and sound a continuous alarm. If no fire is present,
16
Page 17
11. Batteries
This alarm is powered by t wo replaceable AA batteries. Under normal condit ions, fresh batteries
will last at least one year.
NOTE: Constant exposure to high or low humidity or temperatures may reduce bat ter y life.
WARNING: THE ALARM IS SEALED AN D THE COVER IS NOT REMOVABLE!
Low Battery
This alarm is equipped with a low battery monitor circuit. If the battery capacity is nearing the point
where it can no longer provide adequate power for all alarm functions, the low batter y condition
will occur. See Troubleshooting Guide. The batteries must be replaced within 7 days of the first
occurrence of the “Low Battery Warning” to provide continuous alarm detection.
Replace batteries with one of the following approved brands:
Energizer E91, Gold Peak 15A or Golden Power GLR6A.
These batteries can be purchased at your local retailer.
WARNING:
batteries may have a det rimental ef fec t on the alarm. Do not mix old
and new batteries. Do not mix alkaline, standard, or rechargeable
batteries.
NOTE:
is to replace the batteries at least once a year, or at t he same time you change your clocks for
daylight saving time. A missing or improperly installed battery will render the unit inoperable.
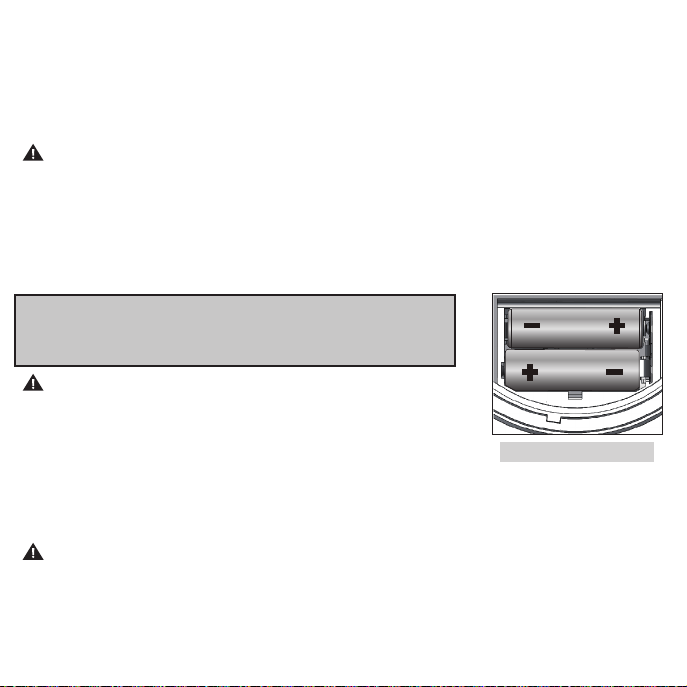
WARNING: FAILURE TO INSTALL BATTERIES IN THE CORRECT ORIENTATION WILL PREVENT
PROPER OPERATION OF THIS ALARM AND WILL PREVENT ITS RESPONSE TO FIRE HAZARDS.
Use only the batteries specified. Use of different
Figure 11
Do not use lithium bat teries in this unit. A good safety measure
17
Page 18
12. Cleaning Your Alarm
Your Alarm Shou ld be Clean ed at Least O nce a Year
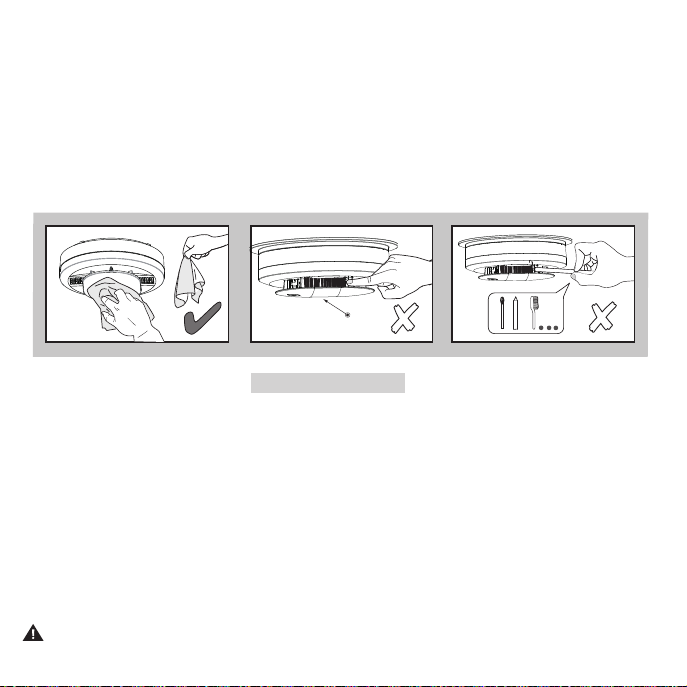
You can clean the interior of your alarm (sensing chamber) by using compressed air or a vacuum
cleaner hose and blowing or vacuuming through the openings around the perimeter of the alarm.
The out side of the alarm can be wiped with a clean, dry cloth. Do not use water, detergents or cleaners
as they may damage the alarm.
NOTE: Do not insert fingers or cleaning items under the shield during cleaning.
Shield
✘
Figure 12-A
If the alarm is in Fault mode, the alarm may be in need of cleaning. After cleaning, press the button.
If the fault does not clear, the alarm needs to be replaced.
• Never use detergent or other solvents to clean the unit.
• Avoid spraying air freshener, hair spray, or other aerosols near the alarm.
• Do not use a hair dr yer to clean the alarm, as it may damage the alarm and impact performance.
• Do not paint the unit. Paint will seal the vents and interfere with the sensor’s ability to detect
smoke.
• Never attempt to disassemble the unit to clean inside. This action will void your warranty.
WARNI NG: REI NSTALL TH E ALA RM AS SO ON AS P OSSIB LE TO ENS URE CO NTIN UOUS
DETECTION.
18
✘
Page 19

13. Good Safety Habits
Develop and Prac tice a Plan of Escape
Prepare and practice a home escape plan tw ice a year, including drills at night. Know two ways ou t
of ever y room (door & window) and identify a meeting place outside the home where everyone will
gather once they have exited the residence. When two people have reached the meeting place, one
should leave to call 911 w hile the second person stays to account for additional family members.
Establish a rule that once you’re out, you never re-enter under any circumstance!
• Make a floor plan indicating all doors and windows and at least t wo (2) escape routes from each
room. Stories above ground level may need a rope or chain ladder.
• Have a family meeting and discuss your escape plan, showing ever yone what to do in case of f ire
and where to meet after they leave the house.
• Ensure that small children hear the alarm and wake when it sounds. They must wake up in order to
execute t he escape plan. Practice allows all occupant s to test your plan before an emergency.
You may not be able to reach your children. It is import ant they know what to do.
• Familiarize ever yone with t he sounds of the smoke alarm and train them to leave your home when
they hear it.
• Current studies have shown smoke alar ms may not awaken all sleeping individuals, and that it is
the responsibility of individuals in the household that are capable of assisting others to provide
assistance to those who may not be awakened by the alarm sound, or to those who may be
incapable of safely evacuating the area unassisted.
• Install and maintain fire extinguishers on every level of the home and in the kitchen, basement and
garage. Know how to use a f ire extinguisher prior to an emergency.
19
Page 20

Fire Prevention
Never smoke in bed or leave cooking food unattended. Teach children never to play with matches or
lighters! Train everyone in the home to recognize the smoke alarm pattern and to leave the home using
their escape plan when it’s heard. Know how to do “Stop, D rop and Roll” if clothes catch on fire, and
how to crawl low under smoke. Install and maintain fire extinguisher s on ever y level of the home and in
the kitchen, basement and garage.
NFPA (National Fire Protection
Association)
Fire Safety in t he Home: NFPA 72 is
intended to prov ide reasonable safet y for
persons in family living units. Reasonable
fire safety can be produced through the
following three-point program: (1) Minimizing fire hazards (2) Providing fire-warning
equipment (3) Having and practicing an
escape plan.
Smoke Detection – Are More Alarms
Desirable?
The required number of smoke alar ms
might not provide reliable early warning
protec tion for those areas separated by a
door from the areas protected by the re quired smoke alarms. For this reason, it is recommended that the resident consider the use of additional smoke alarms for those areas for increased protection. The additional areas include the basement,
bedrooms, dining room, furnace room, utilit y room, and hallways not protected by the required smoke
alarms. The installation of smoke alarms in attics (finished or unfinished), garages, or within 6’ of a heating or cooking appliance is not normally recommended, as these locations occasionally experience
conditions that can result in improper operation. *
* Reference National Fire Protection Association (NFPA) standard 72
20
For your information, the National Fire Protection
Association’s Standard 72 reads: Where required
by other governing laws, codes, or standards for a
specific t ype of occupancy, approved single and
multiple-station smoke alarms shall be installed as
follows:
1. In all sleeping rooms and guest rooms
2. Outside of each separate dwelling unit sleeping
area, within 21 ft (6.4 m) of any door to a sleeping
room, with the dist ance measured along a path
of travel
3. On every level of a dwelling unit, including
basements
4. On every level of a residential board and care
occupancy (small facility), including basements
and excluding crawl spaces and unfinished attics
5. In the li ving area(s) of a guest suite
6. In the li ving area(s) of a residential board and
care occupancy (small facility)
Page 21

California State Fire Marshal
Early warning fire detection is best achieved by the installation of fire detec tion equipment in all
rooms and areas of the household as follows: A smoke alarm installed in each separate sleeping area
(in the vicinity, but outside the bedrooms), heat or smoke detectors in the living rooms, dining rooms,
bedrooms, ki tchens, hall ways, attics, furnace rooms , closets, utility and storage rooms, basement s and
attached garages.
FCC
This dev ice complies with part 15 of the FCC Rules. Operation is subject to the following t wo
conditions: (1) This device may not c ause harmful inter ference, and (2) this device must accept any
interference received, including interference that may cause undesired operation.
WARNING! Changes or modif ications not expressly approved by the part y responsible for
compliance could void the user’s authority to operate this device.
NOTE: This equipment has been tested and found to comply with the limits for a Class B digital device,
pursuant to part 15 of the FCC Rules. These limits are designed to provide reasonable protection
against harmful interference in a residential installation. This equipment generates, uses, and can
radiate radio f requency energy and, if not installed and used in accordance with the instructions, may
cause harmful interference to radio communications.
However, there is no guarantee that interference will not occur in a particular installation. If this
equipment does cause harmful interference to radio or television reception, which can be determined
by turning the equipment of f and on, the user is encouraged to tr y to correct the inter ference by one or
more of the following measures:
- Reorient or relocate the recei ving antenna.
- Increase the separation between the equipment and receiver.
- Connect the equipment into an out let on a circuit different from that to which t he receiver is
connected.
- Consult the dealer or an experienced radio/TV technician for help.
21
Page 22

14. Service And Warranty
Ten-Year Limited Warranty
Kidde warrants that the enclosed alarm (but not the batteries) will be free from defects in mater ial
and workmanship or design under normal use and ser vice for a period of ten years from the date of
purchase. The obligation of Kidde under this warranty is limited to repairing or replacing the alarm
or any part which we find to be defective in material, workmanship or design (part replacement only,
no inst allat ion), free of charge, upon recei ving t he alarm with proof of date of purchase, postage and
return postage prepaid, to Warrant y Ser vice Depar tment, Kidde, 1016 Corpor ate Park Drive, Mebane,
NC 27302. Before shipping the product, please remove the batteries from the batter y compartment.
This warrant y shall not apply to the alarm i f it has been damaged, modif ied , abused or altered af ter the
date of purchase or if it fails to operate due to improper maintenance or inadequate power. Any implied
warranties arising out of this sale, including but not limited to the implied warranties of description,
merchantability and fitness for a particular purpose, are limited in duration to the above warranty
period. In no event shall the Manufacturer be liable for loss of use of this product or for any indirect,
special, incidental or consequential damages, or costs, or expenses incurred by the consumer or any
other user of this product, whether due to a breach of contract, negligence, strict liability in tort or
otherwise.
The Manufacturer shall have no liability for any personal injury, property damage or any special,
incidental, contingent or consequential damage of any kind resulting from gas leakage, smoke, fire
or explosion. Since some states do not allow limitations of the duration of an implied warranty or do
not allow the exclusion or limitation of incidental or consequential damages, the above limitations or
exclusions may not appl y to you. While this warrant y gives you specif ic legal rights, you may also have
other rights which vary from state to state.
The above warranty may not be altered except in writing signed by both parties hereto. Your Kidde
Alarm is not a substitute for proper ty, fire, disability, life or other insurance of any kind. Appropriate
insurance coverage is your responsibility. Consult your insurance agent. Opening the unit will void the
warranty. If there are any differences between this printed warranty and the online limited warranty,
then the terms of the online warranty supersede those in this user guide or other printed materials.
Visit w ww.kidde.com for the latest warrant y statement.
22
Page 23

QUESTIONS OR FOR MORE INFORMATION
Call Kidde Product Support line at 1-800-880-6788
or contact us at www.kidde.com
Kidde
1016 Corporate Park Drive, Mebane, NC 27 302
©2024 Kidde. All Right s Reserved.
23
 Loading...