

Page 1

1
Your home is protected with a Kidde Fyrnetics alarm.
Please read through our guide in full. It should be retained for future reference.
Cut out page 6 and pin up near your Consumer Unit/Fuse Box.
Kidde Fyrnetics recommends for maximum protection that both ionisation and
optical (photo-electric) smoke alarms be installed. Ionisation technology is faster at
detecting fast flaming fires that give off little smoke. Optical (photo-electric)
technology is faster at responding to slow, smouldering smoky fires. Heat alarms
are installed in environments where excessive steam, dust etc. make smoke alarms
impractical e.g. kitchens/boiler rooms/lofts.
Electrical rating 230V AC,
50Hz 80mA max per alarm
(maximum 80mA for originating unit
with 24 alarms interconnected).
Smoke and Heat alarm
Owner’s Manual
230V Interconnectable Mains Operated Alarms For models:
123I, 123/9HI, 123/9HILL, 123/9EI, 223I, 223/9I, 223/9ILL,
223/9HI, 223/9HILL, 323/9HI, 323/9HILL
SAVE THIS MANUAL FOR FUTURE REFERENCE
Contents
Section 1. Alarm Range . . . . . . . . . . . . . . . . . . . . . . . . . . . . . . . . . . . . . . . . . . . . . . .2
Section 2. Important Information . . . . . . . . . . . . . . . . . . . . . . . . . . . . . . . . . . . . . .2
Section 3. Types of Alarm . . . . . . . . . . . . . . . . . . . . . . . . . . . . . . . . . . . . . . . . . . . . .2
Section 4. How to Operate/Test the Alarm . . . . . . . . . . . . . . . . . . . . . . . . . . . . . . .3
Section 5. Battery Checking/Changing . . . . . . . . . . . . . . . . . . . . . . . . . . . . . . . . . .4
Section 6. Checking Battery Back-up on Rechargeable/Long Life Models . . . .8
Section 7. Maintenance . . . . . . . . . . . . . . . . . . . . . . . . . . . . . . . . . . . . . . . . . . . . . . .8
Section 8. What to do in an Emergency . . . . . . . . . . . . . . . . . . . . . . . . . . . . . . . . .8
Section 9. Troubleshooting . . . . . . . . . . . . . . . . . . . . . . . . . . . . . . . . . . . . . . . . . . . .9
Section 10. Useful Hints . . . . . . . . . . . . . . . . . . . . . . . . . . . . . . . . . . . . . . . . . . . . . . .9
Section 11. Good Safety Habits (Cut off Section) . . . . . . . . . . . . . . . . . . . . . . . . . .6
Section 12. What to do when the Alarm Sounds (Cut off Section) . . . . . . . . . . . .6
Section 13. Limitation of Smoke/Heat Alarms . . . . . . . . . . . . . . . . . . . . . . . . . . . .10
Section 14. Service and Guarantee . . . . . . . . . . . . . . . . . . . . . . . . . . . . . . . . . . . . .10
Kidde Safety Europe, Mathisen Way, Colnbrook, SL3 0HB, UK.
www.kiddefyrnetics.co.uk
© Kidde Fyrnetics 2001
Read this manual thoroughly and follow its instructions regards
regular maintenance. – it could save your life.
Lic No: 7861
BS 5446: Pt. 1: 2000
*
*Kite mark is not applicable to 300 series models.
Page 2

2
1. Alarm Range Interconnectable 230V Hard Wired Smoke Alarms
123I Ionisation Smoke Alarm
123/9HI Ionisation Smoke Alarm with Battery Back-up and Hush
123/9HILL Ionisation Smoke Alarm with Long Life Battery Back-up and Hush
123/9EI Ionisation Smoke Alarm with Battery Back-up and Escape Light
223I Optical Smoke Alarm
223/9I Optical Smoke Alarm with Battery Back-up
223/9ILL Optical Smoke Alarm with Long Life Battery Back-up
223/9HI Optical Smoke Alarm with Battery Back-up and Hush
223/9HILL Optical Smoke Alarm with Long Life Battery Back-up and Hush
323/9HI Heat Alarm with Battery Back-up and Hush
323/9HILL Heat Alarm with Long Life Battery Back-up and Hush
Also interconnectable to all Kidde Fyrnetics Slick Rechargeable & Hard Wired CO Alarms
2. Important Information
This alarm is designed for installation by a qualified electrician, in accordance
with the latest I.E.E. Regulations and in regard to relevant Building
Regulations/BS Codes of Practice.
• Hard wired smoke or heat alarms require a constant 230V AC supply.
Battery Back-up models additionally require a healthy battery too.
(In the case of rechargeable battery models, they require 2-3 days of mains
power to reach a fully charged condition.)
• A healthy mains supply is indicated by a constant green L.E.D. (mains)
indicator.
• Test the alarm weekly by pressing (and holding) the test button.
The alarm and all those interconnected to it will sound.
• Vacuum your alarms regularly to reduce the likelihood of nuisance alarms,
caused by dust contamination.
• Never paint or expose alarm to water – this is a 230V alarm.
(If painting or building work is being carried out close to alarm, temporarily
cover with a plastic bag, or the dust cover supplied.)
• If the alarm chirps every 30-40 seconds, it indicates the battery needs
replacing. (If you are in rented property, advise your Landlord.)
Smoke and heat alarms will only function if properly selected, located,
installed and maintained as per KIDDE Fyrnetics instruction manuals.
3. Types of Alarm
a. Power Supply
• DC alarms
9V battery powered units, but will only function if battery is in good condition –
check regularly. (BS5839 Pt6: Grade F).
• AC alarms
230V mains – for professional installation.
(Minimum required by UK Building Regulations in new homes.) Interconnectable
to other Kidde Fyrnetic AC Alarms, so all will sound when one is triggered.
Will not function if mains power lost. (BS5839 Pt6: Grade E).
• AC/DC alarms
230V mains – for professional installation. Interconnectable to other Kidde
Fyrnetic AC Alarms, so all will sound when one is triggered. If mains power is
lost, will operate via battery power if batteries are fresh/properly installed.
Some models use replaceable 9V (PP3 type) batteries, others sealed-in
rechargeable/Long Life batteries. (BS5839 Pt6: Grade D)
Page 3
3
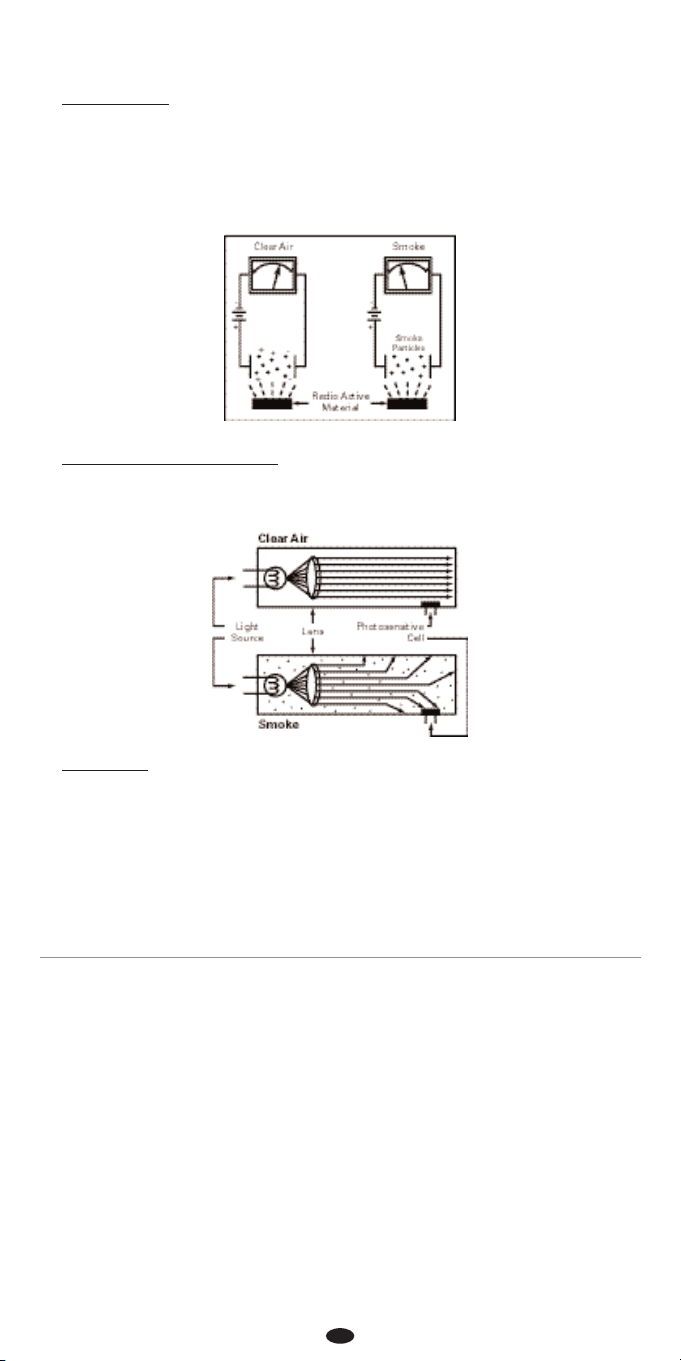
b. Alarm Types
• Ionisation (Ion) alarms are the most common type and provide early detection,
especially against fast flaming fires. Most suitable for dining and living room
areas. Ion alarms contain 0.9 microcurie of Americium 241, a radioactive
material. UK Home Office and BS5839 Pt6 recommend however, that optical
alarms are also used especially in locations where steam or cooking fumes, from
a nearby room could cause nuisance alarms.
No one type of alarm is considered suitable for all locations.
• Optical (Photo-Electric) alarms are increasingly used and are less prone to
nuisance alarms from cooking fumes. They are therefore the recommended type
in BS5839 Pt6, for fitting near kitchen areas and on escape routes/circulation
spaces.
• Heat alarms are for use in areas where Ion or Optical smoke alarms would be
unsuitable e.g. kitchens, boiler rooms, garages. However, they must always be
used interconnected to smoke alarms – do not use in isolation. (They will
typically go into alarm when the temperature reaches 57°C.) Suitable for new
Building Regulations applicable 1/7/2000 regarding use in kitchens.
4. How to Operate/Test the Alarm
a. Operation and L.E.D. Status
• When your alarm is correctly installed to the mains supply, the green L.E.D. light
will be on. The red L.E.D. will blink about once a minute to indicate the sensor is
operating correctly. If the alarm senses products of combustion, it’s 85dB horn
will by activated. The red L.E.D. will flash rapidly on the alarm sensing
smoke/heat. (Other interconnected alarms will also sound to warn those in other
parts of the property.) This will continue until the sensor chamber is clear.
In the case of a heat alarm, it will be triggered when the temperature reaches
57°C and return to it’s standby mode when the temperature drops to normal
levels. On optical alarms if the red L.E.D. blinks every 30-40 seconds and the
alarm chirps inbetween, it indicates failure of the sensing chamber.
Regularly check and ensure that the green L.E.D. is lit – if not, check the
consumer unit/circuit breaker connection. As with previous point above, if in
doubt, consult an electrician or your Landlord.
Page 4
4
b. Testing
• Utilise the test button to test the alarm. Do not use naked flames as this does not
replicate smoke and may cause physical damage to the alarm.
Test all your alarms weekly – remember they are life saving devices, protecting
the family and home.
Press and hold the test button until the alarm sounds. All interconnected alarms
will also sound. (Do not stand too close to the alarm during testing – hearing
may be damaged.)
c. Hush Button
• If this feature of temporarily desensitises the alarm circuit for approximately 7
minutes. This feature is to be used only when a known alarm condition, such as
fumes from cooking, activates the alarm. The alarm is desensitised by pushing
the “HUSH” button on the alarm cover. If the smoke is not too dense, the alarm
will silence immediately and “chirp” every 30-40 seconds for approximately 7
minutes. This indicates that the alarm is in a temporarily desensitised condition.
The alarm will automatically reset after approximately 7 minutes and sound the
alarm if particles of combustion are still present. The “HUSH” feature can be
used repeatedly until the air has been cleared of the condition causing the
alarm.
Note: Dense smoke will override the hush control feature and sound a
continuous alarm.
Caution: Before using the alarm hush feature, identify the source of the smoke
and be certain a safe condition exists. (On heat alarms with hush, the alarms
sensor has detected a high temperature – e.g. 57°C. Check for possible causes
carefully.)
d. Nuisance Alarms
Warning: Persistent nuisance alarms indicates incorrect type and/or siting of
alarm. Review with your installer or Landlord after cleaning as described in
Section 7 (Maintenance).
5. Battery Checking/Changing*
a. Low Battery Indicator (AC models with loose battery only)
If you hear the alarm chirp continuously every 30-40 seconds
(and have not just pressed the hush button) it indicates the battery voltage is at
an unacceptably low level. Replace the battery at the next possible opportunity.
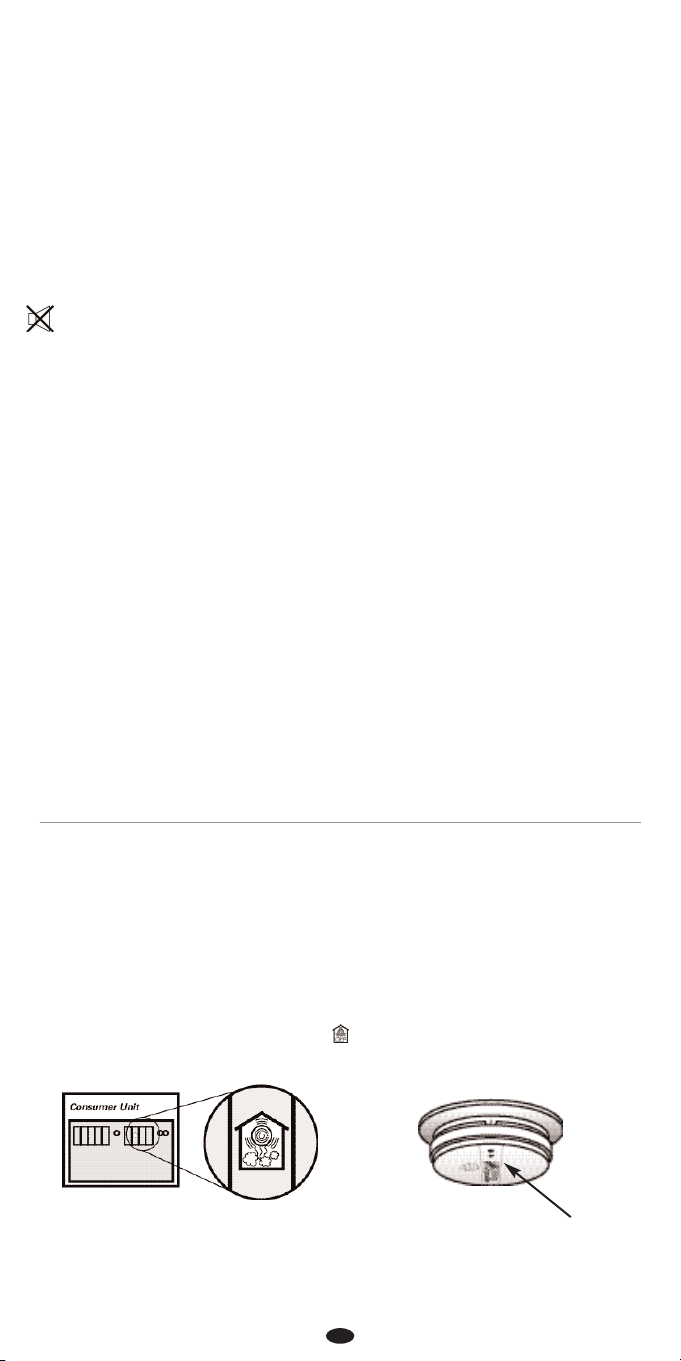
b. Battery Change
i. Firstly isolate the mains supply at the consumer unit by identifying the
appropriate circuit. This may be a dedicated fuse marked “Fire/Smoke
Alarms” or with a symbol such as .
(If you rent your property, your Landlord may arrange this service for you.)
The green L.E.D. should now be out. If not, recheck before proceeding.
* See page 5, section “v”
Page 5
5
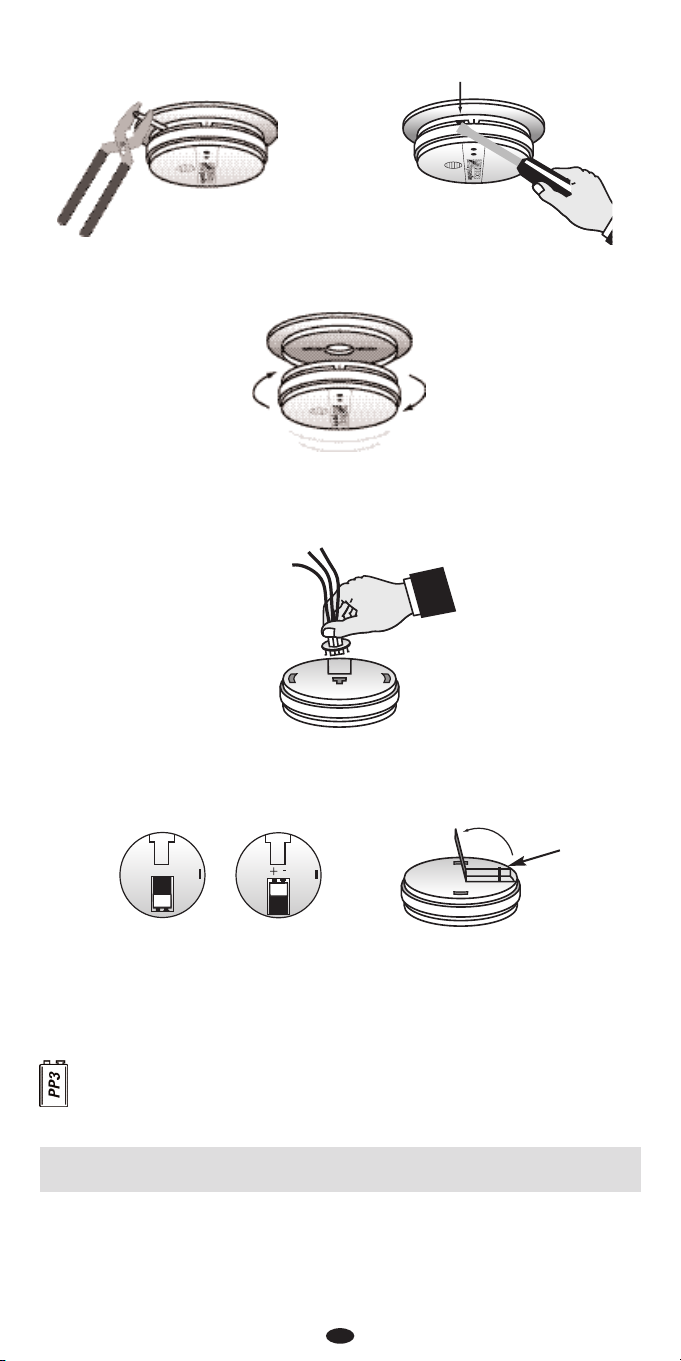
ii. Next pull out with pliers, the locking pin and retain for
reinserting later.
iii. Twist alarm as indicated on housing to remove from mounting base plate.
iv. Finally, carefully pull off cable harness, by squeezing on side, to reveal
battery compartment. (Do not touch the pins on back of alarm.)
v. Flip up lid and note position of red plastic bar, under battery. When you
remove battery, the red door stop bar prevents the door closing unless a
battery is reinstalled. (On 123/9EI models there are 2 batteries/flags.)
This safety feature also prevents the cable harness from being reconnected, and
prevents the alarm from being mounted back on its mounting base plate.
We recommend the use of alkaline or lithium batteries for a longer
service life.
Battery type/code nos.
Alkaline type: Eveready 522; Duracell MN1604; Duracell Ultra MX1604;
Gold Peak 1604A;
Lithium type: Ultralife U9VL
*On rechargeable/Long Life models there are no user serviceable
batteries to be changed. (See Section 6.)
vi. When you have fitted a fresh battery, check test button; if horn sounds then
reverse the process above, reconnect to the mains and switch circuit back on
at Consumer Unit.
If in any doubt, consult a qualified electrician as mains electricity can be
hazardous.
Red
Battery
Flag
On Tamper Resist models, depress screwdriver where shown
Push screwdriver where shown to release from base and twist
✔
✘
Page 6
6
✃
Good Safety Habits
Develop and practice a plan of escape:
• Make a floor plan indicating all doors and windows and
at least two escape routes from each room. Second
storey windows may need a rope or chain ladder.
• Have a family meeting and discuss your escape plan,
showing everyone what to do in case of a fire.
• Determine a place outside your home where you can
meet if a fire occurs.
• Familiarise everyone with the sound of the alarm and
train them to leave your home when they
hear it.
• Practice a fire drill at least every six months. Practice
allows you to test your plan before an emergency. You
may not be able to reach your children.
It is important they know what to do.
Kidde Safety Europe,
Mathisen Way, Colnbrook, SL3 0HB, UK.
Replacement manuals available at:
www.kiddefyrnetics.co.uk
Detach and display next to your Consumer Unit/Fuse Box.
Installation Date:
Alarm Model(s):
Installer/Landlord:
Tel:
What to do when the Alarm Sounds
• Leave immediately by your escape plan. Every second
counts, so don’t waste time getting dressed or picking
up valuables.
• In leaving, don’t open any inside door without first
feeling its surface. If hot, or you see smoke seeping
through cracks, don’t open that door!
Instead use your alternative exit.
• If the inside of the door is cool, place your shoulder
against it, open it slightly and be ready to slam it shut if
heat and smoke rush in.
• Stay close to the floor if the air is smoky.
Breathe shallowly through a cloth, wet if possible.
• Once outside, go to your selected meeting place and
make sure everyone is there.
• Call the fire brigade on 999 from your neighbour’s
home or a call box – not from yours.
• Don’t return to your home until the fire officials say that
it is all right to do so.
Page 7

7
Page 8
8
7. Maintenance
• Your alarm is a life saving device. Spending a
few minutes each month in vacuuming off any
excess dust will enhance it’s performance and
reduce the likelihood of nuisance alarms.
• Vacuum up to the grill and through the slots where dust/talc etc. can enter. Wipe
off with a very mildly damp cloth. Never use cleaning agents/polishes etc..
6. Checking Battery Back-up on Rechargeable/Long Life Models
• There is no user replaceable battery on rechargeable/Long Life models. These
models will be indicated on the product’s label on the underside; additionally
there is no battery drawer. To check charge on these models, switch off the
alarms AC supply at the Consumer Unit/Fuse Box. The green L.E.D. will go out.
Push the test button to check battery only mode works. If the rechargeable
battery is depleted, the low battery beep will be heard once every 40 seconds. If
the alarm has received AC mains power for a minimum of 3 days prior to this,
you will need to have the unit changed by your installer or Landlord.
8. What to do in an Emergency
• If an alarm sounds without anyone pressing the test button you have a potential
emergency.
• Don’t panic – you will need to think clearly to ensure all family members escape
as soon as possible. Never stop to collect belongings etc. – they are replaceable.
• Check the temperature of door handles or doors to check if hot –
if hot do not open them – a fire will be raging the other side of the door.
Find an alternative escape route.
• Keep doors/windows closed to contain the fire after you have passed through
them.
• Call 999 from a neighbour’s phone or call box.
This is preferable to using a mobile.
• Do not re-enter the property until advised it is safe to do so by a
Fire Brigade Officer.
Always be aware of the dangers of fire and ensure your alarms
are functioning, together with equipment such as
fire extinguishers/fire blankets etc..
Never attempt to open the inside of the alarm –
this will invalidate it’s guarantee.
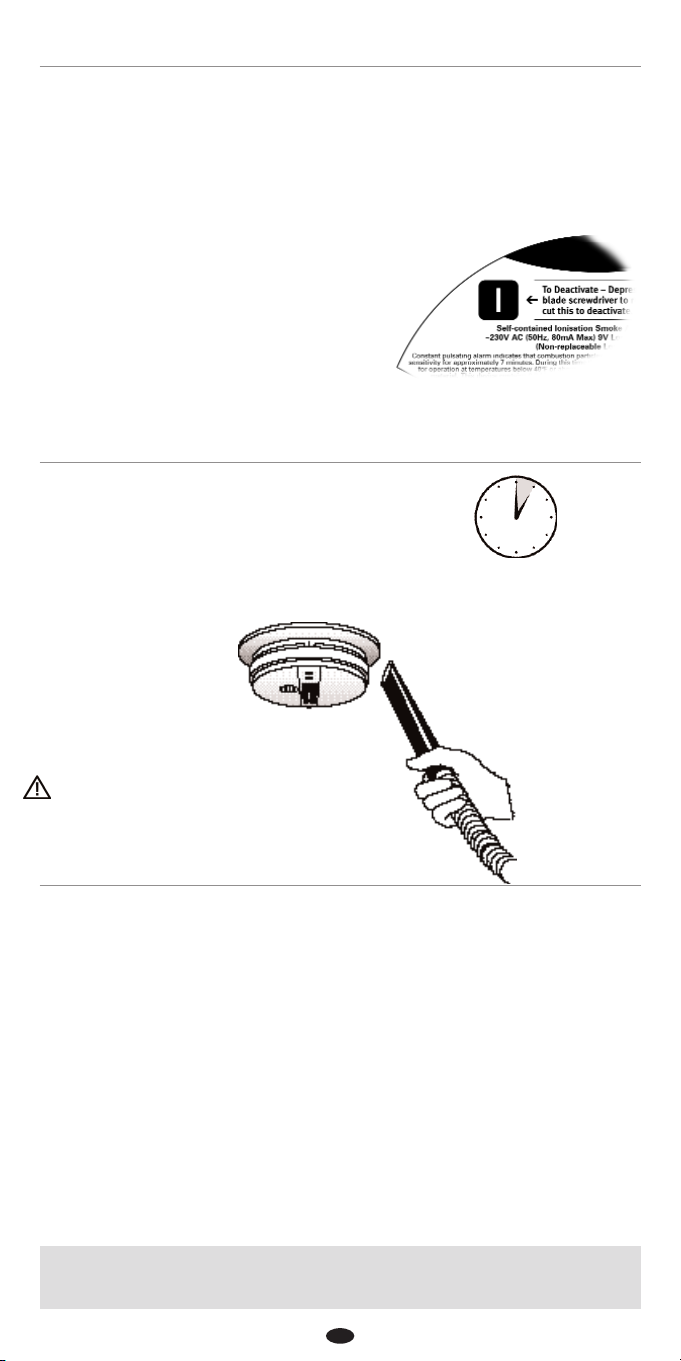
Deactivation:
The alarms battery will chirp as detailed
above, when its power is low. If this lasts over 60
minutes, and is not a result of the HUSH button
being pressed, the alarm needs replacing.
However, to enable you to silence the alarm,
there is on the underside of the alarm, a
deactivation tab: see illustration.
To safely access the rear of the alarm, refer to Section 5.
Page 9

9
9. Troubleshooting
• Always turn off the mains supply to AC alarms before checking connections etc..
Symptom
1. Green L.E.D. not lit
2. Frequent nuisance
alarms
3. Alarm chirps every 40
seconds
4. Alarm does not sound
when test button
pressed and held.
5. Interconnected alarms
do not sound when
test button is pressed
and held.
Possible cause/solutions
a. Loss of mains power – check at Consumer Unit
for Blown Fuse or tripped Circuit Breaker.
b. Check cable harness at back of alarm, is
properly plugged in (see “Battery Changing”
section).
See sections 4d and 7.
See section 5 (if the hush button has been pressed
the unit will chirp for 7 minutes to indicate it is in
hush mode).
See parts 1a and 1b above.
See part 1b above – consult a qualified electrician
or your Landlord to remedy as soon as possible.
10. Useful Hints
• Smoke/heat alarms can only operate correctly if smoke particles/heat reach the
unit. Correct selection/siting and installation are covered in the installers
manual, who fitted your alarm/s.
• UK Building Regulations require new homes to have 1 hard wired smoke alarm
per floor and to be interlinked. During 2000 they will additionally require an
interlinked heat alarm to be fitted in most kitchens too. i.e. 3 alarms per
property.
• With the exception of garages/kitchens/bathrooms it is recommended that
smoke alarms are fitted in every room and outside all sleeping areas too.
A professional electrician should be employed for all mains powered (hard
wired) alarms.
• If you are redecorating your home, paint fumes can contaminate the alarm –
temporarily cover the unit with a plastic bag (during this time the alarm will not
function). Never paint the alarm itself.
Only remove the bag when the paint is thoroughly dry.
• If you extend your property, review your alarm requirements.
• Smoke/heat alarms should be replaced every 10 years or sooner.
• These products are designed for domestically scaled premises.
Page 10

10
13. Limitations of Smoke/Heat Alarms
Warning! Alarms are devices that can provide early warning of possible fires at a
reasonable cost; however, alarms have sensing limitations. Ionisation type alarms
offer a broad range of fire sensing capability but are better at detecting fast flaming
fires than slow smouldering fires. Optical (Photo-electric) alarms sense slow
smouldering fires better than flaming fires. Home fires develop in different ways
and are often unpredictable. Neither type of alarm (Photo-electric or Ionisation) is
always best, and a given alarm may not always provide warning of a fire.
Heat alarms are triggered when a temperature of 57°C is reached – they must
always be used in conjunction and interconnected to smoke alarms.
Loose batteries, where fitted must be of the specified type, in good condition and
installed properly.
AC only powered alarms will not operate if AC power has been cut off such as by
an electrical fire, an open fuse or loss of mains supply.
All alarms must be tested regularly to make sure the batteries and the alarm circuits
are in good operating condition.
Smoke alarms cannot provide an alarm if smoke does not reach the unit. Therefore,
smoke alarms may not sense fires starting in chimneys, walls, on roofs, on the
other side of a closed door or on a different floor. If the alarm is located outside the
bedroom or on a different floor, it may not wake up a sound sleeper. Equally heat
alarms will only be triggered if they are correctly sited to detect heat. The use of
alcohol or drugs may also impair ones ability to hear the alarm. For maximum
protection a smoke alarm should be installed in each sleeping area on every level of
a home. Hearing impaired occupiers should consider fitting additional strobe
accessories to give a visual alarm.
Although smoke/heat alarms can help save lives by providing an early warning of a
fire, they are not a substitute for an insurance policy. Home owners and renters
should have adequate insurance to protect their property.
14. Service and Guarantee
If after reviewing this manual you feel that your smoke alarm is defective in any
way, do not tamper with the unit. Return it prepaid for servicing to: Kidde Safety
Europe, Mathisen Way, Colnbrook, SL3 0HB, UK – Email: info@kiddesafety.co.uk, or
refer to your installer or Landlord.
Guarantee
Kidde Fyrnetics warrants to the purchaser that the enclosed smoke alarm (but not
any loose batteries) will be free of defects in material, workmanship or design
under normal use and service for a period of 6 years,10 years on Long Life [LL]
products (from the date of purchase). The obligation of Kidde Fyrnetics, under this
guarantee is limited to repairing or replacing any part which we find to be defective
in material, workmanship or design, free of charge to the customer, upon sending
the alarm with proof of date of purchase, postage prepaid, to Kidde Safety Europe,
Mathisen Way, Colnbrook, SL3 0HB, UK.
This guarantee shall not apply to the alarm if it has been damaged, modified,
abused or altered after the date of purchase, or if it fails to operate due to incorrect
selection, siting, installation, maintenance or inadequate AC or DC electrical power.
The liability of Kidde Fyrnetics, arising from the sale of this alarm or under the
terms of this guarantee shall not in any case exceed the cost of replacement of the
alarm, in no case, shall be liable for consequential loss or damaged resulting from
the failure of the alarm or for the breach of this or any other guarantee, express or
implied, or for damaged caused by failure to abide by the instructions supplied.
This guarantee does not affect your statutory rights.
Kidde Fyrnetics makes no guarantee, express or implied, written or oral, including
that of merchantability or fitness for any particular purpose, with respect to the
battery, except built-in rechargeable/Long Life cells.
 Loading...