

Page 1

Page 2

2
SS Component Systems
Introduction
SS65.2 / SS56.2
SS Series Component Systems Owner’s Manual
Models:
Dealer Where Purchased:
Purchase Date:
Model Number:
Serial Number:
Congratulations!
You have just purchased the most
advanced component speaker
system to ever leave the Kicker
Livin’ Loud Laboratories. Your
KICKER SS Series Component
System is designed and
engineered to deliver competition
grade sound quality and
legendary
KICKER durability.
Thanks for buying KICKER.
Enjoy.
_________________________________
_________________________________
_________________________________
_________________________________
Attention:
Please take a moment and record the
information asked for below in the
provided area. It is also a good idea
to attach the original sales receipt or a
copy of it to this page for future
reference
If for any reason you require service
on this system during the warranty
period, you will need to provide this
information and a copy of the receipt
to Kicker to validate your warranty.
ALWAYS KEEP YOUR RECEIPT!
Page 3

3
SS Component Systems
Features
• 3 Position Tweeter Attenuator Select
from 0 dB, +1.5 dB or + 3.0 dB tweeter
output level for level matching the tweeter
to the midrange due to personal taste or
mounting locations.
• Zobel Impedance Compensation
Provides more linear response across the
operating range and prevents crossover
point shift by correcting impedance rise.
TWEETER
• DuPont® Tetoron® (Soft Dome) 30mm
Diameter Tweeter Used to provide ultra-
wide frequency response. Excellent
balance between high and low end
frequency response.
• Ferro-Fluid™ Cooled Voice Coil
Enhances the thermal transfer from voice
coil to the motor structure for higher power
handling and decreased power
compression.
• Dual Neo Magnets In Tweeter Top and
bottom magnets provide a reduction in
overall tweeter size while increasing BL
22% over conventional designs. (Patent
Pending)
• Vented Inner Motor System The
chamber under the tweeter dome is vented
to the perimeter of the voice coil with
machined channels in the motor structure
to minimize dome distortion.
Features
A Brief Plug For The SS Systems
And Our Technical Manuals At
www.KICKER.com
The SS Component Speaker Systems are
absolutely the best sounding full-range
speakers to ever leave the KICKER Livin’
Loud Labs. We dare to say (and we tested
quite a few) they are the best sounding
speakers on the market today...period!
There are many state-of-the-art features in
these systems and they are briefly
described in the following Features
section. If you find yourself awake in the
middle of the night with the crave for White
Castles and a thirst for more in-depth
detail on the SS Components then hit our
website and download the Technical
Manual for the SS Component
Systems.(Hit your local White Castle for
the sliders)
CROSSOVER
• System Optimized Two-Way
Asymmetrical Passive Crossover
Network Provides 24 dB High Pass and
12 dB Low Pass at 2.8Khz for seamless
transition from midrange to tweeter.
• Air Core Inductors Provides higher
power handling with less ‘signal smear’
and magnetic saturation when compared
to other ‘core’ type inductors.
• Mylar Film Filter Capacitors Used in
tweeter crossover section for smooth and
extended high frequency response.
Page 4

4
SS Component Systems
Features
• Sealed and Tuned Tweeter Enclosure
Provides awesome control as well as
smooth and extended upper mid/lower
tweeter response from driver.
• Foam Dispersion and Control Plug
Used behind tweeter dome to control
reflected energy and balance air pressure
to the tweeter dome. Increases overall
dome strength while in operation.
• Copper Clad Aluminum Voice Coil
Increases efficiency and thermal
dissipation (power handling) of the tweeter.
MIDRANGE
• Tri-Tech™ Cone with Röhm Rohacell®
Foam Sandwhiched cone material of foam,
poly and woven carbon fiber. Provides a
very light yet very strong cone for
extended frequency response and superior
cone control over the midrange’s entire
operating range.
• T-cut Top Plate with Micro Plate™
Copper Cap Provides very
linear and extended midrange response as
well as increased efficiency and thermal
dissipation (power handling). Micro Plate™
copper shorting cap reduces THD.
• Edgewound Copper Clad Aluminum
Ribbon Voice Coil Very efficient coil
design that provides high coil winding
density and increases thermal transfer
from voice coil to the motor structure for
higher power handling and decreased
power compression.
• Balanced Coil Construction The voice
coil diameter and mass are engineered
specifically to work with the driver system
and provide an extremely linear and
balanced response.
• Variable Surround Thickness The
surround thickness varies across its cross
section to provide higher linearity and
balance of the driver system, especially at
higher excursions, when compared to
conventional surround designs.
• Z-Wave™ Spider Design New spider
design incorporating two complimentary
shaped waves which provides better
control over non-linear motion in the driver
system. (Patent Pending)
Page 5
5
SS Component Systems
Parts List
Parts List
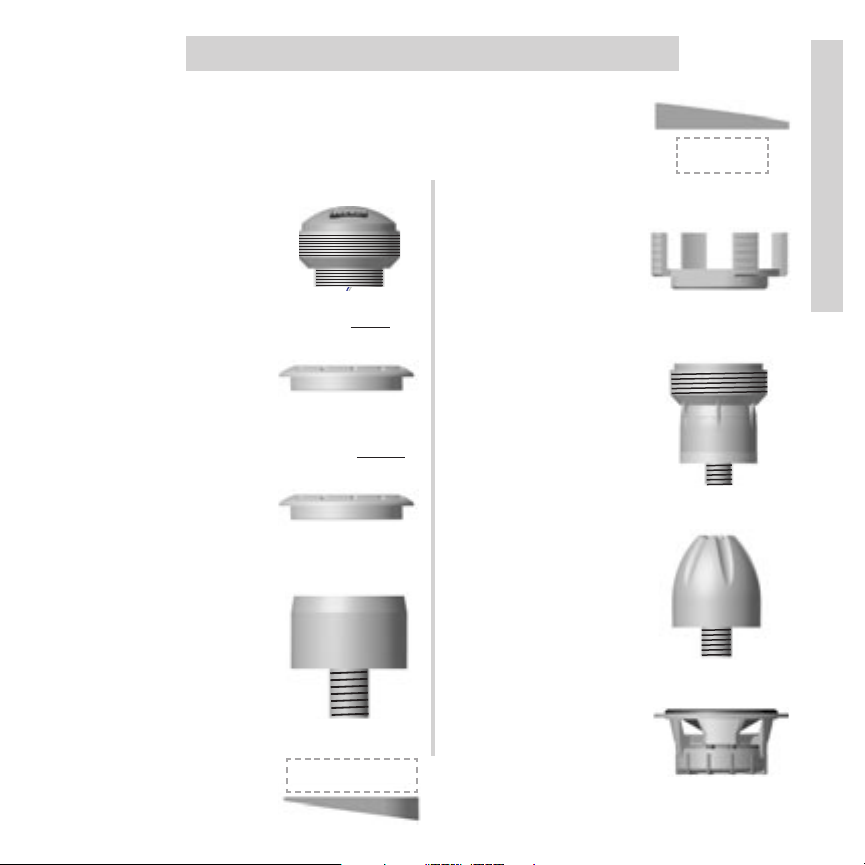
PARTS LIST
Here is a breakdown of the different
parts and accessories you will find in the
SS Components System pack.
TWEETER DRIVER 30 mm soft dome unit
for high frequency sound
reproduction..
TWEETER GRILL MOUNT RING Blue
colored ring to attach
grill to speaker when
tweeter is coaxially
mounted.
TWEETER FLUSH MOUNT RING Black
colored ring attached to
tweeter for separate
flush or angled
mounting.
TWEETER MOUNTING POST Mounting
post used to coaxially
mount tweeter to the
Midrange Driver.
FRONT ANGLE RING 15° ring used on
the front side of your
mounting panel to direct
tweeters output.
BACK ANGLE RING Used on the back
side of your mounting
panel to allow
Mounting Nut to seat
properly.
TWEETER MOUNTING NUT Threads onto
the back of your Tweeter
to hold it to your
mounting panel.
GRILL MOUNT POST Mounting post used
to attach grill to
midrange if tweeter is
not coaxially mounted in
the midrange.
PHASE PLUG Used in midrange driver if
no coaxially mounted
tweeter or grill is being
used.
MIDRANGE DRIVER Used for
midrange/midbass
reproduction.
Has Inset on
this side
Smooth Face
No Inset
Page 6
6
SS Component Systems
Parts List
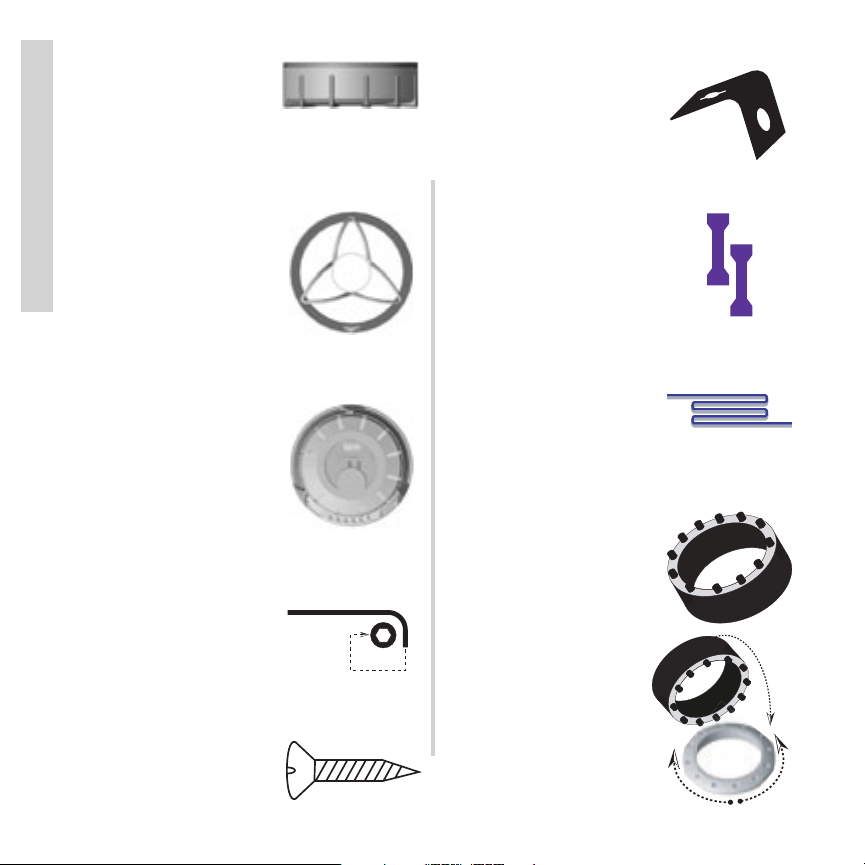
TINNERMAN CLIPS Steel spring anchor
used as anchor point for
screws if required.
BUTT CONNECTORS Insulated crimp
connectors to connect a 16
gauge wire to another 16
gauge wire.
WIRE BUNDLES 3 sets of high quality 16
gauge speaker wire to
connect your SS Series
Components to the
crossover and amplifier.
R-TOOL Tool used to assist in tightening
or loosening the Tweeter
Grill Mount Ring.
Shown is an example
of how the prongs in the
R-Tool line up in the
holes of the rings. Once
in place you use the
R-Tool to tighten or
loosen the ring.
MIDRANGE DRIVER BOOT Protects the
magnet and motor
assembly of the
Midrange Driver.
(Already attached to the midrange and is
removable.)
MIDRANGE GRILL Grill used to protect
the driver when doing a
high-lighted installation
or mounting through a
panel.
COMPONENT CROSSOVER Two way
passive crossover to
split the audio signal
between the tweeter and
midrange.
ALLEN WRENCH Supplied tool used to
tighten and loosen wire
connections at the
crossover.
BEVEL HEAD SCREWS Supplied screws
to mount Midrange
Driver and crossover.
Page 7
7
SS Component Systems
Installation
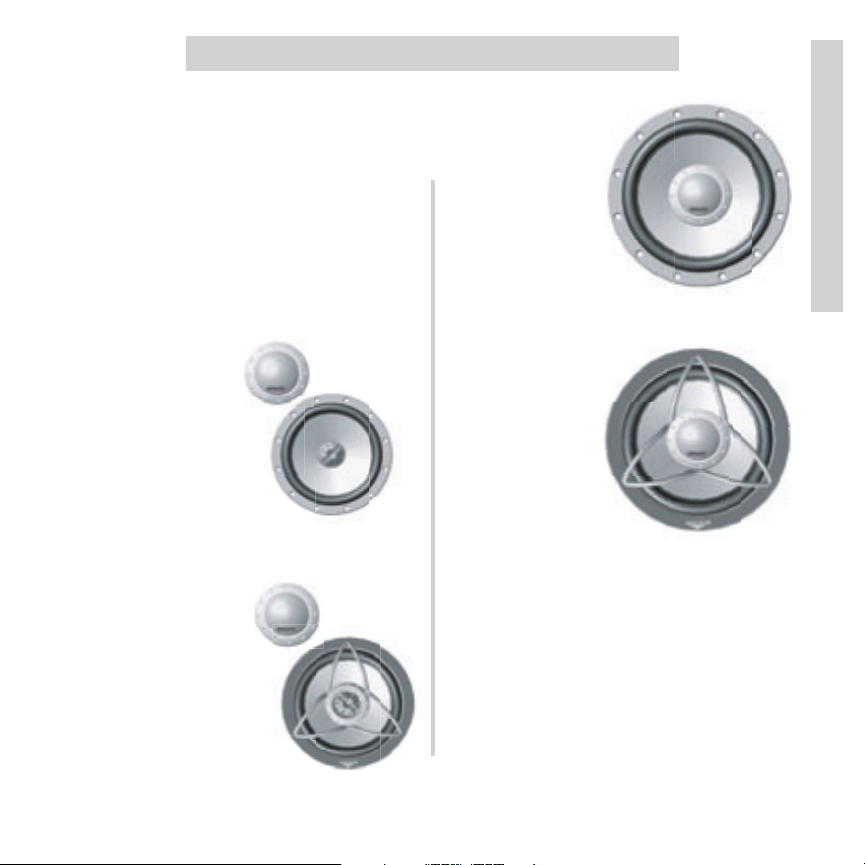
Mounting Options
Your Kicker SS Series Components can
be mounted in either a separates or
coaxial mounting scheme.
You can also choose to mount the
Midrange Driver with or without a grill.
Look at the following diagrams and
explanations to help you in setting up your
preferred layout.
SEPARATES WITHOUT GRILL
In this setup you
are mounting the
midrange behind a
panel while mounting the tweeter on
the panel.
SEPARATES
WITH GRILL
Here you are
mounting the
midrange through
a panel and will be
using the grill to
protect the woofer
while mounting the
tweeter on the
panel.
COAXIAL MOUNT WITHOUT GRILL
Here you are
mounting the
midrange and
tweeter coaxially
behind a panel and
will be using the
panel to protect the
drivers.
COAXIAL MOUNT WITH GRILL
Here you are
mounting the
midrange and
tweeter coaxially
through a panel
and will be using
the grill to protect
the drivers.
These are the most common applications
for mounting. If you have questions about
these or other applications, visit your local
KICKER Dealer or contact Kicker Technical
Services directly by phone or e-mail.
Contact information located at the back of
this manual.
Page 8
8
SS Component Systems
Installation
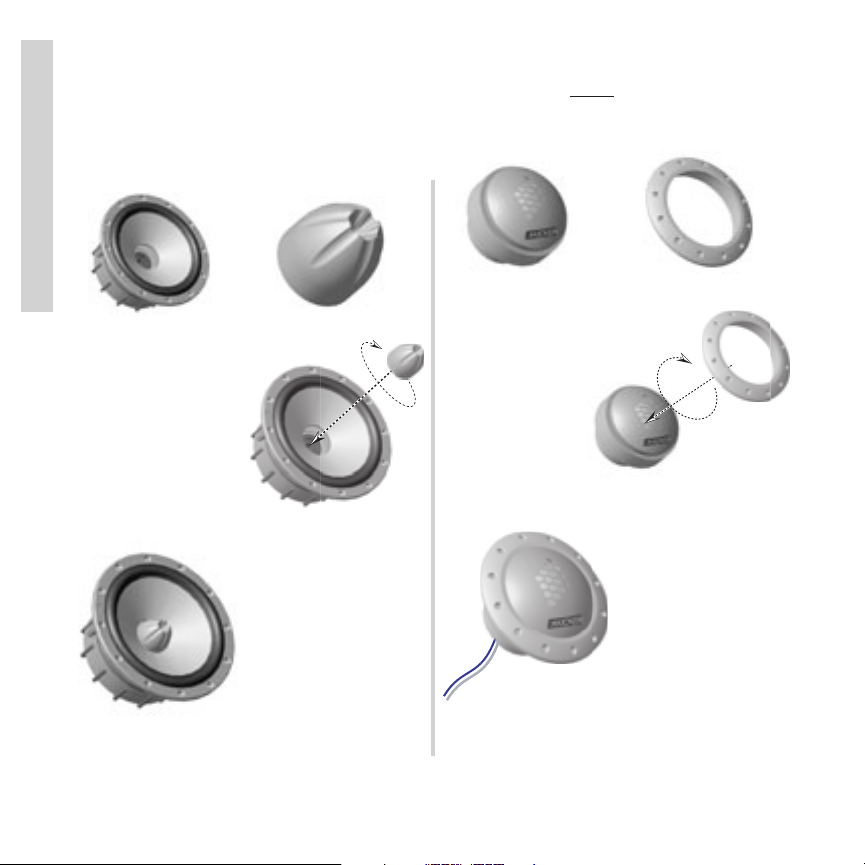
SEPARATES WITHOUT GRILL
Prepare The Midrange
You will need to have the Phase Plug
mounted in the Midrange. Remove any
posts in the Midrange and get a Phase
Plug from the kit.
Insert Phase Plug
into the Midrange
and rotate clock-wise
to tighten.
You should now
have a Midrange
Driver that looks like
this.
Repeat this
process for the
second Midrange.
The Midrange is now ready to mount
under the factory panel or any other panel
you are using.
Prepare The Tweeter
You will need to have the Tweeter
mounted to the Black
Tweeter Flush Mount
Ring. Get a tweeter and the ring from the
kit.
Insert the
Tweeter into the
Flush Mount Ring
and rotate clockwise to tighten.
You should now
have a Tweeter
assembly that looks
like this.
Repeat this
process for the
second Tweeter.
The Tweeter is now ready to mount in
the factory panel or any other panel you
are using.
Page 9

9
SS Component Systems
Installation
SEPARATES WITH GRILL
Prepare The Midrange
You will need to have the Grill Mount
Post in the Midrange. Remove any posts in
the Midrange and get a Grill Mount Post
from the kit.
Insert Grill Mount
Post into the
Midrange and rotate
clock-wise to
tighten.
You should now have
a Midrange Driver that
looks like this.
Repeat this process
for the second
Midrange.
The Midrange is now
ready to mount. Place the
grill on the Midrange and
secure with the Blue
Grill
Mount Nut after it is
mounted.
Prepare The Tweeter
You will need to have the Tweeter
mounted to the Black Tweeter Flush Mount
Ring. Get a tweeter and the ring from the
kit.
Insert the
Tweeter into the
Flush Mount Ring
and rotate clockwise to tighten.
You should now
have a Tweeter
assembly that looks
like this.
Repeat this
process for the
second Tweeter.
The Tweeter is now ready to mount in
the factory panel or any other panel you
are using.
Page 10

10
SS Component Systems
Installation
COAXIAL MOUNT WITHOUT GRILL
Prepare The Midrange
Remove any posts or
plugs in the Midrange. It
should look like the pic
shown here.
Next you will need to
remove the Driver Boot
from the back of the
Midrange. It is a friction
fit, simply pull it straight
off the back.
Prepare The Tweeter
You will need to have the Tweeter,
Tweeter Mounting Post and your choice of
Tweeter Mounting Ring (Blue or Black).
Insert the Tweeter into Tweeter Mounting
Post and tighten by turning clock-wise.
Next attach the
Tweeter Mount Ring
and tighten by turning clock-wise.
You should now have
a tweeter assembly that
looks like this to insert
into your Midrange.
Insert the tweeter
assembly into the
midrange while feeding
the wire through the
Midrange’s motor as
pictured. Tighten by
turning clock-wise.
Lay the tweeter wire
in the machined
groove on the motor
back plate and press
Midrange Driver Boot
into place. Several
inches of the tweeter
wire will be exposed
to permit wring.
You should now
have an assembly
that looks like this.
Repeat this
process for the second Tweeter and
Midrange.
The SS System is now ready to mount.
Page 11

11
SS Component Systems
Installation
COAXIAL MOUNT WITH GRILL
Prepare The Midrange
Remove any posts or
plugs in the Midrange. It
should look like the pic
shown here.
Next you will need to
remove the Driver Boot
from the back of the
Midrange. It is a friction
fit, simply pull it straight
off the back.
Prepare The Tweeter
You will need to have the Tweeter,
Tweeter Mounting Post and Tweeter Grill
Mount Ring (Blue).
Insert the Tweeter into Tweeter Mounting
Post and tighten by turning clock-wise.
Save the Tweeter
Grill Mount Ring for
use later. It is used
to attach the Grill.
You should now have
a tweeter assembly that
looks like this to insert
into your Midrange.
Insert the tweeter
assembly into the
midrange while feeding
the wire through the
Midrange’s motor as
pictured. Tighten by
turning clock-wise.
Lay the tweeter wire
in the machined
groove on the motor
back plate and press
Midrange Driver Boot
into place. Several
inches of the tweeter
wire will be exposed
to permit wring.
After mounting the
assembly to your
panel, place the grill
on the Midrange and
secure with the Blue
Grill Mount Nut.
Repeat this process for the second
Tweeter and Midrange.
Page 12

12
SS Component Systems
Installation
Tweeter Mounting
Your tweeter can be flush mounted into
your panel with or without the 15° angle
rings.
Cut a 1-15/16” (4.9 cm) hole in
your panel for the tweeter. Be
sure there is clearance behind
the panel for the tweeter and
wiring.
WITHOUT ANGLE RINGS
Place the tweeter into
the panel and secure
by tightening (clockwise) the Tweeter
Mounting Nut.
This is what you should
end up with after securing
the Tweeter to the panel
using the Mounting Nut.
If necessary, the legs of the Tweeter
Mounting Nut can be cut to fit
thicker panels. Trim each leg at
the score line. Remove only 1
section from each leg at a time
until desired length is achieved.
WITH ANGLE RINGS
Place the
tweeter through the
Front Angle Ring
and then into the
panel.
Next place the
Back Angle Ring over the Tweeter and line
up the narrow part of the Back Angle Ring
with the wide part of the Front Angle Ring
for proper operation.
Attach the Tweeter
Mounting Nut (clockwise)
but do not tighten
completely.
Rotate all the parts in
unison until the tweeter is
angled in the desired
direction.
Secure the assembly by tightening
(clockwise) the Tweeter Mounting Nut.
This is what you should
end up with after securing
the Tweeter to the panel
using the Mounting Nut.
Panel
Twee ter
Mounting
Nut
Twee ter
Wire
Panel
Twee ter
Mounting
Nut
Twee ter
Wire
Front
Angle
Ring
Back
Angle
Ring
Panel
Twee ter
Mounting
Nut
Twee ter
Wire
Front
Angle
Ring
Back
Angle
Ring
Panel
Twee ter
Mounting
Nut
Twee ter
Wire
Front
Angle
Ring
Back
Angle
Ring
Twee ter
Mounting
Nut
Wire
Panel
Twee ter
Panel
1-15/16" (4.9 cm) Hole
Trim Here
Page 13

13
SS Component Systems
Installation
When mounting to a door panel it is best to get the tweeter as high up on the door as
possible and as far forward as possible without interference from the dashboard. Be sure
the chosen place is flat and space behind the door panel allows the use of the Tweeter
Mounting Nut.
Follow the same rules if mounting to a rear deck, side panel or any other
custom location. Be sure you have chosen a flat location with plenty of
clearance behind it for the necessary wiring and mounting hardware.
After checking for clearance, cut a 1-15/16” (4.9 cm) hole in the desired mounting
location. It may be necessary to cut a 2-1/2” (6.4 cm) clearance hole in any sheet metal
or panel behind your chosen mounting panel to allow clearance for the Tweeter
Mounting Nut.
See the diagrams on this page
for more details.
Door Body
Tweeter Mounting Nut
15 ° Angle Mounting Rin
(Optional)
1-15/16" Hole
(4.9 cm)
Clearance Hole 2-1/2"
(6.4 cm)
Angle Mount Back Ring
(Optional)
Door Panel
Side Panel or Rear Deck
Place tweeter into cutout
1-15/16" hole
(4.9 cm)
Secure with tweeter
mount nut
Sheet Metal, Car Body, Etc.
Clearance
Hole 2-1/2"
(6.4 cm)
Angle Mount Back Ring
(Optional)
Angle Mount Ring
(Optional)
Page 14

14
SS Component Systems
Installation
Midrange Mounting
Your KICKER drivers are specifically designed for mounting in free-air applications.
While the speakers do not need a sealed box for optimum performance, it is
important to isolate the sound coming off the front of the driver from the sound
radiating from the back of the driver. This isolation is usually accomplished by using the
correct size driver in a factory speaker location.
The ideal mounting scheme is to have a sturdy panel to cut out or to reinforce an
existing panel with Masonite or medium density fiberboard. If the panel can flex at all, it
will decrease the output of the driver and keep it from sounding it’s best.
The door or trunk act like an enclosure to keep the backwave from reaching the front
side of the driver. In any mounting situation, check for interference from other
mechanical systems in the vehicle. Watch for window mechanisms, hinges, trunk
springs, wire harnesses, and anything that would be affected by the installation of these
drivers.
Interior Door
Exterior Door
Back Wave
Front Wave
Grill
Package Tray
Reinforcing
Panel
I
V
L
I
N
R
E
'
L
K
O
C
I
U
K
D
+
0
7
1
D
E
T
A
R
L
P
S
S
P
L
R
A
T
E
D
1
7
0
+
D
K
I
U
C
O
K
L
E
'
R
N
I
L
V
I
Page 15

15
SS Component Systems
Installation
Coaxial Mounting
If using the Coaxial mounting method for the tweeter and midrange you can mount the
drivers under a factory speaker panel for protection.
Mount driver with hardware
Push Grill into place
Screw ring nut on until snug
Mount Coax with hardware
Factory Mounting Location
If custom mounting locations are desired for your drivers, check for interference from
other mechanical systems in the vehicle. Watch for window mechanisms, hinges, trunk
springs, wire harnesses, and anything that would be affected by the installation of these
drivers. If metal must be cut to mount the speakers, try to avoid structural metal and
braces. Once a location is chosen, cut the appropriate size hole for the drivers.
r
e
v
o
C
r
e
k
a
e
p
S
y
r
o
t
c
a
F
Factory Mounting Location
Mount Coax
with hardware
e
n
a
P
e
d
i
S
k
c
e
D
r
a
e
R
r
o
l
Mount Coax
with hardware
Custom Cut Moutning Hole
P
e
d
i
S
k
c
e
D
r
a
e
R
r
o
l
e
n
a
Page 16

16
SS Component Systems
Installation
Separates Mounting
If using the Separates mounting method for the tweeter and midrange you can mount
the midrange under a factory speaker panel for protection and mount the tweeter
separately.
Mount midrange with hardware
Place grill over driver
Screw on grill mount ring (blue)
Secure with tweeter mount nut
Place tweeter into cutout
2.50 inch clearance hole
If custom mounting locations are desired for your drivers, check for interference from
other mechanical systems in the vehicle. Watch for window mechanisms, hinges, trunk
springs, wire harnesses, and anything that would be affected by the installation of these
drivers. If metal must be cut to mount the speakers, try to avoid structural metal and
braces. Once a location is chosen, cut the appropriate sized holes for the drivers.
Mount midrange
with hardware
Custom cut
mounting hole
S
i
d
e
P
a
n
e
l
o
r
R
e
a
r
D
e
c
k
Place tweeter into cutout
1.95 inch hole
y
2.50 inch clearance hole
Mount midrange with hardware
Secure with tweeter mount nut
Place tweeter into cutout
1.95 inch hole
r
o
t
c
a
F
Mount midrange
with hardware
Factory
Mounting
Location
Secure with tweeter mount nut
r
e
v
o
C
r
e
k
a
e
p
S
Place tweeter into cutout
1.95 inch hole
P
e
d
i
S
k
c
e
D
r
a
e
R
r
o
l
e
n
a
Page 17

17
SS Component Systems
Installation
Crossover Mounting
When choosing a location for your
crossover keep in mind you will need
access to it so you can connect your
wiring and adjust the tweeter
attenuator. Also, DO NOT place the
crossover in any location where it will get
wet or be in standing water. This will
damage the unit!
The bottom of the car door is not a
good location. If you must mount the
crossover in the car door, exercise
caution as water can accumulate in the
bottom of the car door. Keep the
crossover high in the door and shielded
from water.
C
a
r
D
o
o
r
Once you have selected a mounting location, remove the crossover’s top by pulling it
straight off the crossover. It is held in place with 3 clips at the indicated locations.
Using the supplied screws and hardware (or other method if required) mount the
crossover.
Place the crossover top back on the crossover and press into place.
YES
NO!
r
o
o
D
r
a
C
Clip
Page 18

18
SS Component Systems
Installation
Wiring
There are three sets of high quality 16 Gauge speaker wire supplied with the Kicker
SS Component Systems. The longest set of wires is for connecting your
amplifier or source unit to the crossover network. One of the shorter pairs is to
connect the midrange output of the crossover to the spring loaded binding posts on the
Midrange Driver. The last set connects the tweeter output of the crossover to the short
wire coming out of the tweeter; join using the supplied Butt Connectors.
If you wish to use your own wire or need to lengthen the wire to fit your needs, we
recommend using at least 16 gauge wire.
Use the supplied Allen Wrench to loosen and tighten the connections at the crossover.
Crossover
Amplifier
-
+
SSXX.2
SSXX.2
INPUT
TWEETER
MID
_
_
_
+
+
+
Tweeter
-
+
Midrange
Page 19

19
SS Component Systems
Installation
When installing the speaker wire into your car be sure to avoid sharp edges and the
possibility of it getting pinched. Be careful to keep it out of the path of moving
mechanical parts such as the steering column, brake pedal, gas pedal, clutch pedal,
emergency brake, heater or AC control linkage and any other moving mechanical
systems. Be careful when re-installing any kick panel, sill plate or other interior body
panel removed to route the wire that you don’t damage the wire with attachment clips or
screws.
If running the wire into a door, an existing boot in the door jamb is the ideal place to
run the wires, but sometimes this does not
exist or is inaccessible. Drilling holes to run
wires through is very tricky, and caution must
be exercised not to drill into other wiring or
mechanisms. Any time a wire is run through a
bare hole, it is necessary to insert a rubber or
plastic grommet to
protect the wire.
To Crossover
Stagger Holes
For Wiring &
Use Grommets
(When Factory Are Not Avail.)
Page 20

20
SS Component Systems
Installation
Adjustments
The SS Series Component Crossover is a very high quality unit designed to offer the
best combination of sound quality and driver protection.
The IPC (Illuminated Protection Circuit) is a proven design feature Kicker has used for
many years in all our passive crossover networks where tweeters are involved. This
circuit protects the tweeter from excessive amplifier power and amplifier clipping. It is
normal for these to illuminate during operation.
The Tweeter Attenuation Switch is used to
level match your tweeter’s output level to the
midrange based on varied
mounting locations, car acoustics or your
personal taste.
There are three positions to choose from:
+3 dB, +1.5 dB and +0 dB.
The +0 dB is the reference sound quality
position. The +1.5 dB and +3 dB positions can be used if you need more tweeter output
due to personal taste or car acoustics.
To change the output level simply slide the switch to the desired position.
After reading this manual, if you have any questions about the installation of your Kicker
components, visit your local Authorized KICKER Dealer. You may also contact Kicker
Technical Services directly by visiting the Support Section of our website at
www.kicker.com. Want to talk instead? You can reach us by calling (405)624-8583 and
asking for Technical Services.
(Illuminated Protection Circuit)
IPC
Tweeter Attenuation Switch
(+3dB, +1.5dB, +0dB)
Page 21

21
SS Component Systems
Specifications
Performance
MODELSS SS56.2 SS65.2
Midrange/Midbass (in., cm)
Outside Diameter
Mounting Hole
Mounting Depth
Tweeter (in., cm)
Outside Diameter
Mounting Hole
Mounting Depth
Crossover (in., cm)
Outside Diameter
Freq. Resp. (Hz)
Watts Peak
Watts RMS
Crossover Point (kHz)
Crossover Slope (dB/oct)
Sensitivity (dB 1W/1M)
System Impedance (Ω
)
6-1/16” 15.4
5-1/16” 12.8
2-11/16” 6.8
2-5/16” 6.0
1-15/16” 4.9
1-1/8” 2.9
5-5/8” 14.3
50 - 22k
180
90
2.8k
24 hi / 12 lo
86
3
6-7/16” 16.5
5-7/16” 13.8
2-13/16” 7.1
2-5/16” 6.0
1-15/16” 4.9
1-1/8” 2.9
5-5/8” 14.3
40 - 22k
200
100
2.8k
24 hi / 12 lo
87
3
Page 22

22
SS Component Systems
Warranty
Kicker warrants this product to be free from defects in material
and workmanship under normal use for a period of THREE (3)
MONTHS from date of original purchase with receipt. When
purchased from a Authorized KICKER Dealer it is warranted for
ONE (1) YEAR from date of original purchase with receipt. In all
cases you must have the original receipt! Should service be
necessary under this warranty for any reason due to
manufacturing defect or malfunction during the warranty period,
Kicker will repair or replace (at its discretion) the defective merchandise with equivalent merchandise at no charge. Warranty
replacements may have cosmetic scratches and blemishes.
Discontinued products may be replaced with more current
equivalent products.
This warranty is valid only for the original purchaser and is
not extended to owners of the product subsequent to the original
purchaser. Any applicable implied warranties are limited in
duration to a period of the express warranty as provided herein
beginning with the date of the original purchase at retail, and no
warranties, whether express or implied, shall apply to this
product thereafter. Some states do not allow limitations on
implied warranties, therefore these exclusions may not apply to
you.
This warranty gives you specific legal rights; however you may
have other rights that vary from state to state.
Acoustics LIMITED WARRANTY
WHAT TO DO IF YOU NEED WARRANTY OR
SERVICE
Defective merchandise should be returned to your local
Authorized Stillwater Designs (Kicker) Dealer for warranty.
Assistance in locating an Authorized Dealer can be obtained by
writing or calling Stillwater Designs direct. You can confirm that a
dealer is authorized by asking to see a current authorized dealer
window decal.
If it becomes necessary for you to return defective
merchandise directly to Stillwater Designs (Kicker), call the
Kicker Customer Service Department at (405)624-8510 for a
Return Authorization (RMA) number. Package all defective items
in the original container or in a package that will prevent
shipping damage, and return to:
Stillwater Designs, 5021 North Perkins Road, Stillwater, OK
74075
Freight must be prepaid; items received freight collect will be
refused.
Failure to follow these steps may void your warranty. Any
questions can be directed to the Kicker Customer Service
Department at (405)624-8510.
WHAT IS NOT COVERED?
This warranty is valid only if the product is used for the pur-
pose for which it was designed.
It does not cover:
• Damage due to improper installation.
• Subsequent damage to other components.
• Damage caused by exposure to moisture, exces sive heat,
chemical cleaners,and/or UV radiation.
• Damage through negligence, misuse, accident or abuse.
(Repeated returns for the same damage may be
considered abuse.)
• Any cost or expense related to the removal or
reinstallation of product.
• Speakers damaged due to amplifier clipping or distortion.
• Items previously repaired or modified by any
unauthorized repair facility.
• Return shipping on non-defective items.
• Products with tampered or missing barcode labels.
• Products returned without a Return Authorization (RMA)
number.
• Freight Damage.
• The cost of shipping product to Kicker.
• Service performed by anyone other than Kicker.
• Speaker with any foreign caulk used for gasket material.
The RMA number must be clearly marked on the outside of the
package. Return only defective components. Return of entire
cabinets, system packs, pairs, etc. increases your return freight
charges. Non-defective items received will be returned freight
collect.
Include a dated proof-of-purchase stating the Customer
name, Dealer name, product purchased and date of purchase.
Warranty expiration on items without proof-of-purchase will be
determined from type of sale and the manufacturing date code.
HOW LONG WILL IT TAKE?
Kicker strives to maintain a goal of 24-hour service for all
acoustics (woofers, mids, tweets, etc.) returns. Delays may be
incurred if lack of replacement inventory or parts is
encountered.
INTERNATIONAL WARRANTY
Contact your International Kicker dealer or distributor concerning
specific procedures for your country’s warranty policies.
P.O. Box 459 • Stillwater, Oklahoma 74076 • U.S.A.
• 405 624-8510
KICKER drivers are capable of producing sound
levels that can permanently damage your
hearing! Turning up a system to a level that has
audible distortion is more damaging to your ears
than listening to an undistorted system at the same
volume level. The threshold of pain is always an
indicator that the sound level is too loud and may
permanently damage your hearing.
Please use common sense when controlling
volume!
02022005 + 04SSComp
WARNING:
Page 23

23
SS Component Systems
Notes
Earl’s Thoughts
Page 24

 Loading...