

Page 1
Page 2
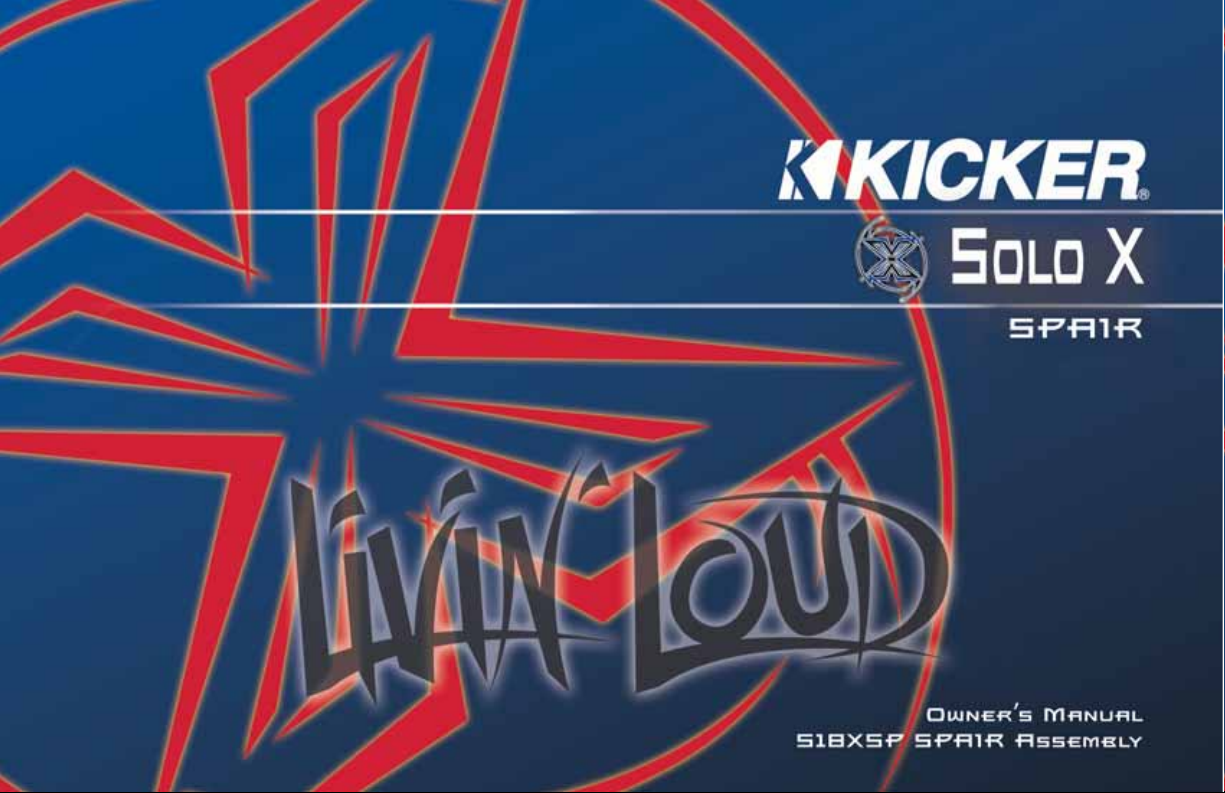
This is the SLAM, SPAIR Lockdown
Attachment Mechanism, and is the four
piece aluminum ring with 12 mounting
holes attached to the front of the SPAIR.
This ring provides a solid surface for the
hardware to secure the SPAIR to the
BAM.
The highlighted piece in the center of
the cutaway view is the ARCTIC Cap,
Aluminum Rapid Cooling Thermal
Induction Centering, and has several
jobs. The most important to you right
now is to help center your SPAIR while
you are placing it into the BAM.
This ring is the SPLAT, Speaker
Precise Location Alignment Tool, and is
the threaded metal part mounted
underneath your enclosures baffle. This
part came with your SoloX 18 and
provides alignment and anchoring for the
BAM and SPAIR. All the hardware which
holds the BAM and SPAIR together
thread into the SPLAT.
2
SoloX 18 Subwoofer
DESCRIPTIONS
Descriptions
This box contains one SPAIR which is the replaceable moving parts
assembly for use with your SoloX 18 subwoofer. If or when you let the
Magic Smoke out of your SoloX 18 you can quickly and easily repair it
without having to remove and replace the very large and very heavy
motor assembly.
The following is a brief description of the various parts of the SoloX 18
and SPAIR you will be encountering in your replacement.
This is the SPAIR, Simple Pull Apart
Insertable Replacement. It is the
replaceable moving parts assembly for
your SoloX 18. NOTE: The Locator Pin
Hole insures proper alignment of the
SPAIR to the BAM. This hole must line up
with the Locator Pin on the BAM for
proper assembly.
This is the BAM, Basket And Motor
assembly, and is the 90+ pound cast
aluminum monster that mounts to your
enclosure to hold the SPAIR and give it
life.NOTE: The Locator Pin insures
proper alignment of the SPAIR to the
BAM. This pin must line up with the
Locator Pin Hole on the SPAIR for
proper assembly.
Locator Pin Hole In SPAIR
Locator Pin
Page 3
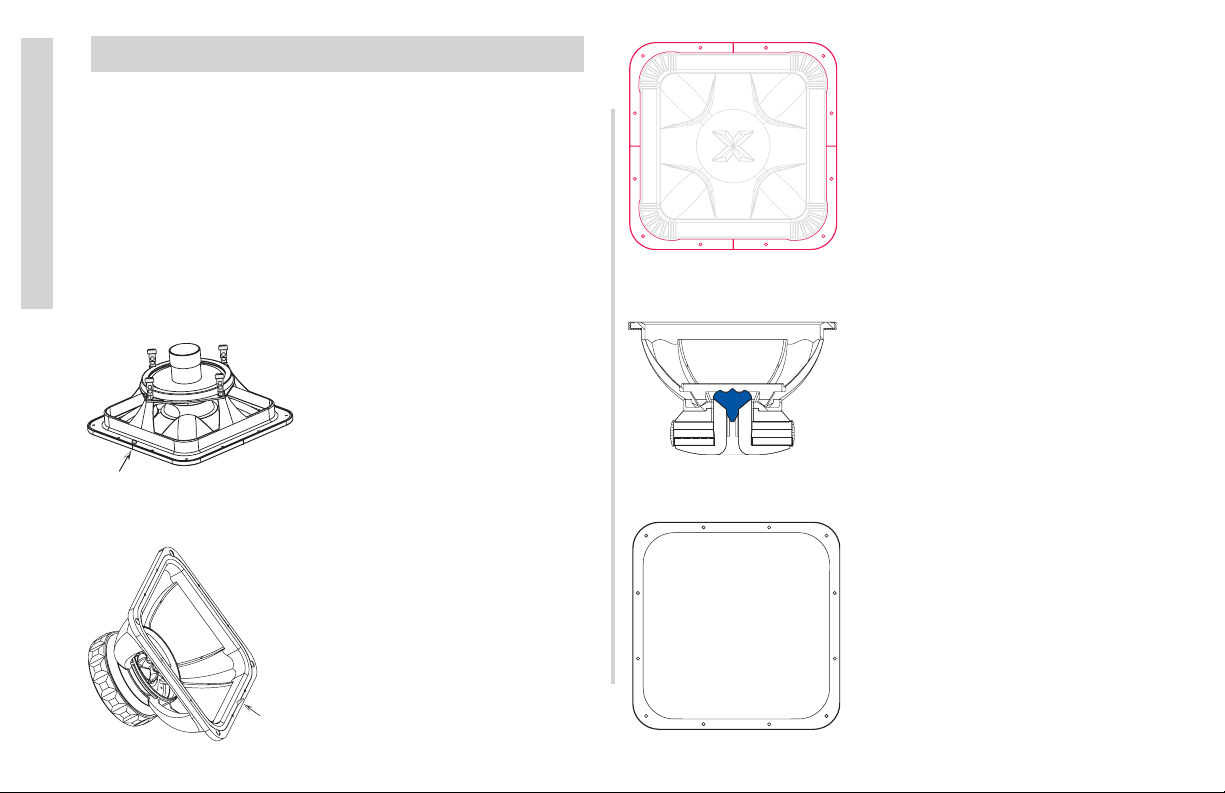
3. With the Coil Cap now
removed you can screw the
four binding posts
(clockwise) back into the
SPAIR assembly.
Note:
The B3 Link system
offers 3 ways to attach your
speaker wires to the SPAIR;
Binding post, Barrier strip
and terminal Block. If you
are using the terminal block
or barrier strip method to
attach your speaker wires,
use the appropriate
hardware included with your
S18X in place of the binding
posts. See your S18X
owners manual for more
details.
4. With your binding
posts or other hardware
now attached to the
SPAIR, place it voice coil
side up in a CLEAN and
SAFE location to protect it
from damage until you are
ready to put it in the BAM
(Basket And Motor)
assembly.
3
SoloX 18 Subwoofer
UNPACK SPAIR
Unpack SPAIR
1. Once you have
removed the SPAIR from
the cardboard shipping
carton you need to remove
the protective Coil Cap.
The Coil Cap is attached
to the spair with the four
binding posts.
2. Simply unscrew the
four binding posts (counterclockwise) and then gently
lift the Coil Cap from the
SPAIR assembly being
careful not to damage the
voice coil.
Locator Pin Hole In SPAIR
Locator Pin Hole In SPAIR
Page 4

4
SoloX 18 Subwoofer
DISASSEMBLE
Disassemble
1. Remove the (4) four acorn head
nuts and (8) eight bolts
securing the SPAIR to the BAM.
ATTENTION!
2. Install the Gap Cap into
the BAM around the
pole-piece to protect the motor
assembly from debris while
you are changing the SPAIR.
If any metal shavings or
pieces of speaker wire were to
fall into the gap, they would be
next to impossible to remove!
Please use the Gap Cap!
3. With the Gap Cap now
installed disconnect the
speaker wires from the SPAIR.
4. Discard damaged SPAIR.
The damaged unit does not
need to be returned to your
Authorized KICKER Dealer
or to KICKER (Stillwater
Designs) unless requested
to do so. You might want to
hang it on your trophy
wall...all big game hunters
do this when they bag a 10
point.
Locator Hole
Locator Pin
Locator Hole
Locator Pin
Page 5

5
WIRING
Wiring
SoloX Subwoofer
The SoloX S18XSP SPAIR assemblies are available with dual 2 Ohm
(W) or dual 1 Ohm (W) voice coils.
SINGLE AMPLIFIER
If operating the SoloX 18 with a single amplifier you will need to
connect both coils to that amplifier by series or parallel wiring of the coils.
Choose the method that is most compatible with your amplifier.
DUAL 2ΩSERIES = 4
Ω
Series wiring the coils will give you an impedance of 4 ohms.
DUAL 1ΩSERIES = 2
Ω
Series wiring the coils will give you an impedance of 2 ohms.
Coil 1 + is connected to your amplifier + speaker terminal.
Coil 1 - is connected to coil 2 + with a short piece of wire.
Coil 2 - is connected to your amplifier - speaker terminal.
DUAL 2ΩPARALLEL = 1
Ω
Parallel wiring the coils will give you an impedance of 1 ohm.
DUAL 1ΩPARALLEL = .5
Ω
Parallel wiring the coils will give you an impedance of .5 ohm.
Coil 1 + is connected to your amplifier + speaker terminal.
Coil 1 + is connected to coil 2 + with a short piece of wire.
Coil 1 - is connected to your amplifier - speaker terminal.
Coil 1 - is connected to coil 2 - with a short piece of wire.
SERIES
PARALLEL
Coil 2 -
Coil 1 +
#Ω
COIL 1
COIL 2
#Ω
COIL 2
#Ω
Amplifer +
Speaker Connection
Coil 1 -
#Ω
COIL 1
Amplifer
Speaker Connection
Coil 2 +
Coil 1 +
#Ω
COIL 1
Amplifer +
Speaker Connection
Coil 2 -
COIL 2
#Ω
Coil 1 -
#Ω
COIL 1
COIL 2
#Ω
Amplifer
Speaker Connection
Coil 2 +
Page 6

6
SoloX 18 Subwoofer
WIRING
DUAL AMPLIFIERS
If operating the SoloX with two amplifiers you will need to connect one
coil to each amplifier.
DUAL 2
Ω
= 2ΩPER AMPLIFIER
Each amplifier will be presented a 2W load.
DUAL 1
Ω
= 1ΩPER AMPLIFIER
Each amplifier will be presented a 1W load.
Coil 1 + is connected to your amplifier 1 + speaker terminal.
Coil 1 - is connected to your amplifier 1 - speaker terminal.
Coil 2 + is connected to your amplifier 2 + speaker terminal.
Coil 2 - is connected to your amplifier 2 - speaker terminal.
ATTENTION!
The SPAIR is a dual voice coil assembly and as such it is very
important that you utilize both voice coils. It may be tempting to use just
one coil to achieve an impedance you want or think that the other coil
can be saved as a ‘spare’ (no pun intended)...please fight both these
urges!
1. The ‘spare’ coil philosophy is flawed because in the event you
damage one coil, it is 99.999% likely that you have damaged the other
coil as well. (in other words...it IS broken dude!)
2. The SoloX/SPAIR was designed to be operated with both voice coils
powered up. If you do not use both coils it will change the
performance characteristics of the driver; especially power handling.
All the power handling specifications given for the SoloX/SPAIR are
with the use of both voice coils. If you utilize only one voice coil you will
decrease the power handling by 50%; half of what we specify in the
SoloX/SPAIR manuals. It will also alter other specifications of the driver
which effect performance and enclosure design.
So as you look through these diagrams for wiring up the SPAIR you
may be saying to yourself: “Hey self...I can’t seem to find an
impedance I like using both coils...I will just use one coil”. Just tell
yourself that is a bad idea and that you should use both coils. Sam and
Sid use both voice coils and so should you.
Speaker Connection
Coil 2 -
Speaker Connection
Amplifer 2
Amplifer 2 +
Coil 1 +
#Ω
COIL 1
COIL 2
#Ω
Amplifer 1 +
Speaker Connection
Coil 1 -
#Ω
COIL 1
Amplifer 1
COIL 2
#Ω
Speaker Connection
Coil 2 +
Page 7

7
SoloX 18 Subwoofer
Reassemble
Reassemble
ATTENTION!
If your BAM has a Locator Pin, skip the instructions here on page
7 and move directly to page 8! If your BAM does not have a
Locator Pin then you must perform these additional steps before
moving to page 8!
Step 1.) By rotating your
SPAIR 90 degrees in
relationship to the BAM there
are 4 possible ways it can be
placed into your SoloX 18
BAM. Due to part
tolerance and buildup it is
possible that only 1 of these
ways will work properly. You
will need to test fit each of
these 4 ways and use the one
that does not show any signs
of interference or
rubbing.
Step 2.) Pick a side of the
SPAIR and label it ‘Side A’.
Insert the SPAIR into the BAM
(you may need a friend to hold
the SPAIR into the BAM if
mounted vertically) and move
the SPAIR back and forth by
pressing directly in the center of
the SPAIR on the ‘X’. Make note
if there any any signs of rubbing
or interference.
Step 3.) Pull the SPAIR out, rotate it 90 degrees and place it back into
the BAM. Now move it back and forth again and make note if there any
any signs of rubbing or interference. You will need to
continue this step until you try all 4 possible combinations. It is
possible that 3 of the 4 locations will have interference problems. There
will always be at least 1 of the 4 combinations that will work properly
and possibly more than one. But there will always be at least 1!!!
Step 4.) Mark the SPAIR and BAM
with a grease pen or piece of tape to
identify the 1 mounting
configuration that DOES NOT have
rubbing or interference issues.
Step 5.) Move to page 8 now and follow the instructions to wire up
and mount your SPAIR to the BAM. Ignore any references on page 8 to
the Locator Pin and Locator Hole, instead be sure to line up the sides of
the BAM and SPAIR with the markings or tape from Step 4.
Side A
Side B
Side C
Side C
Side A
Side D
Side A
Side D
Side D
Side A
Side B
Side B
Side D
Side A
Side C
a) Remove SPAIR
Side A
b) Rotate SPAIR
Side C
c) Insert SPAIR
Side B
Grease Pen Marking
or Tape
Page 8

SoloX 18 Subwoofer
REASSEMBLE
Reassemble
3. With the SPAIR properly
seated in the BAM you can now
secure it using the (4) four acorn
head nuts and (8) eight bolts.
Hand tighten all the
hardware onto the SLAM first
using the pattern shown below.
4. With a 1/4” socket
wrench or open end wrench
go around and tighten all the
hardware following the
pattern shown. Use common
sense while tightening. All
hardware should be snug
but not so tight as to crack
or damage the SLAM.
5. You’re Done! Pop the top on a nice cold beverage while you admire
your work. If you experience any difficulties, contact your local
Authorized KICKER Dealer or KICKER directly for further
assistance.
ATTENTION!
1. Do not remove the Gap
Cap before completing this
step! Connect your speaker
wires to the SPAIR. Use the
instructions from the WIRING
section for assistance if
required. NOTE: The Locator
Hole of the SPAIR must align
with the Locator Pin on the
BAM for proper assembly and
operation.
2. You can now remove the
Gap Cap and slide the SPAIR
assembly back into the BAM.
The ARCTIC Cap, four double
ended studs sticking up and
the Locator Hole/Locator Pin
will help you properly align and
guide it in. Be sure your
speaker wires are free and not
pinched between the SPAIR
and BAM.
8
Locator Hole
Locator Pin
Locator Hole
Locator Pin
Page 9

SoloX 18 Subwoofer
SPECIFICATIONS
Specifications
9
Model: S18X1 S18X2
Nominal Impedance
(
fãéÉÇ~åÅÉéÉêÅçááää
)
SPL 1W/1M
Displacement, cc
Displacement, CuIn
Mounting Depth
Revc
(
ÅçááääëááåëÉêááÉë
)
VC Inductance, mH
Sd, SqM
BL
Vas, Liters
Vas, CuFt
Mms, gms
Fs
Qms
Qes
Qts
Pmax, Peak watts
RMS watts
EXmax, mm
(
bсЕмклбáçåã~ñááãìã
)
2
89.7
3930
239.8
11-3/8
4.07
4.289
0.1426
40.36
177.61
6.27
836.5
22.18
7.83
0.291
0.281
10000
5000
24.48
1
89.6
3930
239.8
11-3/8
2.68
3.033
0.1426
34.54
124.59
4.40
777.5
26.9
6.167
0.302
0.288
10000
5000
24.48
Page 10

SoloX 18 Subwoofer
WARRANTY
g~åì~êóOMMP
10
SoloX Limited Warranty
In addition, the warranty does not cover:
* Damaged Spiders.
* Damaged Surrounds.
* Damaged Cones.
* Damaged Tinsel Leads.
* Damaged Voice Coils.
* Damage due to improper installation.
* Subsequent damage to other components.
* Damage caused by exposure to moisture,
excessive heat, chemical cleaners, and/or UV
radiation.
* Damage through negligence, misuse,
accident or abuse.
* Any cost or expense related to the removal or
reinstallation of the product.
Caution: Burnt voice coils are not covered under warranty!
* Speakers damaged due to amplifier clipping
or distortion.
* Speaker with any foreign caulk used for
gasket material.
* Items previously repaired or modified by any
unauthorized repair facility.
* Return shipping on non-defective items.
* Products with tampered or missing barcode
labels.
* Products returned without a Return
Merchandise Authorization (RMA) number.
* Freight damage.
* The cost of shipping the product to your
Kicker Dealer or Distributor.
* Service performed by anyone other than
Kicker.
International Warranty
Contact your International Stillwater Designs (KICKER) dealer or distributor concerning specific
procedures for your country’s warranty policies.
P.O. Box 459 • Stillwater, Oklahoma 74076 • U.S.A. • 405 624-8510
KICKER drivers are capable of producing sound levels that can permanently damage your hearing! Turning up a system to a level that has
audible distortion is more damaging to your ears than listening to an
undistorted system at the same volume level. The threshold of pain is
always an indicator that the sound level is too loud and may permanently damage your hearing.
Please use common sense when controlling volume!
WARNING:
This warranty is valid only if the product is used for the purpose for which it was designed.
WHAT IS NOT COVERED?
Page 11

SoloX 18 Subwoofer
WARRANTY
11
SoloX Limited Warranty
Ok, you have read all the fine print on the previous page describing the
warranty on a Solo X Subwoofer, (enough there to make even Judge Judy happy)
but what does it all mean? Well, let’s just lay it all out in as simple of terms as possible.
The Solo X is a high performance machine that is built to take gobs of power,
play extremely loud and create enough low bass to rattle the fillings out of your
friend’s teeth who lives in the next county. It is built using the finest materials and
highest degree of workmanship we have available. It is the NASCAR of
subwoofers...designed to be driven hard into all four corners...and we are sure you
will drive it just that way!
With all that being said...we know some of you will still be able to break this
product…it is a plain and simple fact. When you build an extreme product to be
used by extreme people these people can and will find the breaking point...just like
Tony Stewart snapping a rod in a motor.
That is why we designed the Solo X to have a permanently mounted BAM
(Basket And Motor) assembly with a replaceable soft parts assembly, the SPAIR
(Simple Pull Apart Insertable Replacement), so that when you find the breaking
point (and if you can still hear or feel) you can re-build it on the spot. If you read the
big poster that came with your woofer (you did...right?) you know Sam & Sid told
you this thing weighs more than a Mini Cooper (well...really it weighs in at near 100
pounds/45.36 kg). The BAM which is about 90% of the weight in a Solo X stays
mounted in your enclosure AND in your car; you simply exchange the much lighter
SPAIR. This saves you all the fun of wrestling with the entire Solo X and the
ENORMOUS costs of shipping a 100 pound (45.36 kg) woofer to your dealer or
distributor.
The SPAIR and all the parts contained within it are not warranted for:
¾ Burnt, Shucked, Bent, Unraveled or Open Voice Coils.
¾ Torn, Ripped or Punctured Surrounds.
¾ Torn, Ripped or Punctured Cones.
¾ Torn, Ripped or Punctured Spiders.
¾ Burnt or Frayed Tinsel Leads.
We also do not warranty the SPAIR for:
¾ Wear and Tear under normal use.
¾ Product damaged due to abuse.
¾ Damage to Vehicle and/or other components of the sound system.
¾ Scattered, Smothered, Covered and Chunked units.
The SPAIR and BAM are not covered under warranty for any damage due to
shipping or improper packaging.
So what will KICKER cover under warranty?
¾ Poor or misaligned glue joints.
¾ Poor or misaligned parts.
¾ Material, Machining or Assembly flaws with the BAM.
So in a nut-shell if and when you break it (which takes A LOT) you simply return
the soft parts assembly (the SPAIR) to your local dealer and purchase another
SPAIR. If there is a problem with the SPAIR and you feel it should be covered
under warranty, you will need to contact your International Stillwater Designs
(KICKER) dealer or distributor
Special Note: OK that all sounds pretty black and white but we are KICKER
and we know stuff happens. If your Solo X stops working and after pulling the
SPAIR you find a failure other than that mentioned above that you feel is a
manufacturing defect or poor workmanship you may contact your International
Stillwater Designs (KICKER) dealer or distributor) for details.
Page 12

Page 13

 Loading...