


lfKICKER®
DIGITALSTEREOSYSTEMFORiPhone®ANOiPocJ®
Owner'sManua/
Authorized
Purchase Date:
Model Number:
Serial Number:
The Kicker iKICK iK501 Digital Stereo System for iPhone and iPodisdesigned for "Livin' Loud" with your iPodinthe
home environment. The iK501
tweeters driven by a powerful stereo amplifier with digital signal processing. The
(subwoofer)
Kicker subwoofers
Stereo System. The
range of connectivity options including stereo RCA outputs, composite video output, and
incorporating additional audio devices with your iK501 Stereo System.
the auxiliary input instead
KICKER
Dealer:
[J]
@J
iK501
Works
O
iPhone
is
fully featured with dual full-range 5" (127mm) Kicker drivers and 3/4" (20mm) silk dome
6"
(152mm) square passive radiator
on
the back ot the iK501 balances the sonic output, adding the punchy low-frequency response that put
on
the map. The rotary control and Infrared remote allow simple, streamlined control of your iK501
iK501
can be used with any 4th generation or newer iPod.Inaddition, the
Note:
3rd
Generation
of
the Docking
Bay.
iK501
boasts a wide
an
1/8" stereo auxiliary input for
and
older iPods must use
Madefor
iPod
with
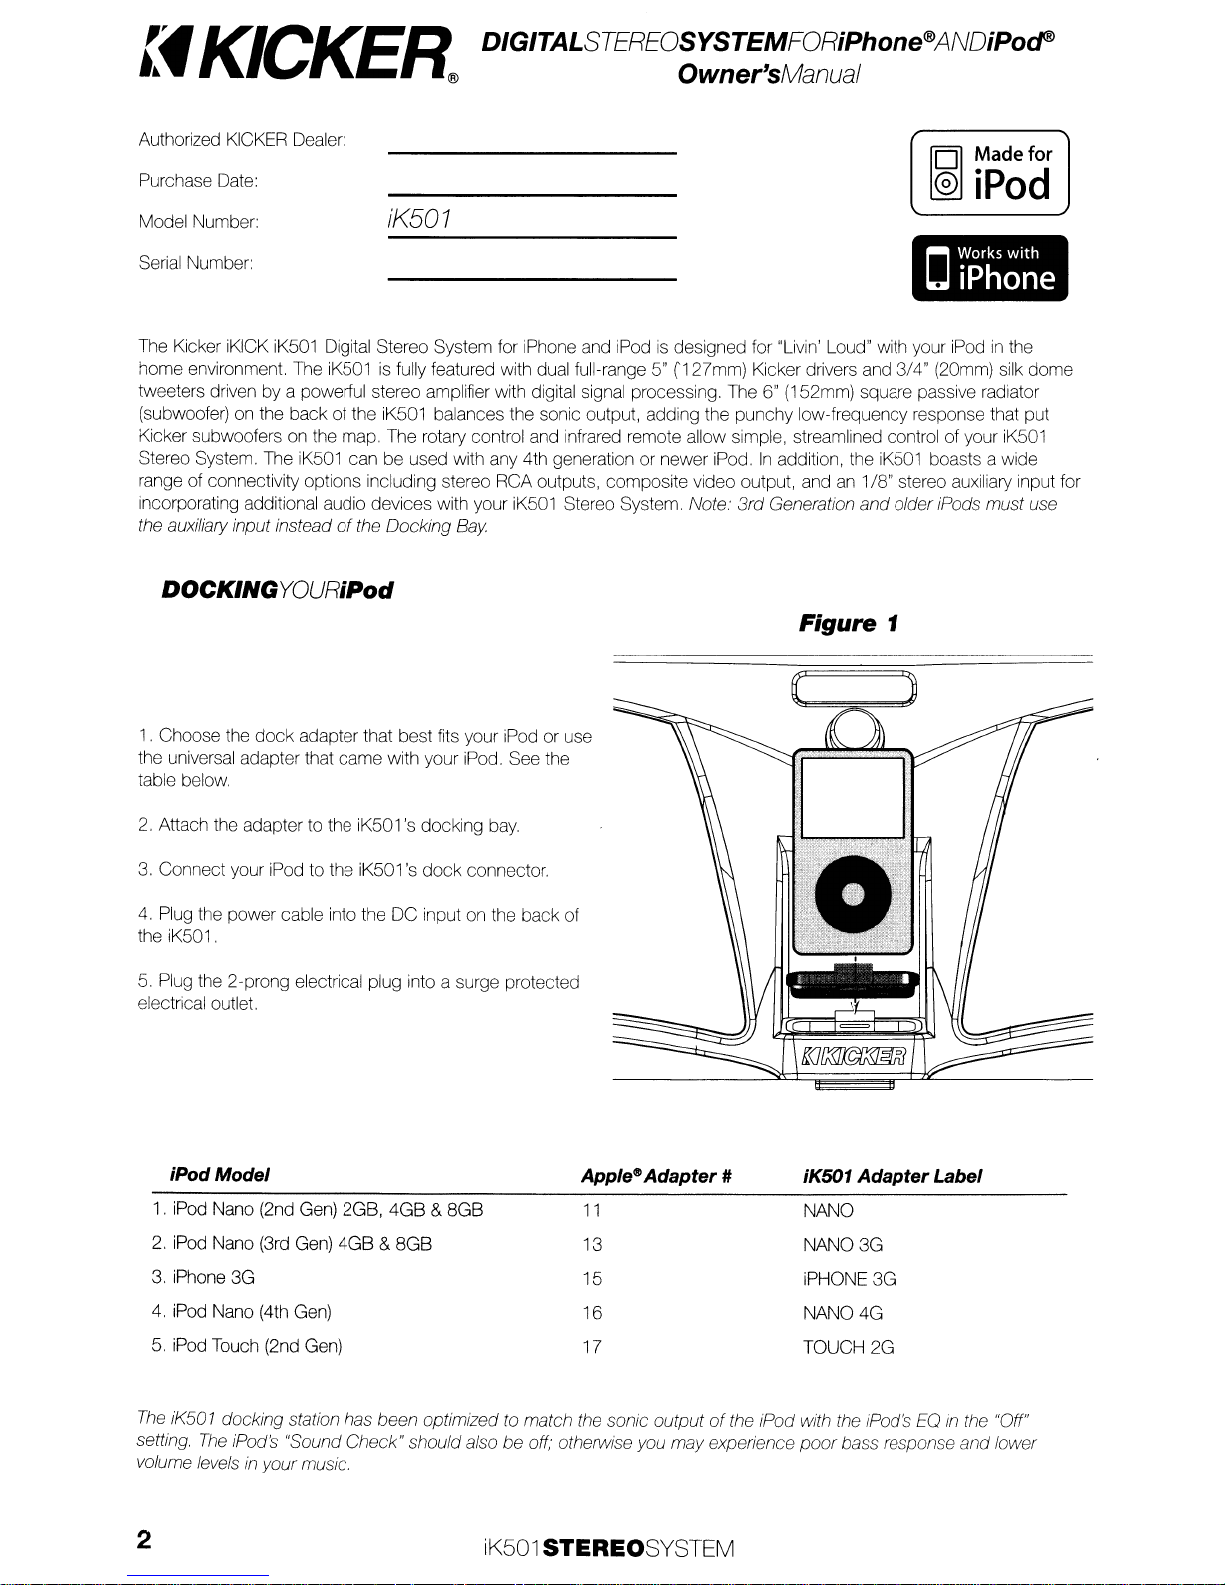
DOCKINGYOURiPod
Figure 1
1. Choose the
the universal adapter that came with your iPod. See the
table below
2.
Attach the adapter to the iK501'sdocking
3.
Connect your iPod to the iK501'sdock
4.
Plug the power cable into the DC input on the back of
the iK501.
5. Plug the 2-prong electrical plug into a surge protected
electrical outlet.
iPodModel
1. iPod Nano (2nd Gen) 2GB,
2.
iPod Nano (3rd Gen)
3. iPhone 3G
4.
iPod Nano (4th Gen)
5.
iPod Touch (2nd Gen)
dock
adapter that best fits your iPod or use
connector.
4GB
&8GB
4GB
&8GB
bay.
Apple~
11
13
15
16
17
Adapter#
iK501 AdapterLabel
NANO
NAN03G
iPHONE3G
NANO 4G
TOUCH 2G
The
iK501 docking station has been optimized to match the sonic outputofthe iPod with the iPod'sEOin
The
setting.
volume levels
iPod's "Sound Check" should alsobeoff; otherwise you may experience
in
your music.
2
iK501
STEREOSYSTEM
poor
bass response
the "Off"
and
lower

Figure 2
Rotary Control
~
- - -
J...
- - - Skid-Resistant, Non-Marking
,
LCD
Display
I
,
,
"
I
I
I
Feet
IR
I
I
I
Remote
5"
(727mm)
Range
Receiver.
Drivers
I
Full-
3/4"
Dome
I
I
I
(20mm)
Tweeters
Silk
Figure 3
Transport
.Handle
,
,
,
"
I
Composite
Video
Output
~
I ,
I I
Stereo
Outputs
RCA
DC Power
22
IMPORTANTSAFETYINSTRUCTIONS
Read and follow
damage to your self, your Kicker product, or your portable entertainment device.
all
the instructions listedinthis manual. Follow
all
safety and procedural recommendations to prevent
Passive
---Square
Radiator
~
I
,-
Volts
Auxiliary
@
1/8'"
I
-,
Stereo
Input
The iK501 should not be used near water or
not exclusive to areas where splashing, dripping, leaks, spills, and exposure to rain can occur, Liquid containers should
not be placed on or near the iK501 Stereo System, The
Use only a dry cloth to clean the iK501 , Only use the iK501
all
of space on
sides of the iK501, Do not set the iK501 on any surface or cover the iK501 with any object that could
impede the airflow to and from the iK501 Stereo System. The iK501 should not be placed near any source of heat. This
includes but is not limited to stoves, radiators, heating elements, electronic heat sources, and areas where excessive
solar heat can be generated. Do not install the iK501 near any flame or place any flammable objects near the device,
The power outlet used to provide power to the iK501 should be accessible at
plug has a wide blade and narrow blade that should
of your electrical outlet. Do not force the plug into the outlet.
an
electrician to upgrade the electrical outlet accordingly, The power cord should be situatedina way that protects
from being pinched, walked on, tripped over, or accidentally pulled from the electrical outlet or the electrical inputonthe
00
not
run
iK501,
the cable through doorways or underneath objects that could damage the wire or tear the insulating
material surrounding the wire, Only use the manufacturer supplied power supply with the iK501 . We recommend using a
surge protector/power conditioner and unplugging the iK501 during any electrical storms or situations that could cause
in
voltage fluctuations
the electrical system,
inanenvironment where exposure to liquids is possible. This includes but
iK501
Stereo System should not be cleaned with liquid cleaners,
in
areas with adequate open ventilation allowingatleast 4"
all
times. The polarized 2-prong electrical
fit
into the corresponding wide and narrow receiving connections
If
the plug provided with the unit does not
fit,
consult with
it
is
3
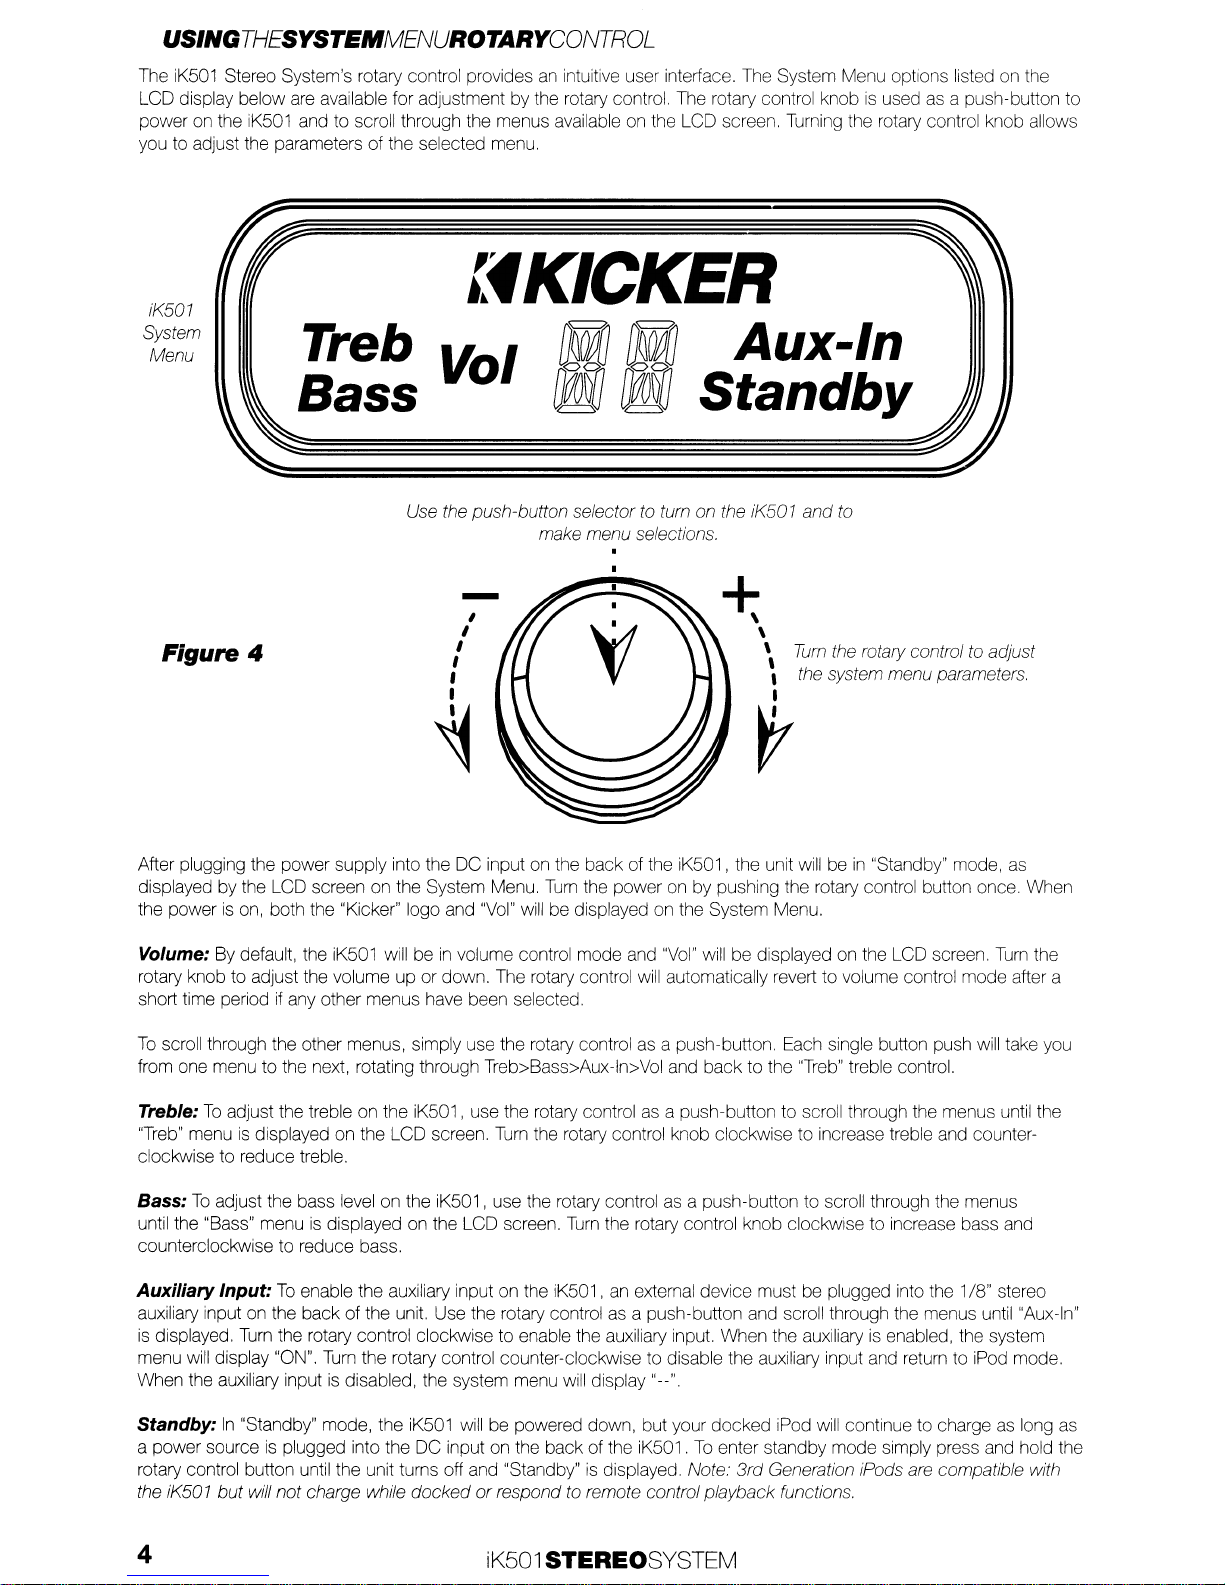
USINGTHESYSTEMMENUROTARYCONTROL
The
iK501
Stereo System's rotary control providesanintuitive user interface. The System Menu options listed on the
LCD display below are available for adjustment by the rotary control. The rotary control knob
power
on
the iK501 and to scroll through the menus available on the LCD screen. Turning the rotary control knob allows
you to adjust the parameters of the selected menu.
is
usedasa push-button to
iK501
System
Menu
Treb
Bass
Use the push-button selector to tum on the iK501
Figure 4
After plugging the power supply into the DC input on the back of the iK501, the unit will bein"Standby" mode, as
displayed by the LCD screen on the System Menu.
the power
is
on, both the "Kicker" logo and
lfKICKER
~
I
0
-
,
I
I
I
,
I
f1M]!lMI
rPJiJ rPJiJ
make menu selections.
~
Turn
the power on by pushing the rotary control button once. When
"Vol"
will
be displayed on the System Menu.
Aux-In
Standby
and
to
\
\
Tum
*
\
,
the rotary control to adjust
the system menu parameters.
I
r
Volume: By default, the iK501 will be
rotary knob to adjust the volume
short time period
To
scroll through the other menus, simply use the rotary control as a push-button. Each single button push
from one menu to the next, rotating through Treb>Bass>Aux-ln>Vol and back to the
Treble:
"Treb"
clockwise to reduce treble.
Bass:
until the "Bass" menu
counterclockwise to reduce bass.
Auxiliary Input:
auxiliary input on the back of the unit. Use the rotary control as a push-button and scroll through the menus until "Aux-In"
is
menu
When the auxiliary input is disabled, the system menu will display "--"
Standby:
a power source
rotary control button until the unit turns off and "Standby"
the iK501
To
menuisdisplayed on the LCD screen.
To
displayed.
will
if
any other menus have been selected.
adjust the treble on the iK501, use the rotary controlasa push-button to scroll through the menus until the
adjust the bass level on the iK501, use the rotary control as a push-button to scroll through the menus
is
displayed on the LCD screen.
To
enable the auxiliary input on the IK501,anexternal device must be plugged into the 1/8" stereo
Turn
the rotary control clockwise to enable the auxiliary input. When the auxiliaryisenabled, the system
display "ON".
In
"Standby" mode, the iK501
but
will not charge while
Turn
the rotary control counter-clockwise to disable the auxiliary input and return to iPod mode.
is
plugged into the DC input on the back of the iK501.Toenter standby mode simply press and hold the
in
volume control mode and
up
or down. The rotary control
Turn
the rotary control knob clockwise to increase treble and counter-
Turn
will
be powered down, but your docked iPod will continue to chargeaslong as
is
dockedorrespondtoremote control playback functions.
"Vol"
will be displayed on the LCD screen.
will
automatically revert to volume control mode after a
"Treb"
the rotary control knob clockwise to increase bass and
displayed Note.'
3rd
Generation iPods are compatible with
treble control.
Turn
will
the
take you
4
iK501 STEREOSYSTEM

USINGTHEREMOTECONTROL
The Infrared Remote Control enables you to control your iPod and access the iK501 System Menu from a convenient
location. With the fully featured remote control
itiseasy to access
all
of your iPod's music
andlor
video content.
Figure 5
@
~e
~
~
:'fKICKER
iKICK
Mute iK501 Output
O:F
~
@volumeup
@)
B
8
8
(Hold down to turn
the iK501 on/off)
Volume
Play/Pause
Skip Forward
~
(Hold down to Fast
Forward)
Skip Backward
...
(Hold down to
Rewind)
Down
Navigate upward through the iPod
menu directoryorincrease values
/"...
within the iK501 System Menu.
8
8
MENU
8
Press the up arrow while
In
Menu to enable the
Navigate downward through the iPod
menu directoryorreduce values
"'-./
within the iK501 System Menu.
down
Press the
Aux-In Menu
Navigate toward iPod root directory.
Hold downtoenter the iK501
System Menu.
Navigate within the iK501 System
Menu. Treble>Bass>Aux-ln
Make selections
arrow while in the
to
disable the Aux input.
and
Aux
enter sub-
Q directories within the iPod.
~
Use the enterbutton/0exit the
iK501 System Menu.
in
the Aux-
input.
CONNECTINGEXTERNALDEVICES
To
connect an external video display to the iK501, make sure the video output is enabledonyour iPod device. Connect
a standard RCA composite video cable from the composite video output on the back of the iK501 to the RCA video
is
input on your external video display. See Figure 3. This
external video display, refer to the iPod device manual or the instructions packaged with your external video display.
To
connect an external audio device to the iK501, enable Aux-In
Input section on the previous page. Connect your line level device to the
the included auxiliary cable. See Figure
down
the external device until the soundisno longer distorted. No/e' 1st -
aUXIliary
input for audio playback.
2.Ifthe soundisdistorted, you may be overdriving the auxiliary input.
a pass-through connection.Ifthere are any problems with your
mode
with the rotary control as describedinthe Auxiliary
1/8" stereo input on the
3rd
Generation ;Pods reqUire the useofthe
back
of the iK501 with
Try
turning
PERFORMANCE
Model:
Speaker Design
Woofer Size,
Tweeter Size,
Tweeter Design
Passive Radiator Size,
RMS Power, Watts
Effective Frequency Range, Hz
in
(mm)
in
(mm)
in
(mm)
@ 1% Total Harmonic Distortion
iK501
2
-Way
5 (127)
3/4
(20)
Silk Dome
6 X 6 (152 X 152)
X
20
2
50-20K
Power Supply, Volts (Ampere)
in
in
in
(mm)
Ib
(mm)
(mm)
(kg)
Height,
Width,
Depth,
Weight,
22
(2.7)
8.5 (216)
(488)
19.2
8.4 (214)
9.2 (4.2)
5
Troubleshooting
1.
No audio output from the iK501? Make sure the volume
playback device connected to the iK501 , Make sure the system
turned on and functioning properly,
wall. Check Auxiliary Mode
device
is
connected to the 1/8" stereo inputonthe back of the iK501,Ifyou are trying to playback audio from a docked iPod, make
sure that Aux-In mode
is
disabled,
Try
If
you are trying to playback audio fromanauxiliary device, make sure that Aux-In modeISenabled and the
resetting the
IK501
by unplugging the unit, waiting 10 seconds and pluggingitbackinto the
IS
turned up toanaudible level on both the
is
not muted, Check power connections, Make sure the
iK501
and the audio
IK501
is
2. Remote Control isn't working? Check for objects blocking the remote sensor on the bottom left corner
grille, See Figure
CR2025 3V Lithium battery, Make sure the iPod
3.
iPod notresponding? Make sure the iPod
to freeze due to acoustic vibrations, Reboot the iPod by pressing and holding the play/pause button for approximately six seconds,
Press
any
Put the iPod
and Menu buttons for approximately six seconds,
simultaneously press and hold the Play/Pause and Menu buttons to reset
Detecci6nyreparaci6n
1.
EI iK501 no suena. Tanto
estar
10
suficientemente altos como para que sean audibles, Asegurese de queelsistema no este silenCiado, Revise
de alimentacion, EIIK501 debe estar encendido y funcionando correctamente, Restablezca
esperando 10 segundos y volvlendo a enchufarla, Veriflque
auxiliar,
la
de
pig, ubicadaenla
entrada auxiliar debe estar deshabilitada,
2. EI control remoto no funciona.
del altavoz derecho,
del control remoto y cambie
consulteelapartado 3 que aparece a continuaclon,
3.
EI iPodno responde. Asegurese de que
puede hacer que
como se muestra enlaFigura 2 puede
reproducci6n y pausa durante aproximadamente sels segundos, Opnma cualquier bot6n para volver a encender
funciona, mrestablezca
el
selector de retenci6n alaposici6n de apagado
el
boton de rnenu durante aproximadamente seis segundos,
botones debajo de
2,
Check the remote battery and replaceifnecessary, Open the battery compartment01the remote and replace the
is
functioning properly,Ifnot, refer to Item3,below,
is
not paused orinHold mode, The high bass output of the
button to turn the iPod back on,IIthis doesn't work, reset the iPod by connecting the iPod to the
in
Hold Mode and then slide the Hold switch back to the Off position,
To
resetanoriginal iPod with a
an
de
averias
el
volumen dellK501 comoeldel dispositivodereproducCion de sonido conectadoaliK501 deben
la
modalidad
modalidad de entrada auxill8r debe estar habilltada yeldlspositivo debe estar conectado alaentrada estereofonica de
parte de atras del iK501,Siesta Intentando reproduCirelsonldo deuniPod montadoenla
Vea
VealaFigura2,Reviselapila del control remoto y camblelasies necesano, Abraelcompartimiento delapila
la
piladelitio CR2025 de 3V.Asegurese de queeliPod este funcionando correctamente,Deno ser
el
iPod se bloquee debido a las vibraciones acusticas Instalarlaalmohadilla de alslamiento de vibraciones
el
iPod conectandoloalconector delabase del
la
pantalla), opnma y mantenga oprimidos simultaneamenteelboton de reproducCion y pausa yelbot6n de menu,
que no haya objetos bloqueandoelsensor remotoenla
el
iPod no esteenpausa 0enmodalldad de retencionLaalta salida de bajos del iK501
eVltar
queeliPodsebloquee, ReinicieeliPod oprimiendo y manteniendo oprimidoelbot6n de
(Off),
Por
ultimO,
Para
auxlliar,Siesta intentando reproducir sonido deundispositivo
IK501
opnma y mantenga oprimidos simultaneamenteelboton central y
restableceruniPod original con un conector de base (con cuatro
Finally,
simultaneously press and hold the Center
dock
connector (with four buttons below the display),
original iPod,
el
iK501 desenchulandolaunidad,
esquina infenor izquierda delarejilla
, PongaeliPodenmodalidad de retencion y luego pase
01
the right speaker
iK501
can cause the iPod
iK501
dock
connector,
las
conexiones
base,lamodalidad de
el
iPod,Siesto no
adJunta
1/8
asi,
Problembehebung
1.
Kein Sound vom iK501? Vergewissern
Audiowledergabegerst auf einen h6rbaren Pegel elngestellt
mStromanschlusse prufen, Vergewissern Sie sich, dass das
zUrUckzusetzen, indem Sle das Gerst vom Netz trennen, 10 Sekunden warten und es dann wieder
AUX-Modus prufen, Wenn Sie versuchen,
Modus aktiviert und das Gerst
Audio von einem iPod
an
in
der Docking-Station wiederzugeben, mussen Sle sicherstellen, dass der Aux-In-Modus deaktivlert
den 1/8-Zoll-Stereoeingang auf der Ruckseite des iK501 angeschlossen
2. Fembedienung funktioniert nicht? Prufen Sie, ob
2,
blockieren, Siehe Abbildung
der Fernbedienung und ersetzen Sle die CR2025 3V-Lithiumbatterie, Prufen Sie, ob der iPod korrekt funktloniert; ansonsten folgen Sie
bltte dem unten
3.
iPod reagiert nicht? Vergewissern Sie sich, dass der iPod sich nlcht
IK501
des
Isollerpolster wie
Sekunden lang gedruckt halten, Drucken Sie dann eine belieblge Taste,
Sie den
schleben Sie den Hold-Schalter wieder
gedruckt,
die Wiedergabe/Pause-Taste und die Menutaste gedruckt,
In Punkt 3 beschriebenen Verfahren,
kannzuakustlschen Vibrationen
in
Abb, 2 gezelgt, urn dieszuverhindern, Starten Sie den iPod erneut, indern Sie die Wiedergabe/Pause-Taste ca, 6
!Pod
zuruck, indem Sie ihnanden iK501-Docking-Anschluss anschlieBen, Stellen Sie auf dem iPod den Hold-Modus
Urn
den Original-iPod mit einem Docking-Anschluss
Uberprulen Sie die Batterie der Fernbedienung und ersetzen Sie diese ggl. Offnen Sie das Batterielach
Sie
slch, dass die Lautstsrke sowohl beim iK501 als auch bei dem daran angeschlossenen
AudiO
von einem Zusatzgerst wiederzugeben, mussen Sie slcherstellen, dass der Aux-In-
fUhren,
In
die Aus-Position, Halten Sie dann die mittlere Taste und die Menu-Taste
ist"
Vergewissern Sle slch, dass die Stummschaltung nlcht aktivlert ist.
iK501
elngeschaltet ist und richtig funktloniert, Versuchen
an
die Steckdose anschlieBen,
ist.
Wenn Sie versuchen,
ObJekte
den Fernbedienungssensor unten linksamLautsprechergrill
im
die den iPod einfrieren lassen, Verwenden Sle das beiliegende Vibrations-
(mit
vier Tasten unter dem Display) zuruckzusetzen, halten Sie gleichzeitig
Pausen- oder Wartemodus befindet. Der hohe Basspegel
urn
den iPod wieder einzuschalten, Wenn das nicht hilft, setzen
ca,
Sie,
das iK501
1St.
ein
6 Sekunden lang
und
Depannage
1.
Aucun son emis
audio raccorde
Verifiez que
sa pnse murale, puis
Ie
par
au
Ie iK501 ? Veriliez que
IK501
iK501
, Verifiez queIemode sourdine du systeme n'est pas active, Veriflez les branchements de I'allmentation,
est sous tension et qu'il fonctionne correctement. Essayez de reinitlallserIeiK501endebranchant I'appareil de
enIerebranchantaubout de 10 secondes,
Ie
bouton de volume est regie aun niveau audible sur
VerifiezIemode d'entree auxllialre,SIvous essayez d'ecouter
Ie
IK501
comme surIelecteur
la
18
iK501 STEREOSYSTEM

musique d'un appareil auxiliaire, verifiez que
du
iK501Sivous essayez d'ecouterlamusique d'un baladeur iPod present danslastation d'accueil, verifiez queIemode Aux-In est
desactive.
Ie
mode Aux-In est active et que I'appareil est raccorde aI'entree stereo de 3 mm aI'arriere
2. La te/ecommande ne fonctionne
en bas agauche de
OuvrezIelogement delapiledela
correctement. DansIecas contraire, consultezIeparagraphe 3 ci-dessous.
3.
Le baladeur iPod ne repond
acoustiques dues au niveau elevedegraves du iK501 peuvent entralnerIegel du baladeur iPod. L'utilisation du patin antivibratoire
Inclus, commeIemontrelafigure2,peut prevenirIegel du baladeur iPod. RedemarrezIebaladeur iPod en appuyant pendant environ
six secondes surlatouche de lecture/pause. Appuyez sur une touche quelconque pour remettreIebaladeur iPod sous tension.SIcela
ne fonctionne pas, mreinitialisezIebaladeur iPod enIebranchant au connecteurdela
en mode verrouillage,
environ six secondes surlatouche centrales etlatouche Menu. Pour reinitialiser un baladeur iPod d'origine avecunconnecteur de
station d'accueil (avec quatre touches sous I'afficheur), appuyez simultanement pendant un certain temps surlatouche de lecture/
pause etlatouche Menu.
Home
KICKER warrants this product to be free from defectsinmaterial and workmanship under normal use for a period of ONE
date of original purchase with the orginal receipt fromanAuthorized KICKER Dealer Should service be necessary under
for any reason due to manufacturing defect or malfunction during the warranty period, KICKER
the defective merchandise with equivalent merchandise at no charge. Warranty replacements may have cosmetic scratches and
blemishes. Discontinued products may be replaced with more current equivalent products.
ThiS
warrantyisvalid only for the original purchaser andisnot extended to ownersofthe product subsequent to the original purchaser.
Any applicable implied warranties are limitedinduration to a period of the express warranty as provided herein beginning with the date
of
the original purchaseatretail, and no warranties, whether express or implied, shall apply to this product thereafter. Some states
not allow limitations on Implied warranties; therefore these exclusions may not apply to you. This warranty gives you specific legal rights;
however you may have other rights that vary from state to state.
la
grille de I'enceintededroite. Voirlafigure2.Venflezlapile delatelecommande, et remplacez-Iasinecessaire.
PUIS
remettezIecommutateurdeverrouillage Hold en
Limited
Warranty
pas?
Verifiez qu'il n'y a pas d'objet entrelatelecommande etIecapteur de telecommande
telecommande et remplacezlapile au lithium
pas?
Veriflez queIebaladeur iPod n'est pas en mode pause ou verrouille. Les vibrations
CR20253v.Verifiez queIebaladeur iPod fonctionne
pOSition
station d'accuell iK501 . MettezIebaladeur iPod
Off
(arret).
Enfin,
appuyez simultanement pendant
will
repair or replace
(1)
thiS
(at
its discretion)
YEAR
warranty
do
from
WHAT TO DOIFYOU NEED WARRANTY OR SERVICE
Defective merchandise should be returned to your local Authonzed KICKER Dealer for warranty service. Assistanceinlocating an
Authorized Dealer can be found at wvwv.klcker.com or by contacting KICKER directly.
Ifitbecomes necessary for you to return defective merchandise directly to Stillwater Designs
Service Departmentat(405)
container orina package that will prevent shipping damage, and return to:
Stillwater Designs,
The RMA number must be clearly marked on the outside of the package. Include a
clearly visible, and a "proof-of-purchase" statement listing your name and return shipping address, the Dealer's name and invoice
number, and product purchased. Warranty expiration on items without proof-of-purchase will be determined from the type of sale and
manufacturing date code. Freight must be prepaid; items sent freight-collect, or COD, will be refused.
HOW
LONG WILLITTAKE?
KICKER stnves to maintain a goalof72-hour service for
replacement inventory or partsisencountered.
Failure to follow these steps may void your warranty. Any questions can be directed to the KICKER Customer Service Department
(405) 624-8510.
WHATISNOT COVERED?
ThiS
warrantyisvalid onlyifthe productisused for the purpose for whichitwas designed.
It
does not cover:
o Damage due to improper use.
o Damage due to improper installationofcomponents or audio/video devices.
o Subsequent damage to other components or audiO/Video devices.
o Damage caused by exposure to moisture, excessive heat, chemical cleaners, and/or UV radiation.
o Damage through negligence, misuse, flood,
considered abuse.
o Items preViously repaired or modified by any unauthorized repair facility or person
o Return shipping on non-defective items.
o Products
o Products returned Without a Return Merchandise s)
Authorization
o Freight Damage
o The cost of shipping product to KICKER
o Service performed by anyone other than KICKER.
With
tampered or missing barcode labels.
(RMA)
624-8510
number. stillwaterdesigns
for a Return Merchandise Authorization
3100
North Husband Road, Stillwater,OK74075
all
home and portable electronic returns. Delays may be incurrediflack of
fire,
earthquake,
aCCident,
(RMA)
copy
or abuse. Repeated returns for the same. Damage may be
(KICKER),
number. Package
of the original receipt with the purchase date
call the
KICKER
all
defective itemsinthe original
Customer
«(
at
P.O.
Box
459·
Stillwater,
Oklahoma
74076·
USA·
(405)
624-8510
20090407
-D+09iK501 19

 Loading...