

Page 1

FOR 120V INSTALLATION
ALL 120V INSTALLATIONS SHOULD COMPLY WITH
LOCAL ELECTRICAL CODES. THIS MAY INCLUDE SETTING STAKE IN CONCRETE, IF YOU HAVE ANY
DOUBTS CONCERNING INSTALLATION CONTACT A
QUALIFIED LICENSED ELECTRICIAN.
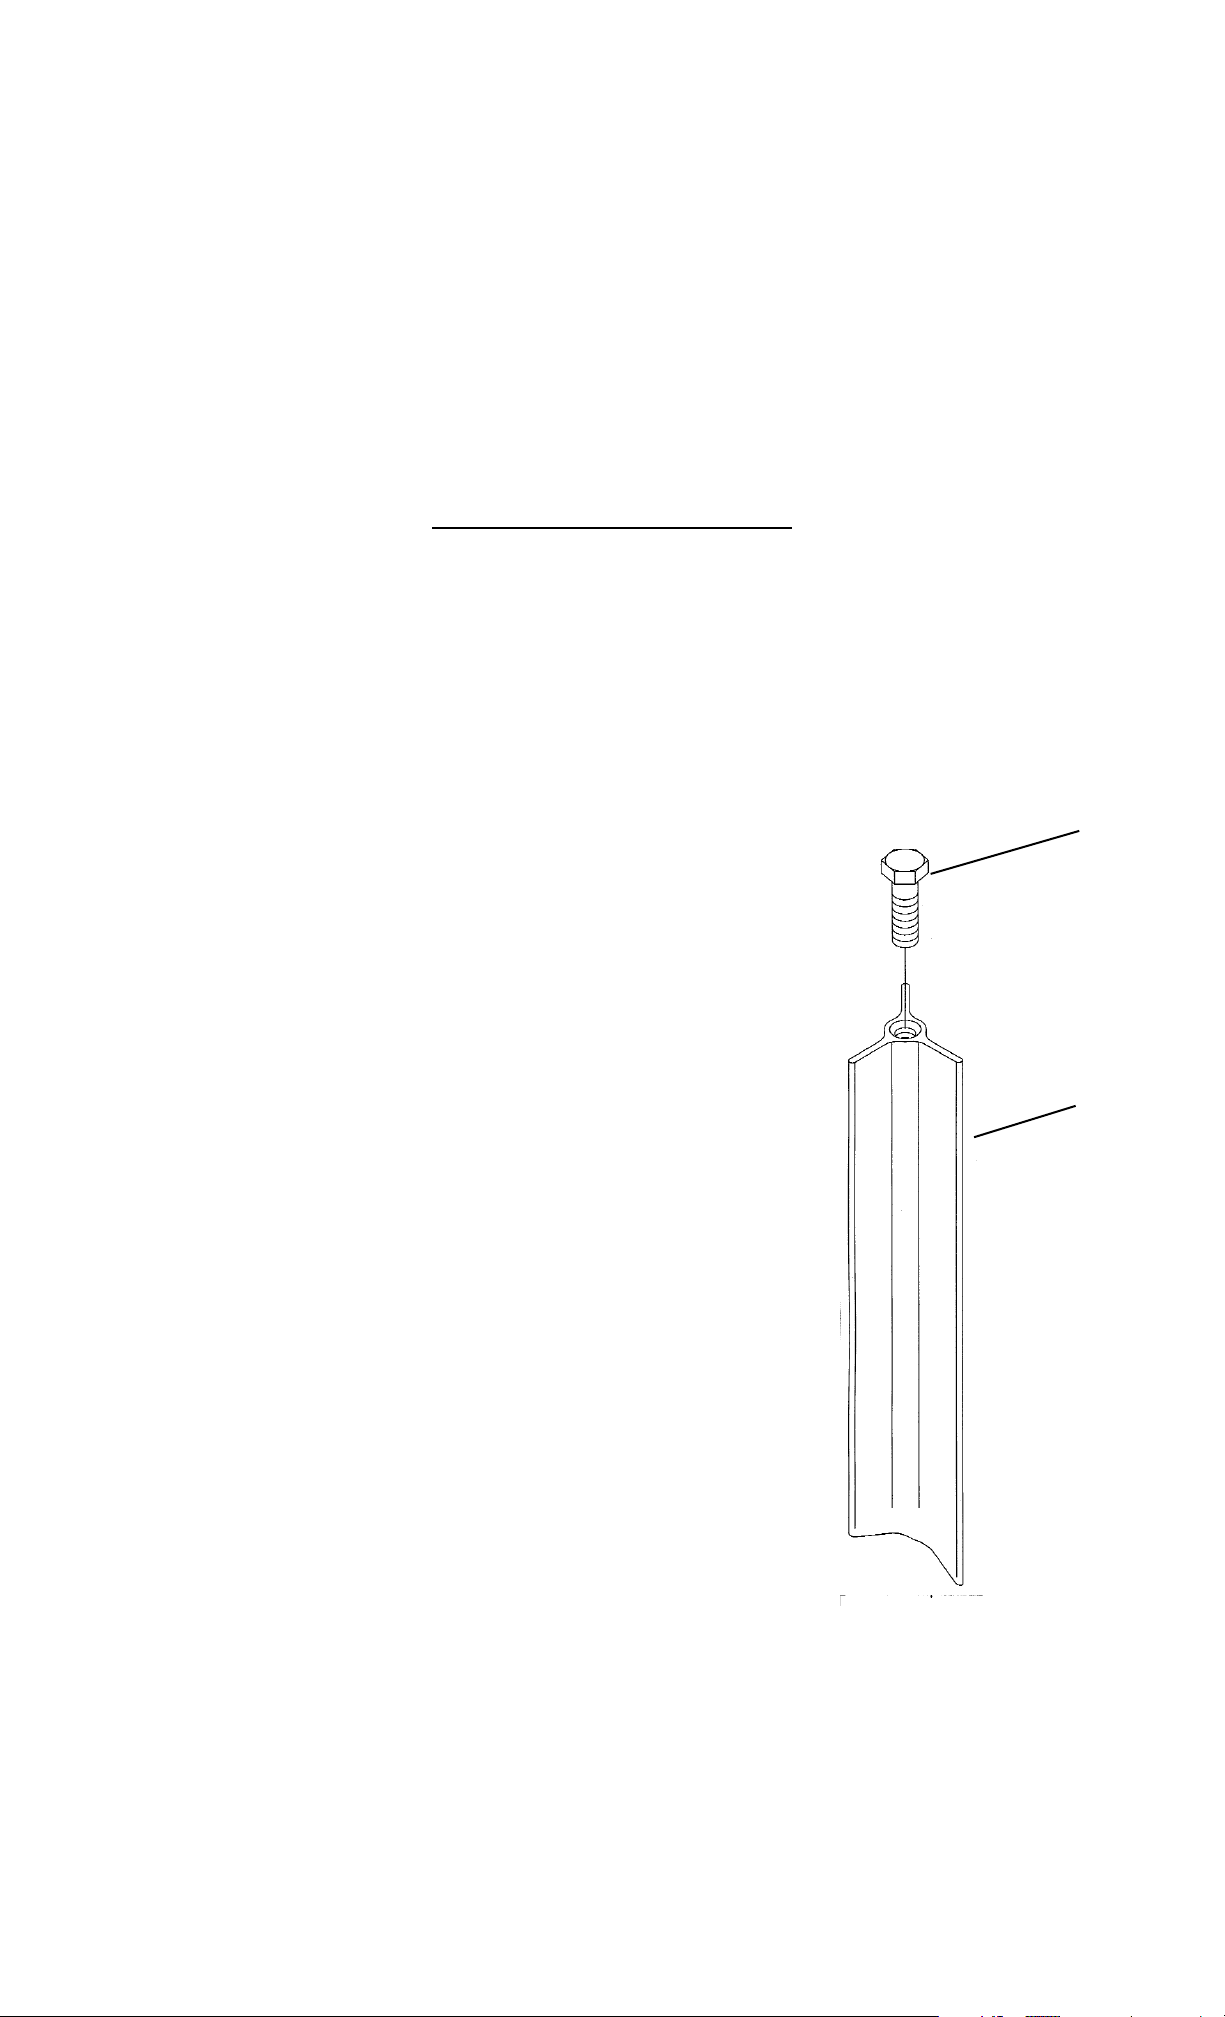
1) Remove bolt from top of stake. (Do not discard bolt.)
2) Dig hole approximately 18” (457mm) deep and 8”
(203mm) in diameter.
3) Dig narrow trench from power source to hole from
step 2. Reference local code for depth of trench.
4) Place stake in center of hole and hammer into
ground until top of stake is flush with top of hole.
CAUTION: Do not strike stake directly. Place a
board on top of the stake. Striking directly will cause
damage to the stake.
5) Install conduit or equivalent (reference local code)
making sure to follow these guidelines.
A) POWER IS OFF.
B) Center conduit between fins of stake.
C) Run conduit up outside of stake approximately
3/16” (5mm) from center (outer wall) of stake.
D) Let conduit extend 2” (51mm) past top of stake.
E) Extend wire 6” (152mm) past top of conduit.
NOTE: To help installation, if more than one bollard
is being installed, steps 1 through 5 should be
completed for each fixture before proceeding to step 6.
6) Make sure stake is level and straight. Back fill hole to
top of stake and hole.
BACK FILL TIPS: Bollard can be temporarily assembled
to stake to ease in making level and straight during
back filling. Do not straighten by pushing or pulling
on bollard, push or pull on stake only using a pry bar
or by hand. Back fill using dirt, gravel or sand.
Compact every couple of inches or after each layer
if mixing these materials. For a more secure mount, use
concrete in bottom half of hole first, let cure, then
back fill top half of hole with dirt.
7) Back fill trenches with dirt. NOTE: Make sure conduit
and wire lengths protruding past top of stake remain
constant during steps 6 and 7.
8) Install remaining stakes, making sure to follow guide
lines listed in step 5 or proceed to bollard installation
following instructions provided with bollard.
FOR 12V INSTALLTION
1) Remove bolt from top of stake. (Do not discard bolt.)
2) Dig hole approximately 18” (457mm) deep and 8”
(203mm) in diameter. Fixture is not to be installed
within 10’ (3M) of a pool, spa or fountain.
3) Place stake in center of hole and hammer into ground
until top of stake is flush with top of hole.
CAUTION: Do not strike stake directly. Place a board
on top of the stake. Striking directly will cause damage
to the stake.
4) Make sure stake is level and straight. Back fill hole
within 2” (51mm) to 4” (102mm) from top. .
BACK FILL TIPS: Bollard can be temporarily assembled
to stake to ease in making level and straight during
back filling. do not straighten by pushing or pulling on
bollard, push or pull on stake only using a pry bar or
by hand. Back fill suing dirt, gravel or sand. compact
every couple of inches or after each layer if mixing
these materials. For a more secure mount, use concrete
in bottom half of hole first, let cure, then back fill top
half of hole with dirt.
5) Lay in 12V cable making sure to follow these guidelines.
A) The 12V cable is intended for shallow burial. Do
not bury deeper than 6” (152mm) below surface.
B) Center wire between fins on stake.
C) Run wire up outside of stake approximately 3/16”
(5mm) away from center (outer wall ) of stake.
D) Allow 7” (178mm) of wire from top of stake.
6) Back fill remaining 2” (51mm) to 4” (102mm) of hole
and compact. NOTE: The 7” (178mm) of wire from top of
stake must stay constant.
7) Install remaining stakes, making sure to follow guidelines
listed in step 5 or proceed to bollard installation following
instructions provided with bollard.
PARA INSTALACIÓN DE 120 VOLTIOS
TODAS LAS INSTALACIONES DE 120 VOLTIOS DEBEN
CUMPLIR CON LOS CÓDIGOS ELÉCTRICOS LOCALES.
ESTO PUEDE INCLUIR FIJAR LA ESTACA EN CONCRETO; SI TUVIERA ALGUNA DUDA RELACIONADA CON
LA INSTALACIÓN, COMUNÍQUESE CON UN ELECTRICISTA CALIFICADO CON LICENCIA.
1) Quite el perno del tope de la estaca. (No deseche el
perno.)
2) Cave un agujero de 18" (457 mm.) de profundidad
aproximadamente y de 8" (203 mm.) de diámetro.
3) Cave una zanja estrecha desde la fuente de alimentación
eléctrica al agujero del paso 2 de arriba. Consulte el
código local para la profundidad de la zanja.
4) Ponga la estaca en el centro del agujero y martille en
el suelo hasta que el tope de la estaca esté a ras con
el tope del agujero. PRECAUCIÓN: No martille la
estaca directamente. Ponga un tablón en el tope de
la estaca. Martillar directamente la estaca dañará la
estaca.
5) Instale el conducto o equivalente (consulte el código
local) asegurándose de que se sigan las directivas
siguientes:
A) La alimentación eléctrica esté apagada.
B) Centre el conducto entre las aletas de la estaca.
C) Pase el conducto arriba fuera de la estaca,
aproximadamente 3/16" (5 mm.) del centro de la
estaca (pared exterior).
D) Deje el conducto extendido 2" (5 mm.) pasando
el tope de la estaca.
E) Extienda el cable 6" (152 mm.) pasando el tope
del conducto.
NOTA: Para ayudar la instalación, si se está instalando
más de un bolardo, se deben completar los pasos 1
al 5 para cada artefacto, antes de proseguir al paso 6.
6) Asegúrese de que la estaca esté recta y a nivel.
Rellene el agujero hasta el tope de la estaca y del
agujero. CONSEJOS PARA RELLENAR: El bolardo
se puede montar temporalmente a la estaca para
facilitar poner a nivel y recto durante el rellenado. No
enderece estirando o empujando del bolardo; empuje
o estire de la estaca solamente utilizando una palanca
o a mano. Rellene con tierra, grava o arena.
Compacte cada 2 pulgadas o después de cada capa,
si el relleno es una mezcla de esos materiales. Para
un montaje más seguro, utilice concreto en la mitad
inferior del agujero, deje fraguar el concreto, luego
rellene la mitad superior del pozo con tierra.
7) Rellene las zanjas con tierra. NOTA: Asegúrese de
que el conducto y las longitudes de los cables que
sobresalgan más allá del tope de la estaca permanezcan
constante durante los pasos 6 y 7.
8) Instale las estacas restantes, asegurándose de
seguir las directivas siguientes indicadas en el paso
5 o prosiga a instalar el bolardo siguiendo las
instrucciones que se proveen con el bolardo.
PARA INSTALACIÓN DE 12 VOLTIOS
1) Quite el perno del tope de la estaca. (No deseche el
perno.)
2) Cave un agujero de 18" (457 mm.) de profundidad
aproximadamente y de 8" (203 mm.) de diámetro. El
artefacto no se debe instalar dentro de los 10 pies (3 m.)
de una piscina, manantial de agua mineral o fuente.
3) Ponga la estaca en el centro del agujero y martille en
el suelo hasta que el tope de la estaca esté a ras con
el tope del agujero. PRECAUCIÓN: No martille la
estaca directamente. Ponga un tablón en el tope de
la estaca. Martillar directamente la estaca dañará la
estaca.
4) Asegúrese de que la estaca esté a nivel y recta.
Rellene el agujero dentro de las 2" (52 mm.) a 4"
(102 mm.) del tope. CONSEJOS PARA RELLENAR:
El bolardo se puede montar temporalmente a la esta-
ca para facilitar poner a nivel y recto durante el rellenado.
No enderece estirando o empujando del bolardo;
empuje o estire de la estaca solamente utilizando una
palanca o a mano. Rellene con tierra, grava o arena.
Compacte cada 2 pulgadas o después de cada
capa, si el relleno es una mezcla de esos materiales.
Para un montaje más seguro, utilice concreto en la
mitad inferior del agujero, deje fraguar el concreto,
luego rellene la mitad superior del pozo con tierra.
5) Tienda el cable de 12 voltios asegurándose de
seguir las directivas siguientes"
A) El cable de 12 voltios está destinado para enterrado
poco profundo. No entierre a más de 6" (152
mm.) debajo de la superficie.
B) Centre el cable entre las aletas en la estaca.
C) Pase el cable arriba fuera de la estaca,
aproximadamente 3/16" (5 mm.) del centro de la
estaca (pared exterior).
D) Deje 7" (178 mm.) del cable desde el tope de la
estaca.
6) Rellene las 2" (51 mm.) a 4" (102 mm.) restantes del
agujero y compacte. NOTA: Las 7" (178 mm.) de
cable del tope de la estaca deben permanecer
constantes.
7) Instale las estacas restantes, asegurándose de
seguir las directivas siguientes de la lista del paso 5
o prosiga a instalar el bolardo siguiendo las instrucciones
que se dan con el bolardo.
Date Issued: 9/30/05
IS-15578-EUR
POUR UNE INSTALLATION À 120 V
TOUTES LES INSTALLATIONS À 120 V DOIVENT ÊTRE
CONFORMES AUX CODES D’ÉLECTRICITÉ LOCAUX,
CE QUI PEUT INCLURE L’INSTALLATION DU PIQUET
DANS LE BÉTON. EN CAS DE DOUTE CONCERNANT
L’INSTALLATION, CONTACTER UN ÉLECTRICIEN
QUALIFIÉ.
1) Enlever le boulon situé sur la partie supérieure du
piquet. (Ne pas jeter le boulon).
2) Creuser un trou d’environ 460 mm de profondeur et
200 mm de diamètre.
3) Creuser une rigole étroite allant de la source
d’alimentation au trou creusé au cours de l’étape 2.
Se reporter au code local pour la profondeur de la
rigole.
4) Placer le piquet au centre du trou et taper dessus
pour l’enfoncer jusqu’à ce que la partie supérieure
soit alignée avec le bord du trou. ATTENTION: Ne
pas taper directement sur le piquet. Placer une
planche sur le piquet pour éviter de l’endommager.
5) Installer la conduite ou système équivalent (conformément
au code local) en respectant les directives ci-dessous.
A) Couper le courant.
B) Centrer la conduite entre les ailettes du piquet.
C) Passer la conduite sur le côté du piquet à environ
5 mm du centre (paroi externe) du piquet.
D) Laisser la conduite dépasser la partie supérieure
du piquet de 50 mm.
E) Passer le fil en dépassant la partie supérieure de
la conduite de 150 mm.
REMARQUE: Au cas où plusieurs bollards d’amarrage
sont installés, répéter les étapes de 1 à 5 pour
chaque luminaire avant de passer à l’étape 6.
6) S’assurer que le piquet est à niveau et vertical.
Remplir le trou jusqu’à la partie supérieure du piquet.
SUGGESTIONS DE REMPLISSAGE: Le bollard
peut être temporairement attaché au piquet afin de
faciliter la mise à niveau et garantir le position verticale
pendant le remplissage. Ne pas forcer la position verticale
en poussant ou tirant sur le bollard. Utiliser une barre
d’écartement pour pousser ou tirer le piquet (ou le
faire manuellement). Remplir de terre, sable ou
pierre. Tasser tous les 5 cm ou si un mélange de
matériaux est utilisé, après chaque couche. Pour
renforcer l’installation, remplir la moitié inférieure du
trou avec du béton, laisser prendre, puis remplir la
moitié supérieure de terre.
7) Remplir les rigoles de terre. REMARQUE: Veiller à
ce que la longueur de la conduite et des fils qui
dépassent la partie supérieure du piquet, restent la
même au cours des étapes 6 et 7.
8) Installer le reste des piquets en respectant les directives
indiquées à l’étape 5 ou procéder à l’installation du
bollard selon les instructions fournies avec le bollard.
INSTALLTION À 12V
1) Enlever le boulon situé sur la partie supérieure du
piquet. (Ne pas jeter le boulon).
2) Creuser un trou d’environ 460 mm de profondeur et
200 mm de diamètre. Ne pas installer le luminaire
dans les 3 m d’une piscine, spas ou fontaine.
3) Placer le piquet au centre du trou et taper dessus
pour l’enfoncer jusqu’à ce que la partie supérieure
soit alignée avec le bord du trou. ATTENTION: Ne
pas taper directement sur le piquet. Placer une
planche sur le piquet pour éviter de l’endommager.
4) S’assurer que le piquet est à niveau et vertical.
Remplir le trou entre 51 mm et 102 mm du dessus. .
SUGGESTIONS DE REMPLISSAGE: Le bollard
peut être temporairement attaché au piquet afin de
faciliter la mise à niveau et garantir le position verticale
pendant le remplissage. Ne pas forcer la position verticale
en poussant ou tirant sur le bollard. Utiliser une barre
d’écartement pour pousser ou tirer le piquet (ou le
faire manuellement). Remplir de terre, sable ou
pierre. Tasser tous les 5 cm ou si un mélange de
matériaux est utilisé, après chaque couche. Pour
renforcer l’installation, remplir la moitié inférieure du
trou avec du béton, laisser prendre, puis remplir la
moitié supérieure de terre.
5) Passer le câble de 12 V en respectant les directives
ci-dessous.
A) Le câble 12V est destiné à une installation
souterraine peu profonde. Ne pas enterrer à plus
de 152 mm sous la surface.
B) Centrer le fil entre les ailettes du piquet.
C) Passer le fil par-dessus le piquet légèrement à
l’extérieur à environ 5 mm du centre (paroi
externe) du piquet.
D) Laisser le fil dépasser de la partie supérieure par
178 mm.
6) Remplir le reste du trou entre 51 mm et 102 mm et
tasser. REMARQUE: La longueur (178 mm) du fil de
dépassant du dessus de la partie supérieure du
piquet doit constante.
7) Installer le reste des piquets en respectant les directives
indiquées à l’étape 5 ou procéder à l’installation du
bollard selon les instructions fournies avec le bollard.
Page 2
WARRANTY
WE WARRANT THE LANDSCAPE PRODUCTS FEATURED IN OUR LANDSCAPE LIGHTING CATALOG (WITH THE EXCEPTION OF LIGHT BULBS) FOR FIVE YEARS AGAINST DEFECTS
IN MATERIALS AND WORKMANSHIP IF IT WAS PROPERLY INSTALLED AND FAILED UNDER NORMAL OPERATING CONDITIONS, PROVIDED IT IS RETURNED TO THE POINT OF
PURCHASE, WHERE IT WILL BE REPAIRED OR, AS IT MAY BE DETERMINED, TO REPLACE THE LANDSCAPE PRODUCT OR PARTS USED ON THAT PRODUCT.
GARANTIA
NOSOTROS GARANTIZAMOS POR CINCO ANOS LOS PRODUCTOS PANORAMICOS QUE OFRECEMOS EN NUESTRO CATALOGO DE ILUMINACION PANORAMICA (CON EXCEPCION
DE LAS BOMBILLAS), QUE ESTAN EXENTOS DE DEFECTOS DE MATERIALES Y MANO DE OBRA, SI SE INSTALARON CORRECTAMIENTE Y FALLARON EN CONDICIONES DE
OPERACION NORMAL, SIEMPRE QUE SE DEVUELVAN AL LUGAR DE COMPRA, DONDE SERAN REPARADOS O, SEGUN PUEDA DETERMINARSE, SERAN CAMBIADOS LOS PRODUCTOS PANORAMICOS O LAS PIEZAS UTILIZADAS EN ESE PRODUCTO
GARANTIE
NOUS GARANTISSONS LES PRODUITS DE PAYSAGES FIGURANT DANS NOTRE CATALOGUE DES LUMIERES PAYSAGISTES (A L’EXCEPTION DES AMPOULES) PENDANT UNE PERIODE DE CINQ ANS CONTRE TOUS DEFAUTS DE MATERIAUX ET DE MAIN D’OEUVRE SOUS CONDITION QUE L’INSTALLATION AIT ETE EFFECTUEE CORRECTEMENT ET QUE LES
PROBLEMES SE SOIENT PRODUITS AU COURS D’UN EMPLOI NORMAL. LE PRODUIT DOIT ETRE RETOURNE AU LIEU DE VENTE OU IL SERA REPARE OU, SUITE A UNE EVALUATION, LE PRODUIT DE PAYAGE OU LES PIECES QUI LE COMPOSENT SERONT REMPLACEES.
GARANTIE
WIR GARANTIEREN DIE LANDSCHAFTSPRODUKTE, DIE IN UNSEREM KATALOG MIT LANDSCHAFTSBELEUCHUNGSSYSTEMEN ANGEBOTEN WERDEN (MIT AUSNAHME DER
GLÜHBIRNEN), FÜR FÜNF JAHRE. DIE GARANTIE DECKT MATERIALFEHLER UND DIE HANDWERKLICHE AUSFÜHRUNG, SOLANGE DIE TEILE FACHGERECHT EINGEBAUT WERDEN UND DIE MÄNGEL UNTER NORMALEN BEDINGUNGEN DER VERWENDUNG AUFTRETEN, VORAUSGESETZT, DASS DAS TEIL/ PRODUKT AM EINKAUFSORT
ZURÜCKGEGEBEN WIRD. DAS PRODUKT WIRD DORT REPARIERT ODER, JE NACH BEURTEILUNG, KANN DAS TEIL / LANDSCHAFTSBELEUCHTUNGSSYSTEM AUCH ERSETZT
WERDEN.
GARANZIA
GARANTIAMO I PRODOTTI DA ESTERNO CONTENUTI IN QUESTO CATALOGO (AD ECCEZIONE DELLE LAMPADINE) PER UN PERIODO DI CINQUE ANNI DA DIFETTI DI MATERIALE E MANODOPERA, SE DEBITAMENTE INSTALLATI, CHE SI GUASTANO IN CONDIZIONI OPERATIVE REGOLARI, AMMESSO CHE VENGANO RESTITUITI AL CENTRO DI ACQUISTO, DOVE VERRANNO RIPARATI, OPPURE, A SECONDA DEL CASO, SOSTITUITI CON PRODOTTI O PARTI DA ESTERNO USATI SUL PRODOTTO IN QUESTIONE.
BOLT
PERNO
BOULON
BOLZEN
BULONE
STAKE
ESTACA
PIQUET
EINSTECKPFOSTEN
PALETTO
120 VOLT INSTALLATION
Alle 120 Volt-Installationen müssen mit den örtlichen
Richtlinien für elektrische Anlagen im Einklang stehen.
Das gilt möglicherweise auch für das Einbetonieren des
Einsteckpfostens. Sollten Sie irgendwelche Zweifel
bezüglich der Installation haben, erkundigen Sie sich bei
einem qualifizierten zugelassenen Elektriker.
1) Entfernen Sie den Bolzen vom oberen Ende des
Einsteckpfostens. (Werfen Sie den Bolzen nicht weg.)
2) Graben Sie eine etwa 46 cm tiefe und 20 cm weite
Vertiefung.
3) Graben Sie eine enge Furche vom elektrischen
Netzanschluß bis zur gegrabenen Vertiefung (Schritt 2)
Sehen Sie in den örtlichen Bauvorschriften nach, wie
tief die Furche sein sollte.
4) Den Einsteckpfosten in die Mitte der Vertiefung set
zen und in den Boden hämmern bis das obere Ende
bündig mit dem Rand der Vertiefung abschließt.
Vorsicht: Schlagen Sie nicht direkt auf den
Einsteckpfosten, sondern legen Sie vorher ein Brett
oben auf den Einsteckpfosten. Sie beschädigen den
Einsteckpfosten, wenn Sie ihn unmittelbar mit dem
Hammer bearbeiten.
5) Installieren Sie das Rohrkabel oder verwenden Sie
eine gleichwertige Leitung im Einklang mit örtlichen
Bestimmungen. Gehen Sie sicher, daß Sie die folgen
den Richtlinien beachten:
A) Der Strom ist abgeschaltet.
B) Arrangieren Sie das Rohrkabel in der Mitte zwischen
den Rippen des Einsteckpfostens.
C) Das Rohrkabel ungefähr 5 mm von der Mitte des
Einsteckpfostens (äußere Wand) aufwärts führen.
D) Das Rohrkabel sollte 5 cm über die Oberkante des
Einsteckpfostens hinausragen.
E) Der Leitungsdraht muß 15 cm über das obere
Ende der Rohrleitung hinausragen. Anmerkung zur
Erleichterung der Installation: Wenn Sie mehr als
einen Pfahl einsetzen, führen Sie die Schritte 1 bis
einschließlich 5 für alle Einsteckpfosten durch,
bevor Sie zum Schritt 6 weitergehen.
6) Versichern Sie sich, daß der Einsteckpfosten im Lot
und gerade ist. Füllen Sie die Vertiefung vollständig
bis zur Oberkante des Einsteckpfostens wieder auf.
Hilfe beim Aufschütten: Der Pfahl kann vorübergehend
auf den unteren Einsteckpfosten montiert werden, so
daß Sie beim Anfüllen die Anordnung leichter ins Lot
bringen können. Der Einsteckpfosten sollte nicht
durch Ziehen und Zerren am Pfahl ausgerichtet wer
den, sondern nur durch Manipulieren des
Einsteckpfostens entweder mit einem Hebel oder mit
der Hand. Füllen Sie die Vertiefung mit Erde, Kies,
Schotter oder Sand auf. Stampfen Sie die
Füllschichten alle paar Zentimeter fest oder nach
Einfüllen jeder Lage, wenn Sie die Materialien mischen.
Die Montage ist solider, wenn die untere Hälfte der
Vertiefung mit Beton gefüllt wird. Wenn der Beton
gehärtet ist, können Sie den Rest der Vertiefung mit
Sand oder Steinen auffüllen.
7) Füllen Sie die Furche wieder mit Erde auf.
ANMERKUNG: Passen Sie darauf auf, daß sich in
den Schritten 6 und 7 die Längen des über den
Einsteckpfosten hinausragenden Rohrkabels und der
Leitungsdrähte nicht ändern.
8) Senken Sie die übrigen Einsteckpfosten in ihre
Vertiefungen und beachten Sie dabei die im Schritt 5
gegebenen Richtlinien oder fangen Sie mit der
Installation des Pfahles (der Pfähle) an. Verwenden
Sie dabei die Anleitungen, die den Pfählen beiliegen.
12 VOLT INSTALLTION
1) Entfernen Sie den Bolzen vom oberen Ende des
Einsteckpfostens. (Werfen Sie den Bolzen nicht weg.)
2) Graben Sie eine Vertiefung, die ungefähr 46 cm tief
und 20 cm weit ist. Der Abstand zwischen der
Lampeninstallation und einer Kuranlage, einem
Schwimmbad oder einem Springbrunnen muß min
destens 3 m betragen.
3) Den Einsteckpfosten in die Mitte der Vertiefung set
zen und in den Boden hämmern bis das obere Ende
bündig mit dem Rand der Vertiefung abschließt.
Vorsicht: Schlagen Sie nicht direkt auf den
Einsteckpfosten, sondern legen Sie vorher ein Brett
oben auf den Einsteckpfosten. Sie beschädigen den
Einsteckpfosten, wenn Sie ihn unmittelbar mit dem
Hammer bearbeiten.
4) Versichern Sie sich, daß der Einsteckpfosten im Lot
und gerade ist. Die Vertiefung bis 5 - 10 cm unter
dem Rand der Vertiefung wieder auffüllen. Der Pfahl
kann vorübergehend auf den unteren
Einsteckpfosten montiert werden, so daß Sie beim
Anfüllen die Anordnung leichter ins Lot bringen können.
Der Einsteckpfosten sollte nicht durch Ziehen und
Zerren am Pfahl ausgerichtet werden, sondern nur
durch Manipulieren des Einsteckpfostens entweder
mit einem Hebel oder mit der Hand. Füllen Sie die
PER L'INSTALLAZIONE A 12 V
1) Togliere il bullone dalla sommità del paletto (non
gettare il paletto).
2) Scavare un buco profondo circa 18 pollici (457 mm)
e dal diametro di 8 pollici (203 mm) circa. L'unità non
va installato entro 10 piedi (3 metri) da piscine,
vasche idromassaggio o fontane.
3) Inserire il paletto al centro del foro e martellarlo nel
terreno fin quando la sua sommità non risulta a filo
con la sommità del buco. Attenzione: non colpire il
paletto direttamente. Poggiarvi invece sopra un'asse.
Colpendo direttamente si causano danni al paletto.
4) Accertarsi che il paletto sia a livello e diritto. Riempire
il buco entro 2 - 4 pollici (51 - 102 mm) dalla sommità.
Suggerimenti per il riempimento: i pilastrini possono
essere montati temporaneamente al paletto per
facilitare il livellamento durante il riempimento. Non
raddrizzare spingendo o tirando il pilastrino, spingere
o tirare invece il paletto utilizzando solo un palanchino
o con la mano. Riempire utilizzando terra, ghiaia o
sabbia. Compattare ogni due pollici o dopo ciascun
strato, se si combinano questi materiali. Per un
montaggio più sicuro, usare dapprima cemento
nella metà inferiore del buco, aspettare che si asci
ughi, quindi riempire la metà superiore del buco con
terreno.
5) Infilare un cavo da 12 V attenendosi a queste
istruzioni.
A) Il cavo da 12 V è inteso per buche poco profonde.
Non scavare oltre 6 pollici (152 mm) sotto la
superficie.
B) Centrare il filo tra le alette del paletto.
C) Far passare il tubo protettivo in alto, esternamente
al paletto, per circa 3/16 di pollice (5 mm) dal
centro (parete esterna) del paletto.
D) Calcolare 7 pollici (178 mm) di filo dalla sommità
del paletto.
6) Riempire i restanti 2 - 4 pollici (51 - 102 mm) del
buco e compattare. NOTA: i 7 pollici (178 mm) di filo
dalla sommità del paletto devono essere costanti.
7) Installare i restanti paletti, accertandosi di attenersi
alle istruzioni elencate al punto 5 oppure procedere
all'installazione del pilastrino attenendosi alle
istruzioni in dotazione allo stesso.
Vertiefung mit Erde, Kies, Schotter oder Sand auf.
Stampfen Sie die Füllschichten alle paar Zentimeter
fest oder nach Einfüllen jeder Lage, wenn Sie die
Materialien mischen. Die Montage ist solider, wenn
die untere Hälfte der Vertiefung mit Beton gefüllt wird.
Wenn der Beton gehärtet ist, können Sie den Rest der
Vertiefung mit Sand oder Steinen auffüllen.
5) Legen Sie das 12 Volt-Kabel ein und beachten Sie
dabei die folgenden Richtlinien:
A) Das 12 Volt-Kabel ist für das Verlegen dicht unter
der Oberfläche vorgesehen. Versenken Sie das
Kabel nicht tiefer als 15 cm.
B) Arrangieren Sie das Rohrkabel in der Mitte zwischen
den Rippen des Einsteckpfostens.
C) Das Rohrkabel ungefähr 5 mm von der Mitte des
Einsteckpfostens (äußere Wand) hochführen.
D) Lassen Sie den Leitungsdraht 18 cm über die
Oberkante des Steckpfostens hinausragen.
6) Füllen Sie die verbleibenden 5-10 cm der Vertiefung
auf und stampfen Sie das Füllmaterial fest.
ANMERKUNG: Stellen Sie sicher, daß 18 cm
Leitungsdraht über dem Einsteckpfosten in der vollen
Länge sichtbar bleiben.
7) Senken Sie die übrigen Einsteckpfosten in ihre
Vertiefungen und beachten Sie dabei die im Schritt 5
gegebenen Richtlinien oder fangen Sie mit der
Installation des Pfahles (der Pfähle) an. Verwenden
Sie dabei die Anleitungen, die den Pfählen beiliegen..
PER L'INSTALLAZIONE A 120 V
Tutte le installazioni a 120 V devono essere conformi ai
codici elettrici locali, che potrebbero includere l'installazione di un paletto nel cemento; in caso di dubbi sull'installazione, rivolgersi ad un elettricista specializzato.
1) Togliere il bullone dalla sommità del paletto (non
gettare il paletto).
2) Scavare un buco profondo circa 18 pollici (457 mm)
e dal diametro di 8 pollici (203 mm).
3) Scavare una piccola traccia dall'alimentatore al foro
(fase 2). Consultare il codice locale per la profondità
della traccia.
4) Inserire il paletto al centro del foro e martellarlo nel
terreno fin quando la sua sommità non risulta a filo
con la sommità del buco. Attenzione: non colpire il
paletto direttamente. Poggiarvi invece sopra
un'asse. Colpendo direttamente si causano danni al
paletto.
5) Installare il tubo protettivo o equivalente (consultare
i codici locali) accertandosi di attenersi a queste
linee guida.
A) La corrente è stata tolta.
B) Centrare il tubo protettivo tra le alette del paletto.
C) Far passare il tubo protettivo in alto, esternamente
al paletto, per circa 3/16 di pollice (5 mm) dal
centro (parete esterna) del paletto.
D) Lasciare che il tubo di protezione di estenda di 2
pollici (51 mm) oltre la sommità del paletto.
E) Estendere il filo di 6 pollici (152 mm) oltre la sommità
del tubo di protezione.
Nota Per favorire l'installazione, se si installano più
pilastrini, completare i punti da 1 a 5 per ciascuna
unità, prima di passare al punto 6.
6) Accertarsi che il paletto sia a livello e diritto. Riempire
di terra la sommità del paletto e del buco.
Suggerimenti per il riempimento: i pilastrini possono
essere montati temporaneamente al paletto per
facilitare il livellamento durante il riempimento. Non
raddrizzare spingendo o tirando il pilastrino, spingere
o tirare invece il paletto utilizzando solo un palanchino
o con la mano. Riempire utilizzando terra, ghiaia o
sabbia. Compattare ogni due pollici o dopo ciascun
strato, se si combinano questi materiali. Per un
montaggio più sicuro, usare dapprima cemento
nella metà inferiore del buco, aspettare che si asciughi,
quindi riempire la metà superiore del buco con terreno.
7) Riempire le tracce di terreno. NOTA: Accertarsi che il
tubo di protezione ed il filo che sporgono oltre la
sommità del paletto restino costanti durante i punti 6 e 7.
8) Installare i restanti paletti, accertandosi di attenersi
alle istruzioni elencate al punto 5 oppure procedere
all'installazione del pilastrino attenendosi alle i
struzioni in dotazione allo stesso.
 Loading...