


DE: Modellbauartikel, kein Spielzeug!
Vor Gebrauch die Sicherheitshinweise und Anleitung genau lesen und beachten. Dieser Artikel ist ein Modellbauartikel für anspruchsvolle
Modellbauer und Sammler. Aufgrund maßstabs- und vorbildgetreuer bzw. funktionsbedingter Gestaltung sind Spitzen, Kanten und filigrane
Kleinteile enthalten. Für den Zusammenbau sind Werkzeuge wie ein scharfes Bastelmesser, eine scharfe Schere und spezieller Kleber nötig.
Die fachgerechte Weiterverarbeitung dieses Modellbauproduktes birgt daher ein Verletzungsrisiko! Das Produkt gehört aus diesem Grund nicht
in die Hände von Kindern! Nach Fertigstellung ist dieser Artikel zum Einbau (Fixierung z. B. durch Klebstoff) in eine Modellbahnanlage,
Schaustück usw. und als hochwertiger Dekorationsartikel vorgesehen.
Nur die diesem Bausatz beiliegenden Teile und empfohlenes Zubehör verwenden. Hände und Werkzeug nach dem Basteln säubern.
Bei der Verwendung von Farben und Klebstoffen unbedingt beachten: Nicht essen, trinken oder rauchen. Farben und Klebstoffe nicht mit
Augen, Haut oder Mund in Berührung bringen. Dämpfe nicht einatmen. Von Zündquellen fernhalten. Die Anleitung und Hinweise des Herstellers
Achtung
genau beachten. Erste Hilfe bei Augenkontakt: Auge unter fließendem Wasser ausspülen und dabei offen halten. Umgehend ärztliche Hilfe
konsultieren.
Diese Information gut aufbewahren.
EN: Model building item, not a toy! Not suitable for children under 14 years!
Read and follow these safety precautions and instructions carefully before use. This product is a model building item for the experienced
modeller and collector. Due to its life-like and true to scale reproduction and functional form, this product contains peaks, edges, and delicate
small parts. For assembly, tools like a sharp cutter, a sharp pair of scissors and special glue are necessary. Therefore, appropriate working with
this model building kit does present a risk of injury! For that reason this product is not for children! Upon completion, this product is designed to be
installed (e.g. fixed with glue) on to a model railway layout, diorama etc. and as a high-quality decorative item and not a toy.
Only use the parts of this kit included and recommended accessories. Please wash your hands and tools after modelling.
For use of paints and glues please follow these safety precautions: Do not eat, drink or smoke. Avoid any contact with eyes, skin or mouth. Do not
breathe any vapours. Keep away from ignition sources. Follow the instructions and safety precautions of the manufacturer carefully. First aid for
Caution
contact with eyes: Flush the eye with clean water holding the eyelid open. Immediately consult medical advice.
Keep these instructions safe.
FR: Ce produit n'est pas un jouet. C'est un modèle réduit!
Avant d'utiliser ce produit, veuillez lire et suivre attentivement les consignes de sécurité et le mode d'emploi. Ce produit est un modèle réduit pour
modélistes et collectionneurs exigeants. En raison d'une reproduction fidèle à l'échelle de l'original ainsi qu'un respect de la fonctionnalité, les
kits contiennent objets pointus, des arêtes et des petites pièces filigranes. Pour le montage, des outils tels une lame aiguisée, des ciseaux
aiguisés ainsi qu'une colle spéciale sont nécessaires. De ce fait, un risque de blessure est possible! Pour cette raison, tenir ce produit hors de
portée des enfants! Après finition, ce produit est destiné à être intégré (p. ex. fixation avec de la colle) dans un réseau, un diorama etc. et peut être
utiliser comme un produit décor de haute qualité. Ce n'est pas un jouet.
N'utiliser que les pièces jointes et les accessoires recommandés. Nettoyer les mains et les outils après l'usage.
Pour l'utilisation des colles et des peintures, veuillez suivre les précautions suivantes: Ne pas manger, boire ou fumer lors de la manipulation.
Eviter tout contact avec les yeux, la peau et la bouche. Ne pas inhaler les vapeurs. Tenir à l'écart des sources inflammables. Veuillez suivre
attentivement le mode d'emploi et les indications du fabricant. Premiers secours en cas de contact avec les yeux: Rincer immédiatement et
Attention
abondamment à l'eau en les maintenant ouverts et consulter un ophtalmologiste.
Veuillez bien conserver ces instructions.
IT: Articolo di modellismo, non è un giocattolo!
Prima dell'uso leggere attentamente le istruzioni per l'uso e le avvertenze di sicurezza. Questo prodotto è un articolo di modellismo per i
modellisti e i collezionisti più esigenti. A causa della struttura in scala e fedele all'originale e della forma funzionale sono presenti unte, spigoli e
piccole parti in filigrana. Per il montaggio sono necessari strumenti come un coltello affilato per modellismo, forbici taglienti e colla special. Per
questo la corretta lavorazione di questo prodotto di modellismo nasconde il rischio di ferirsi! Per questo motivo occorre tenere il prodotto lontano
dalla portata dei bambini! Una volta terminato, questo articolo è adatto per l'installazione (fissaggio ad es. con colla) in un plastic ferroviario,
come pezzo da collezione o come pregiato articolo decorativo. Non è un giocattolo.
Utilizzare esclusivamente i componenti forniti con il kit e gli accessori consigliati. Dopo il bricolage pulire mani e strumenti di lavoro.
Durante l'utilizzo di colori e colle attenersi alle seguenti indicazioni: Non mangiare, bere o fumare. Non portare i colori e la colla a contatto con
occhi, pelle o bocca. Non respirare le esalazioni. Tenere lontano da fonti di ignizione. Osservare attentamente le istruzioni e le indicazioni del
produttore. Primo soccorso in caso di contatto con gli occhi: Sciacquare gli occhi sotto l'acqua corrente tenendoli aperti. Consultare
immediatamente un medico.
Avvertenza
Conservare con cura queste informazioni.
ES: Artículo para modelismo ¡No es un juguete!
Antes de montar leer las instrucciones de seguridad e indicaciones de montaje.
Este artículo es para modelistas y coleccionistas exigentes. Dado que las piezas son réplicas a medida y en algunos casos con funcionamiento,
los modelos pueden tener partes puntiagudas, cantos y piezas filigranas. Para su montaje se necesitan un cuchillo afilado, una tijera que corte y
un pegamento especial. El manipulado posterior de este producto puede llevar consigo un riesgo a lesionarse. ¡Debido a ello este artículo no
puede estar al alcance de los niños! Una vez acabado este artículo se puede montar en una maqueta (p.e. con pegamento), en el escaparate o
como decoración. No es un juguete.
Solamente utilizar las piezas adjuntas y los accesorios indicados. Después del trabajo de bricolaje limpiar las herramientas y las manos.
Al utilizar los colores y pegamentos es indispensable: no comer, beber ni fumar. Los ojos, la piel y la boca no deben entrar en contacto con los
colores y pegamentos. No inhalar los vapores. No dejar cerca de fuentes de calor. Seguir exactamente las instrucciones e indicaciones del
fabricante. Primer auxilio cuando hubo contacto con el ojo: lavar el ojo con agua corriente y mantenerlo abierto. Buscar inmediatamente ayuda
médica.
Advertencia
Guardar bien esta información.
NL: Modelbouwartikel, geen speelgoed!
Voor gebruik de veiligheidswaarschuwingen en instructies goed lezen en opvolgen.
Dit product is een modelbouwartikel voor veeleisende modelbouwers en verzamelaars. Op basis van schaalverhoudingen, natuurgetrouwe- en
functionele nabootsing zijn er scherpe punten en andere kleine, zeer fijne onderdelen aanwezig. Voor het in elkaar zetten is gereedschap zoals
een scherp knutselmes, een scherpe schaar en speciale lijm nodig. Hierdoor vormt ook vakkundige verwerking van dit modelbouwproduct kans
op letsel! Daarom buiten bereik van kinderen houden! Na voltooiing is dit artikel bedoeld voor plaatsing (vastzetten met bijvoorbeeld lijm) op een
modelspoorweg, diorama etc. en als hoogwaardig decoratieartikel bedoeld. Geen speelgoed.
Alleen de in deze bouwdoos ingesloten onderdelen en aanbevolen accessoires gebruiken. Handen en gereedschap na gebruik goed reinigen.
Let op bij het gebruik van verf en lijm: niet eten, drinken of roken. Verf en lijm niet in aanraking brengen met ogen, huid of mond. Niet inademen.
Verwijderd houden van ontstekingsbronnen. De handleiding en instructies van de fabrikant nauwkeurig opvolgen. Eerste hulp bij oogcontact:
Opgelet
ogen open houden en met stromend water uitspoelen. Direct een arts raadplegen.
Deze informatie goed bewaren.
38470
38470
38470
38470
Modifications reserved.
38470
H0 Fachwerkturm mit Tor
H0 Timber-framed tower with gate
DE
EN
Montageanleitung
Mounting instruction
2. Inhalt .................................................2
3. Montage ..............................................3
1. Important information ....................................1
2. Contents...............................................2
3 . Mounting ..............................................3
1. Wichtige Hinweise ............................................1
2. Inhalt ......................................................2
3. Montage ....................................................3
4 . Beleuchtungs-Tipp ............................................4
1. Important information ..........................................1
2. Contents ....................................................2
3 . Mounting....................................................3
4 . Illumination-tip................................................4
Änderungen vorbehalten.
Modifications reserved.
Die aktuelle Version der Anleitung finden Sie auf der kibri-Homepage unter der Artikelnummer.
The latest version of the manual can be looked up at the kibri-homepage entering the item-No.
38470
H0 Fachwerkturm mit Tor
H0 Timber-framed tower with gate
DE
EN
Montageanleitung
Mounting instruction
1. Important information ....................................1
2. Contents...............................................2
3 . Mounting ..............................................3
1. Wichtige Hinweise ............................................1
2. Inhalt ......................................................2
3. Montage ....................................................3
4 . Beleuchtungs-Tipp ............................................4
1. Important information ..........................................1
2. Contents ....................................................2
3 . Mounting....................................................3
4 . Illumination-tip................................................4
Änderungen vorbehalten.
Modifications reserved.
Die aktuelle Version der Anleitung finden Sie auf der kibri-Homepage unter der Artikelnummer.
The latest version of the manual can be looked up at the kibri-homepage entering the item-No.
Modelltechnik GmbH
Bahnhofstraße 2a
D - 35116 Hatzfeld-Reddighausen
info@viessmann-modell.com
www.kibri.de
der Bausätze:
Degree of difficulty:
Made in Europe
Schwierigkeitsgrad
Änderungen vorbehalten.
The latest version of the manual can be looked up at the kibri-homepage entering the item-No.
Montageanleitung
4 . Illumination-tip................................................4
3 . Mounting....................................................3
2. Contents ....................................................2
Die aktuelle Version der Anleitung finden Sie auf der kibri-Homepage unter der Artikelnummer.
1. Important information ..........................................1
EN
4 . Beleuchtungs-Tipp ............................................4
3. Montage ....................................................3
2. Inhalt ......................................................2
1. Wichtige Hinweise ............................................1
DE
H0 Timber-framed tower with gate
Mounting instruction
H0 Fachwerkturm mit Tor
38470
Einsteiger
Advanced
Stand 03/sw
85376
Beginners
Fortgeschrittene
Profis
Professionals
11/2016
SzT
Bauanleitung. Sie erhalten dann umgehend von uns Ersatz.
dieses bitte per E-Mail oder per Post bei uns an. Bitte nennen
Sie uns die Bezeichnung und Artikel-Nummer des Bausatzes
sowie Spritzling- und Teile-Nr. Diese Angaben finden Sie in der
Dieser Bausatz wurde sorgfältig geprüft und verpackt. Sollte es
trotzdem einmal vorkommen, dass ein Teil fehlt, fordern Sie
Da Spritzlinge für mehrere Artikel verwendet werden, kann es
sein, dass bei diesem Bausatz einige Teile übrig bleiben.
vorsichtig vom Spritzbaum ab und entgraten die Ränder.
Sie bitte mit einem Seitenschneider bzw. Modellbaumesser
Die beim jeweiligen Montageschritt benötigten Teile trennen
führen.
Montage des Bausatzes
Andere Klebstoffe können zu Verformungen der Kunststoffteile
Werkzeuge nötig.
Als Klebstoff verwenden Sie bitte ausschließlich den kibri
Plastikkleber flüssig (Art.-Nr. 39995/39996).
und abbruchgefährdete Teile aufweisen. Für die Montage sind
vorgesehenen Verwendung kann das Produkt Spitzen, Kanten
Verletzungsgefahr!
Aufgrund der detaillierten Abbildung des Originals bzw. der
Vorsicht
Bitte halten Sie beim Zusammenbau unbedingt die Reihen-
folge der Bauabschnitte ein!
Sicherheitshinweise
1. Wichtige Hinweise
DE
find all necessary information in this manual. We will
promptly supply the missing parts.
precise product description and the item-No. as well as the
No. of the sprue and the specific part that is missing. You will
contact us by e-mail or by sending a letter. Please state the
particular product.
The contents of this kit have been carefully checked against
the parts list. However, should a part be missing please
is quite possibly that some parts may not be needed for this
assembly phase with a side cutter or a sharp utility knife from
the injection-moulded sprue and deflash the edges.
Since some sprues are used for several different products it
Assembly
Carefully separate the parts required for the respective
Other adhesives may cause deformation of the plastic parts.
Use only kibri plastic glue item-No. 39995/39996.
required for assembly.
Due to the finely detailed reproduction of the original and the
intended use, this product may have sharp points or edges
as well as parts that may easily break off. Some tools are
Risk of injury!
Safety information
Please observe the correct sequence when assembling the
parts to sub-assemblies and to the completed product!
Caution:
1. Important information
EN
1

www.katalogversand.kibri.de
es im Schreibwarenfachhandel. Ideal sind selbstklebende,
glatte Papiere oder Folien mit geringer Materialstärke.
follow the link or use QR-code.
Kataloge von Viessmann und kibri können auch bequem über das Internet
angefordert werden. Folgen Sie dazu einfach diesem Link bzw. scannen Sie den
QR-Code.
Catalogues by Viessmann and kibri can be ordered alternatively via internet. Please
Ausdrucken – ausschneiden – aufkleben – fertig!
Dekobögen lassen sich auf einem handelsüblichen
Farbdrucker ausdrucken. Für den jeweiligen Druckertyp
(Tintenstrahl oder Laser) geeignetes Papier bzw. Folie gibt
www.kibri.de in der Rubrik Service – Download. Die
Beschilderungen finden Sie auf unserer Homepage
Hochauflösende Druckvorlagen für Beschriftungen und
DE
M 894 1
M 893 1 M 930 1 M 812 2
M 892 1 M 929 6 M 811 1
M 891 1 M 928 1 M 810 7
M 890 1 M 910 1 M 927 1
M 889 1 M 909 1 M 926 1 M 947 1
M 888 1 M 908 1 M 925 1 M 946 1
M 887 1 M 907 1 M 924 1 M 945 1
M 886 1 M 906 1 M 923 2 M 944 2
M 885 1 M 905 1 M 922 2 M 943 2
M 884 1 M 903 1 M 941 1
M 883 1 M 920 1 M 940 4
M 882 1 M 931 1 M 919 1 M 939 1
M 881 1 M 902 1 M 918 1
M 880 1 M 901 1 M 917 1 M 938 1
M 879 1 M 900 1 M 916 1 M 937 1
M 878 1 M 898 1 M 914 1 M 935 1
Teile-Nr. Stück Teile-Nr. Stück Teile-Nr. Stück Teile-Nr. Stück
M 877 1 M 897 1 M 913 1 M 934 1
M 876 1 M 896 1 M 912 1 M 933 2
M 875 1 M 895 1 M 911 1 M 932 2
- Anleitung
auf Vollständigkeit:
2. Inhalt
Kontrollieren Sie nach dem Auspacken den Lieferumfang
www.dekoboegen.kibri.de
material thickness.
Print – cut – stick – ready!
for the respective printers are offered by specialized trade.
Best way is to use self-adhesive smooth papers or foil with low
The high-resolution master copy for all kind of signs in your
kibri kit are available as download for free. Deco sheets can be
printed by using a standard colour printer. Suitable paper or foil
EN
M 904 1 M 921 2 M 942 2
M 899 1 M 915 1 M 936 1
- Manual
2. Contents
Check the contents of the package for completeness after
unpacking:
85376 / 38470
2

85376 / 38470
See product information on the last page.
please use Viessmann item-No. 6005 House illumination start-set.
House illumination socket with bulb E5,5, clear. For detailed illumination of each window and room,
Siehe Produkthinweis auf der letzten Seite.
Tip:
If you wish to illuminate the complete model from inside, please use Viessmann item-No. 6832
beleuchten, so empfehlen wir das Hausbeleuchtungs-Startset Art.-Nr. 6005 von Viessmann.
Hausbeleuchtungssockel mit Glühlampe E5,5, klar. Möchten Sie die Fenster einzeln und individuell
Tipp:
Möchten Sie das Modell von innen beleuchten, verwenden Sie bitte die Viessmann Art.-Nr. 6832
3. Montage
Mounting
3
4. Art.-Nr. 6005 von ViessmannHausbeleuchtungs-Startset
Item-No. 6005 House illumination start-set
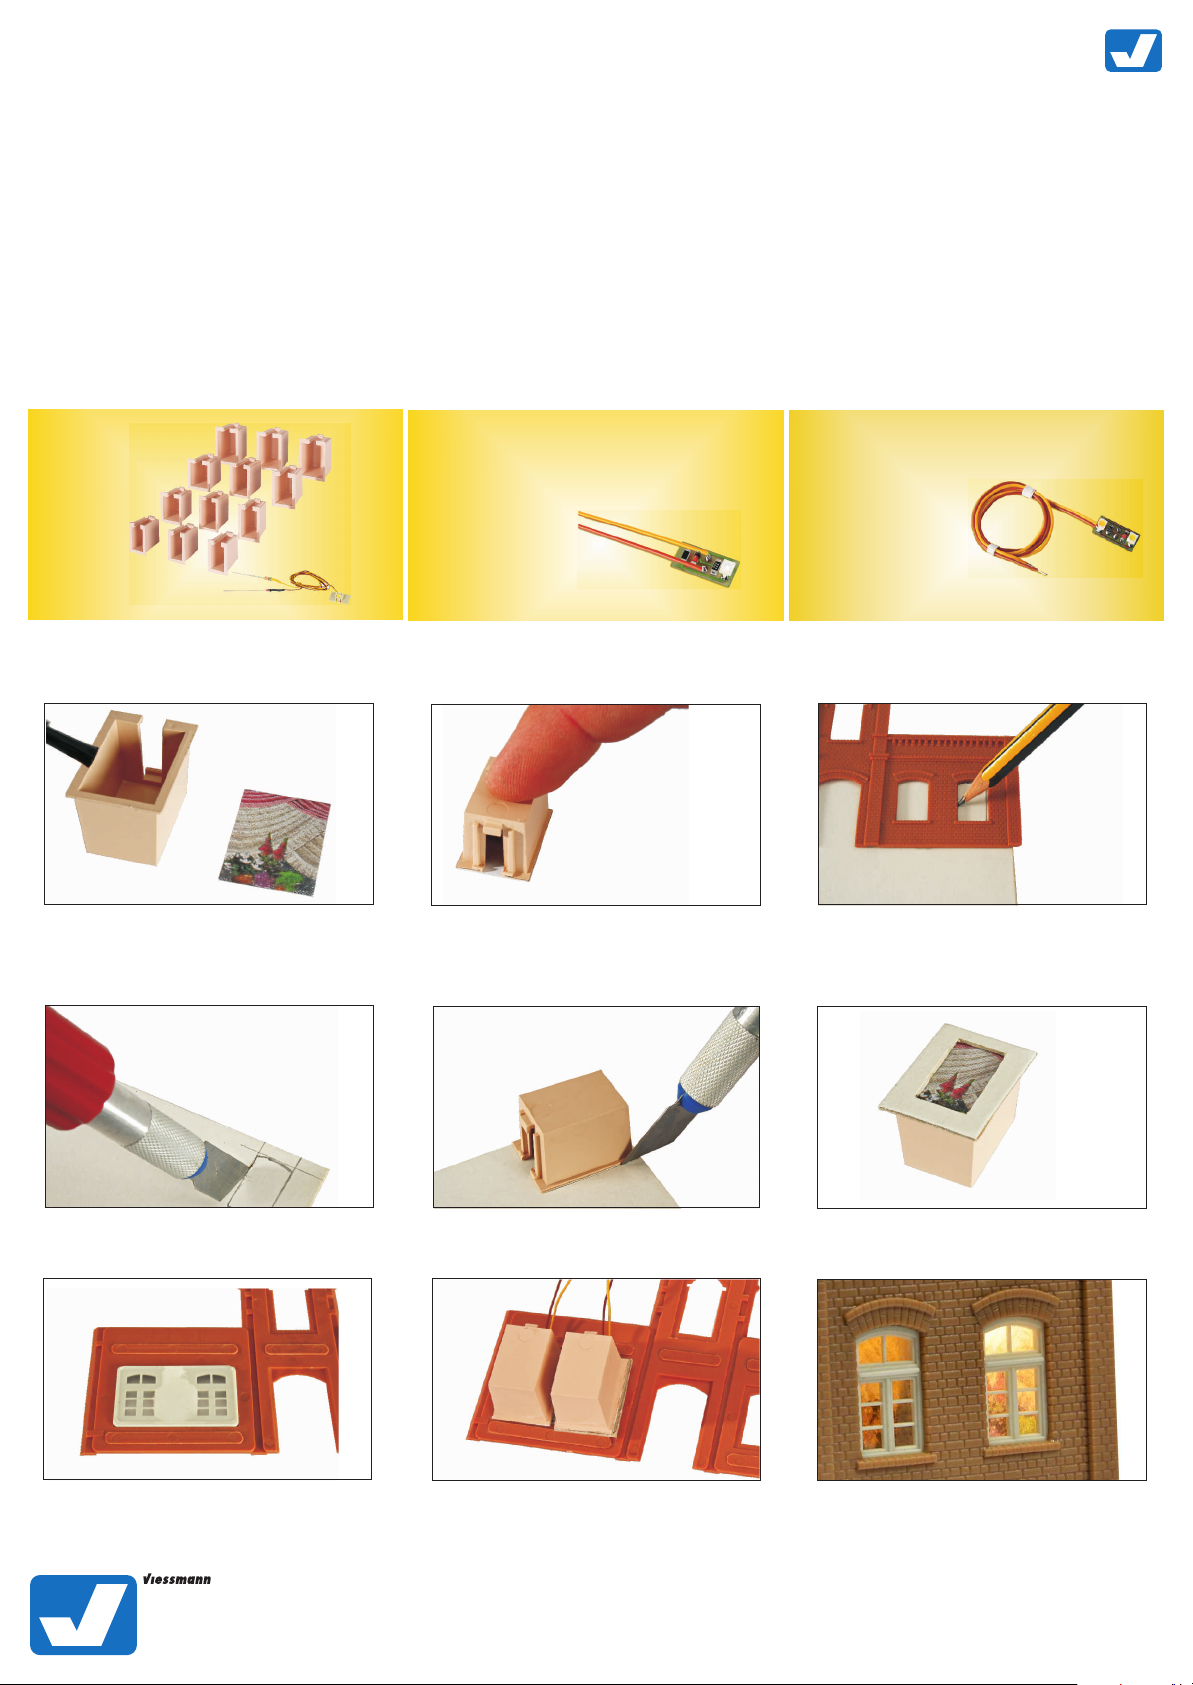
Die Lichtboxen zur indirekten Fensterbeleuchtung ermöglichen eine völlig neuartige Einzelbeleuchtung von Räumen. Zur Beleuchtung der
Lichtboxen empfehlen wir die Platinen mit einer LED in gelb Art. 6007, weiß Art. 6008, warmweiß Art. 6006, die Platinen mit je zwei LEDs in
weiß Art. 6017, gelb Art. 6018 und warmweiß Art. 6021, die LEDs mit Anschlusskabel in weiß Art. 6048, gelb Art. 6047 und warmweiß Art.
6046 oder die LED mit TV-Simulation Art. 5079. Die Lichtboxen werden von innen hinter die Fenster geklebt und geben dem Raum Tiefe. Auf
diese Weise wird das Durchleuchten der Wände verhindert. Auch für TT und N Gebäude geeignet. Maße der Lichtboxen: L 17 x B 18 x H 26
mm, L 17 x B 16 x H 21 mm, L 17 x B 12 x H 19 mm, L 17 x B 14 x H 23 mm.
TIPP: Das Powermodul Art. 5215 sorgt für flackerfreies Licht beim Betrieb mit Wechselstrom und erzeugt nahezu doppelte Helligkeit.
The light boxes for indirect window-illumination allow a completely new individual lighting of rooms. To illuminate the light boxes, we
recommend boards with an LED in yellow item-No. 6007, white item-No. 6008, warm-white item-No. 6006, boards with two LEDs in white
item-No. 6017, yellow item-No. 6018 and warm-white item-No. 6021, the LEDs with connector cable in white item-No. 6048, yellow item-No.
6047 and warm- white item-No. 6046 or the LED with TV-simulation item-No. 5079. The light boxes are glued from the inside behind the
window and they give depth to the room. In this way, shining through of the walls is prevented. Product is suitable for TT and N scale.
Dimensions of light boxes: L 17 x W 18 x H 26 mm, L 17 x W 16 x H 21 mm, L 17 x W 12 x H 19 mm, L 17 x W 14 x H 23 mm.
TIP: The power module item-No. 5215 ensures flickering-free lighting by using AC power and nearly double brightness is possible.
Art. / Item-No. 6005
Hausbeleuchtung mit einer LED:
House illumination with 1 LED:
6006 warmweiß, 10 Stück
warm-white (10 pieces)
6007 gelb, 10 Stück
yellow (10 pieces)
6008 weiß, 10 Stück
white (10 pieces)
Tipp: Mehr Tiefenwirkung für die Modellfenster
Tip: Fantastic depth effect for your windows
1. Schneiden Sie ein Gardinenmotiv aus.
Cut out curtain background motive.
2. Kleben Sie es auf die Lichtbox.
Fix on the light box.
Hausbeleuchtung mit zwei LEDs:
House illumination with 2 LEDs
6017 gelb, 10 Stück
yellow (10 pieces)
6018 weiß, 10 Stück
white (10 pieces)
6021 warmweiß, 10 Stück
warm-white (10 pieces)
3. Zeichnen Sie auf einem mindestens
1 mm dicken Karton die Innenmaße des
Fensters auf.
Draw the internal measurements on a card board minimum 1 mm depth required.
4. Der Fenstergrundriss wird anschließend
mit einem Bastelmesser ausgeschnitten.
Window ground plot is cut with cutter.
7. Die mit Scheiben versehenen Fenster
sind nun aufnahmebereit für die Lichtboxen.
The window glass is finished for the
light box.
Modelltechnik GmbH
Bahnhofstraße 2a
D - 35116 Hatzfeld-Reddighausen
info@viessmann-modell.com
www.kibri.de
5. Das Gleiche geschieht mit dem Außenrah-
men der Lichtbox.
Same way outer frame of light box.
8. In diesem Beispiel zeigen wir Ihnen ein
Fenster mit und das andere ohne Laibung.
Here you see a window with and
without embrasure.
6. Dieses Teil wird nun auf das Gardinen motiv geklebt.
Fix the part on the curtain background.
9. Dieses Bild zeigt die bessere Wirkung des
mit Laibung versehenen Fensters (links).
Picture shows the better method using
embrasure (left window).
4

Art.-Nr. 6045 Etageninnenbeleuchtung von Viessmann
Item-No. 6045 Start set floor interior lights
Eine stimmungsvolle Beleuchtung ist für das Gesamtbild einer Anlage ein wesentlicher Bestandteil. Das Startset Etageninnenbeleuchtung Art.
6045 von Viessmann setzt durch die fantastische Tiefenwirkung einen zusätzlichen Glanzpunkt. Auch in Eckfenstern!
An atmospheric lighting for the general appearance of your model railway. The new Viessmann start set floor interior lights item-No. 6045
is an additional highlight due to the fantastic depth effect. By the way "also around the corner"!
LED für Etageninnenbeleuchtung:
LED for floor interior lights:
6046 warmweiß, 10 Stück
warm-white (10 pieces)
6047 gelb, 10 Stück
yellow (10 pieces)
6048 weiß, 10 Stück
white (10 pieces)
Tipp: Mehr Tiefenwirkung für die Modellfenster
Tip: Fantastic depth effect for your windows
1. Hintergrundmotiv ausschneiden und in die
Lichtschiene kleben. Richtung beachten!
Cut out the background motive and fix
into the light rail. Please take care for
direction!
4. Die Füllstücke und die LED mit Kunst-
stofffassung werden punktgenau über
den Fenstern und Türen positioniert.
The filling pieces and the LED
plastic version are fixed exactly above
windows and doors.
Es geht auch um die Ecke
Das Prinzip:
"Around the corner" The principle:
Lichtschienen in 4 verschiedenen Höhen für unterschiedliche Fenster-/Türhöhen
und Spurgrößen. Beliebig
kürzbar, mit Einkerbungen.
Light rails by four different heights
for different window and door heights
and scales. Can be cut as required,
with notches.
Trennwände verschiebbar,
zur Lichtabschottung zwischen Fenstern und Türen
sowie als Endabschluss.
Filling walls moveable to
cover lighting between the
windows, doors and finish.
2. Trennwände einkleben zur Lichtabschottung
zwischen Fenstern und Türen sowie als
Endabschluss.
Dividing walls for light bashing between
windows and doors as well as
for final end.
5. Dann wird die Lichtschiene hinter der
Fensterreihe angeklebt.
Fix the light rail behind the window.
LED mit Kunststofffassung
verschiebbar zur punktgenauen
Positionierung über den
Fenstern und Türen. Auch
passend für Lichtboxen der
Hausbeleuchtung Art. 6005.
LED with plastic frame moveable to
exact position over the windows and
doors. Suitable for light boxes from
house illumination item-No. 6005.
Füllstücke zur Abdeckung zwischen den LEDs
beliebig kürzbar bzw. Verlängerbar, mit Einkerbungen.
Filling parts to cover space between the LEDs to be
cut as required, with notches.
3. Füllstücke zur Abdeckung zwischen den
LEDs beliebig kürzbar bzw. verlängerbar.
Filling parts to cover space between
the LEDs, length can be cut accordingly.
6. Ein schönes Ergebnis mit viel Tiefenwirkung.
Nice result with depth effect.
Die geniale und praktische 12-polige
Viessmann-Steck-Verteilerleiste
Art. 6049 verbindet bis zu 12 Strom-
verbraucher. Ohne Stecker, ohne
Schraubklemmen und ohne Löten.
Plug-in rail for interior lighting on board,
12-fold.
The brilliant and useful 12-fold Viessmann
plug-in rail for interior lighting on board connects up to 12 power consumers - simply by
jacks for plugging in the resistors. No extra
plug, screw terminals or soldering required.
Modelltechnik GmbH
Bahnhofstraße 2a
D - 35116 Hatzfeld-Reddighausen
info@viessmann-modell.com
www.kibri.de
5
 Loading...