

KIBO 21 kit User Manual

Sound Record/Playback Module
The Sound Record/Playback Module
contains a microphone and a speaker. The
microphone records sounds that you want
to use in your program. The speaker plays the sounds
that you recorded.
Insert the module and turn KIBO on. Record a sound by
pressing and holding one of the three buttons ( ).
Let go of the button to stop recording. You can record up to three
sounds ( ). Each sound can be up to 10 seconds long.
Create your program. Include the “PLAY”
blocks that match the buttons you pressed
to record your sounds.
Scan and run your program. Listen for the sounds you recorded.
Play them as many times as you like, by adding the appropriate
blocks to your program.
Getting started with KIBO
microphone
for recording
speaker
for playing
back
7.
Decorate KIBO with the round or rectangular stage.
Insert stage assembly into middle
motor socket. Decorate and play!
Insert stage support or motor
module into stage pedestal
motor
module
stage
support
stage
pedestal
stage pedestal “buttons”
Insert the wood stage onto the stage
pedestal buttons
“buttons”
Sequence some blocks
into a program. Every
program needs a BEGIN
block and an END block.
3.
Choose the motors, wheels, and sensors
that you want to use. Insert the motors
so that the green dot shows through
KIBO’s transparent bottom.
2.
green dot
If this is your rst time using
your KIBO, insert 4 AA batteries
into the battery case. The red
scanner light will start blinking.
1.
Screwdriver and batteries not included
5.
Use KIBO to scan the bar codes on the
programming blocks, left to right, one at a
time*. If your scan was successful, KIBO will
beep and the scan indicator LED will glow
green after each block.
(A red scan indicator LED indicates a scanning error.)
*See scanning tips on the back of this guide.
6.
To re-run the
program: push
KIBO’s button again.
To change your program: re-arrange the
blocks, re-scan, and push KIBO’s button.
Watch KIBO go!
Push KIBO’s triangular
button to tell KIBO to go!
scan indicator LED
blinking red
scanner light
4.
Push KIBO’s triangular
button to turn KIBO on. The
red scanner light will blink.
KIBO will turn itself
o if left alone for a
few minutes.
Good things to know
KIBO’s lights can tell you lots of useful things:
°
KIBO’s red scanner light and triangular button will blink when
KIBO is ready to scan a program – OR – when KIBO is ready to run
a program. The button will stop blinking while KIBO is scanning
a program; the red scanner light will stop blinking while KIBO is
running a program.
°
When KIBO’s triangular button blinks, it means that KIBO has a
program stored in its memory. The triangular button will go dark
while KIBO is scanning a new program, and also after inserting
new batteries.
°
You can put KIBO to sleep by pressing and holding the
triangular button for several seconds.
Expression Module
~ Express yourself!
KIBO’s Flagpole and Whiteboard are a fun
way to add to a story!
To make a ag, decorate some paper or
cloth, make a loop, and hang your ag on
the Flagpole. Insert it on the Stage Support
for a stationary ag, or mount the Flagpole on a Motor
Module, and KIBO will wave your ag!
Use the Whiteboard and dry-erase
marker to draw a picture or make a
sign. Insert the white board into the
Flagpole “hooks” horizontally or
vertically and display your art work!
Try inserting the motors “upside-down,” with the green dot
*not* showing, and see what happens.
Or, insert the motors into the wheels so that the motors’
axles are o-center, and see what happens!
Fun things to try
Check out more fun challenges
and activity guides at
resources.kinderlabrobotics.com.
motor hub,
center of wheel
motor hub,
o-center
Outside of wheel with motor hub showing through:
red scanner light blinks
through front of KIBO
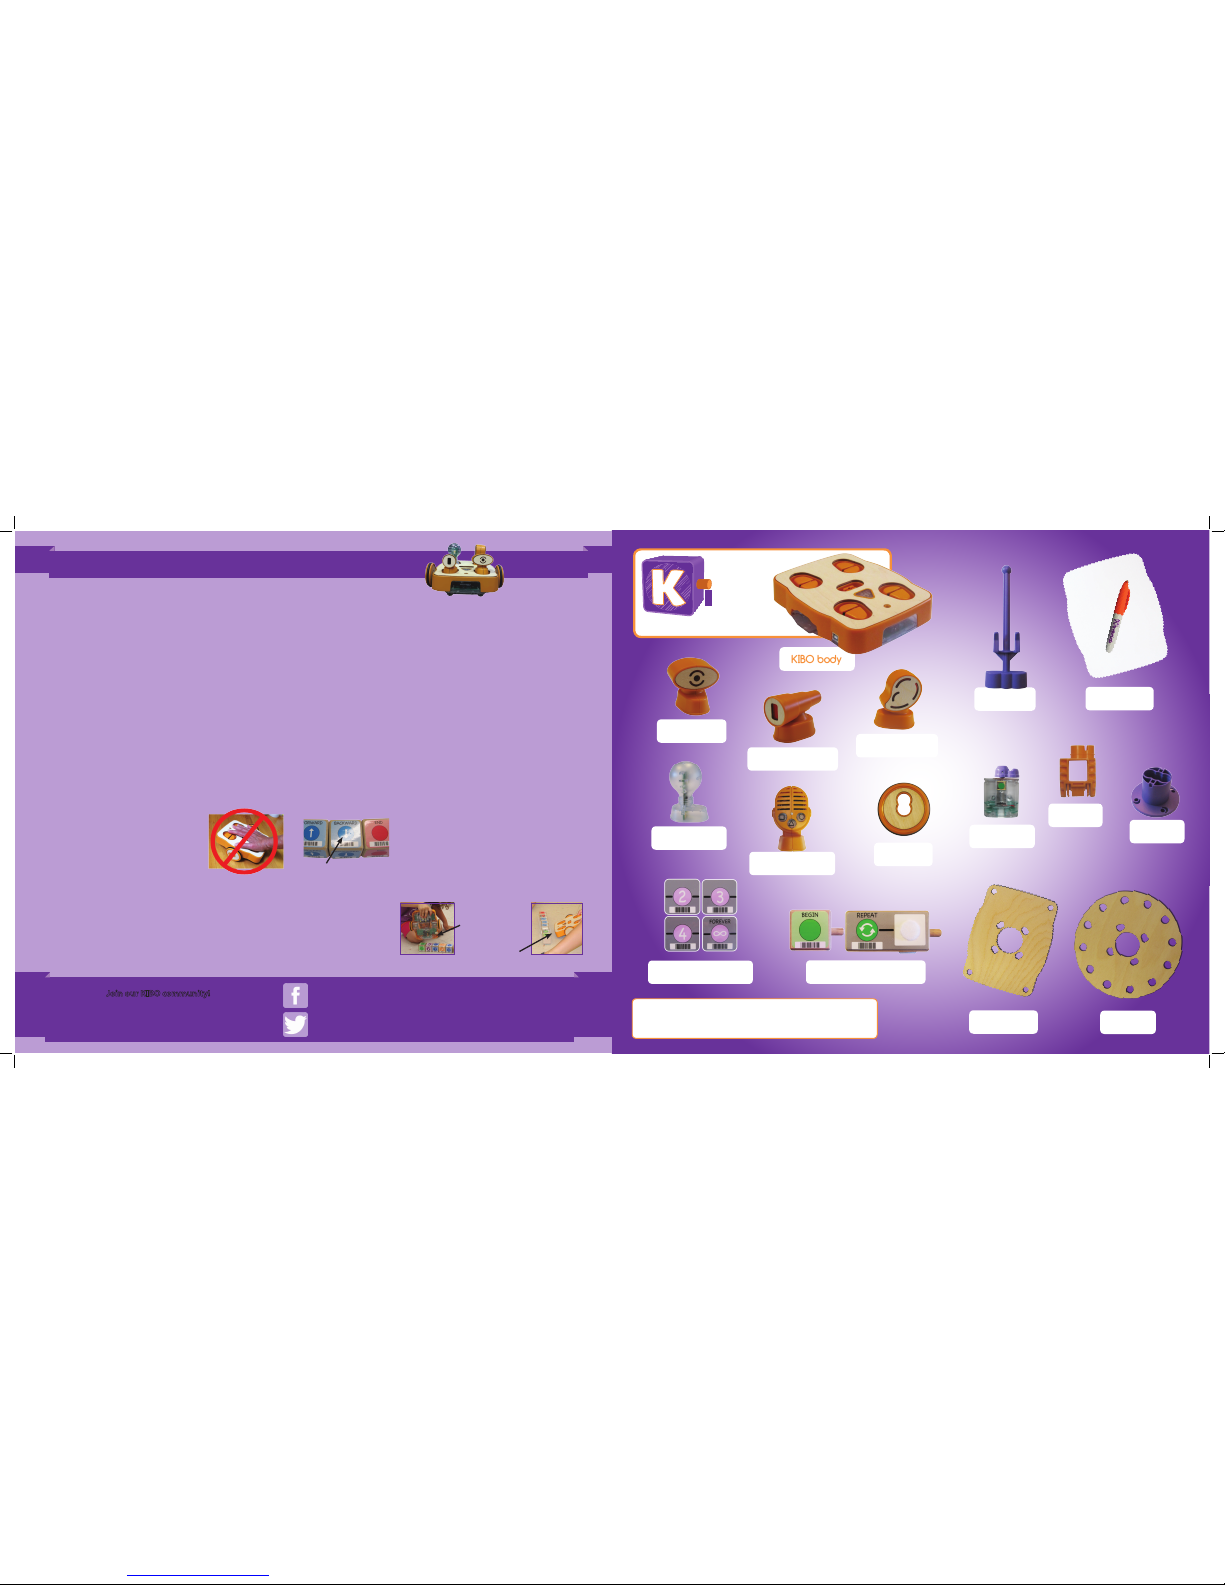
bo
KIBO body
programming blocks (21)
motor
modules (3)
wheels (2)
light output:
light bulb
round
stage
stage
pedestal
light sensor:
eye
sound sensor:
ear
distance sensor:
telescope
KIBO 21 robot kit contents
parameter cards (12)
stage
support
rectangular
stage
sound record/
playback module
agpole
whiteboard
& marker
Colors of some components may vary.
Additional parts available at shop.kinderlabrobotics.com.
FAQs and complete parts list at kinderlabrobotics.com/compare
Uh-oh ...
If the red scanner light is not blinking, it usually
indicates a problem with the batteries. Remove
and re-install the batteries. If that doesn’t help,
replace the batteries with new ones.
A tri-tone sound and a red scan indicator LED
means that an error occurred. KIBO may have
mis-scanned, or there may be an error in your
program. Try scanning again or re-arranging
your blocks. Have fun experimenting!
If KIBO is turning the wrong way, or going
backward when it should be going forward, check
the motors to make sure that the green dots are
showing through KIBO’s transparent bottom.
Take care of your motor modules!
KIBO’s motor modules are
designed to turn KIBO’s wheels;
they are not designed to carry
a lot of weight. So, please don’t
force KIBO to go faster than it
wants, and don’t push down on KIBO’s body
when its wheels and motors are installed. These
behaviors can damage the motor modules. Our
warrantee doesn’t cover damage caused by
improper motor use.
Programming tips
Make sure you plug in the sensors that your program needs! If
you use the WAIT FOR CLAP block, you will need the “ear” (sound
sensor). To use the LIGHT or DARK parameter cards, you will need
the “eye” (light sensor). To use the NEAR or FAR parameter cards,
you will need the “telescope” (distance sensor). To use the RED/
WHITE/BLUE LIGHT ON blocks, you will need the light bulb. To
use the PLAY blocks, you’ll need the Sound Record/Playback
Module.
Scanning tips
To scan, hold KIBO 2–4” away from the programming block.
Shine the red scanner light onto the bar code. It’s ok if the light
is a little “bigger” than the bar code.
If KIBO won’t scan, try changing KIBO’s position slightly. Move
it a little closer or farther away from the block and try changing
the angle a little bit.
Scanning problems can also be caused by
light reecting on the shiny surface of the
stickers, interfering with KIBO’s ability to
read the bar code.
If you are still having scanning problems,
notice if there is light reecting from your stickers. Try moving
away from direct
overhead lighting
and windows. Or,
try scanning the
sides of the blocks,
instead of the top.
Tips & Troubleshooting
this type of reection can
interfere with scanning
If scanning from the
top isn’t working ...
Try scanning from
the side!
Follow us on Twitter: @KinderLabRobot
Visit us on Facebook http://facebook.com/KinderLabRobotics
Join our KIBO community!
Sign up for our email newsletter for KIBO news,
activity ideas, classroom tips, and more, at
http://kinderlabrobotics.com
 Loading...