

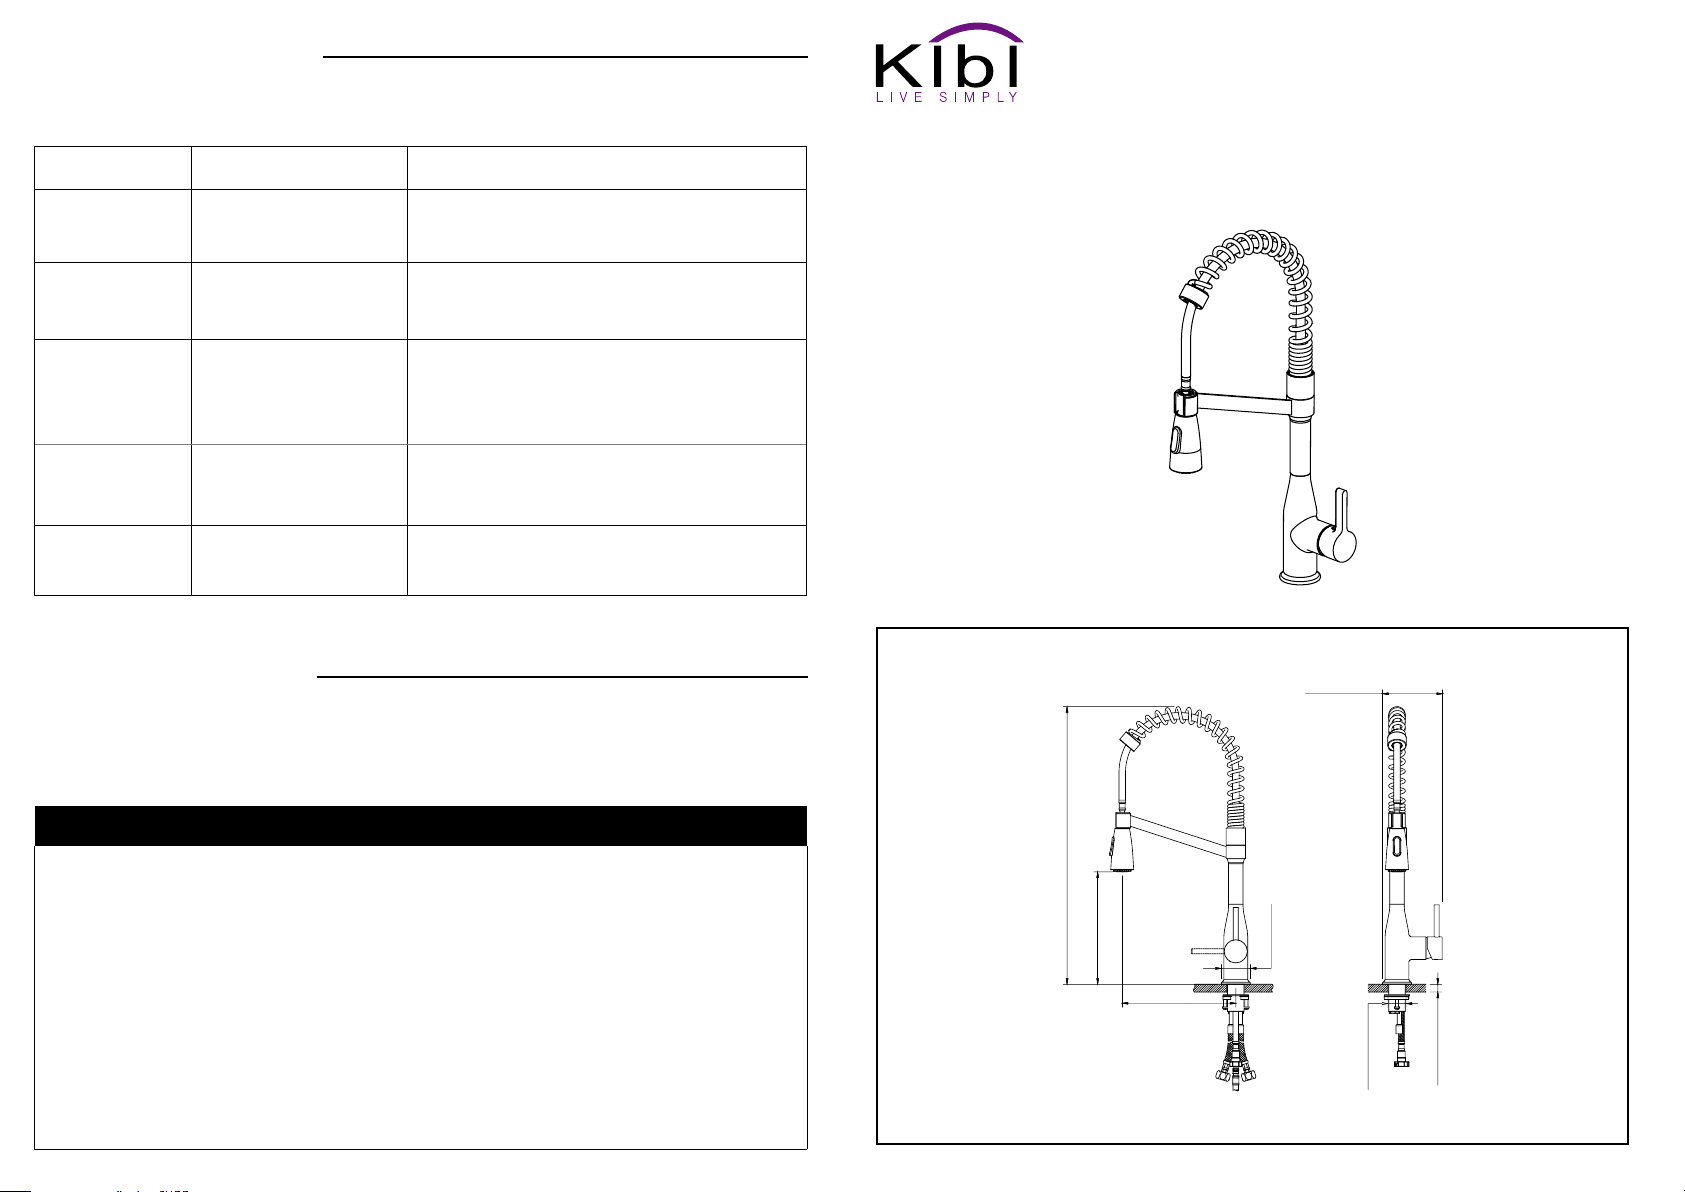
Φ1-3/8”
(Φ35 mm)
Max1-9/16”
(Max40 mm)
TROUBLE-SHOOTING
If you’ve followed the instructions carefully and your faucet still does not work properly, take these
corrective steps.
Problem Cause Action
Low flow
Faucet leaks from
under handle
If leak persists, faucet
leaks from spout
outlet, water does not
shut off
completely
Leaking between
spray head and the
hose
Hose does not retract
Aerator(4) or Filter(6)(11) may
be clogged
Bonnet(2) nut has come loose
or cartridge(3) needs to be
reseated
Cartridge may need to be
adjusted or replaced
Spray head may be loose or
washer is not seated correctly
in the hose connection
Weight may be installed incorrectly
Unscrew aerator to check rubber packing or replace
aerator.
(Note: some models require wrench to remove aerator.)
Remove handle and cap. Using a wrench, ensure bonnet
nut is tight.
SHUT OFF WATER SUPPLIES.
Replace cartridge(3). When reinstalling parts, make sure
bonnet nut (2) is tightened securely with a wrench.
WARNING: Failure to securely tighten bonnet nut with a
wrench could result in water damage.
Tighten spray head by hand until snug. Make sure washer
is seated correctly
Readjust weight on hose
CLEANING AND CARE
Clean the faucet often with a soft cloth to keep it looking like new. For heavy cleaning you can use mild liquid detergents or non-abrasive liquid polisher. Rinse with water and dry with a soft cloth. Avoid abrasive cleaners, steel wool
and harsh chemicals as these will dull the finish and void your warranty.
DIMENSIONS
Model: LargoKKF2006
INSTALLATION GUIDE
4-9/16”
(116 mm)
LIMITED LIFETIME WARRANTY
KIBI provides its customers with an extensive warranty as a result of our excellent workmanship and high quality
components used in our products.
Mechanical warranty: A limited lifetime warranty is provided on all mechanical parts to be free from manufacturing
defects in materials and workmanship under normal use for as long as the original purchaser owns their home.
Finish warranty: A 5-year warranty is provided on all KIBI faucet finishes to the original purchaser against manufacturing defects in materials and workmanship.
At its sole discretion, KIBI will repair or replace any part or finish that proves to be defective in material and/or
workmanship under normal installation, use and service.
This warranty is extended to the original consumer owner, but does not cover installation or any other labor
charges. In no event shall KIBI be liable for any incidental, consequential or special damages, installation cost,
labor, travel time, freight costs incurred, lost profits, or contingent liabilities. KIBI makes no representation that its
products comply with any or all local building or plumbing codes. It is the consumer’s responsibility to determine
local code compliance.
21-3/16”
(538 mm)
8-9/16”
(218 mm)
8-11/16”
(220 mm)
Φ2-3/16”
(Φ56 mm)

Installation
Installation
Shut off water suppliers. Remove the old
faucet, clean the mounting surface.
Note: For first time install, flush the pipes
first by open the angel valve to run 60s.
For Three-Hole Sinks:
3
21
Remove the mounting hardware from the
mounting pipe.
For Three-Hole Sinks:
4
Adjust position of faucet body if necessary,
Then tighten the mounting nuts with phillips
screwdriver until snug.
87
Connect and tighten the supply hoses by using
two adjustable wrenches (avoid twisting or
kinking).
Note: Do not remove the net filter that
attached into the connecting end!
109
Click
Place stainless (non-staining) deck plate
and deck plate gasket onto sink, secure it
with silicone. Note: the deck plate need
purchase seprately.
For Single-Hole Sinks:
5 6
Put the rubber O-ring into the bottom gap of
faucets then Insert faucet into faucet hole.
Put the rubber O-ring into the bottom gap of
faucets then Insert faucet into faucet hole.
From underneath the countertop, Slide rubber
washer, metal washer and mounting bracket
onto the thread shank.
Turn on water suppliers. Place a bucket below
outlet tube, slowly open and close the supply
angle valves, This will prevent debris from
being lodged in the hose and sprayer.
11 12
Install the hose weight on the outlet side of
the hose, near the loop.
Test the handspray hose. If it does not
retract smoothly, reposition the weight.
Shut off water suppliers. Push the
handspray hose(7) into the quick
connector(10) until you hear a click sound.
Make sure it’s secured.
Turn on the water suppliers, Shut off the faucet
and check for leaks.
 Loading...