

KI WorkZone Series Assembly Instructions Manual
Assembly Instructions
WorkZone® Overheads
December 2015

WorkZone® Overheads
Table of Contents
WorkZone Overhead Cabinets
Single Universal Overhead Cabinet Installation ......................................................................3
Single Universal Overhead Shelf Installation ..........................................................................6
Dual Universal Overhead Cabinet Installation ........................................................................9
Dual Universal Overhead Shelf Installation ..........................................................................12
Corner Universal Overhead Cabinet Installation ...................................................................15
Corner Universal Overhead Shelf Installation .......................................................................18
Single & Double Balance Overhead Cabinet Installation ......................................................21
Corner Balance Overhead Cabinet Installation .....................................................................22
2
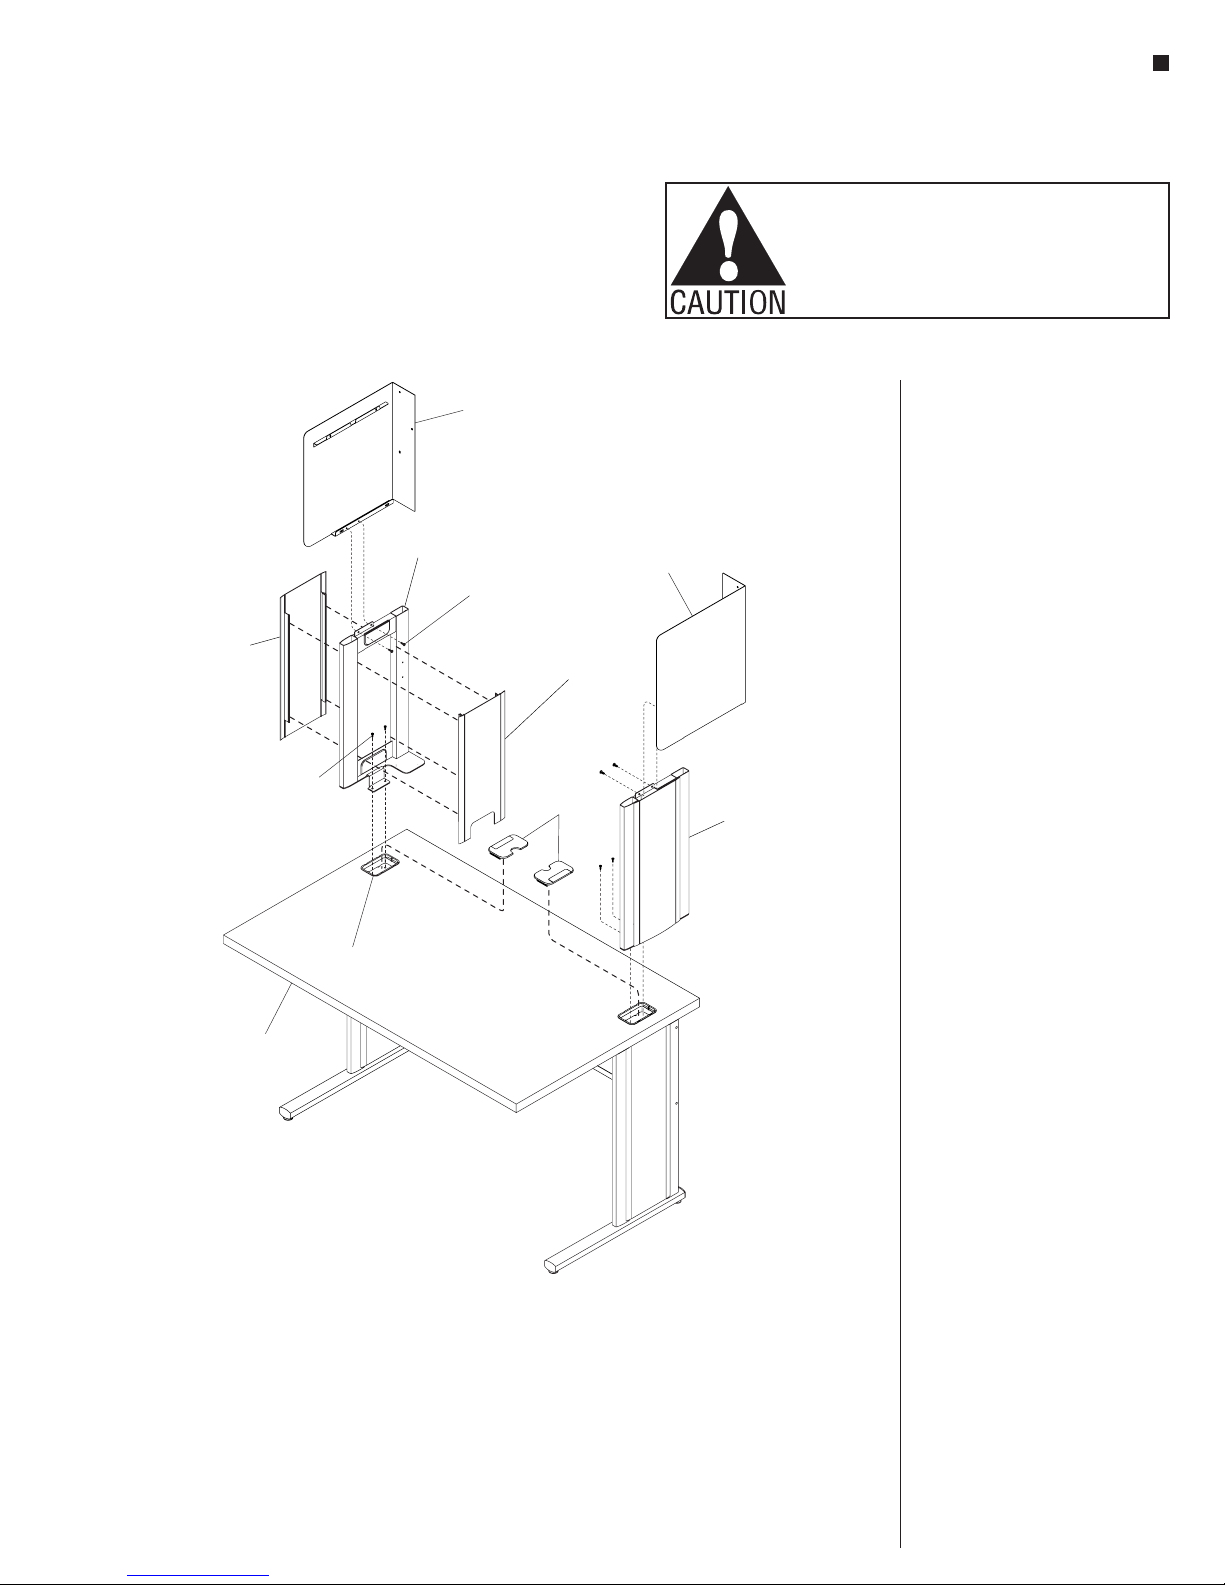
WorkZone® Single Universal Overhead Cabinet
Figure 1
right-hand
inser
Assembly Instructions
Assemble units as described herein only. To do otherwise
may result in instability. All screws, nuts and bolts must be
tightened securely and must be checked periodically after
assembly. Failure to assemble properly, or to secure parts
may result in assembly failure and personal injury.
stanchion
t (outer)
#10-32 x /
screw
1
"
2
grommet
hole
left-hand
stanchion
cabinet side
(left-hand)
#8-32 x /
screw
1
"
2
stanchion
insert (inner)
grommet
covers
cabinet side
(right-hand)
stanchion
Single Universal Overhead
Cabinet Installation
Important: WorkZone desk must be
fully assembled prior to installing the
overhead unit.
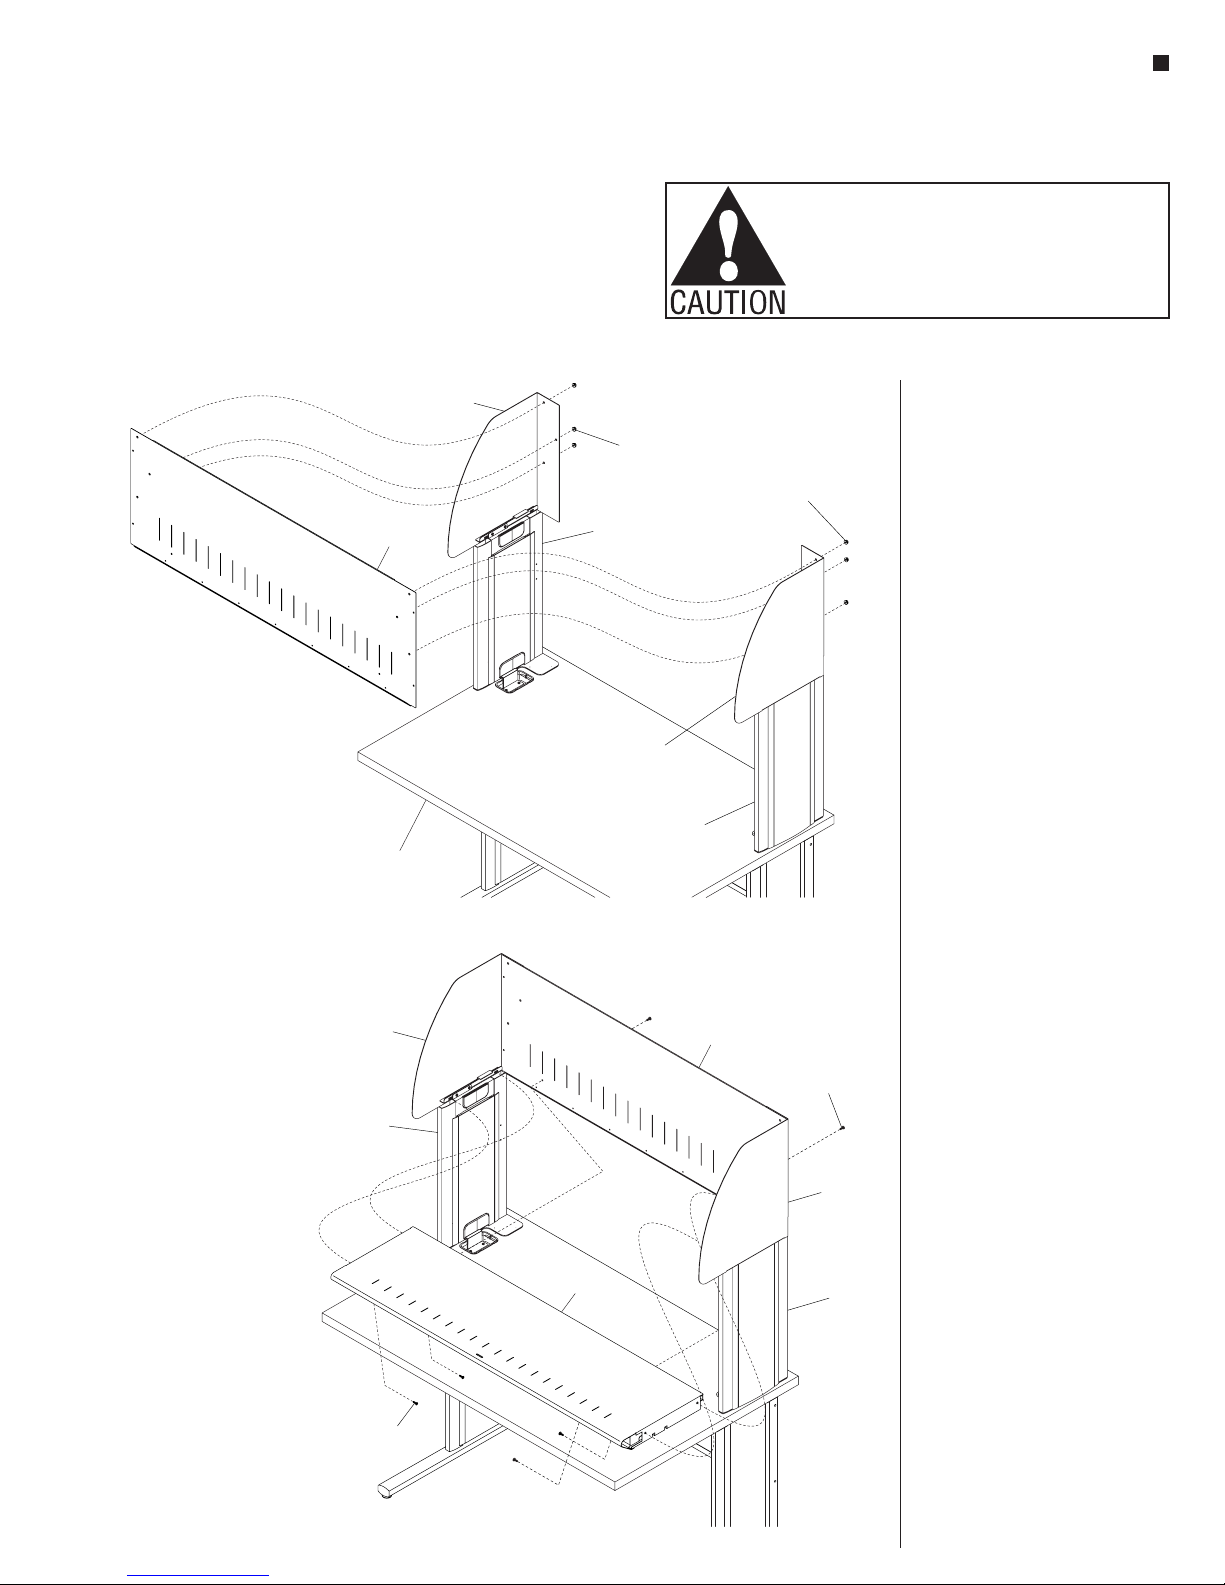
1. Begin by removing grommet covers
from the back sides at the top of the
desk where the overhead cabinet will
install (Figure 1).
2. Reference Figure 1 below to identify
the left- and right-hand stanchions,
as well as the left- and right-hand
cabinet sides. One side at a time,
position the appropriate stanchion
as illustrated such that the lower
mounting bracket of the stanchion
inserts into the grommet hole. Align
the mounting holes in the bracket
with the holes in the top of the leg
and secure using two #10-32 x 1/2”
screws (Figure 1).
3. Orient the right- and left-hand cabinet
sides as illustrated, then nest them
into the tops of the stanchions and
align the mounting holes. Secure
from the inside using two #8-32 x 1/2”
screws at each stanchion side
(Figure 1).
WorkZone
Desk
3

WorkZone® Single Universal Overhead Cabinet
Figure 2
cabinet side
cabinet side
(right-hand)
Figure 3
Assembly Instructions
Assemble units as described herein only. To do otherwise
may result in instability. All screws, nuts and bolts must be
tightened securely and must be checked periodically after
assembly. Failure to assemble properly, or to secure parts
may result in assembly failure and personal injury.
4. Position cabinet back as illustrated,
with studs facing the rear. Orient
the cabinet back into position,
inserting the studs on the cabinet
back through the mounting holes in
rear flanges of both installed cabinet
sides. Use six #10-24 serrated nuts
to secure back to sides (Figure 2).
5. Place the shelf bottom into position
between the cabinet sides, above the
lower mounting flanges and tight
to the installed shelf back. Nest the
bottom shelf down onto both cabinet
sides lower mounting flanges and
align mounting holes. Secure the
bottom shelf to the cabinet sides
from underneath, at each end using
two #8-32 x 1/2” screws (Figure 3).
6. At the lower rear of the shelf back,
secure the shelf back to the rear edge
of the bottom shelf using two
#8-32 x 1/2” screws (Figure 3).
cabinet
back
WorkZone
Desk
(left-hand)
#10-24
serrated nut
#10-24
serrated nut
left-hand
stanchion
cabinet side
(right-hand)
right-hand
stanchion
4
cabinet side
(left-hand)
left-hand
stanchion
#8-32 x /
screw
1
"
2
shelf
bottom
cabinet
back
#8-32 x /
screw
right-hand
stanchion
1
"
2
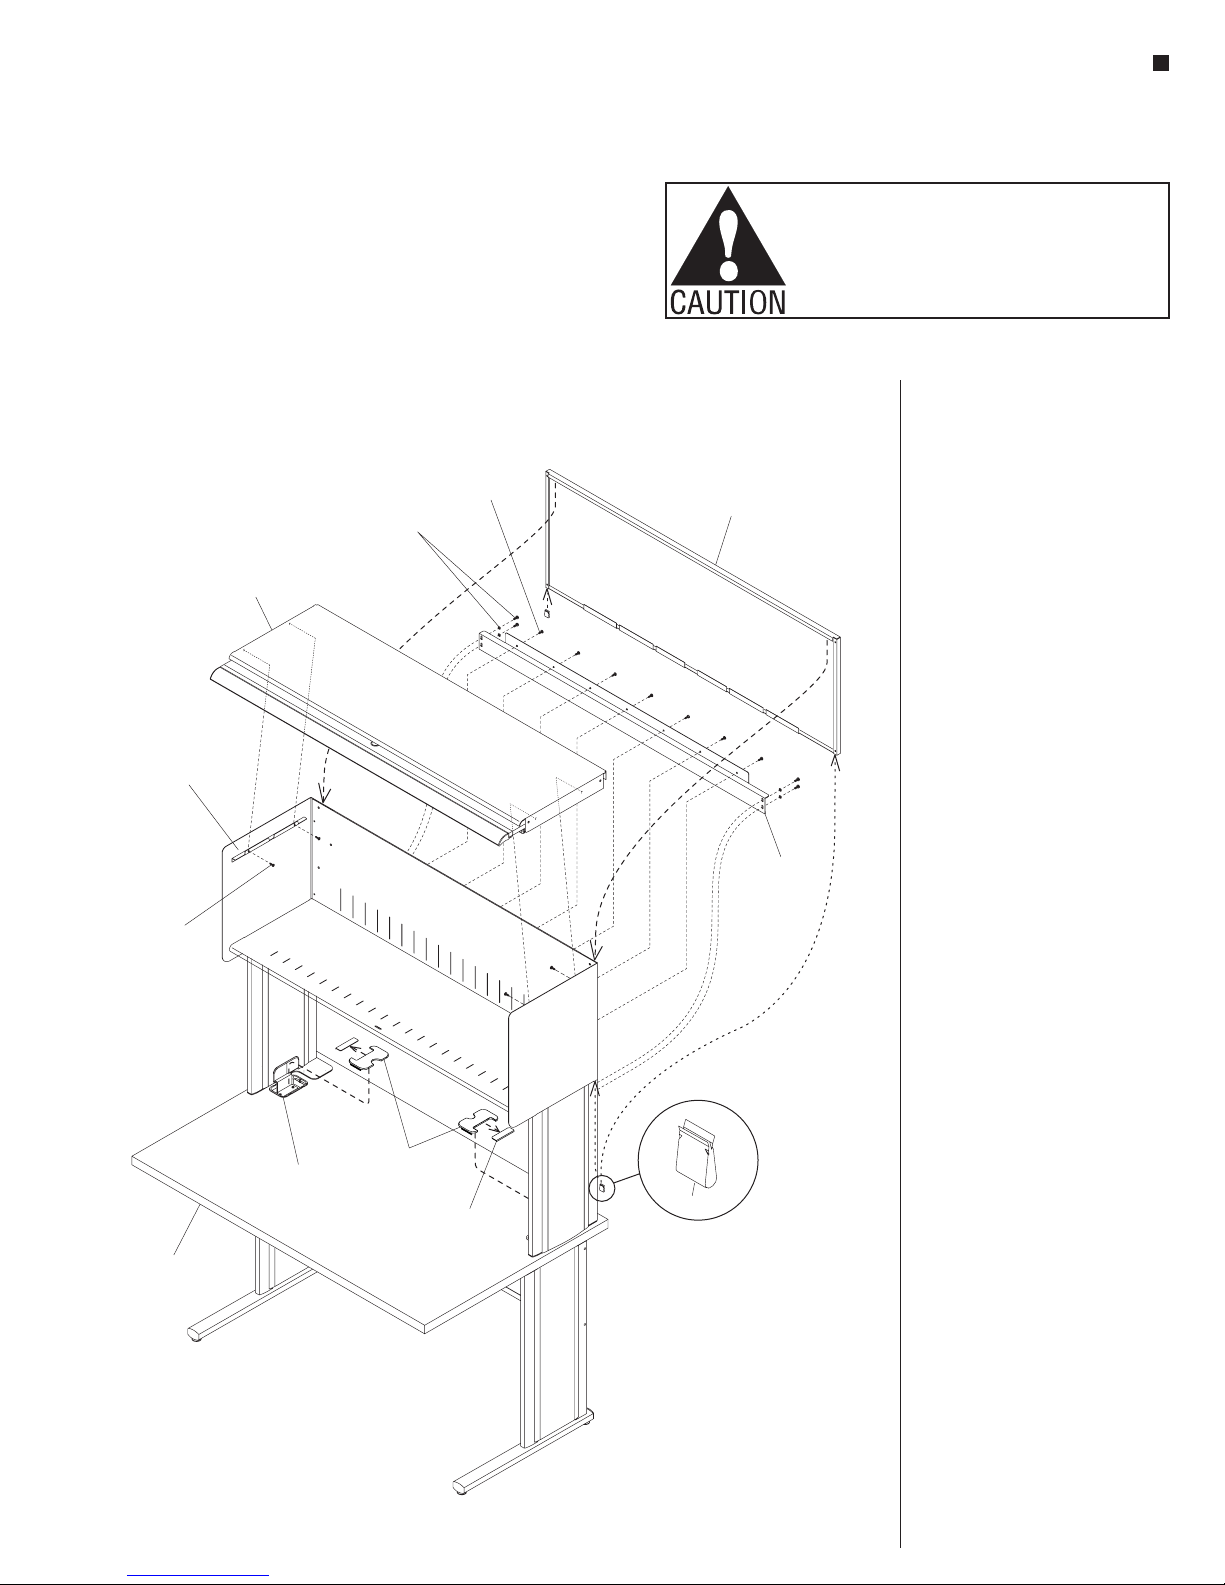
Figure 4
#8-32 x /
1
"
top mounting
flange
1
#8-32 x /
screw
top shelf
& cabinet door
"
2
#10-32 x /
screw & tooth
washer
WorkZone® Single Universal Overhead Cabinet
Assembly Instructions
Assemble units as described herein only. To do otherwise
may result in instability. All screws, nuts and bolts must be
tightened securely and must be checked periodically after
assembly. Failure to assemble properly, or to secure parts
may result in assembly failure and personal injury.
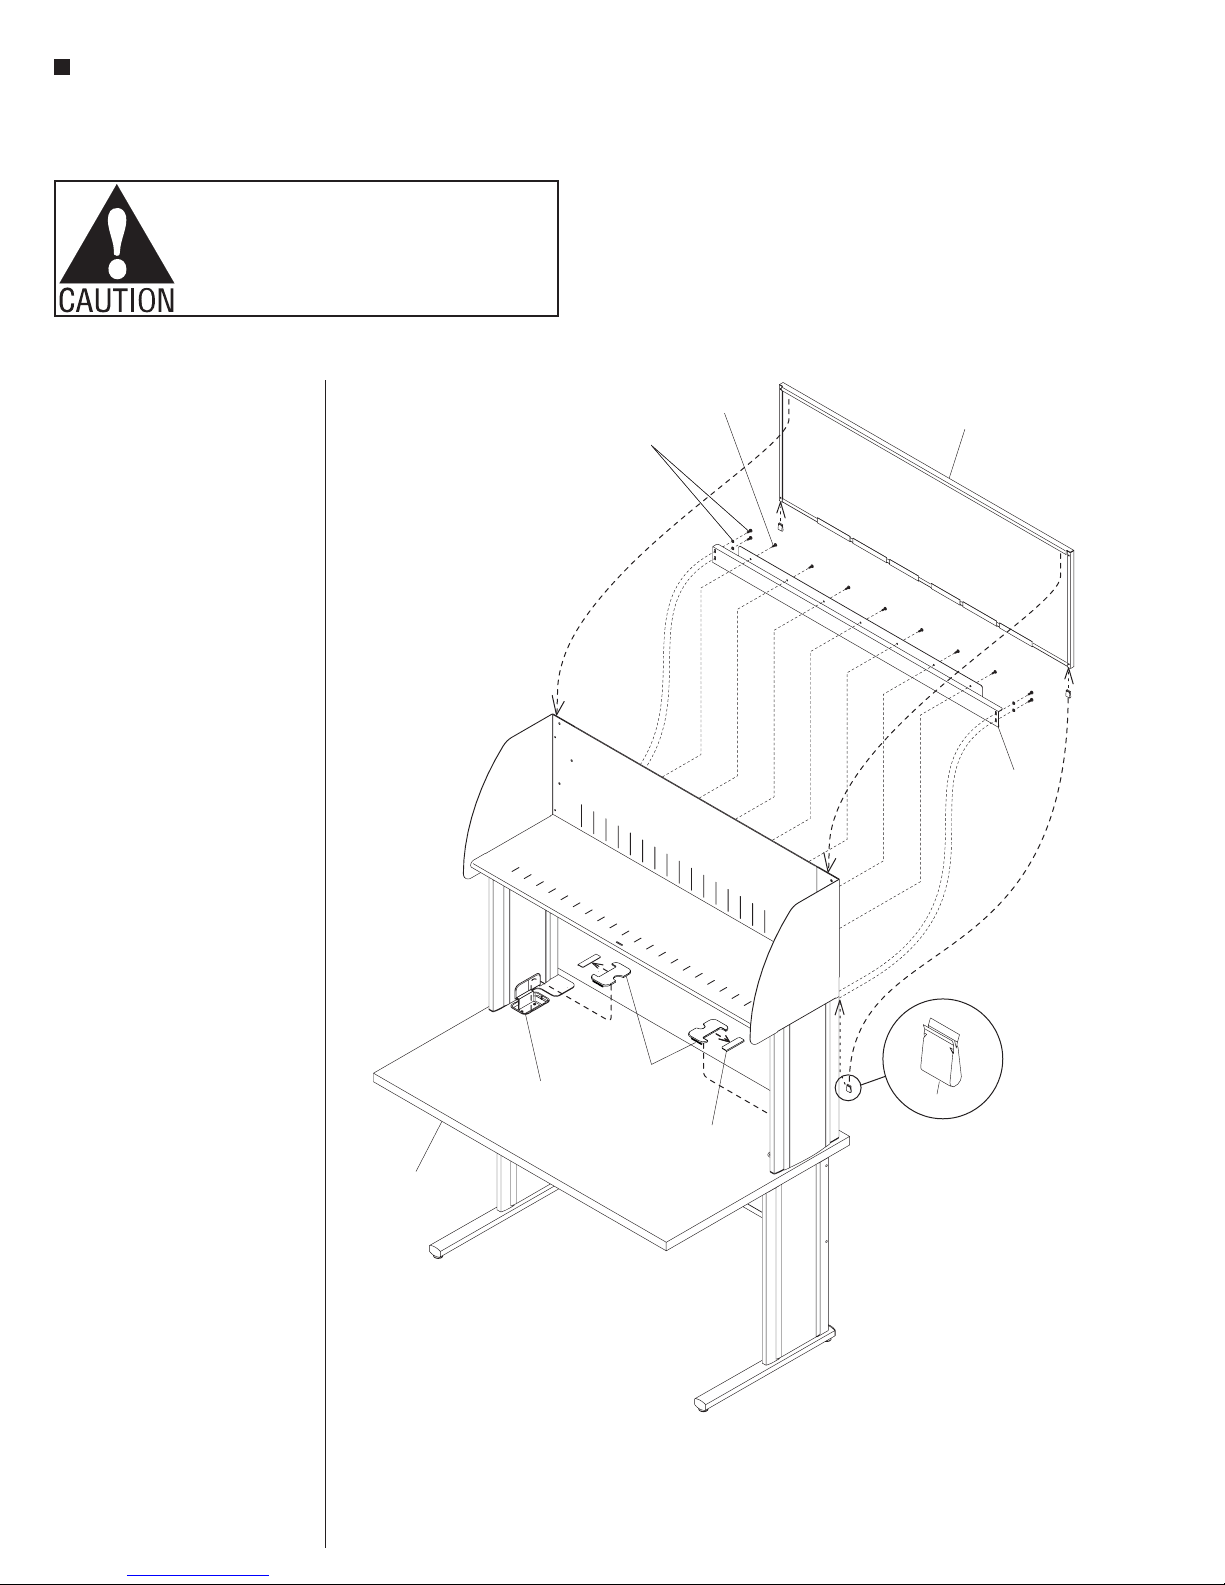
7. Carefully set the top shelf/cabinet
door up onto the top mounting
flanges of both cabinet sides. Align
mounting holes and secure using
2
1
"
2
screw
back
plate
stiffener
beam
two #8-32 x 1/2” screws at each end
(Figure 4).
8. Position the stiffener beam as
illustrated to the lower rear of the
back shelf, align mounting holes
and secure beam to shelf back
using the required number of
#8-32 x 1/2” screws. Also, at each
end of the stiffener beam, use two
#10-32 x 1/2” screws with tooth
washers and secure the beam to the
top rear of the right- and left-hand
stanchions (Figure 4).
9. Orient the back plate as illustrated
behind the cabinet, then hang it
onto the back of the cabinet such
that the top vertical flange of the
back plate captures the top inside
edge of the shelf back. Use the two
barb clips provided and press them
up at the underside of the cabinet to
attach the bottom of the back plate
to the rear, bottom of the shelf back
(Figure 4).
grommet
hole
WorkZone
Desk
grommet
covers
grommet
knock-out
10. Take grommets removed in step one
and remove the knock-outs from
each. Snap the grommets back into
place in the grommet hole at the
installed stanchions (Figure 4).
barb clip
5
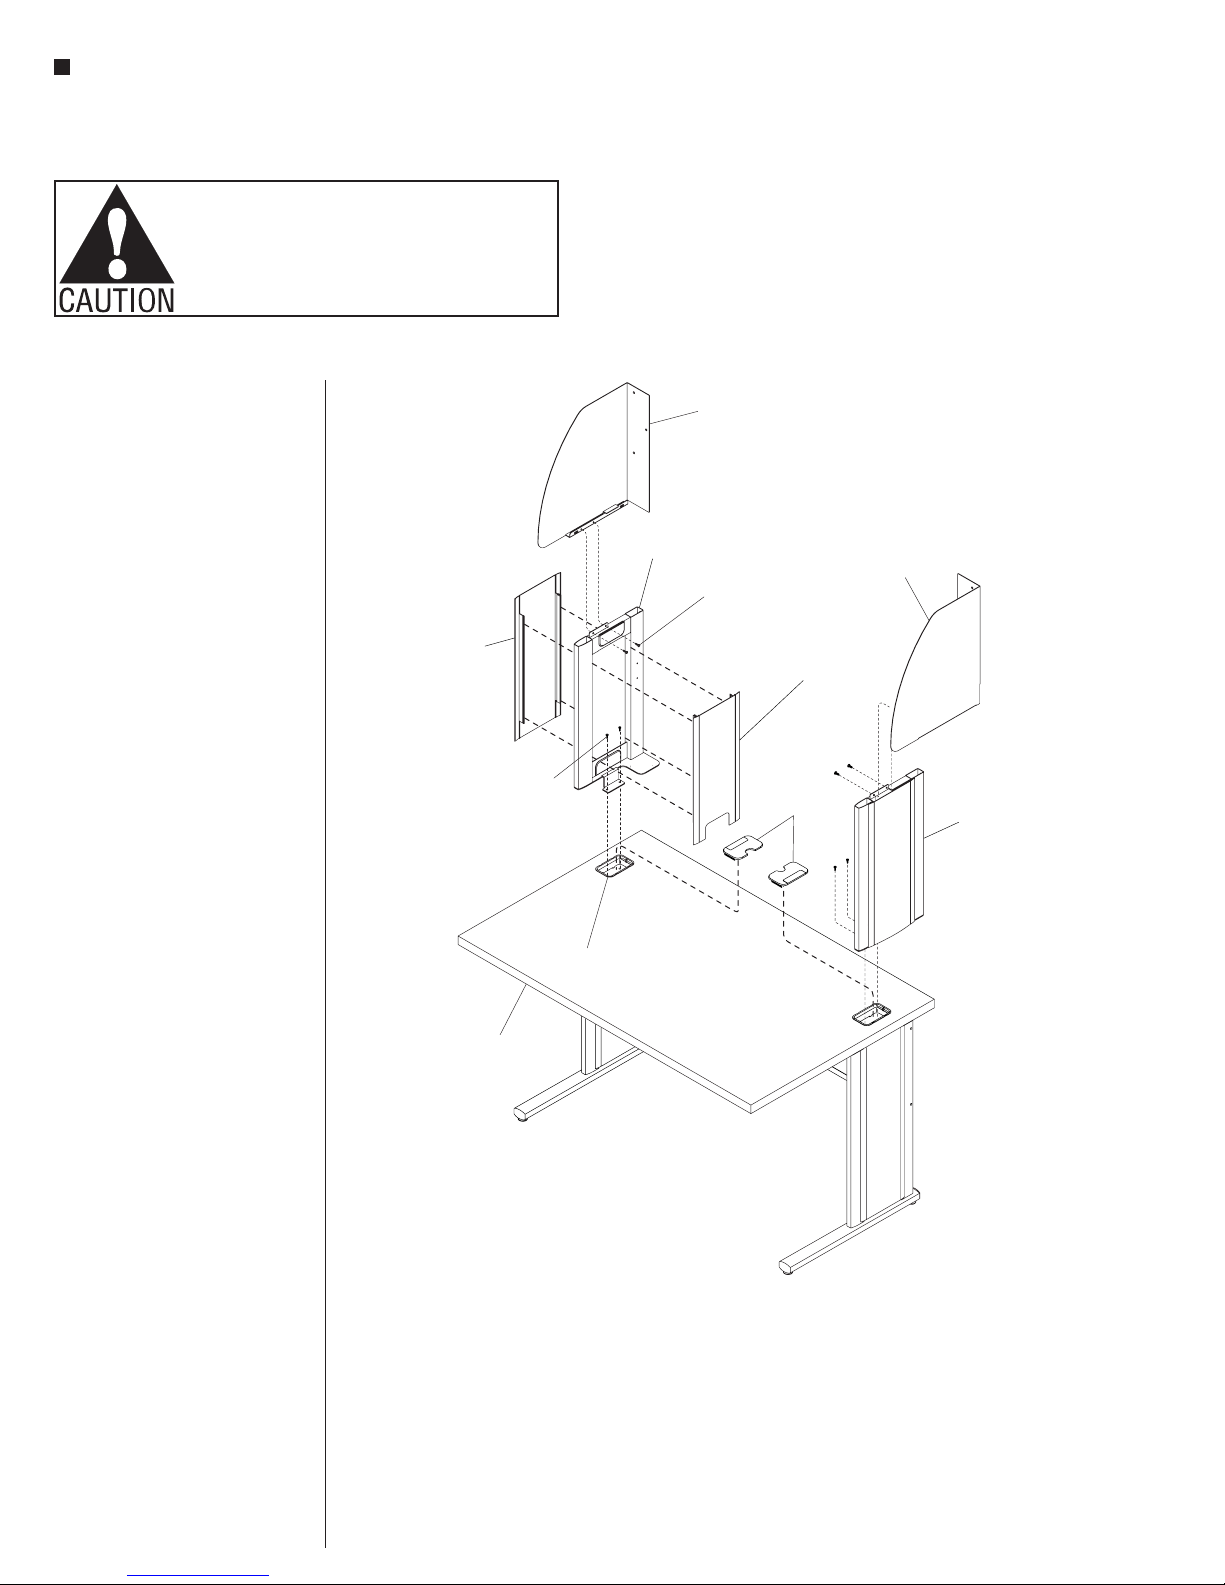
WorkZone® Single Universal Overhead Shelf
Figure 5
right-hand
stanchion
Assembly Instructions
Assemble units as described herein only. To do otherwise
may result in instability. All screws, nuts and bolts must be
tightened securely and must be checked periodically after
assembly. Failure to assemble properly, or to secure parts
may result in assembly failure and personal injury.
Single Universal Overhead Shelf
Installation
Important: WorkZone desk must be
fully assembled prior to installing the
overhead shelf unit.
1. Begin by removing grommet covers
from the back sides at the top of the
desk where the overhead shelf will
install (Figure 5).
2. Reference Figure 5 below to identify
the left- and right-hand stanchions,
as well as the left- and right-hand
shelf sides. One side at a time,
position the appropriate stanchion
as illustrated such that the lower
mounting bracket of the stanchion
inserts into the grommet hole. Align
the mounting holes in the bracket
with the holes in the top of the leg
and secure using two #10-32 x 1/2”
screws (Figure 5).
3. Orient the right- and left-hand shelf
sides as illustrated, then nest them
into the tops of the stanchions and
align the mounting holes. Secure
from the inside using two
#8-32 x 1/2” screws at each stanchion
side (Figure 5).
stanchion
insert (outer)
#10-32 x /
screw
1
"
2
grommet
hole
left-hand
stanchion
shelf side
(left-hand)
#8-32 x /
screw
1
"
2
stanchion
insert (inner)
grommet
cover
shelf side
(right-hand)
6
WorkZone
Desk
WorkZone® Single Universal Overhead Shelf
Figure 6
Figure 7
Assembly Instructions
Assemble units as described herein only. To do otherwise
may result in instability. All screws, nuts and bolts must be
tightened securely and must be checked periodically after
assembly. Failure to assemble properly, or to secure parts
may result in assembly failure and personal injury.
(left-hand)
shelf
back
WorkZone
Desk
shelf side
#10-24
serrated nut
left-hand
stanchion
shelf side
(right-hand)
right-hand
stanchion
#10-24
serrated nut
4. Position shelf back as illustrated,
with studs facing the rear. Orient the
shelf back into position, inserting
the studs on the back through the
mounting holes in rearflanges of
both installed shelf sides. Use six
#10-24 serrated nuts to secure back
to sides (Figure 6).
5. Place the shelf bottom into position
between the shelf sides, above the
lower mounting flanges and tight
to the installed shelf back. Nest the
bottom shelf down onto both shelf
sides lower mounting flanges and
align mounting holes. Secure the
bottom shelf to the shelf sides from
underneath, at each end using two
#8-32 x 1/2” screws (Figure 7).
6. At the lower rear of the shelf back,
secure the shelf back to the rear edge
of the bottom shelf using two
#8-32 x 1/2” screws (Figure 7).
shelf side
(left-hand)
left-hand
stanchion
#8-32 x /
screw
shelf
back
1
#8-32 x /
shelf
bottom
1
"
2
2
screw
shelf side
(right-hand)
right-hand
stanchion
"
7
WorkZone® Single Universal Overhead Shelf
#8-32 x /
1
"
Figure 8
Assembly Instructions
Assemble units as described herein only. To do otherwise
may result in instability. All screws, nuts and bolts must be
tightened securely and must be checked periodically after
assembly. Failure to assemble properly, or to secure parts
may result in assembly failure and personal injury.
7. Position the stiffener bar as
illustrated to the lower rear of the
back shelf, align mounting holes
and secure beam to shelf back using
the required number of #8-32 x 1/2”
screws. Also, at each end of the
stiffener beam, use two #10-32 x 1/2”
screws with tooth washers and
secure the beam to the top rear of
the right- and left-hand stanchions
(Figure 8).
8. Orient the back plate as illustrated
behind the shelf, then hang it onto
the back of the cabinet such that the
top vertical flange of the back plate
captures the top inside edge of the
shelf back. Use the two barb clips
provided and press them up at the
underside of the cabinet to attach
the bottom of the back plate to the
bottom, rear of the shelf back
(Figure 8).
9. Take grommets removed in step one
and remove the knock-outs from
each. Snap the grommets back into
place in the grommet hole at the
installed stanchions (Figure 8).
2
1
washer
washer
1
"
"
2
2
#10-32 x /
#10-32 x /
screw & tooth
screw & tooth
screw
back
plate
stiffener
beam
WorkZone
Desk
8
grommet
hole
grommet
covers
barb clip
grommet
knock-out
 Loading...