

KI System 3000 Countertop Assembly Instructions Manual
Assembly Instructions
System 3000 Countertop
Standard Height
May 2003
You make the rules.
We make the rest
.
®
Of course KI solutions work
better for you. They’re made
for you. No one pays more
attention to customer needs
than we do. We don’t design
our furniture to win awards
(even though it does). We
don’t rely on one-size-fits-all
solutions (even though they
would make our life easier).
We find out what the market
needs. And, we make it. The
same applies to our service,
distribution…everything we
do. KI solutions work, because
we’re working for you.
KI
1330 Bellevue Street
P. O. Box 8100
Green Bay, Wisconsin 54308-8100
1-800-424-2432
www.ki.com
KI and Working for You
are registered trademarks
of Krueger International, Inc.
© 2003 KI
All Rights Reserved.
Litho in USA.
Code KI-61510R1/KI/KP/503
Part # 13.4301
1
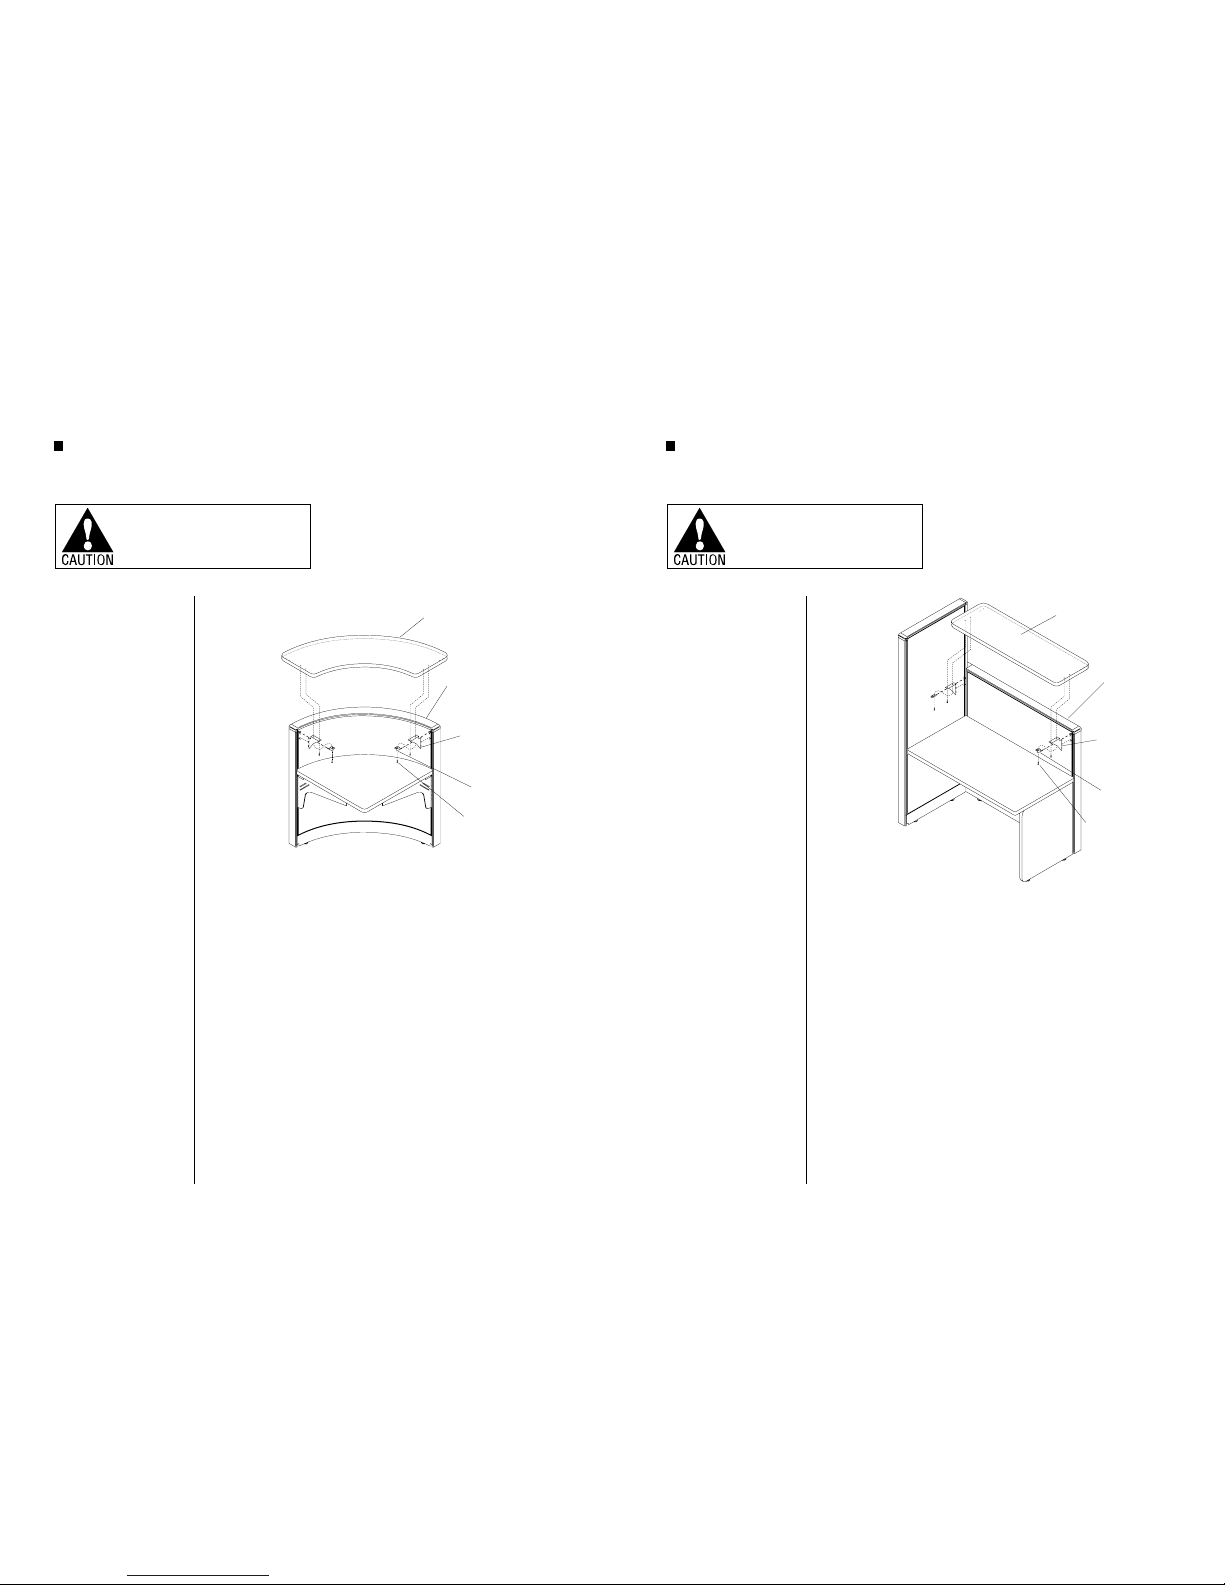
Note: The following instructions
refer to the installation of a single
piece curved countertop onto a
42" and higher curved panel.
Using standard-height ADA
brackets, the countertop extends
no more than 4" into the aisle to
comply with ADA guideline 4.4.1.
Countertops installed onto 32" high
(wheelchair-height) panels require
different ADA countertop support
brackets.
1. Curved countertops installed over
standard height panels require the
use of two ADA standard-height
countertop brackets, one right-,
and one left-hand. Mount the
countertop brackets to the trimrail
grooves so the mounting flanges
are at the same height as the panel
tops. The right- and left-hand
brackets will be different. Notice
that the mounting flanges of the two
outside brackets face inward as
installed to the panel (Figure 1).
Note: The ADA standard lock clips
are an important part of the bracket
assembly which must be installed
when the curved countertop surface
is secured.
2. Carefully place the countertop
surface face up onto the curved
panel and standard ADA countertop
brackets. Align the holes of the two
brackets with corresponding holes
at each end of the countertop
surface (Figure 1).
3. Take the left- and right-hand ADA
standard lock clips and orient the
pin ends into the panel trimrail
grooves at the top tooth of each
installed ADA standard height
countertop bracket. Make sure the
mounting flanges of the outside
clips orient inward and that the
mounting holes of the lock clip line
up with the mounting holes of the
bracket. Secure the brackets and
lock clips to the underside of the
countertop with two #12 x 1" screw
at each bracket location (Figure 1).
Assemble units as described herein only. To do otherwise
may result in instability. All screws, nuts and bolts must be
tightened securely and must be checked periodically after
assembly. Failure to assemble properly, or to secure parts
may result in assembly failure and injury.
System 3000 Countertop
Curved Standard Height
Figure 1
#12 x 1"
screw
ADA
standard-height
countertop
bracket
standard-height
curved wall panel
ADA
standard
lock clip
curved
countertop
surface
Note: The following instructions
refer to the installation of a single
piece rectangular countertop
(60" and less in length) onto a 42"
and higher panel. Using
standard-height ADA brackets, the
countertop extends no more than
4" into the aisle to comply with
ADA guideline 4.4.1. Countertops
installed over 32" high (wheelchairheight) panels require different ADA
countertop support brackets.
1. Rectangular countertops installed
onto standard height panels require
the use of two ADA standard-height
countertop brackets, one right-, and
one left-hand. Mount the countertop brackets to the trimrail grooves
so the mounting flanges are at the
same height as the panel tops. The
right- and left-hand brackets will be
different. Notice that the mounting
flanges of the two outside brackets
face inward as installed to the panel
(Figure 1).
Note: The ADA standard lock clips
are an important part of the bracket
assembly which must be installed
when the rectangular countertop
surface is secured.
2. Carefully place the countertop
surface face up onto the wall panels
and standard ADA countertop
brackets. Align the holes of the two
brackets with corresponding holes
at each end of the countertop
surface (Figure 1).
3. Take the left- and right-hand ADA
standard lock clips and orient the
pin ends into the panel trimrail
grooves at the top tooth of each
installed ADA standard height
countertop bracket. Make sure the
mounting flanges of the outside
clips orient inward and that the
mounting holes of the lock clip line
up with the mounting holes of the
bracket. Secure the brackets and
lock clips to the underside of the
countertop with two #12 x 1"
screws at each bracket location.
(Figure 1).
Assemble units as described herein only. To do otherwise
may result in instability. All screws, nuts and bolts must be
tightened securely and must be checked periodically after
assembly. Failure to assemble properly, or to secure parts
may result in assembly failure and injury.
System 3000 Countertop
Rectangular Standard Height
4
Figure 1
#12 x 1"
screw
rectangular
countertop
surface
standard-height
wall panel
ADA
standard
lock clip
ADA
standard-height
countertop
bracket
 Loading...