


MediaXtreme MediaZone
Table of Contents
Keywest Technology MediaXtreme MediaZone System ............................................................... 2
Models & Connections ................................................................................................................... 3
MX Player Setup............................................................................................................................. 7
Player Network Setup ..................................................................................................................... 7
Setup Player Properties (INI Files) ............................................................................................... 12
Set the MX to PLAY..................................................................................................................... 12
MediaZone Scheduler Software Installation................................................................................. 13
Minimum Editor System Recommendations ................................................................................ 13
Install Software ............................................................................................................................. 13
Software Registration & Seat Licenses......................................................................................... 14
MediaZone Scheduler Graphical User Interface (GUI)................................................................ 14
Browser ......................................................................................................................................... 19
Menu Bar ...................................................................................................................................... 19
Quick Controls .............................................................................................................................. 20
Zones Layers................................................................................................................................. 20
Tutorial.......................................................................................................................................... 21
Zone Attributes ............................................................................................................................. 21
Create a New Set........................................................................................................................... 23
Background Zone.......................................................................................................................... 25
Add BMPs, JPGs, PNGs and Other Media to Zones .................................................................... 32
Add Crawls ................................................................................................................................... 37
Add Logos..................................................................................................................................... 40
Animated Logos............................................................................................................................ 42
Add Rolls ...................................................................................................................................... 42
Save Set......................................................................................................................................... 45
Edit Content Within a Set ............................................................................................................. 45
Blanks ........................................................................................................................................... 45
Rearrange Elements Within a Layer ............................................................................................. 46
Schedule and Communicate.......................................................................................................... 46
Advanced Communications .......................................................................................................... 57
Instant Commands ........................................................................................................................ 81
Appendix A—Player Setting INI Files ....................................................................................... 121
Appendix B—Editor Setting INI Files ................................................................................... 12115
Appendix C—Local Internet Weather Setup ............................................................................ 1210
Appendix D—Multi-Head Audio ........................................................................................... 12125
Appendix E—Data Acquistion ................................................................................................. 1216
Appendix F—Xwarp ................................................................................................................. 121
Appendix G—RSS Feeds ....................................................................................................... 12146
Appendix H—Warranty ............................................................................................................. 121
Keywest Technology
14563 W. 96th Terrace
Lenexa, Kansas 66215
800.331.2019
www.keywesttechnology.com
23 Mar 2009
Change 06
1
MediaXtreme MediaZone
Keywest Technology MediaXtreme MediaZone System
MediaXtreme (MX) MediaZone is Keywest Technology’s Digital Signage and Information
Channel product series. The series software and hardware is designed for easy content creation
and display with minimal graphics or video expertise. The device is capable of multi-zone and
layer compositing at the High-Definition output--the power to combine motion backgrounds,
multiple graphics pages, crawls, rolls, High-Definition MPEG1, 2, 4, WMV, AVI picture-inpicture effects, stereo, 5.1, WAV and MP3 audio, transitions effects, logos, fades, and more.
Check www.mediaxtreme.tv for all the latest product specifications and features.
****************************
Lethal operating voltages present at system power supply unit—internal and external units. Completely
disconnect main power cord prior to opening cover or removing any panels. Only trained and authorized
personnel should attempt any internal modifications, repairs, or service.
WARNING
***CAUTION***
Unit operates on 100 – 220 VAC 50 – 60 Hz Main Power. Inadequate power grounding can result in equipment
damage or destruction and could void warranty. Ensure you utilize provided power supply unit only. Use of
improper power supply can damage or destroy the unit and will void the warranty.
***CAUTION***
If the player is to be rack-mounted, do so using four heavy duty rack screws—rear support is recommended. Do not
use the MX as a shelf to support any weight other than its own. In any mounting configuration, ensure the unit is in
a clean, environmentally controlled location and ensure filters are cleaned regularly
*****************************
Keywest Technology
14563 W. 96th Terrace
Lenexa, Kansas 66215
800.331.2019
www.keywesttechnology.com
23 Mar 2009
Change 06
2
MediaXtreme MediaZone
Models & Connections
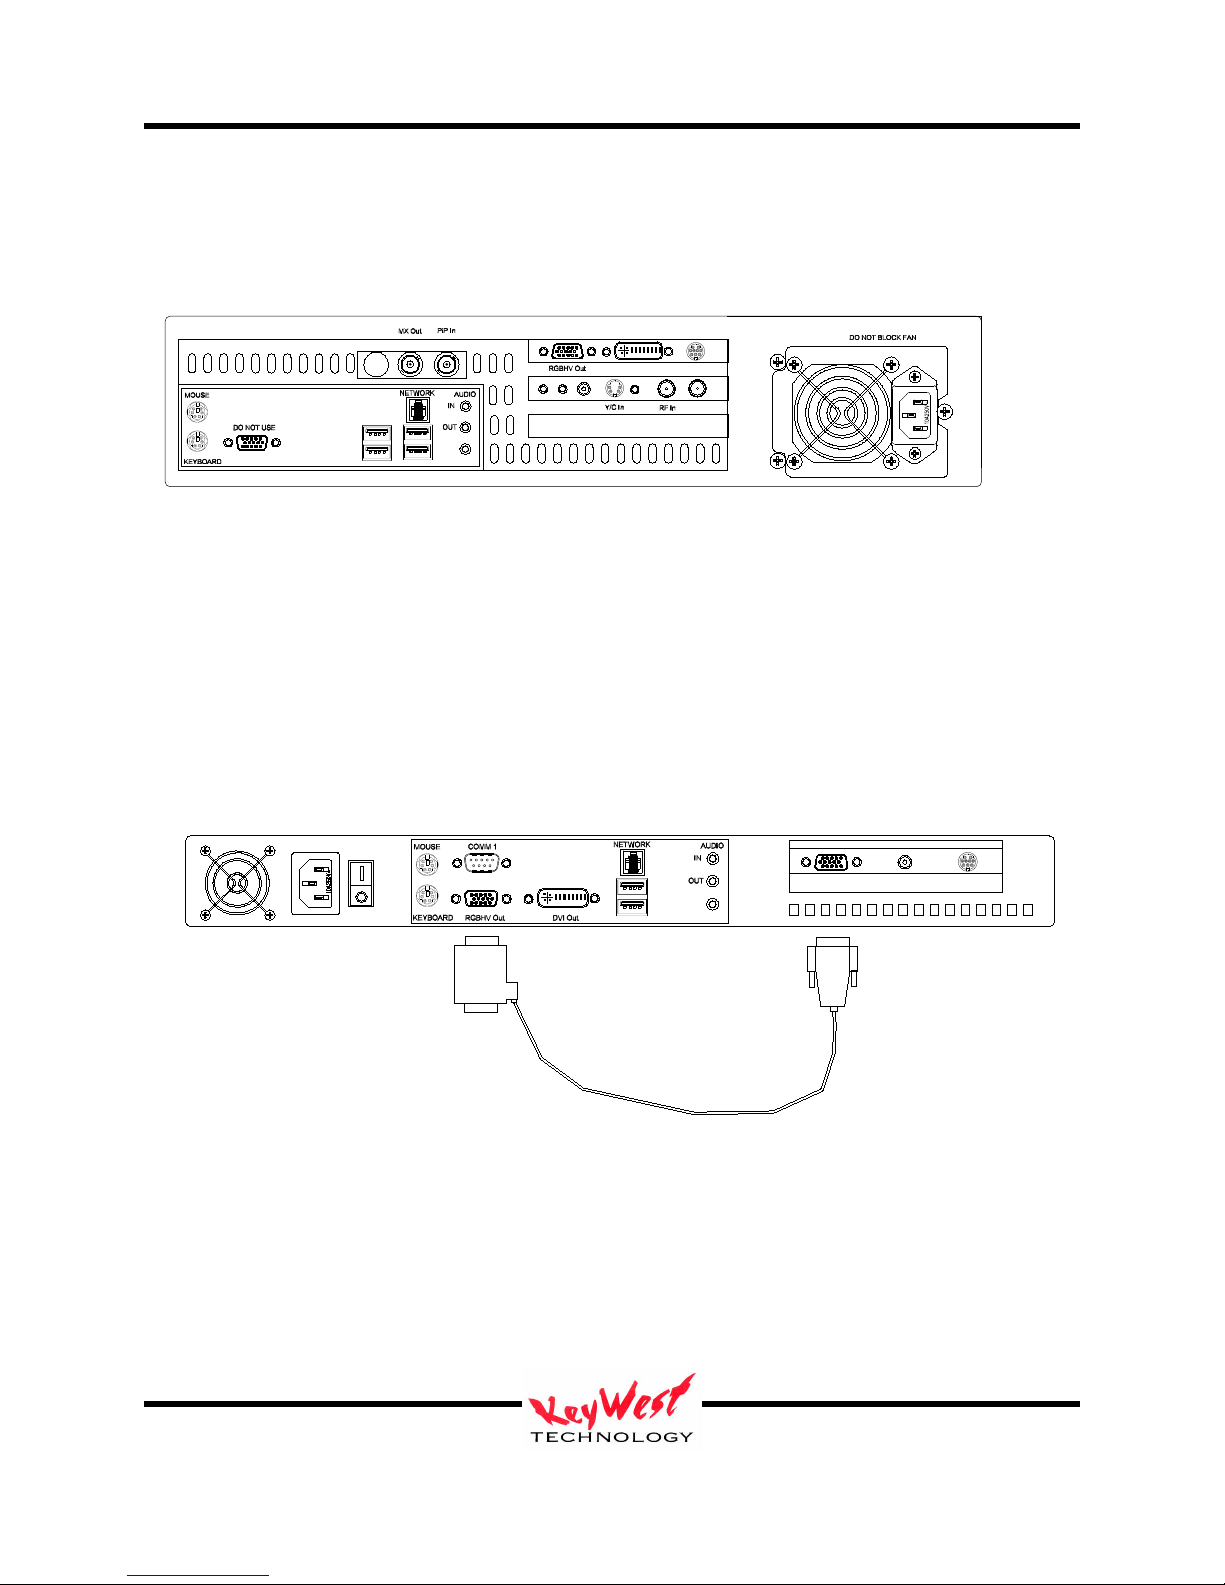
MXB-AV Rear Panel I/O
MX Out and PiP In are BNC connections for NTSC or PAL composite video input.
MXB-A Rear Panel I/O
Scan Converter Loop Cable is required to Activate Composite Video Output.
Keywest Technology
14563 W. 96th Terrace
Lenexa, Kansas 66215
800.331.2019
www.keywesttechnology.com
MXB-AV Notes
Power supply configuration may vary.
Scan-Converter Loop Cable
MXB-A Notes
Power supply configuration may vary.
23 Mar 2009
Change 06
Composite Out
3
MediaXtreme MediaZone
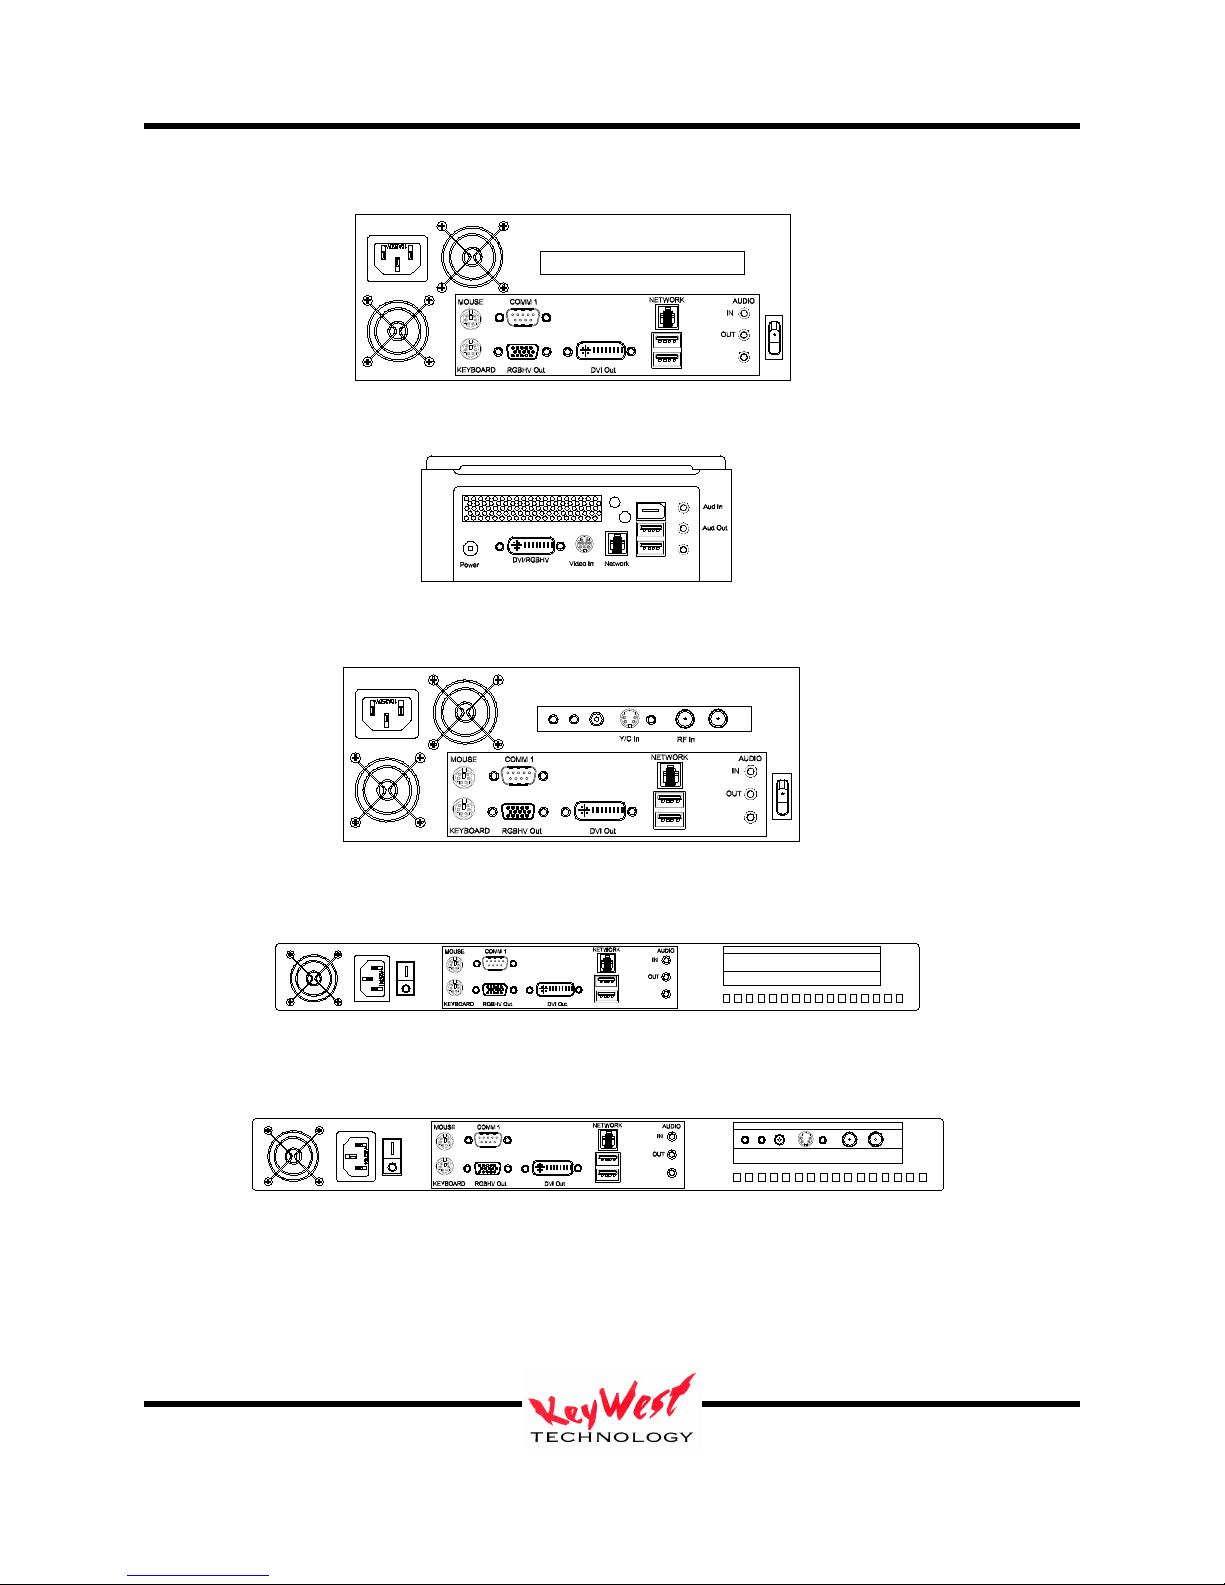
MXS-MZ (G7) Rear Panel I/O
MXS-MZ (G8) Rear Panel I/O
MXS-MZV Rear Panel I/O
MXS-MZR Rear Panel I/O
MXS-MZRV Rear Panel I/O
Keywest Technology
14563 W. 96th Terrace
Lenexa, Kansas 66215
800.331.2019
www.keywesttechnology.com
23 Mar 2009
Change 06
4

MediaXtreme MediaZone
MXS-SDI Rear Panel I/O
MXS-HD Rear Panel I/O
Keywest Technology
14563 W. 96th Terrace
Lenexa, Kansas 66215
800.331.2019
www.keywesttechnology.com
23 Mar 2009
Change 06
5
MediaXtreme MediaZone
Standard Connection Definitions (‘*’ = required connection for normal operation; ‘+’ = required
for initial setup only and may be removed after setup; all other connections not marked with ‘*’
or ‘+’ are optional)
+ MOUSE: Standard PS/2 style mouse
+ KEYBOARD: Standard PS/2 style keyboard
USB 1 & 2: Universal Serial Bus (any number of add-in peripherals such as printer, mouse,
keyboard)
PARALLEL PORT: Standard printer port
IOIO: Standard RS-232 serial port
AUDIO LINE OUT: Connect with 3/8” Stereo plug to audio amplifier or switcher for audio
broadcast over cable or broadcast television system. Required if you desire audio on-air
capability.
AUDIO LINE IN: Use 3/8” stereo plug to connect radio receiver, CD player, tape player, etc…
to line-in to loop through external audio source over the video presentation.
AUDIO MIC IN: Can serve as microphone input or secondary audio source input.
*+ VIDEO Out: Depending on your model hardware one or multiple video connections can be
made simultaneously—Composite Video Out (BNC connector outputting standard baseband (unmodulated) video) NTSC or PAL; DVI Out (typical for PC, HD or Flat Panel displays); RGBHV
Out (typical for PC, HD or Flat Panel displays).
NETWORK: RJ45 WAN/LAN port used to connect your MX to a network for remote control of
the device. Factory default setting for an MX player is Dynamic Host Configuration Protocol
(DHCP) used to force the player to automatically acquire an IP address.
If you must set or change the IP address in your MX and are unfamiliar with networks or do
not understand the steps in this manual, contact IT trained personnel prior to changing any
*Main Power: Standard 100 to 220 VAC, 50 to 60 Hz input. Utilize the A/C power supply cord
and DC Transformer (if applicable) shipped with your unit. Connect this only when you are
ready to run the unit. As soon as you plug in the AC Main Power, the device will power-up,
Power-On-Self-Test (POST), and begin to run the current schedule.
Keywest Technology
14563 W. 96th Terrace
Lenexa, Kansas 66215
800.331.2019
www.keywesttechnology.com
CAUTION
settings
23 Mar 2009
Change 06
6
MediaXtreme MediaZone
Units operate on 100 – 220 VAC 50 – 60 Hz Main Power. Inadequate power grounding can result in equipment
damage or destruction and could void warranty. Ensure you utilize provided power supply unit only. Use of
improper power supply can damage or destroy the unit and will void the warranty. Only use power cords and
transformers supplied by Keywest Technology to maintain warranty.
MX Player Setup
Once you have made the minimum appropriate connections (be sure to connect an output video
and power!) the unit will start, initialize, and begin to play the currently loaded schedule. The
first playback will be a factory test schedule.
MX Players may take up to 60 seconds to completely POST, load sets, and begin playing its
Should an MX device be shut down through its operating system, it will be necessary to use the
power switch on the unit to restart. Power switch locations will vary depending on the hardware
model but will always be on the front or rear of the player. Certain models will require opening
of a door or panel to access the main power button. All Keywest Technology provided hardware
devices are set to auto-start with the application of AC power and will return to ON state after
AC power loss automatically as long as no other method of shut-down has been used.
Remote communication with an MX player is accomplished by Ethernet, Serial, or optional
telephone modem. The selected path is the method used to send content (pages, crawls, videos,
logos, pictures) from a computer running editor software to the Player. Because of the inherent
superiority of network communications (Ethernet; Wide-Area Network (WAN); Local Area
Network (LAN), Wireless LAN (Wi-Fi), Broadband Air Cards, or any other term or method) this
manual will assume it is the method used.
Player Network Setup
A network by definition means there are at least two machines or computers tied together
through some communications link and can share resources over that network.
To configure a network connection connect a PC monitor (use the proper RGBHV connector and
DVI to VGA adapter as required—Do Not Use Any Connector Labeled “DO NOT USE”), a
keyboard, a mouse, a network cable, and power.
schedule. Please be patient during this process.
***CAUTION***
***NOTE***
Keywest Technology
14563 W. 96th Terrace
Lenexa, Kansas 66215
800.331.2019
www.keywesttechnology.com
23 Mar 2009
Change 06
7
MediaXtreme MediaZone
Power the unit and watch the monitor for the POST sequence. Once the device finishes start-up
it will begin playing the current schedule.
With the player displaying content press the “ESC” key on the keyboard. The unit will cease
playback and the operating system (OS) desktop will appear. If “ESC” doesn’t respond use
“CTL-ALT-DEL” and end the appropriate MX5Player task. Note: If a PS/2 keyboard was
installed after the unit was started, the player will require a reboot to recognize the keyboard.
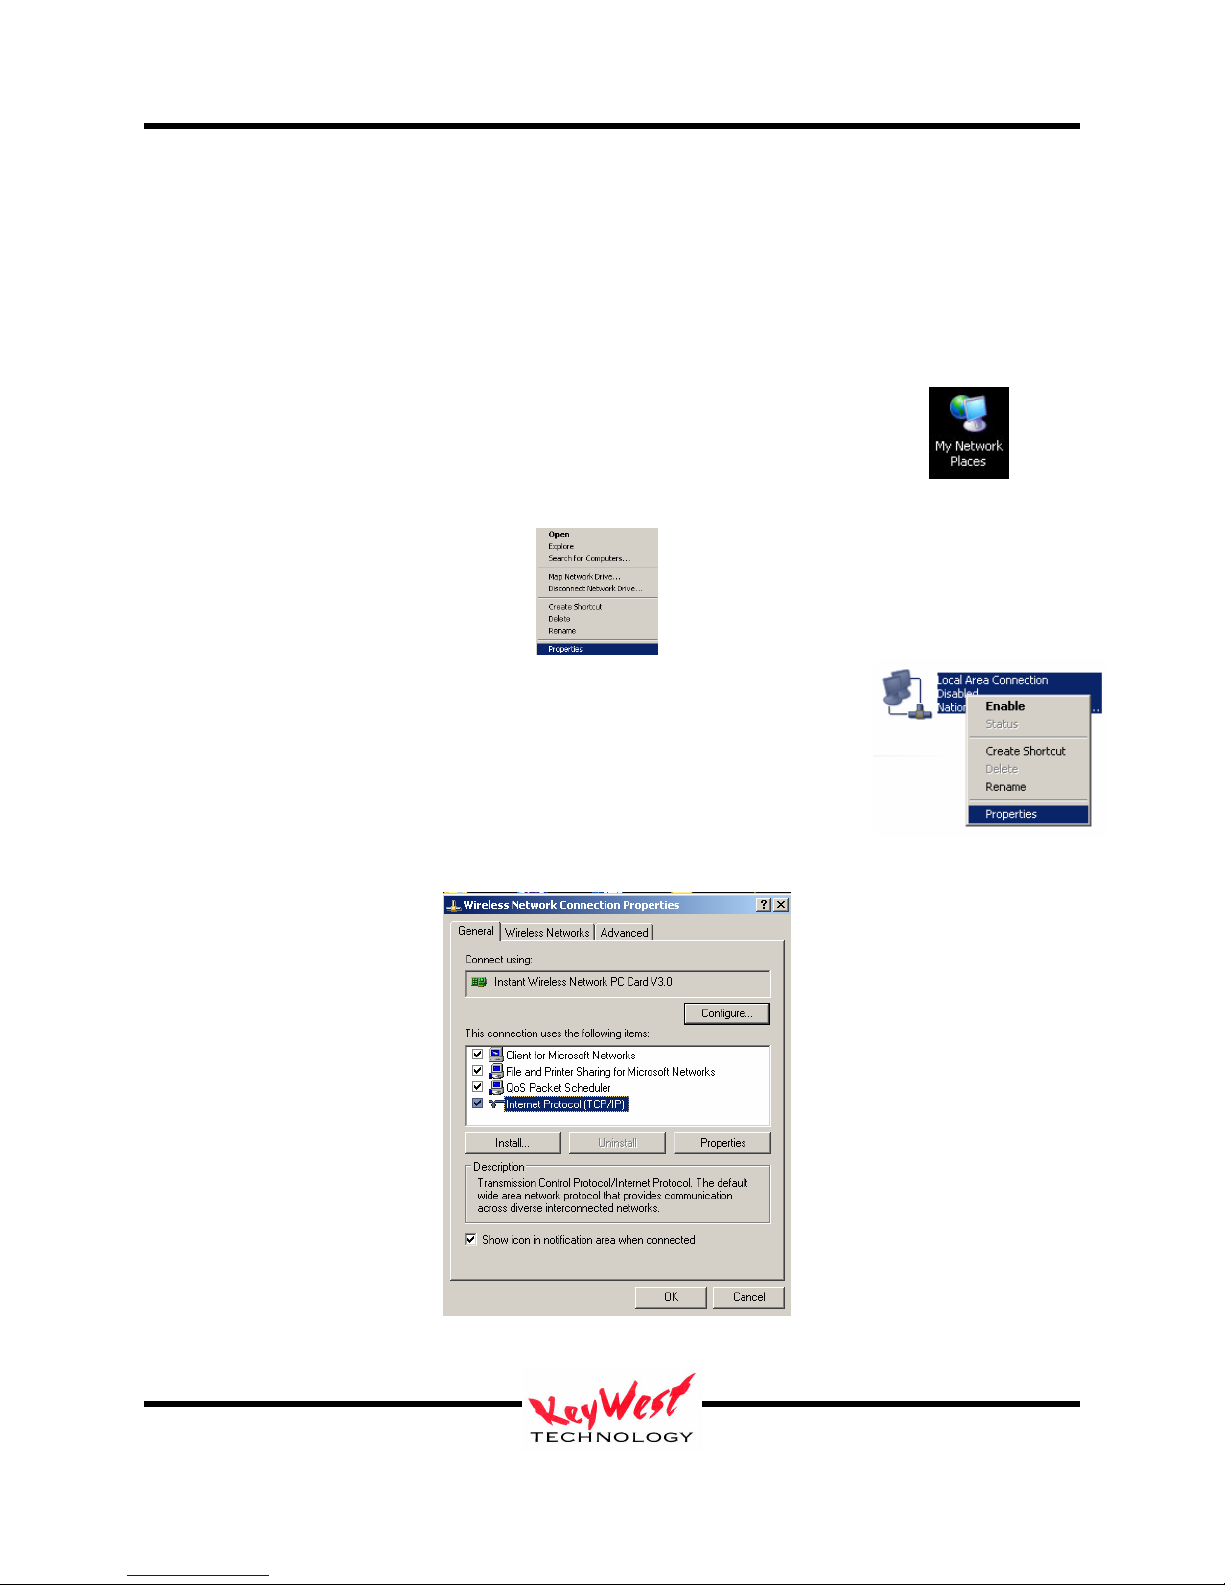
Setup the Network Adapter just like any Windows XP© based computer.
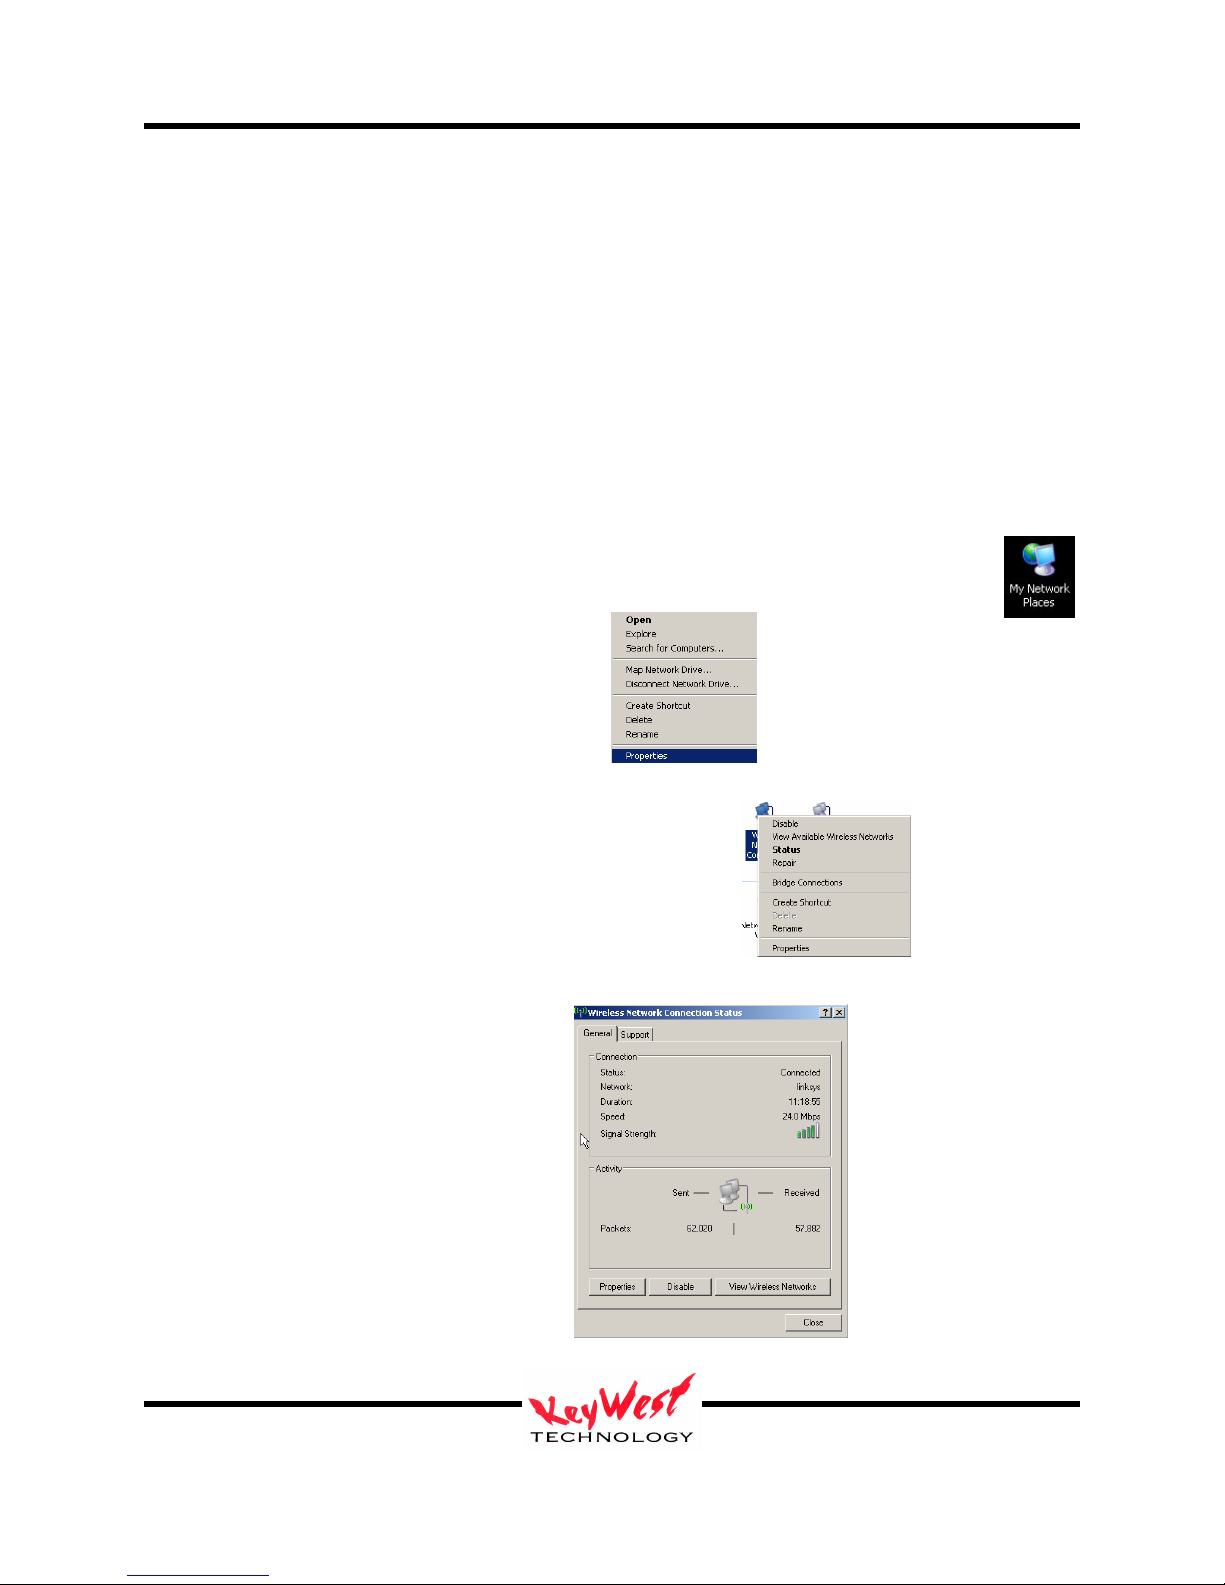
Use the mouse and right click on the My Network Places Icon.
Then single left-click PROPERTIES
Next right-click on the appropriate Network Connection Icon, and leftclick PROPERTIES again
Highlight INTERNET PROTOCOL TCP/IP and left-click PROPERTIES one more time…
Keywest Technology
14563 W. 96th Terrace
Lenexa, Kansas 66215
800.331.2019
www.keywesttechnology.com
23 Mar 2009
Change 06
8
MediaXtreme MediaZone
If there is any question on what settings are valid contact an IT professional before proceeding!
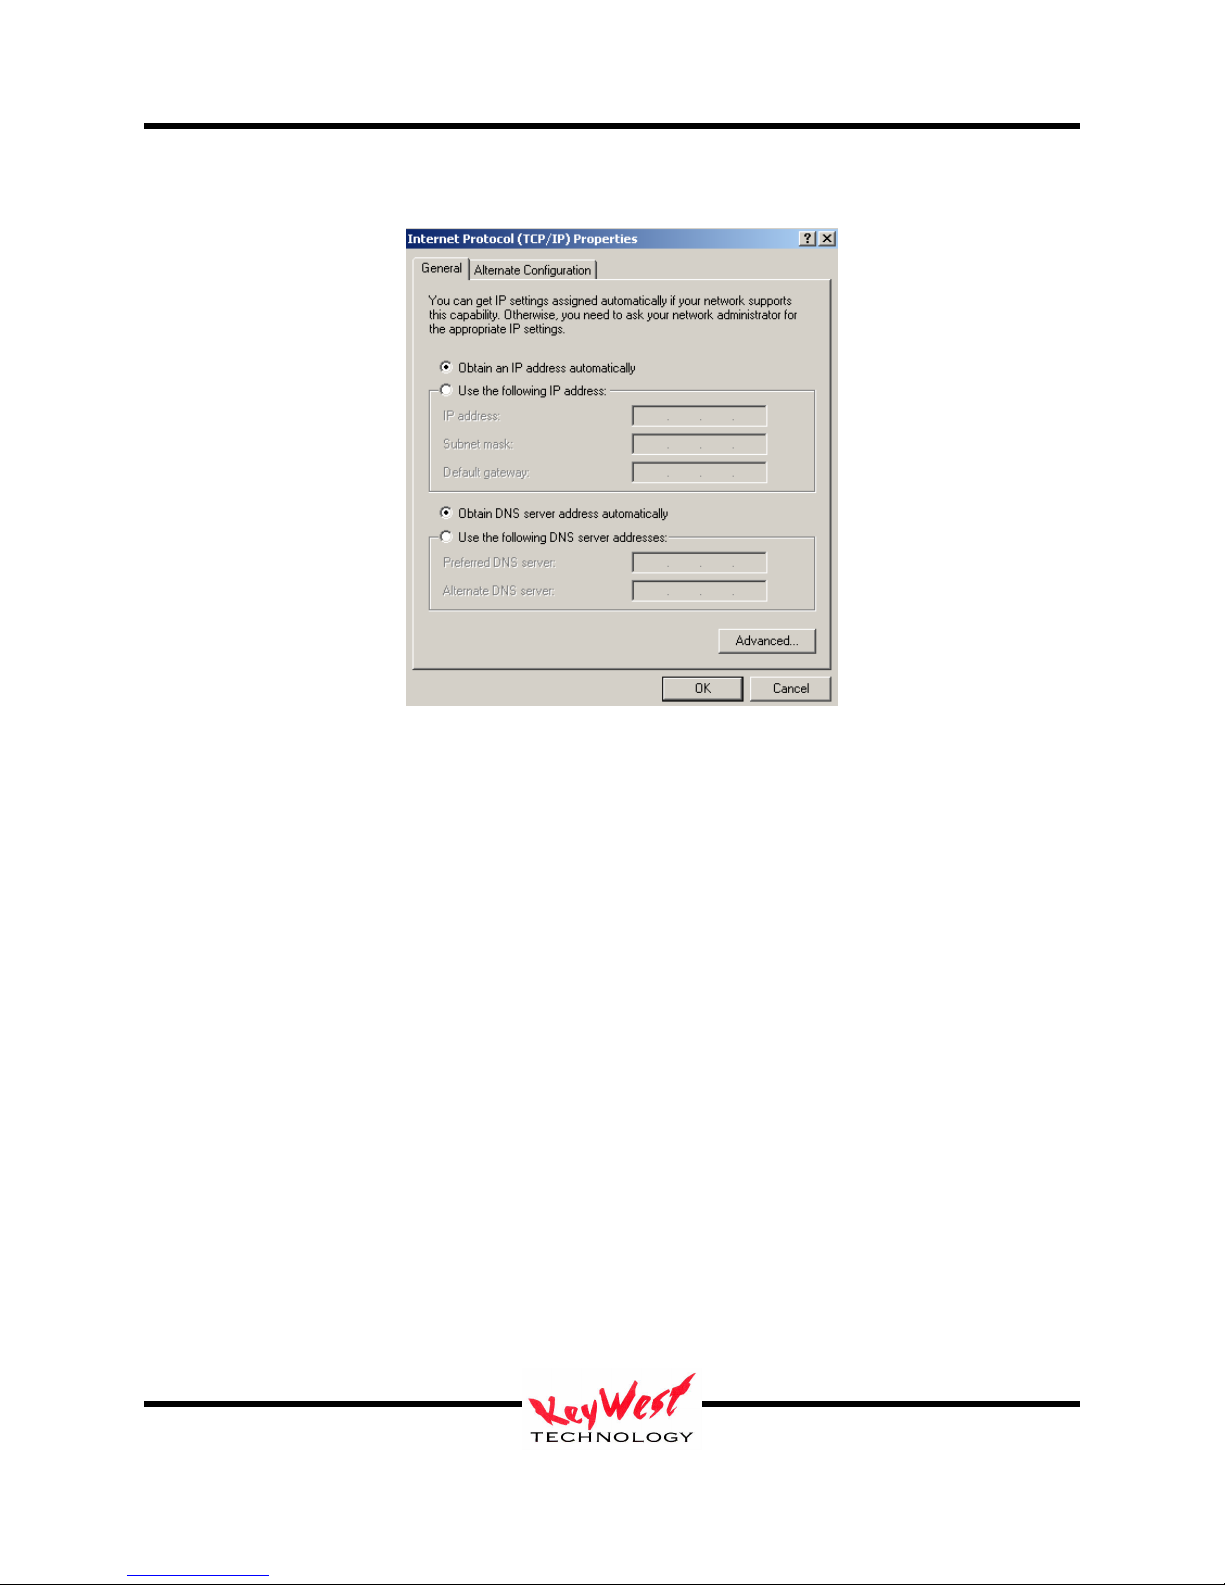
There are two ways to obtain a network address. One is DHCP. This method allows an external
device, such as a router, to assign an address automatically . This is the most popular method of
addressing because it allows for maximum flexibility within a network and it is also the safest
and most secure because the assigned IP address changes over time.
The limitation of DHCP it is the same as its strength--the IP number can change over time.
Since IP address is used to connect to the player, it’s rather important to know this IP number at
all times (when the IP changes via DHCP you won’t necessarily even know it happened).
This makes the second method addressing, called STATIC IPs, the most desirable for this
application. STATIC IPs must be protected by network firewalls and routers. While DHCP is
safer on its own, STATIC IPs are easily guarded.
If DHCP is to be used then simply click OK on the window pictured above.
If there is a DHCP router on the network the player will automatically receive an IP address and
be ready to communicate.
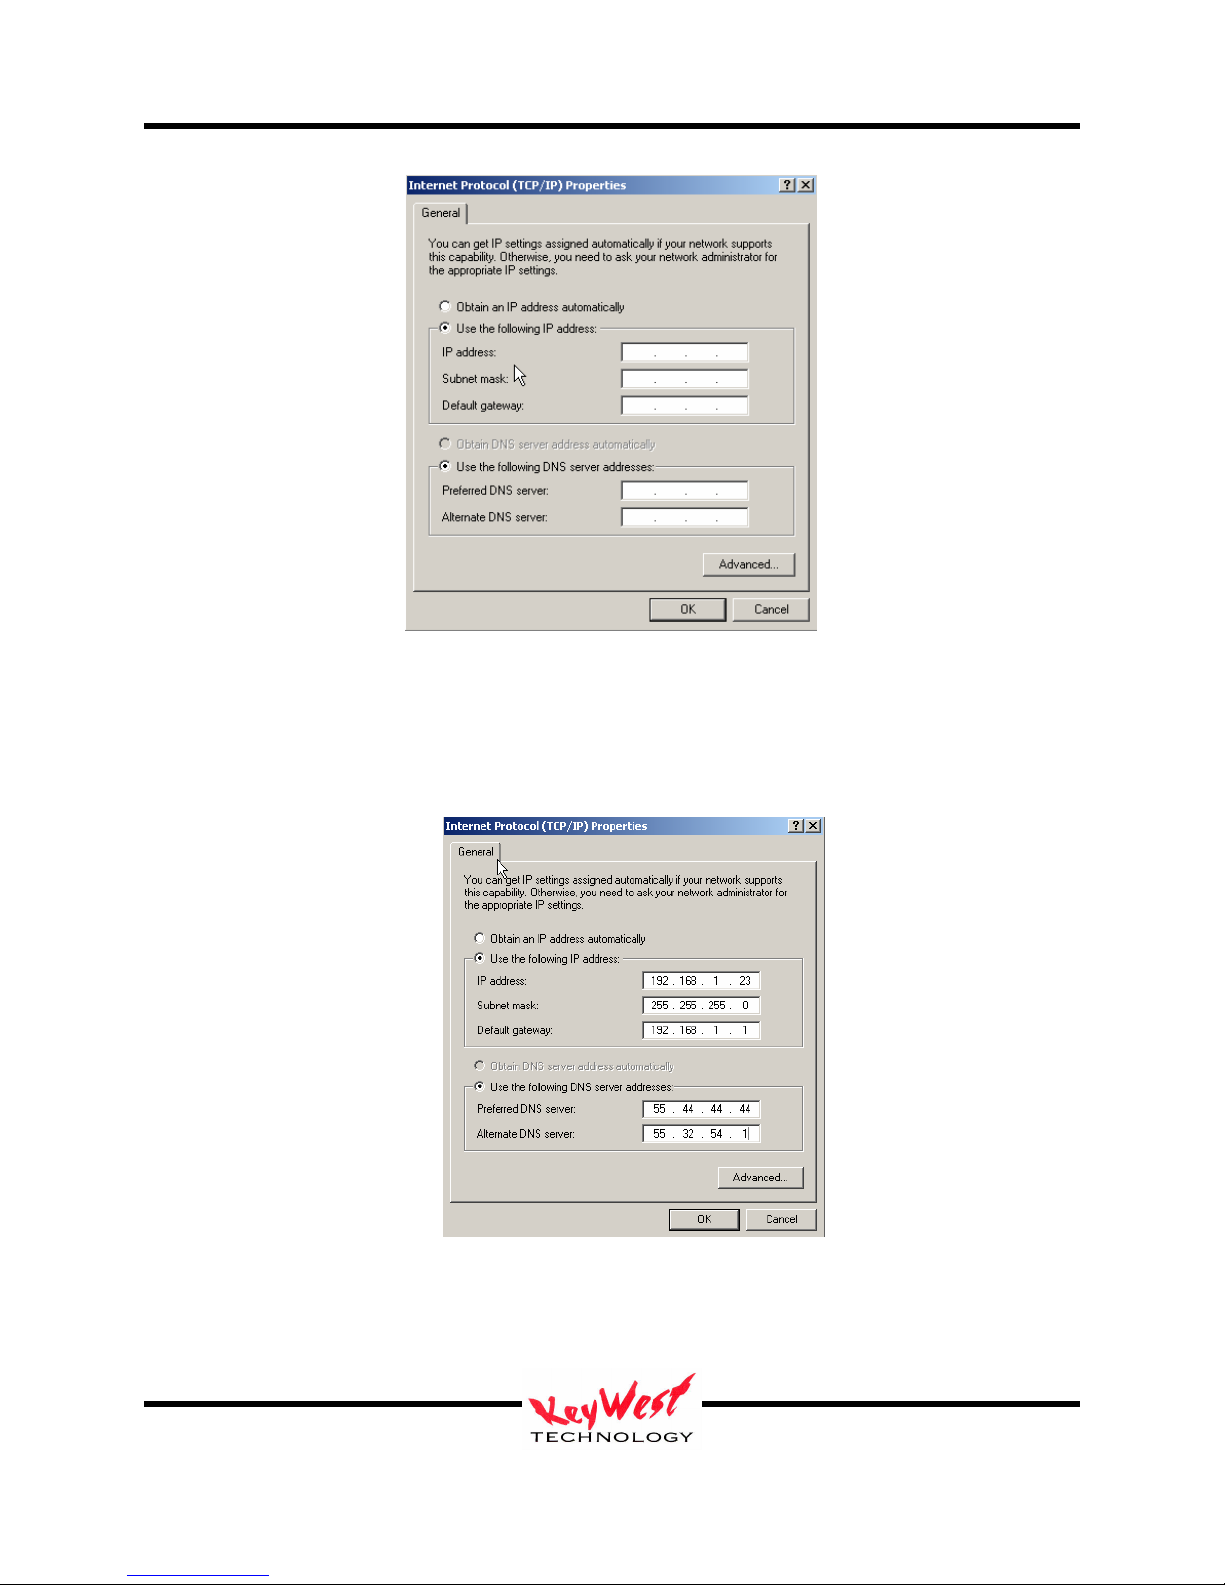
If, on the other hand, a STATIC IP is to be used set it with the IP Properties window (shown
below). This IP address must be something that is compatible with the attached network and is
provided by the IT department or network administrator.
To set the STATIC IP, left-click the USE THE FOLLOWING IP ADDRESS radio button.
Keywest Technology
14563 W. 96th Terrace
Lenexa, Kansas 66215
800.331.2019
www.keywesttechnology.com
23 Mar 2009
Change 06
9
MediaXtreme MediaZone
Enter data in the IP ADDRESS block and the SUBNET MASK block as a minimum. If
available, enter the DEFAULT GATEWAY, PREFERRED DNS SERVER, and ALTERNATE
DNS SERVER numbers also. The IT department or network administrator should provide those
numbers or make these settings.
If the player is going to need internet access, for instance to connect from a different network (as
in connecting from a home internet connection) or to utilize dynamic external data like weather
forecasts or headline news services, then gateway and DNS numbers are mandatory.
Keywest Technology
14563 W. 96th Terrace
Lenexa, Kansas 66215
800.331.2019
www.keywesttechnology.com
23 Mar 2009
Change 06
10
MediaXtreme MediaZone
There are a myriad of IT methods that can be applied, such as virtual private networks, host files,
aliasing, to truly complicate connections. It is best to work cooperatively with the IT department
to ensure smooth operations.
One may also use STATIC IP and a direct connection via a cross-over cable, simply set the IP
number and Subnet Mask to compatible ranges on the creator computer and the MX…but ensure
the IP numbers on both are not the same in the final octave—for example, using a cross-over
cable, if the MX receives an IP number of 10.0.0.5, the creator computer should get an IP
something like 10.0.0.10 (anything from 0 to 255, but not 5 in that last set)! Subnets SHOULD
be identical (255.255.255.0 on both would be typical).
Verify that your IP address you set has “taken” in the MX or confirm the IP address a DHCP
device assigned to the MX by taking the following steps:
1. While still at the MX’s desktop, right click on the MY NETWORK PLACES icon
2. Then single-left-click PROPERTIES
3. Right-click on the network connection’s icon
4. Single-left click on STATUS
Keywest Technology
14563 W. 96th Terrace
Lenexa, Kansas 66215
800.331.2019
www.keywesttechnology.com
23 Mar 2009
Change 06
11

MediaXtreme MediaZone
5. Click the SUPPORT Tab to verify IP settings
If the IP Address, Subnet Mask, and Default Gateway all appear proper, it is time to move on—if
something is wrong, repeat the network setup or contact an IT professional.
Setup Player Properties (INI Files)
The player can be configured for several modes of operation. Those property settings are made
in the SETTINGS.INI initialization file. See Appendix A.
Set the MX to PLAY
Locate the GREEN 5X (a nod to the legacy of the product line) icon on the Player
desktop and double-left-click it to restart the application (all mouse references in this
manual assume right-handed mouse).
The VGA monitor, keyboard, and mouse can be disconnected at this time (they aren’t required
though they don’t detract from any operation if left connected). The bare necessities are the
video connection(s), the communications connection (Ethernet), and Power. If there’s audio
involved, ensure it remains connected as well.
The configured MX should playing content now (the test reel if this is the first time the machine
is ran or if a new schedule has not yet been sent). If something in the previous steps did not
work, contact the IT department, the product dealer, or Keywest Technology for further
assistance.
Keywest Technology
14563 W. 96th Terrace
Lenexa, Kansas 66215
800.331.2019
www.keywesttechnology.com
23 Mar 2009
Change 06
12
MediaXtreme MediaZone
MediaZone Scheduler Software Installation
Minimum Editor System Recommendations
To enjoy the full features and functions of the scheduler software, including rendered full motion
previews, the following minimum requirements should be met:
--P4 at 2GHz (or better—Centrino© adequate for Laptops)
--400MHz Front Side Buss Motherboard
--256MB 2100 DDR RAM
--7200 RPM IDE HDD with at least 150MB open space
--CD-ROM or DVD-ROM drive
--High-Speed Internet Connection
--Video Card or Chipset equivalent to or better than ATI 9000 Rage© with 64MB Video
Memory
--Windows 2000 Pro© or Windows XP© Operating System
For users with Windows Vista, when installing, right click on the SETUP.EXE package and
select RUN AS ADMINISTRATOR. Also, when running the software for the first time after
installation, right click on the start icon and again select RUN AS ADMINISTRATOR.
Failure to follow these steps will render some functions unusable on a VISTA loaded PC. In
addition, if the user does not have full administrator rights, regardless of operating system
installed, certain functions may not work or the entire application may fail to operate. Contact
the IT department or Keywest Technology with questions.
MediaXtreme systems are not compatible with Macintosh© Operating Systems but are run on
Mac computers using Windows emulator programs.
The scheduler software will run on older or less powerful machines, but fully rendered preview
will not be available. We will cover both preview versions later in this manual.
Install Software
Insert the CD that came with the system. If auto run is on a splash screen will appear—if the CD
doesn’t auto-run, browse to the CD drive, and click autorun.exe.
Click the INSTALL MX SCHEDULER button. The Install Wizard should start.
Click NEXT then follow the on-screen prompts and instructions to install the software.
Install all the components listed. Failure to install one of those components might render a
feature or function unavailable.
*****VISTA NOTE*****
Keywest Technology
14563 W. 96th Terrace
Lenexa, Kansas 66215
800.331.2019
www.keywesttechnology.com
23 Mar 2009
Change 06
13
MediaXtreme MediaZone
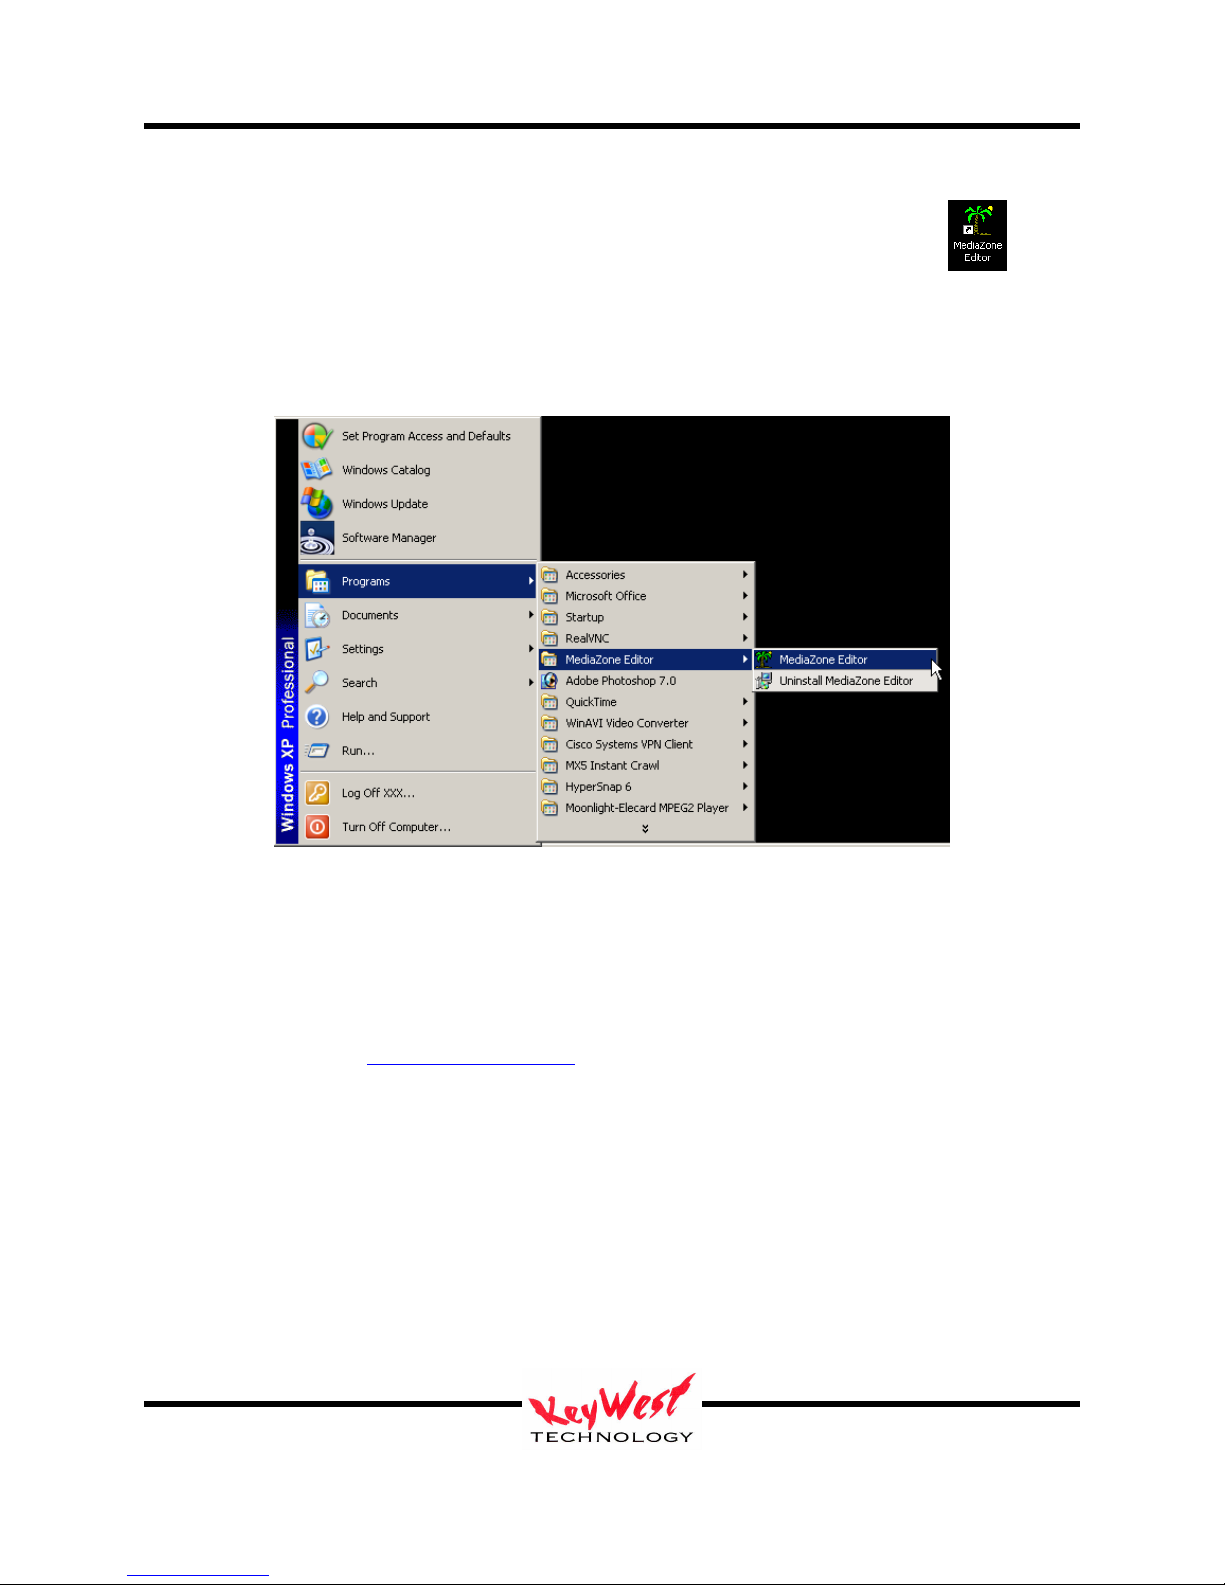
Once the software is completely installed locate the MX icon on the desktop
If there isn’t a desktop icon, click the Windows START button, locate the MX item, and click
MX.exe as pictured below.
Software Registration & Seat Licenses
MediaZone Scheduler software has no seat-license limits. As many copies as desired may be
installed and will be fully operational. Registration is necessary however to access warranty
support.
To register, proceed to www.mediaxtreme.tv and follow instructions located there.
MediaZone Scheduler Graphical User Interface (GUI)
Open the software either by the desktop icon or the start menu. The full graphical user interface
(GUI) will open. Editor settings can be made as with the player. See Appendix B.
Keywest Technology
14563 W. 96th Terrace
Lenexa, Kansas 66215
800.331.2019
www.keywesttechnology.com
23 Mar 2009
Change 06
14
MediaXtreme MediaZone
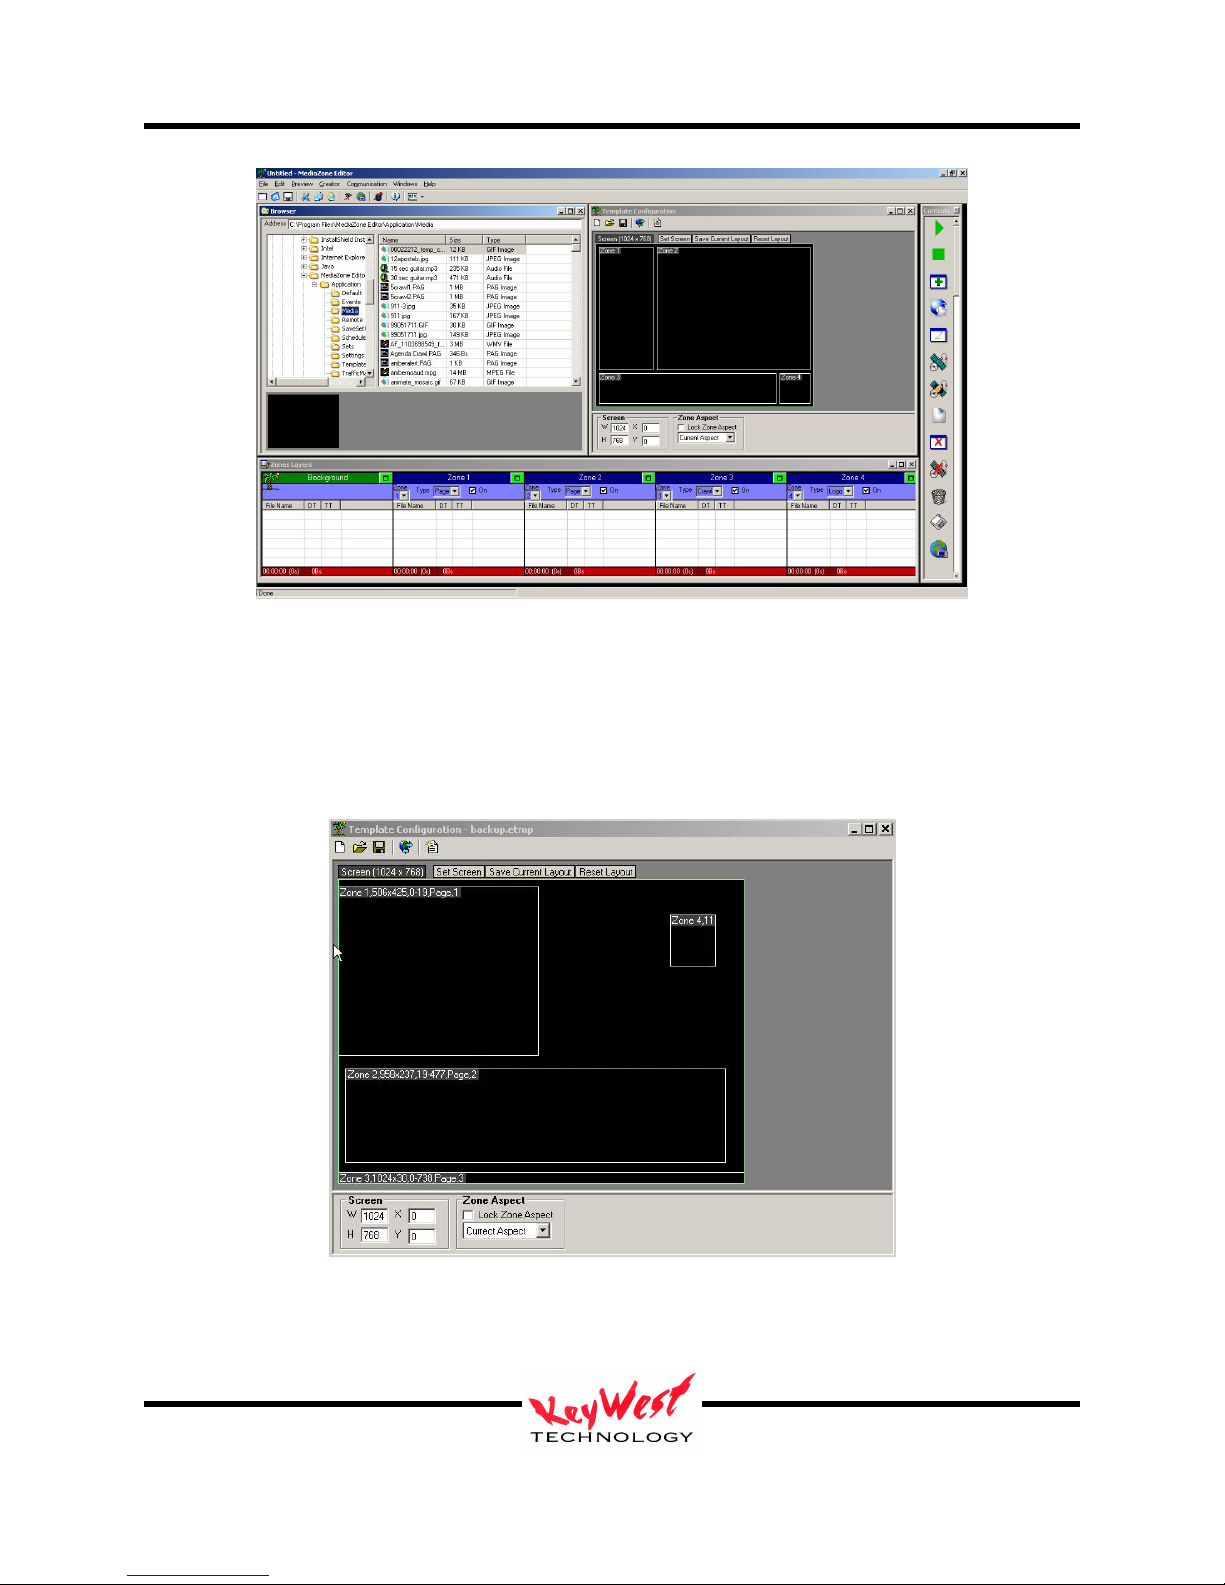
Template Configuration
The Template Configuration Editor provides the means to create zoned playback screen layouts.
This is not to be confused with content templates. The screen template is only the screen layout
for each of the five zones.
Each zone correlates to a layer in the editor. The background zone is always full screen; zones
one, two, three and four can be used page media, crawls, rolls and logos.
Keywest Technology
14563 W. 96th Terrace
Lenexa, Kansas 66215
800.331.2019
www.keywesttechnology.com
23 Mar 2009
Change 06
15
MediaXtreme MediaZone
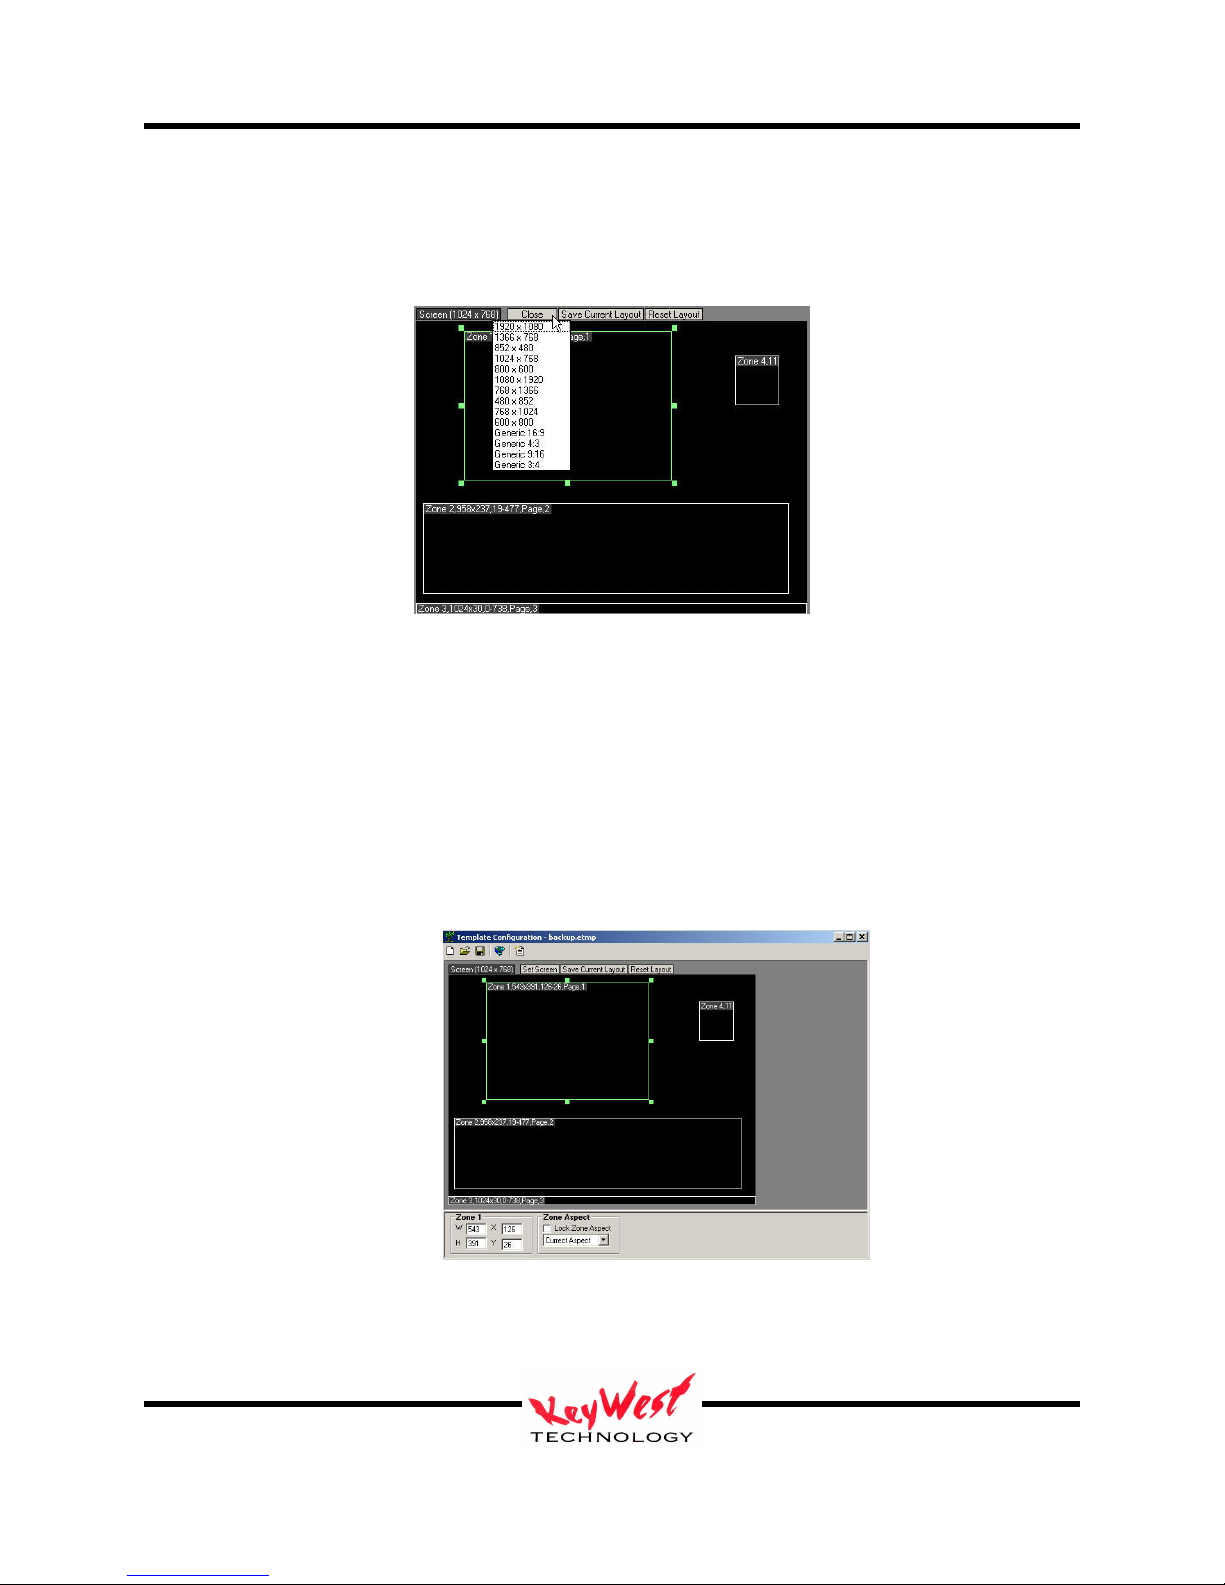
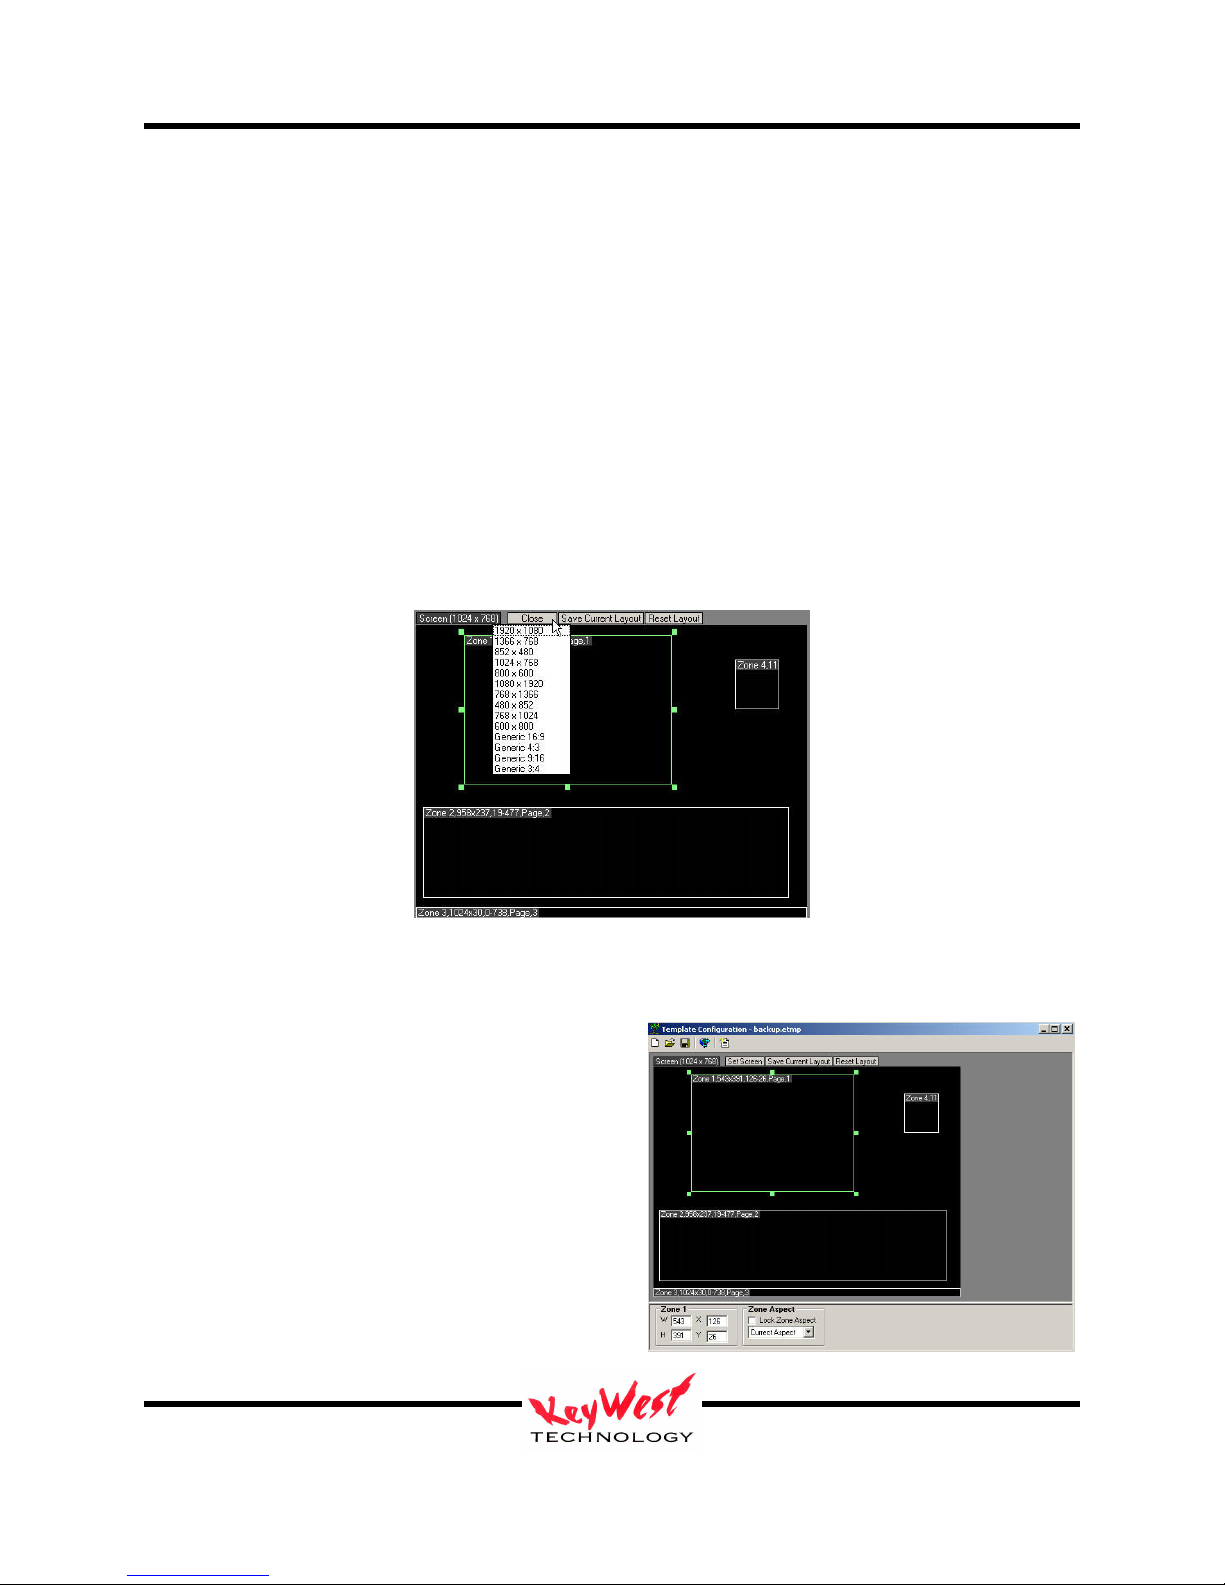
The first step is to select the target screen aspect ration or resolution. The most common sizes
are available in the Screen Size drip down box. If in doubt of true resolution, simply select a
generic aspect ratio.
Any content dragged into any zone will automatically be resized to fill the zone. This eliminates
the need to manually adjust media to fit the screen. Individual zones should then be setup with
the optimum and desired screen look in mind and content should be developed to maintain
appear when used within a particular zone dimension.
The user may adjust each zone by using cursor handles. The handles allow for movement as
well as resizing. Zone size and position data is reflected in the upper left data tab in each zone.
Zone parameters may be manually entered into a dialogue box accessed by clicking on the zone
information tab.
Keywest Technology
14563 W. 96th Terrace
Lenexa, Kansas 66215
800.331.2019
www.keywesttechnology.com
23 Mar 2009
Change 06
16
MediaXtreme MediaZone
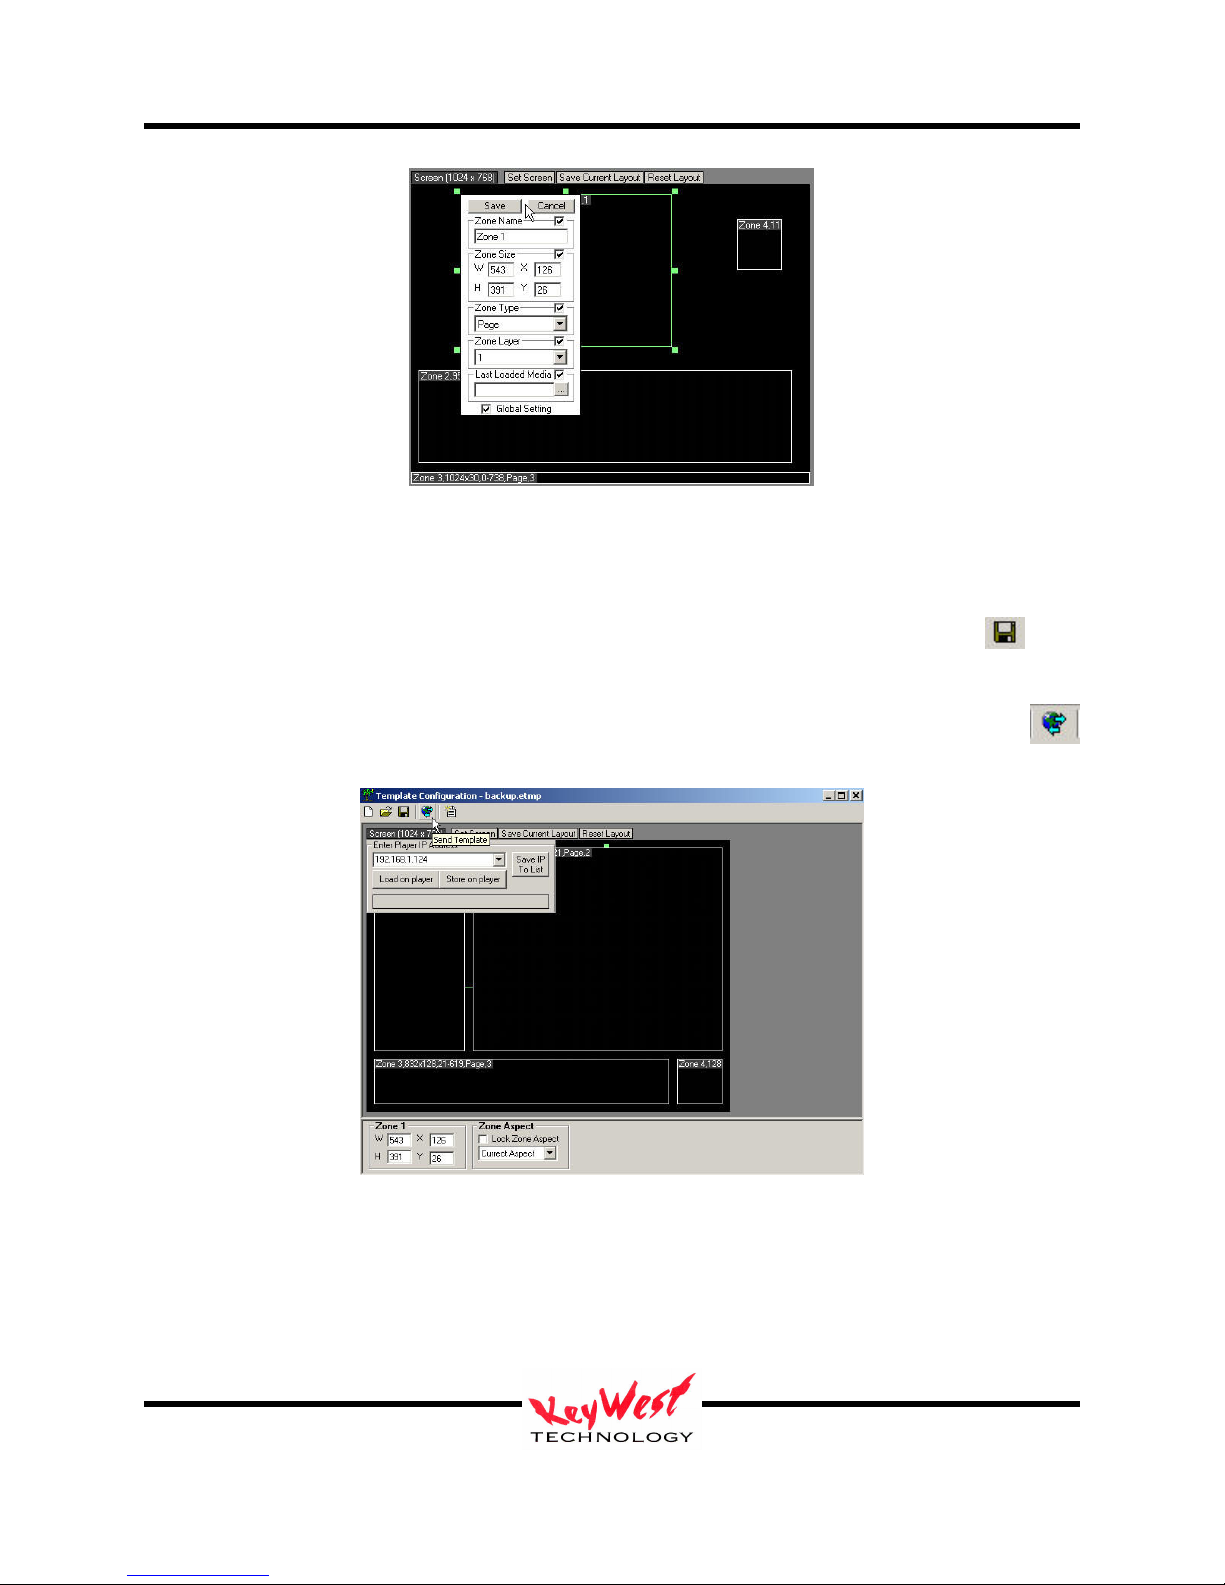
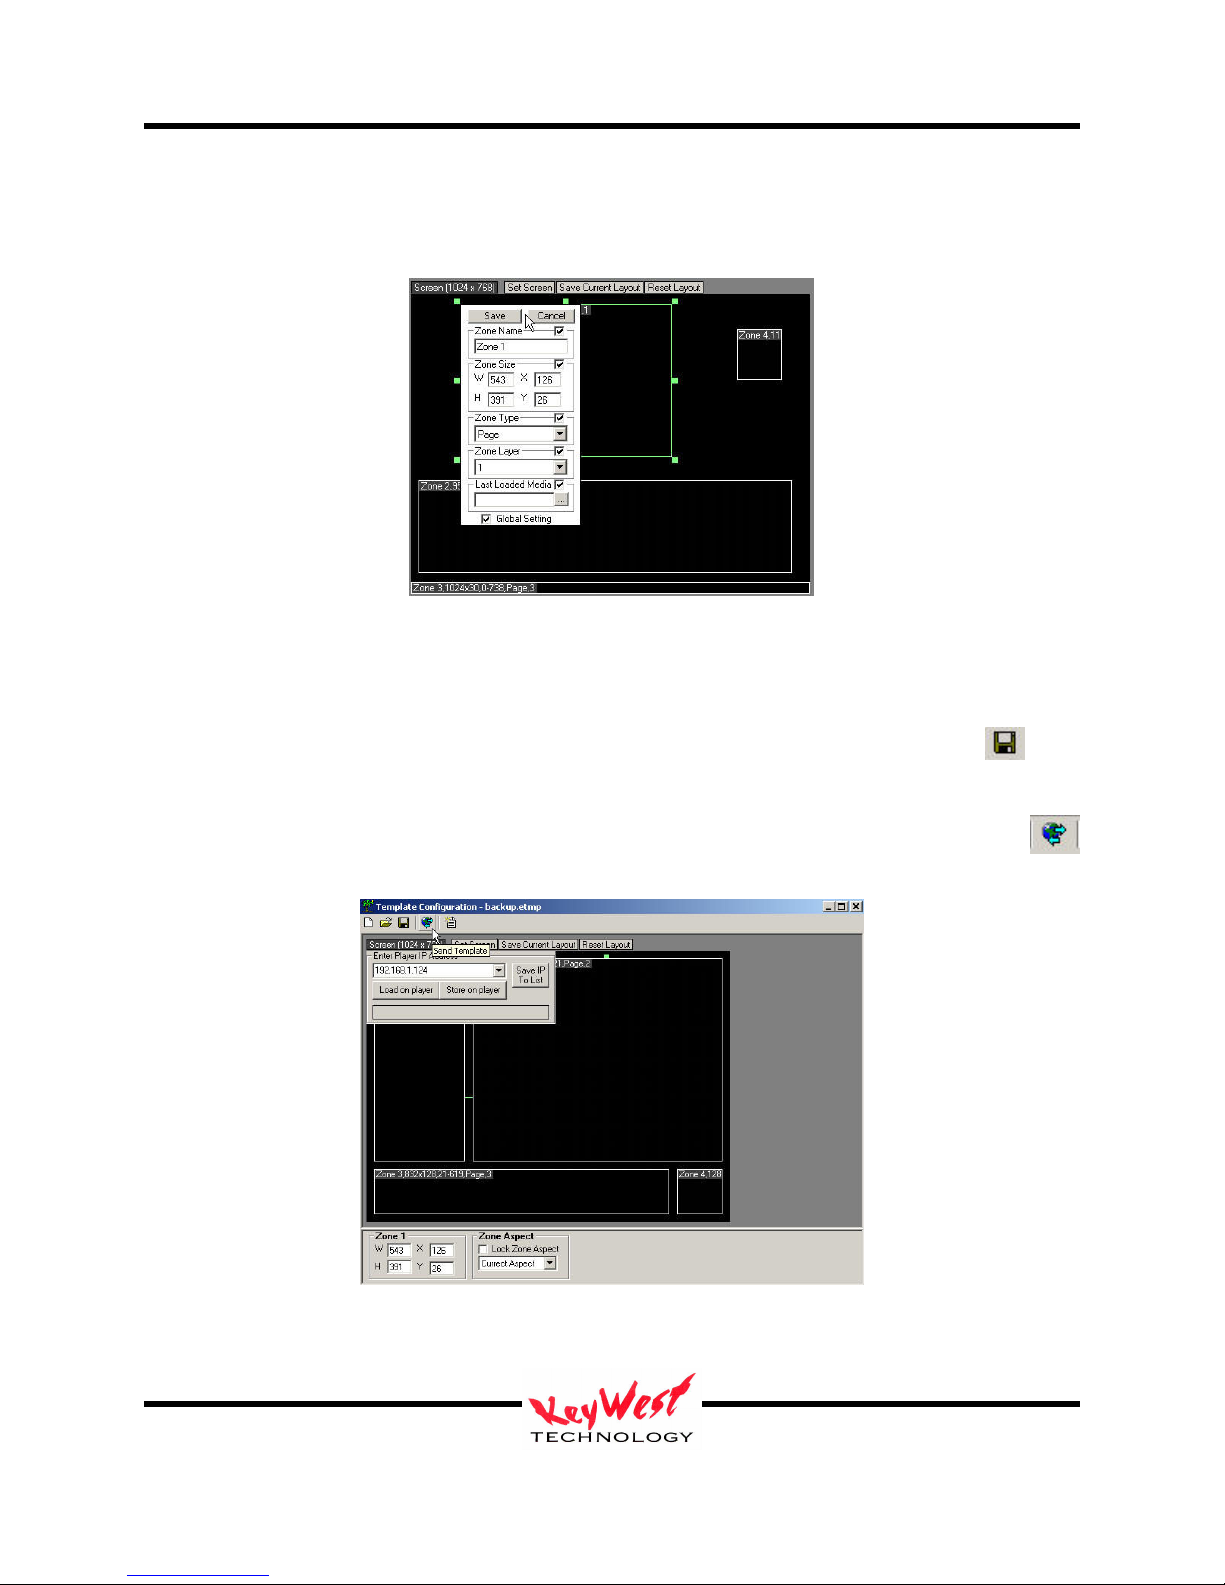
Adjustments are implemented when SAVE is clicked, making for very simple resolution and
layout configuration. Using the proper settings ensures the proper alignment once the data
reaches the player (and should match the settings in the player).
Once the zones are configured, saving the template layout using the save button is
required.
The final step is to transmit this zone template information to the player in question. To
transmit the template, select the Transmit button, enter the destination IP and send.
Be sure to click SAVE CURRENT LAYOUT to set the local preview window to the current
template for ease of editing.
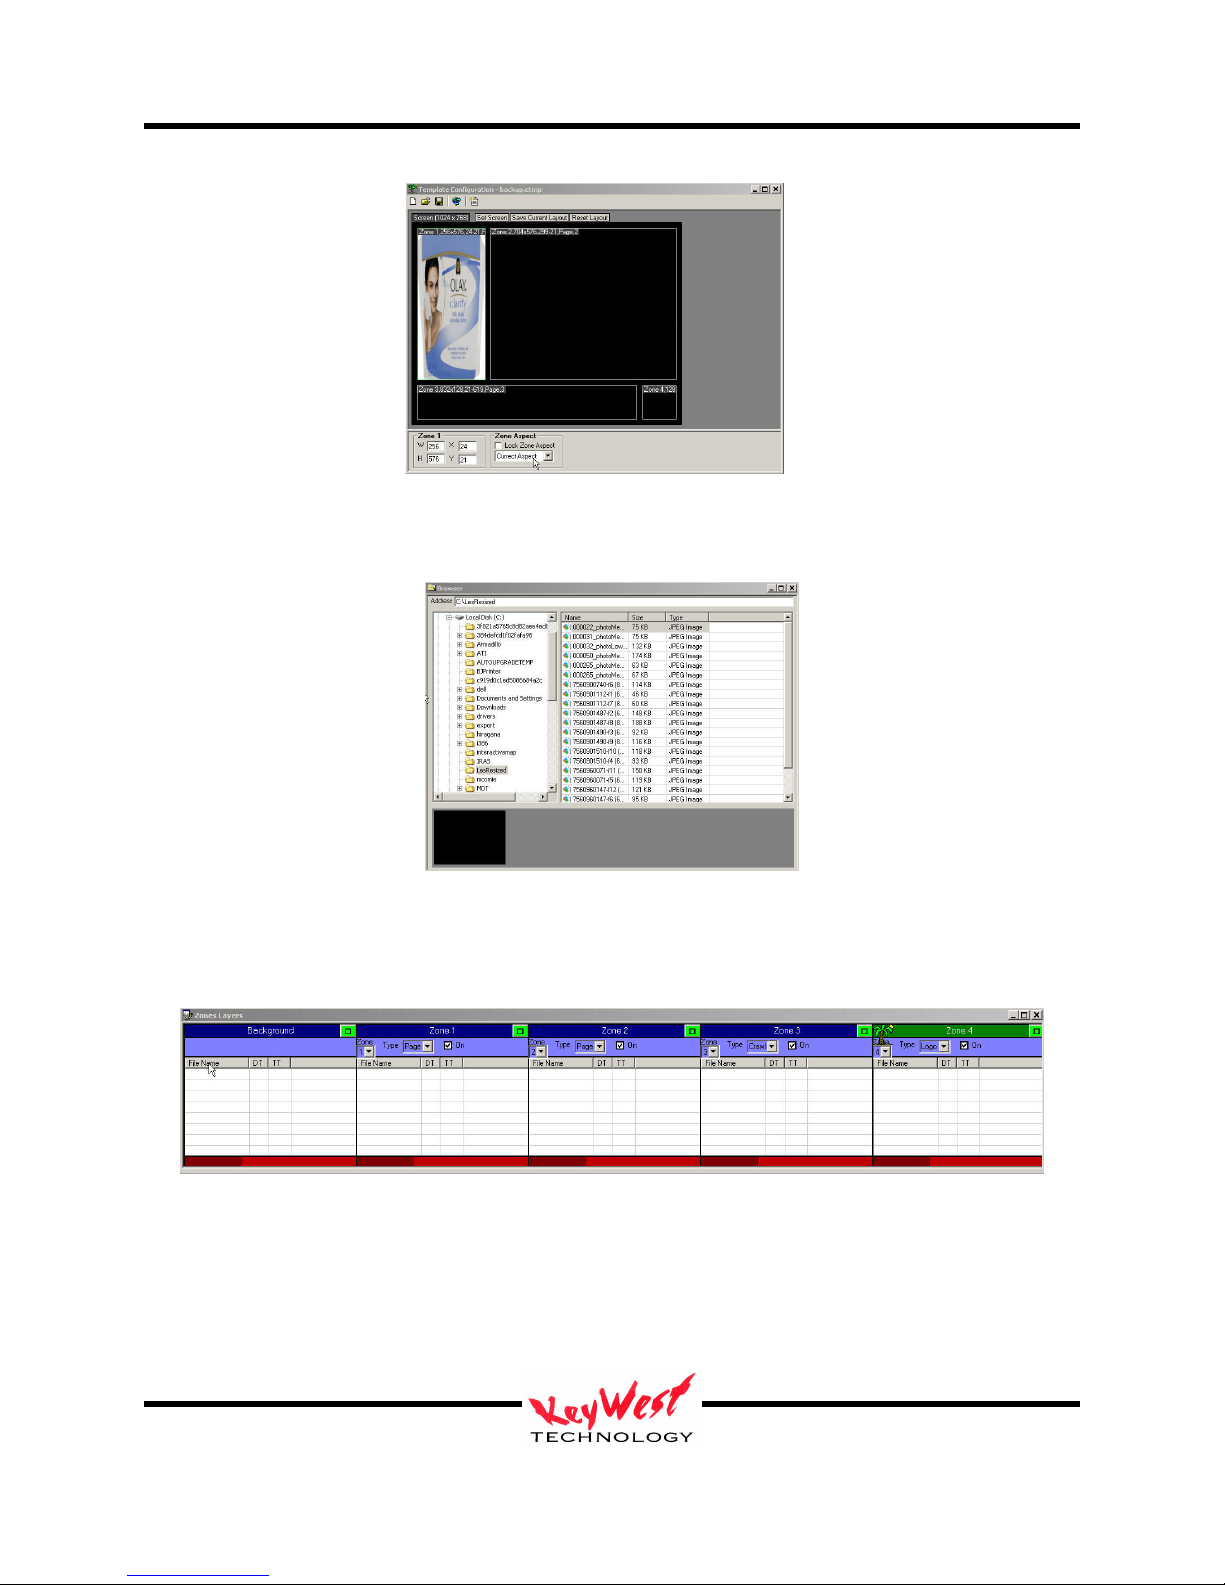
Content may be dragged directly in to zones from the file browser...when done this way, the
content will become the last entered item in a zone play list and the content will appear in the
zone window (PAG files and Video Files will not appear in the template window).
Keywest Technology
14563 W. 96th Terrace
Lenexa, Kansas 66215
800.331.2019
www.keywesttechnology.com
23 Mar 2009
Change 06
17
MediaXtreme MediaZone
Use the file browser is similar to using Windows explorer tools to access any connected folder.
From within the folder, select files for use in a set.
Drag content directly into a zone in the template configuration window or drag content to a zone
play list in the set editor. Double-left-clicking on content will also add content to the selected
layer.
When content has is added to a zone play list, an attributes window will open. Use the attributes
window to set playback parameters of the newly added content asset.
Keywest Technology
14563 W. 96th Terrace
Lenexa, Kansas 66215
800.331.2019
www.keywesttechnology.com
23 Mar 2009
Change 06
18

MediaXtreme MediaZone
Browser
The browser is used to access any drives or folders attached to the scheduler computer, including
all physical drives, virtual drives, and all network drives and folders. The MX series software
allows the storage of content, sets, and schedules on any drive (remote or local). The trick to
using that feature is ensuring any remote drives are accessible when they are needed or portions
of sets may go missing and force lengthy unnecessary troubleshooting and down time.
Use the directory browser window on the left side of the main Browser window to select the
drive or folder that contains the media that to be scheduled.
Once the folder is selected, use the file browser on the right side of the main Browser window to
select the media asset to be scheduled. The file browser works in conjunction with the directory
browser. The content displayed in each file browser changes based on which directory selected.
This window also features sorting capability: click NAME, SIZE, or TYPE to sort.
At the bottom of the browser window is a thumbnail viewer for a small preview of the selected
media element.
Menu Bar
Keywest Technology
14563 W. 96th Terrace
Lenexa, Kansas 66215
800.331.2019
www.keywesttechnology.com
23 Mar 2009
Change 06
19

MediaXtreme MediaZone
Above the other portions of the GUI rests a Menu Bar. The menu bar is a secondary method to
access MediaZone controls.
Quick Controls
The right edge of the application features a vertical Quick Control pane. This
provides quick access to the Preview Window, the Time Specific Preview, Add
Media Files, Save, Send, Cut, Copy and Paste.
Zones Layers
The Zones Layers portion of the MediaZone editor is the heart of content scheduling. This is
where a collection of media becomes a SET. To define SET: A SET is a list of clips and/or
media that are grouped as a sub-section of an entire show. A show is a schedule, and can consist
of only one set, or you can have a show that consists of many sets.
As an analogy, a two-hour motion picture taken all together is one show (one schedule). Within
that two-hour show are many sets—outdoors scenes, indoor scenes, chase scenes…each of these
scenes are separate sets. Put the scenes together, you have a movie—put sets together, you have
a schedule. In the editing room, the sequence of sets can be changed--the MediaZone scheduler
gives you that ability to edit and create the show.
The bottom line is in order to have a schedule, there must be at least one set.
Keywest Technology
14563 W. 96th Terrace
Lenexa, Kansas 66215
800.331.2019
www.keywesttechnology.com
23 Mar 2009
Change 06
20
MediaXtreme MediaZone
TUTORIAL
The TUTORIAL section of this manual is a tour that will result in the creation of a set and a
schedule that is playing. Feel free to substitute any tutorial sample files real files as desired.
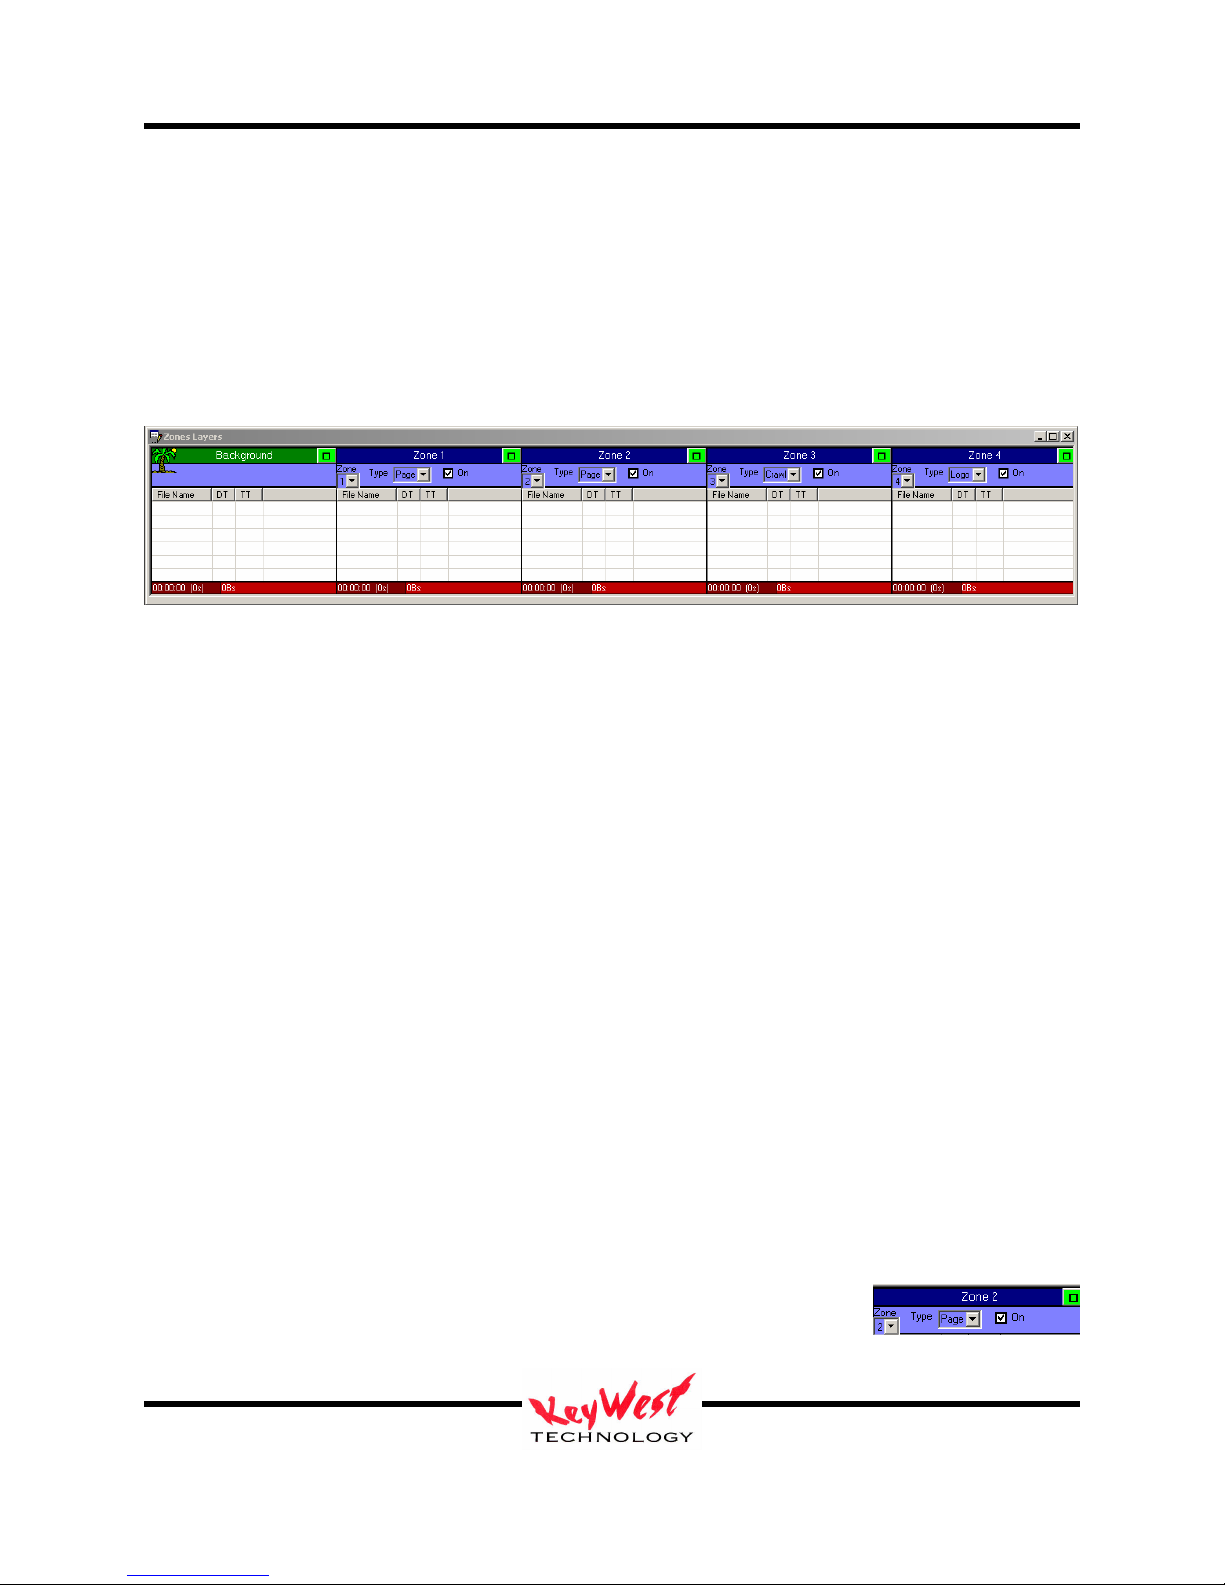
Open the MediaZone Editor and take a look at the ZONES LAYERS section at the bottom of the
interface.
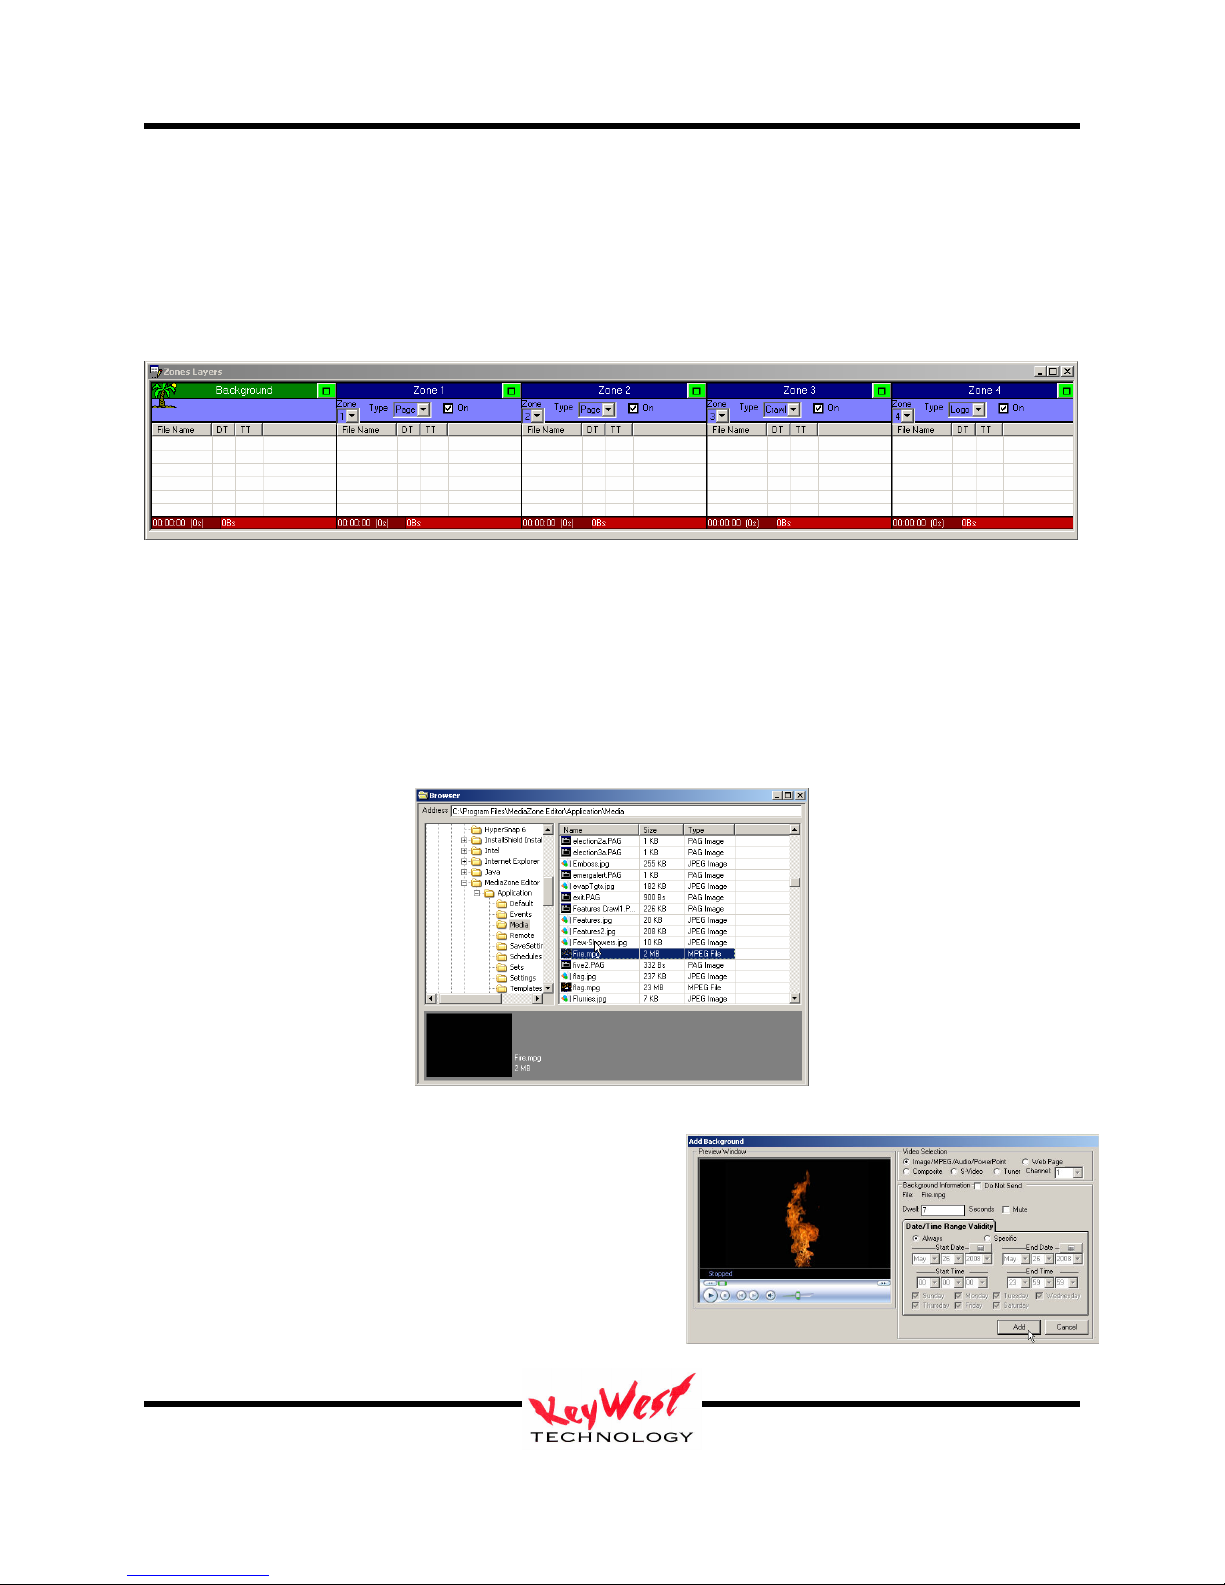
Notice there are five columns in the set list. Each column represents an independent layer of
graphics and images. The first column, labeled BACKGROUND is always the background
layer—its order can’t be changed but it is not required to be used at all times (in fact, no Zone is
required to be used). BACKGROUND is typically used for full-screen motion background files,
background stills, background live video, or any other background image. The BACKGROUND
zone is always full screen size and does not feature any transitions, keying, PiP windows, or
transparencies.
Columns listed as Zone 1, 2, 3, and 4 can consist of:
Pages: These are images, some call them slides, that consist of proprietary .PAG
files, .bmp, tga, tiff, gif, jpg, pcx, png, live web pages, Macromedia Flash© files,
full screen motion videos (MPEG, WMV, AVI, etc….)
Crawls: This is a continuous text line that will “crawl” or move horizontally
across your screen left to right or right to left
Rolls: These are pages that roll from top to bottom or bottom to top—much in the
manner of credits at the end of a movie or television show.
Logos: Logos are images (bmp, jpg, etc…) that can be resized and repositioned
anywhere on the screen. Logos can also be animated GIF files for a power
motion logo effect.
Zone Attributes
Each layer has a few attributes that must be set. The first is turning the
zone on or off. The check mark in the ON box indicates the layer is on.
Clicking the ON box will toggle the check mark and the layer’s on/off
status.
Keywest Technology
14563 W. 96th Terrace
Lenexa, Kansas 66215
800.331.2019
www.keywesttechnology.com
23 Mar 2009
Change 06
21
MediaXtreme MediaZone
Remember, the system functions as independent layers and zones. The BACKGROUND is
always the base layer (the bottom layer). The remaining four columns can have their layer
assignments changed at will.
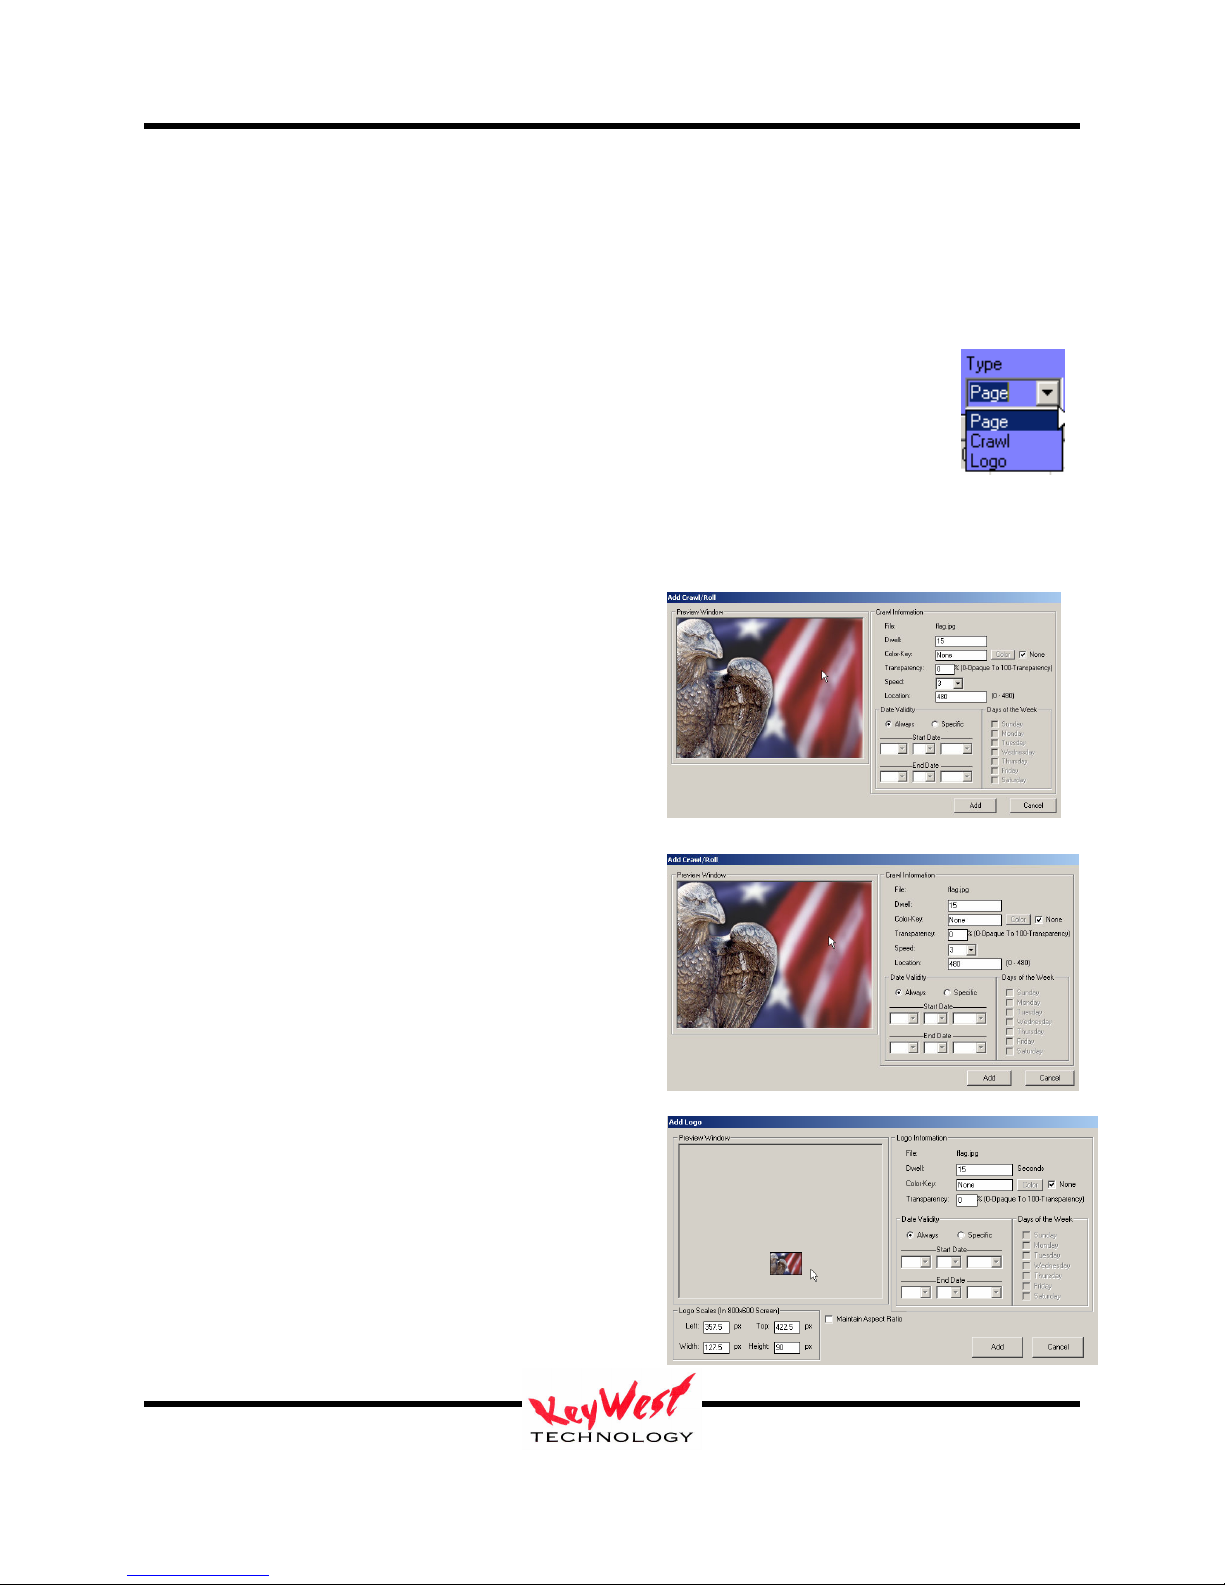
Zone Type (Page, Crawl, Roll, or Logo)
The last thing to set for each column is the type of graphic element. Each of the
three choices has a different reaction when played.
Page
A Page type is adds the graphic to the zone within that column as a full-zone-size image.
Crawl
Selecting Crawl will change what attributes one can
set. Since it is a crawl—it’s going to move, and
there are settings to be made for each aspect of that
movement (speed, direction, etc…)
Crawl will be covered more in-depth later in this
manual.
Roll
Selecting Roll will change what attributes one can
set for your graphic. Since it is a roll—it’s going to
move vertically--and there are settings to be made
for each aspect of that movement (speed, direction,
etc…)
Rolls will be covered more in-depth later in the
tutorial.
Logo
As with crawls, attributes and settings change.
Since a logo is usually a branding mark over all
other graphics and video, they have special
attributes such as size and position.
Logo will be covered more in-depth later in this
manual.
Keywest Technology
14563 W. 96th Terrace
Lenexa, Kansas 66215
800.331.2019
www.keywesttechnology.com
23 Mar 2009
Change 06
22
MediaXtreme MediaZone
Sets can use one column, five columns, or no column (of course that results in a black screen at
playback!).
Create a New Set
On the menu bar, click FILE and NEW to start from scratch.
Setup the Zone Template Configuration
Each zone correlates to a layer in the editor. The background zone is always full screen; zones
one, two, three and four can be used page media, crawls, rolls and logos.
The first step is to select the target screen aspect ration or resolution. The most common sizes
are available in the Screen Size drip down box. If in doubt of true resolution, simply select an
generic aspect ratio.
Any content dragged into any zone will automatically be resized to fill the zone. This eliminates
the need to manually adjust media to fit the
screen. Individual zones should then be setup
with the optimum and desired screen look in mind
and content should be developed to maintain
appeal when used within a particular zone
dimension.
The user may adjust each zone by using cursor
handles. The handles allow for movement as well
as resizing. Zone size and position data is
reflected in the upper left data tab in each zone.
Keywest Technology
14563 W. 96th Terrace
Lenexa, Kansas 66215
800.331.2019
www.keywesttechnology.com
23 Mar 2009
Change 06
23
MediaXtreme MediaZone
Zone parameters may be manually entered into a dialogue box accessed by clicking on the zone
information tab.
Adjustments are implemented when SAVE is clicked, making for very simple resolution and
layout configuration. Using the proper settings ensures the proper alignment once the data
reaches the player (and should match the settings in the player).
Once the zones are configured, saving the template layout using the save button is
required.
The final step is to transmit this zone template information to the player in question. To
transmit the template, select the Transmit button, enter the destination IP and send.
Be sure to click SAVE CURRENT LAYOUT to set the local preview window to the current
template for ease of editing.
Keywest Technology
14563 W. 96th Terrace
Lenexa, Kansas 66215
800.331.2019
www.keywesttechnology.com
23 Mar 2009
Change 06
24
MediaXtreme MediaZone
Background Zone
Remember, a background is not required but will be used for the example.
Select the background layer by clicking the column header highlighting it green (palm tree icon
will follow).
Use the BROWSER window to locate a video file for the background. The system comes with
sample files located in the application folder (typically C:\Program
Files\MX\Application\Media).
Browse to the Media folder. The File Browser window will list the folder contents. There are
several sample MPEG files in the folder. Double left-click on “fire.mpg”—remember, you can
use anything you like for the background…we are using “blueearth.mpg for the tutorial only).
The Background Attributes window will open.
The attributes window provides a preview. If the
media selected has a preset dwell time (such as a
video file) the actual dwell time will appear in the
Dwell window. This may be adjusted but remember,
if a 30 second clip has dwell time changed to 10
seconds, the clip will cut off at 10 seconds.
Keywest Technology
14563 W. 96th Terrace
Lenexa, Kansas 66215
800.331.2019
www.keywesttechnology.com
23 Mar 2009
Change 06
25
MediaXtreme MediaZone
This attributes window can be used to set date validity as well as day of the week validity. If
ALWAYS is selected, as pictured, anytime the player encounters the clip in a valid SET and
SCHEDULE, it will play it. If SPECIFIC is selected, and START DATES and END DATES are
filled in, when the player encounters the file, it will validate if the current real date falls within
those selected START and END dates—if so, it will play the clip, but if not, the clip will be
ignored. Also, DAYS of the WEEK can be selected with the checkboxes below the time validity
selection boxes. DATE VALIDITY allows you to change the entire look of play out based on
calendar days, days of the week, or time while only having to create the set and schedule one
time.
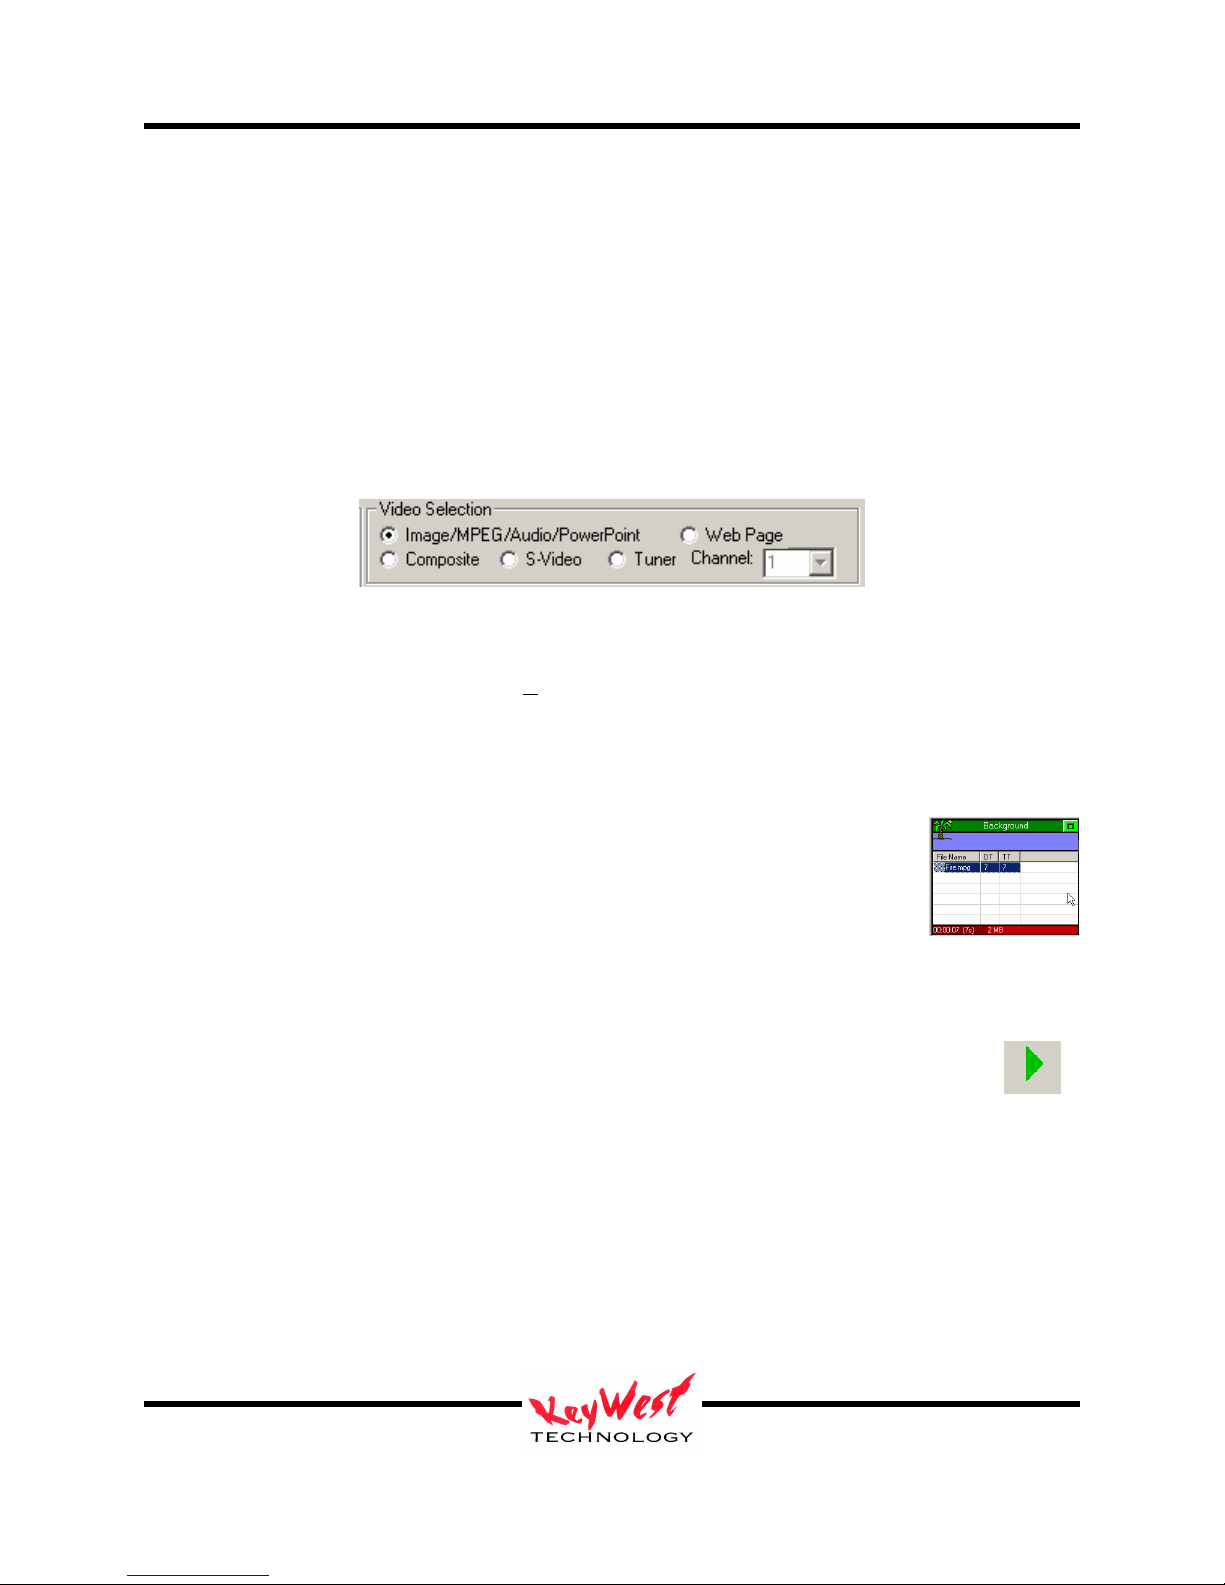
At the top of the background attributes window, notice the alternate background settings panel.
The Video Selection panel shown above defaults to IMAGE/MPEG/AUDIO/POWERPOINT to
indicate that a media file located on the player will be the background. Alternatively, a Web
Page can be used as a background fill. If the hardware supports it a composite video feed, SVideo Feed, or even modulated video feed can be used as background video (a modulated feed
would be a direct cable channel or off-air channel feed). Choosing one of these alternate
background sources will override any file previously selected through the file browser.
Once all the attributes are set, click ADD—the clip will be loaded as the first
entry in the background column. The “DT” column indicates the dwell time of
the particular clip—the “TT” column indicates the running dwell time of the
column. The red cell at the bottom of the column is the total time of the
column (the layer).
The set could be complete at this point. True, not a very interesting set maybe, but as
long as one piece of media is in a set, there enough to play. This would be a good time
to try out preview. Click the Preview button on the right panel (or use the F12 button
on the keyboard).
A preview window should appear and will play the set as it will appear on the player (as long as
the same template has been already sent to the player). The preview window can be sized and
positioned. Use the mouse and left button to select corners for sizing and select the middle of the
window for dragging. The application will remember the size and position automatically. The
size and aspect panel to the left of the preview window may be used for setup as well.
Keywest Technology
14563 W. 96th Terrace
Lenexa, Kansas 66215
800.331.2019
www.keywesttechnology.com
23 Mar 2009
Change 06
26

MediaXtreme MediaZone
Operational Note
Preview quality is purely based on the hardware quality in the creator computer. If the video
card or chipset is limited in speed or memory, or the processor and RAM have bandwidth
limitations, the preview video will stutter. Stuttering is usually just dropped video frames and
can also result from the type of display being used as well as the native resolution and refresh
frequencies. This is normal on preview—player hardware is specifically selected to play back at
full broadcast smooth frame rates. Preview should perform well enough though to present a very
good idea what the set will look like when finally played out from the MX.
WMV, VOB, etc…) check the INI settings for the scheduler and ensure VIDEO=TRUE in
SETTINGS.INI (See Appendix B for details). Black screens or Static (noise) filled screens are
The editor computer may require an updated CODEC. Codecs are small programs that
“decode” compressed video (such as MPEG) for playback. There are many Codecs available on
the internet (some free, some for a fee). Keywest Technology does make
recommendations…browse to the following link to download and install approved Codecs:
Special Instructions will be Included in Read Me Files if Applicable
Add MediaCreator Still Pages to Zones
Select Zone 1 and set the TYPE to PAGE.
MediaCreator is the professional Character Generator (CG) software module
included with MX systems. Content pages made by MediaCreator have the
extension “.PAG”. For specific MediaCreator details see the
MediaCreator manual.
Choose a MediaCreator page to add. The directory browsers
should still be set to “C:\Program Files\MediaZone
Editor\Application\Media”, and the file browser window is
probably still displaying the contents of that folder.
Choose “five2.PAG” to add to the selected Zone 1 column.
Double-Click the page name in the file browser.
: If the preview window appears to not play motion videos (MPEG, AVI,
indications of improper motion video playback
http://www.mediaxtreme.tv/downloads/Codecs/
Keywest Technology
14563 W. 96th Terrace
Lenexa, Kansas 66215
800.331.2019
www.keywesttechnology.com
23 Mar 2009
Change 06
27
MediaXtreme MediaZone
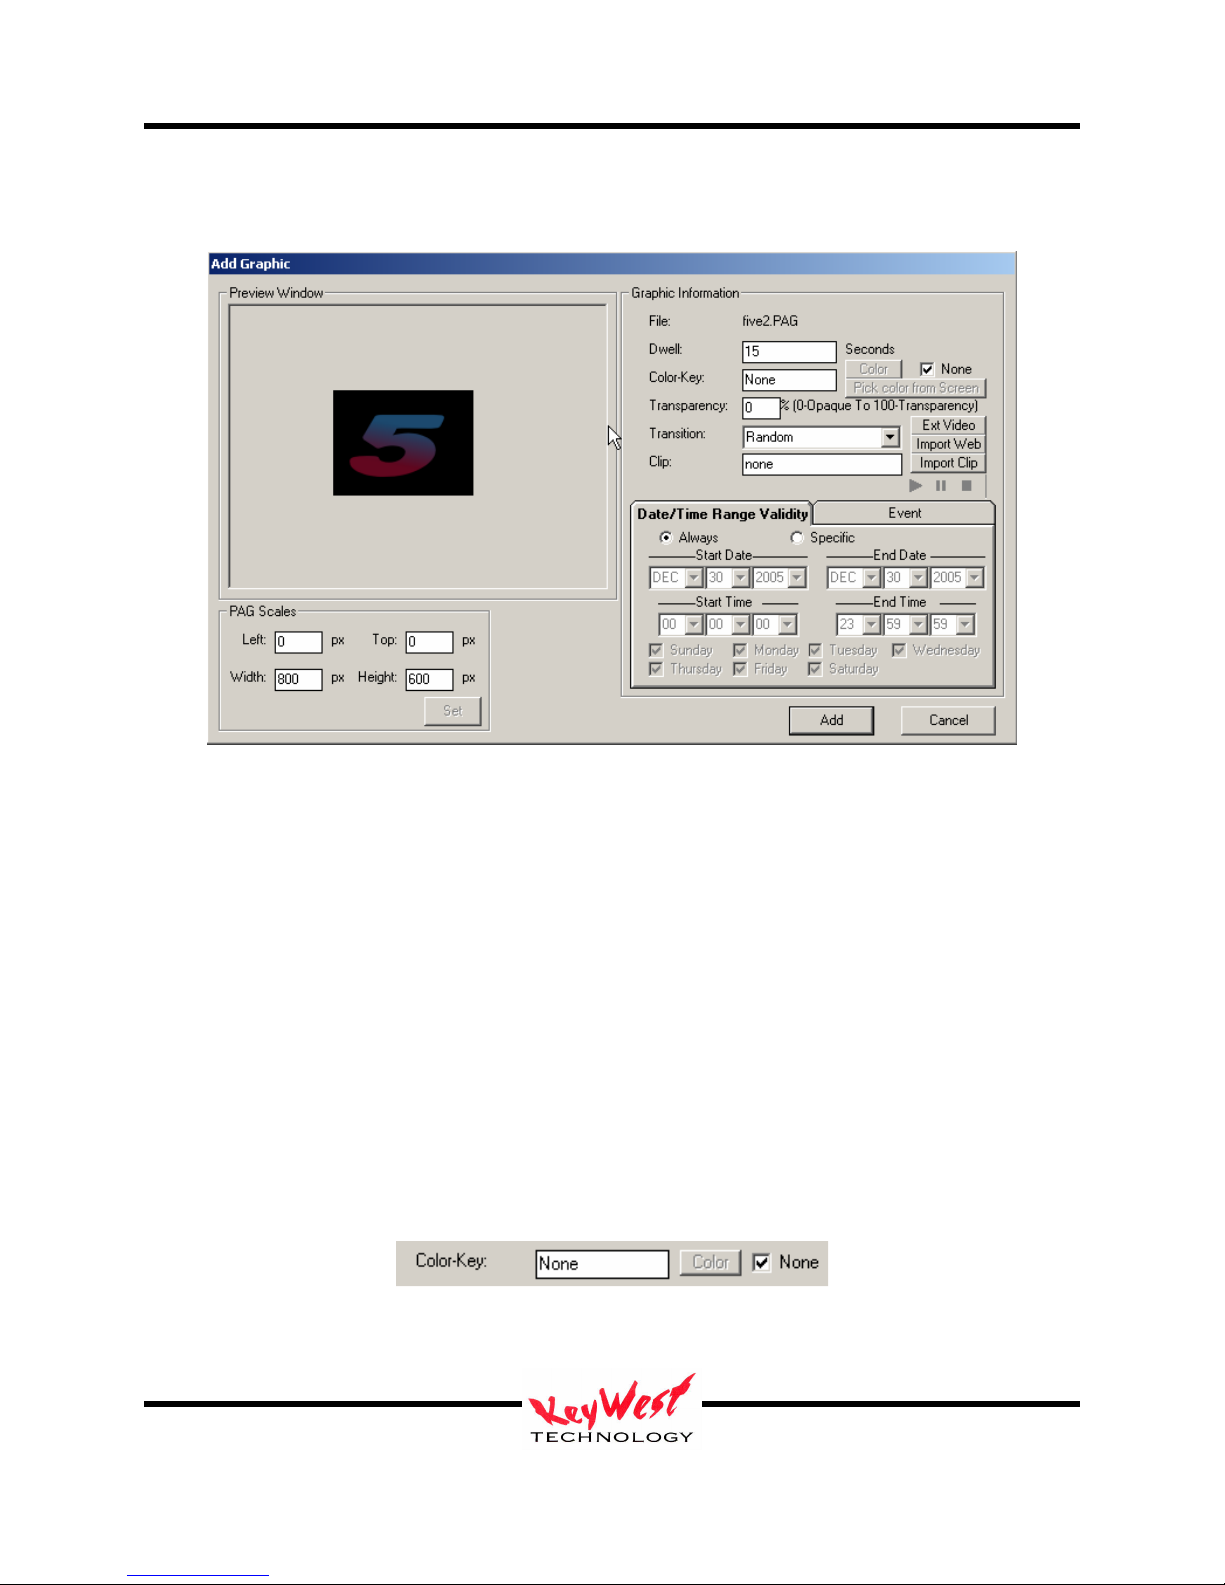
The ADD GRAPHIC dialog box will open. This dialog has its own preview window as shown
below.
This dialog box provides the means to set attributes for all pages.
Dwell
Dwell time is the duration that a page will stay on-screen. To change the dwell time simply
highlight and type a new dwell. Dwell is measured in seconds (default is 15 seconds). Default
dwell may be changed in the settings.ini file (See Appendix B).
Color-Key
The Color-Key box allows one to choose a color to be keyed out when the page is played. A
color that is keyed out becomes transparent at playback. This special effect attribute will allow
you to add graphics or “floating” text and objects over other pages and backgrounds.
Color-Key can also be turned off to ensure all colors show during playback.
For a .PAG MediaCreator page, if the background is blank (black) it will automatically be keyed
out—no need to select black as the key color.
Keywest Technology
14563 W. 96th Terrace
Lenexa, Kansas 66215
800.331.2019
www.keywesttechnology.com
23 Mar 2009
Change 06
28
MediaXtreme MediaZone
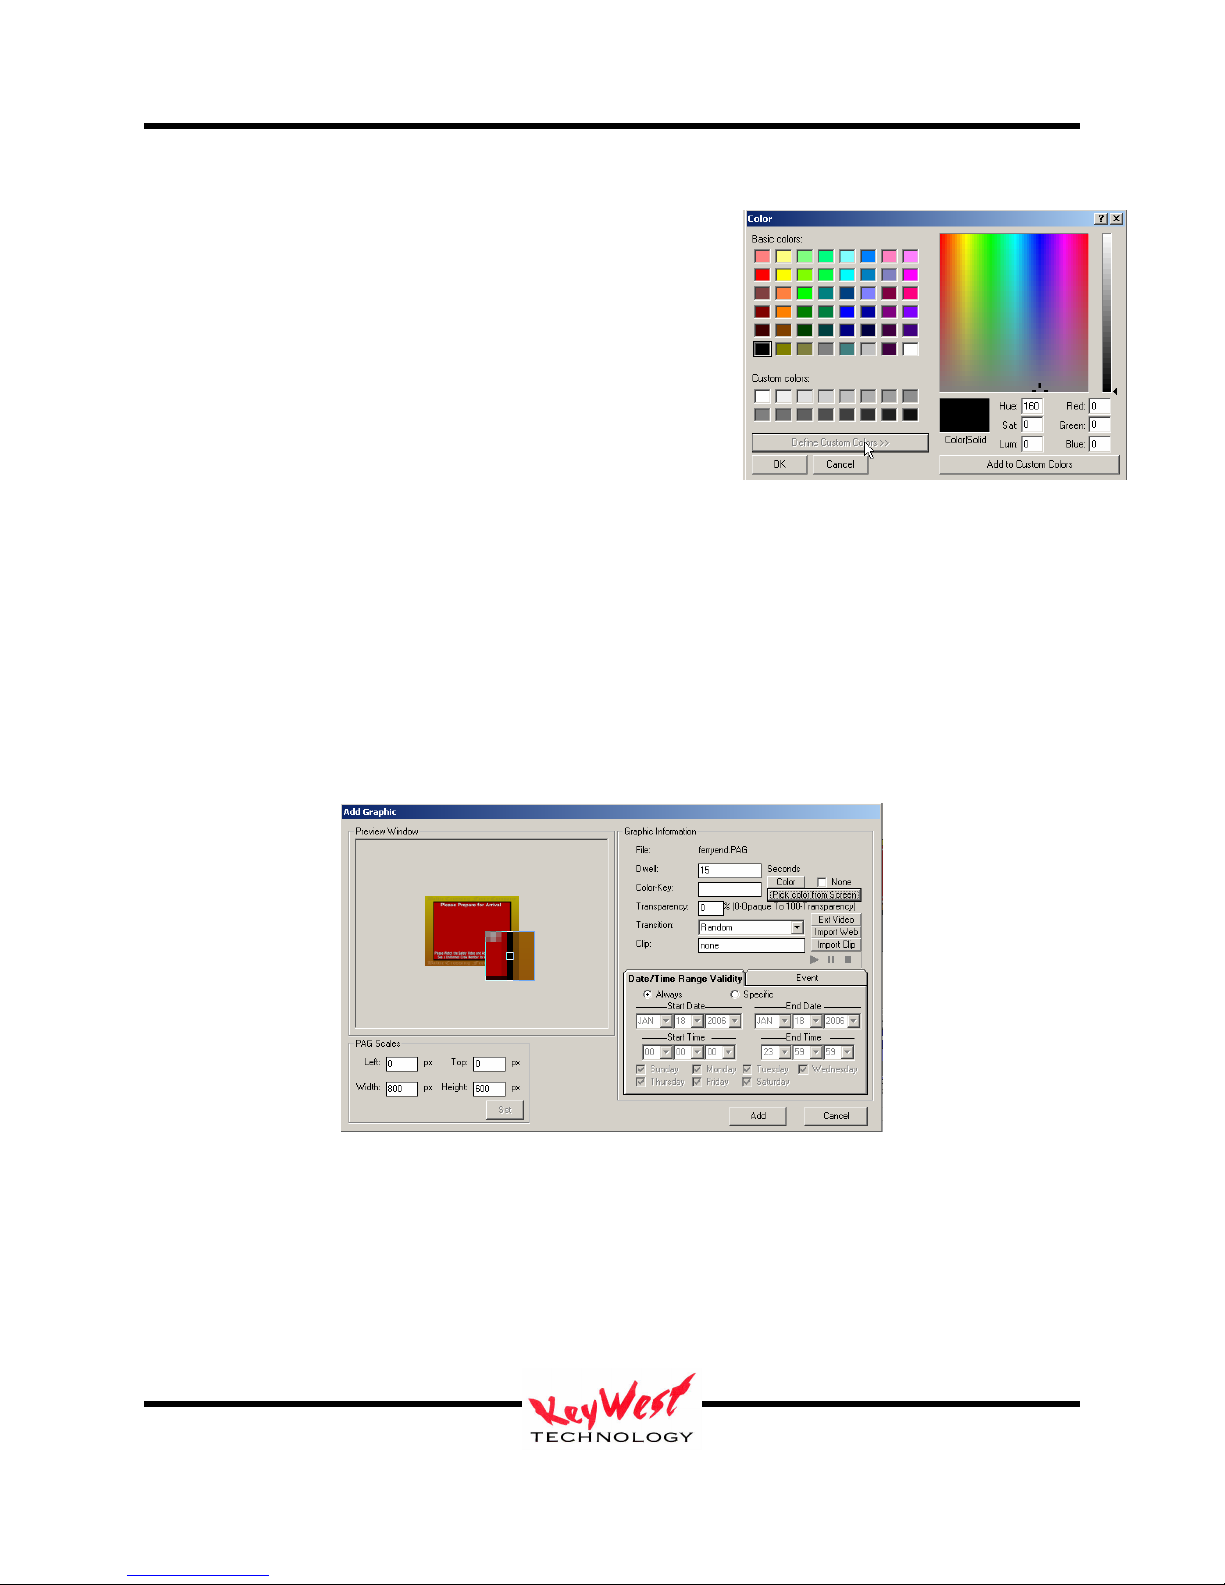
To choose another color to key out either enter the standard
hexadecimal value of the color or click the COLOR button,
and select the key color from the pallet (as pictured on
right).
This window will initially open in basic view—to open the
expanded view as shown in the picture to the right, click the
DEFINE CUSTOM COLORS button.
Pick Color From Screen
Another option for selecting which color to key (or cut) out of an image is Pick Color From
Screen. This option selects a color from anywhere on the screen to serve as the key color—so if
there is a graphic with a large red field to be made transparent, use Pick Color From Screen to
select that exact color. This is extremely useful if the colors to be keyed are of unknown exact
RGB value
To use, first click the NONE check box in the Color Key area of the attributes window to remove
the check mark. Next, click the PICK COLOR FROM SCREEN button:
A reticule box will appear that can be moved around the screen. This reticule will magnify the
pixels it is currently over, allowing one to choose colors down to pixel precision.
Keywest Technology
14563 W. 96th Terrace
Lenexa, Kansas 66215
800.331.2019
www.keywesttechnology.com
23 Mar 2009
Change 06
29
MediaXtreme MediaZone
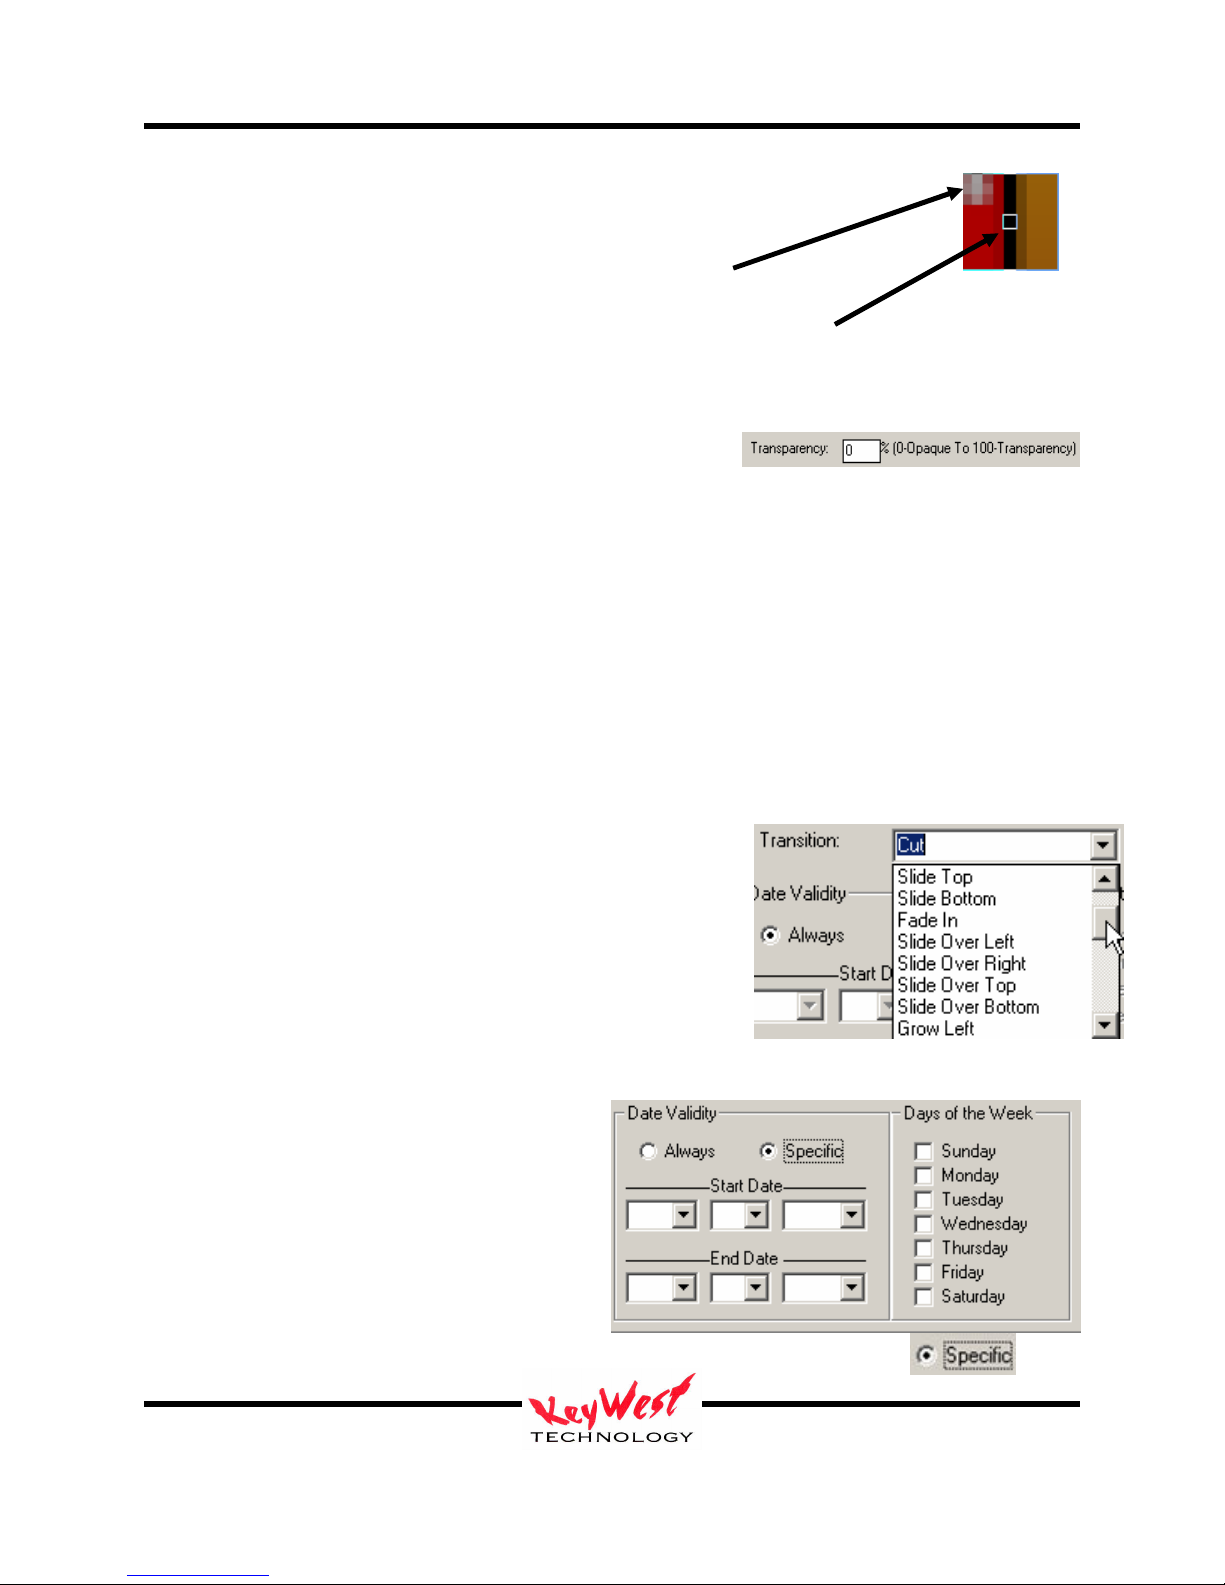
To choose the desired key color, simply place the small square pipper in the center
of the reticule box over the color you desire and left click the mouse.
Transparency
Transparency values can be set for an entire page.
This transparency control refers to the transparency level of the entire page as a single unit. Set
the value by entering a number from 0 to 100 in the text box. 0 means 0% transparent, or not
transparent at all—completely opaque; 100 means 100% transparent, or completely invisible
(probably not a commonly used setting)--if something is set to 100% transparent, no one will
ever see it play (although, it will play in its own invisible way).
Transparency works independently of Key Colors. Certain colors can be keyed out completely
and still make the rest of the page partially transparent (or partially opaque, depending upon the
angle at which is it viewed).
Transition
Transitions are set to add interest to a presentation. A
transition is a special effect entrance applied to a page.
Current transitions are available under the TRANSITIONS
drop down arrow as shown to the right. The Transition
control will default to RANDOM (default can be changed in
settings.ini, see Appendix B). When selected, a Random
transition will be used each time the page plays.
Remember, transitions define how a page or graphic enter the viewing area.
Date Validity
Just as backgrounds can be always valid
(meaning they play every time the player
comes across them regardless of day of week
or date) or have specific day and date
validities set.
To set specific days and date validities, click the SPECIFIC radio button
Reticle Box
Pipper
Keywest Technology
14563 W. 96th Terrace
Lenexa, Kansas 66215
800.331.2019
www.keywesttechnology.com
23 Mar 2009
Change 06
30

MediaXtreme MediaZone
(a radio button is the white circle to the left of a selection that fills with a black dot when
selected).
Then it’s as simple as clicking the down arrows for Start Date Month, Day and Year
and doing the same for End Date.
This sets a WINDOW of VALIDITY. Any time the player encounters a page or
element that has specific day/date settings, and the current real date is within that
WINDOW of VALIDITY, the page or element will be played as normal.
When the player encounters a page outside its WINDOW of VALIDITY, the page or element
will be ignored as though it weren’t even scheduled.
Add Clip
MediaCreator pages can have Picture-in-Picture (PiP) windows. These windows are set in the
MediaCreator program and become an attribute of the page. The only way to add a PiP window
to a .PAG is through MediaCreator.
If a .PAG has a PiP window, one can add a clip to
play in that PiP window each time the page plays.
Click the IMPORT CLIP button on the attributes
window.
A file browser window will open…select the clip of
your choice
The example creator chose “spider.mpg”. Once selected, the PiP clip will be listed in the Clip
text box, and play controls are available now below the Import Clip button—use these controls to
preview your clip if desired. Please wait to move on until the clip name appears in the CLIP box
Keywest Technology
14563 W. 96th Terrace
Lenexa, Kansas 66215
800.331.2019
www.keywesttechnology.com
23 Mar 2009
Change 06
31

MediaXtreme MediaZone
and the dwell time changes to the clip length or the clip will not be attached. The sample page
five2.pag does not have a PiP window embedded—therefore when this page plays, no video PiP
will appear.
Add the Page
Now that all the attributes for the page are set, click the ADD button. The
new page should now be the first entry in the Zone 1 column.
Click the Preview Icon again…playback should now be the background
video fire.mpg playing and five2.pag playing over the top (with random
transitions each time the dwell time cycles).
Remember the big 5 is keyed over the background even though no key color was chosen because
it is a MediaCreator .PAG file with a blank (black) background. .PAG files automatically key
the blank backgrounds without further user intervention.
Add BMPs, JPGs, PNGs and Other Media to Zones
Click on Zone 2 column to select it active. The column header will turn green, and
the little palm tree will follow.
Use the browser to locate “C:\MediaCreator5\Images”.
Choose “Theme069.jpg” to add to Graphic B column.
Double-Click the page name in the file browser. (And
remember, substitute files as desired).
The ADD GRAPHIC dialog box will open. This dialog
has its own preview window as shown below.
This dialog box also allows us to set attributes to all
pages.
DWELL
Dwell time is the duration that a page will stay on-screen. To change the dwell time simply
highlight and type a new dwell. Dwell is measured in seconds.
COLOR-KEY
The Color-Key box allows you to choose a color to be keyed out when the page is played. A
color that is keyed out becomes transparent at playback. This special effect attribute will allow
Keywest Technology
14563 W. 96th Terrace
Lenexa, Kansas 66215
800.331.2019
www.keywesttechnology.com
23 Mar 2009
Change 06
32

MediaXtreme MediaZone
you to add odd shapes or “floating” text and objects over other pages and backgrounds. ColorKey can also be turned off to ensure all of your chosen colors show at playback.
If you desire a color be keyed out, you can either
enter the standard hexadecimal value of your color
(if you have this value handy) or click on the
COLOR button, and select your key color from the
pallet.
This window will initially open in basic view—to
open the expanded view as shown in the picture to
the right, click the DEFINE CUSTOM COLORS
button.
Pick Color From Screen
Another option for selecting which color to key (or cut) out of an image is Pick Color From
Screen. This option allows you to select a color from anywhere on your screen to serve as the
key color—so if you have created a graphic with a large red field that you wish to be transparent,
you can use Pick Color From Screen to select that exact color. This is extremely useful if the
colors you are using for keying are unknown (their exact RGB values are unknown).
To use, first click the NONE check box in the Color Key area of the attributes window to remove
the check mark. Next, click the PICK COLOR FROM SCREEN button:
Keywest Technology
14563 W. 96th Terrace
Lenexa, Kansas 66215
800.331.2019
www.keywesttechnology.com
23 Mar 2009
Change 06
33

MediaXtreme MediaZone
A reticule box will appear that you can move around the screen. This reticule will magnify the
pixels it is currently over, allowing you to choose colors down to pixel precision.
To choose your key color, simply place the small square pipper in the center of the
reticule box over the color you desire and left click the mouse.
TRANSPARENCY
You can also set transparency values for your entire page.
This transparency control refers to the transparency level of the entire page as a single unit. Set
the value by entering a number from 0 to 100 in the text box. 0 means 0% transparent, or not
transparent at all—completely opaque; 100 means 100% transparent, or completely invisible
(probably not a commonly used setting!). Yes, if you set something to 100% transparent, no one
will ever see it play back. Transparency works independently of Key Colors. You can key
certain colors out completely and make the rest of the page partially transparent (or partially
opaque, depending upon how you look at it).
TRANSITION
Transitions are set to add interest to your presentation. A
transition is a special effect entrance applied to a page. Current
transitions are available under the TRANSITIONS drop down
arrow as shown to the right. The Transition control will default to RANDOM. When selected, a
Random transition will be used each time the page plays.
Remember, transitions define how a page or graphic enter the viewing area.
DATE VALIDITY
Just as backgrounds can be always valid (meaning they play every time the player comes across
them regardless of day of week or date) or have specific day and date validities set.
Keywest Technology
14563 W. 96th Terrace
Lenexa, Kansas 66215
800.331.2019
www.keywesttechnology.com
23 Mar 2009
Change 06
Reticle Box
Pipper
34

MediaXtreme MediaZone
To set specific days and date validities, click the SPECIFIC radio button
(a radio button is the white circle to the left of a selection that fills with a black dot
when selected).
Then it’s as simple as clicking the down arrows for Start Date Month, Day and Year and
doing the same for End Date.
This sets a WINDOW of VALIDITY. Any time the player encounters a page or element
that has specific day/date settings, and the current real date is within that WINDOW of
VALIDITY, the page or element will be played as normal.
When the player encounters a page outside its WINDOW of VALIDITY, the page or element
will be ignored as though it weren’t even scheduled.
ADD A PICTURE-IN-PICTURE WINDOW
PiP SETTINGS
When you add a .bmp, .jpg, or other PC type graphic as a page, you can attach a Picture-inPicture window. This differs from the MediaCreator .PAG type files in that the PiP window is
added in the scheduler and not at the time of the graphics creation.
This PiP window will allow a digital movie file to be played within that page.
Click the SCALABLE VIDEO WINDOW button.
Keywest Technology
14563 W. 96th Terrace
Lenexa, Kansas 66215
800.331.2019
www.keywesttechnology.com
23 Mar 2009
Change 06
35

MediaXtreme MediaZone
You will see a gray box appear in the preview
window…this is the PiP window. We will use that gray
box to size and position the PiP window. To change size
or position of the PiP window, simply left click anywhere
within the gray box and drag it around for position. Click
on the corners or edges of the box to resize.
You can remove the 4:3 aspect ratio restrictions by
deselecting the MAINTAIN ASPECT RATIO checkbox
below the preview window.
ADD CLIP
After you have added a PiP window you can add a clip to
play in that PiP window each time the page plays.
Click the IMPORT CLIP button on the attributes window.
A file browser window will open…select the clip of your
choice
We chose “spider.mpg”. Once selected, you will see your PiP
clip listed in the Clip text box, and notice the play controls are
available now below the Import Clip button—use these controls
to preview your clip if desired. Our sample page five2.pag does
not have a PiP window embedded—therefore when this page
plays, no video PiP will appear. Please substitute your own page
with a PiP window if you desire. Notice the dwell time of the
page changes to match the dwell time of the attached clip. This is
not adjustable.
Keywest Technology
14563 W. 96th Terrace
Lenexa, Kansas 66215
800.331.2019
www.keywesttechnology.com
23 Mar 2009
Change 06
36

MediaXtreme MediaZone
ADD THE PAGE
Now that we’ve completed setting all the attributes for the page, click the ADD
button at the bottom of the screen. Our page should now be the first entry in
the Zone 2 column.
To the left of our page’s name, there is a “filmstrip” icon. This indicates that a video clip is
attached to the page.
ADD A CRAWL
The system can “CRAWL” any graphic or page. MediaCreator Crawl pages are specifically
made to crawl, but you can also use graphics, pictures, or other image files as well.
Let’s do this ZONE 3. Select column ZONE 3 by clicking on it; Set its
type to CRAWL. The next step will be to select a graphic to crawl.
In the media folder “C:\Program Files\MediaZone
Editor\Application\Media” choose a sample crawl “5crawl1.PAG”.
This opens the crawl attributes window—similar to page attributes, but with a few key
differences.
Crawl Dwell
Crawl dwell time is basically the same setting as a page dwell, except a crawl will finish. So, if
you have a long crawl but give it a 3 second dwell, it will play the whole thing and may cause
Keywest Technology
14563 W. 96th Terrace
Lenexa, Kansas 66215
800.331.2019
www.keywesttechnology.com
23 Mar 2009
Change 06
37

MediaXtreme MediaZone
you timing issues later down the scheduling process. See the INI settings section for alternate
crawl attributes.
Color-Key
The Color-Key box allows you to choose a color to be keyed out when the crawl is played. A
color that is keyed out becomes transparent at playback. This special effect attribute will allow
you to add odd shapes or “floating” text and objects
over other pages and backgrounds. Color-Key can
also be turned off to ensure all of your chosen colors
show at playback.
If you desire a color be keyed out, you can either enter
the standard hexadecimal value of your color (if you
have this value handy) or click on the COLOR button,
and select your key color from the pallet.
This window will initially open in basic view—to open
the expanded view as shown in the picture to the right,
click the DEFINE CUSTOM COLORS button.
Pick Color From Screen
Another option for selecting which color to key (or cut) out of an image is Pick Color From
Screen. This option allows you to select a color from anywhere on your screen to serve as the
key color—so if you have created a graphic with a large red field that you wish to be transparent,
you can use Pick Color From Screen to select that exact color. This is extremely useful if the
colors you are using for keying are unknown (their exact RGB values are unknown).
To use, first click the NONE check box in the Color Key area of the attributes window to remove
the check mark. Next, click the PICK COLOR FROM SCREEN button:
Keywest Technology
14563 W. 96th Terrace
Lenexa, Kansas 66215
800.331.2019
www.keywesttechnology.com
23 Mar 2009
Change 06
38

MediaXtreme MediaZone
A reticule box will appear that you can move around the screen. This reticule will magnify the
pixels it is currently over, allowing you to choose colors down to pixel precision.
To choose your key color, simply place the small square pipper in the center of the
reticule box over the color you desire and left click the mouse.
Transparency
You can also set transparency values for your entire crawl.
This transparency control refers to the transparency level of the entire crawl as a single unit. Set
the value by entering a number from 0 to 100 in the text box. 0 means 0% transparent, or not
transparent at all—completely opaque; 100 means 100% transparent, or completely invisible
(probably not a commonly used setting!). Yes, if you set something to 100% transparent, no one
will ever see it play back.
Transparency works independently of Key Colors. You can key certain colors out completely
and make the rest of the page partially transparent (or partially opaque, depending upon how you
look at it).
CRAWL SPEED and DIRECTION
You can set and change crawl speeds and direction with this control
Reticle Box
Pipper
Keywest Technology
14563 W. 96th Terrace
Lenexa, Kansas 66215
800.331.2019
www.keywesttechnology.com
23 Mar 2009
Change 06
39

MediaXtreme MediaZone
A negative Speed will create a crawl that moves from LEFT to RIGHT. A positive crawl Speed
will create the standard crawl that moves from RIGHT to LEFT.
Crawl Location
A crawl zone within a screen template will override the Location setting. Screen template
positions will determine where the crawl will appear and the crawl will fill the zone.
Add a Logo
The system is capable of running a LOGO on any of the graphics
columns just as a page or a crawl.
The difference being that a LOGO is a graphic that can be sized or
positioned within that layer.
Step one is to setup the
column as a LOGO column, turn the Layer ON,
and set the Layer Priority.
Next, select a graphic from our File Browser
window to add in as a logo. The LOGO
ATTRIBUTES WINDOW WILL OPEN.
Logo Dwell
Dwell time is the duration that a logo will stay on-screen. To change the dwell time simply
highlight and type a new dwell. Dwell is measured in seconds.
Color-Key
The Color-Key box allows you to choose a color
to be keyed out when the logo is played. A color
that is keyed out becomes transparent at playback.
This special effect attribute will allow you to add
odd shapes or “floating” text and objects over
other pages and backgrounds.
Color-Key can also be turned off to ensure all of
your chosen colors show at playback.
Keywest Technology
14563 W. 96th Terrace
Lenexa, Kansas 66215
800.331.2019
www.keywesttechnology.com
23 Mar 2009
Change 06
40

MediaXtreme MediaZone
If you desire a color be keyed out, you can either enter the standard hexadecimal value of your
color (if you have this value handy) or click on the COLOR button, and select your key color
from the pallet.
This window will initially open in basic view—to open the expanded view as shown in the
picture to the right, click the DEFINE CUSTOM COLORS button.
Pick Color From Screen
Another option for selecting which color to key (or cut) out of an image is Pick Color From
Screen. This option allows you to select a color from anywhere on your screen to serve as the
key color—so if you have created a graphic with a large red field that you wish to be transparent,
you can use Pick Color From Screen to select that exact color. This is extremely useful if the
colors you are using for keying are unknown (their exact RGB values are unknown).
To use, first click the NONE check box in the Color Key area of the attributes window to remove
the check mark. Next, click the PICK COLOR FROM SCREEN button:
A reticule box will appear that you can move around the screen. This reticule will magnify the
pixels it is currently over, allowing you to choose colors down to pixel precision.
To choose your key color, simply place the small square pipper in the center of the
reticule box over the color you desire and left click the mouse.
Keywest Technology
14563 W. 96th Terrace
Lenexa, Kansas 66215
800.331.2019
www.keywesttechnology.com
23 Mar 2009
Change 06
Reticle Box
Pipper
41

MediaXtreme MediaZone
Transparency
You can also set transparency values for your entire logo.
This transparency control refers to the transparency level of the entire logo as a single unit. Set
the value by entering a number from 0 to 100 in the text box. 0 means 0% transparent, or not
transparent at all—completely opaque; 100 means 100% transparent, or completely invisible
(probably not a commonly used setting!). Yes, if you set something to 100% transparent, no one
will ever see it play back.
Transparency works independently of Key Colors. You can key certain colors out completely
and make the rest of the logo partially transparent.
Animated Logos
The MX is capable of playing back Animated GIF files as logos. Simply add the animated GIF
with the same procedures listed above for any other graphic. No special settings are required and
resizing is allowed.
Add a Roll
Related to crawls, but in another dimension, the MX is capable of running a roll independently
on each one of the Graphics Layers.
The MX can “ROLL” any graphic or page. The ROLL feature will dock roll pages together if
the speed and dwell are set properly to achieve a continuous rolling graphic. See the
AdvancedDemo.Set for several ROLL samples.
Roll attributes are similar to crawl attributes.
Keywest Technology
14563 W. 96th Terrace
Lenexa, Kansas 66215
800.331.2019
www.keywesttechnology.com
23 Mar 2009
Change 06
42

MediaXtreme MediaZone
Roll Dwell
ROLL dwell time is the same setting as a crawl dwell.
Color-Key
The Color-Key box allows you to choose a color to be keyed out when the roll is played. A
color that is keyed out becomes transparent at playback. This special effect attribute will allow
you to add odd shapes or “floating” text and objects over other pages and backgrounds. ColorKey can also be turned off to ensure all of your chosen colors show at playback.
If you desire a color be keyed out, you can
either enter the standard hexadecimal value of
your color (if you have this value handy) or
click on the COLOR button, and select your
key color from the pallet.
This window will initially open in basic
view—to open the expanded view as shown in
the picture to the right, click the DEFINE
CUSTOM COLORS button.
Pick Color From Screen
Another option for selecting which color to
key (or cut) out of an image is Pick Color From Screen. This option allows you to select a color
from anywhere on your screen to serve as the key color—so if you have created a graphic with a
large red field that you wish to be transparent, you can use Pick Color From Screen to select that
exact color. This is extremely useful if the colors you are using for keying are unknown (their
exact RGB values are unknown).
To use, first click the NONE check box in the Color Key area of the attributes window to remove
the check mark. Next, click the PICK COLOR FROM SCREEN button:
Keywest Technology
14563 W. 96th Terrace
Lenexa, Kansas 66215
800.331.2019
www.keywesttechnology.com
23 Mar 2009
Change 06
43

MediaXtreme MediaZone
A reticule box will appear that you can move around the screen. This reticule will magnify the
pixels it is currently over, allowing you to choose colors down to pixel precision.
To choose your key color, simply place the small square pipper in the center of the
reticule box over the color you desire and left click the mouse.
Transparency
You can also set transparency values for your entire roll.
This transparency control refers to the transparency level of the entire roll as a single unit. Set
the value by entering a number from 0 to 100 in the text box. 0 means 0% transparent, or not
transparent at all—completely opaque; 100 means 100% transparent, or completely invisible
(probably not a commonly used setting!). Yes, if you set something to 100% transparent, no one
will ever see it play back.
Transparency works independently of Key Colors. You can key certain colors out completely
and make the rest of the page partially transparent (or partially opaque, depending upon how you
look at it).
Roll Speed and Direction
You can set and change roll speeds and direction with this control
Reticle Box
Pipper
Keywest Technology
14563 W. 96th Terrace
Lenexa, Kansas 66215
800.331.2019
www.keywesttechnology.com
23 Mar 2009
Change 06
44

MediaXtreme MediaZone
A negative Speed will create a roll that moves from Bottom to Top…A positive Speed will do
the opposite.
Roll Location
A roll can be located anywhere horizontally on the play out screen. Simply choose the pixel that
you want the crawl to run at, 0 to 1024. Note the limits and pixel counts may change from
application to application—the sample picture to the
right may not be identical to your installation.
Save Set
Once your set is complete, and you are satisfied with it. It will need to be saved so
it can be scheduled.
Click FILE and select SAVE AS then enter a name for your set.
Edit Content Within a Set
Editing Pages or other elements within a set is done to change dwell times, transitions, add or
remove PiP windows, etc….
To Enter the Edit mode either double-left click the Page or element within it’s column, or click
on the EDIT button in the controls section (not EDIT CLIP, we’ll save that for MPEGs).
You can also access edit functions by right clicking the page to be edited within the column
The PAGE ATTRIBUTES window will open (same window initially used to set everything for
the page when it was originally added) for changes.
Blanks
Blanks give us the ability to hold off events within a column. For example, if there is a
background that should run for five seconds before any other zones come into play the zones will
have to be held. Do this by adding a BLANK period within the column.
BLANKS can be added by clicking on the BLANK button in the controls
section.
BLANKS can also be added by right clicking within the column. Let’s add a blank to
our Zone 2. After right clicking Zone 2 select and left-click “ADD BLANK”
Keywest Technology
14563 W. 96th Terrace
Lenexa, Kansas 66215
800.331.2019
www.keywesttechnology.com
23 Mar 2009
Change 06
45

MediaXtreme MediaZone
A “BLANKS” dialog box will appear allowing us to set the BLANK DWELL and
TRANSITION. Type “5” in the blank.
We now have a blank set in column B below the first page.
Now, a blank won’t do much good at the end there other than it would cause the page
“Theme069.jpg” to start 5 seconds later than column A’s first entry the second time around. The
blank would continue to add 5 seconds to the total play time of that column.
Perhaps though, we want to hold off column B for five seconds at the very beginning of the set.
We have to rearrange the content within that column.
Rearrange Elements Within a Layer
Right click on the page that we want to move…in this case, that is “Theme069.jpg”.
Then click CUT.
“Theme069.jpg” should disappear from the column now.
Next, simply right click in the column again, and click PASTE.
“Theme069.jpg” should now reappear in the column, but now below the BLANK
instead of above it.
Start the PREVIEW window now—notice the BACKGROUND and COLUMN A
start immediately while COLUMN B starts 5 seconds later.
Now, as you build your set, you can time events to come and go.
One trick to a professional looking set is that each layer (or column) should end up with the same
total duration. That way, every time the Set Recycles, your timing and events will maintain their
relationships as you intended. Check the ADVANCEDDEMO.SET to see how a complicated set
can be timed to interact between columns and layers.
SCHEDULE AND COMMUNICATE
The final step to being on air with your graphics is communications.
On the Menu Bar, Click COMMUNICATION then MX SCHEULER
The SCHEDULER WINDOW will open.
Keywest Technology
14563 W. 96th Terrace
Lenexa, Kansas 66215
800.331.2019
www.keywesttechnology.com
23 Mar 2009
Change 06
46

MediaXtreme MediaZone
ADD A SET TO THE SCHEDULE
Step one is to add a set to the schedule. Click ADD SET and select the first Set you wish to
place in the schedule
Keywest Technology
14563 W. 96th Terrace
Lenexa, Kansas 66215
800.331.2019
www.keywesttechnology.com
23 Mar 2009
Change 06
47

MediaXtreme MediaZone
Browse to your set with the left-hand side FOLDER BROSWER. Remember, you can save sets
on any attached drive, including network drives. Once you locate your set, ensure you have your
desired attributes set:
FAIL SAFE or SPECIFIC DATE RANGE: Sets can be scheduled in two ways…FAIL SAFE or
SPECIFIC DATE RANGE. Every schedule must have a FAIL SAFE set. FAIL SAFE sets play
when no other scheduled sets are valid, and of course when they are the only set in a schedule.
Fail Safe is designed to prevent “black air”—so that no matter what the date or what the time, at
least one set is always valid within a schedule. If the set you are scheduling is to be the only set
in the schedule (as it would be for a tutorial) ensure you click the FAIL SAFE radio button.
A SPECIFIC DATE RANGE setting allows you to program a set within your schedule to play at
certain times and to be bypassed at other times. For instance, you can have two sets in your
schedule: One is your fail safe (the set that plays when no others are valid) and the other set to a
SPECIFIC DATE RANGE of perhaps every day for the month of December, with time set at
12:00:00 to 15:00:00…this would result in your fail safe set playing most of the day, but each
day in December between 12:00 PM and 3:00 PM, your specific set will play. This is an
extremely valuable tool if you are matching advertising to time of day demographics, or selling
time blocks on a schedule, or just have different content for different periods. Not only can time
and date be specified, so can specific days of the week.
After your attributes are set, click OK on the Set Attributes Window. Your set will now be listed
in the first row of the scheduler.
Notice, you can highlight any set on this form and adjust the Start/Stop Dates, TIMES and Days
of week as well as make a fail safe set specific or vice versa. Finally, we need to save the
Keywest Technology
14563 W. 96th Terrace
Lenexa, Kansas 66215
800.331.2019
www.keywesttechnology.com
23 Mar 2009
Change 06
48

MediaXtreme MediaZone
schedule and name it. Click the SAVE CURRENT SCHEDULE or SAVE ALL SCHEDULES,
and provide a name for the schedule in the browser window that opens. If your schedule already
has a name, SAVE CURRENT and SAVE ALL will save under the same name.
You can determine if your set is programmed as a valid FAIL SAFE if the Start Date, End Date,
Start Time, and End Time all have the value “ANY”.
COMMUNICATIONS
The final step is to send you schedule to the player.
Click the NETWORK CONNECTION Tab.
Click ADD, or ADD NEW if the IP isn’t listed on the left,
to add the IP address of your MX. This address was set
when you first installed the device.
Enter the IP here and a note if you’d like to identify the
address to yourself (useful mostly with multiple devices).
Note: You can use the network name of your MX in lieu of an IP address.
Once an IP address is set, click the SEND SCHEDULE Button.
The UPLOAD OPTIONS dialog will open. Choose the first option
if you know all of your media already exists on the player and you
want the fastest way to send a schedule change only.
Choose the middle option for true SMART UPLOADS. This option
will poll the player, compare your schedule and send only the files
Keywest Technology
14563 W. 96th Terrace
Lenexa, Kansas 66215
800.331.2019
www.keywesttechnology.com
23 Mar 2009
Change 06
49

MediaXtreme MediaZone
that are necessary for the new schedule to play. SMART UPLOADS may not register existing
media during the first upload after software installation or software upgrades as attributes can
change between software versions.
The final option is to Upload all Media—Use this to ensure an upload of all the contents of your
MEDIA folder. This option could take a very long time to progress. This would be used if you
wanted to pre-load all of your media on the player, and only make minor changes later to just the
schedule.
Click OK.
The text box in the network
window should give you progress
and feedback on the sending
process.
Once the send is complete, you
will get a green check mark next
to the IP address in the upper right
box, or a red X if communications
was unsuccessful.
If communications was
successful, your set and your
schedule should now be playing
on your MX.
Keywest Technology
14563 W. 96th Terrace
Lenexa, Kansas 66215
800.331.2019
www.keywesttechnology.com
23 Mar 2009
Change 06
50

MediaXtreme MediaZone
ADDITIONAL FEATURES and FUNCTIONS
ADD VIDEO CLIP to PiP PAGE AFTER PAGE ADDED TO LAYER
As we already have covered, the MX is capable of playing back a video file in a PiP window
within a set. Remember a page must have a PiP window in order for a video clip to be attached
to it. If we have such a page and did not attach a clip to the page at the time we added it to a
layer, we can still do so after the fact.
Going through the tutorial, we added a PiP window to “Theme069.jpg”, and we did add a clip to
the page…but if we hadn’t….
As shown above, select the page to receive the MPEG,
and then select the Clip to be added from the file
browser. Click ADD CLIP in the control section, or
right click and select ADD CLIP.
The Add Clip window will open.
This window will allow you to adjust the clip dwell,
which will change the dwell of the page. The system
defaults to the actual length of the clip, but it is
available for change. This form allows for a clip to be
added over multiple pages. This might be an interesting
addition for you if you wish to play a 30 minute clip
and want to change the graphics and backgrounds, or
crawls and logos during the show.
Keywest Technology
14563 W. 96th Terrace
Lenexa, Kansas 66215
800.331.2019
www.keywesttechnology.com
23 Mar 2009
Change 06
51

MediaXtreme MediaZone
To add an MPEG over multiple pages, simply highlight multiple pages on the COLUMN SET
LIST (each page must already have a PiP Window on-board).
To multi-select pages, hold down the SHIFT key on the keyboard, and click on the
sequential list of pages you wish to add a single clip to.
Then, click on the clip name in the FILE BROWSER WINDOW followed by ADD
CLIP in the control buttons or Right Click on the clip and select ADD CLIP
The MPEG ATTRIBUTES window will open, and this time you’ll see three pages
there.
You can then add the clip to all three pages so that the clip will play once while the pages change
at the dwell periods you set. Notice at the top of this window that you can also add video inputs
(composite, S-Video, or a Tuner Input) as well as sounds to multiple pages (maybe voice-overs
for a classified add channel).
The DWELL times will be evenly spread over all the pages you selected. You
can adjust those times as desired on the previous attributes window.
Once you have selected the MPEGS over three different pages you will see
RED “filmstrip” icons to the left of each page to indicate a clip is attached.
Keywest Technology
14563 W. 96th Terrace
Lenexa, Kansas 66215
800.331.2019
www.keywesttechnology.com
23 Mar 2009
Change 06
52

MediaXtreme MediaZone
ADD AUDIO to a PAGE or MULTIPLE PAGES AFTER PAGES ADDED TO LAYER
As we already have covered, the MX is capable of playing back an Audio file attached to a
specific page. This may be a soundtrack for a page or maybe a voice over (such as those used in
common advertising). If we did not attach an audio clip to a page at the time we added it to a
layer, we can still do so after the fact.
Select any page in our set that does not have a clip of some sort already attached. Note that you
can attach a video clip, or web page, or video source, or audio clip to a page, but only one of
those may be attached at any given time.
As shown above, select the page to receive the audio clip, and then select the Clip to be added
(wav or mp3) from the file browser. Click ADD CLIP in the control section, or right click and
select ADD CLIP.
To add audio over multiple pages, simply highlight multiple pages on the COLUMN SET LIST.
To multi-select pages, hold down the SHIFT key on the keyboard, and click
on the sequential list of pages you wish to add a single clip to.
Then, click on the clip name in the FILE BROWSER WINDOW followed by
ADD CLIP in the control buttons or Right Click on the clip and select ADD
CLIP
The CLIP ATTRIBUTES window will open, and this time you’ll see three pages there.
Keywest Technology
14563 W. 96th Terrace
Lenexa, Kansas 66215
800.331.2019
www.keywesttechnology.com
23 Mar 2009
Change 06
53

MediaXtreme MediaZone
You can then add the clip to all three pages so that the clip will play once while the pages change
at the dwell periods you set.
The DWELL times will be evenly spread over all the pages you selected. You
can adjust those times as desired on the previous attributes window.
Once you have selected the MPEGS over three different pages you will see
RED musical note icons to the left of each page to indicate a clip is attached. If
you had added audio to just one page, the musical note icon will be black.
PLAY POWERPOINT
PowerPoint© is an application unto itself, so there are some limitations when playing back.
Mainly, this limitation is that PowerPoint© has priority over all other media, so the presentation
will be the only visible media on the output. Any effects, such as embedded video, text
animations, transitions, and audio must be embedded in the PowerPoint© as the remaining layers
of MX will be inhibited during playback. PowerPoint© can only be added to the background
layer.
To add PowerPoint©, simply make the Background Layer active and use the file browsers to
find and select your presentation. Add it to the background in the same method used to add any
other content to the background layer.
Keywest Technology
14563 W. 96th Terrace
Lenexa, Kansas 66215
800.331.2019
www.keywesttechnology.com
23 Mar 2009
Change 06
54

MediaXtreme MediaZone
PLAY FLASH
The MX and devices are capable of playing Flash files as standard content. These can be
Macromedia Flash© or any of the third party flash generating products available on the market
(such as Xcelsius©).
Rules for Flash files are similar to PowerPoint©--they can be added to the background layer
only. The difference between PowerPoint© and Flash is that Flash behaves as though it were a
background MPEG video—you can key other content over the top including PiP windows,
crawls, rolls, and logos.
To add FLASH, it must be saved as a .SWF file. Simply browse to the folder containing your
Flash files and add them to the background in the same method you would use to add an MPEG
to the background.
Keywest Technology
14563 W. 96th Terrace
Lenexa, Kansas 66215
800.331.2019
www.keywesttechnology.com
Operational Note: PowerPoint presentations must be properly configured to play as a
slide show on the MX series players per the following directions:
1. Open PPT file in MS PowerPoint, select menu Slide Show -> Set Up Show:
In frame Show type
Check option Presented by a speaker(full screen)
Check option Loop continuously until 'ESC'
In frame Advance slides
Check option Using timings, if present
2. Select menu Slide Show -> Slide Transition:
In frame Advance
Check option Automatically after
And set the [xx:xx] (seconds)
23 Mar 2009
Change 06
55

MediaXtreme MediaZone
DISPLAY WEB PAGE
Web pages can be displayed as background layer items or within PiP windows.
To add as a background, activate the background layer by clicking on it. Then,
right click on the background layer and select ADD WEB PAGE.
Or click the ADD ITEM icon on the right quick start pane
then select WEB PAGE on the select window
The Web Page Attributes window will appear
The Preview Window will start blank—type in the URL (the web address) that you wish to
display. In our example, we used www.mediaxtreme.tv (there is no need to type the http://
portion of the address). After entering the URL, click GO and your web page will be displayed
live in the Preview Window.
Keywest Technology
14563 W. 96th Terrace
Lenexa, Kansas 66215
800.331.2019
www.keywesttechnology.com
23 Mar 2009
Change 06
56

MediaXtreme MediaZone
Once you verify this is the web page you are after, you can set the Dwell time of the page and the
Date/Time validity. Click the ADD button when you are ready to add the web page to your set.
An additional feature of the Web Page tool is WEB CROP WINDOW. This function allows you
to choose just a portion of a web page for display. To use, after you have selected your URL and
have it displayed in the preview window, click the WEB CROP WINDOW button.
A full screen representation of your web page will appear with a translucent green box. This box
is the actual crop area. Use the mouse and drag the corners of the green box to select the area to
be cropped. Once satisfied with the crop area, click the APPLY button within the green box.
This will set the actual size and position of an area of that web page that will be displayed in
your set.
It is important to note that the crop box has no knowledge of the content that is within its
borders. If you are cropping a specific section of a web page that you have no control over (like
a map, or crawl, or active content) and the web master in control of that page moves elements
around, the crop box will not automatically compensate, rather will still crop the exact same size
and position you set in this step.
ADVANCED COMMUNICATIONS
Earlier in the Tutorial Section of this manual we covered the basic communications. As you’ve
probably noticed, the Communications item has several additional buttons we didn’t use. Let’s
start with the Scheduler.
If not already open, click COMMUNICATIONS and MX SCHEDULER.
Keywest Technology
14563 W. 96th Terrace
Lenexa, Kansas 66215
800.331.2019
www.keywesttechnology.com
23 Mar 2009
Change 06
57

MediaXtreme MediaZone
We have already looked at the SET SCHEDULE tab and the NETWORK CONNECTION tab.
Let’s take a look at the EVENTS tab.
SCHEDULED EVENTS
Click the EVENT tab on the scheduler:
Notice the event window has some of the same control as the set schedule tab. The key
differences being that pre-programmed events must be selected through the ADD EVENTS drop
Keywest Technology
14563 W. 96th Terrace
Lenexa, Kansas 66215
800.331.2019
www.keywesttechnology.com
23 Mar 2009
Change 06
58

MediaXtreme MediaZone
down box and that there is no stop time to an event—only start. An event doesn’t require a stop
time because it is a single fire event—it is something that is triggered at an exact time—functions
such as controlling a matrix, starting a DVD, triggering a tape deck.
To add a scheduled EVENT, click the ADD EVENTS drop down box. You’ll
see different events supported by the MX system.
We will cover each possible event individually. Please note that the events
available in your system can differ from the image on the right. Keywest
Technology’s famed flexibility means that we are adding new device control
very often to make our customer’s jobs easier. Contact Keywest Technology
with any requests—most can be accommodated at minimal cost. Any Serial,
Network, or IR device can be controlled. Now let’s look at each event:
USER DEFINED EVENT
A User Defined Event is the epitome of flexibility. This function allows you to create your own
event for serial controlled devices. This can be used to program events to turn off and on
monitors at specific times, or make matrix switches to devices not currently supported, or make
absolutely any RS-232 control command for your system. Click User Defined Event:
The most important block is the COMMAND STRING block. This is where you type in the
actual RS-232 command string to control your device. For instance, if you are commanding a
serially controlled switcher, the string found in that switchers manual might be something like
IN1OUT1 (meaning input one to output 1). Simply type that command string exactly as it is
shown in the device under control’s manual—in our example, you would type IN1OUT1.
Keywest Technology
14563 W. 96th Terrace
Lenexa, Kansas 66215
800.331.2019
www.keywesttechnology.com
23 Mar 2009
Change 06
59

MediaXtreme MediaZone
Next the event is going to require a name…type a name that has meaning to you so you can call
this event again and again (if it’s a switcher event, perhaps the name of the event would be
“switch”—as long as it’s something you can use).
Below the command string block, you’ll need to use the Start Date and End Date to set the
validity of your event. If you want the event to be valid always, simply click the End Date year
drop down and go as far into the future as possible—10 years probably would cover any
“forever” in the video business. You’ll also set the valid Days of the Week for your event, and
most importantly, the Start Time…the Start Time is the exact second your event will trigger.
Use the Comment block below the Start Time to add any reminder comments for yourself.
These comments have no function other than pure information.
Next, you have to set the COMM port that is connected to the device under control. This is the
COMM port of the MX or 7 player that is physically connected to your device. The COMM
ports on your MX/7 are labeled. If your serial commands aren’t working, this is the first place to
look—ensure you have selected the proper COMM port for your event.
Below the port selection, you’ll program the parameters of the RS-232 control. See the manual
for the device you are controlling for BAUD RATE, DATA BITS, PARITY, STOP BITS, and
FLOW CONTROL.
Finally, on the USER EVENT window you can assign an icon to your event. With an assigned
ICON, EVENTS can be drag and dropped into timelines—useful if you want a specific event to
be timed with a specific page or video. Your icon can be bitmap, jpeg, or gif.
MPEG EVENT
The MX system is capable of controlling external video servers via RS-232 serial control.
To add an MPEG EVENT to your schedule, click Communications and
then MX Scheduler.
Click the EVENT tab and the ADD EVENT drop-down.
Keywest Technology
14563 W. 96th Terrace
Lenexa, Kansas 66215
800.331.2019
www.keywesttechnology.com
23 Mar 2009
Change 06
60

MediaXtreme MediaZone
Select MPEG EVENT
These events would be used to control MPEG player devices such as the Keywest Technology’s
MX2-PRO or Adtec Edje and Soloists.
Keywest Technology
14563 W. 96th Terrace
Lenexa, Kansas 66215
800.331.2019
www.keywesttechnology.com
23 Mar 2009
Change 06
61

MediaXtreme MediaZone
Your MPEG player device should be connected serially to your MediaXtreme so commands are
relayed between the two devices. Ensure COM PORT is set to the proper MediaXtreme Port
Number.
Under the category MPEG Function, there are several available options:
PLAY—Plays the current spot (Clip) from the MPEG player’s Play List (next in queue)
PLAY SPOT—Play a specific spot by name
STOP—Stops any spot that is playing
REPEAT ONE—Repeats the current spot until stopped
REPEAT ALL—Cycles through entire list or inventory of clips on MPEG player
REPEAT LAST—Plays entire list to the end, and repeats the last spot only
REPEAT OFF—Plays list to conclusion, then stops
As with all other control events, page events, or crawl events, you can set your MPEG event to
be “always on”, or select certain days, dates, and times for the event to be active.
DVD/VCR EVENT
The MX system is capable of controlling external DVD and VCR devices via RS-232 serial
control.
To add a DVD/VCR EVENT to your schedule, click Communications and
then MX Scheduler.
Keywest Technology
14563 W. 96th Terrace
Lenexa, Kansas 66215
800.331.2019
www.keywesttechnology.com
23 Mar 2009
Change 06
62

MediaXtreme MediaZone
Click the EVENT tab and the ADD EVENT drop-down.
Select DVD/VCR EVENT
The MX series can be programmed to trigger several events on tape decks or DVD players.
These events include playing, stopping, rewinding, Power On and Power Off, selecting chapters
and more.
Keywest Technology
14563 W. 96th Terrace
Lenexa, Kansas 66215
800.331.2019
www.keywesttechnology.com
23 Mar 2009
Change 06
63

MediaXtreme MediaZone
Choose your DVD/VCR Device using the drop-down menu. Next,
choose the event you wish to occur under DVD/VCR Function. Be
aware that available events will change based on the device selected.
All devices feature the basics (Play, Stop, Pause).
As with all other MX events, utilize the lower section of the EVENT window to set dates and
times for events. Also, as a reminder, ensure you have the proper COMM PORT set prior to
saving your event list.
Finally, for success, ensure you have the tape or DVD you wish to trigger inserted in the device
and power applied.
LEIGHTRONIX CONTROL EVENT
The MX system is capable of controlling external Leightronix devices via RS-232 serial control.
To add a LEIGHTRONIX EVENT to your schedule, click
Communications and then MX Scheduler.
Click the EVENT tab and the ADD EVENT drop-down.
Select LEIGHTRONIX EVENT
This function creates events for legacy Leightronix controllers. The events tell the Leightronix
to trigger selected functions on the devices it controls or to create switcher events. There are
three different Leightronix controllers that can be used, the MINI-T, the PRO-8 and the PRO-16.
Keywest Technology
14563 W. 96th Terrace
Lenexa, Kansas 66215
800.331.2019
www.keywesttechnology.com
23 Mar 2009
Change 06
64

MediaXtreme MediaZone
Devices controlled by these units include tape decks and laser discs. Later Leightronix devices
are not supported because of a decision by Leightronix to no longer provide control protocol.
Keywest Technology has replaced the Leightronix device with the AVR-8 switcher and device
controller. This section of the manual is purely for customers who already own the original
Leightronix devices and wish to continue using them.
You can program 3 Leightronix events simultaneously with this window. This allows you to
program a Play, Stop and Rewind sequence on one screen. Select the controller type being used
from the Type drop down menu in the Controller area.
Select the device that will be controlled from the Device drop down menu in the Controller area.
If a switcher event is being programmed, select No Device and go on to the discussion about
switcher events (Error! Reference source not found.).
Choices for the MINI-T include:
No Device (selected when switcher events will be programmed)
Tape Deck (which deck will be specified next)
All Decks (indicating all decks controlled by the system)
Laser Disc (which disc will be specified next)
Keywest Technology
14563 W. 96th Terrace
Lenexa, Kansas 66215
800.331.2019
www.keywesttechnology.com
23 Mar 2009
Change 06
65

MediaXtreme MediaZone
All Discs (indicating all laser discs controlled by the system).
Choices for the PRO-8 and PRO-16 do not include laser discs and are limited to:
No Device (selected when switcher events will be programmed)
Tape Deck (which deck will be specified next)
All Decks (indicating all decks controlled by the system
Select Tape Deck to continue building the sample event. If Tape Deck or Laser Disc has been
selected, define what device number it is in the Number drop down menu, which is activated by
those selections.
Each deck or disc is defined in the system by a number. When several devices of the same type
are controlled by the system, it is important that the system know which one is going to be
controlled in the event.
Choices are device numbers 1 through 8. Select 1 as the device for the sample event being built.
Select the control function for the selected device in the Function drop down menu.
If a tape deck device selection has been made, the function choices include:
Stop
Rewind
Play
Record
If a laser disc device selection has been made, the function choices include:
Stop
Play Segment
Play
Still
If Play Segment is selected for a laser disc event, the Start and Stop fields in the Laser Disc area
are activated for a segment range to be defined. The valid ranges are from 0 to 54000.
The sample event is programmed to play the tape deck, so select Play. Select the com port that
the Leightronix is connected to with the Port Number drop down menu in the Comm Port area.
Port number choices are 1, 2, 3, and 4. This specification tells the Display Station where to look
for the Leightronix input. Select 2, which is the usual port, for the sample event being
programmed. Typically, the Creation Station is connected to port 1. Program the time and date
elements for the event in the Event Time area.
These parameters define the time and date range within which the event will run.
Start Date and End Date come up with the current date as their defaults. Whatever the date range
must be is specified using the drop down menus for month, day and year.
Keywest Technology
14563 W. 96th Terrace
Lenexa, Kansas 66215
800.331.2019
www.keywesttechnology.com
23 Mar 2009
Change 06
66

MediaXtreme MediaZone
The sample event is programmed to run throughout the month of November, so specify Nov 1,
1999 through Nov 30, 1999 as the date range.
Days of the Week determines on which days of the week within the date range the event will run.
Click off any day when the crawl should not display. Remember, this selection defines the days
for every week within the date range. So if Sunday is deselected, for instance, the event will
never display on any Sunday in the date range.
The sample event runs every day, so leave all the days of the week checked off.
Time determines the time of day that the event should be triggered using a twenty-four hour
clock. The sample event plays the tape machine starting at 4 PM, so specify 16:00:00. Click on
OK. The control event is programmed.
Based on the programming in the sample event, the event will play a tape machine every day at 4
PM during the month of November 1999.
The Leightronix Event window for this event with all the programming would look like the one
pictured here.
A second event would be programmed with similar elements, but with Rewind as the Function
and 16:30:30 as the Time to rewind the deck after play out is complete.
The result of this programming appears on the Schedule window as seen on that window at the
beginning of this discussion. The type of event is noted as Control Event but only the date and
time parameters appear in the Schedule window. No indication of what kind of control event is
scheduled appears on the window.
To find out more information about the event, highlight the event in the Schedule list and click on
Edit Event. That brings up the Leightronix Event window for the event. Event information can
be checked and changed if desired.
Switcher events are programmed in the Switcher area of the Leightronix Event window.
The other parameters in the Leightronix Event window must be accessed as needed to program
the switcher event in the same manner as they were for programming the device control event.
Refer to the steps in the discussion above for the specific details of these operations. Switcher
events are programmed in the Switcher or Router area of the Leightronix Event window.
Switcher events and device control events can be programmed to occur together, in which case
the Controller area would be programmed as appropriate for the device control event desired.
For any event, the Port Number in the Comm Port area must be correctly specified (typically 2).
This is usually set once and left alone for all future operations since it will not change.
The Event Time parameters apply to switcher events just as they do to device control events, so
Start Date, End Date, Days of the Week, and Time parameters for when a switcher event should
be triggered must be specified. If both a switcher event and a device control event are
programmed together, the Event Time specification applies to both.
Keywest Technology
14563 W. 96th Terrace
Lenexa, Kansas 66215
800.331.2019
www.keywesttechnology.com
23 Mar 2009
Change 06
67

MediaXtreme MediaZone
The three supported Leightronix controllers each have different Switcher or Router areas that
reflect their individual input/output capabilities. Switcher or router capabilities are defined by
how many inputs come into a unit and how many outputs go out.
That means for multiple inputs and outputs, decisions must be made as to which input to select
and from which output or outputs the unit sends its signal. The Switcher or Router area is used
make these specifications, so it’s Input and Output drop down menus offer the appropriate
choices for each unit.
The MINI-T is an 8 X 1 (8 inputs, 1 output). Since it has only one output, when it is the selected
device, this area is designated as Switcher. The Input drop down menu offers input selections
from 1 – 8 to choose from and there is no output drop down menu. An input selection of “—“
indicates no switch.
The PRO-8 is an 8 X 3 (8 inputs, 3 outputs). Since it has three outputs to choose from, when it is
the selected device, this area is designated as Router and an Output drop down menu appears on
the window. The Input drop down menu offers input selections from 1 – 8 and the Output drop
down menu offers output selections from 1 – 3 to choose from. Multiple outputs can be chosen
for any event. An input selection of “—“ indicates no switch.
Keywest Technology
14563 W. 96th Terrace
Lenexa, Kansas 66215
800.331.2019
www.keywesttechnology.com
23 Mar 2009
Change 06
68

MediaXtreme MediaZone
The PRO-16 is a 16 X 4 (16 inputs, 4 outputs). Since it has three outputs to choose from, when it
is the selected device, this area is designated as Router and an Output drop down menu appears
on the window. The Input drop down menu offers input selections from 1 – 16 and the Output
drop down menu offers output selections from 1 – 4 to choose from. Multiple outputs can be
chosen for any event. An input selection of “—“ indicates no switch.
The Delay drop down menu for all controller types allows a delay in seconds from 0 – 99 to be
specified for each switcher event.
ADD AVR8 EVENT
The MX system is capable of controlling external AVR8 switchers via RS-232 or TCP/IP control
protocol.
To add an AVR8 EVENT to your schedule, click Communications and
then MX Scheduler.
Click the EVENT tab and the ADD EVENT drop-down.
Select AVR8/16 EVENT
The Keywest Technology AVR8 device is an eight input, four output AV switcher device with
network and serial control capability. The AVR8 comes with a manual specific to its operation.
The MX series products can control the AVR8 directly as with other devices already discussed.
Keywest Technology
14563 W. 96th Terrace
Lenexa, Kansas 66215
800.331.2019
www.keywesttechnology.com
23 Mar 2009
Change 06
69

MediaXtreme MediaZone
Select the Router (typically AVR-8) and select control method. There AVR8 differs from other
matrix switchers in that it can be controlled by serial commands (RS-232) or Ethernet via IP.
Setup of the AVR8 is covered in the AVR8 manual—there are specific settings for both types of
control protocols.
Keywest Technology recommends using IP Network control. To use IP Control set the IP
NETWORK port by entering the port number set on the AVR8 (typically this value is 3000).
Next set the IP address of the AVR8 (per the AVR8 manual).
Choose the Input and Output configuration for the event. This event scheduler is programmed
by the outputs—that is, there are four outputs on the AVR8, so those choices are static. What is
changed is the input that is routed to the particular outputs. Set your input to output
configurations using the provided drop-down boxes.
Set the event date/time and day of week trigger time, add any comments desired, and click OK to
set the event in the scheduler.
ADD LOGOSTAR EVENT
The MX system is capable of controlling external LogoStar 200 devices via RS-232 serial
control. LogoStar 200s are used to insert static downstream logos.
To add a LOGOSTAR 200 EVENT to your schedule, click
Communications and then MX Scheduler.
Keywest Technology
14563 W. 96th Terrace
Lenexa, Kansas 66215
800.331.2019
www.keywesttechnology.com
23 Mar 2009
Change 06
70

MediaXtreme MediaZone
Click the EVENT tab and the ADD EVENT drop-down.
Select LOGOSTAR EVENT
To trigger a logo event (logo on or logo off) set the Com Port that is connected directly to the
LogoStar 200.
Select the logo you wish to trigger by number (see the LogoStar 200 manual to load and set
logos).
Keywest Technology
14563 W. 96th Terrace
Lenexa, Kansas 66215
800.331.2019
www.keywesttechnology.com
23 Mar 2009
Change 06
71

MediaXtreme MediaZone
Select the event—LOGO ON or LOGO OFF—by selecting the appropriate radio button.
Set the event time, date, and days of week—when you are satisfied with the event click OK to
add it to the EVENT programming.
ADD SWITCHER EVENT
The MX system is capable of controlling external switcher devices via RS-232 serial control.
To add a SWITCHER EVENT to your schedule, click Communications
and then MX Scheduler.
Click the EVENT tab and the ADD EVENT drop-down.
Select SWITCHER EVENT
Keywest Technology
14563 W. 96th Terrace
Lenexa, Kansas 66215
800.331.2019
www.keywesttechnology.com
23 Mar 2009
Change 06
72

MediaXtreme MediaZone
Set the COM PORT to the actual MX port connected to the Switcher.
Next, set the input desired; set the start and end dates, valid days of the week, and the time for
the triggered event.
Once set, click OK to program.
ADD MX INTERNAL SWITCHER EVENT
The MX system has an optional four input one output internal audio and video switcher. If your
player is so equipped, you can program switcher events through the Scheduler
To add an INTERNAL SWITCHER EVENT to your schedule, click
Communications and then MX Scheduler.
Click the EVENT tab and the ADD EVENT drop-down.
Select MX INTERNAL SWITCHER.
Keywest Technology
14563 W. 96th Terrace
Lenexa, Kansas 66215
800.331.2019
www.keywesttechnology.com
23 Mar 2009
Change 06
73

MediaXtreme MediaZone
FUNCTION should be set to SELECT INPUT. Select the desired input (1 through 4). Set the
start date, end date, days of the week and the Start Time for the triggered event.
When you have all desired settings loaded, click OK to set the event in the scheduler.
ADD EXTRON SWITCHER EVENT
The MX system is capable of controlling external switcher devices via RS-232 serial control.
To add an EXTRON SWITCHER EVENT to your schedule, click
Communications and then MX Scheduler.
Click the EVENT tab and the ADD EVENT drop-down.
Select EXTRON CMS
Keywest Technology
14563 W. 96th Terrace
Lenexa, Kansas 66215
800.331.2019
www.keywesttechnology.com
23 Mar 2009
Change 06
74

MediaXtreme MediaZone
The MX family of products also supports RS-232 control of Extron switchers. Extron has a
varied line of switchers and matrices with multiple inputs and outputs. See the SCHEDULER
SETUP INI section to set your specific I/O count. Most Extron switchers use the same protocol,
making this interface very flexible.
To use, ensure you have the proper com port set (the port on the MX that is physically attached
to the Extron Switcher).
Choose your input number and output number for this specific event with the drop down boxes.
The SPECIAL SWITCHER EVENT section is special purpose and not normally used.
Set your valid days and dates along with trigger time and click OK to save the event.
ADD SYNC ON SYNC OFF EVENT
The MX system has the capability to turn its video sync signals on or off on a triggered event.
When used in a digital signage application, the MX device is typically connected to a flat panel
or PC display via RGBHV or DVI connections. New displays of these type have auto-off
features that cause them to turn off when no video sync signals are present. By triggering the
MX to shut down sync at the end of the day for example, you can effectively turn off the
connected displays at night—you can then add a SYNC ON event for every morning to
automatically turn on your displays in the mornings.
To add a SYNC ON or SYNC OFF EVENT to your schedule, click
Communications and then MX Scheduler.
Click the EVENT tab and the ADD EVENT drop-down.
Keywest Technology
14563 W. 96th Terrace
Lenexa, Kansas 66215
800.331.2019
www.keywesttechnology.com
23 Mar 2009
Change 06
75

MediaXtreme MediaZone
Select SYNC EVENT.
Select either SYNC ON or SYNC OFF by clicking the associated radio buttons.
Set the valid days and dates and the trigger time.
Click OK to add the event to the scheduler.
Remember, SYNC ON and OFF are only applicable to the RGB outputs (RGBHV or DVI)—
composite outputs are not affected.
COMMUNCIATION CONTROLS PANE
To access the COMMUNICATION CONTROL PANE, click
Communications and then MX Scheduler.
These buttons each have specific communications functions related to sending and
retrieving data within the MX system. See the tutorial section of this manual for the
SAVE ALL SCHEDULES and SEND SCHEDULE button function.
The remaining buttons have specific uses we’ll cover individually
SEND SET
To SEND SET, click Communications and then MX Scheduler.
Keywest Technology
14563 W. 96th Terrace
Lenexa, Kansas 66215
800.331.2019
www.keywesttechnology.com
23 Mar 2009
Change 06
76

MediaXtreme MediaZone
On the right side CONTROLS PANE select SEND SET
The SEND SET function allows you to send a set to the MX player
individually, without having to send an entire schedule and causing a restart
of the schedule.
The SET FILE BROWSER window will open.
Browse to the folder that contains your set and then select
the set name in the lower portion of this dialogue box.
Once selected, click SEND to transfer the set from your
scheduler computer to your MX player.
You must already have your network tab on your
scheduler window setup with the proper IP address or
network name to send to. To set this up, see the
NETWORK TAB section of the SEND SCHEDULE
portion of the tutorial earlier in this manual.
SEND and RETRIEVE FILE
To SEND and RETREIVE FILE, click
Communications and then MX Scheduler.
Keywest Technology
14563 W. 96th Terrace
Lenexa, Kansas 66215
800.331.2019
www.keywesttechnology.com
23 Mar 2009
Change 06
77

MediaXtreme MediaZone
On the right side CONTROLS PANE select RETREIVE SCHEDULE
There are occasions it is useful to transfer individual files to or retrieve individual files from your
player: Remote Upgrades; Log Files, Updated Media; Updated Text Files, etc…
This function works much like a standard File Transfer Protocol application. To use, simply
select the file you wish to transfer—either on the left side which is your local computer or the
right side which is the player your are connected to. This means you must have your
NETWORK TAB of your SCHEDULER WINDOW already configured (see the NETWORK
TAB section of the SEND SCHEDULE portion of the tutorial earlier in this manual if not
already configured).
Once you select which file you wish to transfer, you must select where you are going to transfer
to.
As an example, we will retrieve a log file from the player to your local computer:
With the SEND/RETRIEVE dialogue window open, browse to the MXPLAYER folder on the
right side (the player browser).
Keywest Technology
14563 W. 96th Terrace
Lenexa, Kansas 66215
800.331.2019
www.keywesttechnology.com
23 Mar 2009
Change 06
78

MediaXtreme MediaZone
Open the MXPlayer Folder (should appear as shown on the right)
For our example, browse down to LOGA.txt and select.
Next, select on the left side of the dialogue box, the folder we wish to transfer the file into.
For our example, I have chosen my Desktop (makes it very simple to remember where I
transferred the file).
Next, click the left-pointing dual-arrows to begin the transfer . Remember, if we were
transferring the other way, from your local PC to the Player, we’d use the right-pointing arrows.
After the file transfer is complete, you should see a
message box verifying the successful transfer.
Keywest Technology
14563 W. 96th Terrace
Lenexa, Kansas 66215
800.331.2019
www.keywesttechnology.com
23 Mar 2009
Change 06
79

MediaXtreme MediaZone
RETRIEVE CURRENT SCHEDULE
To RETRIEVE CURRENT SCHEDULE, click Communications and
then MX Scheduler.
At times you may have multiple users or multiple scheduler PC’s in control of your MX player.
Or perhaps the control software has been loaded on a new PC. In this case you will probably
need to download the schedule that is currently running on the MX player.
On the right side CONTROLS PANE select RETREIVE CURRENT SCHEDULE
Normally, select the last option (as shown on the right) to download the
schedule file, the set file, and all the associated media. This would not be
necessary if you were just needing to download the media or the set files
separately.
RETREIVE SCHEDULE
To RETRIEVE a SCHEDULE, click Communications and then MX
Scheduler.
Keywest Technology
14563 W. 96th Terrace
Lenexa, Kansas 66215
800.331.2019
www.keywesttechnology.com
23 Mar 2009
Change 06
80

MediaXtreme MediaZone
On the right side CONTROLS PANE select RETREIVE SCHEDULE
RETREIVE SET
To RETRIEVE a SET, click Communications and then MX Scheduler.
On the right side CONTROLS PANE select RETREIVE SET
INSTANT COMMANDS
The MX systems are capable of instant control commands that can be used for many valuable
purposes: Remote Upgrading Players, Player Maintenance, Troubleshooting, Triggering Events,
etc….
Keywest Technology
14563 W. 96th Terrace
Lenexa, Kansas 66215
800.331.2019
www.keywesttechnology.com
23 Mar 2009
Change 06
81

MediaXtreme MediaZone
To access the INSTANT COMMAND menus and functions click
COMMUNICATIONS and select INSTANT EVENTS/CONTROLS
The first step to any instant command is to set the IP address or network name of the player to be
controlled. Enter the IP or network name in the drop-down box or select if already saved (click
SAVE IP TO LIST to enter it).
Communications Protocol can be either UDP or FTP. Do not change this setting unless you have
trouble with the default. If there is an issue, you can change from UDP to FTP or vice versa by
clicking the appropriate radio button. Changes should only be necessary if your network has
certain ports closed or other security blockades.
The first section is INSTANT EVENTS
INSTANT EVENTS
To access the INSTANT COMMAND menus and functions click
COMMUNICATIONS and select INSTANT EVENTS/CONTROLS
Keywest Technology
14563 W. 96th Terrace
Lenexa, Kansas 66215
800.331.2019
www.keywesttechnology.com
23 Mar 2009
Change 06
82

MediaXtreme MediaZone
USER DEFINED EVENT
A User Defined Event is the epitome of flexibility. This function allows you to create your own
event for serial controlled devices. This can be used to program events to turn off and on
monitors at specific times, or make matrix switches to devices not currently supported, or make
absolutely any RS-232 control command for your system. Click User Defined Event:
The most important block is the COMMAND STRING block. This is where you type in the
actual RS-232 command string to control your device. For instance, if you are commanding a
serially controlled switcher, the string found in that switchers manual might be something like
IN1OUT1 (meaning input one to output 1). Simply type that command string exactly as it is
shown in the device under control’s manual—in our example, you would type IN1OUT1.
Keywest Technology
14563 W. 96th Terrace
Lenexa, Kansas 66215
800.331.2019
www.keywesttechnology.com
23 Mar 2009
Change 06
83

MediaXtreme MediaZone
Next the event is going to require a name…type a name that has meaning to you so you can call
this event again and again (if it’s a switcher event, perhaps the name of the event would be
“switch”—as long as it’s something you can use).
Next, you have to set the COMM port that is connected to the device under control. This is the
COMM port of the MX or 7 player that is physically connected to your device. The COMM
ports on your MX/7 are labeled. If your serial commands aren’t working, this is the first place to
look—ensure you have selected the proper COMM port for your event.
Below the port selection, you’ll program the parameters of the RS-232 control. See the manual
for the device you are controlling for BAUD RATE, DATA BITS, PARITY, STOP BITS, and
FLOW CONTROL.
MPEG EVENT
To access the INSTANT COMMAND menus and functions click
COMMUNICATIONS and select INSTANT EVENTS/CONTROLS
Select MPEG EVENT
These events would be used to control MPEG player devices such as the Keywest Technology’s
MX2-PRO or Adtec Edje and Soloists.
Keywest Technology
14563 W. 96th Terrace
Lenexa, Kansas 66215
800.331.2019
www.keywesttechnology.com
23 Mar 2009
Change 06
84

MediaXtreme MediaZone
Your MPEG player device should be connected serially to your MediaXtreme so commands are
relayed between the two devices. Ensure COM PORT is set to the proper MediaXtreme Port
Number.
Under the category MPEG Function, there are several available options:
PLAY—Plays the current spot (Clip) from the MPEG player’s Play List (next in queue)
PLAY SPOT—Play a specific spot by name
STOP—Stops any spot that is playing
REPEAT ONE—Repeats the current spot until stopped
REPEAT ALL—Cycles through entire list or inventory of clips on MPEG player
REPEAT LAST—Plays entire list to the end, and repeats the last spot only
REPEAT OFF—Plays list to conclusion, then stops
DVD/VCR EVENT
To access the INSTANT COMMAND menus and functions click
COMMUNICATIONS and select INSTANT EVENTS/CONTROLS
Keywest Technology
14563 W. 96th Terrace
Lenexa, Kansas 66215
800.331.2019
www.keywesttechnology.com
23 Mar 2009
Change 06
85

MediaXtreme MediaZone
Select DVD/VCR EVENT
The MX series can be programmed to trigger several events on tape decks or DVD players.
These events include playing, stopping, rewinding, Power On and Power Off, selecting chapters
and more.
Choose your DVD/VCR Device using the drop-down menu. Next,
choose the event you wish to occur under DVD/VCR Function. Be
aware that available events will change based on the device
selected. All devices feature the basics (Play, Stop, Pause).
Keywest Technology
14563 W. 96th Terrace
Lenexa, Kansas 66215
800.331.2019
www.keywesttechnology.com
23 Mar 2009
Change 06
86

MediaXtreme MediaZone
Finally, for success, ensure you have the tape or DVD you wish to trigger inserted in the device
and power applied.
LEIGHTRONIX CONTROL EVENT
To access the INSTANT COMMAND menus and functions click
COMMUNICATIONS and select INSTANT EVENTS/CONTROLS
Select LEIGHTRONIX EVENT
This function creates events for legacy Leightronix controllers to trigger selected functions on
the devices it controls or to create switcher events. Only the MINI-T, the PRO-8 and the PRO16 can be used with the MX system. Devices controlled by these units include tape decks and
laser discs. Later Leightronix devices are not supported because of a decision by Leightronix to
no longer provide control protocol. Keywest Technology has replaced the Leightronix device
with the AVR-8 switcher and device controller. This section of the manual is purely for
customers who already own the original Leightronix devices and wish to continue using them.
Keywest Technology
14563 W. 96th Terrace
Lenexa, Kansas 66215
800.331.2019
www.keywesttechnology.com
23 Mar 2009
Change 06
87

MediaXtreme MediaZone
Select the device that will be controlled from the Device drop down menu in the Controller area.
If a switcher event is being programmed, select No Device and go on to the discussion about
switcher events (Error! Reference source not found.).
Choices for the MINI-T include:
No Device (selected when switcher events will be programmed)
Tape Deck (which deck will be specified next)
All Decks (indicating all decks controlled by the system)
Laser Disc (which disc will be specified next)
All Discs (indicating all laser discs controlled by the system).
Choices for the PRO-8 and PRO-16 do not include laser discs and are limited to:
No Device (selected when switcher events will be programmed)
Tape Deck (which deck will be specified next)
All Decks (indicating all decks controlled by the system
Select Tape Deck to continue building the sample event. If Tape Deck or Laser Disc has been
selected, define what device number it is in the Number drop down menu, which is activated by
those selections.
Each deck or disc is defined in the system by a number. When several devices of the same type
are controlled by the system, it is important that the system know which one is going to be
controlled in the event.
Choices are device numbers 1 through 8. Select 1 as the device for the sample event being built.
Select the control function for the selected device in the Function drop down menu.
If a tape deck device selection has been made, the function choices include:
Stop
Rewind
Play
Record
If a laser disc device selection has been made, the function choices include:
Stop
Play Segment
Play
Still
If Play Segment is selected for a laser disc event, the Start and Stop fields in the Laser Disc area
are activated for a segment range to be defined. The valid ranges are from 0 to 54000.
Keywest Technology
14563 W. 96th Terrace
Lenexa, Kansas 66215
800.331.2019
www.keywesttechnology.com
23 Mar 2009
Change 06
88

MediaXtreme MediaZone
Switcher events and device control events can be programmed to occur together, in which case
the Controller area would be programmed as appropriate for the device control event desired.
For any event, the Port Number in the Comm Port area must be correctly specified (typically 2).
This is usually set once and left alone for all future operations since it will not change.
The three supported Leightronix controllers each have different Switcher or Router areas that
reflect their individual input/output capabilities. Switcher or router capabilities are defined by
how many inputs come into a unit and how many outputs go out.
That means for multiple inputs and outputs, decisions must be made as to which input to select
and from which output or outputs the unit sends its signal. The Switcher or Router area is used
make these specifications, so it’s Input and Output drop down menus offer the appropriate
choices for each unit.
The MINI-T is an 8 X 1 (8 inputs, 1 output). Since it has only one output, when it is the selected
device, this area is designated as Switcher. The Input drop down menu offers input selections
from 1 – 8 to choose from and there is no output drop down menu. An input selection of “—“
indicates no switch.
The PRO-8 is an 8 X 3 (8 inputs, 3 outputs). Since it has three outputs to choose from, when it is
the selected device, this area is designated as Router and an Output drop down menu appears on
the window. The Input drop down menu offers input selections from 1 – 8 and the Output drop
down menu offers output selections from 1 – 3 to choose from. Multiple outputs can be chosen
for any event. An input selection of “—“ indicates no switch.
The PRO-16 is a 16 X 4 (16 inputs, 4 outputs). Since it has three outputs to choose from, when it
is the selected device, this area is designated as Router and an Output drop down menu appears
on the window. The Input drop down menu offers input selections from 1 – 16 and the Output
drop down menu offers output selections from 1 – 4 to choose from. Multiple outputs can be
chosen for any event. An input selection of “—“ indicates no switch.
The Delay drop down menu for all controller types allows a delay in seconds from 0 – 99 to be
specified for each switcher event.
ADD AVR8 EVENT
To access the INSTANT COMMAND menus and functions click
COMMUNICATIONS and select INSTANT EVENTS/CONTROLS
Keywest Technology
14563 W. 96th Terrace
Lenexa, Kansas 66215
800.331.2019
www.keywesttechnology.com
23 Mar 2009
Change 06
89

MediaXtreme MediaZone
Select AVR8/16 EVENT
The Keywest Technology AVR8 device is an eight input, four output AV switcher device with
network and serial control capability. The AVR8 comes with a manual specific to its operation.
The MX series products can control the AVR8 directly as with other devices already discussed.
Select the Router (typically AVR-8) and select control method. There AVR8 differs from other
matrix switchers in that it can be controlled by serial commands (RS-232) or Ethernet via IP.
Setup of the AVR8 is covered in the AVR8 manual—there are specific settings for both types of
control protocols.
Keywest Technology recommends using IP Network control. To use IP Control set the IP
NETWORK port by entering the port number set on the AVR8 (typically this value is 3000).
Next set the IP address of the AVR8 (per the AVR8 manual).
Choose the Input and Output configuration for the event. This event scheduler is programmed
by the outputs—that is, there are four outputs on the AVR8, so those choices are static. What is
Keywest Technology
14563 W. 96th Terrace
Lenexa, Kansas 66215
800.331.2019
www.keywesttechnology.com
23 Mar 2009
Change 06
90

MediaXtreme MediaZone
changed is the input that is routed to the particular outputs. Set your input to output
configurations using the provided drop-down boxes.
Click OK to send the event in the scheduler.
ADD LOGOSTAR EVENT
To access the INSTANT COMMAND menus and functions click
COMMUNICATIONS and select INSTANT EVENTS/CONTROLS
Select LOGOSTAR EVENT
To trigger a logo event (logo on or logo off) set the Com Port that is connected directly to the
LogoStar 200.
Select the logo you wish to trigger by number (see the LogoStar 200 manual to load and set
logos).
Select the event—LOGO ON or LOGO OFF—by selecting the appropriate radio button.
Keywest Technology
14563 W. 96th Terrace
Lenexa, Kansas 66215
800.331.2019
www.keywesttechnology.com
23 Mar 2009
Change 06
91

MediaXtreme MediaZone
Click OK to trigger the event.
ADD SWITCHER EVENT
To access the INSTANT COMMAND menus and functions click
COMMUNICATIONS and select INSTANT EVENTS/CONTROLS
Select SWITCHER EVENT
Set the COM PORT to the actual MX port connected to the Switcher.
Once set, click OK to trigger.
ADD MX INTERNAL SWITCHER EVENT
To access the INSTANT COMMAND menus and functions click
COMMUNICATIONS and select INSTANT EVENTS/CONTROLS
Keywest Technology
14563 W. 96th Terrace
Lenexa, Kansas 66215
800.331.2019
www.keywesttechnology.com
23 Mar 2009
Change 06
92

MediaXtreme MediaZone
Select MX INTERNAL SWITCHER.
FUNCTION should be set to SELECT INPUT. Select the desired input (1 through 4). Set the
start date, end date, days of the week and the Start Time for the triggered event.
When you have all desired settings loaded, click OK to trigger the event.
ADD EXTRON SWITCHER EVENT
To access the INSTANT COMMAND menus and functions click
COMMUNICATIONS and select INSTANT EVENTS/CONTROLS
Keywest Technology
14563 W. 96th Terrace
Lenexa, Kansas 66215
800.331.2019
www.keywesttechnology.com
23 Mar 2009
Change 06
93

MediaXtreme MediaZone
Select EXTRON CMS
The MX family of products also supports RS-232 control of Extron switchers. Extron has a
varied line of switchers and matrices with multiple inputs and outputs. See the SCHEDULER
SETUP INI section to set your specific I/O count. Most Extron switchers use the same protocol,
making this interface very flexible.
To use, ensure you have the proper com port set (the port on the MX that is physically attached
to the Extron Switcher).
Choose your input number and output number for this specific event with the drop down boxes.
The SPECIAL SWITCHER EVENT section is special purpose and not normally used.
Click OK to trigger the event.
INSTANT CONTROLS
To access the INSTANT COMMAND menus and functions click
COMMUNICATIONS and select INSTANT EVENTS/CONTROLS
Keywest Technology
14563 W. 96th Terrace
Lenexa, Kansas 66215
800.331.2019
www.keywesttechnology.com
23 Mar 2009
Change 06
94

MediaXtreme MediaZone
TIME/DATE SYNCHRONIZE
Clicking the Time/Date Synchronize button will send a time/date string command from the
scheduler computer to the player. Be very careful, because the time on the player will be
changed to exactly what is on the scheduler—so, if your player is in Germany, your controller is
in Kansas City and you Time/Date Synchronize, your player in Germany will be about seven
hours wrong.
Also, MX players are factory set to auto-sync time with atomic time as long as they are
connected to the Internet and have access to web sites.
If you need to Time/Date Synchronize simply click the TIME/DATE SYNCHRONIZE button.
You will receive a message if the attempt was successful or not.
PLAYER MAINTENANCE
The PLAYER MAINTENANCE Instant Control will connect to designated player and delete all
motion video files (mpg, wmv, vob, avi) that are not in a current set or schedule. This allows
you to clear large amounts of storage space on the player remotely.
To access the PLAYER MAINTENANCE function, click
COMMUNICATIONS and select INSTANT EVENTS/CONTROLS
Keywest Technology
14563 W. 96th Terrace
Lenexa, Kansas 66215
800.331.2019
www.keywesttechnology.com
23 Mar 2009
Change 06
95

MediaXtreme MediaZone
Click PLAYER MAINTENANCE. The following warning will appear:
If you are satisfied that it is safe to proceed, click YES. The system will automatically delete the
unused content.
PLAYER VERSION
To access the PLAYER VERSION control click COMMUNICATIONS
and select INSTANT EVENTS/CONTROLS
Ensure you have the proper IP address or network name entered in the
IP ADDRESS block, then click PLAYER VERISON.
Keywest Technology
14563 W. 96th Terrace
Lenexa, Kansas 66215
800.331.2019
www.keywesttechnology.com
23 Mar 2009
Change 06
96

MediaXtreme MediaZone
The Version Information message box should become visible. Your version number will most
likely differ from the version shown in the illustration to the left.
RESTART SCHEDULE
To access the RESTART SCHEDULE control click
COMMUNICATIONS and select INSTANT EVENTS/CONTROLS
Ensure you have the proper IP address or network name entered in the IP ADDRESS block, then
click RESTART SCHEDULE.
Restart Schedule is used to command the player to stop the currently playing schedule and restart
it…or to start a schedule that has been stopped for some other reason.
You will receive a positive or negative acknowledgement after this command is sent.
RESTORE SCHEDULE
To access the RESTORE SCHEDULE control click
COMMUNICATIONS and select INSTANT EVENTS/CONTROLS
Keywest Technology
14563 W. 96th Terrace
Lenexa, Kansas 66215
800.331.2019
www.keywesttechnology.com
23 Mar 2009
Change 06
97

MediaXtreme MediaZone
USE THIS CONTROL WITH CA
UTION
Ensure you have the proper IP address or network name entered in the IP ADDRESS block, then
click RESTORE SCHEDULE.
Clicking this control will return the MX player to shipped state. Software will all be reset to
default parameters. Proceed only with extreme prejudice.
REBOOT PLAYER
There may be cause to reboot the player remotely…especially if you believe for some reason
playback has stopped or has become errant.
To access the REBOOT PLAYER control click COMMUNICATIONS
and select INSTANT EVENTS/CONTROLS
Keywest Technology
14563 W. 96th Terrace
Lenexa, Kansas 66215
800.331.2019
www.keywesttechnology.com
23 Mar 2009
Change 06
98

MediaXtreme MediaZone
Ensure you have the proper IP address or network name entered
in the IP ADDRESS block, then click REBOOT PLAYER.
Clicking YES on the warning message will cause immediate
reboot of the player.
SYNC ON and SYNC OFF
The MX system has the capability to turn its video sync signals on or off on a triggered event.
When used in a digital signage application, the MX device is typically connected to a flat panel
or PC display via RGBHV or DVI connections. New displays of these types have auto-off
features that cause them to turn off when no video sync signals are present. By triggering the
MX to shut down sync you can effectively turn off the connected displays—you can then add a
SYNC ON event to turn them back on
To access the SYNC ON and SYNC OFF control click
COMMUNICATIONS and select INSTANT EVENTS/CONTROLS
Keywest Technology
14563 W. 96th Terrace
Lenexa, Kansas 66215
800.331.2019
www.keywesttechnology.com
23 Mar 2009
Change 06
99

MediaXtreme MediaZone
Select either SYNC ON or SYNC OFF by clicking the associated buttons.
Remember, SYNC ON and OFF are only applicable to the RGB outputs (RGBHV or DVI)—
composite outputs are not affected.
RUN SET
The RUN SET instant command can be used as an EMERGENY SET trigger. For example, you
can create a set that is intended to only be played during emergencies (or any other time you
have an instant message to get out—boil orders, evacuations, special sales, etc…). Pre-position
that set (or sets) and associated media on the player.
To pre-position sets and media on the player (that are not part of a schedule) use the SEND SET
function described in ADVANCED COMMUNICATIONS.
To access the RUN SET control click COMMUNICATIONS and select
INSTANT EVENTS/CONTROLS
Keywest Technology
14563 W. 96th Terrace
Lenexa, Kansas 66215
800.331.2019
www.keywesttechnology.com
23 Mar 2009
Change 06
100
 Loading...