

KeyWest Technology KWT TM 2-1-DEVISOM Operator's Manual

DEVIS (v.2) Operator’s Manual Keywest Technology Early Warning Systems
1
KWT TM 2
-1-
DEVISOM
Table of Contents
Introduction 3
Connections 4
Operations 9
Store Presentations 10
Store Audio 13
Playback Tones 15
Playback Presentations 16
Presentation Hot Keys 17
Set Presentations & Tones 18
Presentation Slots 19
Audio Slots 20
GPI On/Off 20
Telephony & DTMF Setup 21
Pass Code 22
Level Settings 23
Auto-Answer 24
Dial -Up Control 24
Telephone Quick Reference Guide 25
DTMF Commands 26
Live Voice-Over 26
Clear DTMF Buffer 27
Audio Sources 28
Scheduler 29
Set Day-of -Week 30
Reset Day-Of-Week 32
Set Specific Date 33
Set System Clock/Date 34
Keywest Technology
14563 W. 96th Terrace
Lenexa, Kansas 66215
800.331.2019
www.keywesttechnology.com
14 Mar 03
Change 02

DEVIS (v.2) Operator’s Manual Keywest Technology Early Warning Systems
2
KWT TM 2
-1-
DEVISOM
Remote Control 34
IP Addresses 35
Remote Control Functions 36
Remote Maintenance Screen 37
Reprogram Slots 38
Reprogram Scheduler 38
Appendix A: Connect DEVIS to MHz RF-Switch (Courtesy Bruce Bradley) 40
Keywest Technology
14563 W. 96th Terrace
Lenexa, Kansas 66215
800.331.2019
www.keywesttechnology.com
14 Mar 03
Change 02

DEVIS (v.2) Operator’s Manual Keywest Technology Early Warning Systems
3
KWT TM 2
-1-
DEVISOM
FEATURES
ORDERING INFORMATION
APPLICATIONS
switching is required
Deployable Emergenc y Video Information
System (DEVIS)
DEVIS is a mobile, computer based system used to
display Microsoft PowerPoint™ Presentations over
CCTV, CATV, or broadcast video lines and
airwaves. The unit has two major modes of
operation —displaying normal, user-designed,
presentations and switching on user command to
emergency presentations. DEVIS is capable of
playing audio directly through it’s line-in
port, and overriding with emergency messages. It
features telephone dual-tone multi-frequency
(DTMF) control for switching presentations,
switching audio source, recording messages, and
playback of messages. The system is also
controllable via Ethernet, making it a flexible device,
accessible worldwide.
??Composite NTSC and RGBHV output
??Integrated command & control software
??Stand-alone remote control software
??DTMF remote control
??Built-in LAN and Modem
??PowerPoint™ autoplay & switching
??Line-in & Mic audio loop through
??Record and playback voice messages over
video system
??Real -Time Live Voice-Over capable
??Record and playback alert tone signals
??GPI for external switcher triggering
(example: MegaHertz 1x8 Base band
switch)
??Capable of normal PC operations including
web services, email, etc…
??Ruggedized and redundant internal cooling
with integral air filtration
??Microsoft Windows2000 Pro™ based
system for security and stability
Keywest Technology
14563 W. 96th Terrace
Lenexa, Kansas 66215
800.331.2019
www.keywesttechnology.com
14 Mar 03
Change 02
Part # Options
DEVIS
??Deployed or front-line locations
??Any television system with need to
??Kiosk
??Dormitory, Barracks, Rec Center,
??Anyplace video information is
Keyboard, Monitor, Mouse, any
commercially available software packages
requiring video based information
dissemination
quickly relay alert, advice, or
emergency information to a
population
Clubs, TV & Movie Shelters, Tent
City, Command Post, Headquarters
private or public information server
needed, and real -time presentation
DEVIS (v.2) Operator’s Manual Keywest Technology Early Warning Systems
4
KWT TM 2
-1-
DEVISOM
***CAUTION***
power cable as provided. Inadequate power grounding can result in equipment damage or destruction and could
WARNING
Unit is capable of operating on 110VAC to 240VAC, 60Hz/50Hz. Ensure you use only ground isolation main
void warranty. Further, ensure your AC voltage supply socket is single-phase only at either 60Hz or 50Hz—
400Hz and 3-phase power can damage or destroy the unit.
****************************
Lethal operating voltages present at internal system power supply. Completely disconnect main power cord
prior to opening cover or removing any panels. Appropriately trained personnel only should attempt any
internal modifications, repairs, or service.
*****************************
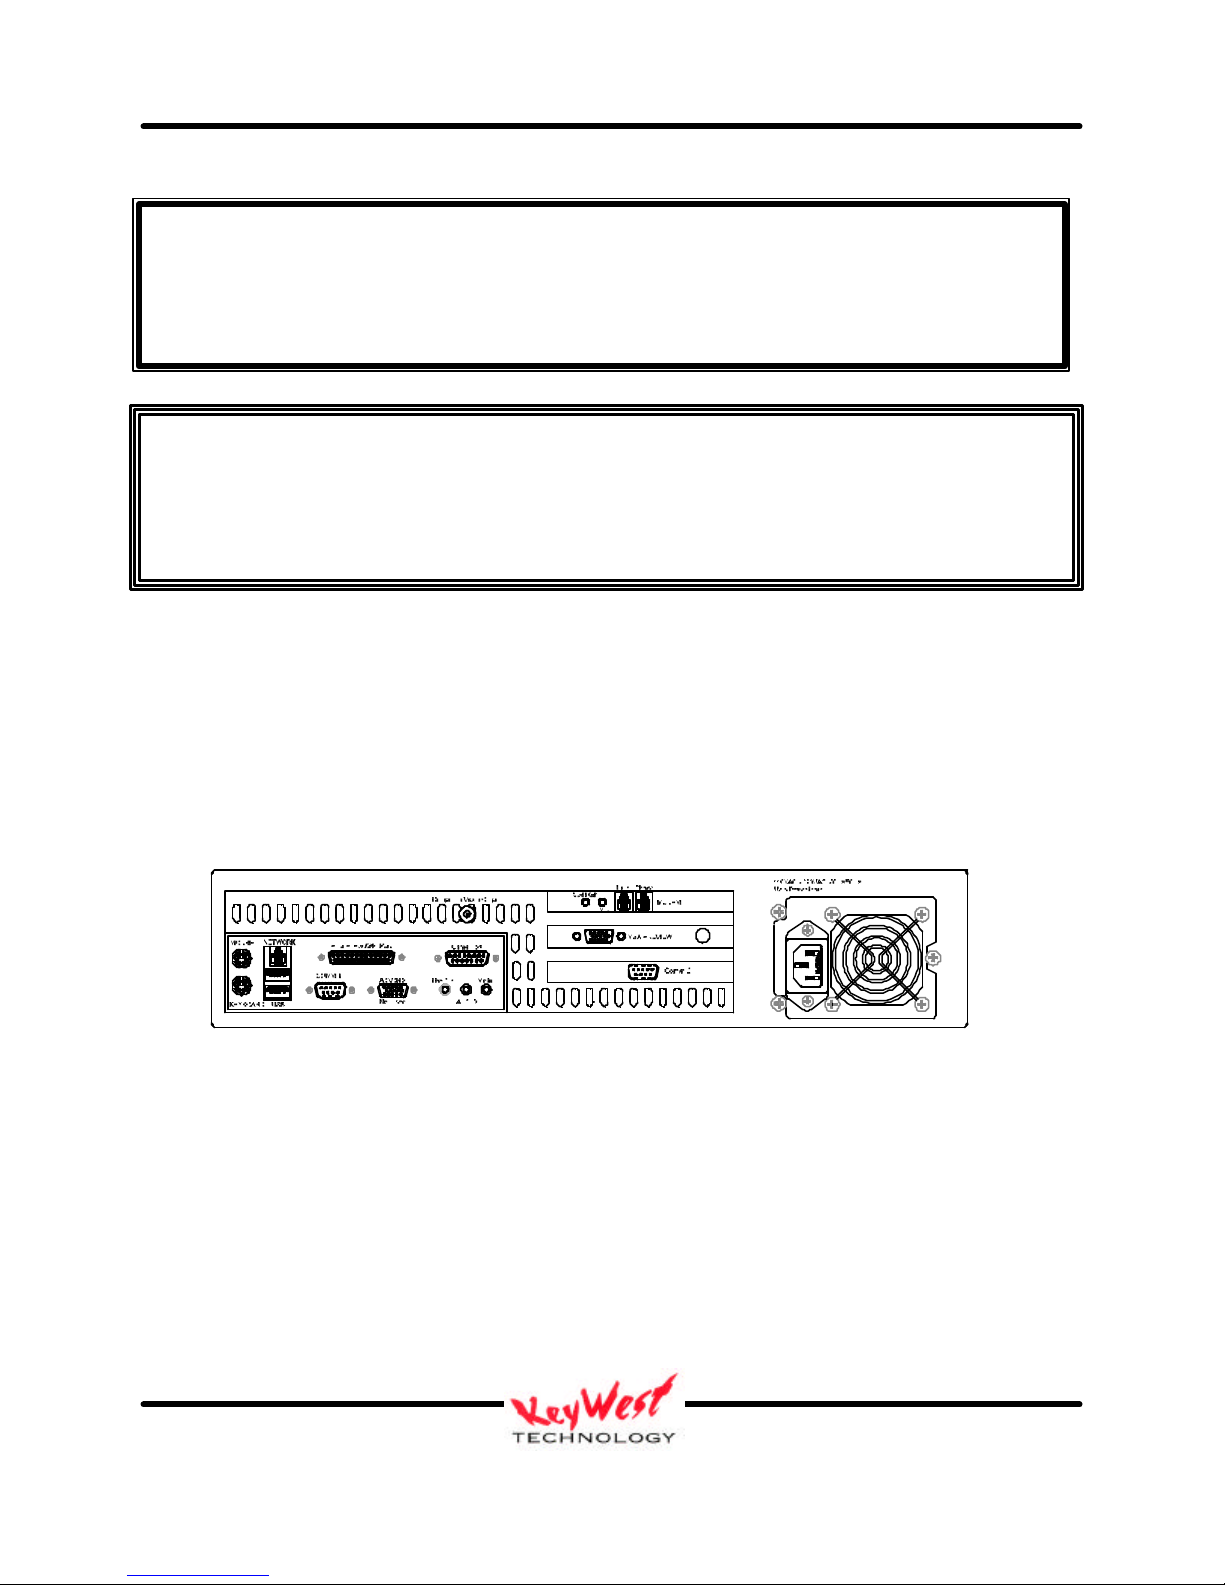
CONNECTIONS
DEVIS Rear Panel Overview
Keywest Technology
14563 W. 96th Terrace
Lenexa, Kansas 66215
800.331.2019
www.keywesttechnology.com
Figure 1
14 Mar 03
Change 02

DEVIS (v.2) Operator’s Manual Keywest Technology Early Warning Systems
5
KWT TM 2
-1-
DEVISOM
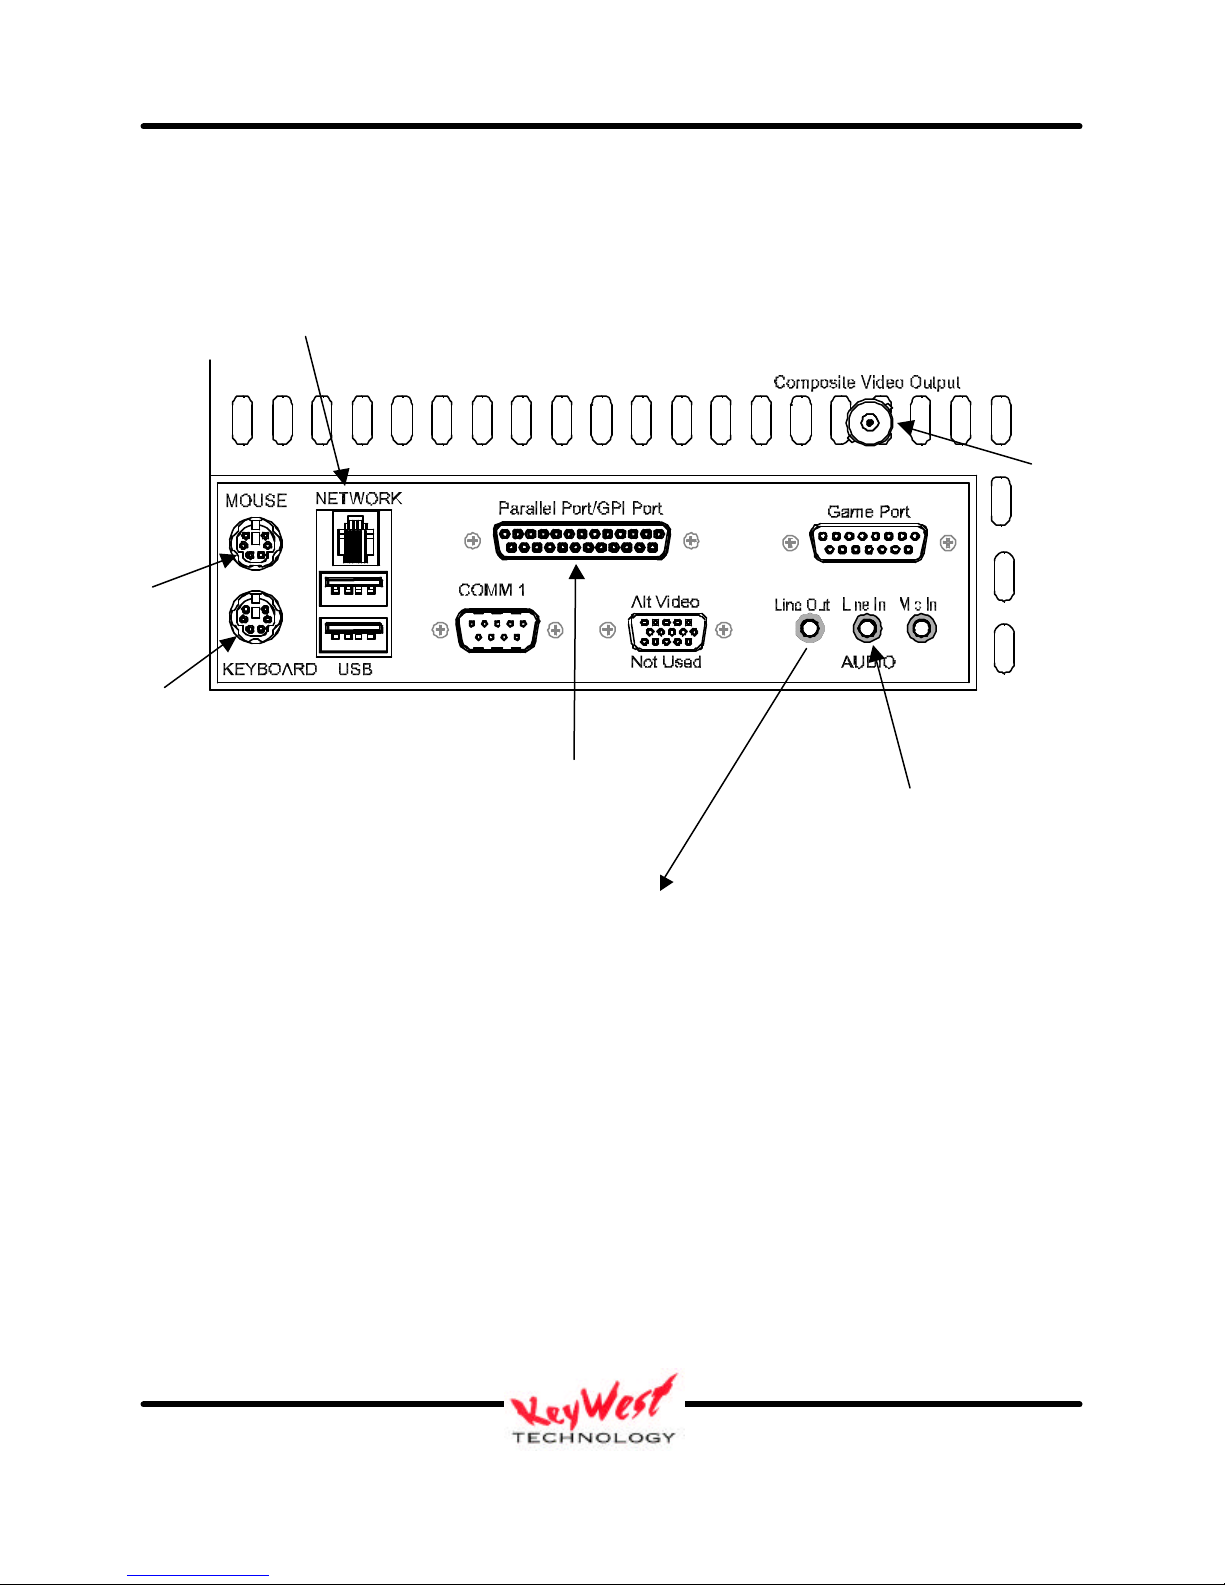
Standard PC Connections (refer to figure 1, 1A and 1B)(* = required connection for DEVIS
normal operation—all other connections not marked with ‘*’ are optional)
*MOUSE: Standard PS/2 style mouse
*KEYBOARD: Standard PS/2 style keyboard
USB: Universal Serial Bus (any number of add-in peripherals such as printer, mouse, keyboard)
*PARALLEL PORT/GPI PORT: Can be standard printer port—for DEVIS, connect 25-Pin GPI
cable (included) for control of external switcher device
COMM 1: Standard RS-232 serial port
COMM 2: Standard RS-232 serial port
GAME PORT: Used for game controllers and some audio devices
*AUDIO LINE OUT: Connect with 1/4” Stereo plug to audio amplifier or switcher for audio
broadcast over cable or broadcast television system. Required if you desire audio on-air
capability.
*AUDIO LINE IN: Use 1/4” stereo plug to connect radio receiver, CD player, tape player, etc…
to line-in to loop through external audio source over the video presentation (Background
Music/Sound). This is the main audio input port for DEVIS operation. This is only required if
you desire audio over your normal PowerPoint™ presentations. Commonly used for simply
playing ambient audio during presentations.
*AUDIO MIC IN: Primary Voice Modem input for live real-time telephonic voice-over-video
functions. Can serve as microphone input or secondary audio source input
*COMPOSITE VIDEO OUTPUT: BNC connector outputting standard NTSC base band
composite video for use with BNC cables. This is main video output to be used in cable and
broadcast video applications.
*MODEM: Connect your telephone line to the modem port labeled “LINE”. This is mandatory
for DTMF dial-up control of the DEVIS. If desired, you can connect a land-line telephone to the
port labeled “PHONE”, which will allow use of the telephone while DEVIS is not being
communicated to—it is also handy to have a phone attached so you can hear the ring, giving you
an indication that someone is dialing into the DEVIS. DEVIS will answer the phone after the
first full ring. Connect a 1/4” stereo audio plug from the “speaker” jack to the sound card’s MIC
input (for real-time voice-over-video function).
Keywest Technology
14563 W. 96th Terrace
Lenexa, Kansas 66215
800.331.2019
www.keywesttechnology.com
14 Mar 03
Change 02

DEVIS (v.2) Operator’s Manual Keywest Technology Early Warning Systems
6
KWT TM 2
-1-
DEVISOM
*VGA PREVIEW: This is DEVIS’ normal VGA-style connector. It is an industry standard
High-Density 15pin connector, used to interface with any computer monitor. Video output of
this connector is not meant for a television, as it is progressive scan component type video (as
opposed to composite video on the BNC connector). This video output is referred to as RGBHV
(Red Green Blue Horizontal Vertical (sync pulses)).
*NETWORK: This is a 10/100 Base-T LAN connector. Connect your DEVIS to your network
via this port to allow for remote control of the device. If you have DEVIS connected this way,
you will need to set your IP addresses in the device. Factory default for the IP Address is:
10.0.0.100, and may be used on many intranet installations.
If you must change the IP address in your DEVIS, contact IT trained personnel. See Appendix A
for further information.
*110VAC – 220VAC: Standard 3-prong ground isolation main power connection. Connect with
provided power cord to single-phase 60Hz/50Hz wall AC outlet. Custom cables for deployed
benches and racks may be manufactured, but must comply with common electrical code for
ground isolation plugs. Contact Civil Engineering or equivalent for special cable manufacture.
Connect this only when you are ready to run the unit, as it is set to “auto-power” (safety against
power outages). As soon as you plug in the AC, the device will power-up, boot-up, and begin to
run the software applications.
Keywest Technology
14563 W. 96th Terrace
Lenexa, Kansas 66215
800.331.2019
www.keywesttechnology.com
14 Mar 03
Change 02
DEVIS (v.2) Operator’s Manual Keywest Technology Early Warning Systems
7
KWT TM 2
-1-
DEVISOM
To Modulator
Mouse
Keyboard
Network
GPI Out to Switch
Audio Out to Modulator or Switch
Figure 1A
Audio In from Radio, CD, etc…
or Switch
Keywest Technology
14563 W. 96th Terrace
Lenexa, Kansas 66215
800.331.2019
www.keywesttechnology.com
14 Mar 03
Change 02

DEVIS (v.2) Operator’s Manual Keywest Technology Early Warning Systems
8
KWT TM 2
-1-
DEVISOM
Telephone Voice-Over Connection
Figure 1B
RJ-11 Telephone Line-In
To Computer Monitor
Keywest Technology
14563 W. 96th Terrace
Lenexa, Kansas 66215
800.331.2019
www.keywesttechnology.com
14 Mar 03
Change 02
DEVIS (v.2) Operator’s Manual Keywest Technology Early Warning Systems
9
KWT TM 2
-1-
DEVISOM
DEVIS OPERATION
Should DEVIS be shut down through normal Windows™ means, you’ll need to power the unit
with the front panel momentary power switch. To do so, simply open the front door, press the
power switch and release. You should hear the fans begin to run, and LED indicators on the
front panel should illuminate.
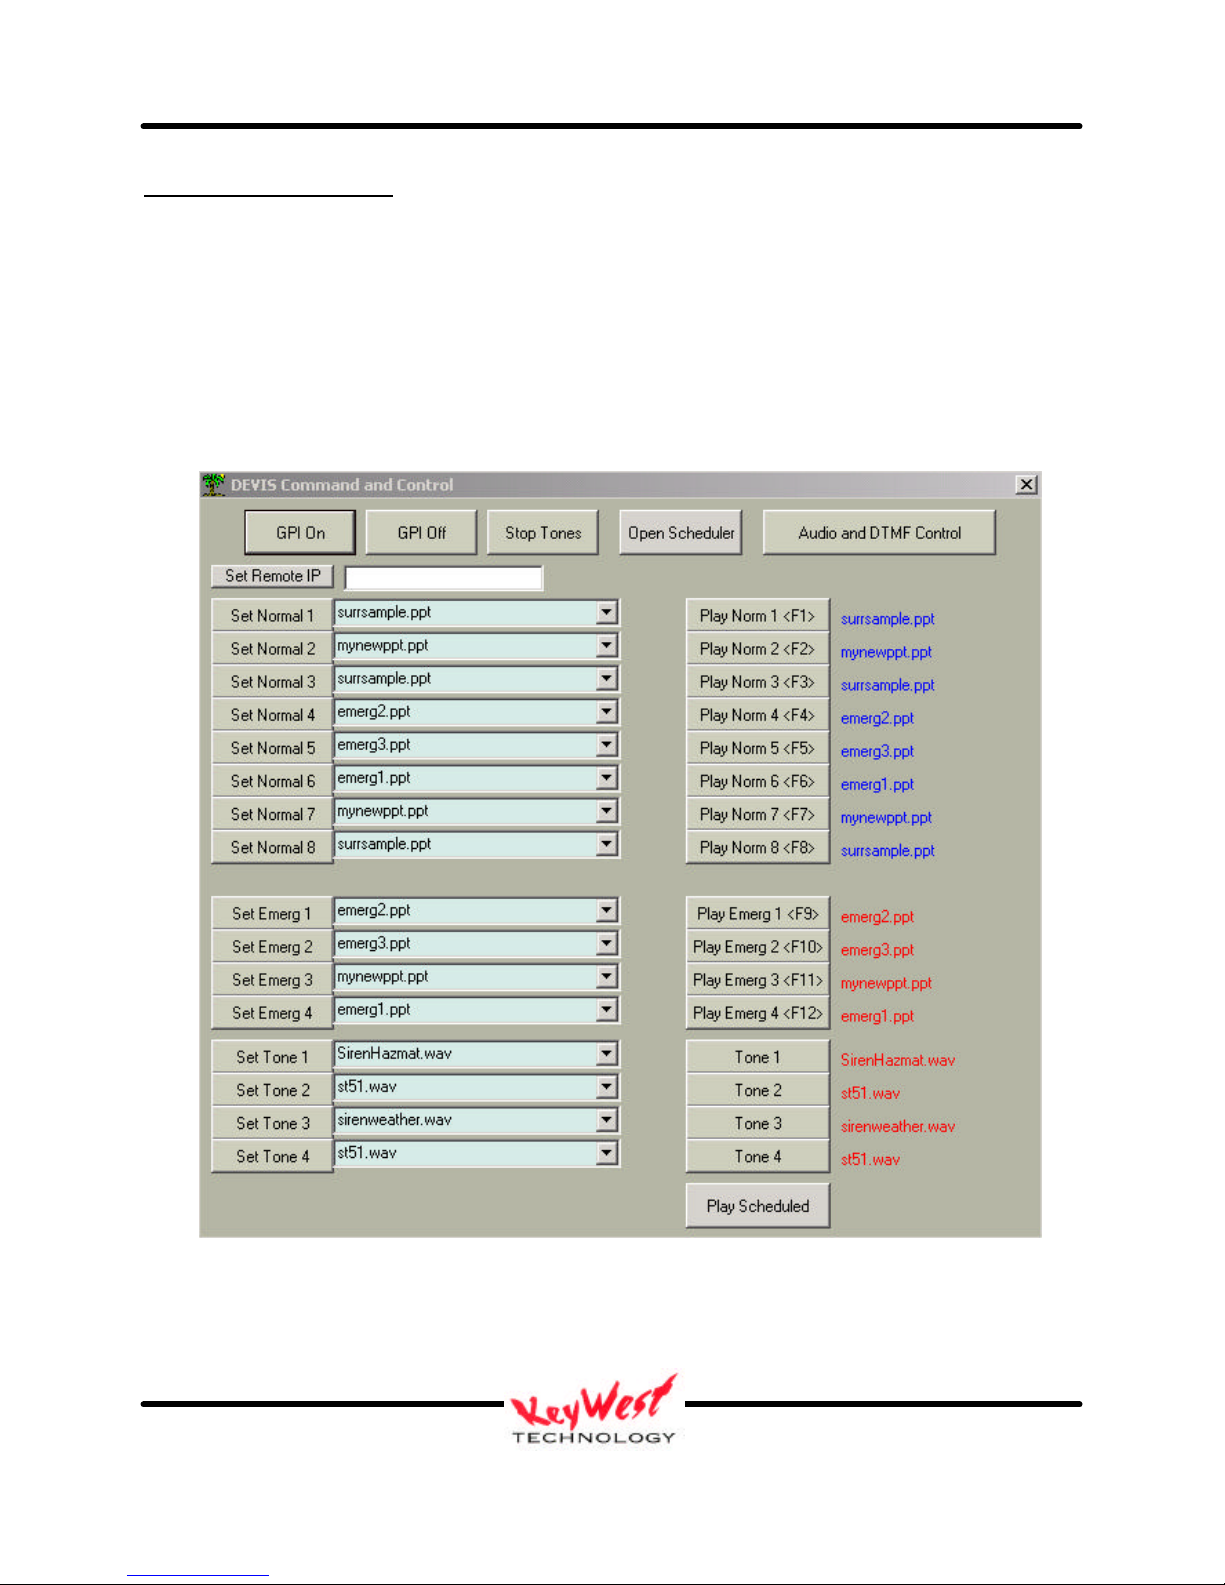
The DEVIS control software will “auto-run” at boot up. After everything is initialized, you
should see the main application form appear on your video monitors.
Figure 2
Keywest Technology
14563 W. 96th Terrace
Lenexa, Kansas 66215
800.331.2019
www.keywesttechnology.com
14 Mar 03
Change 02
DEVIS (v.2) Operator’s Manual Keywest Technology Early Warning Systems
10
KWT TM 2
-1-
DEVISOM
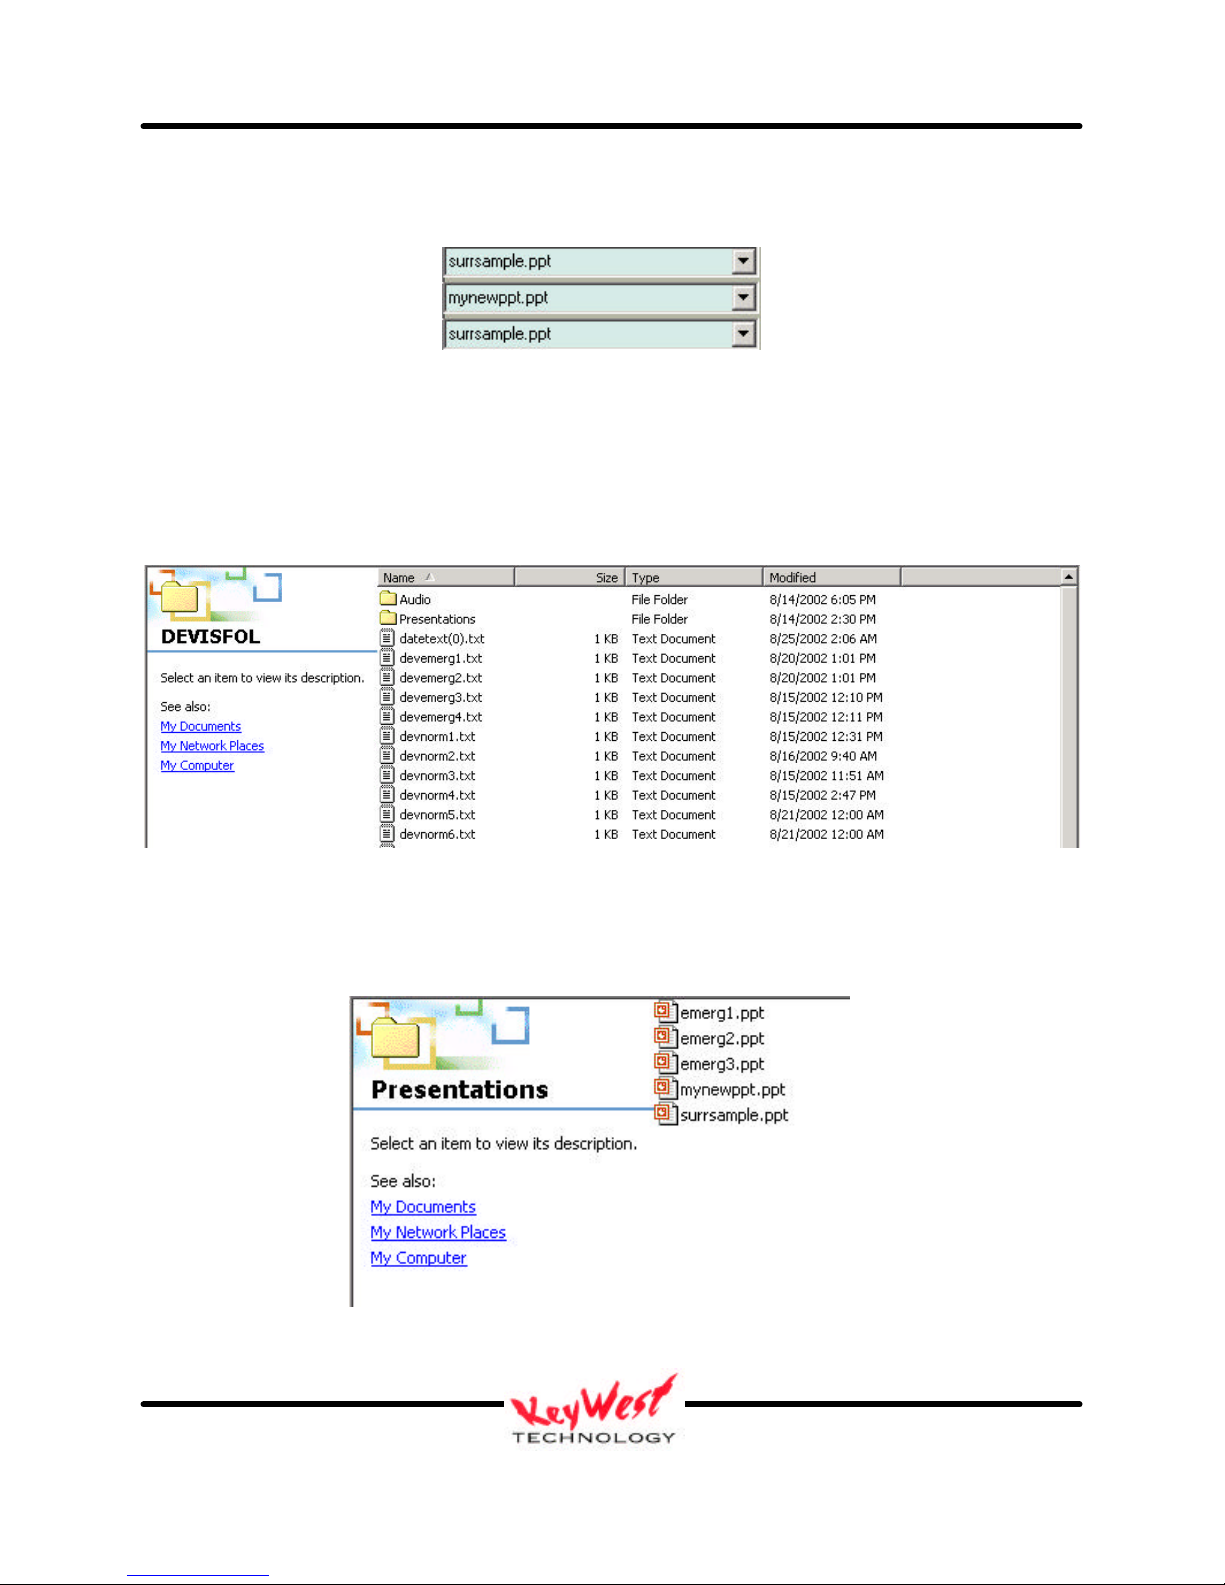
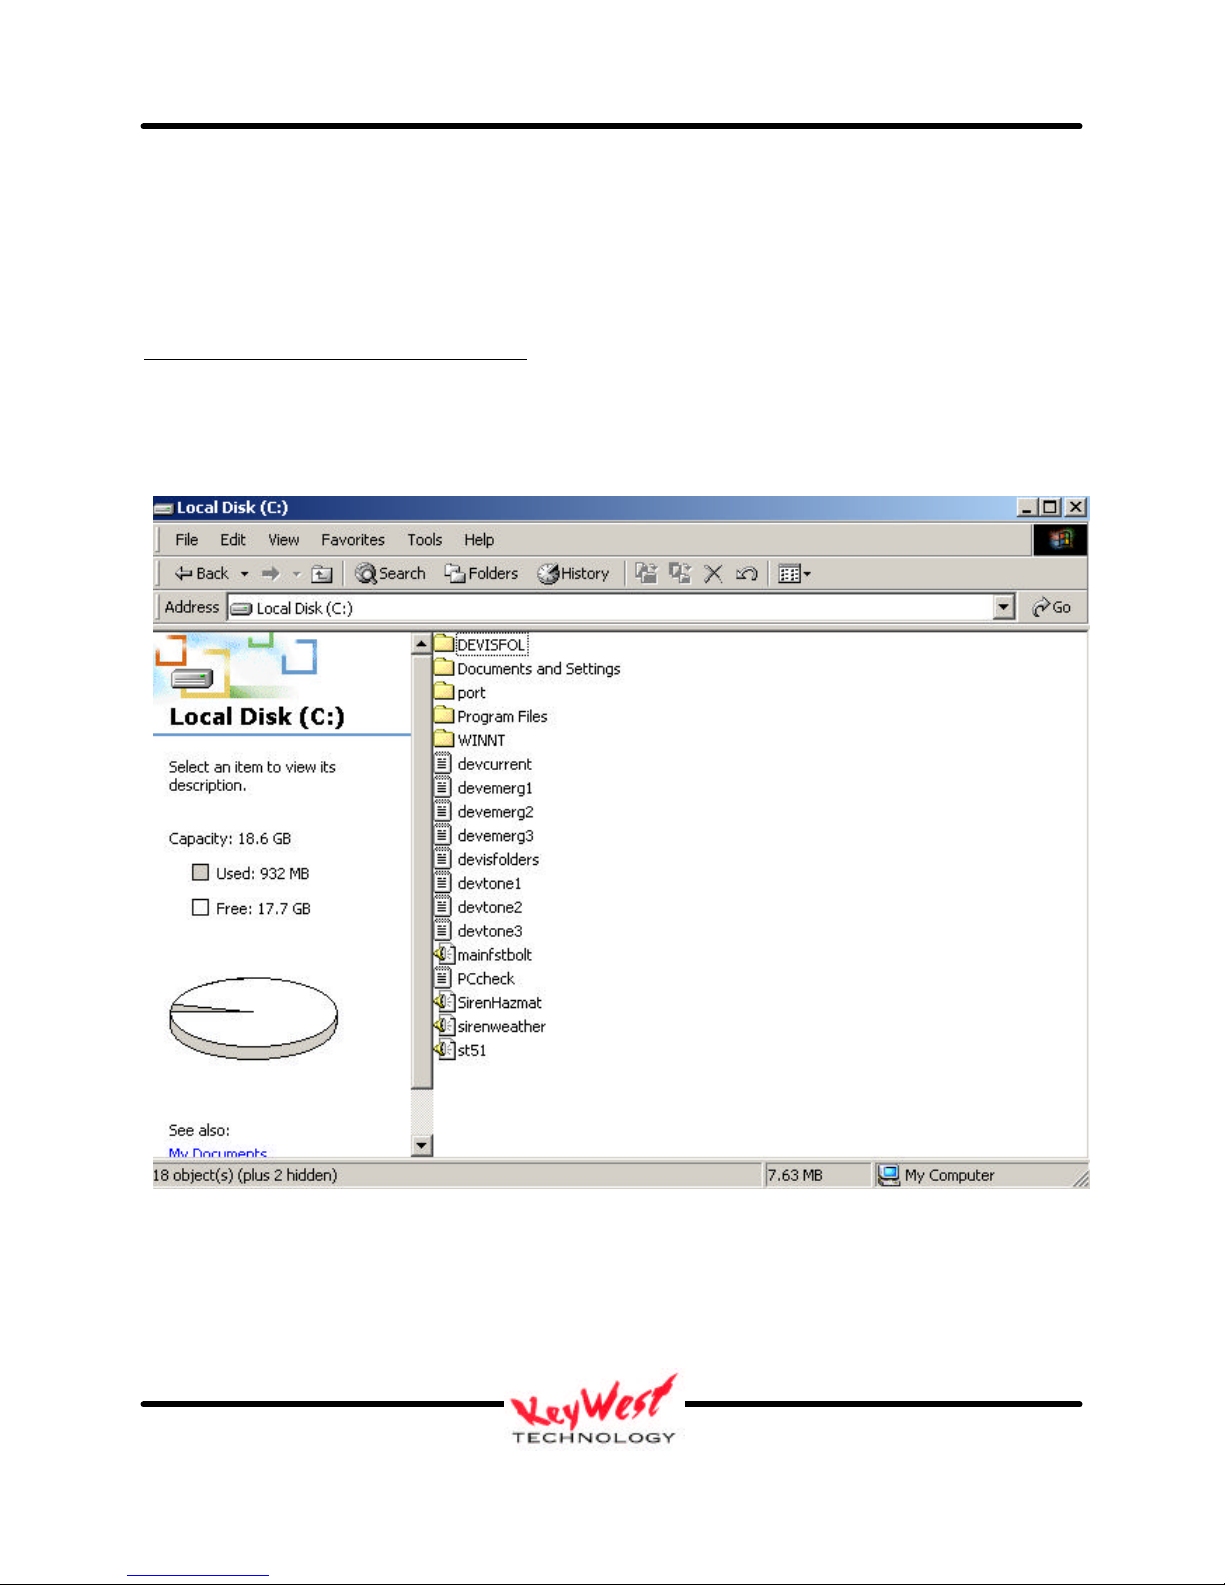
Out of the box, DEVIS has sample presentations and sample tones installed. These are the file
names listed on the form in figure 2 and highlighted in figure 3.
Create your presentations on any other PC as you would normally and import them into DEVIS.
You will need to store them in the “C:\\DEVISFOL \PRESENTATIONS” folder so that DEVIS
can access them.
Access this folder now—you will see the sample presentations stored.
Figure 3
Figure 4
Figure 5
Keywest Technology
14563 W. 96th Terrace
Lenexa, Kansas 66215
800.331.2019
www.keywesttechnology.com
14 Mar 03
Change 02
DEVIS (v.2) Operator’s Manual Keywest Technology Early Warning Systems
11
KWT TM 2
-1-
DEVISOM
You can import presentations in multiple ways—CD, 3.5” Floppy, or via Network. When
importing via network you will treat DEVIS as though it were any other computer on your
network. Simply search for DEVIS from the originating PC, map it as any other computer on the
network, and click & drag files as necessary.
STORE PRESENTATIONS ON DEVIS
Once you have presentations to store in DEVIS, locate the folder DEVISFOL on the DEVIS C:\
drive.
APPENDIX A: Setting IP Address
Figure 6
Keywest Technology
14563 W. 96th Terrace
Lenexa, Kansas 66215
800.331.2019
www.keywesttechnology.com
14 Mar 03
Change 02

DEVIS (v.2) Operator’s Manual Keywest Technology Early Warning Systems
12
KWT TM 2
-1-
DEVISOM
Double click on DEVISFOL to open it. There you will find two sub-folders, “AUDIO” and
“PRESENTATIONS” (see FIGURE 4), as well as a number of text (.txt) files—DO NOT
MOVE OR DELETE THE TEXT FILES—the text files are present to ensure storage of schedule
and presentation log information should power loss occur. These text folders also ensure you
can setup DEVIS at your home base, transport it to the deployed location, and have it function
with all your settings moments after unpacking it.
Now, double-click on the “PRESENTATIONS” folder. When it opens, you will see all
PowerPoint© presentations available to and stored in DEVIS (see FIGURE 5).
From this point you can open another explorer window, open your CD drive on DEVIS if you’re
importing from CD (D:\), or open your floppy drive (A:\), or open your mapped network
computer that contains the files you are importing. Once you have located the presentations to
import, left-click on them one time, and use the mouse to “drag” them to the DEVIS folder
“C:\DEVISFOL \PRESENTATIONS”.
You will now see in the presentations folder your new presentation has been added. It is now
available for use by DEVIS. Remember, for DEVIS to use your presentations for normal or
emergency display, they must be stored in DEVIS in the folder
“C:\DEVISFOL \PRESENTATIONS”. By the same token, if you want to remove a presentation
from DEVIS use, simply remove it from the “PRESENTATIONS” folder. You can utilize the
large unused portion of DEVIS’s hard drive to store and archive old data, or simply delete as
required.
Store your normal (non-emergency) and your emergency presentations in the
“PRESENTATIONS” folder. You may store as many as you like in the folder, and declare
through the software, which one is actually to play in which slot. DEVIS will allow you to use
any presentation from the PRESENTATIONS folder for any normal or emergency slot. You can
repeat presentations as often as you like, and you may choose to not use some of them at all.
This manual will cover how to select which presentation plays in which slot later.
Keywest Technology
14563 W. 96th Terrace
Lenexa, Kansas 66215
800.331.2019
www.keywesttechnology.com
14 Mar 03
Change 02
DEVIS (v.2) Operator’s Manual Keywest Technology Early Warning Systems
13
KWT TM 2
-1-
DEVISOM
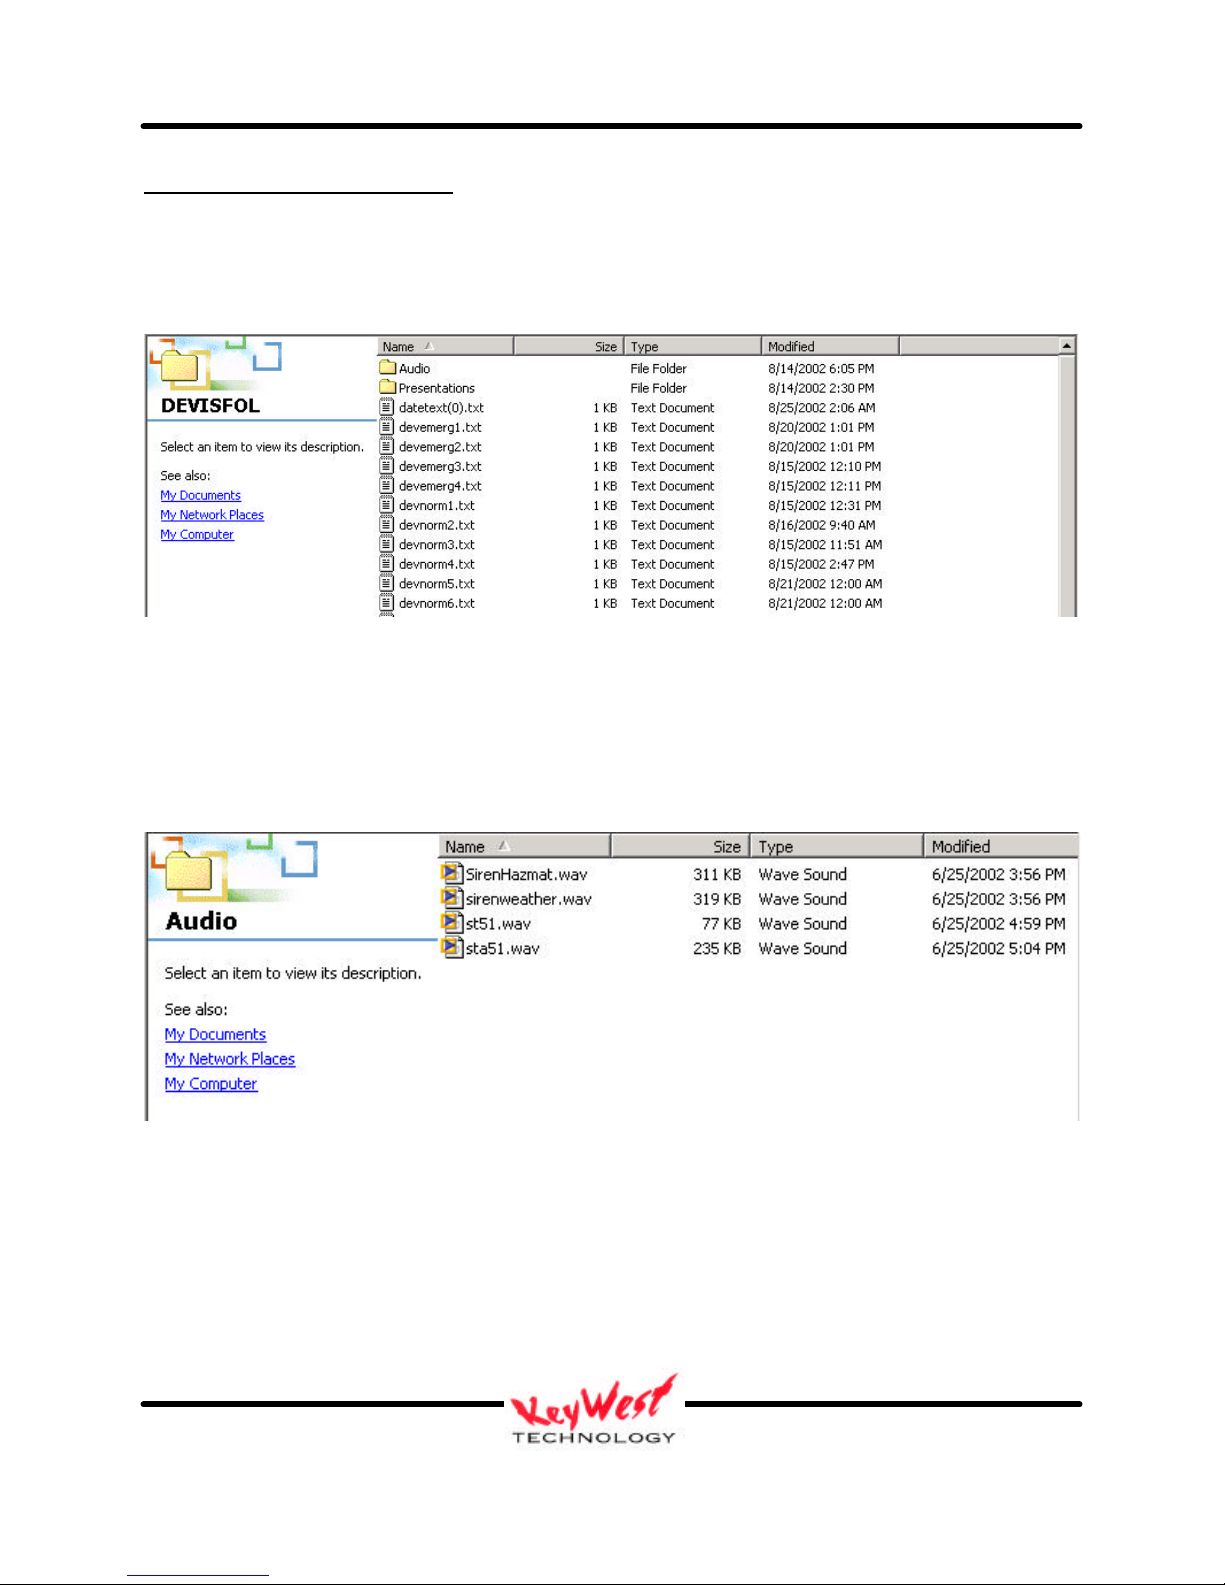
STORE AND ACCESS TONES
Tones that can be used with emergency presentations, or as stand-alone warning tones, are stored
and accessed from DEVIS’s folder “C:\DEVISFOL\AUDIO” (FIGURE 7).
Double-click on the “AUDIO” folder—when it opens, you will see all wave (.wav) files that are
stored in DEVIS for use (FIGURE 8).
Figure 7
Keywest Technology
14563 W. 96th Terrace
Lenexa, Kansas 66215
800.331.2019
www.keywesttechnology.com
Figure 8
14 Mar 03
Change 02
 Loading...