

Keystone Manual: Knife Gate Valves F952 Seat Replacement Instructions, Keystone-EN Manuals & Guides

KEYSTONE KNIFE GATE VALVES
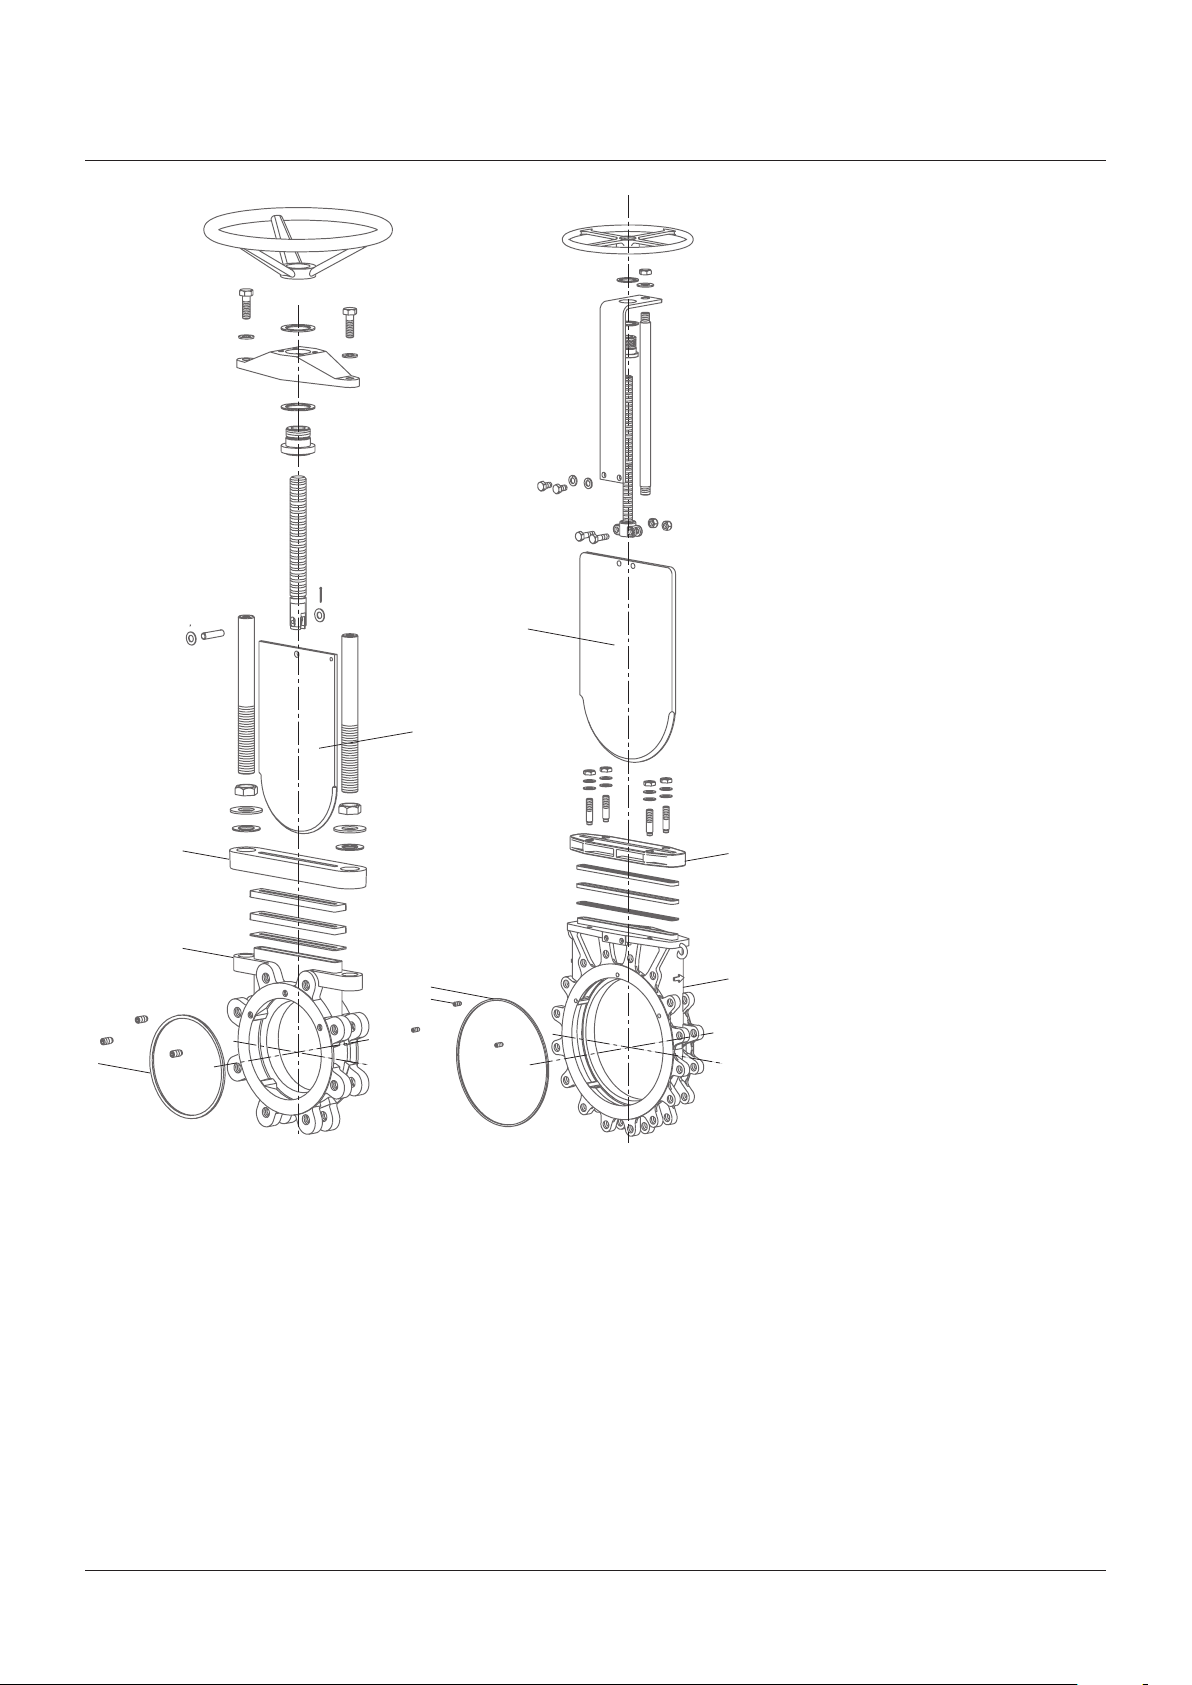
FIGURE 952
RTFE and FKM seat replacement instructions for DN 50 - 600 (NPS 2 - 24)
Figure 952 knife gate valves
FKM SEAT REPLACEMENT
FKM seats are retained in a dovetail groove in
the valve body.
1. Cut through seat (4) and remove from
valve body using a narrow bladed chisel or
screwdriver.
2. Remove all burrs and sharp edges from
seat groove in body (1).
3. With a clean rag or brush, wipe seat groove
and ensure it is free of any oil or dirt.
4. Check replacement seat (4) is not damaged
and place into groove. Check seat is evenly
RTFE seat illustrated
RTFE SEAT REPLACEMENT
entrapped by the dovetail groove.
5. Seat fitting is now complete.
6. Refer valve assembly and installation
instructions.
Seats are bonded into a groove in the valve body.
1. Cut through seat (4) and remove from
valve body using a narrow bladed chisel or
screwdriver.
2. Remove all burrs and sharp edges from
seat groove in body (1) and ensure it is free
of any oil or dirt or bonding residues.
3. With a clean rag or brush, wipe seat groove
clean. Then apply Cyberbond bonding agent
(2241) in a small (1 mm (
bead. Avoid excessive adhesive as it could
remain in groove, causing seat to warp or
build up on seating face, resulting in valve
leakage.
4. Check replacement seat (4) is not damaged
and place into groove. Apply pressure to
displace excess bonding agent.
5. Wipe off excess adhesive from seating face.
6. Apply a light film of petroleum jelly or
lubricant to gate to cover seating face.
7. Insert gate (2) into valve body (1) in the fully
closed position so that it covers seat fully.
8. Apply a light clamping pressure (approx.
5kg (10 lbs) on DN 50 - 200 (NPS 2 - 8)
valves and approx. 15 kg (30 lbs) on
DN250- 600 (NPS 10 - 24) valves) to center
of gate ensuring load is applied to total seat
surface. Maintainfor1hour.
9. Remove gate (2) and clean thoroughly.
10. Check seat is even and that no bonding
agent residues are on it.
11. Seat fitting is now complete.
12. Refer valve assembly and installation
instructions.
1
/
16”)) continuous
STORAGE
Seats should be stored on a shelf away from
sharp or heavy objects that may cause damage.
GENERAL NOTES
If the valve is leaking downstream and seat is
damaged or badly worn, it should be replaced.
To replace seats the valve needs to be
removed from the pipeline and disassembled
(referinstructions).
Emerson.com/FinalControl VCIOM-02049-EN 16/02
© 2017 Emerson. All Rights Reserved.
KEYSTONE KNIFE GATE VALVES
FIGURE 952
2
2
3
1
4
13
4
Note: DN 50 - 200 (NPS 2 - 8) valve illustrated. Note: DN 250 - 600 (NPS 10 - 24) valve illustrated.
3
1
Neither Emerson, Emerson Automation Solutions, nor any of their affiliated entities assumes responsibility for the selection, use or maintenance of any product.
Responsibility for proper selection, use, and maintenance of any product remains solely with the purchaser and end user.
Keystone is a mark owned by one of the companies in the Emerson Automation Solutions business unit of Emerson Electric Co. Emerson Automation Solutions, Emerson,
and the Emerson logo are trademarks and service marks of Emerson Electric Co. All other marks are the property of their respective owners.
The contents of this publication are presented for informational purposes only, and while every effort has been made to ensure their accuracy, they are not to be
construed as warranties or guarantees, express or implied, regarding the products or services described herein or their use or applicability. All sales are governed by
our terms and conditions, which are available upon request. We reserve the right to modify or improve the designs or specifications of such products at any time without
notice.
Emerson.com/FinalControl
2
 Loading...