

Page 1
Table of Contents
5 Local Settings
• Overview
• The Local Settings Tab
6 Menus Commands
• Overview
• Advanced menu
7 Network Discussion
• Setting Up On Different Types of Networks
• LAN - No Connection To Internet/WAN
• LAN - With Connection To Internet/WAN
• LAN - With DSL Router/Gateway
• Wireless Network (Airport/802.11)
8 Troubleshooting
• Before You Begin
• Status Lights
• UDP Ports
• Network Issues
• USB Devices
• Resetting The USB Server Hardware
• When You Need More Help
9 Appendices
• Frequently Asked Questions (FAQs)
• USB Device Compatibility
• Overview
• Tested USB Devices
• Status Light Behavior
• Windows XP Firewall Configuration
• Notices
• Keyspan License and Warranty Information
• Support Information
1 Introduction
• Compatible USB Devices
• Connectivity to USB Devices
• Connectivity to Network
• Requirements
• What's Inside The Package
2 Installation Instructions
• Installing the USB Server Hardware
• Installing the Keyspan Server Utility software
• Uninstall Instructions
3 Using Your USB device On The Network
• Overview
• Using Your First USB Device
• Other Methods To Connect Your USB Devices
• Using Auto-Connect Feature For Windows
• Using The USB Server System Tray Feature
• Using Auto-Connect Feature For Mac
• Using Device Force Disconnect
• Using The Single-User Connect Mode
• USB Device Status Details
4 Changing USB Server's Settings
• Overview
• Editing A Specific USB Server
• USB Server Settings Descriptions
• Applying/Canceling New Server Settings
• Restoring Default Settings
• Advanced menu
• Updating Your USB Server's Firmware
Keyspan:USB Server - User Manual
This User Manual applies to the Keyspan USB Server Software Version 1.3.x. Patent Pending.
Rev 2005jun23 Page 1
Page 2

1 Introduction
The USB Server makes it possible for USB devices such as scanners, printers, hard drives, etc. to
be used and shared by client PCs on a Local Area Network (LAN)! It is ideal for home office,
small office or classroom use. The USB Server supports both Ethernet and Wi-Fi networks -making it easy to print to a USB printer from a Wi-Fi based laptop!
Compatible USB Devices
This release of USB Server software supports USB printers, USB multi-function printers, USB
scanners, USB hard drives, USB HID devices (ie keyboards and mice), and other USB devices.
USB audio and video products are not compatible with this release. See the Keyspan web site for
further compatibility details.
Connectivity to USB Devices
The Keyspan USB Server provides the following connections to your USB Devices:
• 4 USB 2.0 Full-Speed ports (12 Mbps)
• Full 500mA power provided to each port
Connectivity to Network
The Keyspan USB Server provides the following connections to your Network:
• RJ45 Ethernet connector
• 10/100 autosensing
• IP addressing: Static/DHCP/Zeroconfig
Requirements
• Macintosh: Mac OS X 10.3 (or later)
• Windows: Windows 2000/XP or greater
What's Inside The Package
The Keyspan USB Server package includes:
• Keyspan USB Server (US-4A)
• Power Supply
• Quick Start Sheet(s)
• Mac and Windows compatible CD with software and user manual
Keyspan:USB Server - User Manual
This User Manual applies to the Keyspan USB Server Software Version 1.3.x. Patent Pending.
Rev 2005jun23 Page 2
Page 3

2 Installation Instructions
Installing the USB Server Hardware
Note: Do not connect your USB device(s) to the Keyspan USB
Server until you have finished installing the USB Server
software and hardware!!! The next section, Using Your USB
Devices Over Your Network, will walk you through the process of
connecting and using your USB devices with the Keyspan USB Server.
Step 1 - Connect The Keyspan USB Server To Your Network
First connect an Ethernet cable to the USB Server's Ethernet port (see next image):
Once the Ethernet cable is connected, connect the other end of the cable to your network. This can
be a free Ethernet port on your DSL router, Ethernet hub, or 802.11 (aka Airport) router/base
station.
If you do not have a network, you can connect the USB Server directly to the Ethernet port on your
computer.
Tech Note: If you have more questions about connecting the USB Server to your
network, please read the USB Server Networking Discussion section in this
manual.
Step 2 - Connect the USB Server's Power Supply / Read the LEDs
Connect the included power supply to the USB Server's power connector (see next image):
Keyspan:USB Server - User Manual
This User Manual applies to the Keyspan USB Server Software Version 1.3.x. Patent Pending.
Rev 2005jun23 Page 3
Page 4
Once the USB Server has power, you will notice the USB Server's status lights turn on and off.
After a few seconds, the lights will stop blinking. If the USB Server is responding properly, the
four green USB lights will turn on and stay solid. You should also notice that the first green
SYSTEM light will blink on and off every few seconds. Ignore any other status lights for now.
Tech Note: The LEDs on the USB Server can also indicate other status such as IP
configuration type, server status, etc. For a detailed description of what the LED lights
indicate, please read the Status Light Behavior appendix in this manual.
TROUBLESHOOTING: You may see red lights on the server at this point in the installation.
This is normal until you install the Keyspan Server Utility software on at least one computer.
TROUBLESHOOTING: If you do not see the USB lights turn on and/or do not have a blinking
green SYSTEM light, please proceed to the Troubleshooting:Status Lights section in this
manual.
Keyspan USB Server hardware installation is now complete. Please proceed to the Keyspan Server
Utility software installation instructions.
Installing the Keyspan Server Utility software
Tech Note: The following instructions outline the installation of the Keyspan Server
Utility software for both Mac and Windows operating systems. Where instructions are
different for one operating system, the difference will be noted. Although screen shots
of the Keyspan Server Utility software may not match to your operating system, please
note that button, menu, and tab names are identical on both platforms.
Keyspan:USB Server - User Manual
This User Manual applies to the Keyspan USB Server Software Version 1.3.x. Patent Pending.
Rev 2005jun23 Page 4
Page 5

Step 3 - Insert the Keyspan USB Server CD-ROM
Turn your computer ON. When your computer starts up, place the Keyspan USB Server CD into
the CD-ROM drive.
MACINTOSH NOTE:
When the CD icon appears on your desktop, double click on its icon to display its contents.
Locate the Keyspan USB Server Installer icon and double click to start the installation
process. Follow the instructions on screen.
WINDOWS NOTE:
Windows will automatically open the Keyspan CD Browser window. Using the on-screen
menus, locate the Keyspan USB Server Installer selection and click it to start the installation
process. Follow the instructions on screen.
WINDOWS Tech Note: During and/or after the software installation, the Windows
New Hardware Wizard may ask you to install software several times. Select
'Install the software automatically' and click next until the New Hardware Wizard tells
you that the installation is finished. PLEASE NOTE that you will not be able to use your
USB Server until you complete the New Hardware Wizard process.
Step 4 - Running the Keyspan Server Utility application
Once the Keyspan installer completes, it will automatically launch the Keyspan Server Utility
application. You will use this utility to configure the USB Server.
Tech Note: Firmware Update: The first time you launch the USB Server program,
you may be asked to update your USB Server's firmware. If you get this message,
please update your firmware as per the on screen instructions. Please note that you
can also find instructions on how to do this in the Updating Your Firmware subsection in
the Changing USB Server's Settings section later in this manual.
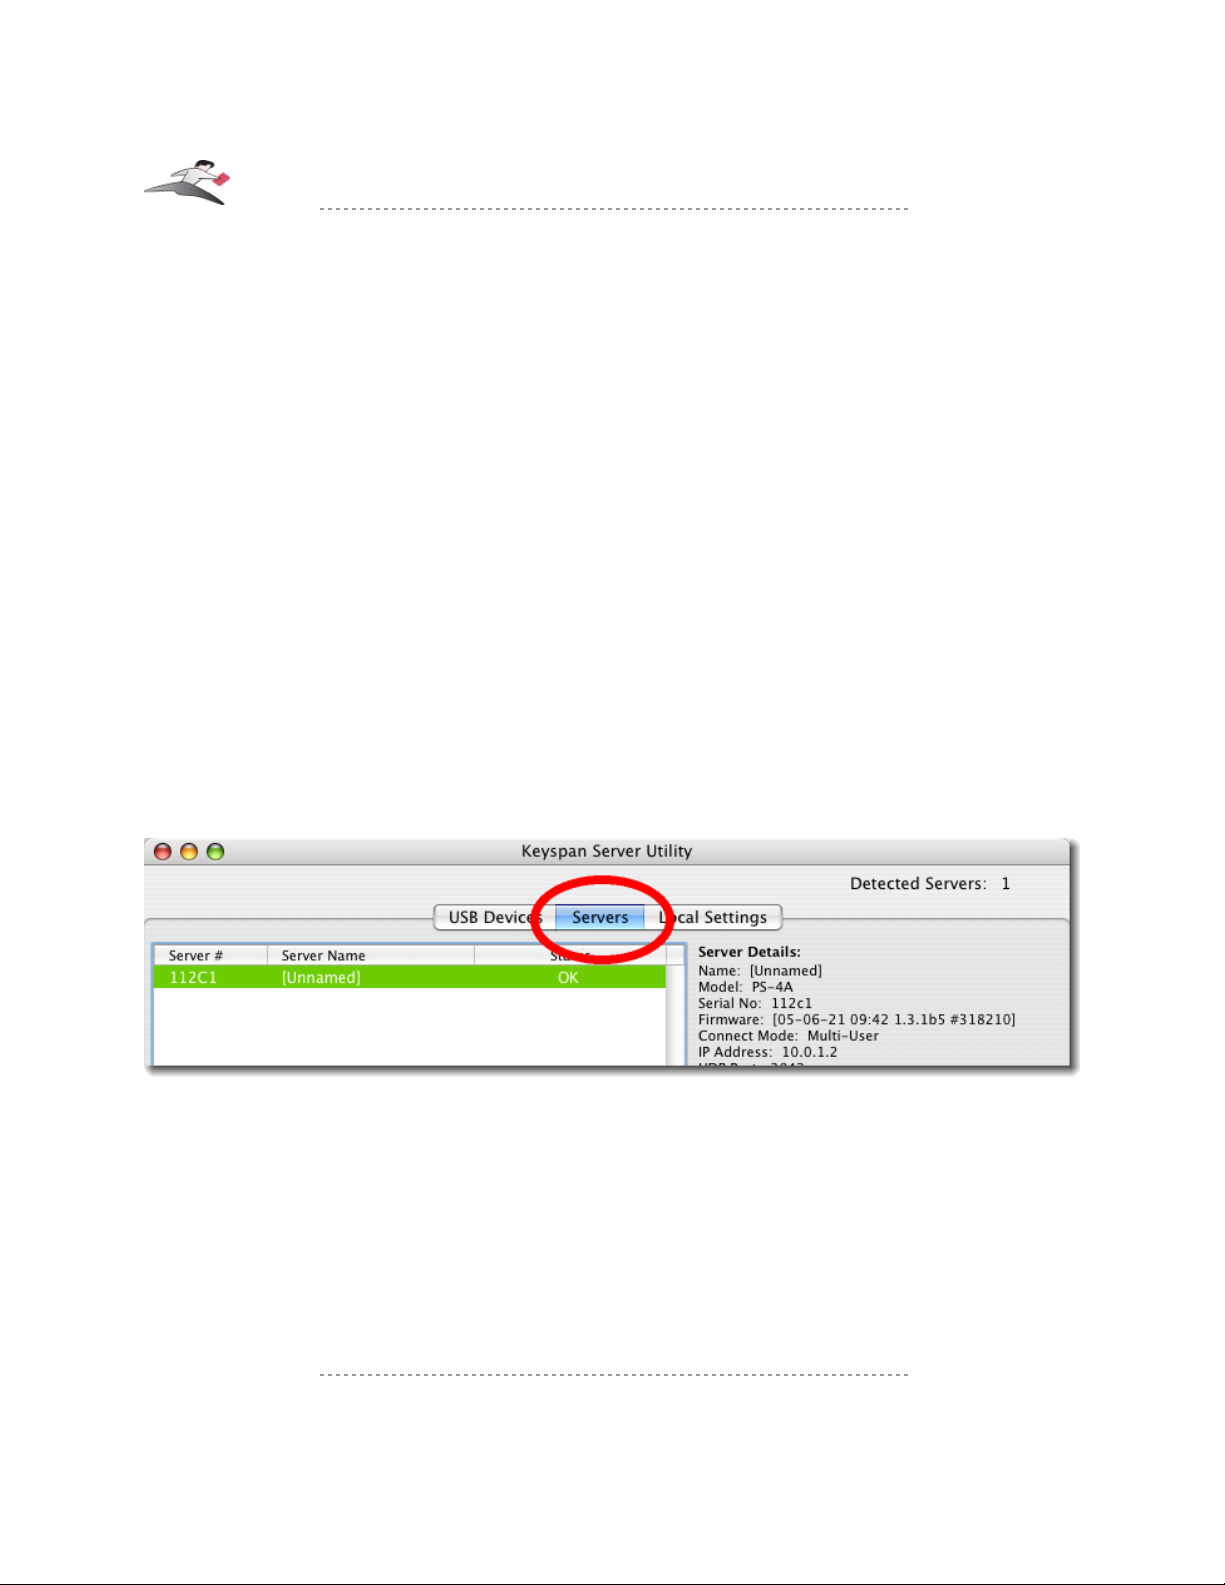
In the Keyspan USB Server window, click the Servers tab. You will now see your USB Server
listed in this tab (see next image):
Keyspan:USB Server - User Manual
This User Manual applies to the Keyspan USB Server Software Version 1.3.x. Patent Pending.
Rev 2005jun23 Page 5
Page 6
Tech Note: Server Names and Serial Numbers: Out of the box, your USB
Server will show up as 'Unnamed'. You can change your USB Server's name in
Servers tab. You will also notice a serial number listed next to your USB Server
name. This serial number corresponds to the last five digits of your USB Server's
MAC/Network address (printed on the bottom of your USB Server hardware).
Tech Note: About Firmware Updates: When you first launch the Keyspan
Server Utility software, you may get a message stating that there is new firmware
available for your USB Server hardware. We recommend that you update your firmware
now. To do this, please follow the instructions on-screen instructions to update your
firmware. Once the update is complete, proceed to Step 5.
Tech Note: About Multiple Servers: If you have multiple unconfigured USB
Servers on your local network, you can determine which server you are configuring by
looking at the serial number presented by the Keyspan Server Utility application. This
number correlates to the MAC/Network address that is printed on the bottom of your
USB Server hardware.
TROUBLESHOOTING: If you do not see any USB Servers in this window, please proceed to the
Troubleshooting:Network Issues section in this guide.
Step 5 - Software Installation Complete!
Keyspan Server Utility software is now complete.
You may now proceed to the Using Your USB Devices On The network section in this guide.
Keyspan:USB Server - User Manual
This User Manual applies to the Keyspan USB Server Software Version 1.3.x. Patent Pending.
Rev 2005jun23 Page 6
Page 7

Uninstall Instructions
If you need to uninstall the Keyspan Server Utility software, please follow these instructions:
MACINTOSH NOTE:
Run the "UninstallUS4A.pkg" uninstaller program. This program is located on the CD that
came with your USB Server. You can also download the uninstaller from Keyspan's web
site (http://www.keyspan.com).
WINDOWS NOTE:
Uninstall the Keyspan Server Utility software using the Add/Remove Programs control
panel. (located in START menu -> SETTINGS -> CONTROL PANEL ). Once the
Add/Remove Programs control panel is open, locate and select the Keyspan USB Server
software and then click the Change/Remove button. Follow the instructions on-screen to
complete the uninstall.
You may now proceed to the next section in this guide...
Keyspan:USB Server - User Manual
This User Manual applies to the Keyspan USB Server Software Version 1.3.x. Patent Pending.
Rev 2005jun23 Page 7
Page 8
3 Using Your USB Devices On The Network
Overview
In this section, you will learn how to use your USB devices via the Keyspan USB Server. You will
learn to:
• connect your USB device (hardware) to the Keyspan USB Server's USB port
• virtually connect to your USB device using the Keyspan USB Server software
• using the Connect and Disconnect buttons
• using the Auto Connect Feature for Printers on Windows
• using the Auto Connect Feature for Printers on Mac OS X
• use your USB device via the Keyspan USB Server
Tech Note: These instructions are intended to help you connect a USB device (ie
printer, scanner, etc.) to the USB Server for the very first time. It is highly
recommended that you only connect one USB device at this time. To connect
additional devices, repeat these instructions for each device.
Using Your First USB Device
Step 1 - Connecting Your USB Device To The USB Server
Before using the Keyspan USB Server, connect your USB device to any USB port on the Keyspan
USB Server.
Tech Note: USB Lights: US-4A Only: Above each USB port is a green LED
light (for a total of 4 lights). These lights indicate whether or not your USB device is
supported in the current software/firmware. If your device is supported, you will have a
solid green light. If you have a slow blinking light, your USB device is not currently
supported. Please contact Keyspan if you have a slow blinking light.
Once your USB device is connected to the USB Server, open the Keyspan Server Utility
application.
Keyspan:USB Server - User Manual
This User Manual applies to the Keyspan USB Server Software Version 1.3.x. Patent Pending.
Rev 2005jun23 Page 8
Page 9
MACINTOSH NOTE:
The Keyspan Server Utility application is located in your Applications folder.
Double click the Keyspan USB Server icon to open the Keyspan Server Utility
application.
WINDOWS NOTE:
The Keyspan Server Utility application is located in your START menu ->
PROGRAMS -> KEYSPAN SERVER -> Server Utility.
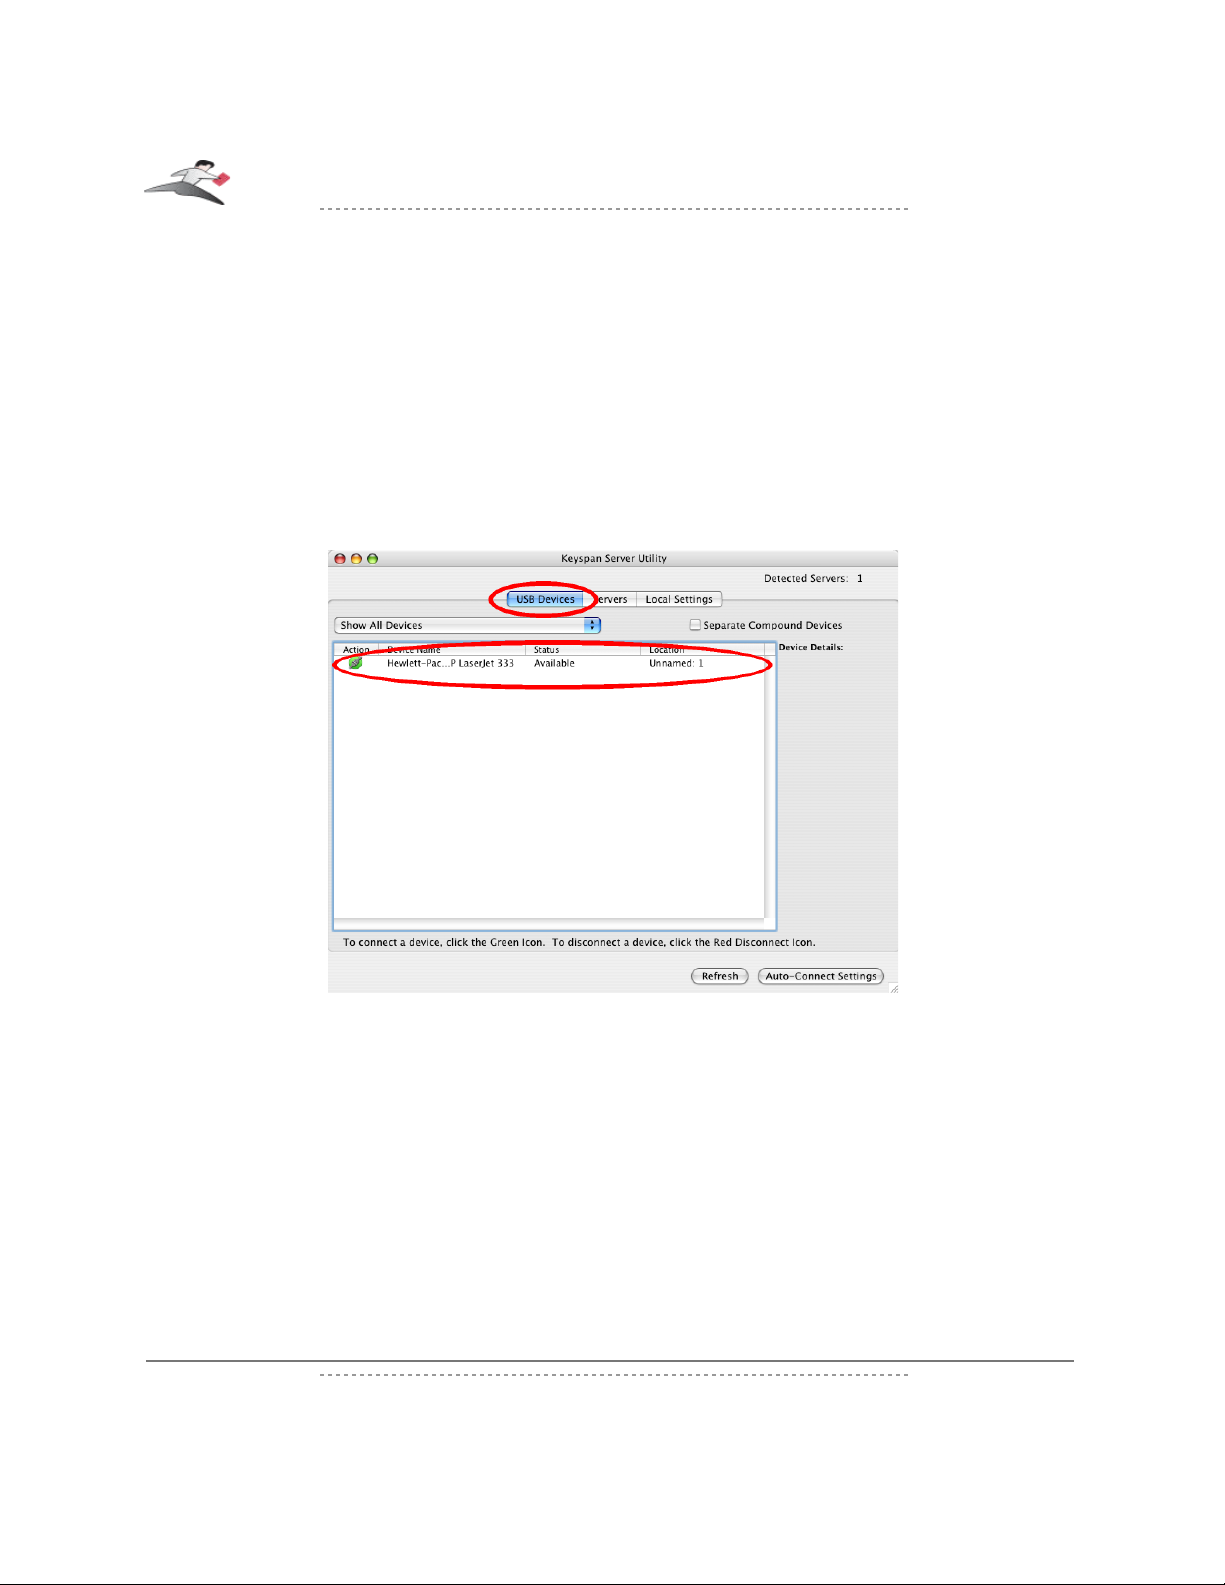
Once it is open, click on the USB Devices tab. You will see the names of your USB devices listed
in this tab (see next image):
Tech Note: US4A: The USB device's name that is shown is the name that is
programmed into your USB device by its manufacturer. This name may different from
the actual name and model number of your device. For example, if you have a HP
Deskjet 882 printer, it may appear as HP Deskjet 880 or HP Printer. Some USB
devices do not have any names programmed into them. For 'unnamed' USB devices,
the USB printer's programmed Vendor ID (VID) and Product ID (PID) will be shown.
You can rename your USB devices. For more information, please read the USB
DEVICE CONFIGURATION subsection in the Changing USB Server's
Settings section in this manual.
TROUBLESHOOTING: US4A: If you do not see your USB device in the Keyspan USB Server
application, please proceed to the Troubleshooting:USB Devices section in this manual.
Keyspan:USB Server - User Manual
This User Manual applies to the Keyspan USB Server Software Version 1.3.x. Patent Pending.
Rev 2005jun23 Page 9
Page 10
Step 2 - (Virtually) Connecting Your USB Device
In the USB Devices tab, the following information is shown:
Action: The Action column contains an icon
Device Name: The name of your USB device. This is the name programmed into the USB
device itself. Note: This name can be changed. Read the USB DEVICE
CONFIGURATION subsection in the Changing USB Server's Settings
section in this manual for more details.
Status: This is the current Status of your USB device. This field is
dynamic and will change as you start to use USB devices
through the USB Server. For now, we're only concerned
with the Available status (which means that the USB device is
ready to used via the USB Server) but there are other Status.
For details, please see the USB Device Status Details subsection
later in this manual.
Location: This column shows the server and server's USB port number
that your USB device is connected to. For example, the
location 'MyServer:3' means that your USB device is connected
to USB port number 3 on the USB Server called 'MyServer' .
Note: You can change the name of your USB Server. Read the
USB Server Settings Descriptions subsection in the
Changing USB Server's Settings section in this manual
for more details.
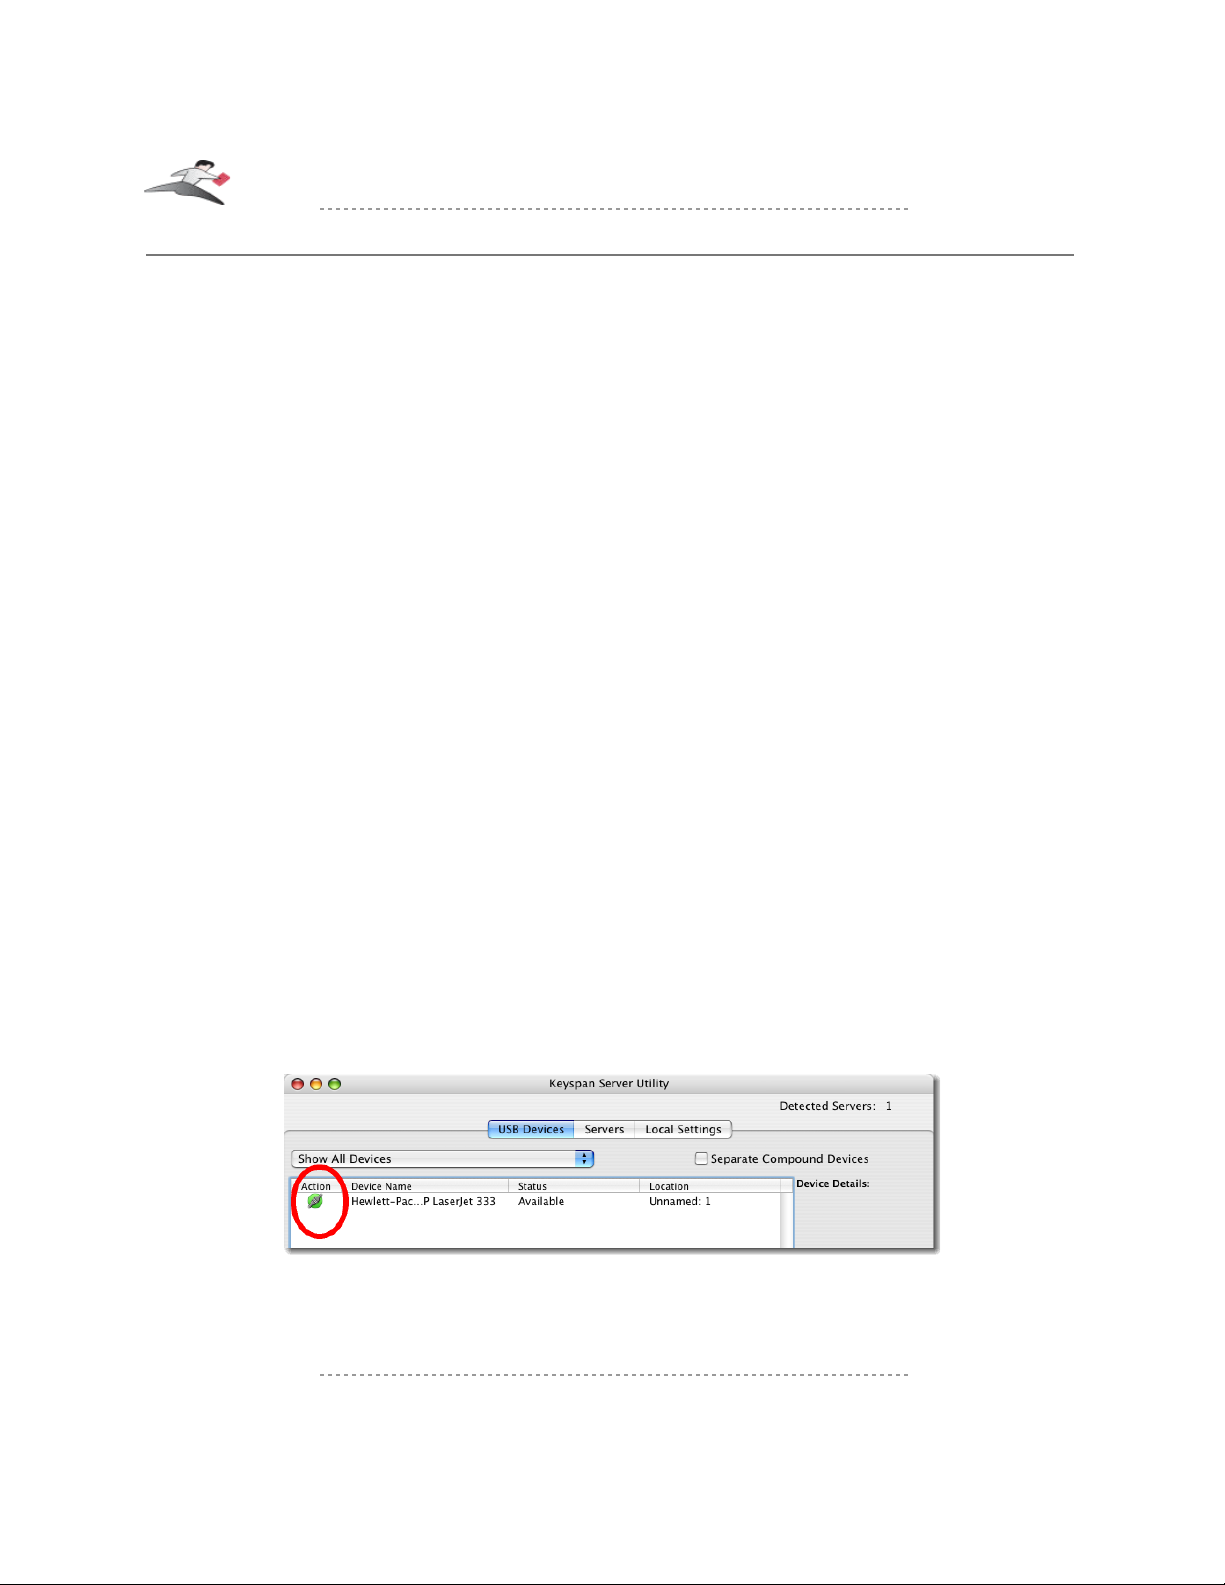
To use a USB device, you will need to first 'connect' your USB device via the Keyspan Server
Utility software.
To connect your USB device to your computer via the USB Server, select your USB device and
then click the green Connect button under the ACTION column as shown below:
You will notice that your USB device's Status will change from Available to In Use by
[ComputerName]. At this point, you can now use this USB device as if it is connected directly to
your computer. You can repeat this step for every USB device that you want to use.
Keyspan:USB Server - User Manual
This User Manual applies to the Keyspan USB Server Software Version 1.3.x. Patent Pending.
Rev 2005jun23 Page 10
Page 11
Tech Note: US4A/PS4A: By default, the USB Server is configured to use the
Multi-User Connect Mode
. In this mode, all USB devices will be shared in a
one-
at-a-time
mode. Before you can use a USB device, you will have to connect to it to
gain exclusive access. Once you are finished using the USB device, you will have to
disconnect from that device before others can use it. In this mode, the USB Server
acts like a library where your USB devices are checked out for use and checked back
in so that other can use these devices. This process can be automated by using the
Auto-Connect Feature. Continue reading this section for details.
In Multi-User' Connect Mode, you can also dedicate USB devices to certain computer,
set up passwords for a certain USB device, and setup Auto-Connect for devices (so
that you don't need to connect and disconnect your device all the time). You can also
configure your USB Server to use the '
Single-User'
Connect Mode where the USB
Server is dedicated to a particular user. In the
Single-User
Connect Mode, you do
not need to connect/disconnect devices since there is only one computer.
You can configure the USB Server to use other sharing modes, such as Single-User
mode. For more details, please read the Sharing Modes Overview sub section at
the end of this section.
TROUBLESHOOTING: US4A/PS4A: If a device is in use by another user, that USB device's
Status show as In Use By [ComputerName]. If you wish to use a USB device that is In Use, you'll
have to wait until that user finishes using it. If a printer has been setup for Auto-Connect, the
printer will automatically become available once the other user finishes printer. If your computer is
also setup for Auto-Connect, your print job will automatically start once the other user has finished
printing. For more information on Auto-Connect, continue reading this section.
Now that your USB device is connected, you can start using your USB device as if it was directly
connected to your computer.
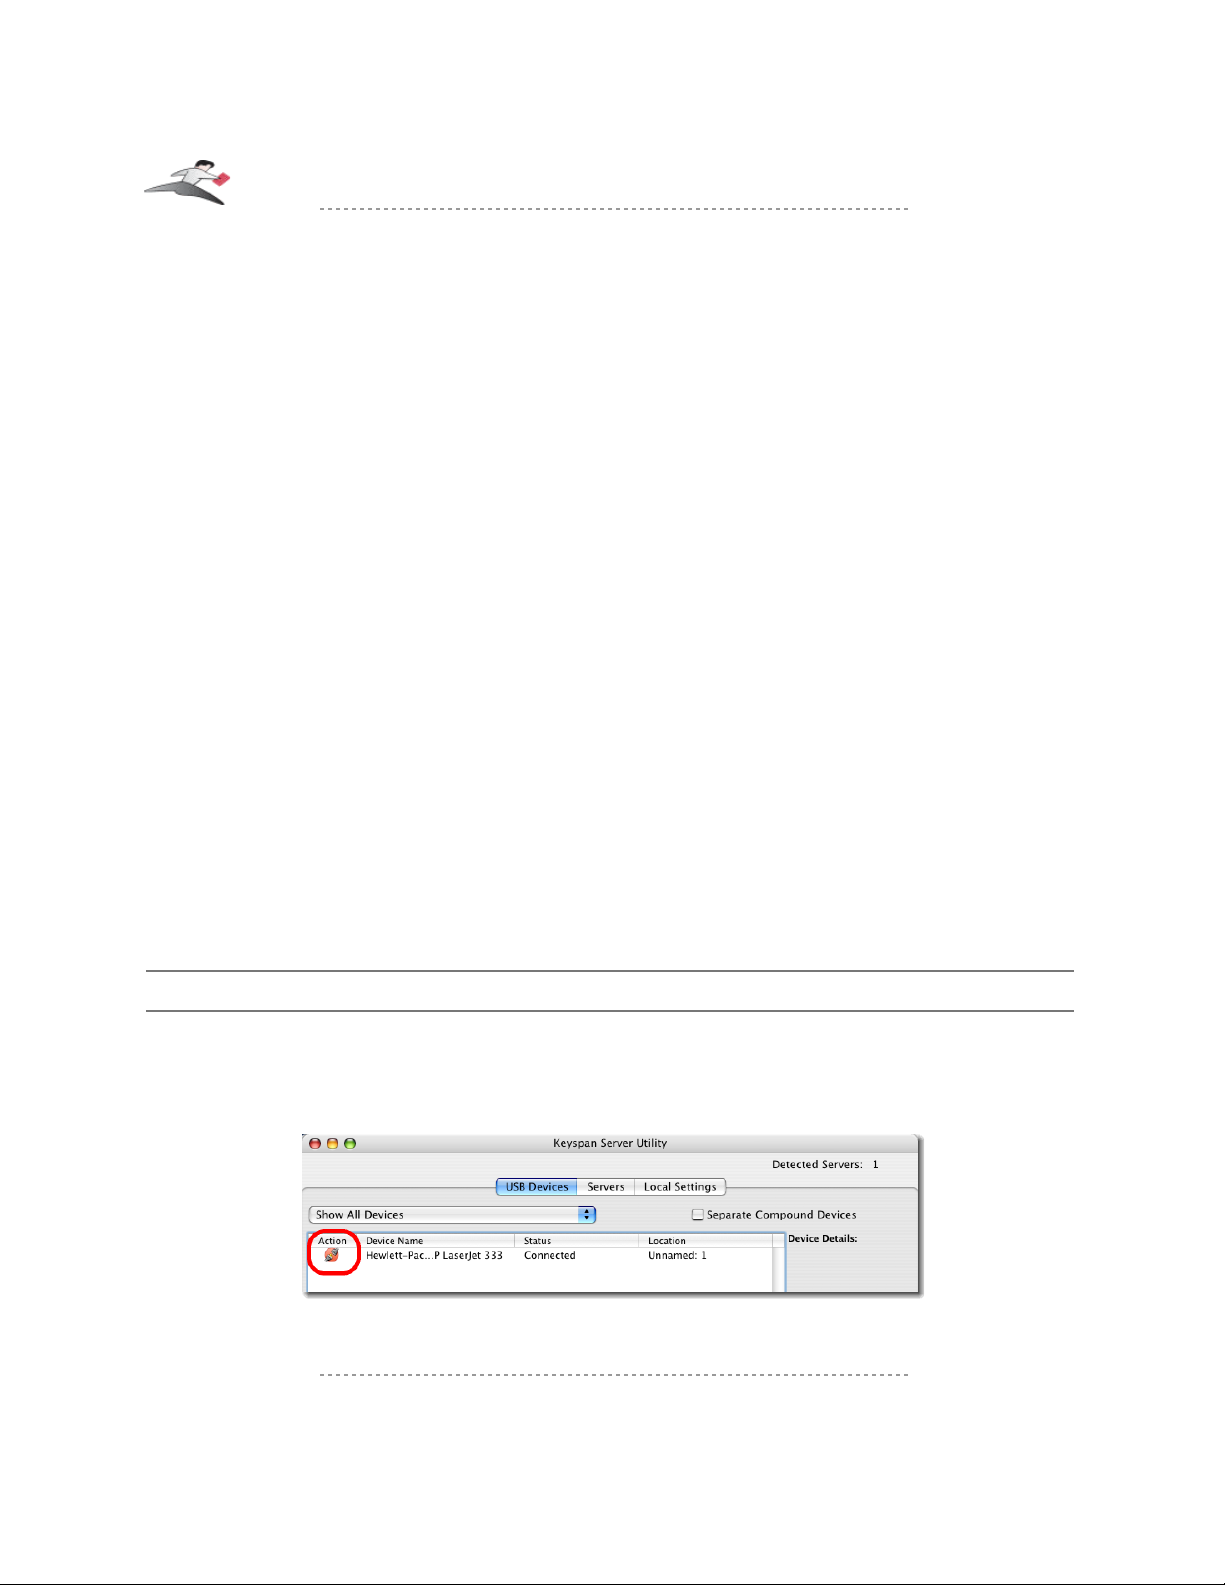
Step 3 - (Virtually) Disconnecting Your USB Device(s)
When you are done using your USB device, you must virtually disconnect it from your computer
before it is available to everyone else on the network. To do this, open the Keyspan Server Utility
application, select your USB device and then click the red DISCONNECT icon (see next image):
You'll notice that the USB device's Status will change to 'Available'. Other users will also see the
Keyspan:USB Server - User Manual
This User Manual applies to the Keyspan USB Server Software Version 1.3.x. Patent Pending.
Rev 2005jun23 Page 11
Page 12

USB device's status change to Available.
Tech Note: US4A/PS4A: Some USB devices may require additional action
PRIOR to 'disconnecting' your USB device. For example, some USB devices (like
printers with a card reader.) will require you to drag the device's icon to the trash, stop
the USB printer's card reader software, etc. If your USB device requires such actions
when the device is directly connected to the computer, please do these actions prior to
clicking the DISCONNECT button in the Keyspan Server Utility software.
If you forget to disconnect a USB device, please note that USB devices will automatically get
disconnected if your computer goes to 'sleep' or 'hibernate', your computer is turned off, or if you
disconnect from your network.
In the worst cases where a device has been left in use and you cannot get the other computer to
disconnect a device, you can forcibly 'Force Disconnect' a device that has been left in use. While
Force Disconnecting a device is not recommended, you can learn more about this feature in the
Advanced menu subsection found in the Changing USB Server's Settings section.
Step 4 - Other Methods Of Connecting USB Devices (Optional)
In addition to using the USB Server program to 'manually' connect USB devices to your computer,
you can also:
• Automatically connect and disconnect printers for improved printer sharing
(by using the Auto-Connect feature)
• Connect and disconnect USB devices without opening the USB Server program
(by using the USB Server system tray icon)
• Not 'share' your USB devices and Automatically connect USB devices to only one
computer (by using the Single-User Connect Mode)
For specific instructions on how to setup and use these features, please read the Other Methods
To Connect Your USB Devices sub section later in this chapter.
Step 5 - Finishing Up and Additional Notes
You have now learned to how use your USB device via the Keyspan USB Server.
If you need to connect additional USB devices, note that you can connect up to 8 USB devices to
one Keyspan USB Server. While the USB Server only has 4 USB ports, we support 8 devices due
to how Compound USB devices work. Compound USB devices are devices that have multiple
components connected to an embedded USB hub inside 1 USB device. For example, the Lexmark
X1150 is a compound device that has 2 components (one for the scanner, one for the printer). The
Canon i475D is also a compound device that has 3 components (the printer, the card reader, and a
HID device [for buttons on the printer]).
Keyspan:USB Server - User Manual
This User Manual applies to the Keyspan USB Server Software Version 1.3.x. Patent Pending.
Rev 2005jun23 Page 12
Page 13

Tech Note: Using Multiple USB Servers and USB Devices:
US4A/PS4A:
You can view up to 8 USB Servers in the Keyspan Server Utility software.
If you are using all of the USB ports on your 8 servers,
you will be able view a total of 32
USB devices
in the Keyspan Server Utility software however you will only be
able to have 12 USB devices 'connected' to your computer.
If you need to use a 13th USB device, 'disconnect' one of your 12 USB devices via the
Keyspan Server Utility software to free a location for the next USB device.
If you need to have more than 8 USB Servers, configure your next 8 servers to use a
different UDP port. Once you have done this, use the USB Software's Local UDP
Port menu item to switch between your first 8 servers and your next 8 servers.
Tech Note: Using One USB Server With Multiple Users:
Only 10 users can connect to a single or set of USB Servers using the same UDP port.
You can support more users by setting up additional USB Servers with different UDP
port numbers.
Other Methods To Connect Your USB Devices
Using the USB Server program to connect and disconnect your USB devices (as outlined above) is
only one method of connecting devices. While the USB Server program gives detailed information
about your USB Server and USB devices connected to it, you may not always want to open the
USB Server program every time you want to use your USB device. Because of this, we have
created other methods to connect your USB devices. With the USB Server 1.3 software, you can:
• Automatically connect and disconnect printers for improved printer sharing
(by using the Auto-Connect feature)
• Connect and disconnect USB devices without opening the USB Server program
(by using the USB Server system tray feature)
• Reclaim or Force Disconnect a device that has been left in use by another user.
• Not 'share' your USB devices and Automatically connect USB devices to only one
computer (by using the Single-User Connect Mode)
The following subsections show you how to use these different features.
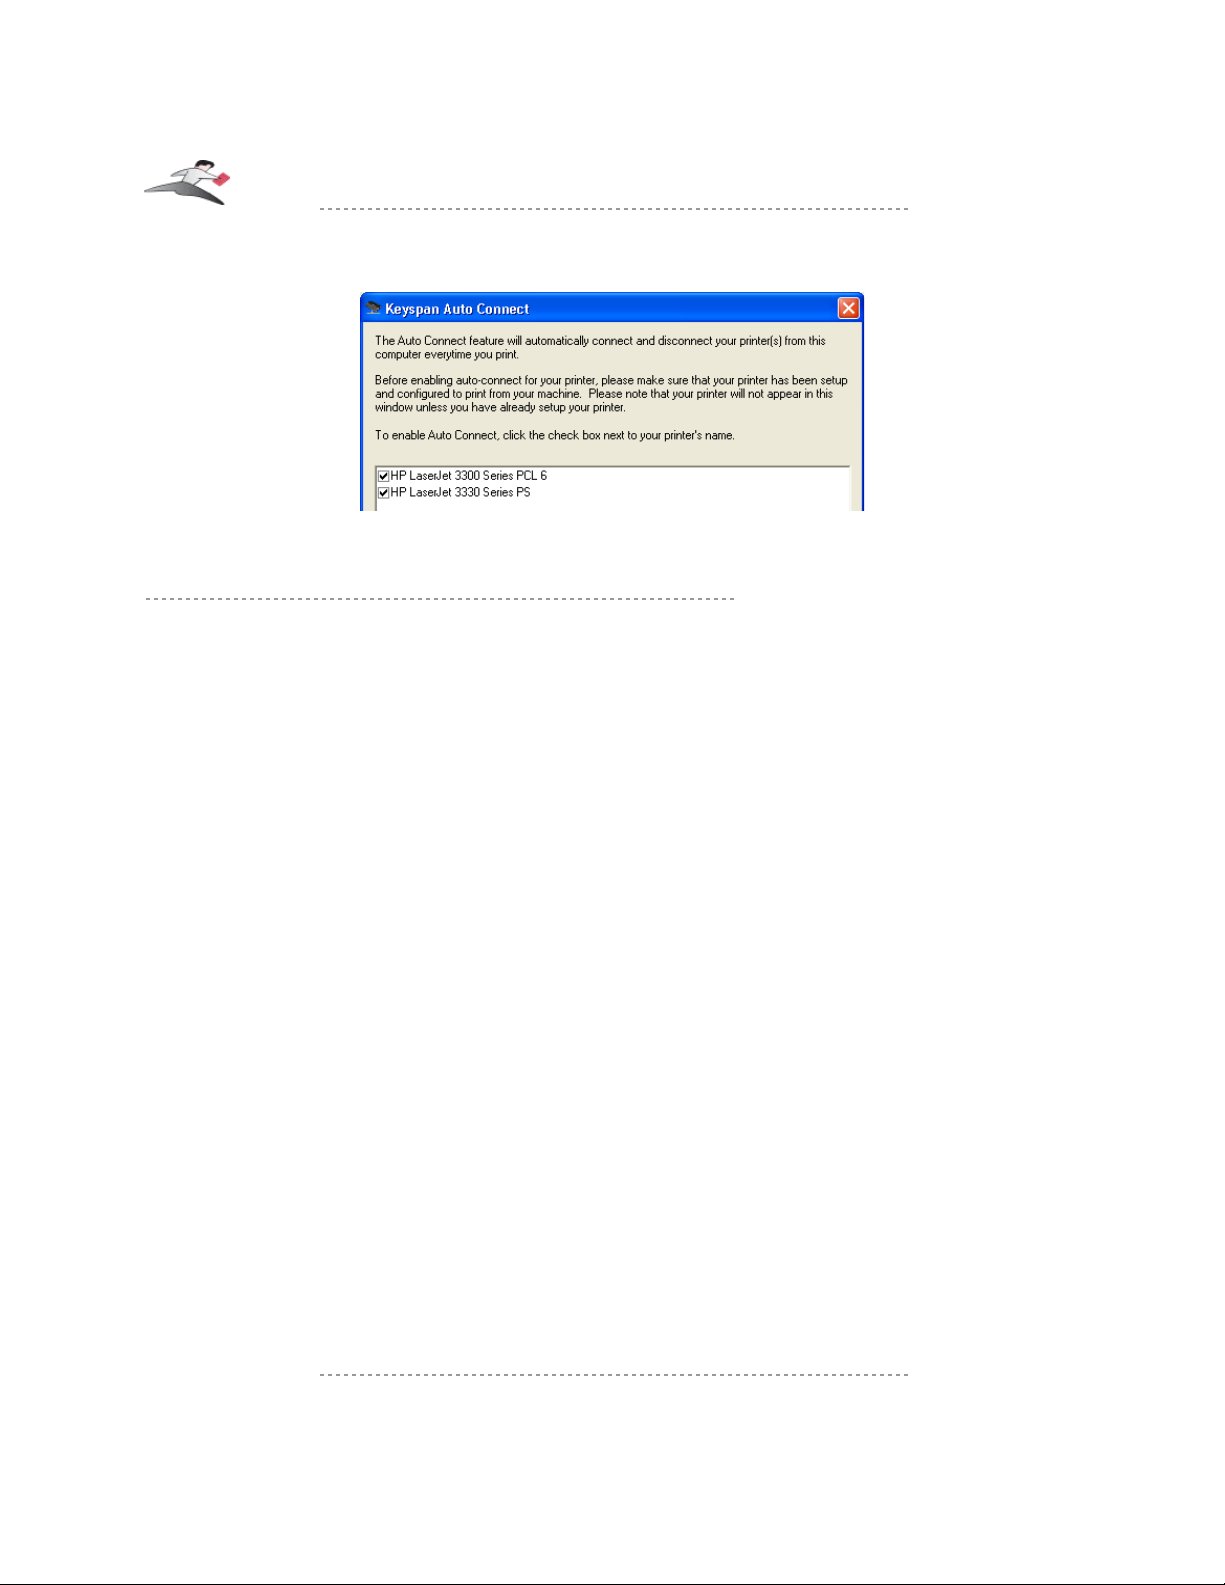
Using The Auto-Connect Feature For Windows
This feature will automatically connect and disconnect printers whenever you have a print job
queued. This gives you a richer printing experience that is similar to using a print servers. Note:
This feature is only enabled in the Multi-User Connect Mode for USB devices that are using the
Shared Share Mode.
Keyspan:USB Server - User Manual
This User Manual applies to the Keyspan USB Server Software Version 1.3.x. Patent Pending.
Rev 2005jun23 Page 13
Page 14
MACINTOSH NOTE:
Auto-Connect feature for Windows is configured differently on Mac OS X systems. If
you are interested in using the Auto-Connect feature for Mac, please skip ahead to the
Using The Auto-Connect Feature For Mac subsection.
Before You Begin
Before you begin, please make sure that you have connected and installed your printer via the
Keyspan USB Server's USB Devices tab (see the Using Your First USB Device sub section
earlier in the section).
To setup your printer for Auto-Connect, please follow these instructions:
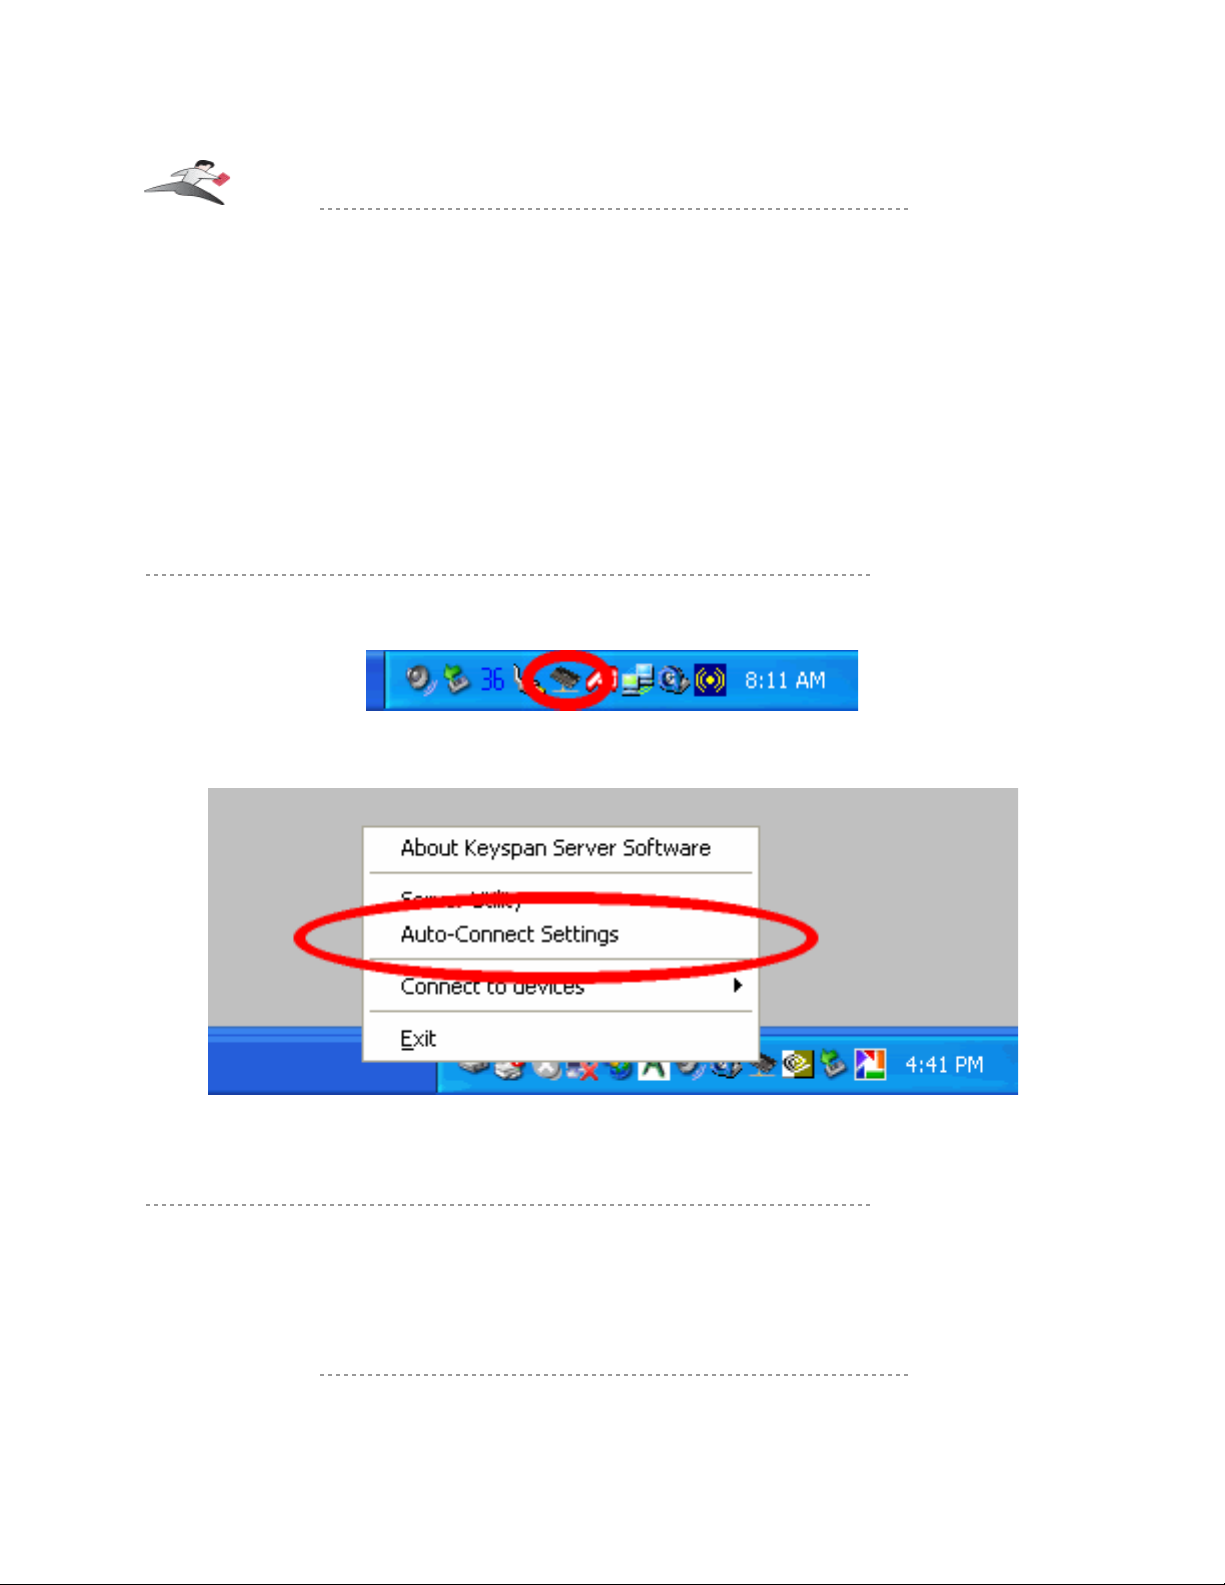
Step 1 - Access The USB Server System Tray Icon And Auto-Connect Settings
Right click the USB Server icon in the System Tray.
When the sub-menu appears, select to Auto-Connect SETTINGS.
This will open the Keyspan Auto-Connect window.
Step 2 - Add Your Printer To Auto-Connect
In the Keyspan Auto-Connect window, click the check box next to your printer's name.
Tech Note: If You See Multiple Selections For The Same Printer:
US4A/PS4A:
You may see your printer listed multiple times if you or your printer's software created
multiple printers in Windows's Printers and Faxes window. You can either delete
Keyspan:USB Server - User Manual
This User Manual applies to the Keyspan USB Server Software Version 1.3.x. Patent Pending.
Rev 2005jun23 Page 14
Page 15
the extra printers in the Printers and Faxes window or enable Auto-Connect for all
of the 'printers'.
Step 3 - Using Your Printer Via Auto-Connect
Now that you have setup your printer via Auto-Connect, you're ready to print. There is nothing
special you need to do. Just print your documents as you would normally. Depending on your
printer, you may get a warning stating that your printer is disconnected. IGNORE THESE
WARNINGS as the Auto-Connect feature will connect the printer for you. Once the printer gets
'Auto-Connected', your print job will be sent to the printer (this may take a few seconds).
When the printer has finished printing, Auto-Connect will disconnect your printer and make it
available to other users.
About Multiple Print Jobs From Multiple Users
If you have 2 users printing to the same printer, Auto-Connect will connect the whichever computer
reaches the USB Server first. The second user's print job will stay in the queue until the first user
finishes printing. Once the first user's print job is finished, the first user will be disconnected and
the second user will connect to the printer and his print job will automatically start.
Using The USB Server System Tray Feature
The USB Server system tray icon allows you to quickly:
• open the Keyspan Server Utility
• configure Auto-Connect settings
• connect and disconnect to USB devices on your USB Server
MACINTOSH NOTE:
The USB Server System Tray is currently Windows only but a Mac OS X version of this
feature is currently in development. Please contact Keyspan for details.
To do any of the above, first find the Keyspan USB Server System Tray icon. The System Tray is
located in the lower right hand corner of your screen (next to the time).
Keyspan:USB Server - User Manual
This User Manual applies to the Keyspan USB Server Software Version 1.3.x. Patent Pending.
Rev 2005jun23 Page 15
Page 16

Once you've found the USB Server icon, right click the icon. This will bring up a sub menu (see
next image).
In the sub menu:
• ABOUT KEYSPAN SERVER SOFTWARE will open an about window that displays the
currently installed software versions.
• SERVER UTILITY will open the Keyspan Server Utility application. This is the same as
opening the Keyspan Server Utility application via the START menu.
• AUTO-CONNECT SETTINGS will open the Auto-Connect window. This is where you
configure your printers to use the Auto-Connect window. For details about this feature,
please read the Using Auto-Connect For Printers section earlier in this guide.
• CONNECT TO DEVICES allows you to connect to available USB devices without having
to open the Keyspan USB Server program. To do this, just select your device from the list.
USB devices connected to your computer will show a check mark next to them. USB
Devices connected to other computers will not show up
Please note that this is the same thing as opening the Keyspan Server Utility software
and manually connecting your device. The System Tray icon makes connecting and
disconnecting USB devices faster and easier.
• EXIT will quit the Keyspan USB Server System Tray icon. IMPORTANT!!! If the
Keyspan System Tray is not running (ie you selected exit), your printers will not AutoConnect. To fix this, restart your computer or re-launching the KEYSPAN USB Server
TASK from START menu -> PROGRAMS -> STARTUP
Keyspan:USB Server - User Manual
This User Manual applies to the Keyspan USB Server Software Version 1.3.x. Patent Pending.
Rev 2005jun23 Page 16
Page 17
Using The Auto-Connect Feature For Mac
This feature will automatically connect and disconnect printers whenever you have a print job
queued. This gives you a richer printing experience that is similar to using a print servers.
MACINTOSH NOTE:
Auto-Connect feature for Windows is configured differently on Mac OS X systems. If
you are interested in using the Auto-Connect feature for Windows, please read the Using
The Auto-Connect Feature For Windows subsection earlier in this section.
Before You Begin
Before you begin, please make sure that you have connected and installed your printer via the
Keyspan USB Server's USB Devices tab (see the Using Your First USB Device sub section
earlier in the section).
To setup you printer for Auto-Connect, please follow these instructions:
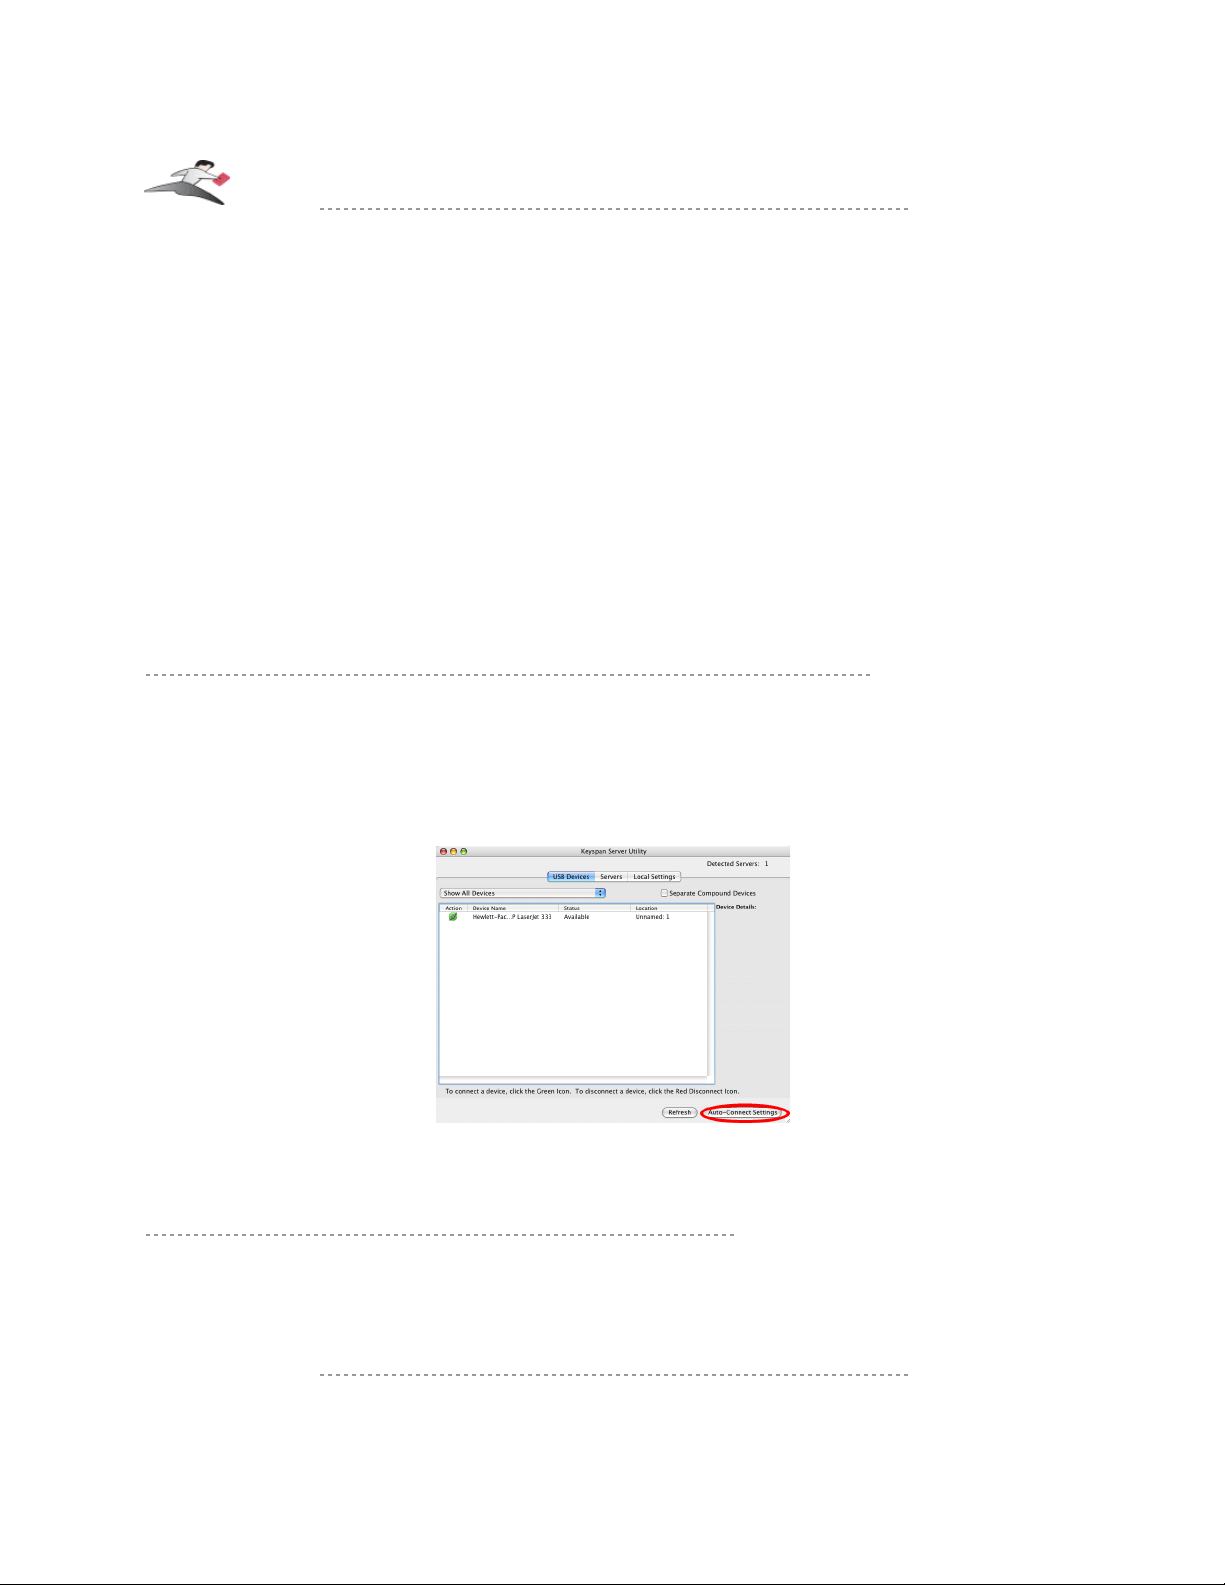
Step 1 - Access The USB Server and Click The Auto-Connect Settings Button
Open the Keyspan Server Utility application. This application is located in your Applications
folder and is called Keyspan USB Server.
Once you have opened the Keyspan Server Utility application, click the Auto-Connect Settings
button as shown below:
This will open the Auto-Connect Printer Settings window.
Step 2 - Enable Auto-Connect For Your Printers
In the Auto-Connect Printer Settings window, you will see printers that are connected to your
USB Server(s). To enable Auto-Connect for your printer, check the check box next your printer's
name (as shown below).
Keyspan:USB Server - User Manual
This User Manual applies to the Keyspan USB Server Software Version 1.3.x. Patent Pending.
Rev 2005jun23 Page 17
Page 18
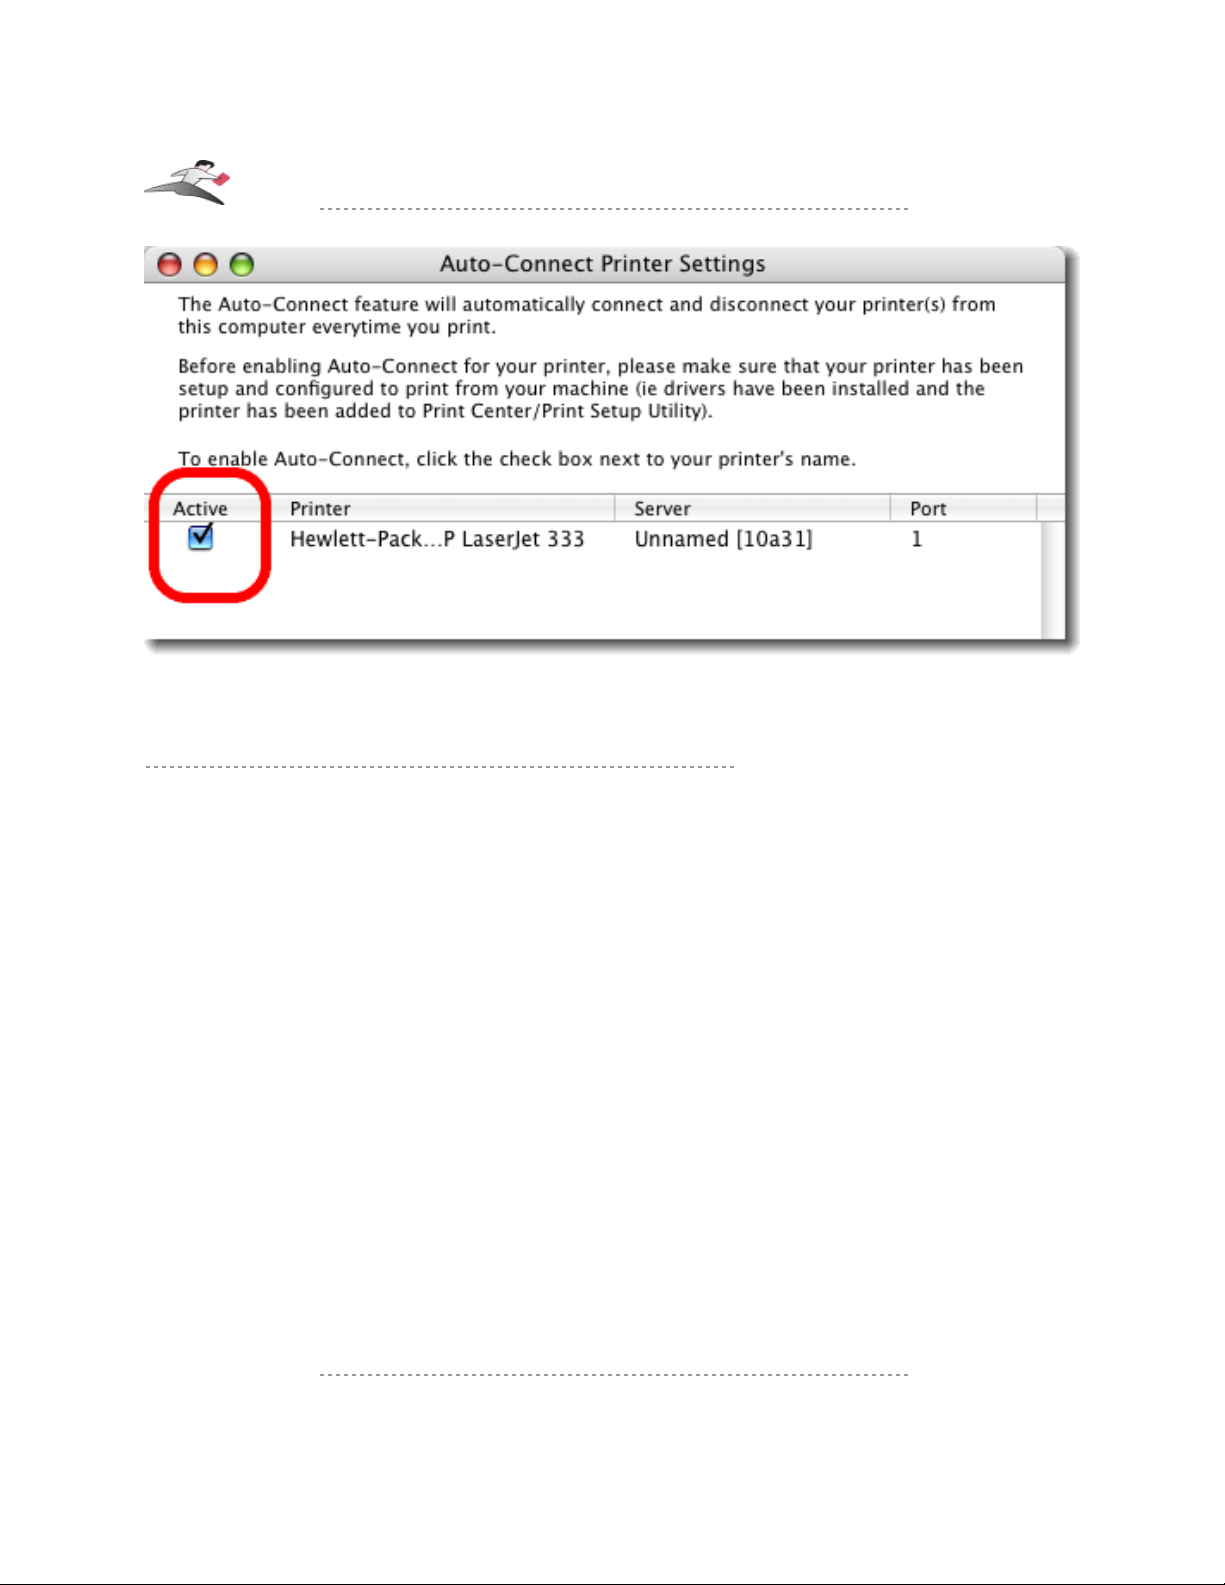
Once you have enabled Auto-Connect for your printer(s), close this window.
Step 3 - Using Your Printer Via Auto-Connect
Now that you have setup your printer via Auto-Connect, you're ready to print. There is nothing
special you need to do. Just print your documents as you would normally. Depending on your
printer, you may get a warning stating that your printer is disconnected. IGNORE THESE
WARNINGS as the Auto-Connect feature will connect the printer for you. Once the printer gets
'Auto-Connected', your print job will be sent to the printer (this may take a few seconds).
When the printer has finished printing, Auto-Connect will disconnect your printer and make it
available to other users.
About Multiple Print Jobs From Multiple Users:
If you have 2 users printing to the same printer, Auto-Connect will connect the whichever computer
reaches the USB Server first. The second user's print job will stay in the queue until the first user
finishes printing. Once the first user's print job is finished, the first user will be disconnected and
the second user will connect to the printer and his print job will automatically start.
Note For Networks With Multiple Users:
Please note that Auto-Connect is enabled PER COMPUTER. If you have multiple computers, you
will need to enable Auto-Connect on each computer.
Using Device Force Disconnect
The Force Disconnect command allows you to disconnect a USB device from another computer if
that USB device that has been left 'in use' by another user. To Force Disconnect a device, select the
Keyspan:USB Server - User Manual
This User Manual applies to the Keyspan USB Server Software Version 1.3.x. Patent Pending.
Rev 2005jun23 Page 18
Page 19

device in the USB Devices tab then select the Force Disconnect command from the Advanced
menu. Follow the instructions on screen to complete the process.
Please note that if your USB Server has an administrator password enabled, you will be asked to
enter that password before you can Force Disconnect the selected USB device.
IMPORTANT NOTE!!! Force Disconnect will disconnect a USB device
that is connected to another user's computer. This is the same as
physically disconnecting the USB device's cable from the USB port.
As with any USB device, it is not recommended to disconnect (or
Force Disconnect) any USB printer while that device is in use (ie
disconnecting a printer while it's printing). You should only use
Force Disconnect if you are sure that the USB device is not in use.
Please note that if your computers automatically 'sleep' (aka
'hibernate', 'power save', etc.), USB devices connected to the
sleeping computer will be released and made available to other users.
Turning off your computer will also release USB devices left in use.
Using The Single-User Connect Mode
The USB Server has two Connect Modes: Multi-User and Single-User.
By default, the server is set to use the Multi-User mode. In Multi-User mode, USB devices are
shared in a one-user-at-a-time mode. This allows multiple computers to use one USB device.
Again, you need to 'connect' to the USB device before you can use it (thus preventing other users
from using your USB device at the same time).
Single-User mode will automatically connect USB devices to your computer without you having to
connect or disconnect. When your USB Server is set to Single-User mode, it will 'connect' all of
the USB devices connected to the server to the first computer (with Keyspan Server Utility
software) it detects. Use this mode, if A) you only have one computer or B) you have multiple
computers but only one computer will have access to the USB Server.
Connect Mode (Multi-User or Single-User) can be configured in the USB Server's Servers tab.
For details, please see the Changing USB Server's Settings section later in this manual.
The Single-User Connect Mode affects an entire USB Server. Please note that you can also
configure a single USB device to be dedicated to particular computer and still share other USB
devices with other computers. For details, please see the XXXX section later in this manual.
USB Device Status Details
The Keyspan USB Server's USB Devices tab will show the 'connection' Status of USB devices
connected to the server. The following is a list of the possible states of USB devices connected to
the USB Server.
Keyspan:USB Server - User Manual
This User Manual applies to the Keyspan USB Server Software Version 1.3.x. Patent Pending.
Rev 2005jun23 Page 19
Page 20
In the USB Devices tab, the following information is shown:
Available: The USB Device is available for use by any computer. To use this
device, click the green Connect button under the ACTION column.
Once you connect to the device, the status message will change to
Connected. If someone else uses the device, you will see the In Use
By [x] status.
Connected: The USB device is connected to your computer. When the Status is
set to Connected, you have exclusive access to that USB device.
Other users on the network will see the In Use By [x] status. To
make this device available for use by any computer, click the red
Disconnect icon
In Use By [x]: The USB device is in use by another computer. You cannot use this
device until the other computer finishes disconnects from that device
(making the device available again).
Note: The text in brackets shows the name of the 'client' that is using
that device. This client name is obtained from the computer's name (as
specified when that computer was setup). You can also change this
name in the USB Server's LOCAL SETTINGS tab.
Auto-Connected: The USB printer (either a printer or a multifunction printer) has been
Keyspan:USB Server - User Manual
This User Manual applies to the Keyspan USB Server Software Version 1.3.x. Patent Pending.
Rev 2005jun23 Page 20
Page 21

setup for Auto-Connect (the feature that automatically
connects/disconnects printers when you print). You cannot 'connect' to
a Auto-Connected printer as this is done for you automatically by the
Keyspan Server Utility software.
Note: For information on how to setup your printer for Auto-Connect,
please read the Using Auto-Connect Feature For Windows/Mac
subsections earlier in this document.
Password Required: The USB device requires a password before you can connect to it.
You can password protect individual USB devices by editing your
USB Server's settings in the Servers tab and then setting a password
in the USB Device Configuration tab. For details about this tab,
please read the USB Device Configuration tab subsection later in
this document.
Reserved/Dedicated: The USB device is reserved/dedicated to your computer. Other
computers will show the device as Dedicated To [x]. You can
dedicate a single USB device to specific computer by editing your
USB Server's settings in the Servers tab and then setting a password
in the USB Device Configuration tab. For details about this tab,
please read the USB Device Configuration tab subsection later in
this document.
Connected Dedicated: The USB device is reserved/dedicated to your computer. Other
computers will show the device as Dedicated To [x]. You can
dedicate a single USB device to specific computer by editing your
USB Server's settings in the Servers tab and then setting a password
in the USB Device Configuration tab. For details about this tab,
please read the USB Device Configuration tab subsection later in
this document.
Dedicated To [x]: The USB device is reserved/dedicated to another computer. You
cannot connect connect to a device that is dedicated to another
computer. You can dedicate a single USB device to specific computer
by editing your USB Server's settings in the Servers tab and then
setting a password in the USB Device Configuration tab. For
details about this tab, please read the USB Device Configuration tab
subsection later in this document.
You may now proceed to the next section in this guide...
Keyspan:USB Server - User Manual
This User Manual applies to the Keyspan USB Server Software Version 1.3.x. Patent Pending.
Rev 2005jun23 Page 21
Page 22
4 Changing USB Server's Settings
Overview
The Keyspan USB Server comes preconfigured for use with most networks. However, you may
want to change some of the Keyspan USB Server's settings to meet specific needs posed by your
network and/or USB device sharing needs. This section describes how to change the USB Server's
settings and what the settings affect.
Editing A Specific USB Server
To change the USB Server's Servers settings, launch the Keyspan Server Utility application.
MACINTOSH NOTE:
The Keyspan Server Utility application is located in your Applications folder.
Double click the Keyspan USB Server icon.
WINDOWS NOTE:
The Keyspan Server Utility application is located in your START menu ->
PROGRAMS -> KEYSPAN Server.
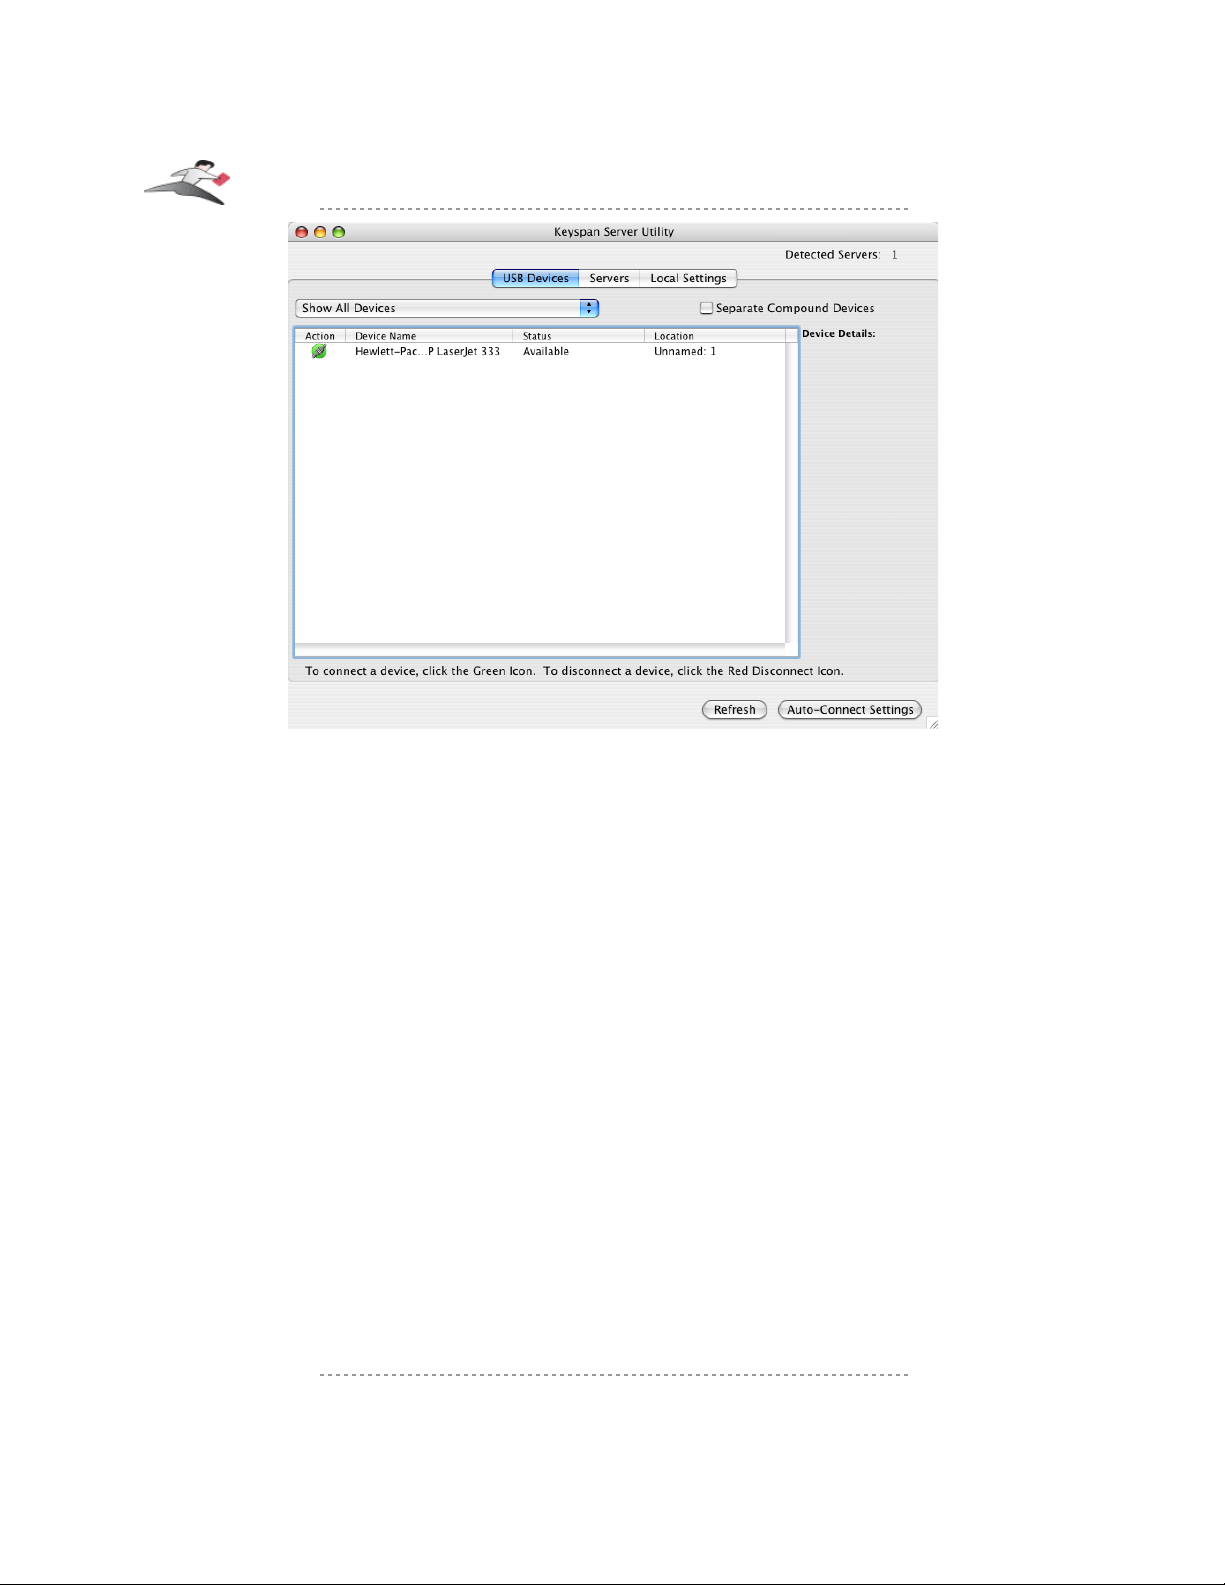
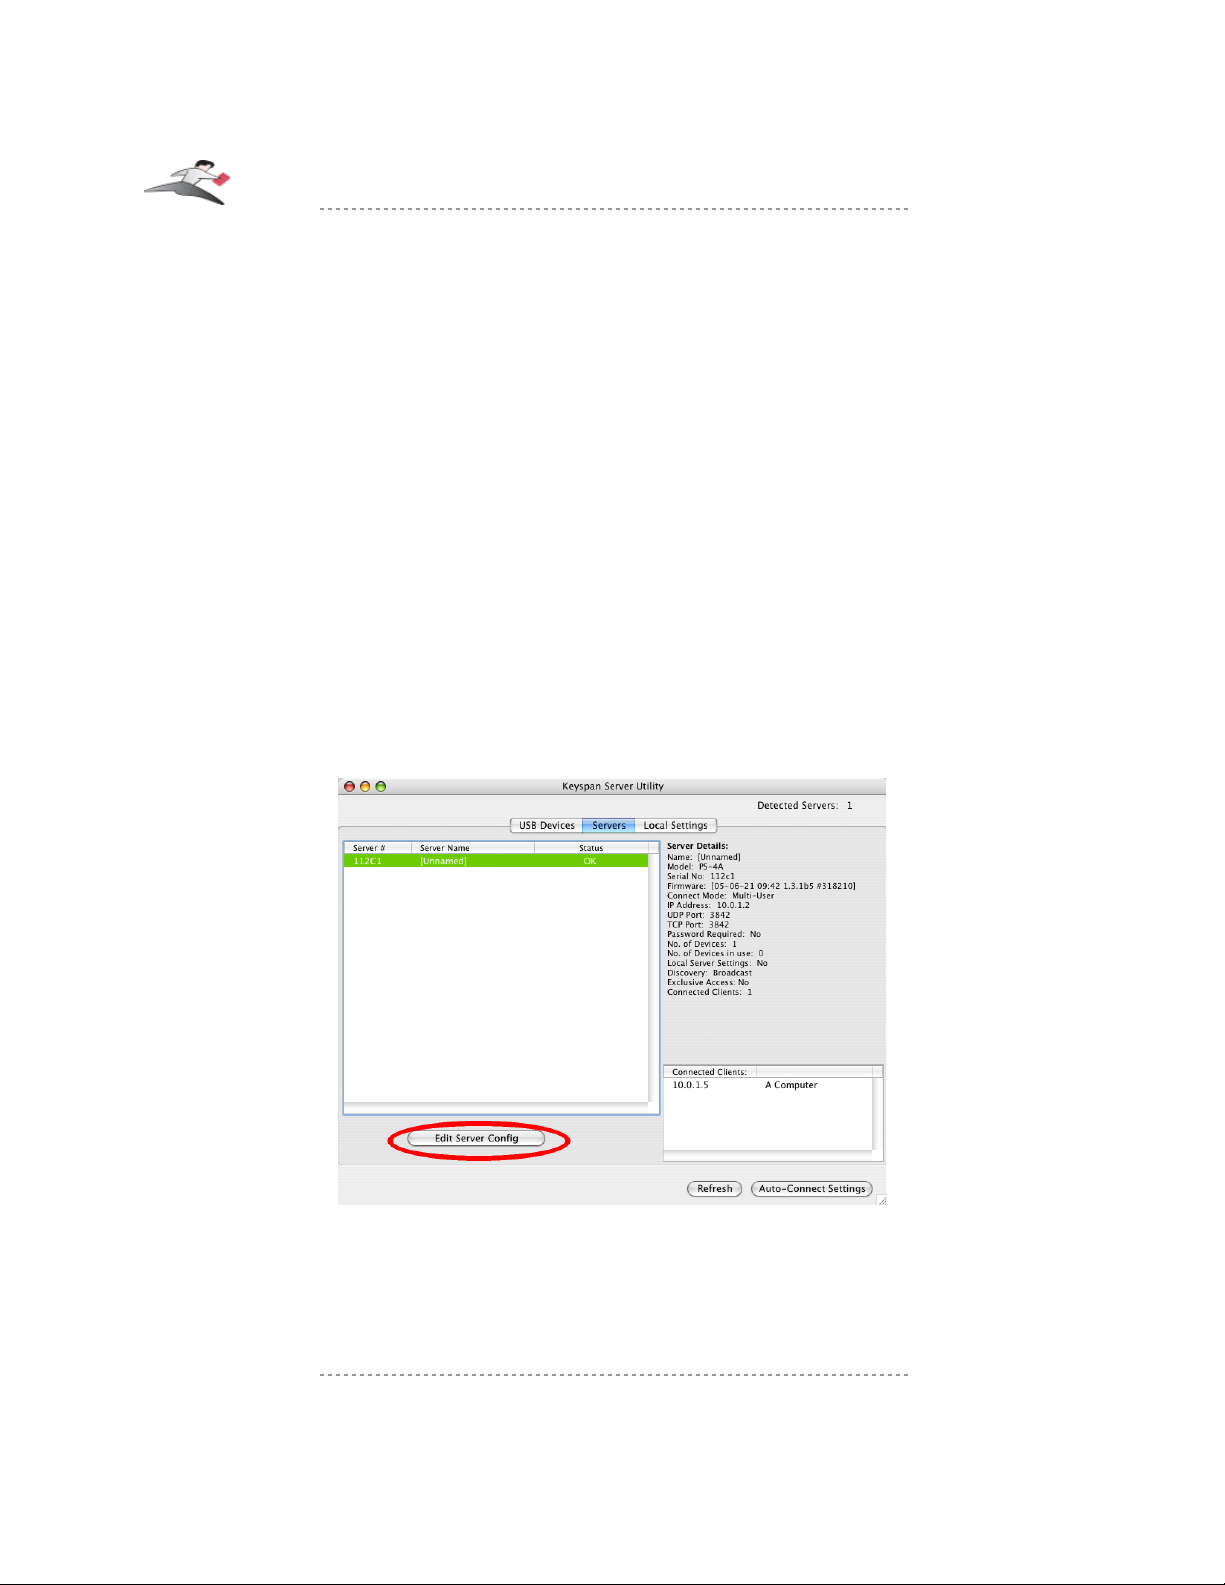
Once the Keyspan Server Utility application is open. Click on the Servers tab (see next image):
The Servers tab will show any USB Server hardware it finds.
The Servers tab shows the following information:
Server #: Displays the last five numbers of your USB Server's Network Address/Mac
Address. The full Network Access is printed on the bottom of your USB
Server hardware.
Server Name: The name of your USB Server. You can modify this name by selecting the
server and clicking the Edit Server Config button.
Keyspan:USB Server - User Manual
This User Manual applies to the Keyspan USB Server Software Version 1.3.x. Patent Pending.
Rev 2005jun23 Page 22
Page 23

Status: This is the current Status of your USB Server's hardware and software. This
column will show if the Keyspan Server Utility software has successfully
communicated with your USB Server hardware. For details, please see the
Server Status Details subsection later in this manual.
Server Status Details
The Server Status are:
OK: The Keyspan Server Utility software has successfully found the USB
Server hardware. You can now communicate with the selected USB
Server. Note: The USB Server may have an Client Access
Password or a Configuration Password that would prevent from
users from using that specific server or changing the selected server's
configuration. For more information about these passwords, please
please see the USB Server Settings : Access Tab subsection later in
this manual.
Old Firmware: The USB Server hardware contains 'old' firmware. This happens your
computer has newer software than the firmware on the USB Server
hardware. If you see this message, you must upgrade your USB
Server's firmware. To do this, select your USB Server in the Servers
tab and click the Edit Server Config button. For more details, please
read the Updating Your USB Server's Firmware subsection later in
this manual.
Temp. Defaults: The USB Server hardware has been put into Temporary Default
Settings Mode. This mode allows you to temporarily return the USB
Server to it's factory settings for diagnostics. You can edit your
previous setting while you are in the Temporary Default Settings
Mode. For more information about how to set your USB Server into
Temporary Default Settings Mode, please please see the Reboot
Server Into 'Temporary Default Settings Mode' Using The Reset
Button subsection (in the Troubleshooting section) later in this
manual.
Login Failed: The USB Server could not connect to the selected USB Server because
the USB Server has a password. You computer either does not have a
password set in the Server Access Settings field in the Local
Settings tab or you have entered an incorrect password for your USB
Server. For more information about these passwords, please please
see the USB Server Settings : Access Tab subsection later in this
manual. mismatch server discovery information.
Keyspan:USB Server - User Manual
This User Manual applies to the Keyspan USB Server Software Version 1.3.x. Patent Pending.
Rev 2005jun23 Page 23
Page 24
Attempting Discovery: The Keyspan Server Utility software is attempting to locate USB
Server hardware on your networks. This message will temporarily
appear when you first start up your computer or when you reboot the
USB Server. Attempting Discovery also means that the client software
is attempting to make a connection to the server over WAN/Internet. If
this message does not go away, please read the Troubleshooting
section later in this manual.
Attempting to Connect: The USB Server hardware is sending 'Broadcast' messages to your
computer but the connection to the USB Server hardware cannot be
made. If you have modified your USB Server's settings, set the USB
Server to the Temporary Default Settings Mode and change your
settings. If this message does not go away, please read the
Troubleshooting section later in this manual.
Editing Your USB Server's Settings
To edit a specific server's setting, select it from the list and click the Edit Server Config button
(see next image):
This will open the the Edit Server Configuration window (see next image). This window has three
tabs, Access, Network, and Device Configuration. For details about these tabs and what settings
can be configured, please read the USB Server Settings : Access Tab, USB Server Settings :
Network Tab, and USB Server Settings : Device Configuration subsections later in this
document.
Keyspan:USB Server - User Manual
This User Manual applies to the Keyspan USB Server Software Version 1.3.x. Patent Pending.
Rev 2005jun23 Page 24
Page 25

NOTE: After clicking the Edit Server Config, you may receive a pop-up window
informing you about new firmware. You will only be able to update your server's
settings AFTER you have upgraded your firmware. While updating your USB Server,
you will notice its icon disappear while the new firmware is being loaded. The USB
Server icon will reappear after your server has loaded the new firmware.
MULTIPLE USERS NOTE: While multiple users can view the Servers
tab at any given time, only one user is allowed to change the server
settings once the Edit Server Config is clicked. If you are editing the
server, other users will receive a message stating that you are editing the
server. Once you have finished making changes, other users will be able
to make changes on a one-user-at-a-time basis.
USB Server Settings : Access Tab
The Access tab contains settings that pertain to accessing the USB Server hardware and how the
USB Server shares USB devices at the server level. These changes affect the selected server.
The following is a description of all of the different settings you can change in the Access tab.
IMPORTANT NOTE: Any server settings changes you make will require that you
click the Apply button. You can also cancel your changes prior to applying your
changes or you can also restore the USB Server to factory settings. Please see the
Applying/Canceling Server Settings and Restoring Factory Settings sub
sections later in this section.
Keyspan:USB Server - User Manual
This User Manual applies to the Keyspan USB Server Software Version 1.3.x. Patent Pending.
Rev 2005jun23 Page 25
Page 26

ACCESS tab: Server Name/Server Config Password
Edit the Server Name field to change the name of the selected
USB Server. This name will appear to anyone using the Keyspan
USB Server application.
ACCESS tab: Connect Mode
The Connect Mode pop-up menu allows you to change how USB
devices get connected to your client PCs.
Multi-User (default setting): Use this mode if you have more than
one client computer connected to the Keyspan USB Server. Prior
to using your USB device, you will have to click the USB Devices
tab's CONNECT button. USB devices will be shared on a one-
user-at-a-time basis. Use this mode if you have more than one
client PC and if all attached USB devices will be used as
subscription devices. Note: You can use the Auto-Connect feature
to automate the process of connecting/disconnecting your devices.
Single-User: Use this mode if there is only one client computer
(or if only one client computer will be powered on at a time and
connected) to the Keyspan USB Server. In this mode it is not
necessary to manually connect and disconnect USB devices. All
devices on the USB Server will be automatically connected to the
client computer. WARNING: Using this mode with multiple
computers will cause unexpected results as all of the computers
will attempt to get exclusive access to your USB Server.
continued on next page...
Keyspan:USB Server - User Manual
This User Manual applies to the Keyspan USB Server Software Version 1.3.x. Patent Pending.
Rev 2005jun23 Page 26
Page 27

ACCESS tab: Configuration Password
Turning on the Requires Configuration Password check box
will force users to enter a password before they can edit any server
settings. Once you have set a password, users will still be able to
see the USB Server in the USB Devices and Admin tabs however
they will not be able to edit any server settings without supplying
the correct password.
Note: This is settings is just a configuration password. You can
restrict access to an entire USB Server by setting the Client
Access Password in this tab or your can restrict access to certain
USB devices by adding a password in the USB Device
Configuration tab in this window. You can also dedicate a
specific to device to a certain user in the USB Device
Configuration tab.
ACCESS tab: Client Access Password
Turning on the Requires Client Access Password check box
will restrict users from using the USB Server unless they have the
correct password for the specified server. If you are adding a
Client Password, this password can be automatically added to your
Local Settings. Other users will need to add a Access Password
in the Server Access Settings field in the Local Settings tab.
users to enter a password in the before they can edit any server
settings. Once you have set a password, users will still be able to
see the USB Server in the USB Devices and Admin tabs however
they will not be able to edit any server settings without supplying
the correct password.
Note: You can also can restrict access to certain USB devices by
adding a password in the USB Device Configuration tab in this
window or you can dedicate a specific to device to a certain user in
the USB Device Configuration tab.
continued on next page...
USB Server Settings : Network Tab
The Network tab contains network settings that pertain to how the USB Server communicates on
your network. You can configure how the USB Server obtains its IP address, what TCP/UDP
ports it uses to communicate (useful when dealing with firewalls), and the method that the USB
Server uses to 'announce' it's presence on your network (aka the Discovery Mode).
Keyspan:USB Server - User Manual
This User Manual applies to the Keyspan USB Server Software Version 1.3.x. Patent Pending.
Rev 2005jun23 Page 27
Page 28

The following is a description of all of the different settings you can change in the Network tab.
Keyspan:USB Server - User Manual
This User Manual applies to the Keyspan USB Server Software Version 1.3.x. Patent Pending.
Rev 2005jun23 Page 28
Page 29

Network tab: IP Address Assignment
The IP Address Assignment pop-up allows you to change how
the USB Server obtains its network settings (ie IP address, Subnet
Mask, etc.).
Using Default (default setting): In this mode, the USB Server will
try to get an IP address via DHCP first. If it fails to obtain an IP
address within 10 seconds, it will assign itself an IP address via
Zeroconfig. This is the recommended setting for most users.
Using DHCP: In this mode, the USB Server will automatically
obtain an address via DHCP server. Use this setting if you only
want to use an IP address obtained via a DHCP server (ie a DSL
router, etc.).
Using Zeroconfig: In this mode, the USB Server will assign itself
an IP address via the Zeroconfig protocol. Use this setting if you
are in a network where you only want to use Zeroconfig IP
addresses.
Tech Note:Zeroconfig: Zeroconfig (aka Zeroconf) is a networking protocol
that allows computers to automatically find each other without the need for you
to enter IP addresses, configure DNS servers, or setup DHCP. You can get
more information about ZeroConf at http://www.zeroconf.org/
Please note that computers using Zeroconfig can only communicate with each
other when they are on the same Ethernet segment (ie all Zeroconfig
computers are connected to same Ethernet hub).
Manually: In this mode, you will manually enter your IP Address,
Subnet Mask, and Gateway Address. Use this mode if you want
your USB Server to always use the same network settings.
Network tab: IP Address/Subnet Mask/ Gateway
The USB Server will show its current network configuration in the
IP Address, Subnet Mask, and Gateway fields. You can only
enter data in these fields if you have the IP Address Assignment
pop-up set to Manually.
IMPORTANT NOTE: All of the the fields (IP Address, Subnet Mask, and
Gateway) must be filled in. Your server will not be able to communicate with
your network if it is missing any of this information.
Keyspan:USB Server - User Manual
This User Manual applies to the Keyspan USB Server Software Version 1.3.x. Patent Pending.
Rev 2005jun23 Page 29
Page 30

Network tab: UDP Port/TCP Port
The UDP port and TCP Port fields allow you to specify which
port numbers the USB Server will communicate on. This
communication happens between the USB Server hardware and
software. By default, these ports are set to 3842. Port 3842 is
reserved exclusively for the Keyspan USB Server. Other IP
services (ie ftp, email, web, etc.) cannot use this reserved port.
UDP Port (default is 3842): Change this setting to change the
UDP port number that the USB Server will broadcast on. Other
computers configured to use this UDP port number will be able to
see this USB Server. This setting is useful if you wish to limit the
number of people connecting to a particular USB Server or if you
want to hide a USB Server from other users on your network.
IMPORTANT NOTE: If you change your server's UDP Port number in the
Servers tab, you will also need to tell the Keyspan Server Utility software to
'listen' to the new port. To do this, go to the LOCAL SETTINGS tab in the
Keyspan Server Utility application and enter your UDP Port field. You only
need to change the Local UDP Port if you've changed the USB Server's UDP
port.
TCP Port (default is 3842): Change this port to change the TCP
port that the USB Server uses to transmit and receive USB data.
Tech Note:UDP/TCP Ports and Firewalls: For most users, there is no
need to change the USB Server's UDP and TCP ports however certain firewalls
may block traffic to the default UDP and TCP ports. In these instances, you
can either change the port numbers or configure your firewall to allow
connections via USB Server's configured UDP and TCP ports.
continued on next page...
Keyspan:USB Server - User Manual
This User Manual applies to the Keyspan USB Server Software Version 1.3.x. Patent Pending.
Rev 2005jun23 Page 30
Page 31

USB Server Settings : Device Configuration Tab
the USB Device Configuration tab shows USB devices that are attached to the USB Server and
configuration records for detached USB devices. This tab allows you to make server specific
changes to devices connected to your server. You can configure:
• a USB device to require a password before you can access the device
• a USB device to be dedicated to certain computer so that a USB device is always connected
to that computer.
• the name that is displayed for a particular USB device. This is useful if you multiple USB
devices that don't register a name or if you have multiple identical USB devices.
In the USB Devices tab, the following information is shown:
Device Name: The Device Name column shows the name of selected USB
device. If your USB device has a name programmed into the
Keyspan:USB Server - User Manual
This User Manual applies to the Keyspan USB Server Software Version 1.3.x. Patent Pending.
Rev 2005jun23 Page 31
Page 32

device itself, that name will be shown here. You can change the
name of your device bu selecting you device and clicking the Add
button. Please read the USB Device Configuration tab - USB
Device Configuration Window subsection for details.
Location/Serial Number: The Location/Serial Number column shows the serial number of
your USB device if it has one. If it does not have a serial number,
its location on the USB Server will be shown (ie Port 2).
Cfg: The Location/Serial Number column will display an asterisk '*'
if you have configured the selected USB device using the USB
Device Configuration Window. Please read the USB Device
Configuration tab - USB Device Configuration Window
subsection for details about what USB device specific settings you
can change.
Status: This Status displays whether or not the selected USB device is
Attached, Detached, or has an Invalid Password (if the
password in this and the password saved in Local Settings tab are
different).
Device Configuration Tab - USB Device Configuration Window
If you want to change how a particular USB device is accessed through the USB Server, select the
device and click the Add button or Edit Button (see next image):
Keyspan:USB Server - User Manual
This User Manual applies to the Keyspan USB Server Software Version 1.3.x. Patent Pending.
Rev 2005jun23 Page 32
Page 33

This will open the USB Device Configuration window (see next image):
The following is a description of the settings that are shown in the USB Device Configuration
tab.
IMPORTANT Tech Note: About USB Device Configuration:
When you click the Add button and open the USB Device Configuration window, you
are creating a device configuration record for your USB device that is attached
to a specific Keyspan Server on a specific port on that Keyspan Server. If your USB
devices does not have a unique USB Serial Number and you move the device to a
different port on the same server, you will need to create a new device
configuration record. If you move any USB device to a different Keyspan Server,
regardless whether or not that device has a unique USB Serial Number, you will also
need to create new device configuration records on the new Keyspan Server.
Keyspan:USB Server - User Manual
This User Manual applies to the Keyspan USB Server Software Version 1.3.x. Patent Pending.
Rev 2005jun23 Page 33
Page 34

Device Configuration: Device Names, IDs & Serial No.
The USB Device Name displays the name programmed into your
USB device. This name is shown in all of the USB Server
windows unless an alternate name is specified in the Alternate
Name field.
The Vendor ID and Product ID fields will show the USB Vendor
ID and Product IDs (aka VID and PID) that are programmed into
your USB device.
The Location ID shows the location of the selected device on the
USB Server. For example, if the Location ID shows '0x2', your
USB device is located on USB port# 2 on the USB Server
hardware.
The USB Serial No. field shows the serial number, if any,
programmed into your USB device.
Device Configuration: Alternate Name
The Alternate Name field allows you to change the name of the
selected USB device on a particular server.
Device Configuration: Password
Turn on the Requires Password to Connect check box to only
share the specified USB device with users that have the password
to that USB device. When users first attempt to connect to a
password protected USB device, they will receive a dialog asking
them to enter a password prior to using the USB device. User can
then opt to store passwords locally in the Local Settings tab so that
they do not need to reenter password every time they want to use
that USB device.
Device Configuration: Connection Type/Client Name
The Connect Type pop-up determines if the specified device is
can shared with with multiple users (Subscription mode) or if the
USB device is only to be used with one particular user/computer
(Dedicated mode).
If you set the Connection Type to Dedicated, you will need to
enter the Client Name of the user/computer that you want to
dedicate the selected device to. To determine what a particular
user's/computer name is, on that computer, click the Local
Settings tab in the Keyspan Server Utility software.
Keyspan:USB Server - User Manual
This User Manual applies to the Keyspan USB Server Software Version 1.3.x. Patent Pending.
Rev 2005jun23 Page 34
Page 35

Applying/Canceling Server Settings
Once you have changed the server's settings, you will need to apply your changes in order for the
changes to take effect. To do this, click the Apply button (see next image).
Once you Apply your changes, the USB Server (hardware) will disconnect any users connected to
it and restart itself. Please note that your USB Server will disappear temporarily from the Keyspan
Server Utility application while it is restarting.
If you do not want to keep the changes that you made, cancel your changes by clicking the Cancel
button. Your USB Server hardware will not be restarted.
Restoring Default Settings
You can reset the USB Server to factory settings by using the Keyspan Server Utility application.
To do this, select and edit your USB Server (as detailed earlier in this section) and then click the
Restore Defaults button (see next image).
Keyspan:USB Server - User Manual
This User Manual applies to the Keyspan USB Server Software Version 1.3.x. Patent Pending.
Rev 2005jun23 Page 35
Page 36

Restoring the default settings will cause the USB Server (hardware) to restart.
Tech Note: Restoring to default settings will also set the USB Server's UDP port to
3842 and the Multicast address to 239.255.176.42. If you previously changed your
UDP port and/or Multicast address, remember to change the Keyspan Server Utility
application's Local UDP Port to 3842 and Multicast address to 239.255.176.42. You
may not be able to see your USB Server if you fail to change your Local UDP Port a
nd/or Multicast address. To change the Local UDP Port, go to the Local Settings
tab and edit the UDP Port field.
IMPORTANT NOTE FOR FIREWALL USERS: If you've configured your firewall
to allow access to the USB Server, remember to check your firewall's setting. The USB
Server's IP address may have changed after restoring to default settings.
Updating Your USB Server's Firmware
The Keyspan USB Server's firmware can be updated at any time via the Keyspan Server Utility
application.
To do this, select the Servers tab, select your USB Server, and then click the Edit Server Config.
If your USB Server requires new firmware, you will receive a pop-up window with instructions on
how to update the server's firmware.
To manually update your server's firmware, select the Servers tab, select your USB Server, and then
Keyspan:USB Server - User Manual
This User Manual applies to the Keyspan USB Server Software Version 1.3.x. Patent Pending.
Rev 2005jun23 Page 36
Page 37

click the Edit Server Config button. Then click the Check Server Firmware button.
TROUBLESHOOTING: It is important that you always have the latest firmware installed on your
USB Server. It is not recommend to use older firmware on your USB Server with newer Keyspan
Server Utility software on your computer (or vice versa). Certain features, such as Auto-Connect,
may not work if your firmware is not compatible with the version of software that you have on your
computer(s).
You may now proceed to the next section in this guide...
Keyspan:USB Server - User Manual
This User Manual applies to the Keyspan USB Server Software Version 1.3.x. Patent Pending.
Rev 2005jun23 Page 37
Page 38

5 Local Settings
Overview
The USB Server package is separated by two components. The USB Server hardware and the
Keyspan Server Utility software. Both have their own settings and configuration options. Settings
for the Server are modified via the Server's tab (and stored on the USB Server hardware). Settings
for the Keyspan Server Utility software are modified via the Local Settings tab and are kept on
your computer.
The Local Settings tab allows you to:
• change your Client Name (used to identify yourself to the USB Server hardware and to
other USB Server users)
• change your UDP Port number and Multicast Address (used to access the USB Server)
• create and manage Server Access Settings (which allow you to encode your communication
with the USB Server [Encode Session], connect to USB Servers outside of your subnet
[Active Discovery], and enter Server Access passwords)
• view and delete saved/stored passwords for password protected USB devices (USB Device
Passwords window)
The Local Settings Tab
To change the USB Server's Local Settings, launch the Keyspan Server Utility application.
MACINTOSH NOTE:
The Keyspan Server Utility application is located in your Applications folder.
Double click the Keyspan USB Server icon.
WINDOWS NOTE:
The Keyspan Server Utility application is located in your START menu ->
PROGRAMS -> KEYSPAN Server.
Once the Keyspan Server Utility application is open. Click on the Local Settings tab (see next
image):
Keyspan:USB Server - User Manual
This User Manual applies to the Keyspan USB Server Software Version 1.3.x. Patent Pending.
Rev 2005jun23 Page 38
Page 39

Personal Communication Settings
The Personal Communication Settings in the Local Settings tab, shows the following
information:
Client Name: This is the client name that is broadcast to the USB Server and to other
users on the network. The default name is the computer name that you
specified when you first setup to your computer. You can enter a
different Client Name in this field.
UDP Port: This is the UDP Port number that the Keyspan Server Utility software
will use to discover USB Server hardware on your network. The default
value is 3842. If your USB Server hardware is set to broadcast on a
different port number (ie 3841), you will need to change the UDP port
number here.
Multicast Address: This is the Multicast Address that the Keyspan Server Utility software
will use to discover USB Server hardware on your network. The default
value is 239.255.176.42. If your USB Server hardware is set to
Keyspan:USB Server - User Manual
This User Manual applies to the Keyspan USB Server Software Version 1.3.x. Patent Pending.
Rev 2005jun23 Page 39
Page 40

broadcast on a different address, you will need to change the address
here.
When you are finished entering your Personal Communication settings, click the Apply button
to save your changes. Click the Cancel button to cancel your changes. Click the Restore
Defaults button to restore the default Personal Communication Settings values.
Server Access Settings
The Server Access Settings in the Local Settings tab, is used when you want to connect to a
USB Server that has been either password protected or has been setup to use Active Discovery.
For most users, Server Access Settings will be blank and not contain any settings. If you need to
access a USB Server that has been either password protected or is using Active Discovery, click
the Add button as shown below:
This will open the Configure Server Access window:
Server Server Number: This is the serial number of the USB Server that you want to connect to.
You only need to enter the last five digits.
Access Password: Enter the USB Server's password here.
Keyspan:USB Server - User Manual
This User Manual applies to the Keyspan USB Server Software Version 1.3.x. Patent Pending.
Rev 2005jun23 Page 40
Page 41

Encode Session: Enabling this check box will encode your communication between the
USB Server hardware and your computer. You only need to enable this
option in this window.
IMPORTANT NOTE: Encoding your communication with your USB Server will
affect overall performance of your USB Server and USB devices connected to it.
Active Discovery: If your USB Server is outside of your network, ie in another office, or if
you need to access your USB Server across a WAN, enable Active
Discovery. Active Discovery will search for USB Servers outside of
your local network. Please note that active discovery requires that you
know the IP address, TCP port, and password (if one has been setup) of
the USB Server that you want to access.
IP Address: If Active Discovery is enabled, enter the IP address of the USB Server
that you want to connect to. This field is only available if Active
Discovery is turned on.
TCP Port: If Active Discovery is enabled, enter the TCP Port of the USB Server
that you want to connect to. The default setting is 3842. This field is
only available if Active Discovery is turned on.
Re-try timeout: When Active Discovery is enabled, your computer will continually try
to connect to the specified USB Server. The Re-try timeout setting
determine how long, in seconds, the USB Server will try to contact the
specified USB Server. The default setting is 15 seconds. This field is
only available if Active Discovery is turned on. NOTE: Re-try timeout
is only available on the Mac version of the Keyspan Server Utility.
When you have finished entering your settings, click the OK button to save your changes or click
the Cancel button to discard your changes and return to the previous window.
If you have added a Server Access Settings record, the Server Access Settings shows the
following information:
Server #: Displays the last five numbers of your USB Server's Network
Address/Mac Address. The full Network Access is printed on the
bottom of your USB
Keyspan:USB Server - User Manual
This User Manual applies to the Keyspan USB Server Software Version 1.3.x. Patent Pending.
Rev 2005jun23 Page 41
Page 42

Server Name: Displays the name of the USB Server that you want to connect to.
Status: Displays the Status of the USB Server that you want to connect to.
ONLINE will be shown if you have successfully connected to the USB
Server. OFFLINE will be shown if the USB Server is not detected.
Password: Displays YES/NO depending on whether or not a password has been
specified in the Server Access Settings record.
Active Discovery: Displays YES/NO depending on whether or not the specified the Server
Access Settings record has been setup to use Active Discovery.
USB Device Passwords
When you connect to a USB device that is password protected, you are asked if you want to save
your password. If you save a password for a USB device, it will be shown in USB Device
Passwords in the Local Settings tab.
To remove a password, select the password record and click the Remove button (see next image):
If you have any saved USB Device Passwords in the Local Settings tab, you will see the
following information:
Device Name: The name of the USB device that you have saved a password for.
Status: The status of the USB device. This screen will show
Attached/Detached if the device is connected to a detected USB
Server.
Server #: Displays the last five numbers of your USB Server's Network
Address/Network Address that the selected USB device is connected to.
Loc.: Displays the location/port number on the USB Server that the selected
USB device is connected to.
Device Serial #: If the selected USB device has a serial number programmed into it by
Keyspan:USB Server - User Manual
This User Manual applies to the Keyspan USB Server Software Version 1.3.x. Patent Pending.
Rev 2005jun23 Page 42
Page 43

the manufacturer of the serial device, that serial number will be displayed
in this column.
Keyspan:USB Server - User Manual
This User Manual applies to the Keyspan USB Server Software Version 1.3.x. Patent Pending.
Rev 2005jun23 Page 43
Page 44

6 Menu Commands
Overview
The following is a description of the Keyspan Server Utility's ADVANCED menu and the actions
that can be performed in this menu.
Advanced menu
The Advanced menu contains the following commands:
Force Disconnect: The Force Disconnect command allows you to 'Force
Disconnect' a USB device that has been left 'in use' by another
user.
To Force Disconnect a device, select it in the USB Devices
tab then select the Force Disconnect command from the
Advanced menu. Follow the instructions on screen to
complete the process.
Please note that if your USB Server has an administrator
password enabled, you will be asked to enter that password
before you can Force Disconnect the selected USB device.
IMPORTANT NOTE!!! Device Force Disconnect will
disconnect a USB device that is connected to another user's
computer. This is the same as physically disconnecting the
USB device's cable from the USB port. As with any USB
device, it is not recommended to disconnect (or Force
Disconnect) any USB device while that device is in use (ie
disconnecting a printer while it's printing). You should only
use Device Force Disconnect if you are sure that the USB
Keyspan:USB Server - User Manual
This User Manual applies to the Keyspan USB Server Software Version 1.3.x. Patent Pending.
Rev 2005jun23 Page 44
Page 45

device is not in use. Please note that if your computers
automatically 'sleep' (aka 'hibernate', 'power save', etc.), USB
devices connected to the sleeping computer will be released
and made available to other users. Turning off your
computer will also release USB devices left in use
Server IP Address Override: The Server IP Address Override command is used to 'force
configure' a USB Server that is on your local network but not
shown in the Servers tab. This is common for USB Servers
installed on Static IP based networks. When you select this
command, the Server IP Address Override will open. In
this window, enter the serial number of the USB Server (the
last five digits of the Network Address printed on the bottom
of your USB Server) and the IP settings that you want to send
to the USB Server
Keyspan:USB Server - User Manual
This User Manual applies to the Keyspan USB Server Software Version 1.3.x. Patent Pending.
Rev 2005jun23 Page 45
Page 46

7 Network Discussion
Setting Up On Different Types of Networks
The Keyspan USB Server can be configured in many types of networks. It can often be difficult to
determine exactly where to physically connect your USB Server hardware to your network. The
following diagrams are meant as a starting point for configuring your network. In all cases, the
USB Server's default network settings should be appropriate unless otherwise noted.
LAN - No Connection To Internet
2 or more PCs on an Ethernet network, with no
connection to the internet or where PCs may have
individual dial up accounts:
Connect the USB Server to an Ethernet port on the
Ethernet Hub. Connect USB devices to the USB
ports on the Print Server. Note: Set your Print
Server's network settings to Zeroconfig for faster
USB Server boot times.
LAN - With Connection To Internet
2 or more PCs on an Ethernet network, with a
connection to the Internet or a wide area network:
Connect the USB Server to an Ethernet port on the
Ethernet Hub. Connect USB devices to the USB ports on
the USB Server.
LAN With DSL Router/Gateway
2 or more PCs on an Ethernet network, with an
Internet gateway (combination router and ethernet hub
or switch) for connection to the Internet:
Connect the USB Server to an Ethernet port on the
Internet Gateway. Connect USB devices to the USB
ports on the USB Server.
Wireless Network (Airport/802.11)
With Wired and Wireless Computers
2 or more PCs on an Ethernet network with a connection
to the Internet and a wireless 802.11 base station:
Connect the USB Server to an Ethernet port on the
ethernet hub or to an ethernet port on the
Wi-Fi (802.11) base station.
Keyspan:USB Server - User Manual
This User Manual applies to the Keyspan USB Server Software Version 1.3.x. Patent Pending.
Rev 2005jun23 Page 46
Page 47

6 Troubleshooting
Before You Begin
Before you begin, please make sure that you already have:
installed the latest version of the Keyspan Server Utility software
connected your USB Server hardware to your network
connected your computer to same network as the USB Server hardware
turned on Keyspan USB Server (by connecting its power supply to an outlet)
turned on your computer
connected a USB device to the USB Server hardware
installed your USB device's software on your computer
had the USB Server turned on for at least 15 seconds
If you have not done any of the above, please do so now and return to this section when you have
finished.
Tech Note: You can find the latest version of the Keyspan Server Utility software at:
http://www.keyspan.com/
IMPORTANT NOTE: Please follow these instructions in order as each sub section
builds on the previous one. If you cannot proceed past a certain sub section, please
contact Keyspan technical support.
Troubleshooting:Status Lights
Look at the status lights on you Keyspan USB Server hardware. These status lights will either:
• Off
• On (doesn't blink)
• Blinking Steady (blinks on/off every second)
• Blinking Rapidly (blinks on/off rapidly)
• Blinking Slowly (stays on for 3 seconds then blinks off/on and repeats)
Three lights indicate SYSTEM, NETWORK, or USB device status (see next image). For
troubleshooting purposes, we will focus on the SYSTEM and USB lights:
Keyspan:USB Server - User Manual
This User Manual applies to the Keyspan USB Server Software Version 1.3.x. Patent Pending.
Rev 2005jun23 Page 47
Page 48

Tech Note: For a detailed description of every light and their status, please read the
Status Light Behavior appendix.
SYSTEM Status Light: 1
While the USB Server is booting up, you will notice different lights turn on and off. The following
table explains what these lights mean during the boot up process.
Keyspan:USB Server - User Manual
This User Manual applies to the Keyspan USB Server Software Version 1.3.x. Patent Pending.
Rev 2005jun23 Page 48
Page 49

STAGE 3
Checking Ethernet
Connection
SYSTEM 2 and SYSTEM 3 (both red) start flashing while the server looks for an
Ethernet signal (aka a physical Ethernet connection). SYSTEM 2 and 3 will flash
forever until the server finds this signal.
SYSTEM 2 and SYSTEM 3 (both red) flash while the server tries to obtain an IP
address. Once the server obtains its IP address, the server is completed booted up and
running. The status lights will now have a new meaning. Please refer to the USB
Server Is Running (Has Finished Booting Up) table.
Tech Note: If the server is configured to use a Static IP address, the Stage 4 is
completed immediately. For DHCP only, it waits for the DHCP server. For Zeroconfig
only, it takes about 1-2 seconds while it negotiates. For Default, it waits for DHCP for 10
seconds before taking a Zeroconfig address (1-2 seconds).
TROUBLESHOOTING: System 2 and 3 Don't stop blinking: If System 2 and
3 never stop flashing, the USB Server is not finding a valid ethernet connection or you've
configured the server to use an invalid IP address. Please contact Keyspan for further
details.
STAGE 4
Finding IP Address
The (green) USB 1-4 lights are turned ON as the firmware starts running.
TROUBLESHOOTING: System 1 and 2 Blinking: If System 2 and 3 never stop
flashing, the USB Server is not finding a valid ethernet connection or you've configured
the server to use an invalid IP address. Please contact Keyspan for further details.
STAGE 2
Firmware Loading
STAGE 1
Server Is Booting Up
Stage
When the USB Server is first powered on, the (red) SYSTEM 3 light is ON while the server
is booting.
TROUBLESHOOTING: If this light never goes off or the 4 (green) USB lights never
come on, you may have a serious hardware failure. Please contact Keyspan tech
support immediately.
TROUBLESHOOTING: System 1 and 2 Alternate Blinking: If System 1
(green) and System 2 (red) both blink alternately, the USB Server firmware has failed to
update or load. Please contact Keyspan tech support immediately.
USB Server Is Booting Up
Status
After the boot up, the status lights will have new meanings. Now that the server is running, we will
use the status lights to troubleshoot the USB Server.
Keyspan:USB Server - User Manual
This User Manual applies to the Keyspan USB Server Software Version 1.3.x. Patent Pending.
Rev 2005jun23 Page 49
Page 50

SYSTEM Status Light: 1
Look at the SYSTEM status light 1 (the green leftmost light under SYSTEM). If the light is:
• Off: Check the USB Server's power supply and its connection to an outlet. If you have done
this and the light does not turn on, please contact Keyspan technical support.
• On: If this light doesn't blink on/off within 6 seconds, the USB Server has failed to boot up.
Please try Resetting Your USB Server Hardware (as described later in this section). If it
still fails, contact Keyspan technical support.
• Blinking Slowly: This is normal and indicates the USB Server hardware is working.
Proceed to the next light.
• Alternating On/Off With System Lights 2 and 3: If the System 1 (green) alternates
on/off with either System 2 or 3 (red), so that when System 1 turns off, System 2/3 turns on
and vice versa, the USB Server has encountered an error while loading its firmware. Contact
Keyspan tech support for assistance.
USB Status Lights: 1-4
Look at the USB status light (any green light under USB). Next locate the light that corresponds to
the USB port that your USB device is connected to. If the light is:
• Off: Check the USB Server's power supply and its connection to an outlet. If you have done
this and the does not turn on, please contact Keyspan technical support.
• Blinking: This indicates the a) USB Server hardware does not support your USB device b)
if you or is having problems communicating with the device. Please check the the USB
Server's USB Device Compatibility information (found in the Appendices) or contact
Keyspan for further support.
The USB lights will also blink if you have exceeded the number of USB devices per server.
The USB Server support up to 8 USB devices on one USB Server. While many USB
devices appear as one USB device, components of Compound USB devices (a device with an
embedded hub or a device that has multiple components tied together by an internal USB
hub) will count as one device each. For example, the Lexmark X1150 is a compound device
that has 2 components (one for the scanner, one for the printer). The Canon i475D is also a
compound device that has 3 components (the printer, the card reader, and a HID device [for
buttons on the printer]). If you connect four X1150 devices you are still under the 8 device
limit and the USB lights will not blink. If you have 3 Canon i475D, you have 9 USB devices
and are over the limit therefore the light will blink.
Tech Note: While most USB devices will work with the USB Server, certain
incompatible USB devices can be supported via future software updates from
Keyspan. Please check the USB Device Compatibility appendix or contact
Keyspan for more information about compatible devices.
• On: This is normal and indicates the USB Server supports your USB device. Proceed to the
Keyspan:USB Server - User Manual
This User Manual applies to the Keyspan USB Server Software Version 1.3.x. Patent Pending.
Rev 2005jun23 Page 50
Page 51

next light.
SYSTEM Status Lights: 2 and 3
Look at the USB status lights 2 and 3 (the two red lights under under SYSTEM. Status 2 is the red
light in the middle and Status 3 is the rightmost red light). Please note the status of Status 2 and 3.
If:
• System 2 is On / System 3 is On: The server has obtained an IP address via DHCP (ie your
DSL router) and does not show any users connected to the USB Server. If your computer
is turned on, proceed to the Troubleshooting:UDP Ports sub section.
• System 2 is On / System 3 is Off: The server is configured to use a Static IP (ie you've
configured the USB Server's settings prior to troubleshooting) and does not show any
users connected to the USB Server. If your computer is turned on, proceed to the
Troubleshooting:UDP Ports sub section.
• System 2 is Off / System 3 is On: The server obtained an IP address via Zeroconfig (ie you
don't have a DSL router and you have not specified IP settings) and does not show any
users connected to the USB Server. If your computer is turned on, proceed to the
Troubleshooting:UDP Ports sub section.
• Status 2 is Off / Status 3 is Off: This is normal and indicates the USB Server hardware is
working. More specifically, the USB Server has obtained a IP address and has detected
users (client computers) connected to it. Skip ahead to the Troubleshooting: USB Devices
sub section.
Troubleshooting:UDP Ports
Make sure that your Keyspan Server Utility software and hardware are communicating on the same
UDP port. To verify this, open the Keyspan Server Utility application. You USB Server should
appear (see next image):
In the Keyspan Server Utility application's Servers tab, is your USB Server listed? If your server:
• Is Not Listed: The Keyspan Server Utility software cannot find the USB Server hardware.
Change the Keyspan Server Utility software's Local UDP Port (use the LOCAL
SETTINGS tab's UDP Port field) to match the UDP port that is being used by the USB
Server hardware. If you do not know the UDP port that your server software is using, try
Keyspan:USB Server - User Manual
This User Manual applies to the Keyspan USB Server Software Version 1.3.x. Patent Pending.
Rev 2005jun23 Page 51
Page 52

setting the Local UDP Port to 3842. If this still does not work, try Resetting Your USB
Server Hardware (as described later in this section). If you still cannot see your server,
proceed to the Troubleshooting:Network Issues sub section.
• Is Listed: This is normal and indicates the USB Server hardware is working. Skip ahead to
the Troubleshooting: USB Devices sub section.
Troubleshooting:Network Issues
At this point, your Keyspan Server Utility software is communicating with a specific network.
Unfortunately, the network link between your computer and your USB Server is broken. The
following are suggestions on how to solve these network related issues.
Firewalls
A 'Firewall' is a piece of software or hardware that helps keep your network safe by preventing
hackers from getting inside your network and also by preventing you from sending private data to
outside networks (ie the Internet).
Firewalls are either hardware (a physical item on your network ie your DSL router) or software
(resides on your computer ie Windows XP's built-in firewall software). In most cases, these
firewalls are configured to only allow 'basic' internet traffic (web, email, ftp, etc.) to come in and out
of your network. Since the USB Server is a new product, these firewalls usually do not know
ABOUT KEYSPAN SERVER SOFTWARE network data and may prevent you from
communicating with your USB Server.
If you are using a firewall, configure the firewall software to allow UDP traffic on port 3842 as well
as allow TCP/IP traffic on port 3842. The USB Server uses both UDP and TCP/IP to
communicate. If you have configured your firewall to allow UDP and TCP on port 3842 and you:
• Cannot See Your Server: skip ahead to the Wireless LANs or Wired LANs sub section.
• Can See Your Server: Your firewall was preventing access to the Keyspan USB Server. If
you had to configure a software firewall on your computer, please note that you have allowed
only your computer to see your USB Server. If you configured a hardware firewall, test
other computers to make sure that they can the your USB Server.
Tech Note: We have included step-by-step instructions on how to configure the
software firewall that is built into Windows XP. You can find these instructions in the
Windows XP Firewall Configuration appendix in this manual.
Wireless LANs
If you have a wireless network, please make sure that your wireless base station has Ethernet
Bridging enabled. Ethernet bridging allow wireless computers to act as if they are directly
connected to a wired network. If this feature is not turned on, your wireless computers will not be
able to see that Keyspan USB Server where as your wired computers will have full access.
To test this, temporarily connect your wireless computer to your network via a wired connection (ie
Keyspan:USB Server - User Manual
This User Manual applies to the Keyspan USB Server Software Version 1.3.x. Patent Pending.
Rev 2005jun23 Page 52
Page 53

connect using an Ethernet cable).
If you are not able see the USB Server after you've connected your computer via a wired
connection, please skip ahead to the wired LANs spend USB Server sub section.
If you are able to see the USB Server when wired directly to the network, then you do not have
Ethernet Bridging turned on. Please enable Ethernet bridging on your wireless base station (refer
to your wireless base station's documentation for further instructions). If you have done this and
are still not able to see the USB Server, please contact Keyspan technical support.
Tech Note: In most cases, wireless base stations and routers have Ethernet
bridging enabled. Older base stations and router may not have Ethernet Bridging
enabled or may not even support it. Please check your wireless base station's
documentation for details.
Wired LANs
If your computer and your Keyspan USB Server are both wired to your network via a physical
cable and you are not able to see the Keyspan USB Server, you may have issues with your network
hardware (ie your ethernet hub, ethernet switch, or router).
To test this, connect the Keyspan USB Server directly to your computer via an ethernet cable. At
this point, check the Keyspan Server Utility application can see if your server appears. If it does
not show up, disconnect the USB Server's power supply for 10 seconds then plug back in. Wait 10
seconds for the USB Server to boot up then see if the USB Server appears in the Keyspan
software.
If your server does not show up, contact Keyspan technical support for further assistance.
If your server does show up, try moving your USB Server and computer to the same ethernet
hub/switch. If this does not solve your problem, contact Keyspan technical support for further
assistance.
Tech Note: Some Ethernet hubs/switches may not properly route UDP and TCP
traffic when connected to other hubs and switches. This is especially true when your
USB Server is using Zeroconfig to obtain an IP address. To avoid these issues,
connect your USB Server and your computer to the same Ethernet hub/switch.
WANs
If you're trying to access your USB Server across a WAN (ie you want to access your USB Server
at home when you are at work), you'll need to create an entry in the Server Access Settings in the
LOCAL SETTINGS tab. This tells your Keyspan Server Utility to connect to remote server.
To do this, you will to know the remote's server's IP address. Your home router must be able to
allow traffic from TCP port 3842 from an outside network. Please refer to your router's
documentation for further details.
If your routers do not support this, you may be able to use a software-based solution such as a
Keyspan:USB Server - User Manual
This User Manual applies to the Keyspan USB Server Software Version 1.3.x. Patent Pending.
Rev 2005jun23 Page 53
Page 54

VPN type type solution.
If you need to connect your USB Server between two networks and are still having a problem,
please contact Keyspan technical support for further assistance.
Networking Wrap Up
If you are still have problems with your USB Server, try resetting the USB Server hardware and
then repeating the troubleshooting process. For instructions on how to reset your USB Server
hardware, please skip ahead to the Resetting The USB Server Hardware sub section.
Troubleshooting:USB Devices
Open the Keyspan Server Utility application and go to the USB Devices tab. You should see your
USB device listed under the USB Devices tab.
If your USB device does not appear under either heading, please contact Keyspan technical support
for further assistance
If your USB device appears under the USB Devices tab heading, you'll have to select your device
from the list and click the green Connect button in order to use your device.
MULTIPLE USERS NOTE: Certain USB devices will report that they
are In Use when located under the USB Devices tab heading. In Use
devices are USB devices that are being used by another user. To help
you identify who is using the device, you will be able to see the other
user's computer name. Once the user has 'disconnected' the USB device
from their computer, you will be able to connect it to your computer.
If you're sure that no one else is using your USB device and the devices
still showing up as In Use, please contact Keyspan technical support for
further assistance.
If your USB device shows as Connected (under the Status column), you should be able to use the
USB device as you would normally. You should be able to print just by going to your File menu
and selecting Print. If your USB device is a scanner, you should be able to open the scanner
software and scan as you would normally.
If you're not able to use your device, please refer to your USB devices troubleshooting instructions
for what to do next. If you are still not able to use your USB device, please contact Keyspan
technical support for further assistance
Resetting The USB Server Hardware
You can reset the USB Server hardware at any time. There are two ways of doing this. You can
reset the server by power cycling the server or by using the server's reset button.
Reset Via Power Cycling
To reset the USB Server, just disconnect the server's power supply, wait 5 seconds, and reconnect
the power supply. This will reset/reboot your server.
Keyspan:USB Server - User Manual
This User Manual applies to the Keyspan USB Server Software Version 1.3.x. Patent Pending.
Rev 2005jun23 Page 54
Page 55

Reset Using The Reset Button
To reset your hardware, please make sure that you have:
a straightened or unfolded paper clip or a (similar object without a sharp tip)
your USB Server is turned on
Next, locate the reset hole. This is located on the top of your USB Server (see next image):
Using your paper clip, quickly press the reset button inside the hole. This will reset/reboot your
server.
Reboot Server Into 'Temporary Default Settings Mode' Using The Reset Button
If you've made an unwanted change to the USB Server settings and can't access your server
anymore, you can boot your server into a 'Temporary Default Settings Mode'. In this mode, your
server will reboot using default settings (ie Multi-user connect mode, default IP mode) and allow
you to view and edit your server's settings. If you want to return to your settings, just power cycle
your server.
To boot into 'Temporary Default Settings Mode', press and hold the reset button until the lights turn
off (this will take 3+ seconds).
The USB Server is now resetting itself. It will take approximately 15 seconds to complete the reset.
In the Keyspan Server Utility application, make sure that your Local UDP Port is set to 3842.
Once you've verified the port, check the the Keyspan Server Utility application to see if your server
appears. If it does not appear, please contact Keyspan technical support for further assistance.
When You Need More Help...
The Keyspan web site, http://www.keyspan.com/ is your best source for technical support
information. The web site includes technical notes, reference manual updates, and answers to
frequently asked questions.
You may also contact our technical support department directly via email, phone, or fax. Please see
the Support Information section in this manual for more details.
Keyspan:USB Server - User Manual
This User Manual applies to the Keyspan USB Server Software Version 1.3.x. Patent Pending.
Rev 2005jun23 Page 55
Page 56

7 Appendices -
• Frequently Asked Questions
Frequently Asked Questions
• USB Device Compatibility
Information about of USB device compatibility
and a list of devices that have been tested with
the Keyspan USB Server
• Status Light Behavior
Description of the USB Server's LED status lights
and what they indicate
• Windows XP Firewall Configuration
Instructions on how to configure Windows XP's built-in
firewall for use with the Keyspan USB Server
• Notices
FCC, CE, VCCI, Copyright and Trademark Information
• Keyspan Warranty Information
Keyspan Warranty Information
• Support Information
Information about obtaining technical support
Keyspan:USB Server - User Manual
This User Manual applies to the Keyspan USB Server Software Version 1.3.x. Patent Pending.
Rev 2005jun23 Page 56
Page 57

Frequently Asked Questions (FAQs)
The following is a list of Frequently Asked Questions (FAQs) about the Keyspan USB Server.
We frequently update our FAQs and add them to our web site and future version of this document.
For the most recent and complete version of this list, please visit the our web site at:
http://www.keyspan.com/products/usb/server/downloads/docs/
Frequently Asked Question List
Question:
How do configure my Windows XP firewall to allow USB Server
data transmission?
Answer:
For step-by-step instructions on how to configure Windows XP's built-in firewall for use with the
Keyspan USB Server, please read the Windows XP Firewall Configuration appendix later in
this manual.
Question:
How many USB devices can I connect to my USB Server?
Answer:
You can connect up to 8 USB devices to one USB Server.
While the USB Server only has 4 USB ports, we support 8 devices due to how Compound USB
devices work. Compound USB devices are devices that have multiple components connected to an
embedded USB hub inside 1 USB device. For example, the Lexmark X1150 is a compound
device that has 2 components (one for the scanner, one for the printer). The Canon i475D is also a
compound device that has 3 components (the printer, the card reader, and a HID device [for buttons
on the printer]).
Note:
You can view up to 8 USB Servers in the Keyspan Server Utility.
If you are using all of the USB ports on your 8 servers, you will be able view a total of 32
USB devices in the Keyspan Keyspan Server Utility software however you will only be able
to have 12 USB devices 'connected' to your computer.
If you need to use a 13th USB device, 'disconnect' one of your 12 USB device via the
Keyspan Keyspan Server Utility software to free a location for the next USB device.
Keyspan:USB Server - User Manual
This User Manual applies to the Keyspan USB Server Software Version 1.3.x. Patent Pending.
Rev 2005jun23 Page 57
Page 58

If you need to have more than 8 USB Server, configure your next 8 servers to use a
different UDP port. Once you have done this, use the USB Software's Local UDP Port
menu item to switch between your first 8 servers and your next 8 servers.
Question:
How many USB Servers can I connect to my computer?
Answer:
You can connect up to 8 USB Servers to your computer.
Note:
You can view up to 8 USB Servers in the Keyspan Server Utility software.
If you are using all of the USB ports on your 8 servers, you will be able view a total of 32
USB devices in the Keyspan Server Utility software however you will only be able to have
12 USB devices 'connected' to your computer.
If you need to use a 13th USB device, 'disconnect' one of your 12 USB device via the
Keyspan Server Utility software to free a location for the next USB device.
If you need to have more than 8 USB Server, configure your next 8 servers to use a
different UDP port. Once you have done this, use the USB Software's Local UDP Port
menu item to switch between your first 8 servers and your next 8 servers.
Question:
How many users can be connected to my USB Servers?
Answer:
Only 10 users can connect to a single or set of USB Servers using the same UDP port. You can
support more users by setting up additional USB Servers with a different UDP port numbers.
Question:
How can I change my computer's name that appears in the
Keyspan Server Utility software?
Answer:
The Keyspan USB Server obtains your computer name from your computer's settings. To change
Keyspan:USB Server - User Manual
This User Manual applies to the Keyspan USB Server Software Version 1.3.x. Patent Pending.
Rev 2005jun23 Page 58
Page 59

this name, please do the following:
For Windows:
1. Right click the My Computer icon, and select Properties from the menu that appears. This
will open the System Properties window.
2. In the System Properties window, select the Computer Name tab.
3. In the Computer Name tab, click the Change button. The Computer Name Changes
window will open.
4. In the Computer Name Changes window, enter your desired computer name in the
Computer name: field.
5. You will be asked to restart your computer. Close the remaining windows by clicking on the
OK and Yes buttons.
6. Your computer will now restart. Your new computer name will appear after restart.
IMPORTANT NOTE FOR WINDOWS USERS: If your computer is setup as a
member of a Windows Domain, please make sure that you add your new computer
name to the Domain. If you do not do this, you will not be able to connect to your
domain.
For Mac OS X:
1. Open System Preferences (located the Apple menu - the apple icon in the upper left hand
corner of the screen). This will open the System Preferences window.
2. In System Preferences, select the Sharing icon.
3. Enter you computer name in the Computer Name field and close the Sharing/System
Preferences window.
4. Restart your computer. Your new computer name will appear after restart.
Keyspan:USB Server - User Manual
This User Manual applies to the Keyspan USB Server Software Version 1.3.x. Patent Pending.
Rev 2005jun23 Page 59
Page 60

USB Device Compatibility
Overview
The Keyspan USB Server hardware (model US-4A) supports USB devices, USB multi-function
printers, scanners, hard drives, HID devices, and other USB devices.
The USB Server supports up to 8 USB devices on one USB Server. While the USB Server only
has 4 USB ports, we support 8 devices due to how Compound USB devices work. Compound
USB devices are devices that have multiple components connected to an embedded USB hub inside
1 USB device. For example, the Lexmark X1150 is a compound device that has 2 components
(one for the scanner, one for the printer). The Canon i475D is also a compound device that has 3
components (the printer, the card reader, and a HID device [for buttons on the printer]).
Tech Note About USB Devices:
Technically speaking, USB devices can either be a single USB device (a USB printer
that contains only one component ie a single button mouse), a
composite
USB
device (a device that contains multiple components but appears as one device ie a
multifunction printer), or a
compound
USB device (a device that has multiple
components that are tied together by an embedded USB hub inside the USB device
itself ie a printer with a card reader, a keyboard with a port to connect a mouse, etc.).
Using single and composite USB devices via the USB Server is identical to using them
when connecting to built-in port. By default,
compound
USB devices also work the
same way as when they are connected to a built-in port however you can OPTIONALLY
configure the USB Server to allow you to connect to certain components of a
compound device instead of connecting every component. This is useful if you just
want to connect the printer component of a multi-function so that you don't get any
message screens regarding the scan component of that device.
Tested USB Devices List
For a list of USB devices that have been tested with the Keyspan Server Utility software version
1.3.1, please refer to the Keyspan USB Server Tested USB Device List'. This document is a
separate document and can be found on Keyspan's web site.
The Keyspan USB Server Tested USB Device List is intended to be used as reference guide and
not as a compatibility list. The USB Server platform is intended to work with a wide variety of USB
devices with the exception of Isochronous USB devices.
If you have a USB device that doesn't work with the Keyspan USB Server, please contact us as we
may already have a software/firmware update that will fix the incompatibly.
Keyspan:USB Server - User Manual
This User Manual applies to the Keyspan USB Server Software Version 1.3.x. Patent Pending.
Rev 2005jun23 Page 60
The USB Server, part# US-4A, supports ANY USB device provided the USB device:
* IS NOT AN ISOCHRONOUS USB DEVICE - this is video webcams and USB speaker.
* IS NOT AN ILOK DONGLE BY PACE - compatibility was removed per PACE's request
All other USB devices will 'just work' with the USB Server provided that yuou have the latest
Keyspan software and firmware as well as the latest drivers for your USB device.
If you have a USB device that does not work with the USB Server, contact Keyspan Tech Support.
In most cases, these issues over the phone or via email. In other cases, we will ask you for
diagnostic information so that we can provide you an updated driver/firmware that fixes the issue
or tell if your device falls under one of the two categories outlined above.
Page 61

Status Light Behavior
The Keyspan USB Server part number US-4A/US-4A comes equipped with a 10 Status LED
lights that report the status of the Keyspan hardware (see next image).
The meaning of these lights will change depending on whether the USB Server is booting up (ie
you've just turned on the USB Server) or if it is running (and has finished booting up).
The two tables on the following pages shows all of the possible states of these LED light and what
they mean.
Note:
If you are having problems with your USB Server, please use this information in
conjunction with our Troubleshooting section to diagnose the problem. If you still need
assistance, please contact Keyspan technical support.
While the USB Server is booting up, please refer to the following table for detailed description of
the server's status lights:
Keyspan:USB Server - User Manual
This User Manual applies to the Keyspan USB Server Software Version 1.3.x. Patent Pending.
Rev 2005jun23 Page 61
Page 62

STAGE 3
Checking Ethernet
Connection
SYSTEM 2 and SYSTEM 3 (both red) start flashing while the server looks for an
Ethernet signal (aka a physical Ethernet connection). SYSTEM 2 and 3 will flash
forever until the server finds this signal.
SYSTEM 2 and SYSTEM 3 (both red) flash while the server tries to obtain an IP
address. Once the server obtains its IP address, the server is completed booted up and
running. The status lights will now have a new meaning. Please refer to the USB
Server Is Running (Has Finished Booting Up) table.
Tech Note: If the server is configured to use a Static IP address, the Stage 4 is
completed immediately. For DHCP only, it waits for the DHCP server. For Zeroconfig
only, it takes about 1-2 seconds while it negotiates. For Default, it waits for DHCP for 10
seconds before taking a Zeroconfig address (1-2 seconds).
TROUBLESHOOTING: System 2 and 3 Don't stop blinking: If System 2 and
3 never stop flashing, the USB Server is not finding a valid ethernet connection or you've
configured the server to use an invalid IP address. Please contact Keyspan for further
details.
STAGE 4
Finding IP Address
The (green) USB 1-4 lights are turned ON as the firmware starts running.
TROUBLESHOOTING: System 1 and 2 Blinking: If System 2 and 3 never stop
flashing, the USB Server is not finding a valid ethernet connection or you've configured
the server to use an invalid IP address. Please contact Keyspan for further details.
STAGE 2
Firmware Loading
STAGE 1
Server Is Booting Up
Stage
When the USB Server is first powered on, the (red) SYSTEM 3 light is ON while the server
is booting.
TROUBLESHOOTING: If this light never goes off or the 4 (green) USB lights never
come on, you may have a serious hardware failure. Please contact Keyspan tech
support immediately.
TROUBLESHOOTING: System 1 and 2 Alternate Blinking: If System 1
(green) and System 2 (red) both blink alternately, the USB Server firmware has failed to
update or load. Please contact Keyspan tech support immediately.
USB Server Is Booting Up
Status
Now that your USB Server is running, please refer to the following table for detailed description of
the server's status lights:
Keyspan:USB Server - User Manual
This User Manual applies to the Keyspan USB Server Software Version 1.3.x. Patent Pending.
Rev 2005jun23 Page 62
Page 63

USB 1 thru 4 [Green]
NETWORK 3 [Green]
NETWORK 2 [Green]
NETWORK 1 [Green]
SYSTEM 2 - 3 [Red]
SYSTEM 1 [Green]
Light Name [Color]
ON/OFF:
If light is on, the server’s has detected a link speed of 100 Mbits. If light is off and
NETWORK 3 is on, the link speed is 10 Mbits.
ON/OFF:
If light is on, the server’s Ethernet port is in full-duplex mode. If light is off and
NETWORK 3 is on, the Ethernet port is in half duplex mode.
Blinking:
Packet collision has occurred. This is a normal and self recovering occurrence with
Ethernet.
ON or Blinking:
Server has detected an Ethernet connection. This light blinks during data transmission.
If light is off, no Ethernet connection was detected.
ON (does not blink):
Server is working. If a USB device is connected to the USB port, this light indicates that
the USB Server supports your USB device.
Blinking (only appears when a USB device is connected):
Server hardware does not support your USB device, you have connect more than 8 USB
devices (by using multiple
compound
USB devices), the server is having problems
communicating with the device. Please check the the USB Server's USB Device
Compatibility section (found in the Appendices) or contact Keyspan for further support.
SYSTEM 2 = OFF and SYSTEM 3 = OFF:
Server is currently working as detects users connect to the server.
SYSTEM 2 = ON and SYSTEM 3 = off:
Server is configured to use a Static IP and doesn't detect any users connected to the
server.
SYSTEM 2 = ON and SYSTEM 3 = ON:
Server has obtained an IP address via DHCP and doesn't detect any users connected to
the server.
SYSTEM 2 = off and SYSTEM 3 = ON:
Server obtained an IP address via Zeroconfig and does not detect any users connected
to the server.
Slowing Blinking (on for 3 seconds then off/on):
Server is currently working
OFF or ON (does not blink):
If light is off, the server is not receiving power. If the light is on, the server has crashed
and needs to be reset (see Troubleshooting).
USB Server Is Booting Up/Running (After Booting Up)
Status
Keyspan:USB Server - User Manual
This User Manual applies to the Keyspan USB Server Software Version 1.3.x. Patent Pending.
Rev 2005jun23 Page 63
Page 64

Windows XP Firewall Configuration
Overview
The following instructions detail how to configure Window XP's built-in firewall for use with the
Keyspan USB Server. While these instructions are specific for this software, the basic idea of
these instructions can be applied to configuring other firewalls.
These instructions will show you how to:
determine which version of Windows XP is installed on your computer
access your firewall software
add settings to your firewall to allow communication with
your Keyspan USB Server
Step 1 - Determine Which Version Of Windows XP Is Installed On Your Computer
If you have Windows XP with Service Pack 2, skip ahead to Step 3.
If you have Windows XP with Service Pack 1 or Windows XP without any Service Packs installed,
proceed to Step 2.
If you don't know what version of Windows you have installed on your computer, please complete
this step.
First, go to the START menu and select RUN. In the Open Box, type winver.exe and click OK.
This will open the About Windows dialog (see next image)
Keyspan:USB Server - User Manual
This User Manual applies to the Keyspan USB Server Software Version 1.3.x. Patent Pending.
Rev 2005jun23 Page 64
Page 65

If you have Windows XP with Service Pack 2, skip ahead to Step 3.
If you have Windows XP with Service Pack 1 or Windows XP without any Service Packs installed,
proceed to Step 2.
Step 2 - Access And Configure Your Firewall Software
WINDOWS XP and XP Service Pack 1 ONLY
If you are running Windows XP or Windows XP with Service Pack 1, you will need to first
determine your USB Server's IP address.
You will need to know your USB Server's UDP/TCP port numbers and IP address prior to
configuring your firewall. If you already know this information, skip ahead to Access Your
FireWall subsection in this Step. Otherwise, please read on.
UDP and TCP Port Numbers
The Keyspan USB Server defaults to using UDP port 3842 and TCP/IP port 3842. If haven't
changed these settings, we will use these port numbers when we configure your firewall.
If you've changed the USB Server's UDP and/or TCP port numbers, please note that you will have
to enter your UDP port number instead of 3842.
Obtaining Your IP Address
To obtain your IP address, open the Keyspan Server Utility application. When it is open, click the
Servers tab and locate your USB Server. Click on your server and you should see its IP number
under network settings (see next image):
IMPORTANT NOTE: If the IP Address Assignment pop-up menu is set to
Default, DHCP, or Zeroconfig, please note that your IP address is obtaining an IP
address dynamically. Dynamic addresses can change at any moment making it harder
for firewalls to keep track of. If you have need to use a firewall, we suggest that you
configure your server to use a Static IP address. ALSO, if your FireWall is currently
turned ON, you will not be able to see the server. Turn OFF the firewall to temporarily
Keyspan:USB Server - User Manual
This User Manual applies to the Keyspan USB Server Software Version 1.3.x. Patent Pending.
Rev 2005jun23 Page 65
Page 66

allow your computer to communicate with the USB Server.
Now that you have your IP address, you will access and configure your Windows XP firewall.
Access Your Firewall
First locate your network connection's icon. To do this, go to the START menu, then to
SETTINGS, then to Network. You should see an icon for your network connection (it is usually
called Local Area Connection). When you see your network connection icon, right-click it to bring
up the sub-menu (see next image):
In the sub-menu, select Properties. This will open the [Local Area Connection] Properties
window. Click on the Advanced tab and then click the Settings button (see next image):
This will open the Advanced Settings window.
In the Advanced Settings window, click the Add button (see next image):
Keyspan:USB Server - User Manual
This User Manual applies to the Keyspan USB Server Software Version 1.3.x. Patent Pending.
Rev 2005jun23 Page 66
Page 67

This will open the Service Settings window.
Add Your UDP Port To The Firewall
We will now enter your UDP information (the info you obtained earlier in this step).
While in the Service Settings window, enter something descriptive like 'Keyspan USB ServerUDP' in Description of Service field. Enter your IP address in the IP address field. Enter your
UDP port number in both the External Port and Internal Port fields. Click the UDP radio button.
You window should look like the following image:
Lastly, click the OK button to save your changes. You've now added support for the USB Server's
UDP port. Now we need to add a setting for TCP.
Add Your TCP Port To The Firewall
You should be back at the Advanced Settings window. Click the Add button to create a new
Service Settings window.
We will now enter your TCP information (the info you obtained earlier in this step).
While in the Service Settings window, enter something descriptive like 'Keyspan USB TCP' in
Description of Service field. Enter your IP address in the IP address field. Enter your UDP port
Keyspan:USB Server - User Manual
This User Manual applies to the Keyspan USB Server Software Version 1.3.x. Patent Pending.
Rev 2005jun23 Page 67
Page 68

number in both the External Port and Internal Port fields. Click the TCP radio button. You
window should look like the following image:
Lastly, click the OK button to save your changes.
Close Remaining Windows
Click the OK buttons on the remaining windows to finish up. Skip ahead to Step 4.
Step 3 - Access And Configure Your Firewall Software
WINDOWS XP Service Pack 2 ONLY
Access Your Firewall
Go to the START menu, then to CONTROL PANEL.
Keyspan:USB Server - User Manual
This User Manual applies to the Keyspan USB Server Software Version 1.3.x. Patent Pending.
Rev 2005jun23 Page 68
Page 69

This will open the Control Panel window. Next, open the Windows Firewall icon. If you don't
see the Windows Firewall icon, select 'Switch To Classic View' in the Control Panel sidebar.
In the Windows Firewall window, click the Exceptions tab.
Add Your UDP Port To The Firewall
We will now enter your USB Server's UDP port information. In the Exceptions tab, click the Add
Port button.
Keyspan:USB Server - User Manual
This User Manual applies to the Keyspan USB Server Software Version 1.3.x. Patent Pending.
Rev 2005jun23 Page 69
Page 70

This will open the Add A Port window. In the Name field, enter something descriptive like 'USB
Server UDP'. In the Port Number field, enter 3842. Next, enable the UDP radio button. You
window should look like the following image:
Lastly, click the OK button to save your changes. You've now added support for the USB Server's
UDP port. Now we need to add a setting for TCP.
Add Your TCP Port To The Firewall
We will now enter your USB Server's TCP port information. In the Exceptions tab, click the Add
Port button.
This will open the Add A Port window. In the Name field, enter something descriptive like 'USB
Server TCP'. In the Port Number field, enter 3842. Next, enable the TCP radio button. You
window should look like the following image:
Keyspan:USB Server - User Manual
This User Manual applies to the Keyspan USB Server Software Version 1.3.x. Patent Pending.
Rev 2005jun23 Page 70
Page 71

Lastly, click the OK button to save your changes.
Close Remaining Windows
Click the OK buttons on the remaining windows to finish up. Proceed to Step 4.
Step 4 - Firewall Configuration Complete!
Your firewall is now configured to allow access to the Keyspan USB Server. Windows should
now detect your USB Server and display the Hardware Wizard dialog. Proceed through the
dialogs to finish installation (for details, see the Installation Instructions section in this guide).
If you have multiple computers, please repeat these steps for every computer that will access the
USB Server.
Keyspan:USB Server - User Manual
This User Manual applies to the Keyspan USB Server Software Version 1.3.x. Patent Pending.
Rev 2005jun23 Page 71
Page 72

Notices
Notices
United States FCC
DECLARATION OF CONFORMITY
We, InnoSys Incorporated at
4118 Lakeside Drive
Richmond, CA 94806 USA
(510) 222-7717
declare under our sole responsibility that the
KEYSPAN USB Server, Model US-4A
complies with Part 15 of FCC Rules. Operation is subject to the following two conditions: (1) this
device may not cause harmful interference, and (2) this device must accept any interference received,
including interference that may cause undesired operation.
CAUTION: Changes or modifications to the USB Server not expressly approved by InnoSys
Incorporated could void the user's authority to operate this equipment.
NOTE: This equipment has been tested and found to comply with the limits for a Class B digital
device, pursuant to Part 15 of the FCC Rules. These limits are designed to provide reasonable
protection against harmful interference in a residential installation. This equipment generates, uses
and can radiate radio frequency energy, and, if not installed and used in accordance with the
instructions, may cause harmful interference to radio communications. However, there is no
guarantee that interference will not occur in a particular installation. If this equipment does cause
harmful interference to radio or television reception, which can be determined by turning the
equipment off and on, the user is encouraged to try to correct the interference by one or more of the
following measures:
• Reorient or relocate the receiving antenna.
• Increase the separation between the equipment and receiver.
• Connect the equipment into an outlet on a circuit different from that to which the receiver is
connected.
• Consult InnoSys Incorporated or an experienced radio/TV technician for help.
(continued on next page...)
Keyspan:USB Server - User Manual
This User Manual applies to the Keyspan USB Server Software Version 1.3.x. Patent Pending.
Rev 2005jun23 Page 72
Page 73

CE MARK DECLARATION OF CONFORMITY
(According to EN 45014)
Manufacturer's Name and Address
InnoSys Incorporated
4118 Lakeside Dr
Richmond CA 94806
Declares that the product:
Product Name: KEYSPAN USB Server
Model Number: US-4A
Conforms to the following Product Specifications:
EN 55022: 1998 Class B
EN 55024: 1998
following the provisions of the Electromagnetic Compatibility Directive.
Mike Ridenhour, Richmond, CA, USA,
President, March, 2005
Canada Digital Apparatus EMI Standard
This Class B digital apparatus meets all the requirements of the Canadian Interference-Causing
Equipment Regulations.
Cet appareil numerique de la classe B respecte toutes les exigences du Reglement sur le material
brouilleur du Canada.
VCCI
Voluntary Control Council for Interference from Information Technology Equipment
Class B ITE
(continued on next page...)
Keyspan:USB Server - User Manual
This User Manual applies to the Keyspan USB Server Software Version 1.3.x. Patent Pending.
Rev 2005jun23 Page 73
Page 74

Translation:
This is a Class B product based on the standard of the Voluntary Control Council for Interference
from Information Technology Equipment (VCCI). If this is used near a radio or television receiver
in a domestic environment, it may cause radio interference. Install and use the equipment according
to the instruction manual.
Australia/New Zealand
This device complies with AS/NZS 3548 Class B limits for the operation of Information
Technology Equipment.
Copyright
This manual and the software described in it are copyrighted, with all rights reserved. Under the
copyright laws, this manual or the software may not be copied, in whole or in part, without the
written consent of KEYSPAN. NO WARRANTIES OF ANY KIND ARE EXTENDED BY THIS
DOCUMENT. The information herein and the Keyspan products themselves are furnished only
pursuant to and subject to the terms and conditions of a duly executed License Agreement.
KEYSPAN SPECIFICALLY DECLINES ALL WARRANTIES, WHETHER IMPLIED OR
EXPRESSED, INCLUDING BUT NOT LIMITED TO THOSE OF MERCHANTABILITY
AND FITNESS FOR A PARTICULAR PURPOSE. KEYSPAN has no responsibility, financial or
otherwise, for any result of the use of this document and/or the associated product, including direct,
indirect, special and/or consequential damages. The information contained herein is subject to
change without notice.
Trademarks
KEYSPAN is a trademark of InnoSys Inc. Mac and Mac OS are trademarks of Apple Computer,
Inc., used under license. Apple and Macintosh are registered trademarks of Apple Computer, Inc.,
registered in the USA and other countries. Other brand names are trademarks or registered
trademarks of their respective holders. Copyright © 2005 KEYSPAN, a division of InnoSys Inc.
Keyspan:USB Server - User Manual
This User Manual applies to the Keyspan USB Server Software Version 1.3.x. Patent Pending.
Rev 2005jun23 Page 74
Page 75

Keyspan License and Warranty Information
Keyspan License Agreement
This Agreement constitutes a legal agreement between you, the end user, and Keyspan, a division of
InnoSys Incorporated ("Keyspan") regarding the Keyspan software accompanying this Agreement
(“Software”). You should carefully read the following terms and conditions before installing this
software. EITHER CLICKING ON THE ACKNOWLEDGMENT BUTTON BELOW OR
INSTALLING THE SOFTWARE INDICATES YOUR ACCEPTANCE OF THESE TERMS
AND CONDITIONS.
1. Ownership; Copy Restrictions. You are being granted a limited license to use the Software; you
are not purchasing a copy of the Software. The copyright to the hardware and Software comprising
this product is owned, patent pending and copyright by Keyspan. Keyspan retains title to the
Software including copies, regardless of form or media, and to all copyrights therein. Except as
otherwise expressly provided for in this Agreement, You may make one or more copies of the
Software solely for archival or backup purposes. The Software and accompanying written materials
are copyrighted. Except as expressly provided in this Agreement, any act of reproduction,
distribution or development of derivative works of any portion of the Software is strictly prohibited
by such laws and treaty provisions. Nothing in this Agreement constitutes a waiver of Keyspan’s
rights under any copyright law.
2. Grant of License. Keyspan grants to you the right to use this copy of the software ("Software")
on a one or more computers provided that the Software is only used with the Keyspan US-4A
hardware.
3. Transfer Restrictions. You may transfer the Software to another person only in connection with
the transfer of the Keyspan US-4A hardware, and only if: a) you delegate your duties under this
Agreement to the transferee; and only if b) the transferee/other party accepts the terms and
conditions of this Agreement. Upon such transfer, you must transfer all accompanying written
materials, and either transfer or destroy all copies of the Software. You may not lease, rent, merge,
reverse engineer, decompile or disassemble the Software or hardware.
4. Termination. This License Agreement is effective until terminated. This License Agreement will
automatically terminate without notice from Keyspan if you fail to comply with any of the
provisions of the License. You may voluntarily terminate this Agreement at any time. Upon
termination, you agree to destroy or purge all copies of the Software and accompanying written
materials in your possession.
5. LIMITED WARRANTY. As its only Warranty under this Agreement, Keyspan warrants the
media on which the Software is provided to be free from defects in materials under normal use for a
period of 90 days from the date of the purchase of the Keyspan US-4A hardware. EXCEPT AS
EXPRESSLY WARRANTED HEREIN, THE SOFTWARE IS PROVIDED "AS IS"
WITHOUT WARRANTY OF ANY KIND, EITHER EXPRESS OR IMPLIED, INCLUDING
BUT NOT LIMITED TO IMPLIED WARRANTIES OF MERCHANTABILITY AND
Keyspan:USB Server - User Manual
This User Manual applies to the Keyspan USB Server Software Version 1.3.x. Patent Pending.
Rev 2005jun23 Page 75
Page 76

FITNESS FOR A PARTICULAR PURPOSE. THE ENTIRE RISK AS TO THE QUALITY
AND PERFORMANCE OF THE SOFTWARE IS WITH YOU. KEYSPAN DOES NOT
WARRANT THAT THE FUNCTIONS CONTAINED IN THE SOFTWARE WILL MEET
YOUR REQUIREMENTS OR THAT THE OPERATION OF THE SOFTWARE WILL BE
UNINTERRUPTED OR ERROR FREE OR THAT SOFTWARE DEFECTS WILL BE
CORRECTED. SOME STATES DO NOT ALLOW THE EXCLUSION OF IMPLIED
WARRANTIES, SO THE ABOVE EXCLUSIONS MAY NOT APPLY TO YOU. THIS
WARRANTY GIVES YOU SPECIFIC, LIMITED RIGHTS. YOU MANY HAVE OTHER
RIGHTS WHICH VARY FROM STATE TO STATE.
6. LIMITATION OF LIABILITY. Keyspan's entire liability and your sole remedy under this
License Agreement is, at Keyspan's option, either: a) the return of payment as evidenced by a copy
of your purchase receipt; or b) the replacement of the media not meeting Keyspan's Limited
Warranty. IN NO EVENT WILL KEYSPAN OR ITS VENDORS BE LIABLE FOR ANY
DIRECT, CONSEQUENTIAL OR INCIDENTAL DAMAGES (INCLUDING DAMAGES
FOR LOSS OF BUSINESS PROFITS, INFORMATION, OR USE) EVEN IF KEYSPAN HAS
BEEN ADVISED OF THE POSSIBILITY OF SUCH DAMAGES. SOME STATES DO NOT
ALLOW THE EXCLUSION OR LIMITATION OF LIABILITY FOR CONSEQUENTIAL OR
INCIDENTAL DAMAGES, SO THE ABOVE LIMITATION OR EXCLUSION MAY NOT
APPLY TO YOU.
7. Governing Law. This Agreement is governed by the laws of the State of California.
Keyspan Warranty
Limited Warranty on Keyspan USB Server (US-4A)
Definitions:
The following definitions apply to the terms as they appear in this document:
* KEYSPAN means KEYSPAN, a division of InnoSys Inc.
* Hardware means the Keyspan USB Server (US-4A).
* Product means the Hardware and Documentation
Limited Warranty on Hardware:
KEYSPAN's warranty obligations are limited to the terms set forth below:
KEYSPAN warrants this Hardware against defects in materials and workmanship for a period of
five (5) years from the date of original purchase.
If you discover a defect, KEYSPAN will repair this Hardware with either new or refurbished parts
at no charge. If KEYSPAN is unable to restore your product to good working order after a
reasonable number of attempts, KEYSPAN will, at its option replace or refund the purchase price of
your product. To obtain service under this warranty you must do the following during the warranty
period:
Deliver this Hardware, at your expense, to KEYSPAN. When submitting the Hardware for
Keyspan:USB Server - User Manual
This User Manual applies to the Keyspan USB Server Software Version 1.3.x. Patent Pending.
Rev 2005jun23 Page 76
Page 77

warranty service, please provide your name, address, telephone number, and email address. Unless
you registered your ownership of the Product with KEYSPAN within 90 days of purchase, also
include a copy of the bill of sale from KEYSPAN or from a KEYSPAN Authorized Reseller as
proof of the date of original purchase. You may be charged a fee if no trouble with this Hardware
can be found.
This warranty does not apply to damage caused by accident, abuse, misuse, misapplication, or
service (including upgrades and expansions) performed by anyone other than KEYSPAN; if the
product has been modified without the written permission of KEYSPAN; if any KEYSPAN serial
number has been removed or defaced; or if you cannot provide proof of original retail purchase as
described above.
THE WARRANTY AND REMEDIES SET FORTH ABOVE ARE EXCLUSIVE AND IN LIEU
OF ALL OTHERS, WHETHER ORAL OR WRITTEN, EXPRESS OR IMPLIED. KEYSPAN
SPECIFICALLY DISCLAIMS ANY AND ALL IMPLIED WARRANTIES, INCLUDING
WITHOUT LIMITATION, WARRANTIES OF MERCHANTABILITY AND FITNESS FOR A
PARTICULAR PURPOSE. No KEYSPAN Authorized Reseller, agent or employee is authorized
to make any modification, extension or addition to this warranty.
KEYSPAN IS NOT RESPONSIBLE FOR DIRECT, SPECIAL, INCIDENTAL, OR
CONSEQUENTIAL DAMAGES RESULTING FROM ANY BREACH OF WARRANTY, OR
UNDER ANY OTHER LEGAL THEORY, INCLUDING BUT NOT LIMITED TO LOST
PROFITS, DOWNTIME, GOODWILL, DAMAGE TO OR REPLACEMENT OF
EQUIPMENT AND PROPERTY, AND ANY COSTS OF RECOVERING,
REPROGRAMMING, OR REPRODUCING ANY PROGRAM OR DATA STORED IN OR
USED WITH KEYSPAN PRODUCTS.
Some jurisdictions do not allow the exclusion or limitation of incidental or consequential damages
or exclusions of implied warranties, so the above limitations or exclusions may not apply to you.
This warranty gives you specific legal rights, and you may also have other rights that vary from
jurisdiction to jurisdiction.
KEYSPAN
A division of InnoSys Inc.
4118 Lakeside Dr
Richmond, CA USA 94806
KEYSPAN is a trademarks of InnoSys Inc.
(Warranty Doc. 00-40-01 Rev. 10/98)
Keyspan:USB Server - User Manual
This User Manual applies to the Keyspan USB Server Software Version 1.3.x. Patent Pending.
Rev 2005jun23 Page 77
Page 78

Support Information
Contacting Support
If you require assistance with any Keyspan product, you may contact us by one of the following
ways:
• web/email:
http://www.keyspan.com/support/
• fax: +1.510.222.0323
(Monday through Friday)
• telephone : +1.510.222.8802
(tech support) (Monday through Friday: 9am-12pm / 1pm-5pm Pacific)
International Support Options
If you live outside of the United States and require assistance with your Keyspan product, please
contact the Keyspan distributor in your country for technical support in your language. For a list of
Keyspan's international distributors, please visit our international web page at:
http://www.keyspan.com/international/
Keyspan:USB Server - User Manual
This User Manual applies to the Keyspan USB Server Software Version 1.3.x. Patent Pending.
Rev 2005jun23 Page 78
 Loading...