

Keyspan 4-PORT PRINT SERVER 1.3.1 User Manual

Table of Contents
5 Local Settings
• Overview
• The Local Settings Tab
6 Menus Commands
• Overview
• Advanced menu
7 Network Discussion
• Setting Up On Different Types of Networks
• LAN - No Connection To Internet/WAN
• LAN - With Connection To Internet/WAN
• LAN - With DSL Router/Gateway
• Wireless Network (Airport/802.11)
8 Troubleshooting
• Before You Begin
• Status Lights
• UDP Ports
• Network Issues
• USB Devices
• Resetting The 4-Port Print Server Hardware
• When You Need More Help
9 Appendices
• Frequently Asked Questions (FAQs)
• USB Device Compatibility
• Overview
• Tested USB Devices
• Status Light Behavior
• Windows XP Firewall Configuration
• Notices
• Keyspan License and Warranty Information
• Support Information
1 Introduction
• Compatible USB Devices
• Connectivity to USB Devices
• Connectivity to Network
• Requirements
• What's Inside The Package
2 Installation Instructions
• Installing the 4-Port Print Server Hardware
• Installing the Keyspan Server Utility software
• Uninstall Instructions
3 Using Your USB Printer On The Network
• Overview
• Using Your First USB Device
• Other Methods To Connect Your USB Devices
• Using Auto-Connect Feature For Windows
• Using The 4-Port Print Server System Tray
Feature
• Using Auto-Connect Feature For Mac
• Using Device Force Disconnect
• Using The Single-User Connect Mode
• USB Device Status Details
4 Changing 4-Port Print Server's Settings
• Overview
• Editing A Specific 4-Port Print Server
• 4-Port Print Server Settings Descriptions
• Applying/Canceling New Server Settings
• Restoring Default Settings
• Advanced menu
• Updating Your 4-Port Print Server's Firmware
Keyspan:4-Port Print Server - User Manual
This User Manual applies to the Keyspan 4-Port Print Server Software Version 1.3.x. Patent Pending.
Rev 2005jun23 Page 1

1 Introduction
The 4-Port Print Server makes it possible for USB printers to be used and shared by client
computers on a Local Area Network (LAN)! It is ideal for home office, small office or classroom
use. The 4-Port Print Server supports both Ethernet and Wi-Fi networks -- making it easy to print
to a USB printer from a Wi-Fi based laptop!
Compatible USB Devices
This release of 4-Port Print Server software supports USB printers and USB multi-function
printers. Other USB devices are not supported with the 4-Port Print Server. See the Keyspan web
site for further compatibility details.
Connectivity to USB Devices
The Keyspan 4-Port Print Server provides the following connections to your USB Devices:
• 4 USB Full-Speed ports (12 Mbps)
• Full 500mA power provided to each port
Connectivity to Network
The Keyspan 4-Port Print Server provides the following connections to your Network:
• RJ45 Ethernet connector
• 10/100 autosensing
• IP addressing: Static/DHCP/Zeroconfig/Rendezvous
Requirements
• Macintosh: Mac OS X 10.3 (or later)
• Windows: Windows 2000/XP or greater
What's Inside The Package
The Keyspan 4-Port Print Server package includes:
• Keyspan 4-Port Print Server (PS-4A/US-4A)
• Power Supply
• Quick Start Sheet(s)
• Mac and Windows compatible CD with software and user manual
Keyspan:4-Port Print Server - User Manual
This User Manual applies to the Keyspan 4-Port Print Server Software Version 1.3.x. Patent Pending.
Rev 2005jun23 Page 2
2 Installation Instructions
Installing the 4-Port Print Server Hardware
Note: Do not connect your USB printer to the Keyspan 4-Port
Print Server until you have finished installing the 4-Port Print
Server software and hardware!!! The next section, Using Your USB
Printers Over Your Network, will walk you through the process of
connecting and using your USB devices with the Keyspan 4-Port Print Server.
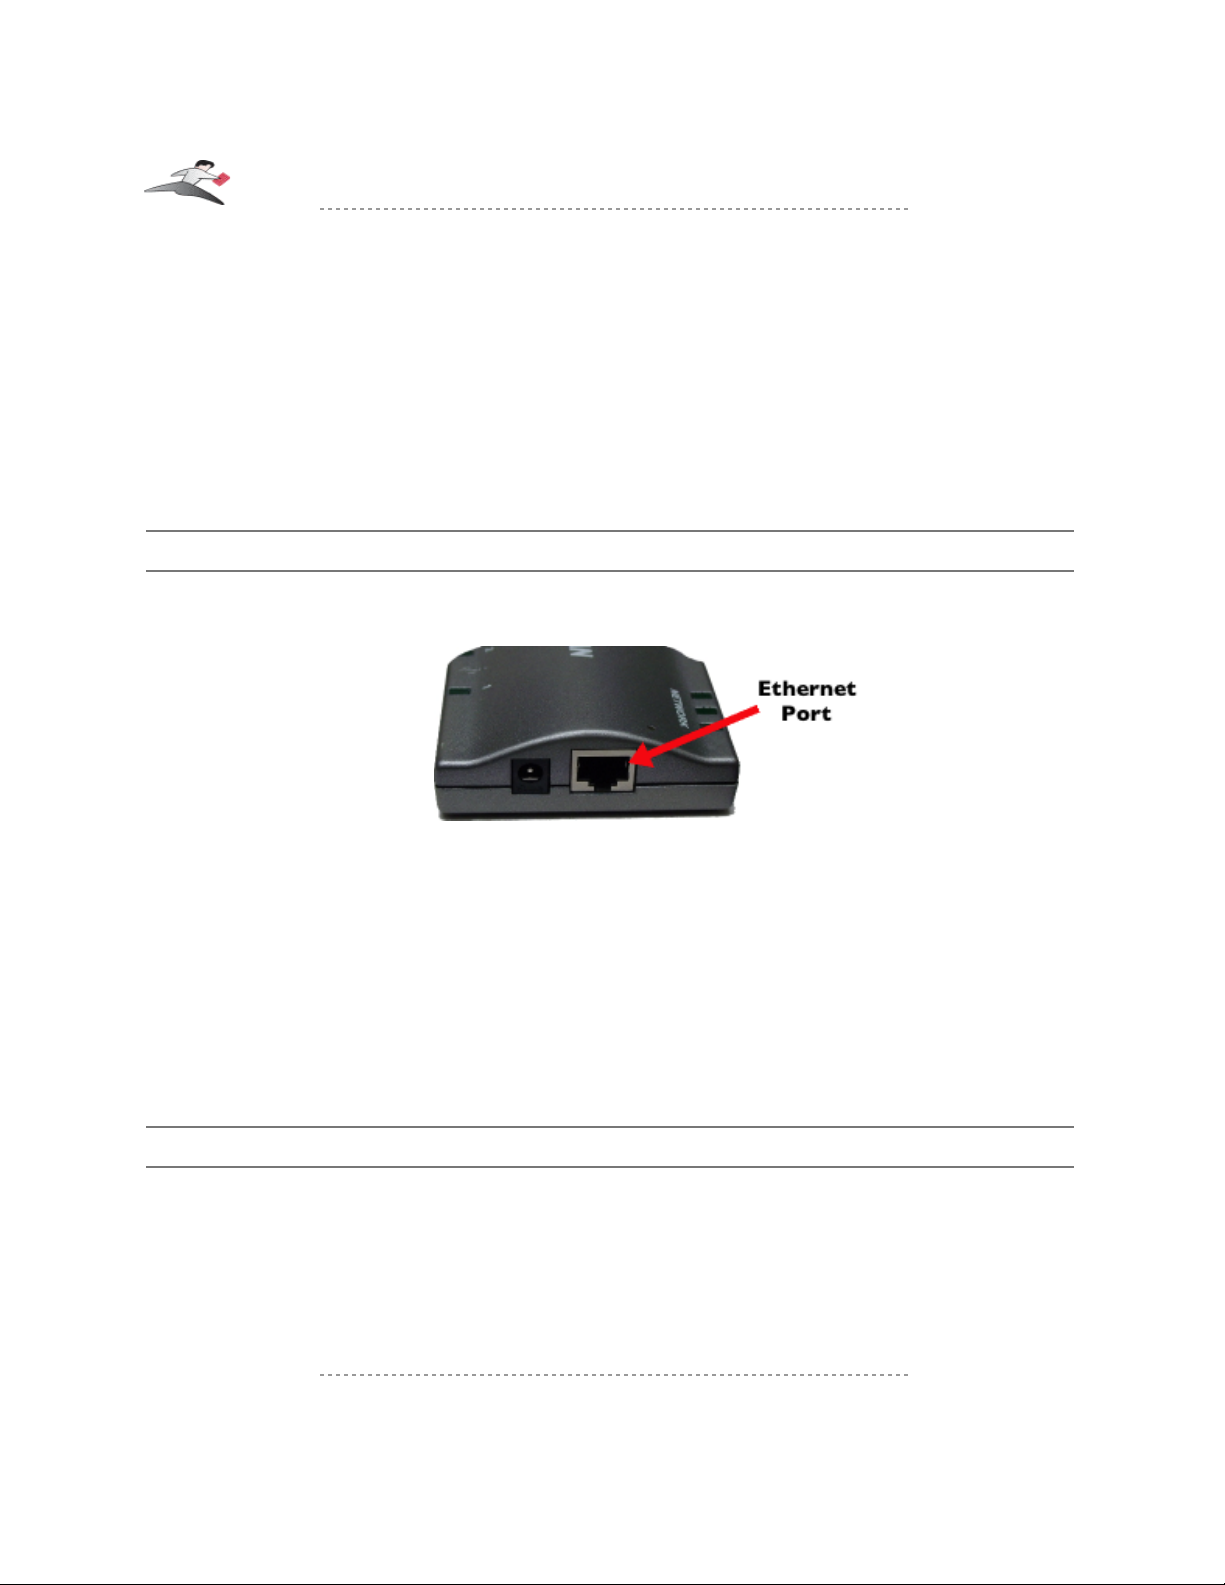
Step 1 - Connect The Keyspan 4-Port Print Server To Your Network
First connect an Ethernet cable to the 4-Port Print Server's Ethernet port (see next image):
Once the Ethernet cable is connected, connect the other end of the cable to your network. This can
be a free Ethernet port on your DSL router, Ethernet hub, or 802.11 (aka Airport) router/base
station.
If you do not have a network, you can connect the 4-Port Print Server directly to the Ethernet port
on your computer.
Tech Note: If you have more questions about connecting the 4-Port Print Server to
your network, please read the 4-Port Print Server Networking Discussion
section in this manual.
Step 2 - Connect the 4-Port Print Server's Power Supply / Read the LEDs
Connect the included power supply to the 4-Port Print Server's power connector (see next image):
Keyspan:4-Port Print Server - User Manual
This User Manual applies to the Keyspan 4-Port Print Server Software Version 1.3.x. Patent Pending.
Rev 2005jun23 Page 3
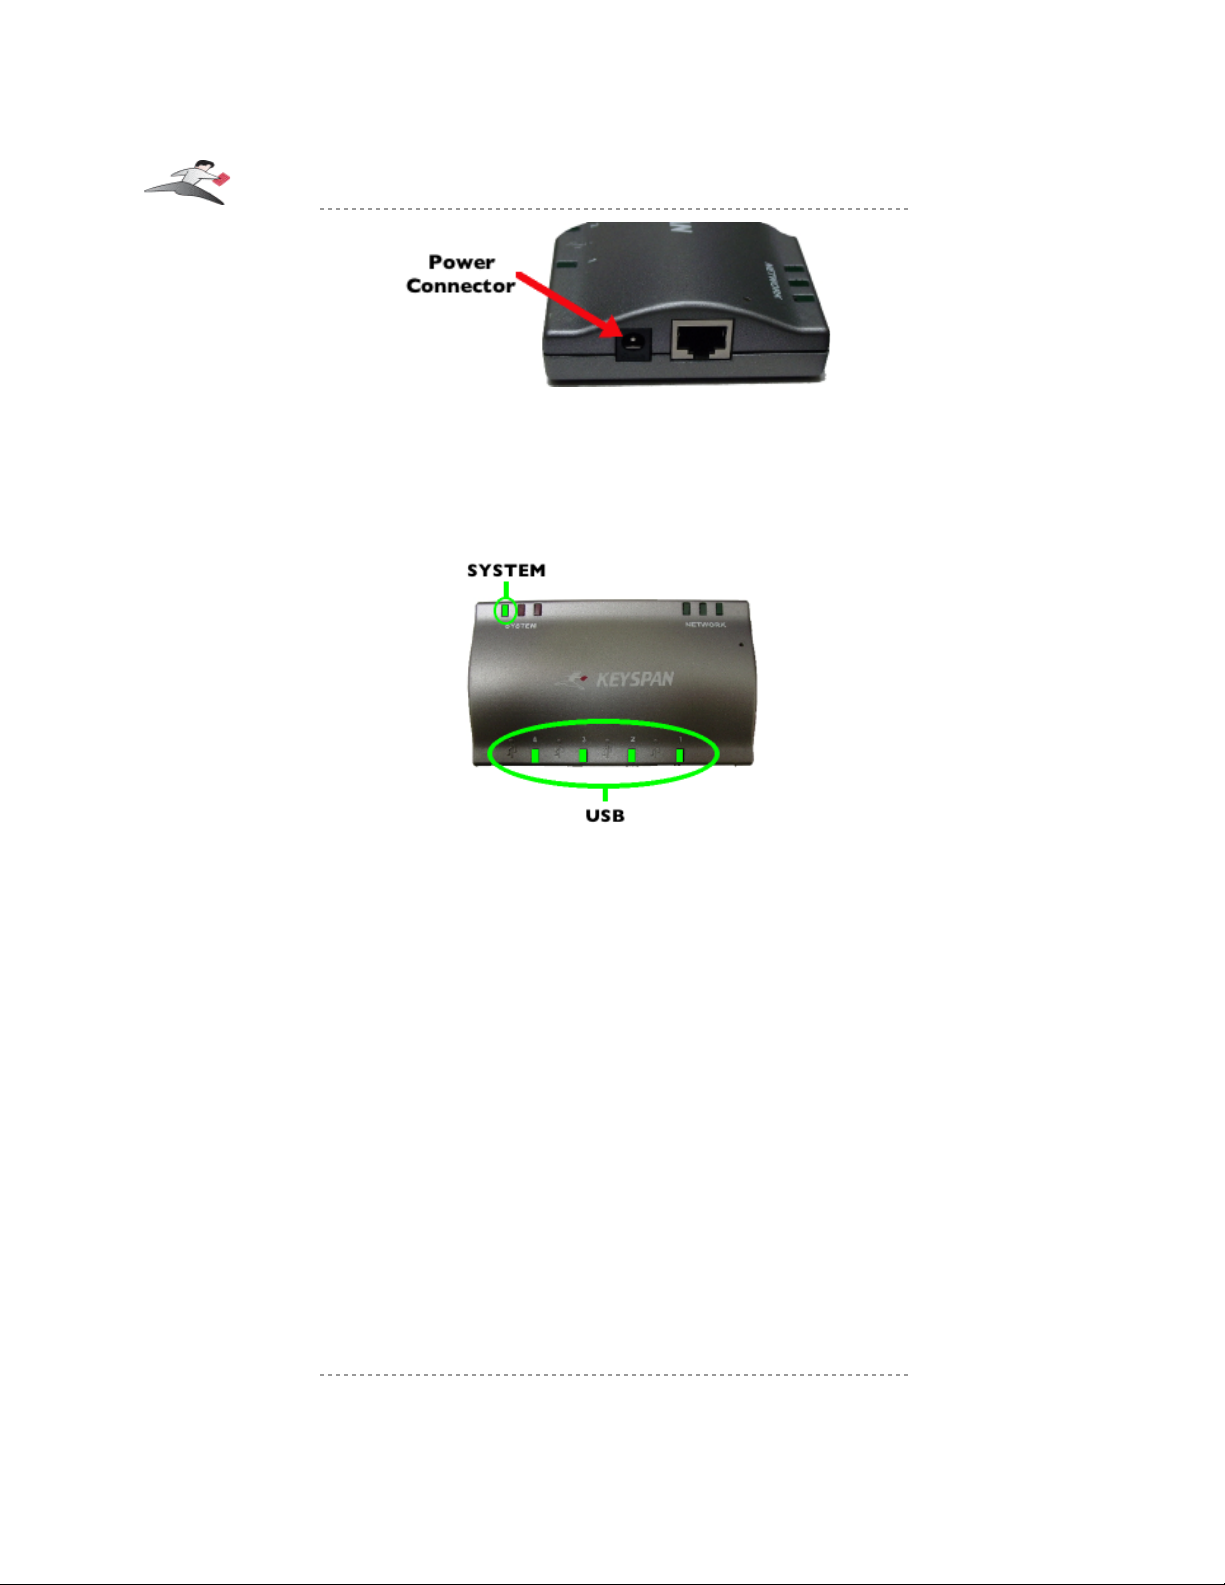
Once the 4-Port Print Server has power, you will notice the 4-Port Print Server's status lights turn
on and off. After a few seconds, the lights will stop blinking. If the 4-Port Print Server is
responding properly, the four green USB lights will turn on and stay solid. You should also notice
that the first green SYSTEM light will blink on and off every few seconds. Ignore any other status
lights for now.
Tech Note: The LEDs on the 4-Port Print Server can also indicate other status such
as IP configuration type, server status, etc. For a detailed description of what the LED
lights indicate, please read the Status Light Behavior appendix in this manual.
TROUBLESHOOTING: You may see red lights on the server at this point in the installation.
This is normal until you install the Keyspan Server Utility software on at least one computer.
TROUBLESHOOTING: If you do not see the USB lights turn on and/or do not have a blinking
green SYSTEM light, please proceed to the Troubleshooting:Status Lights section in this
manual.
Keyspan 4-Port Print Server hardware installation is now complete. Please proceed to the Keyspan
Server Utility software installation instructions.
Installing the Keyspan Server Utility software
Tech Note: The following instructions outline the installation of the Keyspan Server
Utility software for both Mac and Windows operating systems. Where instructions are
different for one operating system, the difference will be noted. Although screen shots
of the Keyspan Server Utility software may not match to your operating system, please
Keyspan:4-Port Print Server - User Manual
This User Manual applies to the Keyspan 4-Port Print Server Software Version 1.3.x. Patent Pending.
Rev 2005jun23 Page 4

note that button, menu, and tab names are identical on both platforms.
Step 3 - Insert the Keyspan 4-Port Print Server CD-ROM
Turn your computer ON. When your computer starts up, place the Keyspan 4-Port Print Server
CD into the CD-ROM drive.
MACINTOSH NOTE:
When the CD icon appears on your desktop, double click on its icon to display its contents.
Locate the Keyspan 4-Port Print Server Installer icon and double click to start the
installation process. Follow the instructions on screen.
WINDOWS NOTE:
Windows will automatically open the Keyspan CD Browser window. Using the on-screen
menus, locate the Keyspan 4-Port Print Server Installer selection and click it to start the
installation process. Follow the instructions on screen.
WINDOWS Tech Note: During and/or after the software installation, the Windows
New Hardware Wizard may ask you to install software several times. Select
'Install the software automatically' and click next until the New Hardware Wizard tells
you that the installation is finished. PLEASE NOTE that you will not be able to use your
4-Port Print Server until you complete the New Hardware Wizard process.
Step 4 - Running the Keyspan Server Utility application
Once the Keyspan installer completes, it will automatically launch the Keyspan Server Utility
application. You will use this utility to configure the 4-Port Print Server.
Tech Note: Firmware Update: The first time you launch the 4-Port Print Server
program, you may be asked to update your 4-Port Print Server's firmware. If you get
this message, please update your firmware as per the on screen instructions. Please
note that you can also find instructions on how to do this in the Updating Your Firmware
subsection in the Changing 4-Port Print Server's Settings section later in this manual.
In the Keyspan 4-Port Print Server window, click the Servers tab. You will now see your 4-Port
Print Server listed in this tab (see next image):
Keyspan:4-Port Print Server - User Manual
This User Manual applies to the Keyspan 4-Port Print Server Software Version 1.3.x. Patent Pending.
Rev 2005jun23 Page 5
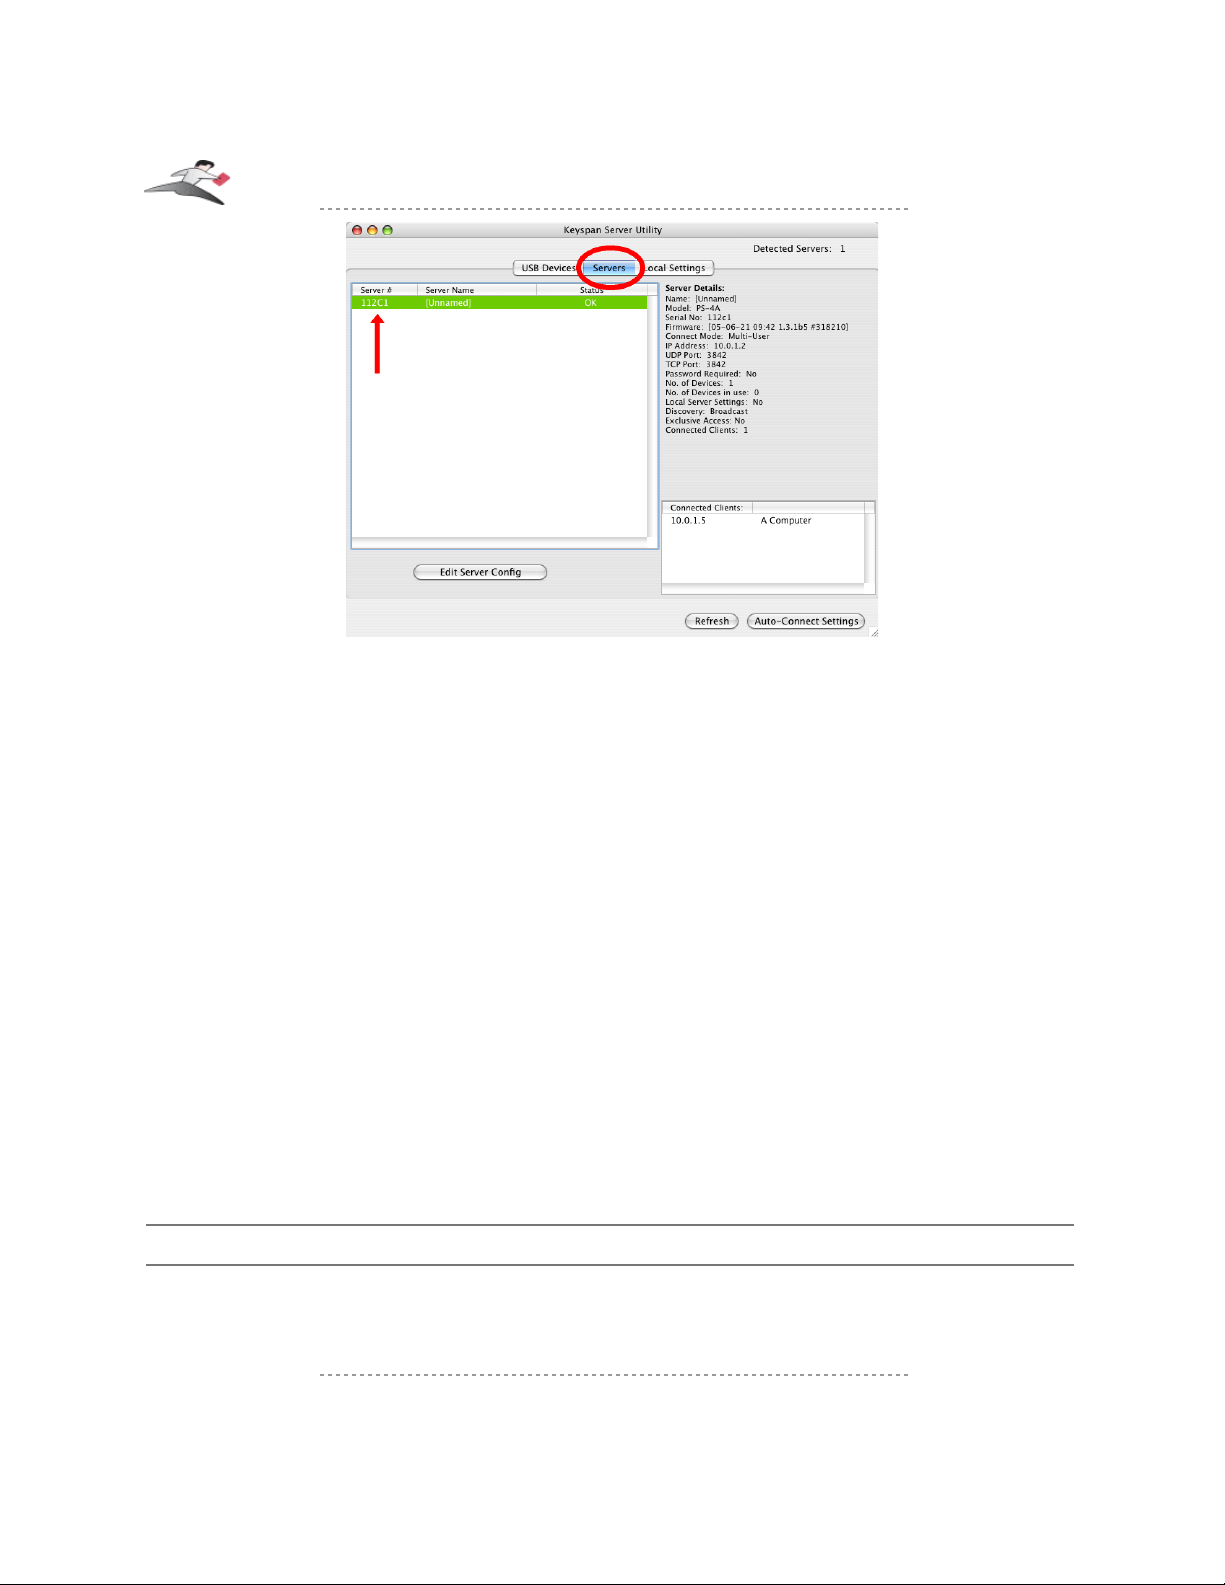
Tech Note: Server Names and Serial Numbers: Out of the box, your 4-Port
Print Server will show up as 'Unnamed'. You can change your 4-Port Print Server's
name in Servers tab. You will also notice a serial number listed next to your 4-Port
Print Server name. This serial number corresponds to the last five digits of your 4-Port
Print Server's MAC/Network address (printed on the bottom of your 4-Port Print Server
hardware).
Tech Note: About Firmware Updates: When you first launch the Keyspan
Server Utility software, you may get a message stating that there is new firmware
available for your 4-Port Print Server hardware. We recommend that you update your
firmware now. To do this, please follow the instructions on-screen instructions to
update your firmware. Once the update is complete, proceed to Step 5.
Tech Note: About Multiple Servers: If you have multiple unconfigured 4-Port
Print Servers on your local network, you can determine which server you are
configuring by looking at the serial number presented by the Keyspan Server Utility
application. This number correlates to the MAC/Network address that is printed on the
bottom of your 4-Port Print Server hardware.
TROUBLESHOOTING: If you do not see any 4-Port Print Servers in this window, please
proceed to the Troubleshooting:Network Issues section in this guide.
Step 5 - Software Installation Complete!
Keyspan Server Utility software is now complete.
You may now proceed to the Using Your USB Devices On The network section in this guide.
Keyspan:4-Port Print Server - User Manual
This User Manual applies to the Keyspan 4-Port Print Server Software Version 1.3.x. Patent Pending.
Rev 2005jun23 Page 6

Uninstall Instructions
If you need to uninstall the Keyspan Server Utility software, please follow these instructions:
MACINTOSH NOTE:
Run the "UninstallUS4A.pkg" uninstaller program. This program is located on the CD that
came with your 4-Port Print Server. You can also download the uninstaller from Keyspan's
web site (http://www.keyspan.com).
WINDOWS NOTE:
Uninstall the Keyspan Server Utility software using the Add/Remove Programs control
panel. (located in START menu -> SETTINGS -> CONTROL PANEL ). Once the
Add/Remove Programs control panel is open, locate and select the Keyspan 4-Port Print
Server software and then click the Change/Remove button. Follow the instructions onscreen to complete the uninstall.
You may now proceed to the next section in this guide...
Keyspan:4-Port Print Server - User Manual
This User Manual applies to the Keyspan 4-Port Print Server Software Version 1.3.x. Patent Pending.
Rev 2005jun23 Page 7
3 Using Your USB Printer On The Network
Overview
In this section, you will learn how to use your USB printer(s) via the Keyspan 4-Port Print Server.
You will learn to:
• connect your USB printer (hardware) to the Keyspan 4-Port Print Server's USB
port
• virtually connect to your USB printer using the Keyspan Server Utility software
• using the Connect and Disconnect buttons
• using the Auto-Connect Feature for Printers on Windows
• using the Auto-Connect Feature for Printers on Mac OS X
• use your USB printer via the Keyspan 4-Port Print Server
Tech Note: These instructions are intended to help you connect a USB printer to the
4-Port Print Server for the very first time. It is highly recommended that you
only connect one USB printer at this time. To connect additional devices, repeat these
instructions for each device.
Using Your First USB Device
Step 1 - Connecting Your USB Device To The 4-Port Print Server
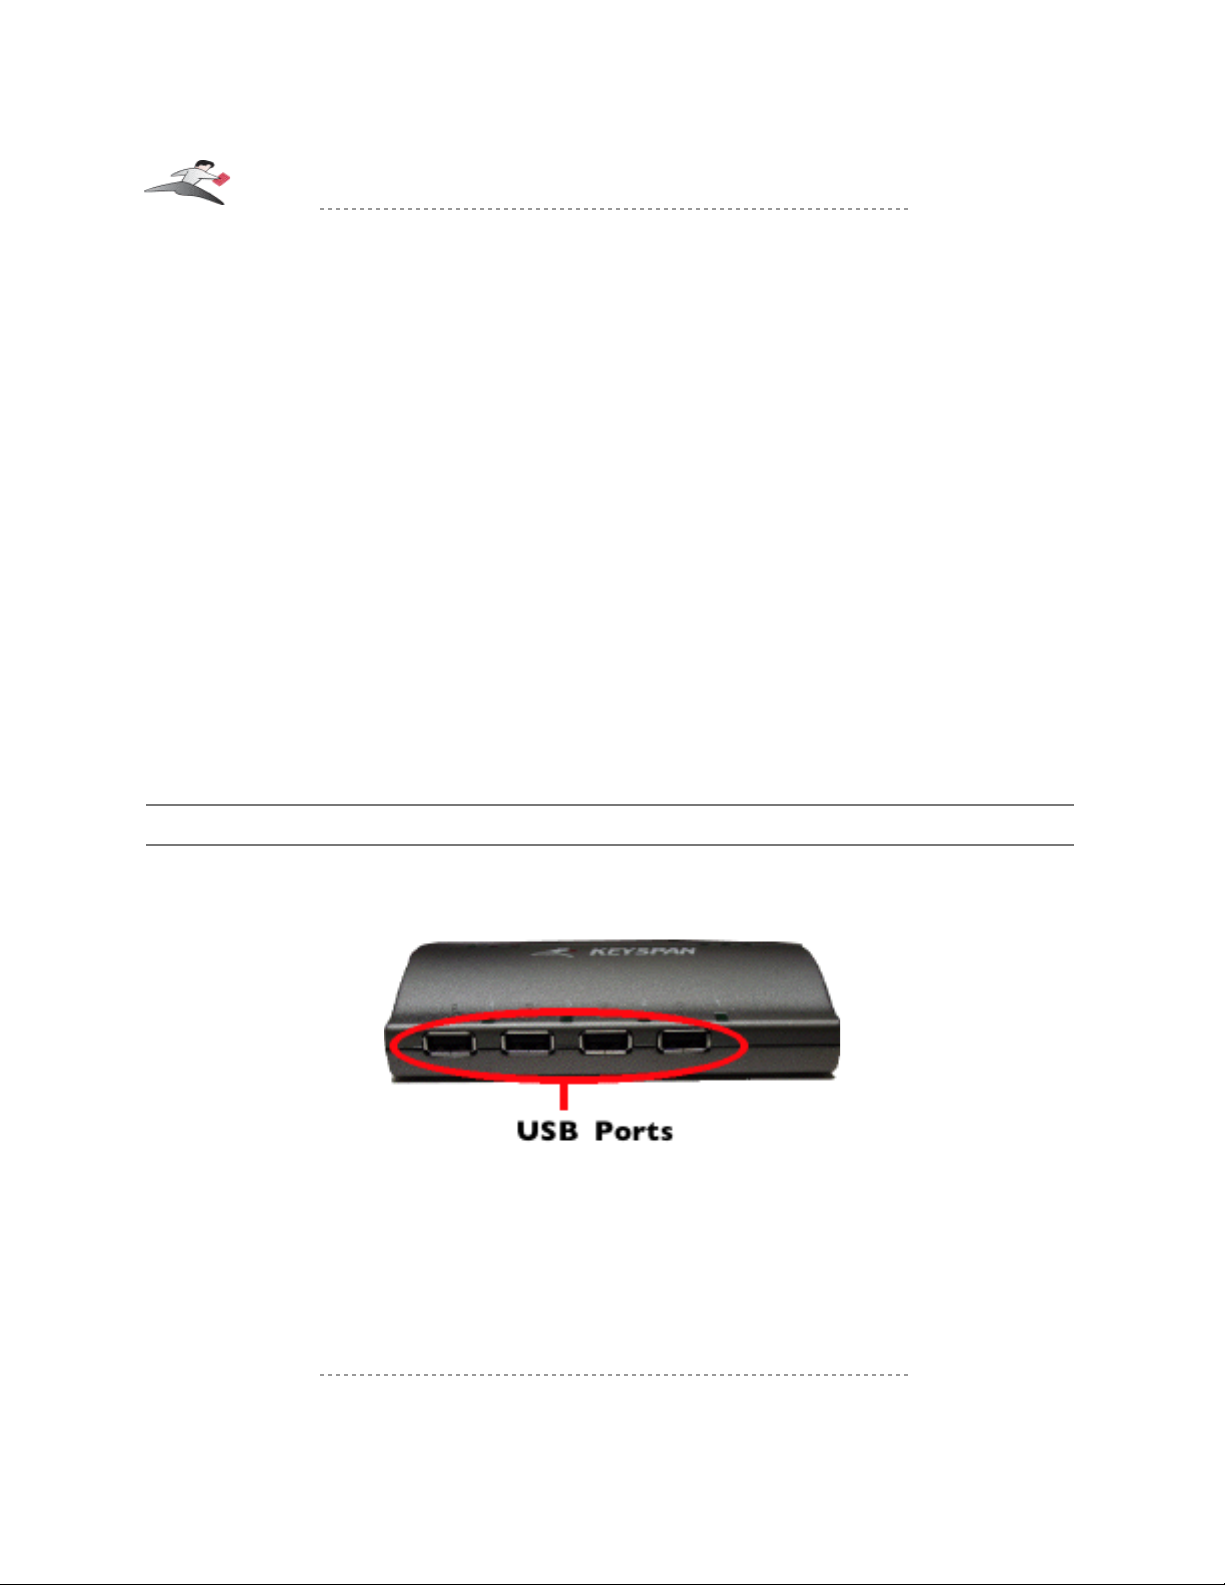
Before using the Keyspan 4-Port Print Server, connect your USB printer to any USB port on the
Keyspan 4-Port Print Server.
Tech Note: USB Lights: Above each USB port is a green LED light (for a total of 4
lights). These lights indicate whether or not your USB printer is supported in the
current software/firmware. If your printer is supported, you will have a solid green light.
If you have a slow blinking light, your USB printer is not currently supported or you
have connected a USB device that is not a printer/multifunction printer. Please
contact Keyspan if you have a slow blinking light when you connect a
printer/multifunction printer.
Keyspan:4-Port Print Server - User Manual
This User Manual applies to the Keyspan 4-Port Print Server Software Version 1.3.x. Patent Pending.
Rev 2005jun23 Page 8
Once your USB printer is connected to the 4-Port Print Server, open the Keyspan Server Utility
application.
MACINTOSH NOTE:
The Keyspan Server Utility application is located in your Applications folder.
Double click the Keyspan USB Server icon to open the Keyspan Server Utility
application.
WINDOWS NOTE:
The Keyspan Server Utility application is located in your START menu ->
PROGRAMS -> KEYSPAN SERVER -> Server Utility.
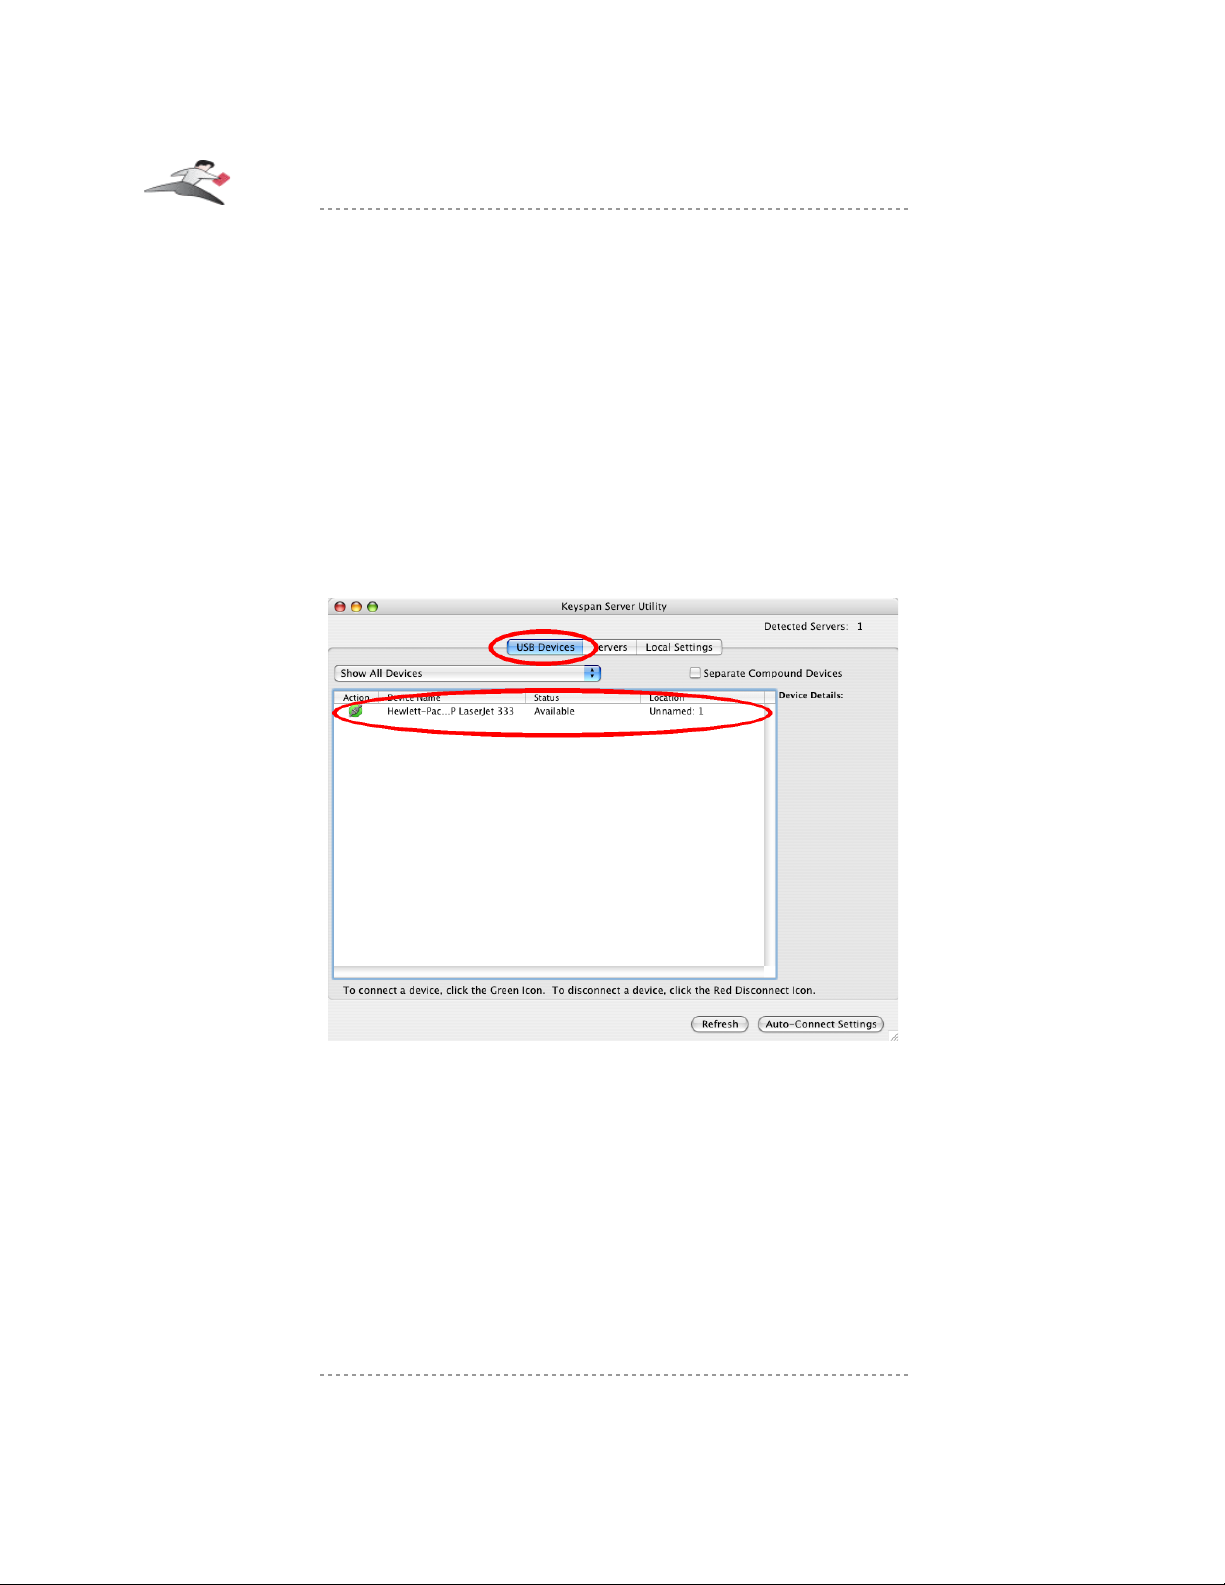
Once it is open, click on the USB Devices tab. You will see the names of your USB printers listed
in this tab (see next image):
Tech Note: The USB printer's name that is shown is the name that is programmed
into your USB printer by its manufacturer. This name may different from the actual
name and model number of your device. For example, if you have a HP Deskjet 882
printer, it may appear as HP Deskjet 880 or HP Printer. Some USB devices do not have
any names programmed into them. For 'unnamed' USB devices, the USB printer's
programmed Vendor ID (VID) and Product ID (PID) will be shown. You can rename
your USB printers. For more information, please read the USB DEVICE
CONFIGURATION subsection in the Changing 4-Port Print Server's
Settings section in this manual.
TROUBLESHOOTING: If you do not see your USB printer in the Keyspan Server Utility
application, please proceed to the Troubleshooting:USB Devices section in this manual.
Keyspan:4-Port Print Server - User Manual
This User Manual applies to the Keyspan 4-Port Print Server Software Version 1.3.x. Patent Pending.
Rev 2005jun23 Page 9

Step 2 - (Virtually) Connecting Your USB Device
In the USB Devices tab, the following information is shown:
Action: The Action column contains an icon
Device Name: The name of your USB printer. This is the name programmed
into the USB printer itself. Note: This name can be changed.
Read the USB DEVICE CONFIGURATION subsection in
the Changing 4-Port Print Server's Settings section in this manual
for more details.
Status: This is the current Status of your USB printer. This field is
dynamic and will change as you start to use USB devices
through the 4-Port Print Server. For now, we're only concerned
with the Available status (which means that the USB printer is
ready to used via the 4-Port Print Server) but there are other Status.
For details, please see the USB Device Status Details subsection
later in this manual.
Location: This column shows the server and server's USB port number
that your USB printer is connected to. For example, the
location 'MyServer:3' means that your USB printer is connected
to USB port number 3 on the 4-Port Print Server called 'MyServer' .
Note: You can change the name of your 4-Port Print Server. Read the
4-Port Print Server Settings Descriptions subsection in the
Changing 4-Port Print Server's Settings section in this manual
for more details.
To use a USB printer, you will need to first 'connect' your USB printer via the Keyspan Server
Utility software.
To connect your USB printer to your computer via the 4-Port Print Server, select your USB printer
and then click the green Connect button under the ACTION column as shown below:
Keyspan:4-Port Print Server - User Manual
This User Manual applies to the Keyspan 4-Port Print Server Software Version 1.3.x. Patent Pending.
Rev 2005jun23 Page 10

You will notice that your USB printer's Status will change from Available to In Use by
[ComputerName]. At this point, you can now use this USB printer as if it is connected directly to
your computer. You can repeat this step for every USB printer that you want to use.
Tech Note: By default, the 4-Port Print Server is configured to use the
Multi-User
Connect Mode
. In this mode, all USB devices will be shared in a
one-at-a-time
mode. Before you can use a USB printer, you will have to connect to it to gain
exclusive access. Once you are finished using the USB printer, you will have to
disconnect from that device before others can use it. In this mode, the 4-Port Print
Server acts like a library where your USB devices are checked out for use and
checked back in so that other can use these devices. This process can be automated
by using the Auto-Connect Feature. Continue reading this section for details.
In Multi-User' Connect Mode, you can also dedicate USB devices to certain computer,
set up passwords for a certain USB printer, and setup Auto-Connect for printers (so
that you don't need to connect and disconnect your printer all the time). You can also
configure your 4-Port Print Server to use the '
Single-User'
Connect Mode where the
4-Port Print Server is dedicated to a particular user. In the
Single-User
Connect
Mode, you do not need to connect/disconnect devices since there is only one
computer.
You can configure the 4-Port Print Server to use other sharing modes, such as
Single-User mode. For more details, please read the Sharing Modes Overview
sub section at the end of this section.
TROUBLESHOOTING: If a device is in use by another user, that USB printer's Status show as
In Use By [ComputerName]. If you wish to use a USB printer that is In Use, you'll have to wait
until that user finishes using it. If a printer has been setup for Auto-Connect, the printer will
automatically become available once the other user finishes printer. If your computer is also setup
for Auto-Connect, your print job will automatically start once the other user has finished printing.
For more information on Auto-Connect, continue reading this section.
Now that your USB printer is connected, you can start using your USB printer as if it was directly
connected to your computer.
Step 3 - (Virtually) Disconnecting Your USB Device(s)
When you are done using your USB printer, you must virtually disconnect it from your computer
before it is available to everyone else on the network. To do this, open the Keyspan Server Utility
application, select your USB printer and then click the red DISCONNECT icon (see next image):
Keyspan:4-Port Print Server - User Manual
This User Manual applies to the Keyspan 4-Port Print Server Software Version 1.3.x. Patent Pending.
Rev 2005jun23 Page 11
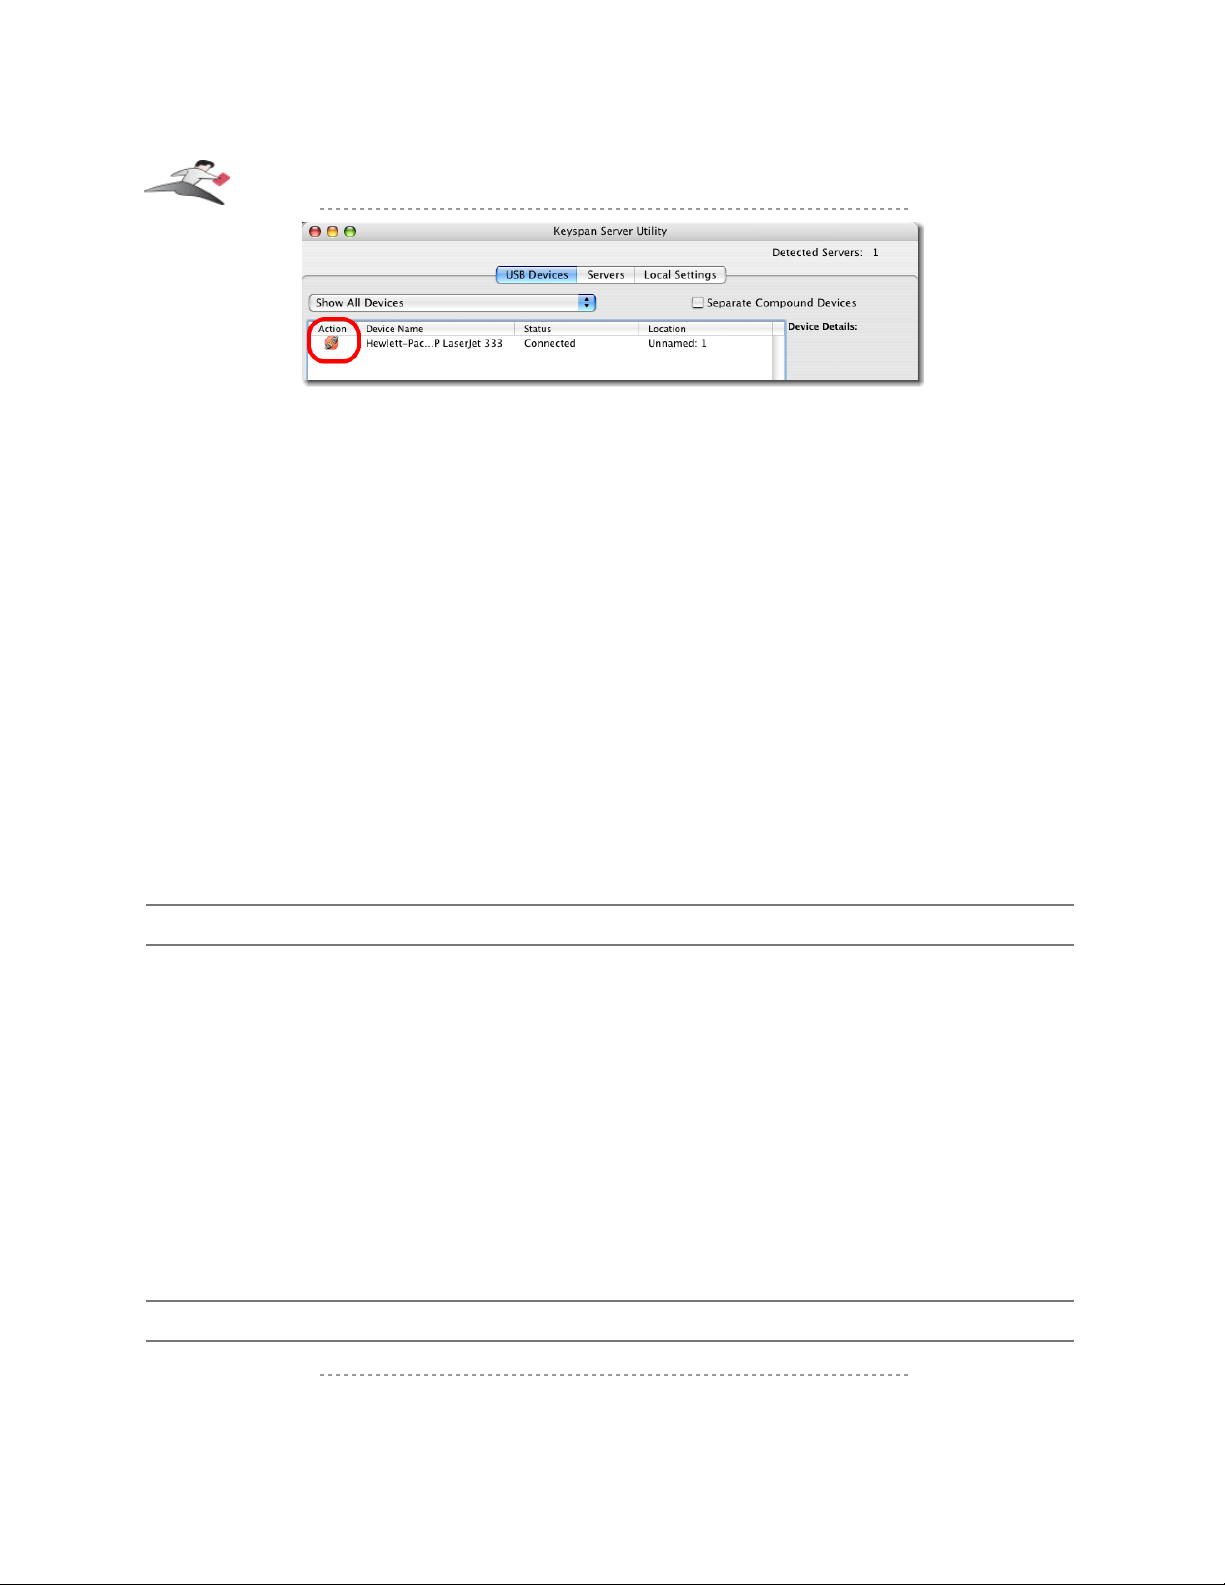
You'll notice that the USB printer's Status will change to 'Available'. Other users will also see the
USB printer's status change to Available.
Tech Note: Some USB devices may require additional action PRIOR to
'disconnecting' your USB printer. For example, some USB devices (like printers with a
card reader.) will require you to drag the device's icon to the trash, stop the USB
printer's card reader software, etc. If your USB printer requires such actions when the
device is directly connected to the computer, please do these actions prior to clicking
the DISCONNECT button in the Keyspan Server Utility software.
If you forget to disconnect a USB printer, please note that USB devices will automatically get
disconnected if your computer goes to 'sleep' or 'hibernate', your computer is turned off, or if you
disconnect from your network.
In the worst cases where a device has been left in use and you cannot get the other computer to
disconnect a device, you can forcibly 'Force Disconnect' a device that has been left in use. While
Force Disconnecting a device is not recommended, you can learn more about this feature in the
Advanced menu subsection found in the Changing 4-Port Print Server's Settings section.
Step 4 - Other Methods Of Connecting USB Devices (Optional)
In addition to using the 4-Port Print Server program to 'manually' connect USB devices to your
computer, you can also:
• Automatically connect and disconnect printers for improved printer sharing
(by using the Auto-Connect feature)
• Connect and disconnect USB printers without opening the 4-Port Print Server program
(by using the 4-Port Print Server system tray icon)
• Not 'share' your USB devices and Automatically connect USB devices to only one
computer (by using the Single-User Connect Mode)
For specific instructions on how to setup and use these features, please read the Other Methods
To Connect Your USB Devices sub section later in this chapter.
Step 5 - Finishing Up and Additional Notes
Keyspan:4-Port Print Server - User Manual
This User Manual applies to the Keyspan 4-Port Print Server Software Version 1.3.x. Patent Pending.
Rev 2005jun23 Page 12

You have now learned to how use your USB printer via the Keyspan 4-Port Print Server.
If you need to connect additional USB printers, note that you can connect up to 8 USB printers to
one Keyspan 4-Port Print Server. While the 4-Port Print Server only has 4 USB ports, we support
8 devices due to how Compound USB devices work. Compound USB devices are devices that
have multiple components connected to an embedded USB hub inside 1 USB printer. For
example, the Lexmark X1150 is a compound device that has 2 components (one for the scanner,
one for the printer). The Canon i475D is also a compound device that has 3 components (the
printer, the card reader, and a HID device [for buttons on the printer]).
Tech Note: Using Multiple 4-Port Print Servers and USB Devices:
You can view up to 8 4-Port Print Servers in the Keyspan Server Utility
software.
If you are using all of the USB ports on your 8 servers,
you will be able view a total of 32
USB devices
in the Keyspan Server Utility software however you will only be
able to have 12 USB devices 'connected' to your computer.
If you need to use a 13th USB printer, 'disconnect' one of your 12 USB devices via the
Keyspan Server Utility software to free a location for the next USB printer.
If you need to have more than 8 4-Port Print Servers, configure your next 8 servers to
use a different UDP port. Once you have done this, use the USB Software's Local
UDP Port menu item to switch between your first 8 servers and your next 8 servers.
Tech Note: Using One 4-Port Print Server With Multiple Users:
Only 10 users can connect to a single or set of 4-Port Print Servers using the same
UDP port. You can support more users by setting up additional 4-Port Print Servers
with different UDP port numbers.
Other Methods To Connect Your USB Devices
Using the 4-Port Print Server program to connect and disconnect your USB devices (as outlined
above) is only one method of connecting devices. While the 4-Port Print Server program gives
detailed information about your 4-Port Print Server and USB devices connected to it, you may not
always want to open the 4-Port Print Server program every time you want to use your USB printer.
Because of this, we have created other methods to connect your USB devices. With the 4-Port
Print Server 1.3 software, you can:
• Automatically connect and disconnect printers for improved printer sharing
(by using the Auto-Connect feature)
• Connect and disconnect USB devices without opening the 4-Port Print Server program
(by using the 4-Port Print Server system tray feature)
• Reclaim or Force Disconnect a device that has been left in use by another user.
• Not 'share' your USB devices and Automatically connect USB devices to only one
Keyspan:4-Port Print Server - User Manual
This User Manual applies to the Keyspan 4-Port Print Server Software Version 1.3.x. Patent Pending.
Rev 2005jun23 Page 13
computer (by using the Single-User Connect Mode)
The following subsections show you how to use these different features.
Using The Auto-Connect Feature For Windows
This feature will automatically connect and disconnect printers whenever you have a print job
queued. This gives you a richer printing experience that is similar to using a print servers. Note:
This feature is only enabled in the Multi-User Connect Mode for USB devices that are using the
Shared Share Mode.
MACINTOSH NOTE:
Auto-Connect feature for Windows is configured differently on Mac OS X systems. If
you are interested in using the Auto-Connect feature for Mac, please skip ahead to the
Using The Auto-Connect Feature For Mac subsection.
Before You Begin
Before you begin, please make sure that you have connected and installed your printer via the
Keyspan 4-Port Print Server's USB Devices tab (see the Using Your First USB Device sub
section earlier in the section).
To setup your printer for Auto-Connect, please follow these instructions:
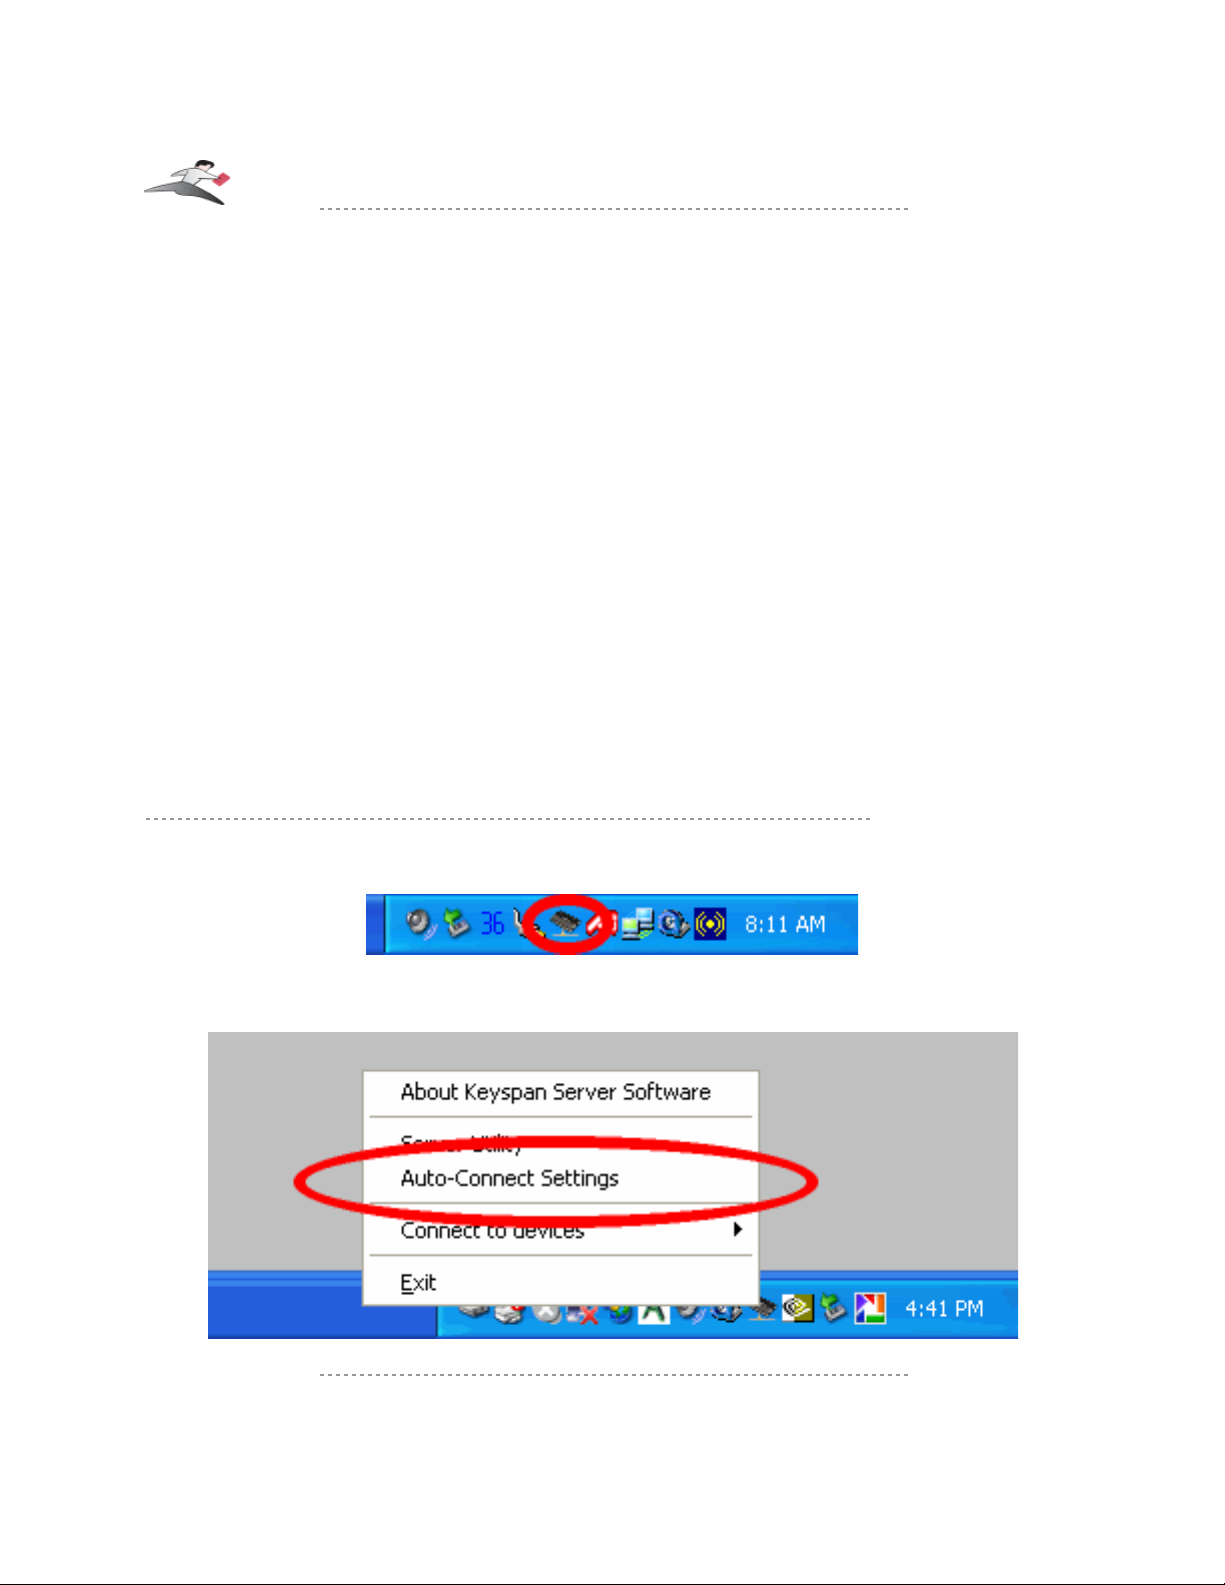
Step 1 - Access The 4-Port Print Server System Tray Icon And Auto-Connect Settings
Right click the 4-Port Print Server icon in the System Tray.
When the sub-menu appears, select to Auto-Connect SETTINGS.
Keyspan:4-Port Print Server - User Manual
This User Manual applies to the Keyspan 4-Port Print Server Software Version 1.3.x. Patent Pending.
Rev 2005jun23 Page 14
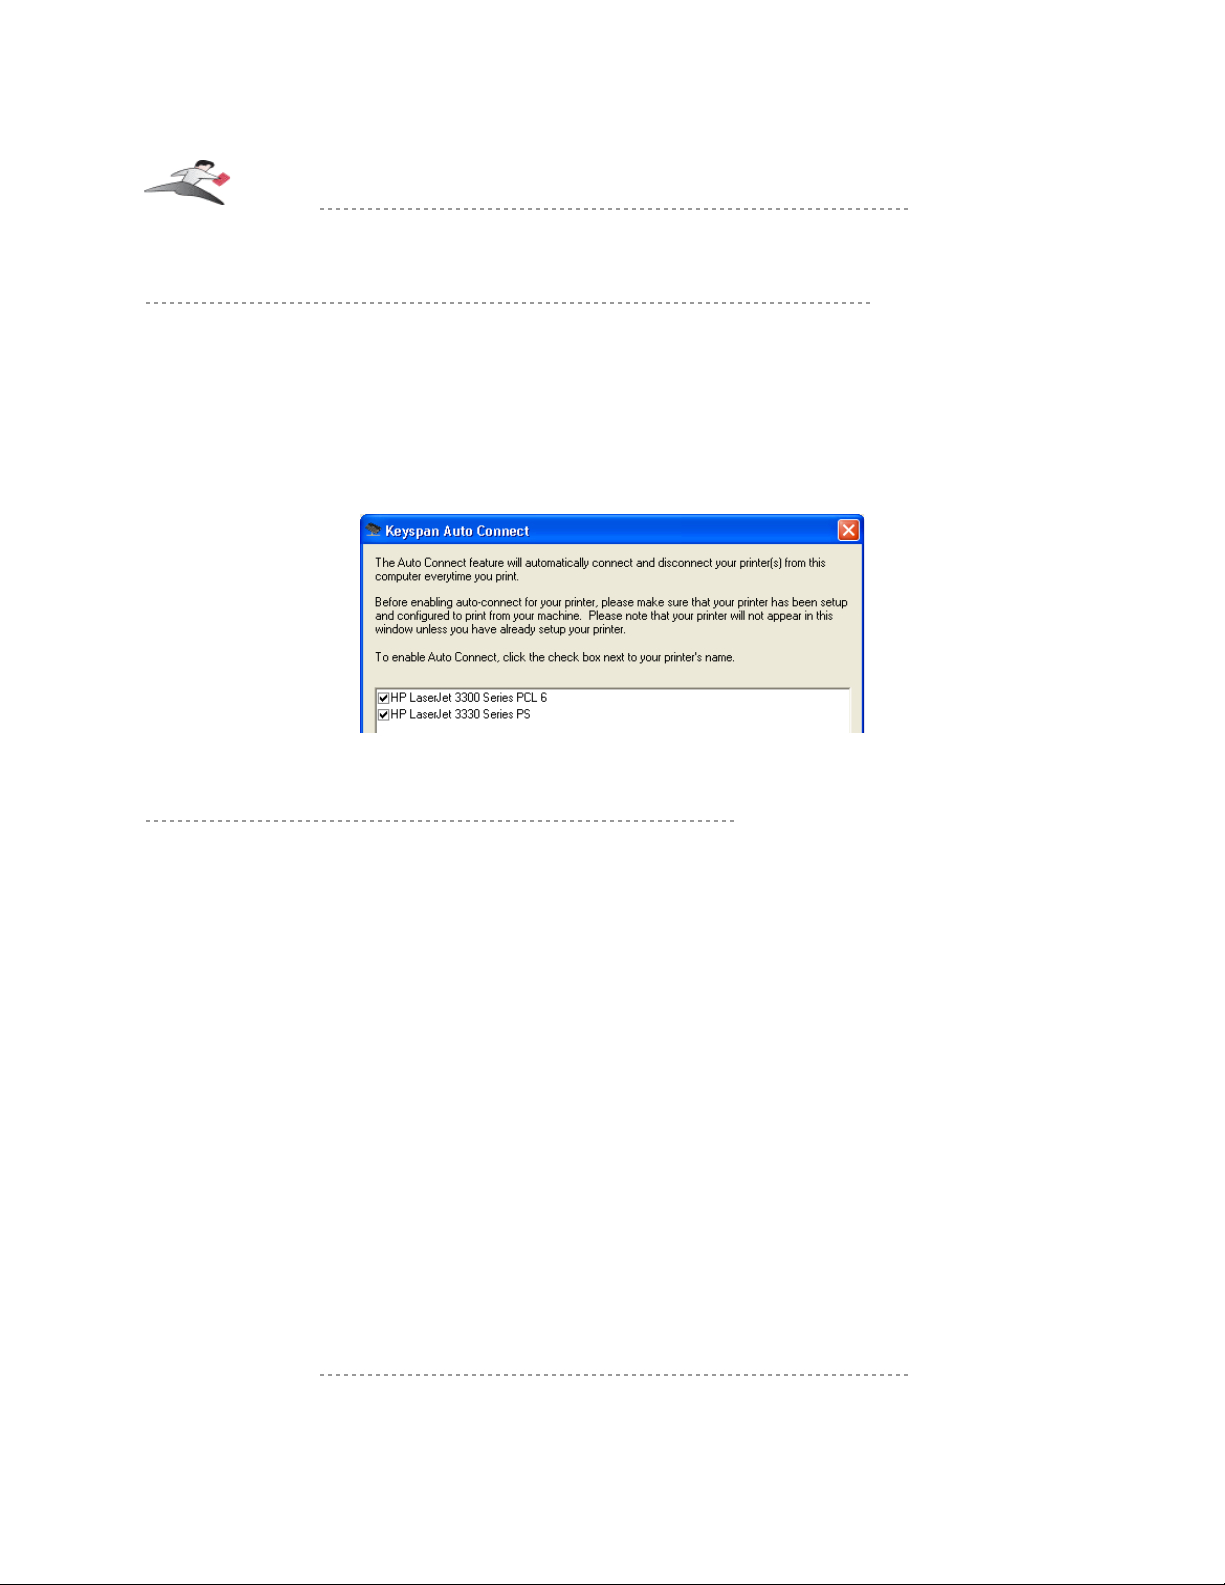
This will open the Keyspan Auto-Connect window.
Step 2 - Add Your Printer To Auto-Connect
In the Keyspan Auto-Connect window, click the check box next to your printer's name.
Tech Note: If You See Multiple Selections For The Same Printer:
You may see your printer listed multiple times if you or your printer's software created
multiple printers in Windows's Printers and Faxes window. You can either delete
the extra printers in the Printers and Faxes window or enable Auto-Connect for all
of the 'printers'.
Step 3 - Using Your Printer Via Auto-Connect
Now that you have setup your printer via Auto-Connect, you're ready to print. There is nothing
special you need to do. Just print your documents as you would normally. Depending on your
printer, you may get a warning stating that your printer is disconnected. IGNORE THESE
WARNINGS as the Auto-Connect feature will connect the printer for you. Once the printer gets
'Auto-Connected', your print job will be sent to the printer (this may take a few seconds).
When the printer has finished printing, Auto-Connect will disconnect your printer and make it
available to other users.
About Multiple Print Jobs From Multiple Users
If you have 2 users printing to the same printer, Auto-Connect will connect the whichever computer
reaches the 4-Port Print Server first. The second user's print job will stay in the queue until the first
user finishes printing. Once the first user's print job is finished, the first user will be disconnected
and the second user will connect to the printer and his print job will automatically start.
Using The 4-Port Print Server System Tray Feature
The 4-Port Print Server system tray icon allows you to quickly:
• open the Keyspan Server Utility
• configure Auto-Connect settings
Keyspan:4-Port Print Server - User Manual
This User Manual applies to the Keyspan 4-Port Print Server Software Version 1.3.x. Patent Pending.
Rev 2005jun23 Page 15
• connect and disconnect to USB devices on your 4-Port Print Server
MACINTOSH NOTE:
The 4-Port Print Server System Tray is currently Windows only but a Mac OS X
version of this feature is currently in development. Please contact Keyspan for details.
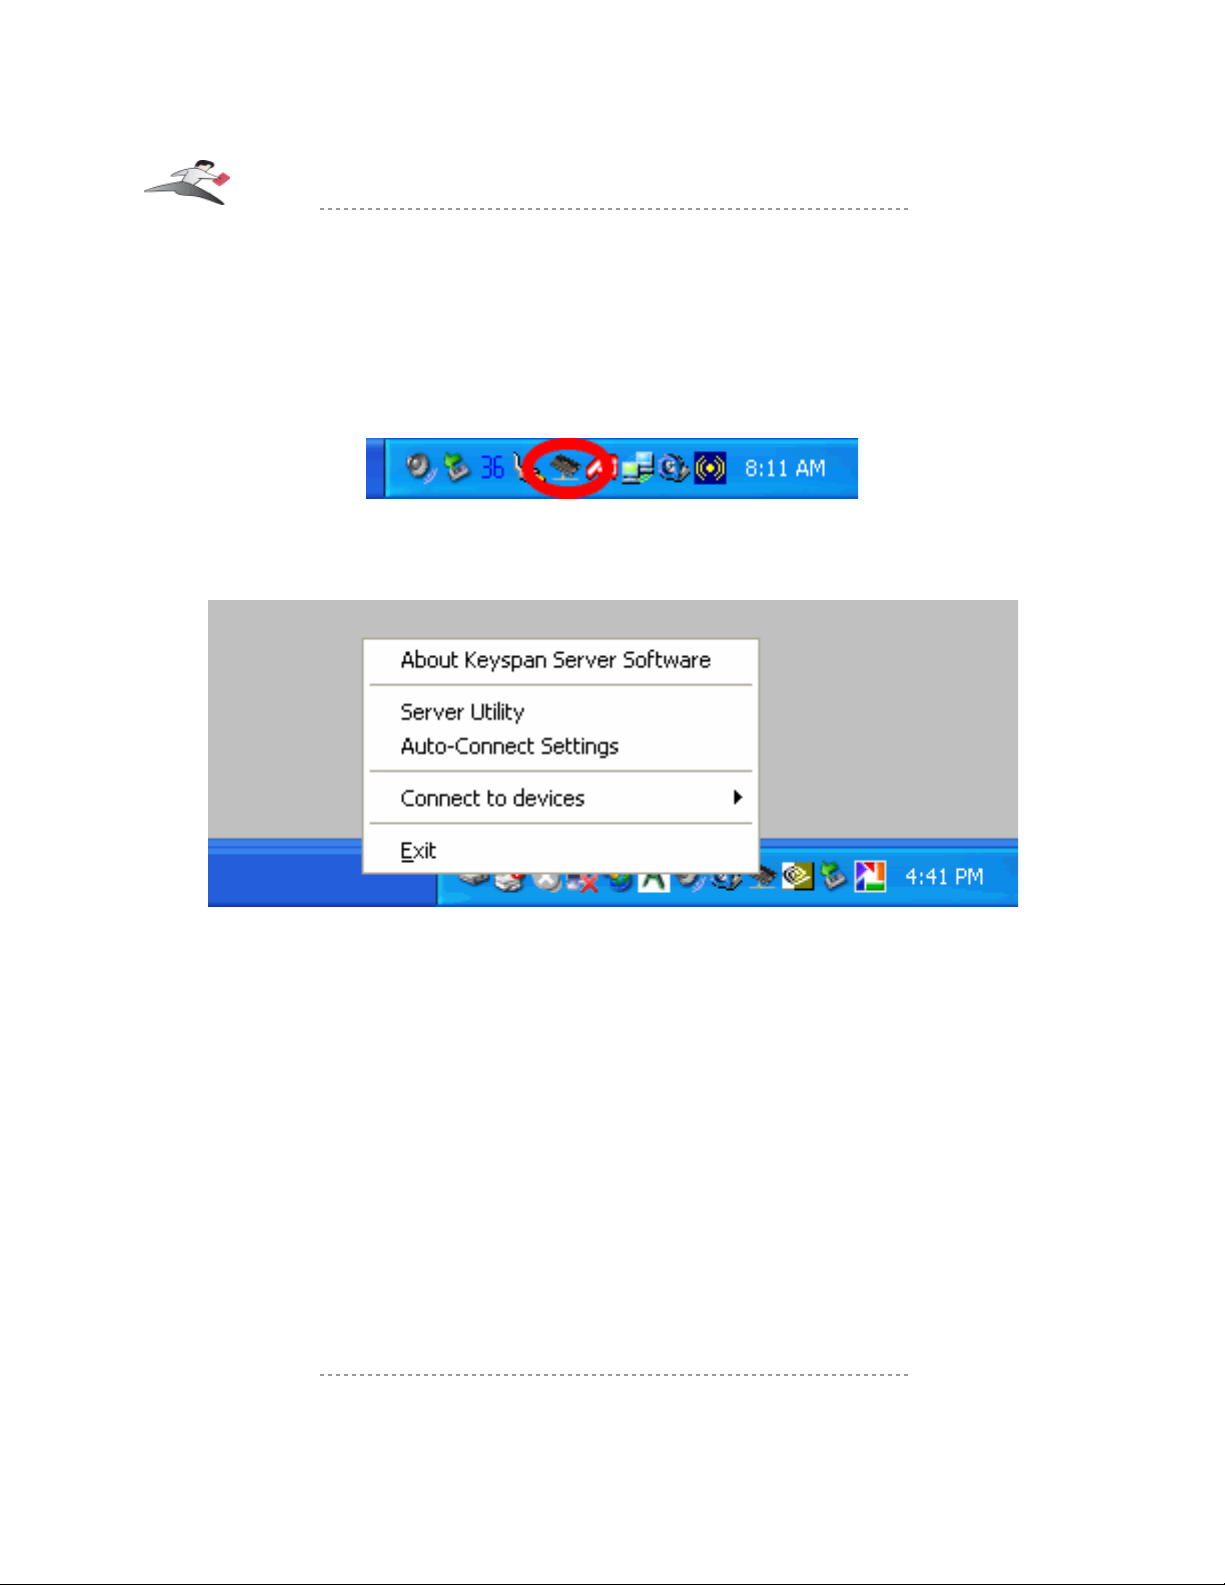
To do any of the above, first find the Keyspan 4-Port Print Server System Tray icon. The System
Tray is located in the lower right hand corner of your screen (next to the time).
Once you've found the 4-Port Print Server icon, right click the icon. This will bring up a sub menu
(see next image).
In the sub menu:
• ABOUT KEYSPAN SERVER SOFTWARE will open an about window that displays the
currently installed software versions.
• SERVER UTILITY will open the Keyspan Server Utility application. This is the same as
opening the Keyspan Server Utility application via the START menu.
• AUTO-CONNECT SETTINGS will open the Auto-Connect window. This is where you
configure your printers to use the Auto-Connect window. For details about this feature,
please read the Using Auto-Connect For Printers section earlier in this guide.
• CONNECT TO DEVICES allows you to connect to available USB devices without having
to open the Keyspan 4-Port Print Server program. To do this, just select your device from
the list. USB devices connected to your computer will show a check mark next to them.
USB Devices connected to other computers will not show up
Please note that this is the same thing as opening the Keyspan Server Utility software
Keyspan:4-Port Print Server - User Manual
This User Manual applies to the Keyspan 4-Port Print Server Software Version 1.3.x. Patent Pending.
Rev 2005jun23 Page 16
and manually connecting your printer. The System Tray icon makes connecting and
disconnecting USB devices faster and easier.
• EXIT will quit the Keyspan 4-Port Print Server System Tray icon. IMPORTANT!!! If the
Keyspan System Tray is not running (ie you selected exit), your printers will not AutoConnect. To fix this, restart your computer or re-launching the KEYSPAN 4-Port Print
Server TASK from START menu -> PROGRAMS -> STARTUP
Using The Auto-Connect Feature For Mac
This feature will automatically connect and disconnect printers whenever you have a print job
queued. This gives you a richer printing experience that is similar to using a print servers.
MACINTOSH NOTE:
Auto-Connect feature for Windows is configured differently on Mac OS X systems. If
you are interested in using the Auto-Connect feature for Windows, please read the Using
The Auto-Connect Feature For Windows subsection earlier in this section.
Before You Begin
Before you begin, please make sure that you have connected and installed your printer via the
Keyspan 4-Port Print Server's USB Devices tab (see the Using Your First USB Device sub
section earlier in the section).
To setup you printer for Auto-Connect, please follow these instructions:
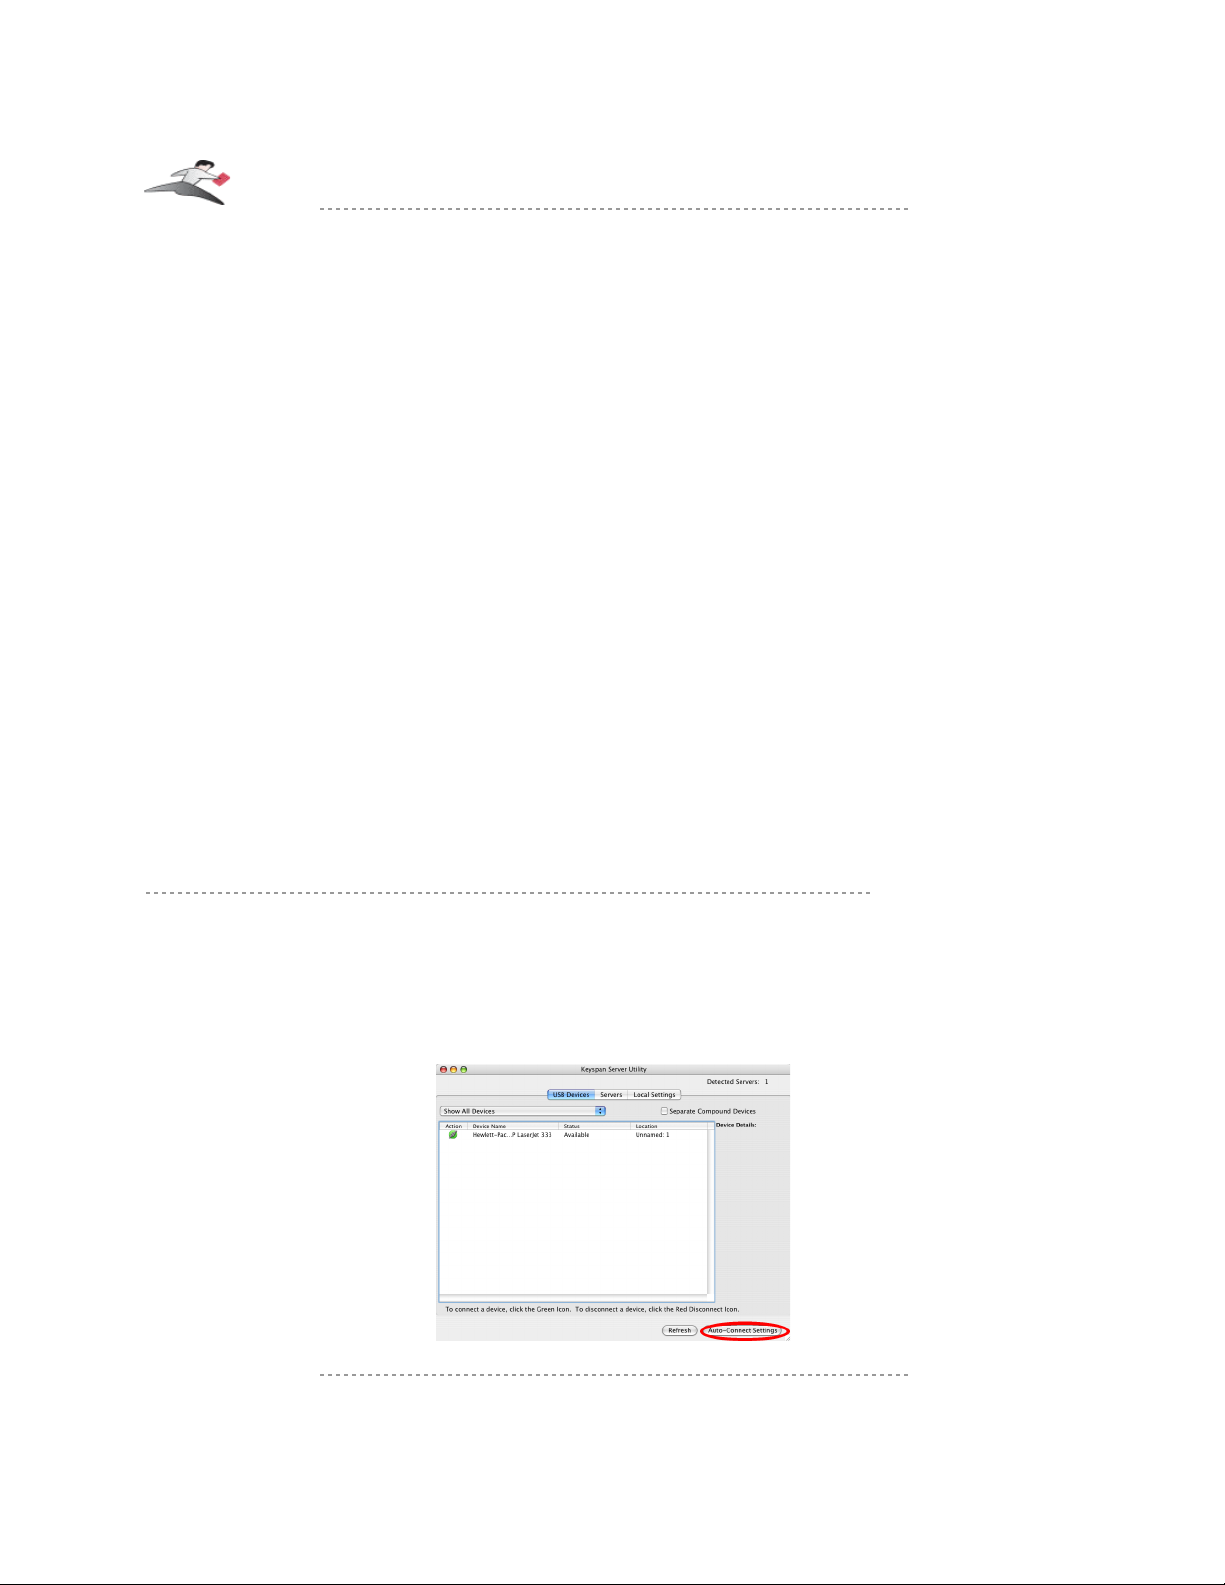
Step 1 - Access The 4-Port Print Server and Click The Auto-Connect Settings Button
Open the Keyspan Server Utility application. This application is located in your Applications
folder and is called Keyspan 4-Port Print Server.
Once you have opened the Keyspan Server Utility application, click the Auto-Connect Settings
button as shown below:
Keyspan:4-Port Print Server - User Manual
This User Manual applies to the Keyspan 4-Port Print Server Software Version 1.3.x. Patent Pending.
Rev 2005jun23 Page 17
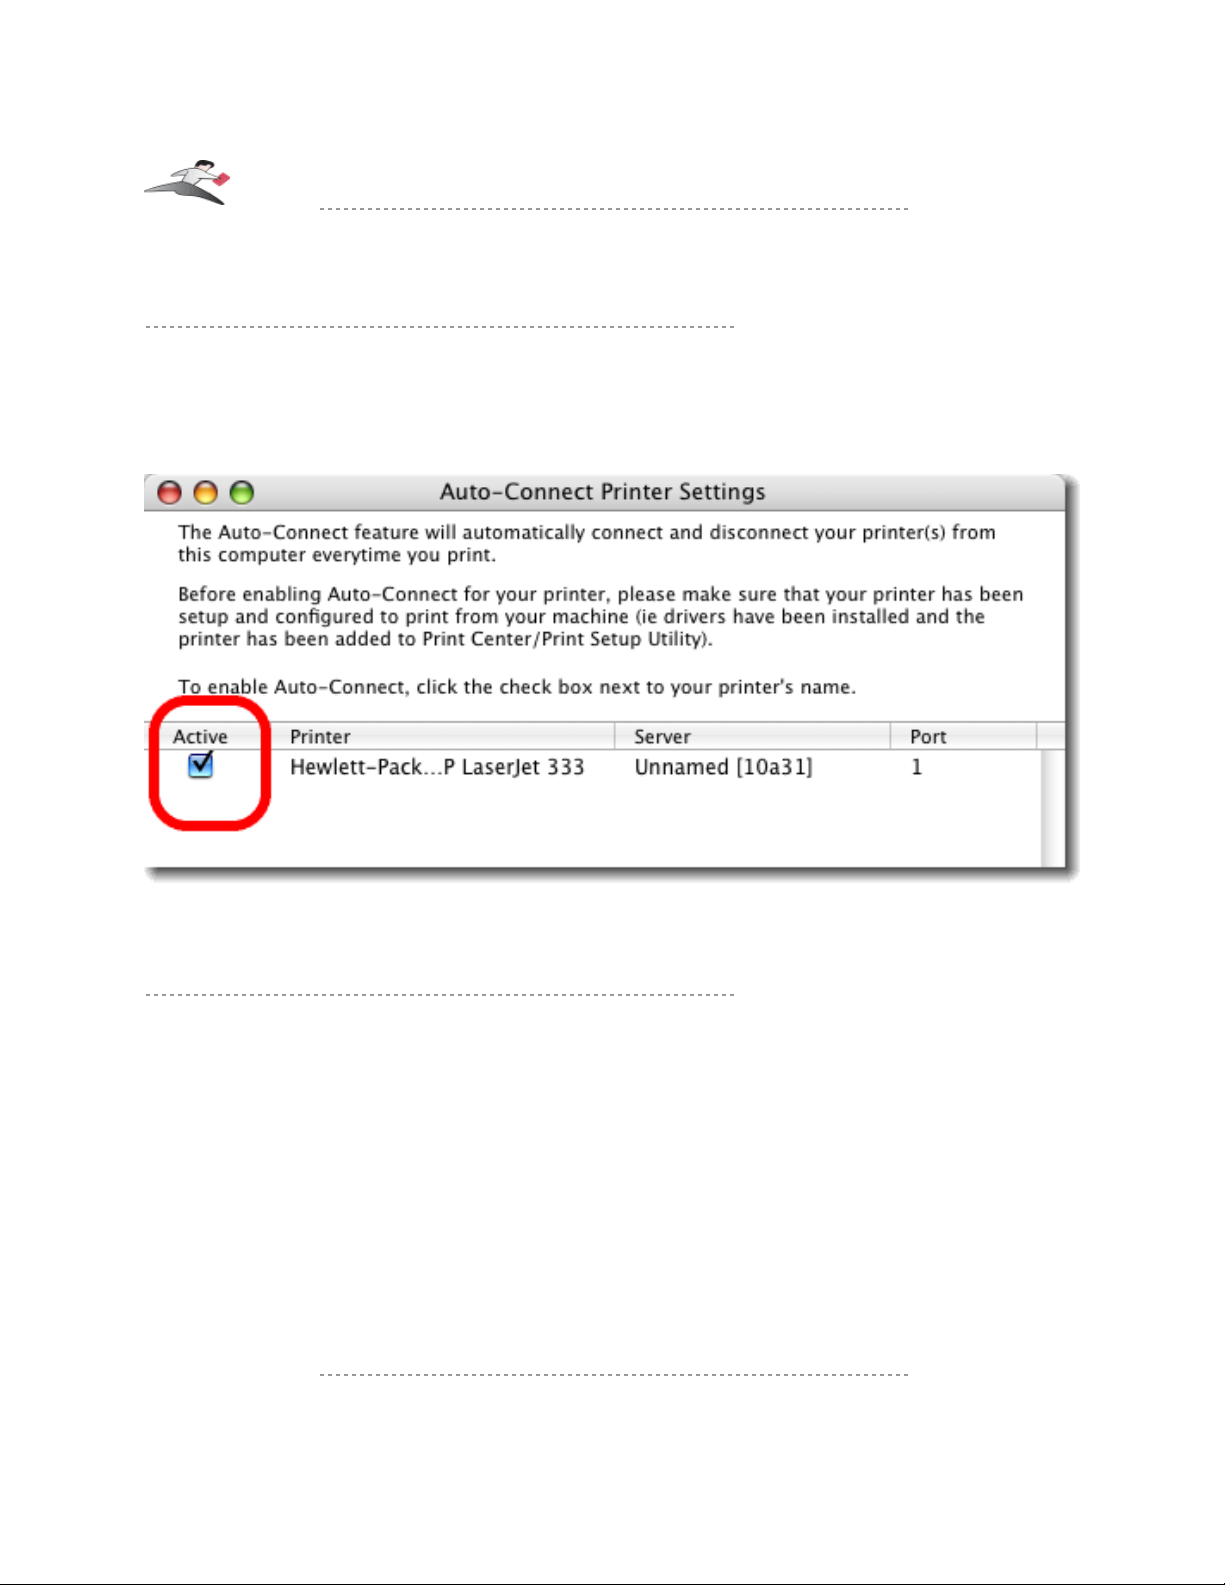
This will open the Auto-Connect Printer Settings window.
Step 2 - Enable Auto-Connect For Your Printers
In the Auto-Connect Printer Settings window, you will see printers that are connected to your 4Port Print Server(s). To enable Auto-Connect for your printer, check the check box next your
printer's name (as shown below).
Once you have enabled Auto-Connect for your printer(s), close this window.
Step 3 - Using Your Printer Via Auto-Connect
Now that you have setup your printer via Auto-Connect, you're ready to print. There is nothing
special you need to do. Just print your documents as you would normally. Depending on your
printer, you may get a warning stating that your printer is disconnected. IGNORE THESE
WARNINGS as the Auto-Connect feature will connect the printer for you. Once the printer gets
'Auto-Connected', your print job will be sent to the printer (this may take a few seconds).
When the printer has finished printing, Auto-Connect will disconnect your printer and make it
available to other users.
About Multiple Print Jobs From Multiple Users:
If you have 2 users printing to the same printer, Auto-Connect will connect the whichever computer
reaches the 4-Port Print Server first. The second user's print job will stay in the queue until the first
user finishes printing. Once the first user's print job is finished, the first user will be disconnected
and the second user will connect to the printer and his print job will automatically start.
Keyspan:4-Port Print Server - User Manual
This User Manual applies to the Keyspan 4-Port Print Server Software Version 1.3.x. Patent Pending.
Rev 2005jun23 Page 18

Note For Networks With Multiple Users:
Please note that Auto-Connect is enabled PER COMPUTER. If you have multiple computers, you
will need to enable Auto-Connect on each computer.
Using Device Force Disconnect
The Force Disconnect command allows you to disconnect a USB printer from another computer if
that USB printer that has been left 'in use' by another user. To Force Disconnect a device, select the
device in the USB Devices tab then select the Force Disconnect command from the Advanced
menu. Follow the instructions on screen to complete the process.
Please note that if your 4-Port Print Server has an administrator password enabled, you will be
asked to enter that password before you can Force Disconnect the selected USB printer.
IMPORTANT NOTE!!! Force Disconnect will disconnect a USB printer
that is connected to another user's computer. This is the same as
physically disconnecting the USB printer's cable from the USB port.
As with any USB printer, it is not recommended to disconnect (or
Force Disconnect) any USB printer while that device is in use (ie
disconnecting a printer while it's printing). You should only use
Force Disconnect if you are sure that the USB printer is not in use.
Please note that if your computers automatically 'sleep' (aka
'hibernate', 'power save', etc.), USB devices connected to the
sleeping computer will be released and made available to other users.
Turning off your computer will also release USB devices left in use.
Using The Single-User Connect Mode
The 4-Port Print Server has two Connect Modes: Multi-User and Single-User.
By default, the server is set to use the Multi-User mode. In Multi-User mode, USB devices are
shared in a one-user-at-a-time mode. This allows multiple computers to use one USB printer.
Again, you need to 'connect' to the USB printer before you can use it (thus preventing other users
from using your USB printer at the same time).
Single-User mode will automatically connect USB devices to your computer without you having to
connect or disconnect. When your 4-Port Print Server is set to Single-User mode, it will 'connect'
all of the USB devices connected to the server to the first computer (with Keyspan Server Utility
software) it detects. Use this mode, if A) you only have one computer or B) you have multiple
computers but only one computer will have access to the 4-Port Print Server.
Connect Mode (Multi-User or Single-User) can be configured in the 4-Port Print Server's Servers
tab. For details, please see the Changing 4-Port Print Server's Settings section later in this
manual.
The Single-User Connect Mode affects an entire 4-Port Print Server. Please note that you can also
Keyspan:4-Port Print Server - User Manual
This User Manual applies to the Keyspan 4-Port Print Server Software Version 1.3.x. Patent Pending.
Rev 2005jun23 Page 19
configure a single USB printer to be dedicated to particular computer and still share other USB
devices with other computers. For details, please see the XXXX section later in this manual.
USB Device Status Details
The Keyspan 4-Port Print Server's USB Devices tab will show the 'connection' Status of USB
devices connected to the server. The following is a list of the possible states of USB devices
connected to the 4-Port Print Server.
In the USB Devices tab, the following information is shown:
Available: The USB Device is available for use by any computer. To use this
device, click the green Connect button under the ACTION column.
Once you connect to the device, the status message will change to
Connected. If someone else uses the device, you will see the In Use
By [x] status.
Connected: The USB printer is connected to your computer. When the Status is
set to Connected, you have exclusive access to that USB printer.
Other users on the network will see the In Use By [x] status. To
make this device available for use by any computer, click the red
Disconnect icon
In Use By [x]: The USB printer is in use by another computer. You cannot use this
Keyspan:4-Port Print Server - User Manual
This User Manual applies to the Keyspan 4-Port Print Server Software Version 1.3.x. Patent Pending.
Rev 2005jun23 Page 20

device until the other computer finishes disconnects from that device
(making the device available again).
Note: The text in brackets shows the name of the 'client' that is using
that device. This client name is obtained from the computer's name (as
specified when that computer was setup). You can also change this
name in the 4-Port Print Server's LOCAL SETTINGS tab.
Auto-Connected: The USB printer (either a printer or a multifunction printer) has been
setup for Auto-Connect (the feature that automatically
connects/disconnects printers when you print). You cannot 'connect' to
a Auto-Connected printer as this is done for you automatically by the
Keyspan Server Utility software.
Note: For information on how to setup your printer for Auto-
Connect, please read the Using Auto-Connect Feature For
Windows/Mac subsections earlier in this document.
Password Required: The USB printer requires a password before you can connect to it.
You can password protect individual USB devices by editing your 4Port Print Server's settings in the Servers tab and then setting a
password in the USB Device Configuration tab. For details about
this tab, please read the USB Device Configuration tab subsection
later in this document.
Reserved/Dedicated: The USB printer is reserved/dedicated to your computer. Other
computers will show the device as Dedicated To [x]. You can
dedicate a single USB printer to specific computer by editing your 4Port Print Server's settings in the Servers tab and then setting a
password in the USB Device Configuration tab. For details about
this tab, please read the USB Device Configuration tab subsection
later in this document.
Connected Dedicated: The USB printer is reserved/dedicated to your computer. Other
computers will show the device as Dedicated To [x]. You can
dedicate a single USB printer to specific computer by editing your 4Port Print Server's settings in the Servers tab and then setting a
password in the USB Device Configuration tab. For details about
this tab, please read the USB Device Configuration tab subsection
later in this document.
Dedicated To [x]: The USB printer is reserved/dedicated to another computer. You
cannot connect connect to a device that is dedicated to another
computer. You can dedicate a single USB printer to specific computer
by editing your 4-Port Print Server's settings in the Servers tab and
Keyspan:4-Port Print Server - User Manual
This User Manual applies to the Keyspan 4-Port Print Server Software Version 1.3.x. Patent Pending.
Rev 2005jun23 Page 21

then setting a password in the USB Device Configuration tab. For
details about this tab, please read the USB Device Configuration tab
subsection later in this document.
You may now proceed to the next section in this guide...
Keyspan:4-Port Print Server - User Manual
This User Manual applies to the Keyspan 4-Port Print Server Software Version 1.3.x. Patent Pending.
Rev 2005jun23 Page 22
4 Changing 4-Port Print Server's Settings
Overview
The Keyspan 4-Port Print Server comes preconfigured for use with most networks. However, you
may want to change some of the Keyspan 4-Port Print Server's settings to meet specific needs
posed by your network and/or USB printer sharing needs. This section describes how to change
the 4-Port Print Server's settings and what the settings affect.
Editing A Specific 4-Port Print Server
To change the 4-Port Print Server's Servers settings, launch the Keyspan Server Utility
application.
MACINTOSH NOTE:
The Keyspan Server Utility application is located in your Applications folder.
Double click the Keyspan USB Server icon.
WINDOWS NOTE:
The Keyspan Server Utility application is located in your START menu ->
PROGRAMS -> KEYSPAN Server.
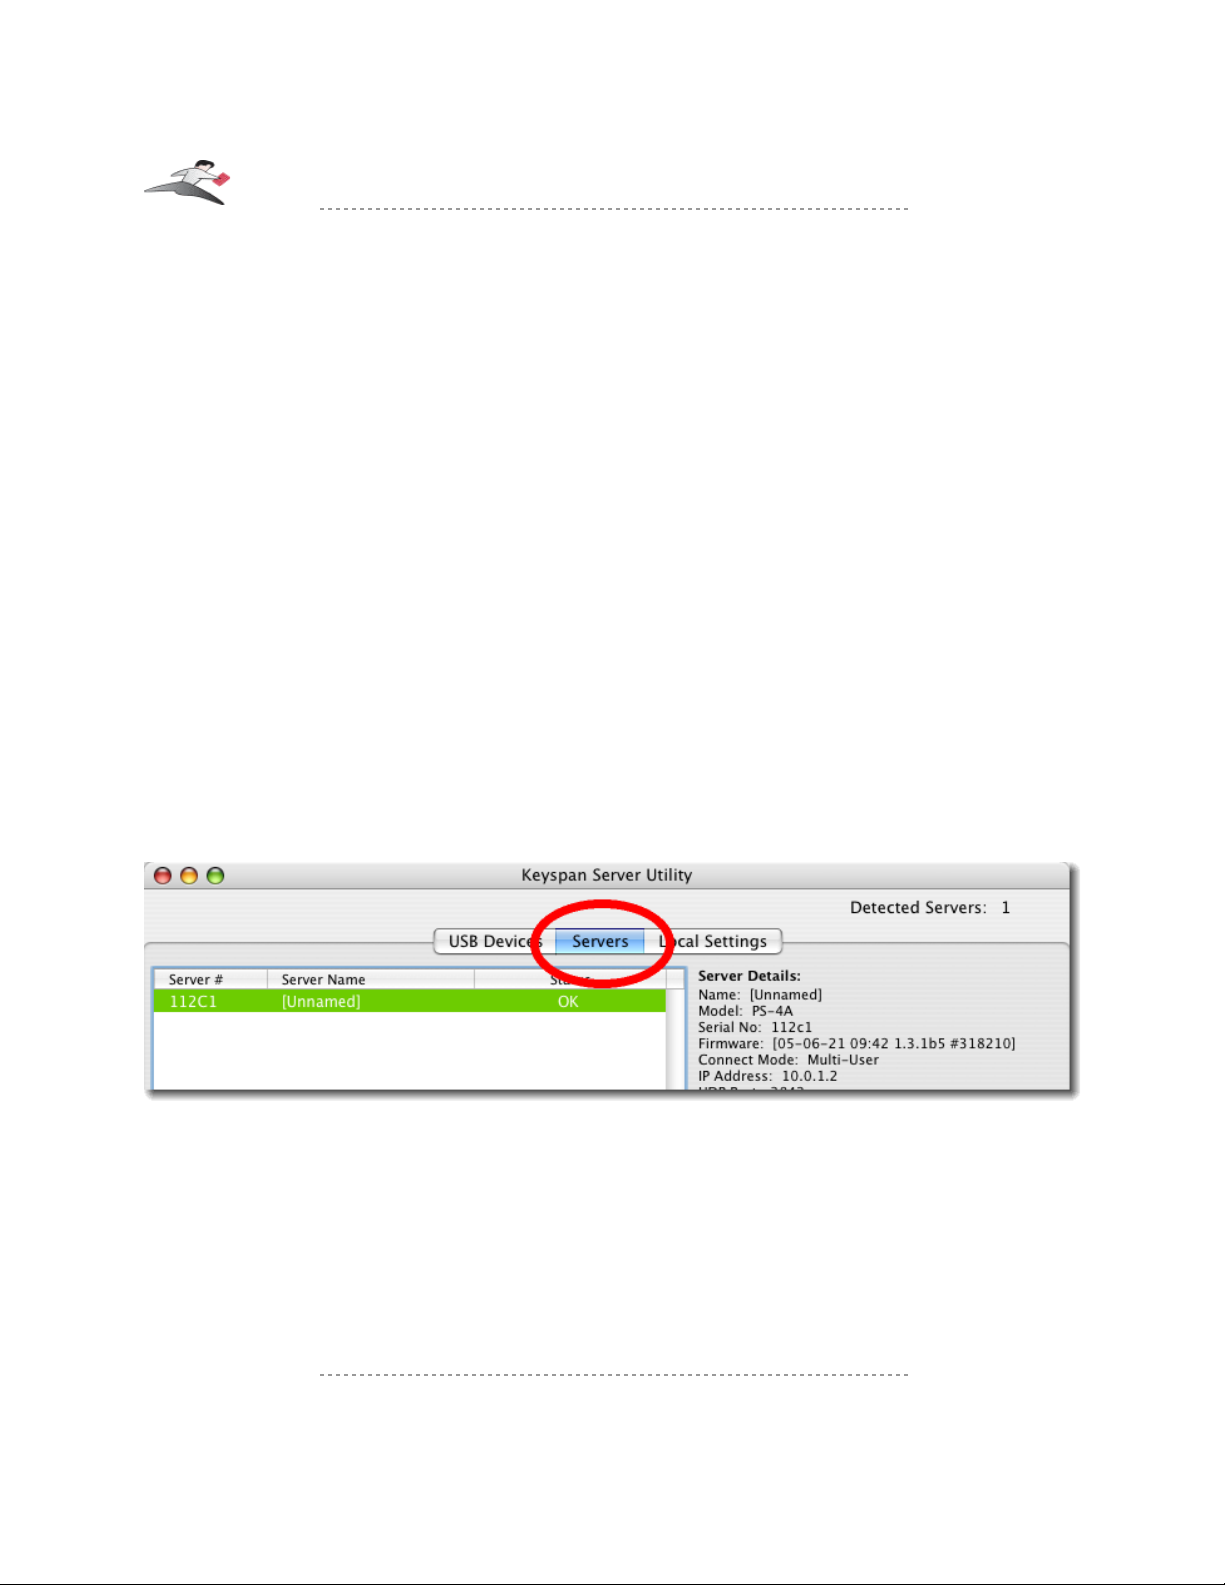
Once the Keyspan Server Utility application is open. Click on the Servers tab (see next image):
The Servers tab will show any 4-Port Print Server hardware it finds.
The Servers tab shows the following information:
Server #: Displays the last five numbers of your 4-Port Print Server's Network
Address/Mac Address. The full Network Access is printed on the bottom of
your 4-Port Print Server hardware.
Server Name: The name of your 4-Port Print Server. You can modify this name by selecting
Keyspan:4-Port Print Server - User Manual
This User Manual applies to the Keyspan 4-Port Print Server Software Version 1.3.x. Patent Pending.
Rev 2005jun23 Page 23

the server and clicking the Edit Server Config button.
Status: This is the current Status of your 4-Port Print Server's hardware and software.
This column will show if the Keyspan Server Utility software has successfully
communicated with your 4-Port Print Server hardware. For details, please see
the Server Status Details subsection later in this manual.
Server Status Details
The Server Status are:
OK: The Keyspan Server Utility software has successfully found the 4-Port
Print Server hardware. You can now communicate with the selected 4Port Print Server. Note: The 4-Port Print Server may have an Client
Access Password or a Configuration Password that would prevent
from users from using that specific server or changing the selected
server's configuration. For more information about these passwords,
please please see the 4-Port Print Server Settings : Access Tab
subsection later in this manual.
Old Firmware: The 4-Port Print Server hardware contains 'old' firmware. This
happens your computer has newer software than the firmware on the
4-Port Print Server hardware. If you see this message, you must
upgrade your 4-Port Print Server's firmware. To do this, select your 4Port Print Server in the Servers tab and click the Edit Server Config
button. For more details, please read the Updating Your 4-Port
Print Server's Firmware subsection later in this manual.
Temp. Defaults: The 4-Port Print Server hardware has been put into Temporary
Default Settings Mode. This mode allows you to temporarily return
the 4-Port Print Server to it's factory settings for diagnostics. You can
edit your previous setting while you are in the Temporary Default
Settings Mode. For more information about how to set your 4-Port
Print Server into Temporary Default Settings Mode, please please
see the Reboot Server Into 'Temporary Default Settings Mode'
Using The Reset Button subsection (in the Troubleshooting
section) later in this manual.
Login Failed: The 4-Port Print Server could not connect to the selected 4-Port Print
Server because the 4-Port Print Server has a password. You computer
either does not have a password set in the Server Access Settings
field in the Local Settings tab or you have entered an incorrect
password for your 4-Port Print Server. For more information about
these passwords, please please see the 4-Port Print Server Settings :
Access Tab subsection later in this manual. mismatch server discovery
information.
Keyspan:4-Port Print Server - User Manual
This User Manual applies to the Keyspan 4-Port Print Server Software Version 1.3.x. Patent Pending.
Rev 2005jun23 Page 24
 Loading...