


Federal Communications Commission (FCC) Notice
This device complies with Part 15 of the FCC rules. Operation is subject to the following two conditions
(1) This device may not cause harmful interference, and
(2) This device must accept any interference received, including interference that may cause undesired
operation.
This equipment has been tested and found to comply with the limits of a Class B digital device, pursuant to
Part 15 of the FCC Rules These limits are designed to provide reasonable protection against harmful
interference in a residential installation This equipment generates, uses and can radiate radio frequency
energy and, if not installed and used in accordance with the instructions, may cause harmful interference to
radio communications, However, there is no guarantee that interference will not occur in particular
installations If this equipment does cause harmful interference to radio or television reception, which can be
determined by turning the equipment off and on, the user is encouraged to try to correct the interference by
one or more of the following measures:
1. Reorient / Relocate the receiving antenna.
2. Increase the distance between the mouse and receiver.
3. Connect the equipment into an outlet on a circuit different from that the receiver is connected.
CAUTION:
Change or modifications not expressly approved by the manufacturer responsible for compliance could void
the user's authority to operate the equipment.
Version 1.0 (2007/08/20) ● © 2007 by MaxPoint Handelsges. mbH


1. Installation
1.1 System-Voraussetzungen
Diese Tastatur erfordert einen PC mit USB-Anschluss und einem der folgenden Betriebssysteme:
Windows 98SE / ME / 2000 / XP / Vista
1.2 Anschluss der Tastatur an den PC
Um Ihre Tastatur zu installieren, führen Sie bitte folgende Schritte aus:
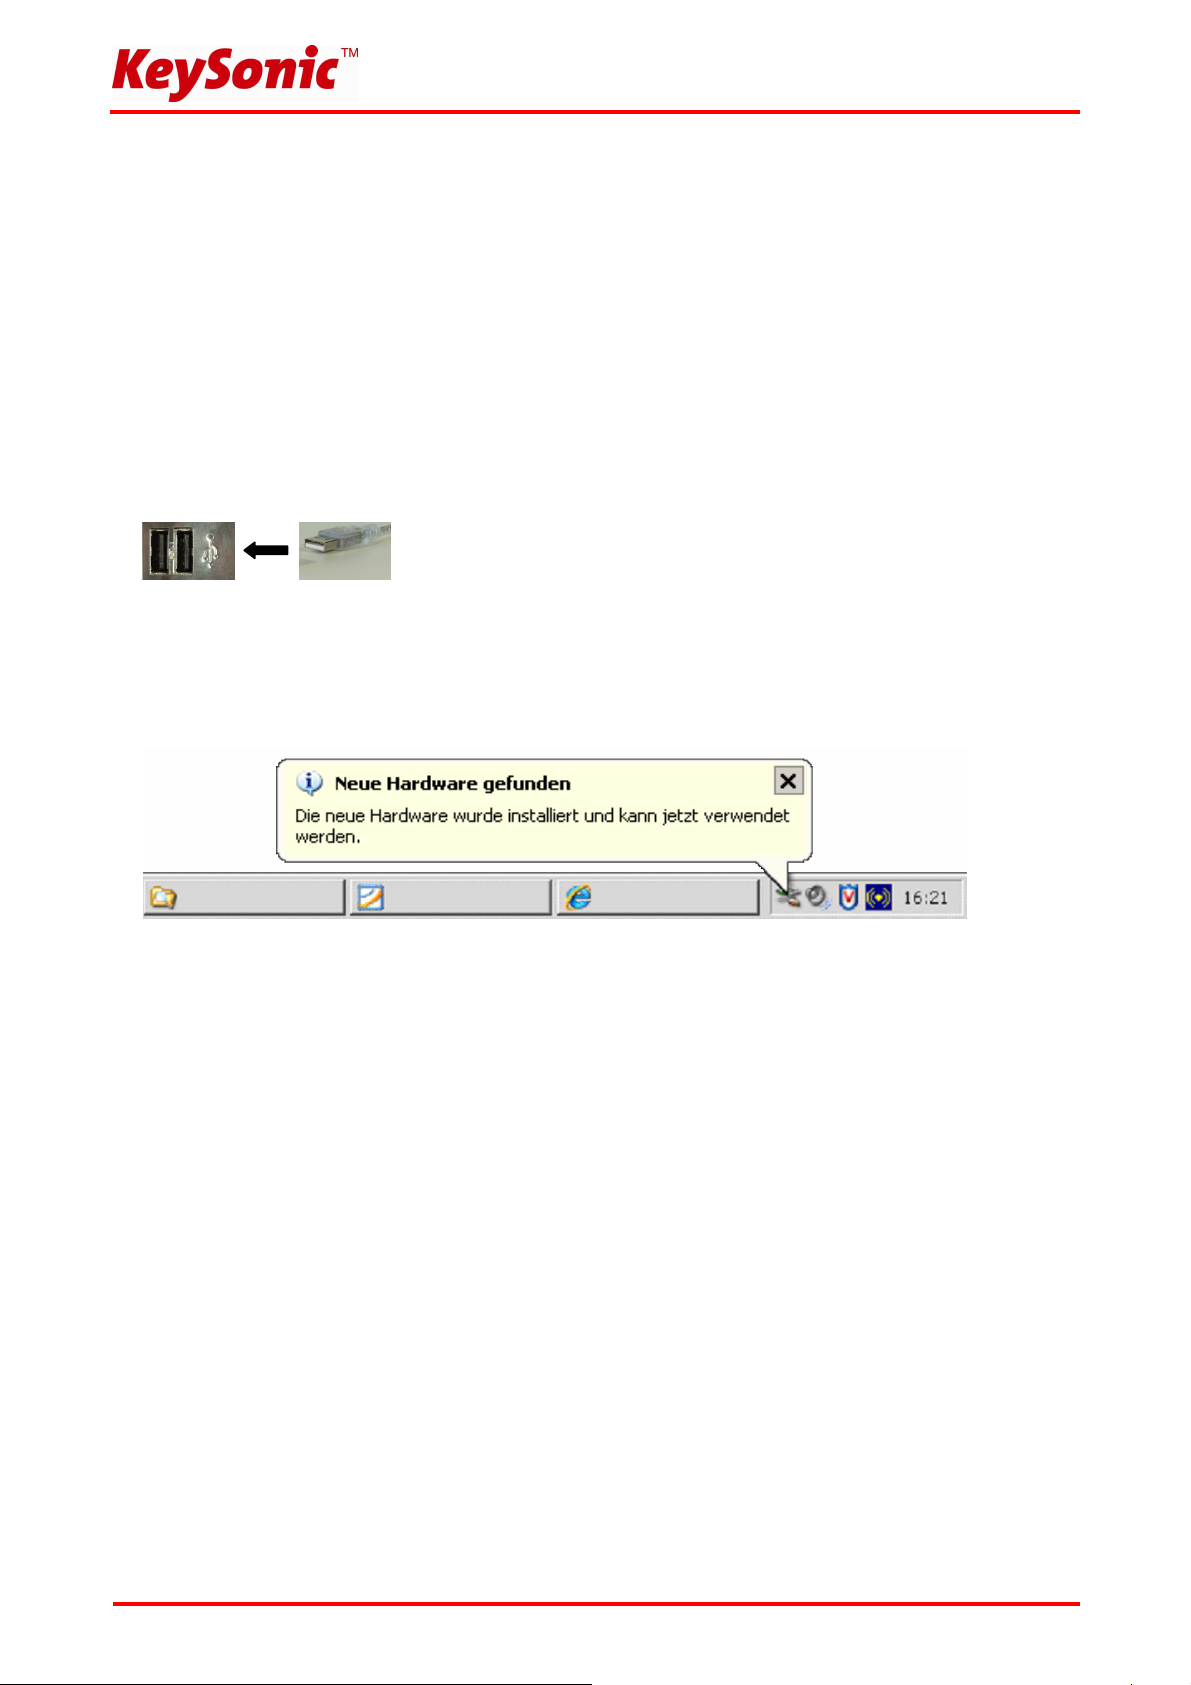
• Schließen Sie Ihre Tastatur über eine freie USB-Buchse an Ihren Rechner an.
• Alle aktuellen Betriebssysteme mit Unterstützung für Plug & Play werden Ihre Tastatur nun automatisch
erkennen und die erforderlichen Treiber laden. Während der Installationsphase informiert Sie Ihr
Betriebssystem mit Hilfe wechselnder Pop-up-Informationsfenster an der Task-Leiste über den aktuellen
Installationsstatus. Bitte haben Sie etwas Geduld, bis Sie das System abschließend über die erfolgreiche
Installation informiert. Die Tastatur ist nun einsatzbereit.
Ältere Betriebssysteme unterstützen nicht immer das automatische Erkennen von USB- oder PS/2-Geräten.
Haben Sie Ihre Tastatur über USB angeschlossen und macht sich genau dieser Fehler bei Ihnen bemerkbar,
so haben Sie folgende Möglichkeiten zur Lösung dieses Problems:
• Machen Sie ein Update Ihres Betriebssystems und beginnen wieder mit Schritt 1.2
• In manchen Fällen ist gemäß den Bildschirmanweisungen die Installations-CD Ihres Betriebssystems
erforderlich. Unter diesen Umständen folgen Sie bitte diesen Anweisungen.
• Kontrollieren Sie bei USB-Anbindung, ob Ihr BIOS-System USB-Tastaturen unterstützt*. Manche
Hersteller bieten BIOS-Updates im Internet zum Downloaden an.
• Stellen Sie in Ihren Systemeinstellungen sicher, dass der verwendete USB-Anschluss nicht im
Betriebssystem deaktiviert wurde*.
• Sollten System-Updates erfolglos bleiben, so empfiehlt es sich, die Tastatur mal an einen anderen PC mit
gleichem Betriebssystem zu testen, um ein Hardware-Defekt des Eingabegerätes auszuschließen.
* Einzelheiten entnehmen Sie der Dokumentation Ihres PCs.
Version 1.0 (2007/08/20) ● © 2007 by MaxPoint Handelsges. mbH
- 1 -
Bedienungsanweisung ACK-730 BK
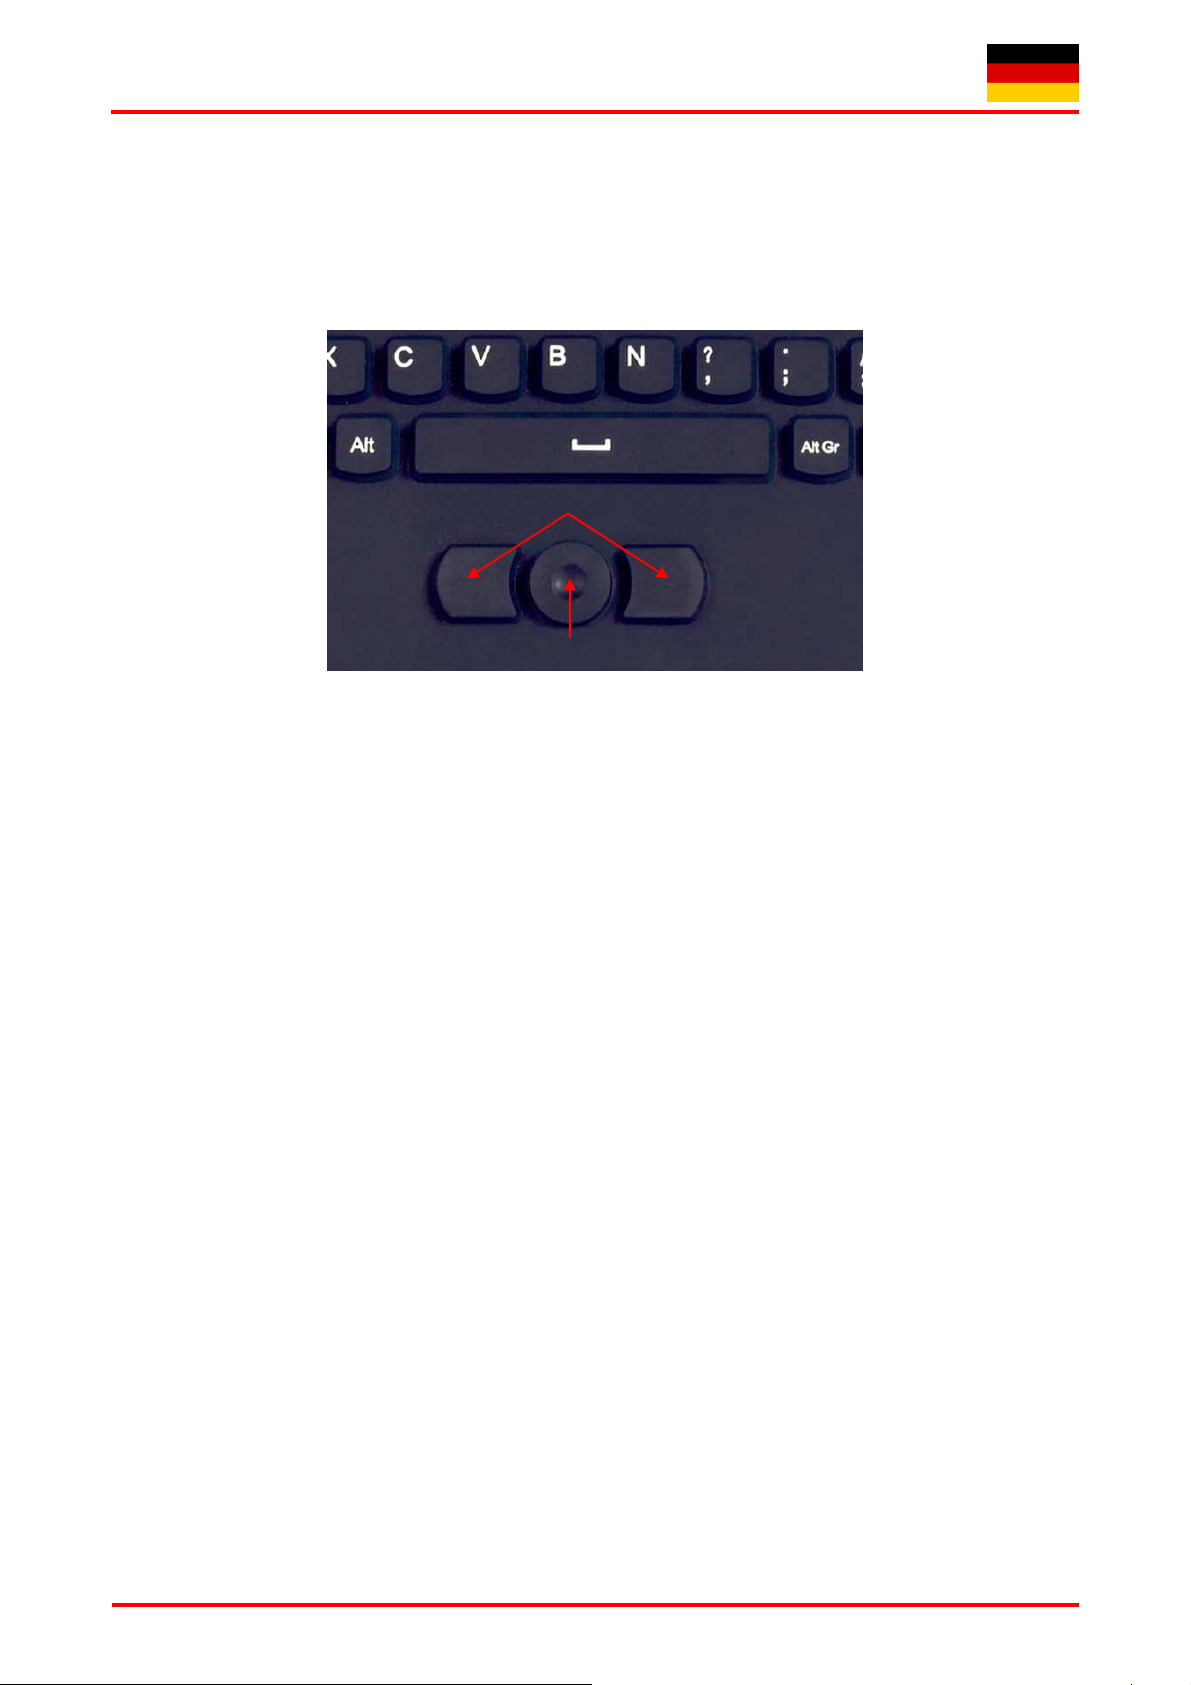
2. Bedienung der Tastatur – „Maus-Pointer“
Als Mausersatz ist diese Tastatur mit einem „Maus-Pointer“ einschließlich zwei Maus-Funktionstasten
ausgestattet, welches eine komfortable und ergonomische Bedienung des PCs ohne Verwendung einer
separat angeschlossenen Maus gestattet. Nach der erfolgreichen Installation der Tastatur ist die Bedienung
des „Maus-Pointers“ so einfach wie genial.
Maus-Funktionstasten
Maus-Pointer
• Legen Sie den Finger auf den „Maus-Pointer“ und drücken ihn auf der Außenkante in die Richtung, in der
Sie den Mauszeiger auf den Bildschirm bewegen möchten. Die Zeiger-Geschwindigkeit folgt dabei
proportional dem Druck auf dem „Maus-Pointer“.
• Die beiden Maus-Funktionstasten verwenden Sie, wie bei einer separat angeschlossenen Maus auch, als
linke und rechte Maustaste mit dessen bekannten spezifischen Funktionen.
• Bei Notebooks mit bereits integriertem „Touchpad“ und Mausfunktionstasten, müssen Sie bei der
Verwendung der Tastatur diese internen Steuergeräte u. U. deaktivieren, falls es zu Fehlermeldungen
oder Funktionsstörungen kommt*.
• Um die Doppelklick-Geschwindigkeit und die Geschwindigkeit der Cursorbewegungen langsamer oder
schneller zu machen, verändern Sie die Einstellungen der Maus-Optionen in Ihrer Systemsteuerung unter
Windows*.
3. Sicherheitshinweise
Warnung – Beschädigung der Tastatur bei folgenden Anwendungen:
• Kontakt mit scharfen Gegenständen
• Offenes Feuer oder Wärme über +80 °C
• Extreme Temperaturen unter –40 °C
• Vollständiges Eintauchen in Wasser einschließlich Tastaturkabel bzw. Batteriefach
• Unter schweren Gegenständen über eine längere Zeit lagern
• Kontakt mit folgenden Stoffen: Öle, Kohlenwasserstoffe (Benzin, Petroleum, Toluol etc.),
Azeton, aggressive Oxidationsmittel, hochkonzentrierte Säuren oder Laugen
- 2 -
Irrtümer und Auslassungen vorbehalten

1. Installation
1.1 System requirements
This keyboard requires a PC with USB connection and one of the following operating systems:
Windows 98SE / ME / 2000 / XP / Vista
1.2 Keyboard connection to the PC
In order to install your keyboard, please perform the following steps:
• Connect your keyboard to a free USB port on your computer.
• All state-of-the-art operating systems with Plug & Play support will recognize your keyboard automatically
and load the required drivers. During the phase of installation your operating system informs you via
changing pop-up information windows on the task-bar about the current status of installation. Please be
patient, until the system informs you finally about the successful installation. The keyboard is now ready
for operation.
Older operating systems not always support automatic recognition of USB or PS/2 devices. If you have
attached your USB receiver and exactly this error occurs on your system, you have the following alternatives
to solve the problem:
• Perform an update of your operating system and return to Step 1.2
• In some cases the installation CD of your operating system is necessary according to the instructions on
your screen. In this circumstance please follow these instructions.
• Check whether your BIOS system supports USB keyboards*. Some main board manufacturers offer
BIOS up-dates for download over the Internet.
• Ensure in your system settings, that the used USB connection was not deactivated in your operating
system*.
• Should your system-updates keep out of success, it is recommendable to test the keyboard with another
PC with the same operating system to rule out a hardware damage of the keyboard.
* Please refer details to the manual of your PC.
Version 1.0 (2007/08/20) ● © 2007 by MaxPoint Handelsges. mbH
- 3 -
Operation Manual ACK-730 BK
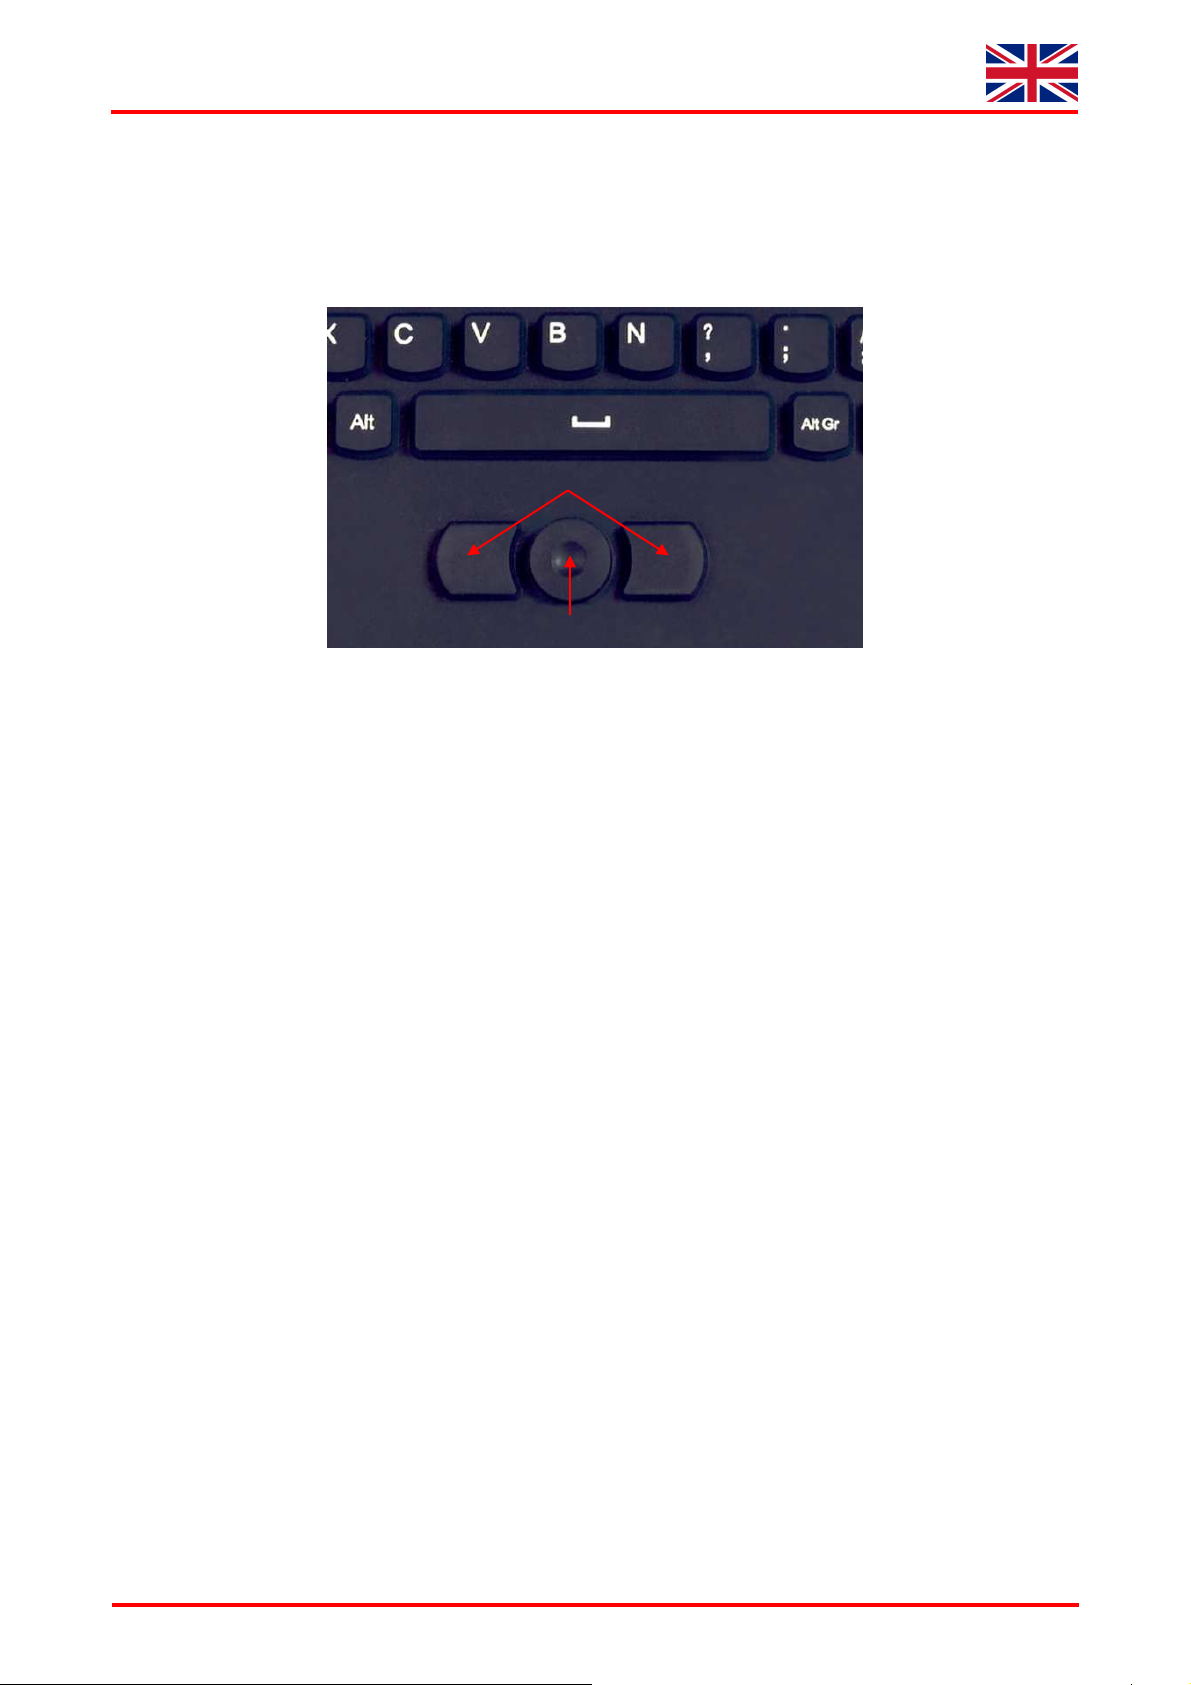
2. How to use the keyboard – “Mouse-Pointer”
As a mouse alternative the keyboard is equipped with a “mouse-pointer” inclusive two mouse function keys
allowing comfortable and ergonomic handling of the PC, without use of a separately attached mouse. After
successful installation of the keyboard the handling of the “mouse-pointer” is as simple as brilliant.
Mouse-Function Keys
Mouse-Pointer
• Place your finger on the “mouse-pointer” and press it on the outer edge to those direction you want to
move the cursor on your screen. The speed of the cursor follows proportionally to the pressure on the
“mouse-pointer”.
• The both mouse-function keys you can use as left and right mouse key with their well-known specific
functions like with a separate attached mouse.
• Using notebooks with already integrated “touchpad” and mouse function keys maybe you have to de-
activate these intern control devices in case of error messages or malfunctions*.
• In order to increase or decrease the speed of the cursor movements, change the settings of the mouse
options in your system control under Windows*.
3. Security advice
Warning — the keyboard gets damaged in the following cases:
• Contact with sharp objects
• Open fire or heat above +80 °C (+176 °F)
• Extreme temperatures below –40 °C (–40 °F)
• Complete immersion in water including the keyboard cable or battery case
• Storage under heavy objects for a long time
• Exposure to the following chemicals: Oils, hydrocarbons (gasoline, petroleum, toluene etc.), acetone,
aggressive oxidizers, highly concentrated acids and alkaline solutions
- 4 -
E&OE
1. Installation
1.1 Demandes au Système
Ce clavier demande un PC avec connexion USB et un des systèmes d’exploitation suivants :
Windows 98SE / ME / 2000 / XP / Vista
1.2 Connexion du clavier à l’ordinateur
Pour installer votre clavier, exécutez les pas suivants :
• Branchez votre clavier à une borne USB libre sur votre ordinateur.
• Tous systèmes d’exploitation actuels qui supportent « Plug & Play » reconnaîtront votre clavier
automatiquement et lanceront les pilotes nécessaires. Pendant la phase de l'installation, votre logiciel
d'exploitation vous informe de changer les fenêtres instantanées de l'information sur la barre d'outils au
sujet de l'état actuel de l'installation. Veuillez patienter, jusqu'à la fin que le système vous informe la fin de
l'installation. Le clavier est maintenant prêt pour l'opération.
Des logiciels d'exploitation d'une version ancienne ne soutiennent pas toujours automatiquement
l'identification de USB ou PS/2. Si vous avez attaché votre récepteur USB et se produit exactement cette
erreur sur votre système, vous avez les solutions de rechange suivantes pour résoudre le problème :
• Mettez votre système d’exlpoitation à jour er retournez à Pas 1.2
• Dans certains cas, le CD d'installation de votre logiciel d'exploitation est indissociablement selon les
instructions sur votre écran. Dans cette circonstance, veuillez suivre ces instructions.
• Vérifier si votre système BIOS soutient le clavier de USB*. Certains fabricants de cartes mères offrent la
mise à jour de BIOS par téléchargement en ligne.
• Vérifier sur l'option du votre système que la connexion USB utilisée n'est pas désactivée sur votre
système*.
•
Si votre système mise à jour n'arrive toujours pas à installer successivement, nous vous conseillons de
tester le clavier sur un autre PC avec le même système d'exploitation pour exclure le dommage du
récepteur USB.
*Consultez le documentation de votre PC pour détails.
Version 1.0 (2007/08/20) ● © 2007 by MaxPoint Handelsges. mbH
- 5 -

Manuel d’Utilisation ACK-730 BK
2. Utilisation du Clavier – « Pointeur de la souris »
Le clavier est équipé d'un « Pointeur de la souris » avec deux boutons des fonctions du souris comme une
souris alternative, qui permet d'avoir une manipulation confortable et ergonomique de l'ordinateur, sans
utilisation d'une souris séparément attachée. Après l'installation réussie de votre clavier la manipulation du
« Pointeur de la souris » est aussi simple que brillante.
Touches de fonction de souris
Pointeur de la souris
• Mettre votre doigt sur le “pointeur de la souris“ et glisser sur la bordure externe des directions que vous
voulez déplacer le curseur sur votre écran. La vitesse du curseur est définit proportionnellement par un
click sur le pointeur de la souris.
• Vous pouvez utiliser ces deux boutons de fonction de la souris comme la bouton gauche et droit avec
leurs fonctions spécifiques assez connues comme une souris attachée séparée.
• En utilisant un portable intégré déjà le « touchpad » et les touches multifonctionnels, il faut que vous
désactivez le logiciel du contrôle interne de votre portable en évitant les messages d'erreurs ou de
fonctionnements défectueux*.
• Changer les options de votre souris dans la rubrique du contrôle du système sous Windows afin
d'augmenter ou diminuer la vitesse des mouvements de curseur*.
3. Avis de sécurité
Avertissement — le clavier est dommagé en les cas suivants :
• Contact aux objets coupants
• Feu ouvert ou températures au-dessus de +80 °C
• Températures extrêmes au-dessous de –40 °C
• Immersion complète en eau (avec le câble du clavier et boîte de batterie)
• Stockage à long temps sous objets lourds
• Exposition aux agents suivants : Huiles, carbures d’hydrogène (essence, pétrole, toluène etc.), acétone,
oxydants agressifs, acides et alcaliques très concentrés
- 6 -
Reservados errores y omisiones
 Loading...