


Federal Communications Commission (FCC) Notice
This device complies with Part 15 of the FCC rules. Operation is subject to the following two conditions
(1) This device may not cause harmful interference, and
(2) This device must accept any interference received, including interference that may cause undesired operation.
This equipment has been tested and found to comply with the limits of a Class B digital device, pursuant to Part 15 of the FCC Rules
These limits are designed to provide reasonable protection against harmful interference in a residential installation This equipment
generates, uses and can radiate radio frequency energy and, if not installed and used in accordance with the instructions, may cause
harmful interference to radio communications, However, there is no guarantee that interference will not occur in particular installations If
this equipment does cause harmful interference to radio or television reception, which can be determined by turning the equipment off
and on, the user is encouraged to try to correct the interference by one or more of the following measures:
1. Reorient / Relocate the receiving antenna.
2. Increase the distance between the mouse and receiver.
3. Connect the equipment into an outlet on a circuit different from that the receiver is connected.
CAUTION:
Change or modifications not expressly approved by the manufacturer responsible for compliance could void the user's authority to
operate the equipment.
Version 1.1 (2008/06/05) ● © 2008 by MaxPoint Handelsges. mbH

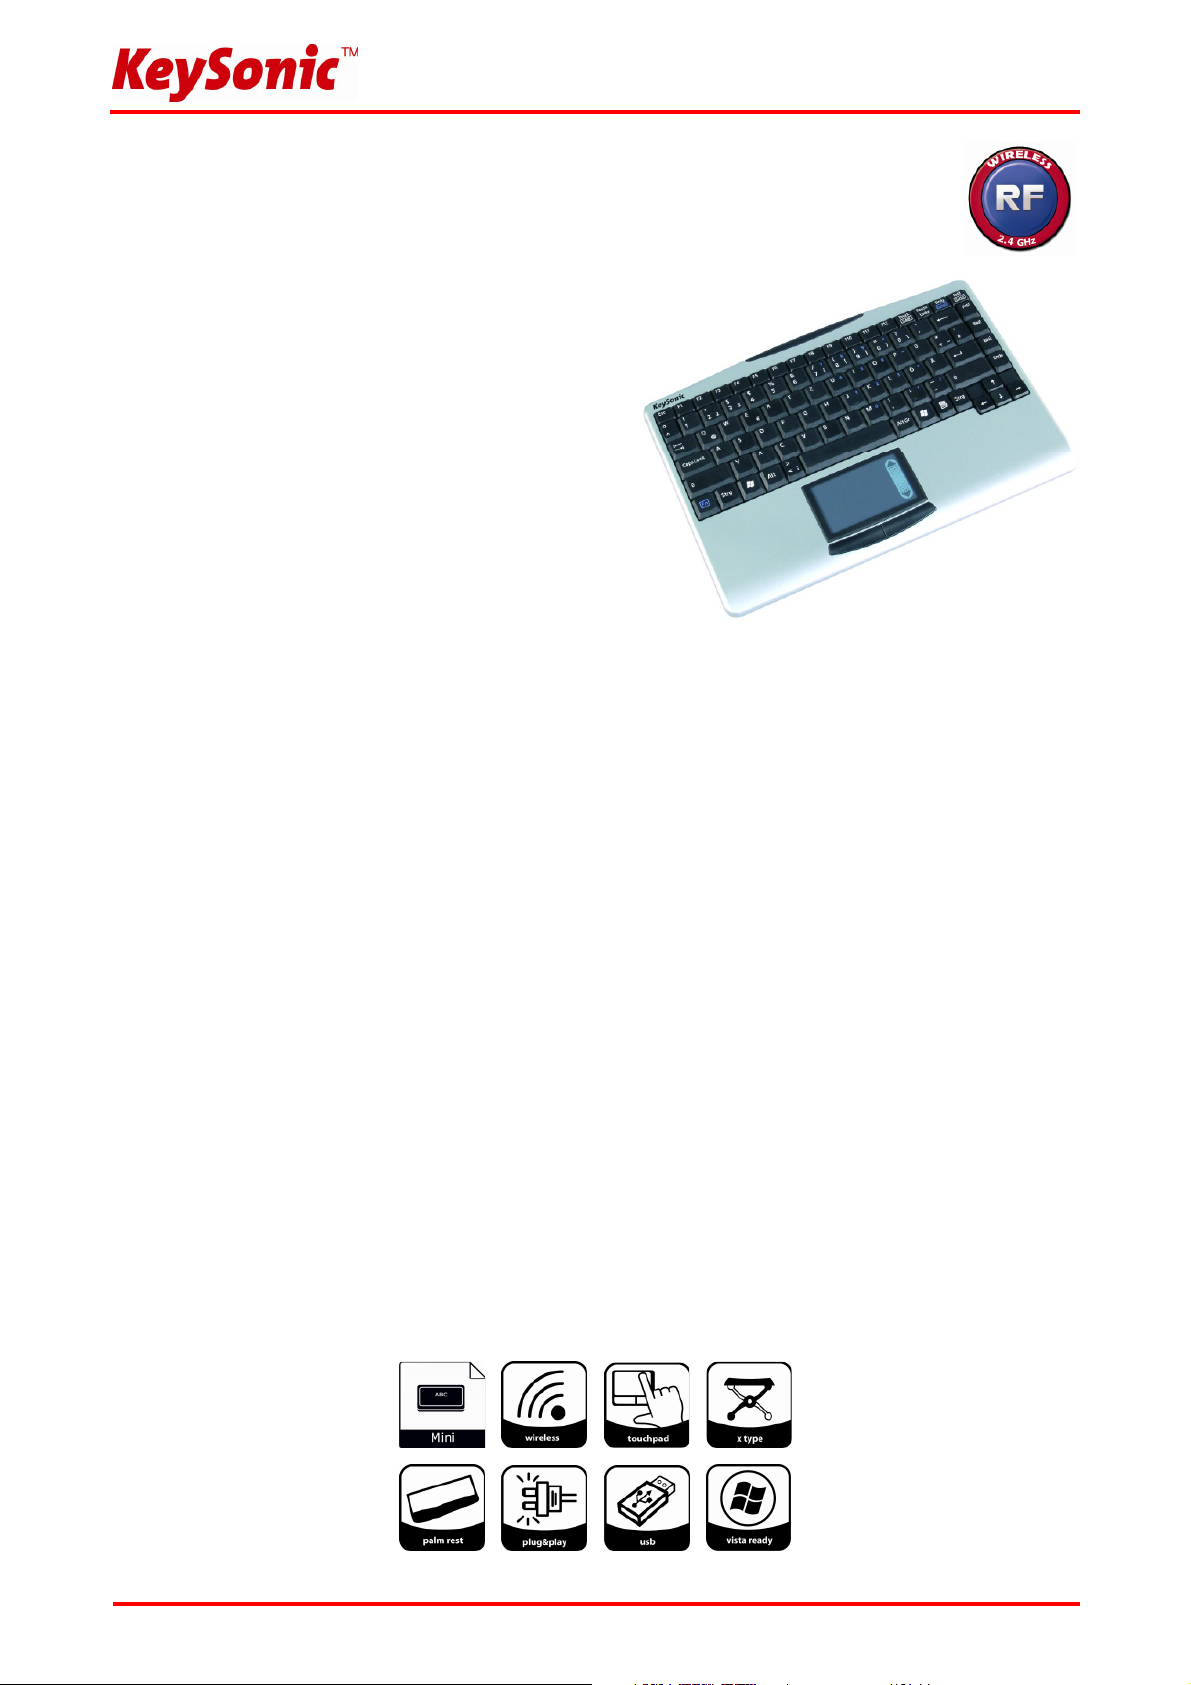
1. Einleitung ACK-540 RF
1.1 Besondere Eigenschaften
• Kabellose Mini-Tastatur mit integriertem Touchpad
• Weitreichende und zuverlässige 2,4 GHz Funkübertragung
bis ca. 10 m Entfernung zum PC
• Integriertes 1000 dpi Touchpad mit
Scroll- Page-Area und 2 Mausfunktionstasten
• Besonders flache Bauform mit eingearbeiteter
Handballenauflage für eine komfortable Bedienung
• Volle Funktionalität einer Tastatur mit Full-Size-Layout
durch integrierten Nummernblock und 12 Funktionstasten
• Besonders leiser und spürbarer Anschlag durch
hochwertige X-Type-Membrantechnologie
• Klappfüße zur Verstellung des Anstellwinkels für eine
ergonomische und ermüdungsfreie Arbeitsweise
• Plug & Play-Installation ohne speziellen Treiber
• Optimal für Digital Living Rooms (HTPC) sowie
Schulungs-, Konferenz- und Präsentationsräume etc.
1.2 Technische Daten
Anzahl Tasten: 88
Bauart: X-Type-Membrantechnologie
Zu erwartende Lebensdauer: ca. 7 Mio. Anschläge / Taste
Betätigung: 3,0 ±0,5 mm (Gesamtweg)
Druckpunkt: 55 ±15 g
Funkübertragung: 2,4 – 2,483 GHz, ISM-Band, GFSK, 1 Kanal
Geräteerkennung: 256 IDs (Mögliche Anzahl mehrerer Tastaturen in einem „Raum“)
Effektive Funkreichweite: ca. 10 m
Batterietyp: 4× AAA 1,5 V
Spannungsversorgung: Tastatur +6 VDC ±5 % Receiver: +5 VDC ±5 %
Stromaufnahme max.: Tastatur: 7 mA Receiver: 60 mA
Tastatur Standby: 5 mA (nach 1 Sek.)
Tastatur Sleep-Mode: 150 µA (nach 30 Min.)
Temperatur: Betrieb: -5 °C bis +40 °C
Lagerung: -20 °C bis +65 °C
Feuchtigkeit: Betrieb und Lagerung: 10 % bis 85 % rel.
Abmessungen ca.: Tastatur: 300 x 210 x 20,5 mm Receiver: 80 x 22 x 14 mm
Gewicht ca.: Tastatur: 570 g (inkl. Batterien) Receiver: 12 g
Schnittstelle: USB (für Empfangsstecker)
Lieferumfang: Tastatur, USB-Empfangsstecker, 1 Satz Batterien, Bedienungsanleitung
Farbe: schwarz/silber
Zertifiziert: CE, FCC, WEEE/RoHS
Kompatibilität: Win 98SE / ME / 2000 / XP / Vista
Version 1.1 (2008/06/05) ● © 2008 by MaxPoint Handelsges. mbH
- 1 -
Bedienungsanweisung ACK-540 RF
2. Installation
2.1 System-Voraussetzungen
Diese Tastatur erfordert einen PC mit USB-Anschluss und einem der folgenden Betriebssysteme:
Windows 98SE / ME / 2000 / XP / Vista
Für die Installation der Tastatur unter den o. g. Betriebssystemen benötigen Sie KEINEN speziellen Treiber!
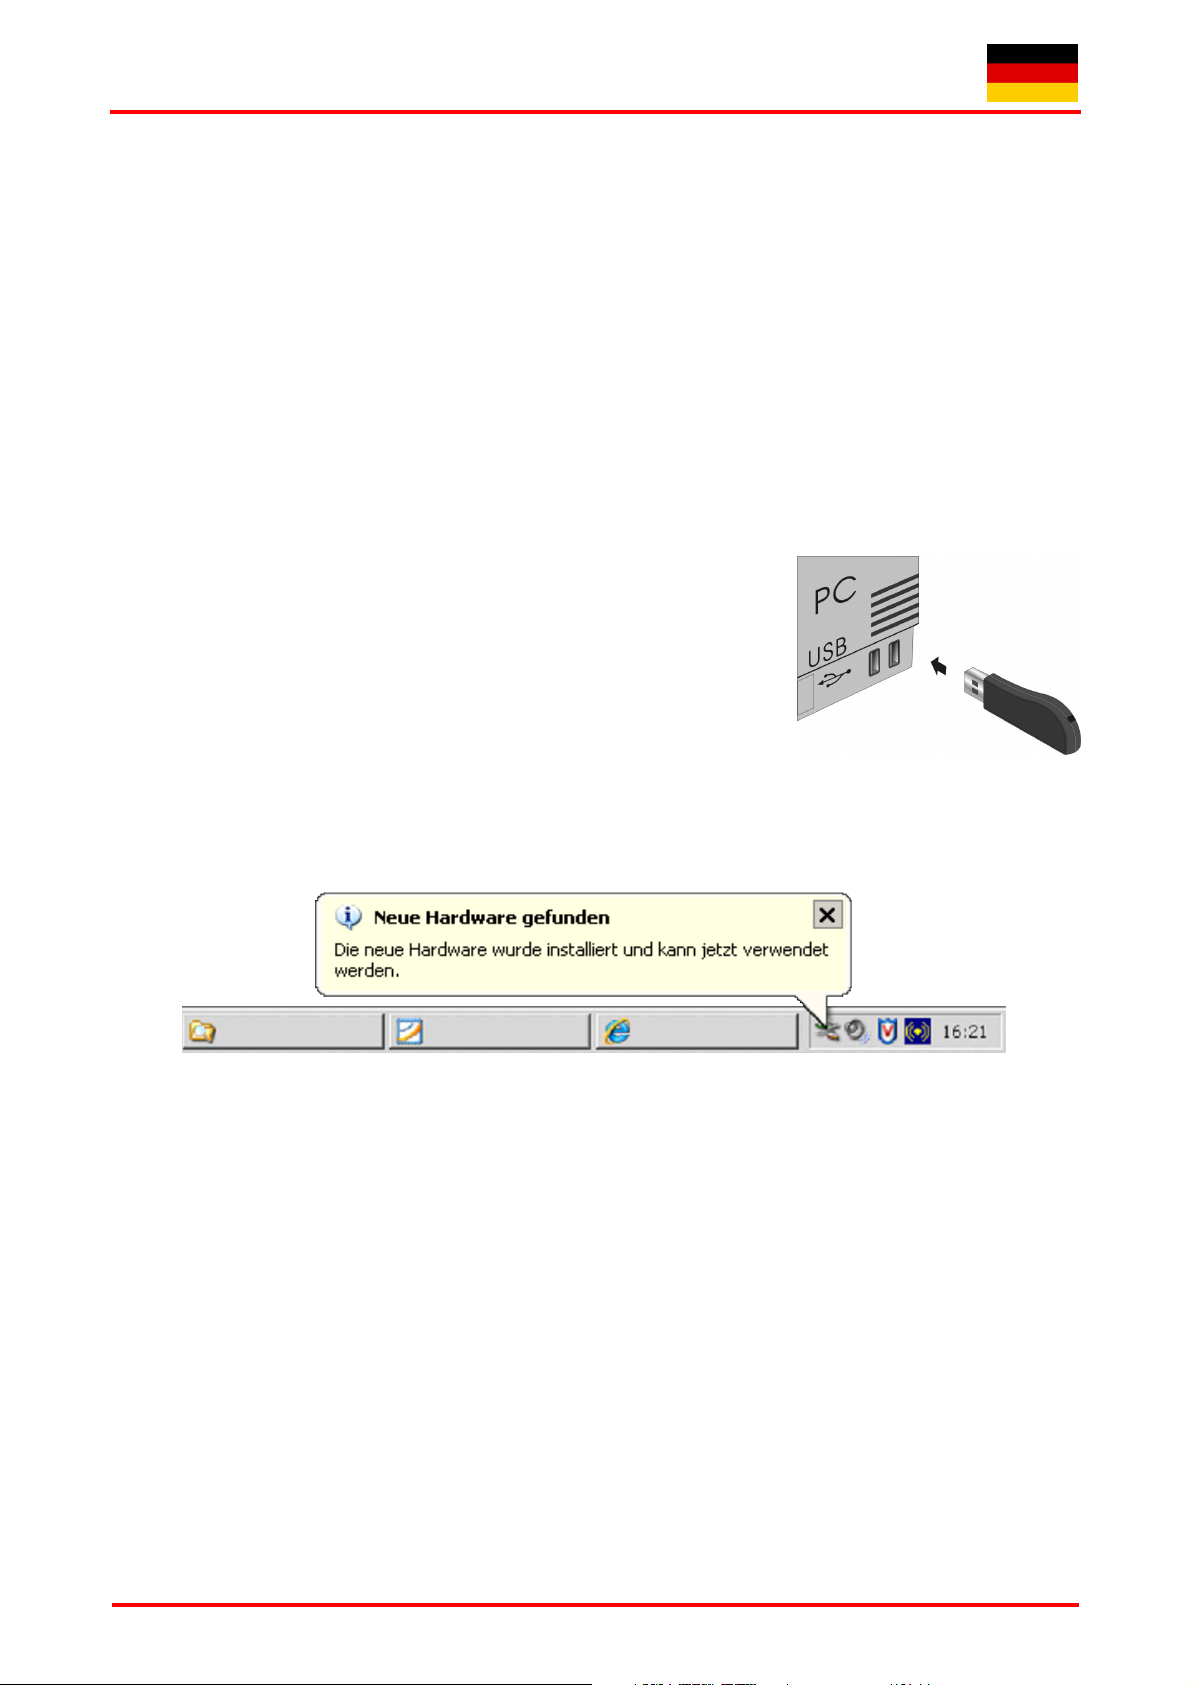
2.2 Installation des USB-Receivers
Um Ihre Tastatur zu installieren, führen Sie bitte folgende Schritte aus:
• Stecken Sie den im Lieferumfang enthaltenen USB-Receiver
(Empfangsstecker) an eine freie USB-Buchse Ihres Rechners.
Hinweis: Bitte gewährleisten Sie, dass der USB-Receiver einen
Mindestabstand von 20 cm zu metallischen Trennwänden, anderen
Computergehäusen, Monitoren, ZIP-Laufwerken, Lautsprechern und
Schaltnetzteilen einhält.
• Alle aktuellen Betriebssysteme mit Unterstützung für Plug & Play
werden Ihren USB-Receiver nun automatisch erkennen und die erforderlichen Treiber laden. Während
der Installationsphase informiert Sie Ihr Betriebssystem mit Hilfe wechselnder Pop-up-Informationsfenster
an der Task-Leiste über den aktuellen Installationsstatus. Bitte haben Sie etwas Geduld, bis Sie das
System abschließend über die erfolgreiche Installation informiert. Der USB-Receiver ist nun einsatzbereit.
Ältere Betriebssysteme unterstützen nicht immer das automatische Erkennen von USB- oder PS/2-Geräten.
Haben Sie den USB-Receiver angeschlossen und macht sich genau dieser Fehler bei Ihnen bemerkbar, so
haben Sie folgende Möglichkeiten zur Lösung dieses Problems:
• Machen Sie ein Update Ihres Betriebssystems und beginnen wieder mit Schritt 2.2
• In manchen Fällen ist gemäß den Bildschirmanweisungen die Installations-CD Ihres Betriebssystems
erforderlich. Unter diesen Umständen folgen Sie bitte diesen Anweisungen*.
• Kontrollieren Sie, ob Ihr BIOS-System USB-Tastaturen unterstützt*.
Manche Hersteller bieten BIOS-Updates im Internet zum Downloaden an.
• Stellen Sie in Ihren Systemeinstellungen sicher, dass der verwendete USB-Anschluss nicht im
Betriebssystem deaktiviert wurde*.
• Sollten System-Updates erfolglos bleiben, so empfiehlt es sich, die Tastatur mal an einen anderen PC mit
gleichem Betriebssystem zu testen, um ein Hardware-Defekt des USB-Receivers auszuschließen.
* Einzelheiten entnehmen Sie der Dokumentation Ihres PCs.
- 2 -
Irrtümer und Auslassungen vorbehalten
4
×
2.3 Installation der Tastatur
• Empfohlene Voraussetzung dazu ist die erfolgreiche Installation des USB-Receivers unter Punkt 2.2
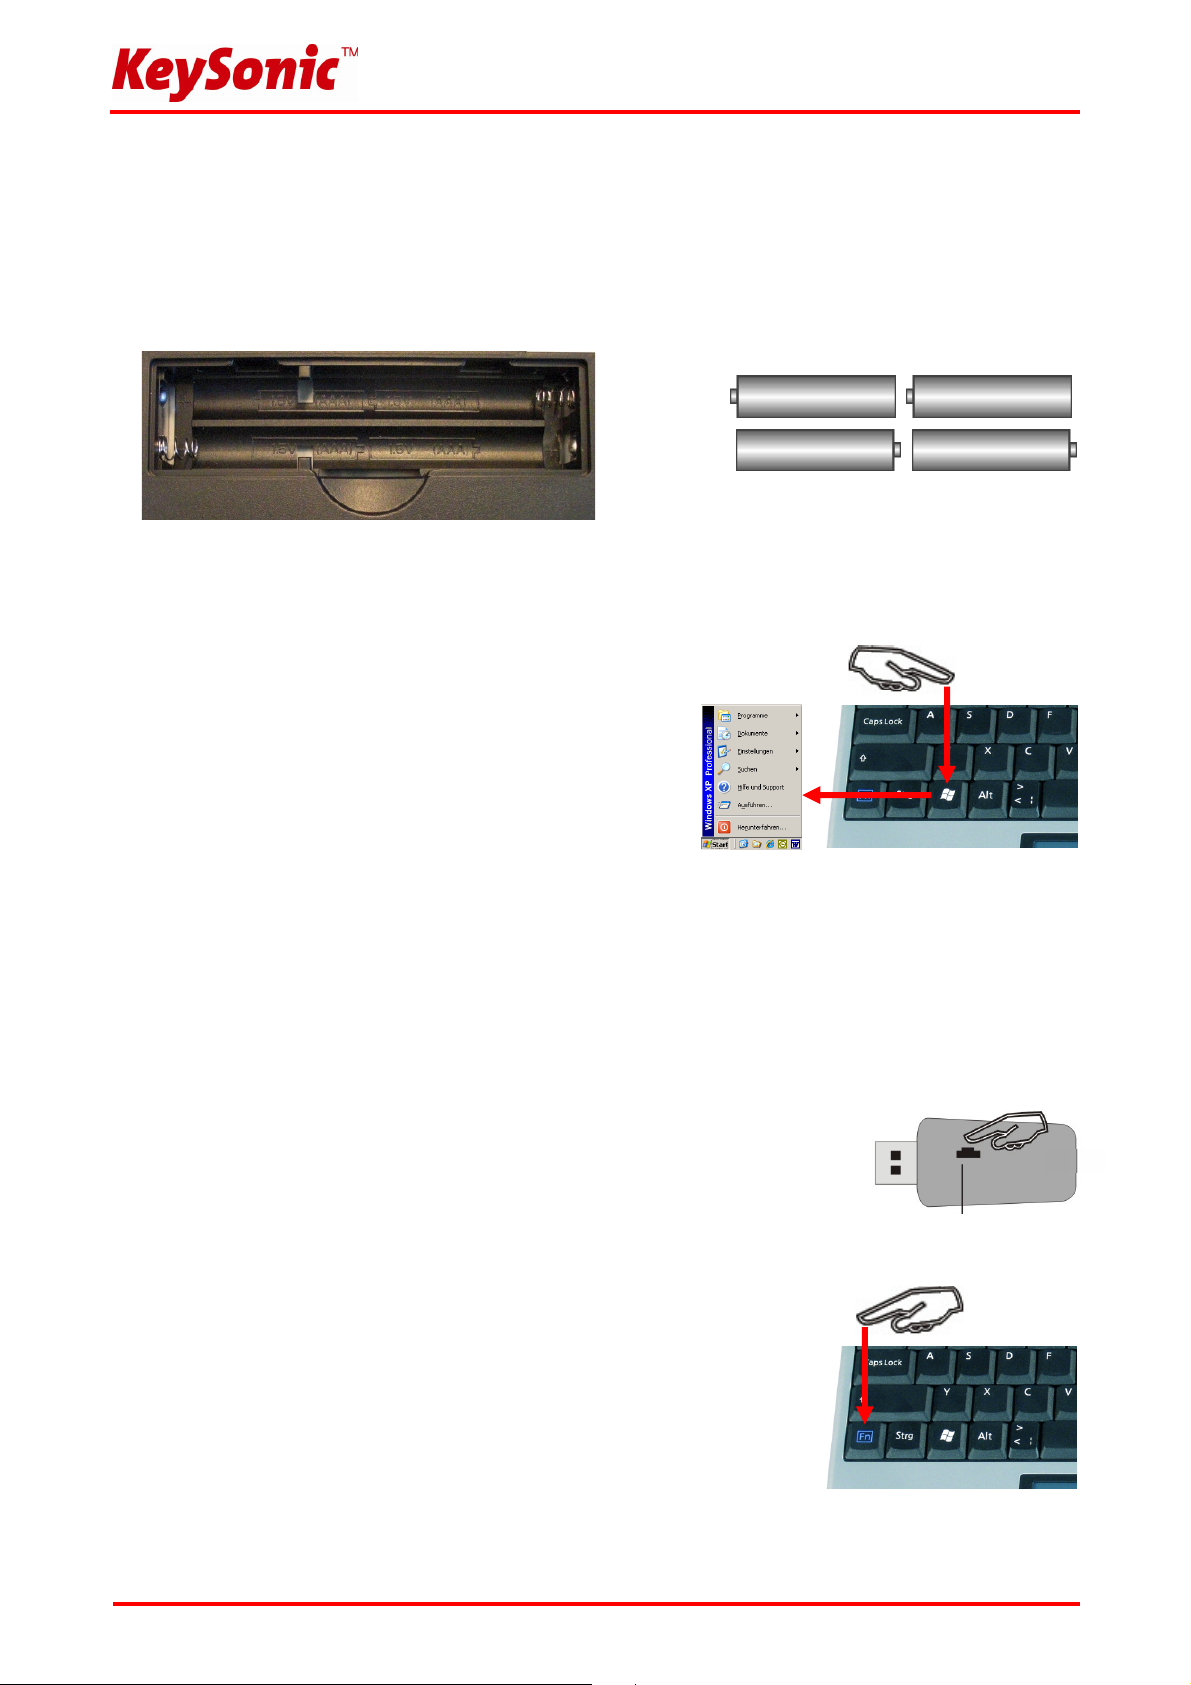
• Falls noch nicht geschehen, entfernen Sie die Abdeckung des Batteriefaches auf der Unterseite der
Tastatur und installieren Sie die mitgelieferten Batterien des Typs AAA 1,5 V unter Beachtung der
richtigen Polarität in das Batteriefach (wie im Bild dargestellt).
• Der USB-Receiver und die Tastatur sind fabrikseitig bereits auf den gleichen Kanal synchronisiert. In der
Regel müssen Sie also keine Neu-Synchronisierung (wie unter 2.4 beschrieben) vornehmen.
• Nun testen Sie die Funktionsweise, indem Sie eine beliebige
Taste auf Ihrer Tastatur betätigen. Beim Drücken der
Windows-Taste müsste sich beispielsweise also unten links
auf Ihrem Bildschirm das Windows Pop-up-Menü öffnen.
Wenn ja, dann arbeitet Ihre Funktastatur nun einwandfrei.
Wenn nicht, dann synchronisieren Sie den USB-Receiver
und die Tastatur wie unter 2.4 beschrieben erneut.
Hinweis:
Sollte die Funktionsweise durch andere Benutzer, die ebenfalls eine Funktastatur in näherer Umgebung
verwenden, beeinflusst werden, führen Sie bitte ebenfalls eine Neu-Synchronisation, wie unter 2.4
beschrieben, durch.
2.4 Neu-Synchronisierung des Funkkanals
• Wenn Sie die Tastatur in Betrieb nehmen und keine Verbindung hergestellt
werden konnte, so synchronisieren Sie den Funkkanal zwischen Tastatur und
USB-Receiver erneut, indem Sie mit Hilfe eines spitzen Gegenstands (z. B.
eines Kugelschreibers) zunächst die SW-Taste auf dem USB-Receiver drücken.
SW-Taste
• Drücken Sie nun innerhalb der nächsten 3 Sekunden die Taste
Fn unten links auf der Tastatur für mehr als 1 Sekunde, wodurch
das Synchronisations-Signal an den USB-Receiver gesendet wird.
Die Tastatur ist nun einsatzbereit.
Testen Sie diese wie unter 2.3 beschrieben.
Hinweis:
Sollte nicht innerhalb von 3 Sekunden die Fn -Taste auf
der Tastatur gedrückt sein, so geht der USB-Receiver ohne vorherige
Neu-Synchronisierung wieder in den Ursprungszustand über.
Version 1.1 (2008/06/05) ● © 2008 by MaxPoint Handelsges. mbH
- 3 -

Bedienungsanweisung ACK-540 RF
Sollte die Tastatur auch nach der Neu-Synchronisierung immer noch nicht funktionieren, so haben Sie
folgende Möglichkeiten zur Lösung dieses Problems:
• Wiederholen Sie den Synchronisationsvorgang wie unter 2.4 beschrieben. Manchmal ist es erforderlich,
die Routine mehrmals zu wiederholen, bis der richtige „Funkkanal“ gefunden wurde.
• Falls Sie den USB-Receiver an einen USB-Hub angeschlossen haben, sollten Sie diesen bitte direkt an
einem USB-Anschluss Ihres Notebooks bzw. Desktops installieren.
• Während des Synchronisationsvorgangs sollte sich die Tastatur in dichter Nähe zum USB-Receiver
befinden, um sicher zu stellen, dass die unmittelbare Umgebung keine Einflüsse auf die Funkübertragung
ausübt (z.B. Funksignalabschwächung/Interferenzen durch Metallgehäuse, andere Funkstörquellen etc.).
• Stellen Sie sicher, dass Sie nur Batterien mit voller Ladekapazität verwenden. Im Zweifelsfalle tauschen
Sie die Batterien vor der nächsten Synchronisierung sicherheitshalber einmal gegen Neue aus.
3. Bedienung der Tastatur
Nach erfolgreicher Inbetriebnahme genießen Sie nun bei der Bedienung eine freie und unabhängige
Standortwahl bis ca. 10 m Entfernung zum PC. Mehr- oder Minderabstand können, wie bereits erwähnt,
durch metallische Trennwände, Computergehäuse, Monitore, ZIP-Laufwerke, Lautsprecher, Schaltnetzteile
u. v. m., aber auch durch eine unterschiedliche Ladekapazität der Batterien verursacht werden.
3.1 Spezielle Betriebs-Modi der Tastatur
• Sleep-Modus
Wenn 10 Minuten lang keine Eingabe über die Tastatur bzw. das Touchpad erfolgt, geht die Tastatur
automatisch in den Sleep-Modus (Ruhezustand) über, um die Batteriekapazität zu schonen.
• Wake up-Modus
Um die Tastatur aus dem Ruhezustand wieder zu aktivieren, drücken Sie eine beliebige Taste auf dem
Tastaturfeld (nicht die linke oder rechte Mausfunktionstaste des Touchpads bzw. das Touchpad selbst!).
• Re-Connect-Modus
Nach der Wiederaktivierung verbindet sich die Tastatur automatisch erneut mit dem USB-Receiver.
Abhängig von den Umgebungsbedingungen für die Funkverbindung benötigt sie dafür zwischen weniger
als eine Sekunde bis hin zu einigen Minuten.
- 4 -
Irrtümer und Auslassungen vorbehalten

3.2 Touchpad
Als Mausersatz ist diese Tastatur mit einem Touchpad einschließlich zwei
Page-Scroll-Feld
Mausfunktionstasten ausgestattet, welches eine komfortable und
ergonomische Bedienung des PCs von z. B. einem Sofa aus gestattet.
Dabei ist die Bedienung des Touchpads so einfach wie genial.
• Gleiten Sie mit dem Finger sanft über die Oberfläche des Touchpads,
Touchpad
um den Cursor zu bewegen und tippen Sie darauf, um zu „klicken“.
• Klick-, Doppelklick-, Markier- und Ziehfunktionen der linken und rechten
Maustaste können direkt durch das Tippen auf die Oberfläche des
Touchpads ausgeführt werden. Sie brauchen dabei keine große Kraft
auszuüben. Das beste Ansprechverhalten erzielt man durch leichtes
Maus-Funktionstasten
und schnelles Klicken.
(Wahlweise können Sie dafür natürlich auch die Maus-Funktionstasten verwenden).
• Um zu „ziehen“, zeichnen oder zu markieren, müssen Sie einen Doppelklick ausüben, wobei der Finger
nach dem zweiten Klick auf dem Touchpad verbleibt. Dann gleiten Sie mit dem Finger über das
Touchpad, um die Bewegung zu vollziehen.
• Legen Sie Ihren Finger auf das Page-Scroll-Feld und gleiten Sie darüber, um in Ihrer Anwendung auf-
und abzuscrollen (identisch einem Maus-Scrollrad).
• Bei Notebooks mit bereits integriertem Touchpad und Mausfunktionstasten, müssen Sie bei der
Verwendung der Tastatur diese internen Steuergeräte deaktivieren, falls es zu Fehlermeldungen oder
Funktionsstörungen kommt*.
• Um die Doppelklick-Geschwindigkeit und die Geschwindigkeit der Cursorbewegungen langsamer oder
schneller zu machen, verändern Sie die Einstellungen der Maus-Optionen in Ihrer Systemsteuerung unter
Windows*.
Hinweis:
Die Sensitivität (Empfindlichkeit) sowie das Deaktivieren der Klick-Funktion des Touchpads lässt sich
nicht verändern. Auch gibt es hierfür keine separate Treiber-Software, die diese Einstellungen unterstützt.
* Einzelheiten entnehmen Sie der Dokumentation Ihres PCs.
Version 1.1 (2008/06/05) ● © 2008 by MaxPoint Handelsges. mbH
- 5 -

Virtueller Ziffernblock
Bedienungsanweisung ACK-540 RF
3.3 Tasten mit doppelten Funktionen
Beim Layout der Tastatur handelt es sich um ein spezielles Platz sparendes Layout mit dem von Notebooks
her bekannten virtuellen Ziffernblock.
• Drücken Sie die Tasten Fn + NumLk
(unten links + oben rechts auf der
Tastatur), um den virtuellen
Ziffernblock ein- bzw. auszuschalten.
(Die Doppel-Funktionstasten erhalten
die blau aufgedruckten Bedeutungen:
Numeric keypad locked)
• Bei aktivierter Num Lock-Funktion
können Sie auch die Taste Fn in der
linken unteren Ecke gedrückt halten,
um den virtuellen Ziffernblock
temporär zu deaktivieren.
Das ist besonders praktisch, wenn Sie
neben den vielen Zahlen zwischendurch
auch Buchstaben schnell eingeben möchten.
• Ohne vorher aktivierte Num Lock-Funktion steuert die gedrückt
gehaltene Fn-Taste die integrierten Positionstasten genau wie
bei einem externen Ziffernblock (siehe Bild).
Pos1 (Home)
Ende (End)
Bild
Bild
(PgUp)
(PgDn)
Einfg (Ins) Entf (Del)
Hinweis:
Beim Starten des PCs ist zu beachten, dass im BIOS bzw. Betriebssystem eingestellt wird, ob die Num
Lock-Funktion automatisch im aktivierten oder deaktivierten Status mit hochgefahren wird. Dieses kann
damit Einfluss auf die Eingabe eines möglichen Passwortes beim Starten des Betriebssystems haben.
Meldet Ihr System nach der Eingabe also ein unkorrektes Passwort, so ist möglicherweise nur die Num
Lock-Funktion aktiv.
4. Reinigung der Tastatur
• Staub entfernen Sie mit einem Pinsel, mit sanfter Druckluft oder mit einem Staubsauger mit
Bürstenkopfdüse.
• Feinen Schmutz entfernen Sie mit einem nicht allzu feuchten Lappen.
• Verwenden Sie KEINE scharfen Putzmittel, Lösungsmittel oder Benzin zur Reinigung der Tastatur!
Haftungsausschlusserklärung des Herstellers
Für Informationen in diesem Dokument behält sich der Hersteller Änderungen ohne Mitteilung vor und geht keinerlei Verpflichtungen ein. Durch dieses Dokument wird, weder
ausgedrückt noch angedeutet, keinerlei Garantie oder Erklärung in Bezug auf Qualität, Genauigkeit oder Eignung für einen bestimmten Zweck übernommen. Der Hersteller behält
sich das Recht vor, jederzeit Änderungen zum Inhalt dieses Dokumentes zu machen und/ oder die dazugehörigen Produkte unverbindlich zu ändern ohne Verpflichtung, Personen
oder Organisationen über derartige Änderungen in Kenntnis zu setzen. Unter keinen Umständen ist der Hersteller haftbar für direkte, indirekte, spezielle, zufällige oder
Folgeschäden, die durch die Nutzung oder Unmöglichkeit der Nutzung des Produktes oder der Dokumentation entstehen, selbst wenn auf die Möglichkeit solcher Schäden
hingewiesen wurde. Dieses Dokument enthält Materialien, die durch Copyright geschützt sind
daraus ohne die schriftliche Einwilligung der Autoren in irgendeiner Form zu vervielfältigen oder zu verbreiten, in welcher Form, zu welchem Zweck und mit welchen Mitteln auch
immer. Produktnamen, die in diesem Dokument erwähnt werden, dienen ausschließlich als Verkaufsbezeichnung. Alle Handelsmarken, Produktnamen oder Markennamen, die in
diesem Dokument erwähnt werden, sind eingetragenes Eigentum des jeweiligen Inhabers.
. Alle Rechte sind vorbehalten. Es ist untersagt, diese Bedienungsanleitung oder Teile
- 6 -
Irrtümer und Auslassungen vorbehalten

1. Introduction ACK-540 RF
1.1 SPECIAL FEATURES
• Wireless mini-keyboard with integrated touchpad
• Far-ranging and reliable radio-frequency transmission at 2.4 GHz
up to approx. 10 m (33 ft) away from the PC
• Built-in 1000 dpi touchpad with scroll page area and
2 mouse function keys
• Extremely flat construction with built-in hand cushion
for comfortable work
• Full functionality of a full-size layout keyboard due to
built-in numeric keypad and 12 functional keys
• Extremely silent stroke and tactile feedback due to high
quality X-Type membrane technology
• Tilt feet for adjustment of the tilt angle for an ergonomic and
non-fatigue operation
• Plug & Play installation without special driver
• Optimal for Digital Living Room (HTPC) as well as
for training, conference and presentation facilities etc.
1.2 Technical data:
Key count: 88
Construction X-Type membrane technology
Life expectancy: approx. 7 million strokes per key
Switch travel: 3.0 ±0.5 mm total run
Pressure point: 55 ±15 g
Radio Transmission: 2.4 – 2.483 GHz, ISM band, GFSK, 1 Channel
Device recognition: 256 IDs (Channels to differentiate several keyboards in a room)
Effective operation distance: approx. 10 m
Battery type: 4× AAA 1.5 V
Power supply: Keyboard: +6 VDC ±5 % Receiver: +5 VDC ±5 %
Power consumption maximal: Keyboard: 7 mA Receiver: 60 mA
Keyboard Standby: 5 mA (after 1 sec.)
Keyboard Sleep-Mode: 150 µA (after 30 min.)
Temperature: Operating: -5 °C up to +40 °C
Storage: -20 °C up to +65 °C
Humidity: Operating and storage: 10 % up to 85 % RH
Dimensions approx.: Keyboard: 300 x 210 x 20.5 mm Receiver: 80 x 22 x 14 mm
Weight approx.: Keyboard: 570 g (incl. batteries) Receiver: 12 g
Interface: USB (for dongle receiver)
Scope of delivery: Keyboard, USB dongle receiver, 1 set of batteries, user manual
Colour: Black/ silver
Certificated: CE, FCC, WEEE/RoHS
Compatibility: Win 98SE / ME / 2000 / XP / Vista
Version 1.1 (2008/06/05) ● © 2008 by MaxPoint Handelsges. mbH
- 7 -

Operation Manual ACK-540 RF
2. Installation
2.1 System Requirements
This keyboard requires a PC with USB connection and one of the following operating systems:
Windows 98SE / ME /2000 / XP / Vista
For the installation of the keyboard under the mentioned above operating systems you need NO special
driver!
2.2 Installation of the USB receiver
In order to install your keyboard, please perform the following steps:
• Connect the included USB receiver (dongle receiver) to a free USB port
on your computer.
Advise: Please ensure, that the USB receiver has a minimal distance of
20 cm to metallic dividing walls, other computer cases, monitors, ZIP
drives, loudspeakers and switching power supplies.
• All state-of-the-art operating systems with Plug & Play support will
recognize your keyboard automatically and load the required drivers.
During the phase of installation your operating system informs you via
changing Pop-up information windows on the task-bar about the current status of installation. Please be
patient, until the system informs you finally about the successful installation. The USB receiver is now
ready for operation.
Older operating systems not always support automatic recognition of USB or PS/2 devices. If you have
attached your USB receiver and exactly this error occurs on your system, you have the following alternatives
to solve the problem:
• Perform an update of your operating system and return to Step 2.2
• In some cases the installation CD of your operating system is necessary according to the instructions on
your screen. In this circumstance please follow these instructions*.
• Check whether your BIOS system supports USB keyboards*. Some main board manufacturers offer
BIOS updates for download over the Internet.
• Ensure in your system settings, that the used USB connection was not deactivated in your operating
system*.
• Should your system-updates keep out of success, it is recommendable to test the keyboard with another
PC with the same operating system to rule out a hardware damage of the USB receiver.
* Please refer details to the manual of your PC.
- 8 -
E&OE

4
×
1.3 Installation of keyboard
• Recommended requirement for that is the successful installation of the USB receiver under point 2.2
• If you haven’t done yet, remove the covering of the battery case on the bottom of your keyboard. Install
the included batteries of type AAA 1.5 V considering the right polarity in the battery case (see picture).
• The USB receiver and the keyboard are factory-made already synchronised on the same channel.
Normally you have not to make a new-synchronisation (as described under point 2.4).
• Now you can check this by pressing any key of your
keyboard. If you press the Windows key, there has to open
for instance the Windows Pop-up menu down left on your
screen. If so, your wireless keyboard is working correctly
now. If not, please synchronise the USB receiver and the
keyboard again like described under point 2.4.
Advise:
Should the functionality be influenced by other users applying their wireless keyboard close-by, make
also a new-synchronisation as described under point 2.4.
2.4 New-synchronisation of the radio channel
• When you start up your keyboard and no connection could be established,
so synchronise the radio channel between keyboard and USB receiver
again by pressing firstly the SW key on the USB receiver with a sharp
object (for instance a ball-pen).
SW key
• Press now within the next 3 seconds the key Fn below on the left of the
keyboard for more than 1 second by which the synchronization-signal is
sent to the USB-Receiver.
The keyboard is ready for use now.
Please check it as described under point 2.3.
Advise:
Should the Fn key on your keyboard not be pressed within
3 seconds, so turns the USB receiver without previous newsynchronisation back to the condition of origin.
Version 1.1 (2008/06/05) ● © 2008 by MaxPoint Handelsges. mbH
- 9 -

Operation Manual ACK-540 RF
Is your keyboard after new-synchronisation still not working, you have the following possibilities to solve the
problem:
• Repeat the procedure of synchronisation as described under 2.4.
Sometimes it is necessary to repeat this routine several times, until the right radio channel was found.
• In case your USB receiver is attached to an USB hub, you should install it directly on the USB connector
of your notebook or desktop.
• During the procedure of synchronisation the keyboard should be located close to the USB receiver to
make sure, that the immediate environment has no influence on the radio transmission (for instance
reduction/ interferences due to metal cases, other sources of interferences etc.).
• Ensure that you use only batteries with full loading capacity. In case of doubt change the old batteries
before next synchronisation against new ones as a precaution.
3. How to use the keyboard
After successful launch enjoy now during the operation a free and independent choice of location up to
approx. 10 m distance to the PC. More or less range can be caused, like mentioned above, by metallic
dividing walls, other computer cases, monitors, ZIP drives, loudspeakers, switching power supplies etc.,
but also by different loading capacity of the batteries.
3.1 Special operation modes of the keyboard
• Sleep-Mode
When 10 minutes happens no input in your keyboard respectively touchpad, the keyboard turns
automatically into Sleep-Mode (idle state) to save battery capacity.
• Wake up-Mode
For activating the keyboard from Sleep-Mode press any key on your keypad (not the left or right mouse
function key of the touchpad or the touchpad itself!).
• Re-Connect-Mode
After reactivation the keyboard connects automatically again with the USB receiver. Depending on
environmental conditions for the radio transmission it needs for that between less than 1 second up to few
minutes.
- 10 -
E&OE

3.2 Touchpad
As a mouse alternative the keyboard is equipped with a touchpad inclusive
Page scroll area
two mouse function keys allowing comfortable and ergonomic handling of the
PC, for instance from a sofa. Thereby the handling of the touchpad is as
simple as brilliant.
Touchpad
• Gently glide over the touchpad surface with your finger in order to move
the cursor, and press it in order to "click".
• Click, double-click, marking, and drag functions of the left and right
mouse button can be performed directly by tapping on the surface of the
touchpad. You don’t need to apply a lot of pressure in order to do that.
Mouse function keys
You will get the best reaction by clicking gently and rapidly
(optional you can use for that the mouse function keys as well).
• In order to "drag", to draw, or to mark, you must apply a double-click with the finger remaining on the
touchpad after the second click. Then, glide over the touchpad with your finger in order to complete the
movement.
• Put your finger on the Page-Scroll-Area and glide over to scroll up and down in your application
(identically to a mouse scroll wheel).
•
Using notebooks with already integrated touchpad and mouse function keys you have to de-activate
these intern control devices in case of error messages or malfunctions*.
•
In order to increase or decrease the speed of the cursor movements, change the settings of the mouse
options in your system control under Windows*.
Advice:
The sensitivity and the deactivation of the click-function of the touchpad cannot be changed. There is also
no separate driver supporting these settings.
* Please refer details to the manual of your PC.
Version 1.1 (2008/06/05) ● © 2008 by MaxPoint Handelsges. mbH
- 11 -

Virtu
al numeric keypad
Operation Manual ACK-540 RF
3.3 Keys with double functions
The layout of the keyboard is a special space-saving layout with the same virtual numeric keypad also used
in notebook keyboards.
• Press the Fn + NumLk keys (lower left
and upper right corner of the keyboard) in
order to switch the virtual numeric keypad
function on and off.
(The double functional keys get the blue
imprinted significations: Numeric keypad
locked)
• During active "Num Lock" function, you
may keep the Fn key pressed, in order to
temporarily de-activate the virtual numeric
keypad. This is particularly convenient to
quickly enter letters apart from numbers.
• Without the NumLk key having been pressed, the Fn key kept
pressed will control the integrated position keys in the same way
as an external keypad (please refer to the picture).
Home
End
PgUp
PgDn
Ins Del
Note:
When starting the PC should be noted, that in the BIOS or in
operating system is set, whether the Num Lock function also will
be booted up automatically in activated or deactivated status.
This can so influence the input of a possible password when
starting the operating system. So if your system reports after
input an incorrect password, perhaps only the Num Lock function is active.
4. How to Clean the Keyboard
• Remove dust with a brush, with soft compressed air, or with a vacuum cleaner with brush head nozzle.
• Remove fine dirt with a not-too-damp cloth.
• DO NOT use any aggressive detergents, solvents or gasoline in order to clean the keyboard.
Manufacturer's Disclaimer Statement
The information in this document is subject to change without notice and does not represent a commitment on the part of the vendor. No warranty or representation, either expressed
or implied, is made with respect to the quality, accuracy or fitness for any particular purpose of this document. The manufacturer reserves the right to make changes to the content of
this document and/or the products associated with it at any time without obligation to notify any person or organization of such changes. In no event will the manufacturer be liable for
direct, indirect, special, incidental or consequential damages arising out of the use or inability to use this product or documentation, even if advised of the possibility of such damages.
This document contains materials protected by copyright. All rights are reserved. No part of this manual may be reproduced or transmitted in any form, by any means or for any
purpose without expressed written consent of its authors. Product names appearing in this document are mentioned for identification purchases only. All trademarks, product names
or brand names appearing in this document are registered property of their respective owner.
- 12 -
E&OE

1. Introduction ACK-540 RF
1.1 Caractéristiques
• Mini-clavier sans fil à touchpad intégré
• Transmission radio puissante et fiable à 2,4 GHz jusqu’à
env. 10 m éloigné de l’ordinateur
• Touchpad 1000 dpi intégré avec défilement des pages et
2 touches de fonction ressemblantes les boutons de la souris
• Construction extrêmement plate à coussin à main
intégré pour un travail non fatigant
• Plein fonctionnement d’un clavier à disposition
standard à cause d’un intégré bloc numérique et
12 touches de fonction
• Frappe extrêmement silencieuse et feed-back tactile à
cause e la technologie de membranes X-Type de haute
qualité
• Pieds escamotables pour l'ajustement de l'inclinaison,
pour une opération ergonomique et non fatigant
• Installation Plug & Play sans pilote spécial
• Application idéale pour : cinéma de maison,
salles de formation, de conférence et de présentation etc.
1.2 Information Technique
Nombre des touches : 88
Construction : X-Type membrane technologie
Durée de vie : Env. 7 million frappes par touche
Actionnement : 3,0 ±0,5 mm chemin total
Point de poussée : 55 ±15 g
Transmission radio : 2,4 – 2,483 GHz, ISM bande, GFSK, 1 channel
Reconnaissance de
périphérique : 256 ID (reconnais différents claviers dans une salle)
Distance effective : env. 10 m
Type de pile : 4× AAA 1,5 V
Alimentation : Clavier : +6 VDC ±5 % Récepteur : +5 VDC ±5 %
Courant absorbé max. : Clavier : 7 mA Récepteur : 60 mA
En stand-by : 5 mA (après 1 sec.)
En veille : 150 µA (après 30 min.)
Température : Exploitation : -5 °C jusqu’à +40 °C
Entrepôt : -20 °C jusqu’à +65 °C
Humidité :
Exploitation et entrepôt :
10 % jusqu’à 85 % rel.
Dimension approx. : Clavier : 300 x 210 x 20,5 mm Récepteur : 80 x 22 x 14 mm
Poids approx. : Clavier : 570 g (inclu piles) Récepteur : 12 g
Interface: USB (pour récepteur USB)
Contenu : Clavier, récepteur USB, 1 set des batteries, Manuel d’Utilisation
Couleur : Noir/ argent
Certifié : CE, FCC, WEEE/RoHS
Compatibité : Win 98SE / ME / 2000 / XP / Vista
Version 1.1 (2008/06/05) ● © 2008 by MaxPoint Handelsges. mbH
- 13 -

Manuel d’Utilisation ACK-540 RF
2. Installation
2.1 Demandes au Système
Ce clavier demande un PC avec connexion USB et un des systèmes d’exploitation suivants:
Windows 98SE / ME / 2000 / XP / Vista
Pour l'installation du clavier sous les systèmes d'exploitation mentionné au-dessus vous n'avez besoin
d'AUCUN pilote spécial!
2.2 Installation de receveur USB
Pour installer votre clavier, exécutez les pas suivants :
• Connectez le receveur USB inclut (dongle) à un port USB libre de votre
ordinateur.
Conseils : assurez-vous que le receveur USB a une distance minimale
de 200 mm des murs métalliques, autres boîtiers de l'ordinateur,
écrans, disques ZIP, haut-parleur, et alimentations.
• Tous systèmes d’exploitation actuels qui supportent Plug & Play
reconnaîtront votre clavier automatiquement et lanceront les pilotes nécessaires. Pendant la phase de
l'installation, votre logiciel d'exploitation vous informe de changer les fenêtres instantanées de
l'information sur la barre d'outils au sujet de l'état actuel de l'installation. Veuillez patienter, jusqu'à la fin
que le système vous informe la fin de l'installation. Le receveur USB est maintenant prêt pour l'opération.
Des logiciels d'exploitation d'une version ancienne ne soutiennent pas toujours automatiquement
l'identification de USB ou PS/2. Si vous avez attaché votre récepteur USB et se produit exactement cette
erreur sur votre système, vous avez les solutions de rechange suivantes pour résoudre le problème :
• Mettez votre système d’exlpoitation à jour er retournez à Pas 2.2
• Dans certains cas, le CD d'installation de votre logiciel d'exploitation est indissociablement selon les
instructions sur votre écran. Dans cette circonstance, veuillez suivre ces instructions*.
• Vérifier si votre système BIOS soutient le clavier de USB*. Certains fabricants de cartes mères offrent la
mise à jour de BIOS par téléchargement en ligne.
• Vérifier sur l'option du votre système que la connexion USB utilisée n'est pas désactivée sur votre
système*.
• Si votre système mise à jour n'arrive toujours pas à installer successivement, nous vous conseillons de
tester le clavier sur un autre PC avec le même système d'exploitation pour exclure le dommage du
récepteur USB.
*Consultez le documentation de votre PC pour détails.
Les erreurs et les omissions réservés
- 14 -

4
×
2.3 Installation de clavier
• La condition recommandée est celle d'une installation réussie du récepteur USB sous point 2.2
• Si vous ne l’avez pas encore fait, retirez le cache situé dans le logement pour les piles, en bas de votre
clavier derrière. Installer les batteries incluses du type AAA 1,5 V vu la bonne polarité dans la boîte de
batterie (voir l'image).
• Le récepteur USB et le clavier sont synchronisés sur le même canal à l'usine. Normalement, ça vaut pas
la peine de refaire la synchronisation (comme décrit sous point 2.4).
• Vous pouvez vérifier en appuyant sur n'importe quelle
touche de votre clavier. Si vous appuyez sur la touche de
Windows, il doit ouvrir par exemple le menu popup de
Windows vers le bas à gauche sur votre écran. Si oui,
votre clavier sans fil fonctionne correctement maintenant.
Sinon, veuillez synchroniser le récepteur USB et le clavier
encore une fois comme décrit sous le point 2.4.
Conseil:
Si la fonctionnalité est influencée par d'autres utilisateurs appliquant leur clavier sans fil fermer-par, faire
une nouveau-synchronisation aussi comme décrit sous le point 2.4.
2.4 Refaire la synchronisation du canal radio
• Quand vous démarrez votre clavier pour la première fois et aucune
connexion ne pouvait être établie, il faut donc synchroniser le canal
radio entre le clavier et le récepteur USB encore une fois en appuyant
premièrement le touche SW sur le récepteur USB avec un objet pointu
(par exemple un stylo).
la touche SW
• Maintenant, appuyez au cours des 3 secondes suivantes sur les
clés Fn ci-dessous à gauche du clavier plus longtemps que 1 seconde par
lequel le signal de synchronisation est envoyé au récepteur USB.
Le clavier est maintenant prêt pour l'utilisation.
Le vérifier comme décrit sous point 2.3.
Conseil:
Il faut que le touche Fn n'était pas appuyé pendant 3 secondes, et que le
récepteur d'USB n'a pas de
nouvelle synchronisation précédente à l'état
d'origine.
Version 1.1 (2008/06/05) ● © 2008 by MaxPoint Handelsges. mbH
- 15 -

Manuel d’Utilisation ACK-540 RF
Si votre clavier ne fonctionnant toujours pas après la resynchronisation, vous avez les possibilités suivantes
pour résoudre le problème :
• Répéter la processus de la synchronisation comme décrit le point 2.4. Parfois il est nécessaire de répéter
plusieurs fois cette routine, jusqu'à ce que le bon canal du radio ait été trouvé.
• Au cas où votre récepteur USB est fixé à un hub de USB, vous devriez l'installer directement sur le
connecteur USB de votre portable ou ordinateur de bureau.
• Pendant le procédure de la synchronisation, le clavier devrait être situé près du récepteur USB pour
assurer que l'environnement proche n'a aucune influence sur la transmission du radio (par exemple, la
diminution / l'interférence à cause du boîtier en métal et autres sources d'interférences, etc.).
• S'assurez que vous utilisez seulement des piles en pleine capacité de chargement. En cas de doute,
changer les piles avant prochaine synchronisation comme précaution.
3. Utilisation du Clavier
Après la réussite de la synchronisation, la distance de transmission du radio entre le clavier et le récepteur
est approximativement de 10 m. Plus ou moins de la distance peut être causé, comme ceux que nous avons
mentionné au-dessus, par des murs métalliques, d'autres boîtiers d'ordinateur, écrans, ZIP drives, hautparleurs, alimentations chargée, etc., mais aussi par les différentes capacités de chargement des piles.
3.1 Fonctionnement spécial du clavier
• Mise en veille
Après 10 minutes d’inutilisation, le clavier passera automatiquement en veille afin d’économiser la
batterie.
• Sortie de veille
Afin de sortir le clavier du mode veille, cliquez sur n’importe quelle touche. (sauf les boutons L et R du
Touchpad ou le Touchpad lui-même)!
• Reconnexion
Après un allumage, le clavier se reconnecte automatiquement au récepteur USB. Selon les conditions
aux alentours concernant les ondes radio, la reconnexion peut prendre de moins d’une seconde à
plusieurs minutes.
Les erreurs et les omissions réservés
- 16 -

3.2 Touchpad
Le clavier est équipé d'un touchpad avec deux boutons des fonctions du
Défilement de page
souris comme une souris alternative, qui permet d'avoir une manipulation
confortable et ergonomique de l'ordinateur, par exemple dans un sofa.
Ainsi la manipulation du touchpad est aussi simple que pratique.
« touchpad »
Touchpad
• Glissez doucement avec votre doigt sur la surface du touchpad
pour mouvoir le curseur, et tapez-en pour « cliquer ».
• Le clic, double clic, le surlignement et le déplacement peuvent être
accomplis directement en appuyant sur la surface du touchpad sans
exercer une pression trop importante. Vous obtiendrez une réaction
Boutons de fonctions du souris
idéale en cliquant doucement et rapidement (vous pouvez également
utilisez les deux boutons pour cela).
• Pour « glisser », dessiner, ou marquer, vous devrez exercer un cliquement double (le doigt restera sur le
touchpad après le cliquement deuxième). Après, glissez sur le touchpad avec votre doigt pour complèter
le mouvement.
• Mettez votre doigt sur la zone de défilement et glissez en haut ou en bas afin de faire défiler votre page
(fonction identique à la roulette d’une souris).
• En utilisant un portable intégré déjà le touchpad et les touches des fonctions du souris, il faut que vous
désactivez le logiciel du contrôle interne de votre portable en évitant les messages d'erreurs ou de
fonctionnements défectueux*.
• Changer les options de votre souris dans la rubrique du contrôle du système sous Windows afin
d'augmenter ou diminuer la vitesse des mouvements de curseur*.
Conseil:
La sensibilité et la désactivation de la fonction clic du pavé tactile ne peut être changé. En outre, il
n’existe aucun autre pilote, qui prend en charge ces paramètres.
*Consultez le documentation de votre PC pour détails.
Version 1.1 (2008/06/05) ● © 2008 by MaxPoint Handelsges. mbH
- 17 -

Pavé numérique
virtuel
Manuel d’Utilisation ACK-540 RF
3.3 Touches avec double fonction
La disposition de l’clavier est une disposition spécial économe d’espace avec le bloc numérique virtuel des
claviers de portatif.
• Appuyez sur les touches Fn + Verr Num
(en bas à gauche + en haut à droite sur le
clavier) pour activer ou désactiver le pavé
numérique virtuel.
(les touches ayant une double fonction
ont leurs secondes utilisations imprimées
en bleu : Pavé numérique verrouillé)
• Avec active « Verr Num » fonction vous
pourriez aussi tenir la touché Fn dans le
coin inférieur gauche pressée pour une
désactivation temporaire du bloc
numérique virtuel. Ceci sera
particulièrement pratique si vous voudriez
entrer des letters rapidement à côté beaucoup de nombres.
• Si la touche Verr Num n’est pas activée, la touche Fn permet de
régler les touches suivantes : (Veuillez vous référer à l’image)
Home
End
PgUp
PgDn
Ins Del
Conseil :
Au démarrage de l'ordinateur il faut faire attention, sous la
configuration BIOS aux définitions du système d'exploitation,
si la fonction Num Lock sera activé ou désactivé au démarrage.
Cette configuration peut influencer l'entrée du mot de passe au
démarrage du système d'exploitation. Donc, si votre système
rapport un mot de passe incorrect, peut-être la fonction Num Lock est active.
4. Nettoyage du Clavier
• Ôtez poussière en utilisant un pinceau, d’air comprimé doux, ou un aspirateur à buse-brosse.
• Ôtez saleté subtile en utilisant un chiffon pas trop mouillé.
• NE PAS utiliser des nettoyants agressifs, des solvants, ou d’essence pour nettoyer le clavier.
Clause d’exonération de responsabilité du fabricant
Les informations dans ce document peuvent être sujet à changement sans avertissement préalable et ne représente pas un engagement de la part du vendeur.
Aucune garantie ou représentation, exprimée ou implicite, n'est faite en ce qui concerne la qualité, l'exactitude ou l’apparence pour n'importe quelle partie de ce document. Le
fabricant se réserve le droit, à n’importe quel moment, d’effectuer des changements dans le contenue de ce document et/ou sur les produits associés avec, sans avoir l’obligation de
le notifier à des personnes ou des organisations. En aucun cas, le fabricant ne sera tenu responsable des dommages directs, indirects, spéciaux ou consécutifs à l’utilisation ou
l’incapacité d’utiliser ce produit ou ce document. Ce document contient des éléments protégés par le Copyright. Tous droits réservés. Aucunes parties de ce document ne peuvent
être reproduite ou transmises sous aucunes formes, moyens ou but sans le consentement écrit de ses auteurs. Le nom des produits apparaissant dans ce document le sont pour
l’identification pour la vente seulement. Toutes les marques déposées, les noms de produits ou les noms de marques apparaissant dans ce document sont des marques déposées
de leurs propriétaires respectifs.
Les erreurs et les omissions réservés
- 18 -
 Loading...