

Keysight Technologies E Series, E9300, E9300A, E9304A, E9301B Operating And Service Manual
...Page 1

Keysight E-Series E9300
Power Sensors
Operating and
Service Guide
Page 2

Notices
CAUTION
WARNING
Copyright Notice
© Keysight Technologies 2006 - 2018
No part of this manual may be repro-
duced in any form or by any means
(including electronic storage and
retrieval or translation into a foreign
language) without prior agreement and
written consent from Keysight Technologies as governed by United States and
international copyright laws.
Manual Part Number
E9300-90016
Edition
Edition 15, March 23, 2018
Printed in:
Printed in Malaysia
Published by:
Keysight Technologies
Bayan Lepas Free Industrial Zone,
11900 Penang, Malaysia
Technology Licenses
The hardware and/or software
described in this document are furnished under a license and may be
used or copied only in accordance with
the terms of such license.
Declaration of Conformity
Declarations of Conformity for this
product and for other Keysight products may be downloaded from the
Web. Go to http://www.keysight.com/
go/conformity. You can then search by
product number to find the latest Declaration of Conformity.
U.S. Government Rights
The Software is “commercial computer
software,” as defined by Federal Acquisition Regulation (“FAR”) 2.101. Pursuant to FAR 12.212 and 27.405-3 and
Department of Defense FAR Supplement (“DFARS”) 227.7202, the U.S.
government acquires commercial computer software under the same terms
by which the software is customarily
provided to the public. Accordingly,
Keysight provides the Software to U.S.
government customers under its standard commercial license, which is
embodied in its End User License
Agreement (EULA), a copy of which can
be found at http://www.keysight.com/
find/sweula. The license set forth in the
EULA represents the exclusive authority
by which the U.S. government may use,
modify, distribute, or disclose the Software. The EULA and the license set
forth therein, does not require or permit, among other things, that Keysight:
(1) Furnish technical information
related to commercial computer software or commercial computer software
documentation that is not customarily
provided to the public; or (2) Relinquish
to, or otherwise provide, the government rights in excess of these rights
customarily provided to the public to
use, modify, reproduce, release, perform, display, or disclose commercial
computer software or commercial computer software documentation. No
additional government requirements
beyond those set forth in the EULA
shall apply, except to the extent that
those terms, rights, or licenses are
explicitly required from all providers of
commercial computer software pursuant to the FAR and the DFARS and are
set forth specifically in writing elsewhere in the EULA. Keysight shall be
under no obligation to update, revise or
otherwise modify the Software. With
respect to any technical data as
defined by FAR 2.101, pursuant to FAR
12.211 and 27.404.2 and DFARS
227.7102, the U.S. government
acquires no greater than Limited Rights
as defined in FAR 27.401 or DFAR
227.7103-5 (c), as applicable in any
technical data.
Warranty
THE MATERIAL CONTAINED IN THIS
DOCUMENT IS PROVIDED “AS IS,”
AND IS SUBJECT TO BEING
CHANGED, WITHOUT NOTICE, IN
FUTURE EDITIONS. FURTHER, TO THE
MAXIMUM EXTENT PERMITTED BY
APPLICABLE LAW, KEYSIGHT DISCLAIMS ALL WARRANTIES, EITHER
EXPRESS OR IMPLIED, WITH REGARD
TO THIS MANUAL AND ANY INFORMATION CONTAINED HEREIN, INCLUDING BUT NOT LIMITED TO THE
IMPLIED WARRANTIES OF MERCHANTABILITY AND FITNESS FOR A
PARTICULAR PURPOSE. KEYSIGHT
SHALL NOT BE LIABLE FOR ERRORS
OR FOR INCIDENTAL OR CONSEQUENTIAL DAMAGES IN CONNECTION
WITH THE FURNISHING, USE, OR
PERFORMANCE OF THIS DOCUMENT
OR OF ANY INFORMATION CONTAINED HEREIN. SHOULD KEYSIGHT
AND THE USER HAVE A SEPARATE
WRITTEN AGREEMENT WITH WARRANTY TERMS COVERING THE MATERIAL IN THIS DOCUMENT THAT
CONFLICT WITH THESE TERMS, THE
WARRANTY TERMS IN THE SEPARATE
AGREEMENT SHALL CONTROL.
Safety Information
A CAUTION notice denotes a hazard. It
calls attention to an operating procedure, practice, or the like that, if not
correctly performed or adhered to,
could result in damage to the product
or loss of important data. Do not proceed beyond a CAUTION notice until
the indicated conditions are fully
understood and met.
A WARNING notice denotes a hazard. It
calls attention to an operating procedure, practice, or the like that, if not
correctly performed or adhered to,
could result in personal injury or death.
Do not proceed beyond a WARNING
notice until the indicated conditions are
fully understood and met.
2 Keysight E-Series E9300 Operating and Service Guide
Page 3

Certification
Warranty
Keysight Technologies certifies that this product met its published specifications
at the time of shipment. Keysight further certifies that its calibration
measurements are traceable to the United States National Institute of Standard
and Technology (formerly National Bureau of Standards), to the extent allowed by
that organization’s calibration facility, and to the calibration facilities of other
International Standards Organization members.
This Keysight Technologies instrument product is warranted against defects in
material and workmanship for a period of 1 year from date of shipment. During the
warranty period, Keysight Technologieswill at its option, either repair or replace
products which prove to be defective. For warranty service or repair, this product
must be returned to a service facility designated by Keysight Technologies. Buyer
shall prepay shipping charges to Keysight Technologies and Keysight
Technologies shall pay shipping charges, duties, and taxes for products returned
to Keysight Technologies from another country. Keysight Technologies warrants
that its software and firmware designated by Keysight Technologies for use with
an instrument will execute its programming instructions when properly installed
on that instrument. Keysight Technologies does not warrant that the operation of
the instrument, or firmware will be uninterrupted or error free.
Keysight E-Series E9300 Operating and Service Guide 3
Page 4

Limitation of Warranty
The foregoing warranty shall not apply to defects resulting from improper or
inadequate maintenance by Buyer, Buyer-supplied software or interfacing,
unauthorized modification or misuse, operation outside of the environmental
specifications for the product, or improper site preparation or maintenance. NO
OTHER WARRANTY IS EXPRESSED OR IMPLIED. KEYSIGHT TECHNOLOGIES
SPECIFICALLY DISCLAIMS THE IMPLIED WARRANTIES OF MERCHANTABILITY
AND FITNESS FOR A PARTICULAR PURPOSE.
Exclusive Remedies
THE REMEDIES PROVIDED HEREIN ARE BUYER’S SOLE AND EXCLUSIVE
REMEDIES. KEYSIGHT TECHNOLOGIES SHALL NOT BE LIABLE FOR ANY DIRECT,
INDIRECT, SPECIAL, INCIDENTAL, OR CONSEQUENTIAL DAMAGES, WHETHER
BASED ON CONTRACT, TORT, OR ANY OTHER LEGAL THEORY.
Restricted Rights Legend
The Software and Documentation have been developed entirely at private
expense. They are delivered and licensed as “commercial computer software” as
defined in DFARS 252.227-7013 (Oct 1988), DFARS 252.211-7015 (May 1991), or
DFARS 252.227-7014 (Jun 1995), as a “commercial item” as defined in FAR
2.101(a), or as “restricted computer software” as defined in FAR 52.227-19 (Jun
1987) (or any equivalent agency regulation or contract clause), whichever is
applicable. You have only those rights provided for such Software and
Documentation by the applicable FAR or DFARS clause or the Keysight standard
software agreement for the product involved.
Technology Licenses
The hardware and/or software described in this document are furnished under a
license and may be used or copied only in accordance with the terms of such
license.
4 Keysight E-Series E9300 Operating and Service Guide
Page 5

Safety Symbols
The following symbols on the instrument and in the documentation indicate
precautions which must be taken to maintain safe operation of the instrument.
Caution, risk of danger (refer to this
manual for specific Warning or Caution
information)
This symbol indicates that the power
line switch is OFF or in STANDBY
position
Caution, risk of electric shock Earth (ground) terminal
Laser radiation
Alternating current (AC)
On (mains supply)
Keysight E-Series E9300 Operating and Service Guide 5
Page 6

Safety Considerations
CAUTION
WARNING
Read the information below before using this instrument.
The following general safety precautions must be observed during all phases of
operation, service, and repair of this instrument. Failure to comply with these
precautions or with specific warnings elsewhere in this manual violates safety
standards for design, manufacture, and intended use of the instrument. Keysight
Technologies assumes no liability for the customer’s failure to comply with these
requirements.
The Instruction Documentation Symbol. The product is marked with this
symbol when it is necessary for the user to refer to the instructions in the
supplied documentation.
BEFORE CONNECTING THE POWER SENSOR TO OTHER INSTRUMENTS,
ensure that all instruments are connected to the protective (earth) ground.
Any interruption of the protective earth grounding will cause a potential
shock hazard that could result in personal injury.
6 Keysight E-Series E9300 Operating and Service Guide
Page 7

Sound emission
Softkey Label
Display Text
Herstellerbescheinigung
Diese Information steht im Zusammenhang mit den Anforderungen der
Maschinenlarminformationsverordnung vom 18 Januar 1991.
– Sound Pressure LpA < 70 dB.
– Am Arbeitsplatz.
–Normaler Betrieb.
– Nach DIN 45635 T. 19 (Typprufung).
Manufacturers Declaration
This statement is provided to comply with the requirements of the German Sound
DIN 45635 T. 19 (Typprufung).
– Sound Pressure LpA < 70 dB.
– At operator position.
– Normal operation.
– According to ISO 7779 (Type Test).
Power Meter Front Panel Operation
This guide uses the following symbols to denote power meter front panel keys and
display legends.
A function name in a keycap symbol indicates the use
of a key physically located on the power meter’s front
panel.
A function name in display-font indicates the use of a
key down the right side of the power meter’s display
adjacent to the displayed text.
The Display Text shown in this font indicates the
message text displayed by the power meter.
Keysight E-Series E9300 Operating and Service Guide 7
Page 8

Documentation
Sensors covered by this manual
These sensors have a two-part serial number: the prefix (two letters and the first
four numbers), and the suffix (the last four numbers). The two letters identify the
country in which the unit was manufactured. The four numbers of the prefix are a
code identifying the date of the last major design change incorporated in your
sensor. The four-digit suffix is a sequential number and, coupled with the prefix,
provides a unique identification for each unit produced. The contents of this
manual apply directly to all serial numbers unless otherwise indicated.
Related publications
The Keysight E-Series E9300 Power Sensors Operating and Service Guide is also
available in the following language:
Further useful information can be found in:
– Application Note 64-1B, Fundamentals of RF and Microwave Power
–The Keysight EPM Series Power Meter User’s Guide and Programming Guide.
Japanese Language Operating and Service Guide - Option ABJ
Measurements, available by ordering through your local Keysight Technologies
Sales Office.
8 Keysight E-Series E9300 Operating and Service Guide
Page 9

Regulatory Markings
The CE mark is a registered trademark
of the European Community. This CE
mark shows that the product complies
with all the relevant European Legal
Directives.
The CE mark is a registered trademark
of the European Community. This CE
mark shows that the product complies
with all the relevant European Legal
Directives.
ICES/NMB-001 indicates that this ISM
device complies with the
Canadian ICES-001.
Cet appareil ISM est conforme a la
norme NMB-001 du Canada.
ISM GRP.1 Class A indicates that this
is an Industrial Scientific and Medical
Group 1 Class A product.
This instrument complies with the
WEEE Directive (2002/96/EC) marking
requirement. This affixed product label
indicates that you must not discard
this electrical or electronic product in
domestic household waste.
The CSA mark is a registered
trademark of the Canadian Standards
Association.
The RCM mark is a registered
trademark of the Australian
Communications and Media Authority.
Keysight E-Series E9300 Operating and Service Guide 9
Page 10

Waste Electrical and Electronic Equipment (WEEE) Directive 2002/ 96/EC
This instrument complies with the WEEE Directive (2002/96/EC) marking
requirement. This affixed product label indicates that you must not discard this
electrical or electronic product in domestic household waste.
Product category:
With reference to the equipment types in the WEEE directive Annex 1, this
instrument is classified as a “Monitoring and Control Instrument” product.
The affixed product label is as shown below.
Do not dispose in domestic household waste.
To return this unwanted instrument, contact your nearest Keysight Service Center,
or visit http://about.keysight.com/en/companyinfo/environment/takeback.shtml
for more information.
Sales and Technical Support
To contact Keysight for sales and technical support, refer to the support links on
the following Keysight websites:
– www.keysight.com/find/powersensors
(product-specific information and support, software and
documentation updates)
– www.keysight.com/find/assist
(worldwide contact information for repair and service)
10 Keysight E-Series E9300 Operating and Service Guide
Page 11

Table of Contents
Certification . . . . . . . . . . . . . . . . . . . . . . . . . . . . . . . . . . . . . . . . . . . . . . . .3
Warranty . . . . . . . . . . . . . . . . . . . . . . . . . . . . . . . . . . . . . . . . . . . . . . . . . .3
Limitation of Warranty . . . . . . . . . . . . . . . . . . . . . . . . . . . . . . . . . . . . . . .4
Exclusive Remedies . . . . . . . . . . . . . . . . . . . . . . . . . . . . . . . . . . . . . . . . .4
Restricted Rights Legend . . . . . . . . . . . . . . . . . . . . . . . . . . . . . . . . . . . . .4
Technology Licenses . . . . . . . . . . . . . . . . . . . . . . . . . . . . . . . . . . . . . . . . .4
Safety Symbols . . . . . . . . . . . . . . . . . . . . . . . . . . . . . . . . . . . . . . . . . . . . .5
Safety Considerations . . . . . . . . . . . . . . . . . . . . . . . . . . . . . . . . . . . . . . . .6
Sound emission . . . . . . . . . . . . . . . . . . . . . . . . . . . . . . . . . . . . . . . . . .7
Power Meter Front Panel Operation . . . . . . . . . . . . . . . . . . . . . . . . . . . .7
Documentation . . . . . . . . . . . . . . . . . . . . . . . . . . . . . . . . . . . . . . . . . . . . . 8
Sensors covered by this manual . . . . . . . . . . . . . . . . . . . . . . . . . . . . .8
Related publications . . . . . . . . . . . . . . . . . . . . . . . . . . . . . . . . . . . . . . 8
Regulatory Markings . . . . . . . . . . . . . . . . . . . . . . . . . . . . . . . . . . . . . . . . .9
Waste Electrical and Electronic Equipment (WEEE) Directive 2002/96/
EC . . . . . . . . . . . . . . . . . . . . . . . . . . . . . . . . . . . . . . . . . . . . . . . . . . . . 10
Product category: . . . . . . . . . . . . . . . . . . . . . . . . . . . . . . . . . . . . . . .10
Sales and Technical Support . . . . . . . . . . . . . . . . . . . . . . . . . . . . . . . . .10
1Introduction
What You’ll Find In This Chapter . . . . . . . . . . . . . . . . . . . . . . . . . . . . . .20
General information . . . . . . . . . . . . . . . . . . . . . . . . . . . . . . . . . . . . . . . .21
Accessories shipped with the instrument . . . . . . . . . . . . . . . . . . . . .21
Power meter requirements . . . . . . . . . . . . . . . . . . . . . . . . . . . . . . . .21
The Keysight E-Series E9300 power sensors in detail . . . . . . . . . . .21
Getting Started . . . . . . . . . . . . . . . . . . . . . . . . . . . . . . . . . . . . . . . . . . . .24
Initial inspection . . . . . . . . . . . . . . . . . . . . . . . . . . . . . . . . . . . . . . . . .24
Checking power meter firmware and DSP revision . . . . . . . . . . . . .24
Interconnections and calibration . . . . . . . . . . . . . . . . . . . . . . . . . . . . 25
Recommended calibration interval . . . . . . . . . . . . . . . . . . . . . . . . . . 27
Keysight E-Series E9300 Operating and Service Guide 11
Page 12

Specifications . . . . . . . . . . . . . . . . . . . . . . . . . . . . . . . . . . . . . . . . . . 27
2Making Measurements
What You’ll Find In This Chapter . . . . . . . . . . . . . . . . . . . . . . . . . . . . . . 30
Power Meter Configuration Changes . . . . . . . . . . . . . . . . . . . . . . . . . . 31
Measuring Spread Spectrum and Multitone Signals . . . . . . . . . . . . . . 32
CDMA Signal Measurements . . . . . . . . . . . . . . . . . . . . . . . . . . . . . . . . . 33
Multitone Signal Measurements . . . . . . . . . . . . . . . . . . . . . . . . . . . . . . 35
Measuring TDMA Signals . . . . . . . . . . . . . . . . . . . . . . . . . . . . . . . . . . . . 36
Power meter and sensor operation . . . . . . . . . . . . . . . . . . . . . . . . . . 36
Achieving stable results with TDMA signals . . . . . . . . . . . . . . . . . . . 36
Achieving stable results with GSM signals . . . . . . . . . . . . . . . . . . . . 37
Electromagnetic Compatibility (EMC) Measurements . . . . . . . . . . . . . 38
Measurement Accuracy and Speed . . . . . . . . . . . . . . . . . . . . . . . . . . . . 39
Setting the range . . . . . . . . . . . . . . . . . . . . . . . . . . . . . . . . . . . . . . . . 39
Measurement considerations . . . . . . . . . . . . . . . . . . . . . . . . . . . . . . 40
Accuracy . . . . . . . . . . . . . . . . . . . . . . . . . . . . . . . . . . . . . . . . . . . . . . 41
Speed and averaging . . . . . . . . . . . . . . . . . . . . . . . . . . . . . . . . . . . . 41
Summary . . . . . . . . . . . . . . . . . . . . . . . . . . . . . . . . . . . . . . . . . . . . . . 41
3Characteristics and Specifications
4Service
General Information . . . . . . . . . . . . . . . . . . . . . . . . . . . . . . . . . . . . . . . . 46
Cleaning . . . . . . . . . . . . . . . . . . . . . . . . . . . . . . . . . . . . . . . . . . . . . . . 46
Connector cleaning . . . . . . . . . . . . . . . . . . . . . . . . . . . . . . . . . . . . . . 46
Performance Test . . . . . . . . . . . . . . . . . . . . . . . . . . . . . . . . . . . . . . . . . . 47
Standing Wave Ratio (SWR) and Reflection Coefficient (Rho)
performance test . . . . . . . . . . . . . . . . . . . . . . . . . . . . . . . . . . . . . 47
Zero set performance verification . . . . . . . . . . . . . . . . . . . . . . . . . . . 49
Replaceable parts . . . . . . . . . . . . . . . . . . . . . . . . . . . . . . . . . . . . . . . 50
Service . . . . . . . . . . . . . . . . . . . . . . . . . . . . . . . . . . . . . . . . . . . . . . . . . . 54
Principles of operation . . . . . . . . . . . . . . . . . . . . . . . . . . . . . . . . . . . 54
Troubleshooting . . . . . . . . . . . . . . . . . . . . . . . . . . . . . . . . . . . . . . . . 54
12 Keysight E-Series E9300 Operating and Service Guide
Page 13

Repair of defective sensor . . . . . . . . . . . . . . . . . . . . . . . . . . . . . . . . .55
Disassembly procedure . . . . . . . . . . . . . . . . . . . . . . . . . . . . . . . . . . .55
Reassembly procedure . . . . . . . . . . . . . . . . . . . . . . . . . . . . . . . . . . .56
Repair and Adjustments . . . . . . . . . . . . . . . . . . . . . . . . . . . . . . . . . .56
Keysight E-Series E9300 Operating and Service Guide 13
Page 14

THIS PAGE HAS BEEN INTENTIONALLY LEFT BLANK.
14 Keysight E-Series E9300 Operating and Service Guide
Page 15

List of Figures
Figure 1-1 Typical Keysight E-Series E9300 power sensor . . . . .20
Figure 1-2 Simplified block diagram of diode pair/attenuator/diode
Figure 1-3 Power meter firmware version screen . . . . . . . . . . . . .24
Figure 2-1 Auto-averaging settings . . . . . . . . . . . . . . . . . . . . . . . .31
Figure 2-2 Example of an 8 MHz bandwidth digital television signal
Figure 2-3 Wideband CDMA error of Keysight E-Series E9300 power
Figure 2-4 CDMA (IS-95A): 9Ch Fwd . . . . . . . . . . . . . . . . . . . . . .34
Figure 2-5 Calibration factors versus frequency . . . . . . . . . . . . . .35
Figure 4-1 Zero set performance verification equipment setup . .49
Figure 4-2 Illustrated parts break down . . . . . . . . . . . . . . . . . . . .51
Figure 4-3 Removing power sensor shell . . . . . . . . . . . . . . . . . . .56
pair . . . . . . . . . . . . . . . . . . . . . . . . . . . . . . . . . . . . . . 22
32
sensor versus corrected CW sensor . . . . . . . . . . . .33
Keysight E-Series E9300 Operating and Service Guide 15
Page 16

THIS PAGE HAS BEEN INTENTIONALLY LEFT BLANK.
16 Keysight E-Series E9300 Operating and Service Guide
Page 17

List of Tables
Table 2-1 Sensor ranges . . . . . . . . . . . . . . . . . . . . . . . . . . . . . . . .39
Table 2-2 Range crossover values . . . . . . . . . . . . . . . . . . . . . . . .39
Table 4-1 Power sensor SWR and reflection coefficient for the
E9300A . . . . . . . . . . . . . . . . . . . . . . . . . . . . . . . . . .47
Table 4-2 Power sensor SWR and reflection coefficient for the
E9301A . . . . . . . . . . . . . . . . . . . . . . . . . . . . . . . . . .47
Table 4-3 Power sensor SWR and reflection coefficient for the
E9304A . . . . . . . . . . . . . . . . . . . . . . . . . . . . . . . . . .48
Table 4-4 . . . . .Power sensor SWR and reflection coefficient for the
E9300A . . . . . . . . . . . . . . . . . . . . . . . . . . . . . . . . . .48
Table 4-5 Power sensor SWR and reflection coefficient for the
E9301B . . . . . . . . . . . . . . . . . . . . . . . . . . . . . . . . . .48
Table 4-6 Power sensor SWR and reflection coefficient for the
E9300H . . . . . . . . . . . . . . . . . . . . . . . . . . . . . . . . . .48
Table 4-7 Power sensor SWR and reflection coefficient for the
E9301H . . . . . . . . . . . . . . . . . . . . . . . . . . . . . . . . . .49
Keysight E-Series E9300 Operating and Service Guide 17
Page 18

THIS PAGE HAS BEEN INTENTIONALLY LEFT BLANK.
18 Keysight E-Series E9300 Operating and Service Guide
Page 19

Keysight E-Series E9300 Power Sensors
Operating and Service Guide
1 Introduction
General information 21
Getting Started 24
19
Page 20

1Introduction
What You’ll Find In This Chapter
This chapter introduces you to the Keysight E-Series E9300 power sensors, some
details on their operation, the minimum power meter requirements and
connecting to your power meter. It contains the following sections:
“General information” on page 21
“The Keysight E-Series E9300 power sensors in detail” on page 21
“Getting Started” on page 24
Figure 1-1 Typical Keysight E-Series E9300 power sensor
20 Keysight E-Series E9300 Operating and Service Guide
Page 21

General information
Welcome to the Keysight E-Series E9300 power sensors Operating and Service
Guide. This guide contains information about the initial inspection, operation,
specifications and repair of the Keysight E-Series E9300 power sensors. Use this
guide as a supplement to the Keysight EPM series power meters User’s Guides. It
is 3-hole drilled to allow you to retain it in the power meter’s binder.
All power meter functions are detailed in the Keysight EPM series power meters
User’s Guide and Programming Guide, however, this guide contains information
specific to the operation of Keysight E-Series E9300 power sensor.
Accessories shipped with the instrument
The following items are shipped with every purchase of E-Series E9300 power
sensor:
– Certificate of Calibration
– E-Series E9300 Power Sensors Operating and Service Guide
Verify that any options ordered are included with the shipment by checking the
packing list included with the shipment.
Introduction 1
Power meter requirements
The Keysight E-Series E9300 power sensors are NOT compatible with the earlier
Keysight 430-Series, Keysight E1416A, or Keysight 70100A power meters. They
are compatible ONLY with the Keysight EPM series power meters. Also, not all
Keysight EPM series power meters are immediately compatible - your power
meter must use firmware and Digital Signal Processing (DSP) code from a specific
release onwards. see “Checking power meter firmware and DSP revision” on
page 24 tells you how to check your power meter and have it upgraded if
required.
The Keysight E-Series E9300 power sensors in detail
Most power sensors used for measuring average power employ either
thermocouple or diode technologies. Diode based sensors frequently rely on the
application of correction factors to extend their dynamic range beyond their
square law response region, typically –70 dBm to –20 dBm. However, while this
Keysight E-Series E9300 Operating and Service Guide 21
Page 22

1Introduction
RF in
Low Sense
+
Low Sense
-
High Sense
+
High Sense
-
Upper Range
(-10 dBm to +20dBm)
Lower Range
(-60 dBm to -10dBm)
technique achieves wide dynamic range capability, it is limited to continuous
wave (CW) signals outside the square law region. Modulated signals must be
padded down or at low levels, with their average and peak power levels within the
diode square law region, to be measured accurately. Accurate, average power
measurement of high level signals carrying modulation cannot be obtained using
a CW correction factor technique. Specialized modulation sensors provide
accurate measurements but are bandwidth limited.
The Keysight E-Series E9300 power sensors are true average, wide dynamic range
RF microwave power sensors. They are based on a dual sensor diode pair/
attenuator/diode pair proposed by Szente et. al. in 1990
block diagram of this technique.
[1]
. Figure 1-2 shows a
Figure 1-2 Simplified block diagram of diode pair/attenuator/diode pair
This technique ensures the diodes in the selected signal path are kept in their
square law region, thus the output current (and voltage) is proportional to the
input power. The diode pair/attenuator/diode pair assembly can yield the average
of complex modulation formats across a wide dynamic range, irrespective of
signal bandwidth.
[1] US Patent #4943764, assigned to Keysight Technologies.
22 Keysight E-Series E9300 Operating and Service Guide
Page 23

Introduction 1
The dual range Modified Barrier Integrated Diode (MBID)
[1]
package includes
further refinements to improve power handling allowing accurate measurement of
[2]
high level signals with high crest factors without incurring damage
to the
sensor.
These sensors measure average RF power on a wide variety of modulated signals
and are independent of the modulation bandwidth. They are ideally suited to the
average power measurement of multi-tone and spread spectrum signals such as
CDMA, W-CDMA and digital television formats. Also, pulsed, TDMA signals can
be measured within the constraints detailed in “Measuring TDMA Signals” on
page 36.
The results are displayed on a compatible
[3]
power meter in logarithmic (dBm or
dB) or linear (Watts or %) measurement units.
[1] November 1986 Hewlett-Packard Journal pages 14-2, “Diode Integrated Circuits for
Millimeter-Wave Applications”.
[2] Refer to the datasheet in Chapter 3, "Characteristics and Specifications" for maximum power
handling specifications.
[3] A Keysight EPM-Series power meter is required as specified in the section see “Checking power
meter firmware and DSP revision” on page 24
Keysight E-Series E9300 Operating and Service Guide 23
Page 24

1Introduction
Service
Version
Firmware
Revision Code
(dual channel)
DSP Revision
Code
Getting Started
Initial inspection
Inspect the shipping container for damage. If the shipping container or packaging
material is damaged, it should be kept until the contents of the shipment have
been checked mechanically and electrically. If there is mechanical damage, notify
the nearest Keysight Technologies office. Keep the damaged shipping materials (if
any) for inspection by the carrier and a Keysight Technologies representative. If
required, you can refer to the “Sales and Technical Support” on page 10
Checking power meter firmware and DSP revision
Before proceeding, first ensure your Keysight EPM series power meter has the
required firmware and DSP revisions (E4418B and E4419B only) for the correct
operation of your Keysight EPM series power meters.
On the power meter press , , , .
Figure 1-3 Power meter firmware version screen
24 Keysight E-Series E9300 Operating and Service Guide
Page 25

Introduction 1
NOTE
CAUTION
NOTE
First check the section labelled DSP Revision:. Release A.01.11 or later is
required. If your power meter has an earlier release, please contact “Sales and
Technical Support” on page 10 to arrange an upgrade.
Next check the section labelled Main F/W Rev:. Release A1.04.00 or later is
required for single channel meters; release A2.04.00 or later is required for dual
channel meters. For E9300 power sensors with suffix ‘B’ or ‘H’, firmware revision
A1.06.00 or later is required for single channel meters; revision A2.06.00 or later is
required for dual channel meters. If your power meter has an earlier release,
please contact “Sales and Technical Support” on page 10 to arrange an upgrade.
You can carry out the firmware upgrade yourself if your power meter has the
required. Access http://www.keysight.com/find/powermeters and click on the
link:
“EPM Series E4418B Single-Channel Power Meter” or
“EPM Series E4419B Dual-Channel Power Meter”.
Click the “Software, Firmware and Drivers” link and follow the downloading
instructions.
Interconnections and calibration
Connect one end of a Keysight 11730 series sensor cable to the Keysight E-Series
E9300 power sensor and connect the other end of the cable to the power meter’s
channel input. Allow a few seconds for the power meter to download the power
sensor’s calibration table.
The Keysight 9304A Sensor is DC coupled. DC voltages in excess of the
maximum value
(5 Vdc) can damage the sensing diode.
Ensure power sensors and cables are attached and removed in an indoor
environment.
Keysight E-Series E9300 Operating and Service Guide 25
Page 26

1Introduction
Zero
Zero A
Zero B
Cal
Cal
Cal A
Cal B
CAUTION
WARNING
To carry out a zero and calibration cycle as requested by the power meter proceed
as follows:
– Ensure the Keysight E-Series E-Series E9300 power sensor is disconnected
– When calibrating Keysight E-Series E9300B or E9301B sensors, first
– On the power meter, press , (or / ). During
– When the wait period is complete connect the Keysight E-Series power
– Press (or , / ). The wait symbol is again displayed
On completion the power meter and sensor are ready to connect to the device
under test (DUT). Ensure the attenuator is re-connected to the Keysight E-Series
E9300B or E9301B sensors prior to making measurements.
The Keysight E-Series E9300B or E9301B sensors should not be operated
without the attenuator connected at any time other than for calibration. You
must ensure the attenuator is reconnected following calibration.
from any signal source.
remove the attenuator.
zeroing the wait symbol is displayed.
sensor to the power meter’s POWER REF output.
during calibration.
BEFORE CONNECTING THE POWER SENSOR TO OTHER INSTRUMENTS
ensure that all instruments are connected to the protective (earth) ground.
Any interruption of the protective earth grounding will cause a potential
shock hazard that could result in personal injury.
The measurement connector (for connection to DUT) is Type-N (male) for all the
Keysight E-Series E9300 power sensors. A torque wrench should be used to
tighten these connectors. Use a 3/4-inch open-end wrench and torque to 12 in-lb
(135 Ncm) for the Type-N connector.
26 Keysight E-Series E9300 Operating and Service Guide
Page 27

Recommended calibration interval
Keysight Technologies recommends a one-year calibration cycle for the E-Series
E9300 power sensors.
Specifications
The specifications listed in Chapter 3, "Characteristics and Specifications", are the
performance standards or limits against which the power sensor may be tested.
These specifications are valid ONLY after proper calibration of the power meter.
Refer to the “Calibration Procedure Using Keysight E-Series Power Sensors” in
your Keysight EPM series power meter User’s Guide.
Use the plastic flange cover to protect the waveguide connector from dirt and
mechanical damage whenever it is not in use. Any burn, dents or dirt on the
flange or waveguide surface will increase the SWR and change the Cal Factor.
Refer to the power meter operating and service manual for interconnecting
instructions.
Introduction 1
Keysight E-Series E9300 Operating and Service Guide 27
Page 28

1Introduction
THIS PAGE HAS BEEN INTENTIONALLY LEFT BLANK.
28 Keysight E-Series E9300 Operating and Service Guide
Page 29

Keysight E-Series E9300 Power Sensors
Operating and Service Guide
2 Making Measurements
Power Meter Configuration Changes 31
Measuring Spread Spectrum and Multitone Signals 32
CDMA Signal Measurements 33
Multitone Signal Measurements 35
Measuring TDMA Signals 36
Electromagnetic Compatibility (EMC) Measurements 38
Measurement Accuracy and Speed 39
29
Page 30

2 Making Measurements
What You’ll Find In This Chapter
This Chapter shows you how to use the Keysight E-Series E9300 power sensors to
make power measurements on signals with different modulation formats. For all
other operations please refer to your Keysight EPM series power meter User’s
Guide.
This chapter contains the following sections:
– “Power Meter Configuration Changes” on page 31
– “Measuring Spread Spectrum and Multitone Signals” on page 32
– “Measuring TDMA Signals” on page 36
– “Electromagnetic Compatibility (EMC) Measurements” on page 38
– “Measurement Accuracy and Speed” on page 39
30 Keysight E-Series E9300 Operating and Service Guide
Page 31
Power Meter Configuration Changes
–4 dBm
–10 dBm
sensor power
Minimum
10 dBm
2 dBm
1234
1114
Resolution setting
Number of averages
11416
11832
1416128
11664128
Maximum
–40 dBm
–50 dBm
–20 dBm
–30 dBm
1114
11216
121664
4 16 128 256
32 64 256 256
Upper range
Lower range
sensor power
6 dBm
0 dBm
20 dBm
12 dBm
–30 dBm
–40 dBm
–10 dBm
–20 dBm
26 dBm
20 dBm
40 dBm
32 dBm
–10 dBm
–20 dBm
10 dBm
0 dBm
E9300/1B
E9300/1H
E9300/1/4A
NOTE
The Keysight EPM series power meter recognizes when a Keysight E-Series E9300
power sensor is connected. The sensor calibration data is automatically read by
the power meter. In addition, the Keysight E-Series E9300 power sensors change
the auto-averaging settings used by the power meter. These are also
automatically configured.
Making Measurements 2
Keysight E-Series E9300 Operating and Service Guide 31
Figure 2-1 Auto-averaging settings
These values are valid only for the power meter channel connected to the
Keysight E-Series E9300 power sensor and only while the sensor is connected.
Averaging settings can also be manually configured. Refer to “Achi eving stable
results with TDMA signals” on page 36 if required.
Page 32

2 Making Measurements
Measuring Spread Spectrum and Multitone Signals
To achieve high data transfer rates within a given bandwidth, many transmission
schemes are based around phase and amplitude (I and Q) modulation. These
include CDMA, W-CDMA and digital television. These signals are characterized by
their appearance on a spectrum analyzer display — a high amplitude noise-like
signal of bandwidths up to 20 MHz. An 8 MHz bandwidth digital television signal
is shown in Figure 2-2.
Figure 2-2 Example of an 8 MHz bandwid th digital television signal
Prior to the Keysight E-Series E9300 power sensors, average power measurement
over a wide dynamic range of these signals required either tuned/swept signal
analyzer methods or a dual channel power meter connected to power sensors,
pads and a power splitter.
The diode pair/attenuator/diode pair architecture of the Keysight E-Series E9300
power sensors is ideally suited to the average power measurement of these
signals. The sensors have wide dynamic range (80 dB max, sensor dependent) and
are bandwidth independent.
Some signal modulation formats such as orthogonal-frequency-division
multiplexing (OFDM) and CDMA have large crest factors. The Keysight E-Series
E9300/1/4A power sensors can measure +20 dBm average power even in the
presence of +13 dB peaks as long as the peak pulse duration is less than 10
microseconds. For high power applications, such as base-station testing the
E9300/1B and E9300/1H are recommended.
32 Keysight E-Series E9300 Operating and Service Guide
Page 33

CDMA Signal Measurements
1.2
1
0.8
0.6
0.4
–30 –20 –10 0 10
20
30
0.2
0
0.2
Power (dBm)
Error (dB)
Lower range error
Upper range error
CW sensor error
Figure 2-3 and Figure 2-4 show typical results obtained when measuring a CDMA
signal. In these examples, the error is determined by measuring the source at the
amplitude of interest, with and without CDMA modulation, adding attenuation
until the difference between the two values stops changing. The CW sensor in
Figure 2-3 uses correction factors to correct for power levels beyond its square
law operating region.
Making Measurements 2
Figure 2-3 Wideband CDMA error of Keysight E-Series E9300 power sensor
Keysight E-Series E9300 Operating and Service Guide 33
versus corrected CW sensor
Page 34

2 Making Measurements
0.1
0.05
0
–0.05
–30
–20
–10
0
10
20
30
–0.1
–0.15
–0.2
Power (dBm)
Modulation error (dB)
Lower range error
(E-Series E9300 power
sensor only shown)
Upper range error
Figure 2-4 CDMA (IS-95A): 9Ch Fwd
34 Keysight E-Series E9300 Operating and Service Guide
Page 35

Multitone Signal Measurements
110 %
105 %
100 %
95 %
90 %
0 5 10 15 20
110 %
105 %
100 %
95 %
90 %
0 5 10 15 20
Cal factor
Frequency (GHz)
Typical lower range
calibration factor
Typical upper range
Frequency (GHz)
Cal factor
calibration factor
In addition to wide dynamic range, the Keysight E-Series E9300 power sensors
also have an exceptionally flat calibration factor versus frequency response across
the entire frequency range as shown in Figure 2-5. This is ideal for amplifier
intermodulation distortion measurements where the components of the two-tone
or multitone test signal can be separated by hundreds of MHz.
Making Measurements 2
Keysight E-Series E9300 Operating and Service Guide 35
Figure 2-5 Calibration factors versus frequency
Simply select an suitable single calibration factor frequency for your measurement
using the key on the power meter.
Page 36

2 Making Measurements
NOTE
Input Settings
Filter
Length
Mode Man Auto
Man
Measuring TDMA Signals
Power meter and sensor operation
The voltages generated by the diode detectors in the power sensor can be very
small. Gain and signal conditioning are required to allow accurate measurement.
This is achieved using a 220 Hz (440 Hz in fast mode) square wave output from
the power meter to drive a chopper-amplifier in the power sensor. Digital Signal
Processing (DSP) of the generated square wave is used by the power meter to
recover the power sensor output and accurately calculate the power level.
The chopper-amplifier technique provides noise immunity and allows large
physical distances between power sensor and power meter (Keysight 11730
series cables available up to 61 metres). Additional averaging helps reduce noise
susceptibility.
Achieving stable results with TDMA signals
The averaging settings in the power meter are designed to reduce noise when
measuring continuous wave (CW) signals. Initial measurement of a pulsed signal
may appear unstable with jitter on the less significant displayed digits. With
pulsed signals the averaging period must be increased to allow measurement over
many cycles of the pulsed signal.
36 Keysight E-Series E9300 Operating and Service Guide
To set the averaging proceed as follows:
The example shows the key labels for a single channel power meter. Dual
channel meter are similar, adding only channel identification to the softkey
labels.
1 Press , , . Press the softkey to access
the filter menu.
2 The filter setting is displayed under the softkey label. To change this
setting first set manual mode by pressing the softkey to
highlight .
Page 37

Making Measurements 2
Length
Enter
NOTE
Input Settings
Filter
Step Det Off On
Off
Length
Length
3 Press and use the , , or to set the averaging
you require. Confirm your entry by pressing .
You should also ensure the filter is not reset when a step increase or decrease in
power is detected by switching the step detection off.
Switch off step detection as follows:
1 Press , , .
2 Press the softkey to access the filter menu.
3 Press to highlight .
The section “Setting the Range, Resolution and Accuracy” in the Keysight EPM
series power meters Programming Guide shows you how to configure these
parameters using the remote interface.
Achieving stable results with GSM signals
Signals with a pulse repetition frequency (PRF) close to a multiple or sub-multiple
of the 220 Hz chopper-amplifier signal generate a beat note at a frequency
between the PRF and 220 Hz. Control over the filter settings is again required to
obtain stable results.
The PRF of a GSM signal is approximately 217 Hz and thus requires more
averaging than most other TDMA signals. To achieve a stable measurement use
the filter setting procedures to set the . Experimentally, a
setting of 148 gives optimum results although settings in the order of 31 or 32
give acceptable results if a faster measurement is required.
Keysight E-Series E9300 Operating and Service Guide 37
Page 38

2 Making Measurements
CAUTION
Electromagnetic Compatibility (EMC) Measurements
The low frequency range of the Keysight 9304A make it the ideal choice for
making EMC measurements to CISPR (Comite International Special Perturbations
Radioelectriques) requirements, and electromagnetic interference (EMI) test
applications such as the radiated immunity test (IEC61000-4-3).
DC coupling of the Keysight 9304A input allows excellent low frequency coverage.
However, the presence of any dc voltages mixed with the signal will have an
adverse effect on the accuracy of the power measurement.
TheKeysight 9304A sensor is DC coupled. DC voltages in excess of the maximum
value (5 Vdc) can damage the sensing diode.
The Keysight 9304A Sensor is DC coupled. DC voltages in excess of the
maximum value (5 Vdc) can damage the sensing diode.
38 Keysight E-Series E9300 Operating and Service Guide
Page 39

Measurement Accuracy and Speed
CAUTION
The power meter has no internal ranges. The only ranges you can set are those of
the Keysight E-Series E9300 power sensors (and other Keysight E-Series power
sensors). With a Keysight E-Series E9300 power sensor the range can be set
either automatically or manually. Use autoranging when you are not sure of the
power level you are about to measure.
To prevent damage to your sensor do not exceed the power levels specified
in the datasheet.
The Keysight 9304A sensor is DC coupled. DC voltages in excess of the
maximum value (5 Vdc) can damage the sensing diode
Setting the range
There are two manual settings, “LOWER” and “UPPER”. The LOWER range uses
the more sensitive path and the UPPER range uses the attenuated path in the
Keysight E-series E9300 power sensors (see Table 2 -1).
Making Measurements 2
Table 2-1 Sensor ranges
Sensor LOWER range UPPER range
E9300/1/4A –60 dBm to –10 dBm –10 dBm to +20 dBm
E9300/1B –30 dBm to +20 dBm +20 dBm to +44 dBm
E9300/1H-50 –50 dBm to 0 dBm 0 dBm to +30 dBm
The default is “AUTO”. In AUTO the range crossover value depends on the sensor
model being used (see Table 2-2).
Table 2-2 Range crossover values
E9300/1/4A E9300/1B E9300/1H
–10 dBm ± 0.5 dBm +20 dBm ± 0.5 dBm 0 dBm ± 0.5 dBm
Keysight E-Series E9300 Operating and Service Guide 39
Page 40

2 Making Measurements
NOTE
Input Settings
Range
Range
Enter
Configure the power meter as follows:
The example shows the key labels for a single channel power meter. Dual
channel meters are similar, adding channel identification to the softkey labels.
1 Press , . The current setting is displayed under the
2 To change this press . A pop up window appears. Use or to
highlight your choice.
To confirm your choice press .
The section “Setting the Range, Resolution and Accuracy” in the Keysight EPM
series power meters Programming Guide shows you how to configure these
parameters using the remote interface.
softkey.
Measurement considerations
While autoranging is a good starting point, it is not ideal for all measurements.
Signal conditions such as crest factor or duty cycle may cause the power meter to
select a range which is not the optimum configuration for your specific
measurement needs. Signals with average power levels close to the range switch
point require you to consider your needs for measurement accuracy and speed.
For example, using a Keysight E9300/1/4A sensor, where the range switch point is
–10 ± 0.5 dBm in a pulsed signal configured as follows:
Characteristics Value
Peak amplitude –6 dBm
Duty cycle 25%
The calculated average power is –12 dBm.
40 Keysight E-Series E9300 Operating and Service Guide
Page 41

Accuracy
The value of –12 dBm lies in the lower range of the Keysight E-Series E9300
power sensor. In autoranging mode (“AUTO”) the Keysight EPM Series power
meter determines the average power level is below –10 dBm and selects the low
power path. However, the peak amplitude of –6 dBm is beyond the specified,
square law response range of the low power path diodes.The high power path
(–10 dBm to +20 dBm) should be used to ensure a more accurate measurement of
this signal. However, range holding in “UPPER” (the high power path), for a more
accurate measurement, results in considerably more filtering.
Speed and averaging
The same signal also requires that consideration is given to measurement speed.
As shown above, in autoranging mode the Keysight EPM series power meter
selects the low power path in the Keysight E-Series E9300 power sensor. With
auto-averaging also configured, minimal filtering is applied. Values of 1 to 4 for
average power levels above –20 dBm are used in the low power path. (Refer to
Figure 2-1.)
If the range is held in “UPPER” for more accuracy, the measurement is slower.
More filtering is applied due to the increase in noise susceptibility at the less
sensitive area of the high power path. Values of 1 to 128 for average power levels
less than –10 dBm are used. (Again, refer to Figure 2-1.) Manually lowering the
filter settings speeds up the measurement but can result in an unwanted level of
jitter.
Making Measurements 2
Summary
Attention must be paid to signals whose average power levels are in the low
power path range whilst their peaks are in the high power path range. You can
achieve best accuracy by selecting the high power path or best speed by selecting
the low power path.
Keysight E-Series E9300 Operating and Service Guide 41
Page 42

2 Making Measurements
THIS PAGE HAS BEEN INTENTIONALLY LEFT BLANK.
42 Keysight E-Series E9300 Operating and Service Guide
Page 43

Keysight E-Series E9300 Power Sensors
Operating and Service Guide
3 Characteristics and
Specifications
For the characteristics and specifications of the E-Series E9300 power sensors,
refer to the datasheet at
http://literature.cdn.keysight.com/litweb/pdf/5990-4019EN.pdf
43
Page 44

3 Characteristics and Specifications
THIS PAGE HAS BEEN INTENTIONALLY LEFT BLANK.
44 Keysight E-Series E9300 Operating and Service Guide
Page 45

Keysight E-Series E9300 Power Sensors
Operating and Service Guide
4 Service
General Information 46
Performance Test 47
Service 54
45
Page 46

4Service
CAUTION
CAUTION
General Information
This chapter contains information about general maintenance, performance tests,
troubleshooting and repair of Keysight E-Series E9300 power sensors.
Cleaning
Use a clean, damp cloth to clean the body of the Keysight E-Series E9300 power
sensor.
Connector cleaning
The RF connector beads deteriorate when contacted by hydrocarbon
compounds such as acetone, trichloroethylene, carbon tetrachloride, and
benzene.
Clean the connector only at a static free workstation. Electrostatic discharge
to the center pin of the connector will render the power sensor inoperative.
Keeping in mind its flammable nature; a solution of pure isopropyl or ethyl alcohol
can be used to clean the connector.
Clean the connector face using a cotton swab dipped in isopropyl alcohol. If the
swab is too big use a round wooden toothpick wrapped in a lint free cotton cloth
dipped in isopropyl alcohol. Refer to Keysight Application Note 326, Principles of
Microwave Connector Care (5954-1566) or Microwave Connector Care
(08510-90064) for proper cleaning methods.
46 Keysight E-Series E9300 Operating and Service Guide
Page 47

Performance Test
Standing Wave Ratio (SWR) and Reflection Coefficient (Rho) performance test
This section does not establish preset SWR test procedures since there are several
test methods and different equipment available for testing the SWR or reflection
coefficient. Therefore, the actual accuracy of the test equipment must be
accounted for when measuring against instrument specifications to determine a
pass or fail condition. The test system used must not exceed the system Rho
uncertainties shown in the following tables when testing the Keysight E-Series
E9300 power sensors.
Table 4-1 Power sensor SWR and reflection coefficient for the E9300A
Service 4
Frequency
10 MHz to 30 MHz ±0.010 0.070
30 MHz to 2 GHz ±0.010 0.061
2 GHz to 14 GHz ±0.010 0.087
14 GHz to 16 GHz ±0.010 0.099
16 GHz to 18 GHz ±0.010 0.115
System Rho
uncertainty
Actual measurement Maximum Rho
Table 4-2 Power sensor SWR and reflection coefficient for the E9301A
Frequency
10 MHz to 30 MHz ±0.010 0.070
30 MHz to 2 GHz ±0.010 0.061
2 GHz to 6 GHz ±0.010 0.087
System Rho
uncertainty
Actual measurement Maximum Rho
Keysight E-Series E9300 Operating and Service Guide 47
Page 48

4Service
CAUTION
DC voltages in excess of the maximum value (5 Vdc) can damage the
sensing diode.
Tab le 4-3 Power sensor SWR and reflection coefficient for the E9304A
Frequency
9 kHz to 2 GHz ±0.010 0.061
2 GHz to 6 GHz ±0.010 0.087
System Rho
uncertainty
Actual measurement Maximum Rho
Tab le 4-4 Power sensor SWR and reflection coefficient for the E9300A
Frequency
10 MHz to 8 GHz ±0.010 0.057
8 GHz to 12.4GHz ±0.010 0.078
12.4 GHz to 18 GHz ±0.010 0.107
System Rho
uncertainty
Actual measurement Maximum Rho
Tab le 4-5 Power sensor SWR and reflection coefficient for the E9301B
Frequency
10 MHz to 6 GHz ±0.010 0.057
System Rho
uncertainty
Actual measurement Maximum Rho
Tab le 4-6 Power sensor SWR and reflection coefficient for the E9300H
Frequency
10 MHz to 8 GHz ±0.010 0.070
8 GHz to 12.4GHz ±0.010 0.111
12.4 GHz to 18 GHz ±0.010 0.123
System Rho
uncertainty
Actual measurement Maximum Rho
48 Keysight E-Series E9300 Operating and Service Guide
Page 49

Service 4
DUT
NOTE
Table 4-7 Power sensor SWR and reflection coefficient for the E9301H
Frequency
10 MHz to 6 GHz ±0.010 0.070
System Rho
uncertainty
Zero set performance verification
This performance verification is carried out to verify that a minimal amount of
residual offset error is present after zeroing has been performed. The offset error is
caused by contamination from several sources including the noise of the DUT
itself. Zero set is the difference between the power levels indicated by the DUT,
after executing zeroing and the true zero power. Ideally, this difference should be
zero.
This performance verification requires a power meter (E4416/7A).
Procedure
1 Connect the DUT (E-Series E9300 power sensor) to the power meter as shown
in Figure 4-1.
Actual measurement Maximum Rho
Figure 4-1 Zero set performance verification equipment setup
2 Warm up the DUT for approximately 30 minutes.
3 Connect the DUT to the power meter power reference terminal to perform zero
and calibration.
For E9300B series, the high power attenuator must be removed.
Keysight E-Series E9300 Operating and Service Guide 49
Page 50

4Service
Replaceable parts
4 Detach the DUT from the power meter reference oscilloscope.
5 Launch the Interactive IO on the Keysight IO Libraries Suite.
6 Set the frequency of the DUT to 50 MHz by sending "FREQ 50MHz".
7 Enable auto-averaging for the DUT by sending "AVER:COUN:AUTO ON".
8 Change the power measurement unit of the DUT to watt by sending
"UNIT:POW W".
9 Set the DUT to the single trigger mode by sending "INIT:CONT OFF".
10 Perform zeroing for the DUT by sending "CAL:ZERO:AUTO ONCE" and wait for
the power meter to complete the zeroing process.
11 Read the noise level of the DUT by sending "READ?" and then record the
reading.
12 Repeat 10 times, step 11 to step 12 and then calculate the mean value of the
readings.
13 Compare the calculated mean value to the product datasheet. If the
verification fails, refer to “Repair and Adjustments” on page 56.
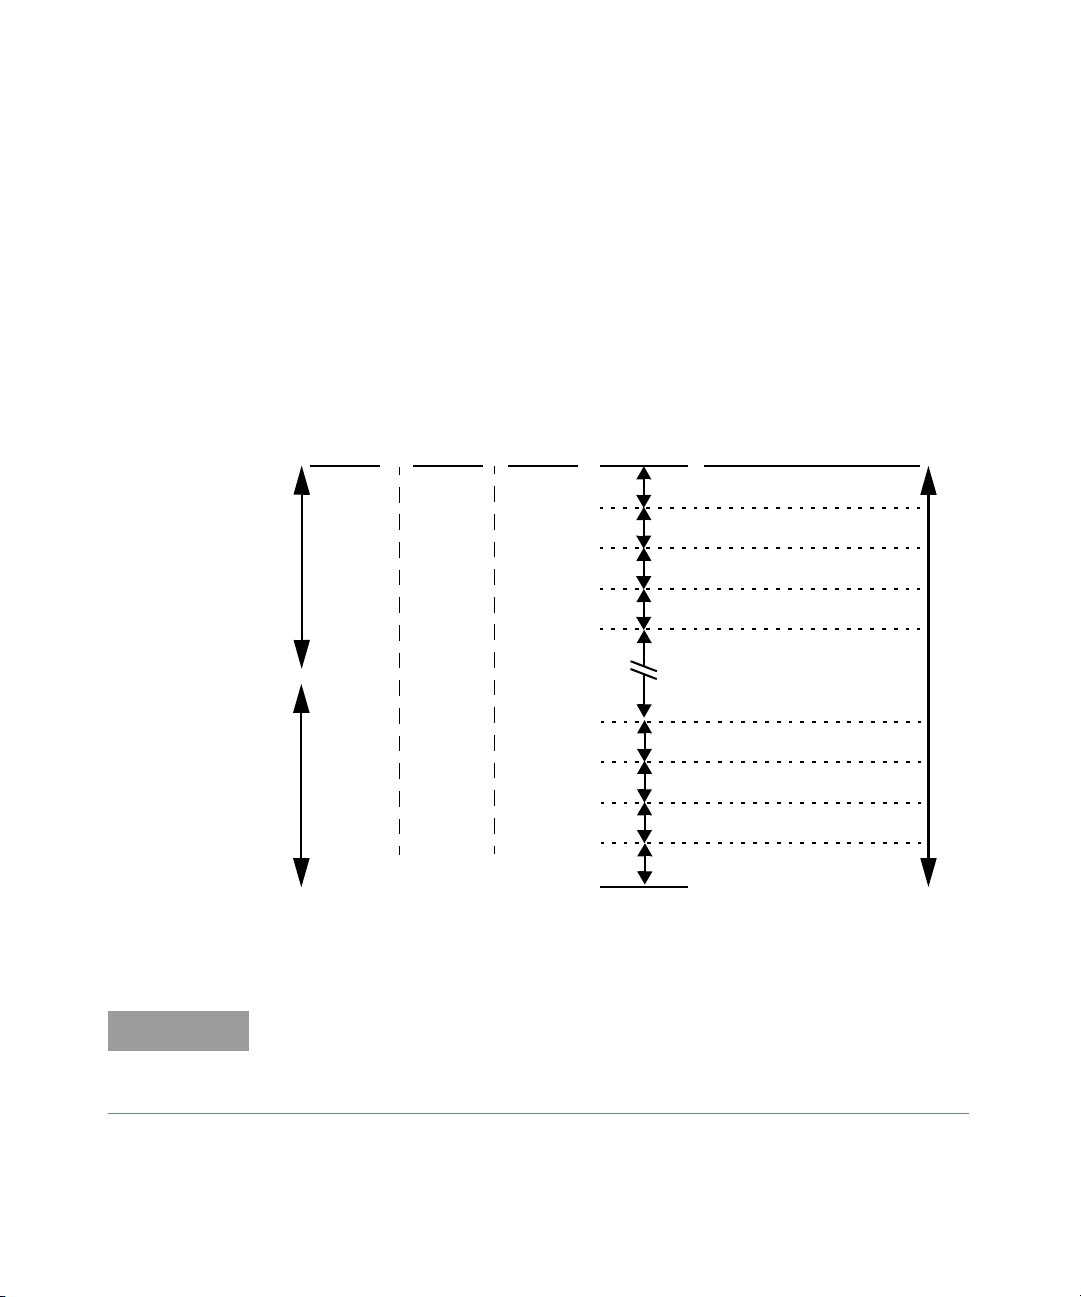
Figure 4-2 is the illustrated parts breakdown (IPB) that identifies all of the
replaceable parts. To order a part, quote the Keysight part number, specify the
quantity required, and address the order to the nearest Keysight office.
Within the USA, it is better to order directly from the Keysight Parts Center in
Roseville, California. Ask your nearest Keysight office for information and forms for
the “Direct Mail Order System.” Also your nearest Keysight office can supply toll
free telephone numbers for ordering parts and supplies.
50 Keysight E-Series E9300 Operating and Service Guide
Page 51

Service 4
Figure 4-2 Illustrated parts break down
Keysight E-Series E9300 Operating and Service Guide 51
Page 52

4Service
NOTE
The A1/A2 parts are applicable only for Keysight Service Center as calibration is
required.
Reference designation Keysight part number Quantity Description
A1/A2
E9300A
E9300B
E9300H
E9301A
E9301B
E9301H
E9304A
A1/A2
E9300A
E9300B
E9300H
E9301A
E9301B
E9301H
E9304A
E9300-60006
E9300-60017
E9300-60018
E9301-60007
E9301-60001
E9301-60002
E9304-60003
E9300-69006
E9300-69017
E9300-69018
E9301-69007
E9301-69001
E9301-69002
E9304-69003
1
1
1
1
1
1
1
1
1
1
1
1
1
1
SENSOR MODULE
SENSOR MODULE
SENSOR MODULE
SENSOR MODULE
SENSOR MODULE
SENSOR MODULE
SENSOR MODULE
RESTORED SENSOR MODULE
RESTORED SENSOR MODULE
RESTORED SENSOR MODULE
RESTORED SENSOR MODULE
RESTORED SENSOR MODULE
RESTORED SENSOR MODULE
RESTORED SENSOR MODULE
[a]
[a]
CHASSIS PARTS
MP1 5041-9160 2 SHELL-PLASTIC
MP2 5041-9160 SHELL-PLASTIC
MP3 08481-20011 2 CHASSIS
MP4 08481-20011 CHASSIS
MP8 08481-00002 2 SHIELD
MP9 08481-00002 SHIELD
MP26 E9300-80001 1 LABEL, ID E9300A
MP26 E9300-80002 1 LABEL, ID E9300B
52 Keysight E-Series E9300 Operating and Service Guide
Page 53

Service 4
Reference designation Keysight part number Quantity Description
MP26 E9300-80003 1 LABEL, ID E9300H
MP26 E9301-80001 1 LABEL, ID E9301A
MP26 E9301-80003 1 LABEL, ID E9301B
MP26 E9301-80002 1 LABEL, ID E9301H
MP26 E9304-80001 1 LABEL, ID E9304A
MP27 7121-7389 2 LABEL, POWER SENSOR
MP30 7121-7388 1 LABEL, CAL/ESD
MP30 E9304-80002 1 LABEL, CAUTION E9304A
MP31 00346-80011 1 LABEL, CAUTION
[a] Includes attenuator assembly
Keysight E-Series E9300 Operating and Service Guide 53
Page 54

4Service
Service
Principles of operation
Service instructions consist of principles of operation, troubleshooting, and
repairs.
The A1 bulkhead assembly on the Keysight E-Series E9300 power sensors
provides a 50 ohm load to the RF signal applied to the power sensor. The A1
bulkhead assembly on the E9300/1B sensors includes a 30 dB attenuator that can
be disconnected by means of a Type-N connector. The A1 bulkhead assembly on
the E9300/1H sensors includes a 10 dB attenuator in the front end. A dual range
GaAs diode pair/attenuator/diode pair assembly in the bulkhead rectifies the
applied RF to produce dc voltages (high and low ranges) which vary with the RF
power across the 50 Ω load. Thus the voltage varies with the RF power dissipated
in the load.
The low-level dc voltages from the bulkhead assembly are amplified before they
are transferred on standard cables to the power meter. The amplification is
provided by an input amplifier assembly which consists of a chopper (sampling
gate) and an input amplifier. The chopper circuit converts the dc voltages to ac
voltages. The chopper is controlled by a 220 Hz square wave generated by the
power meter. The amplitude of the sampling gate output is a 220 Hz square wave
which varies with the RF power input. The 220 Hz ac output is applied to an
amplifier which provides the input to the power meter.
The Keysight EPM series power meter automatically detects when a Keysight
E-Series E9300 power sensor is connected and downloads the correction data
from the sensor’s EEPROM. In the E9300/1B/H the EEPROM contains an offset
value for the measured attenuation value of the attenuator used in the bulkhead
assembly. Thus, the attenuator is matched to a particular sensor. The
auto-averaging settings are also configured automatically for use with Keysight
E-Series E9300 power sensors. This configures the power meter to operate over
the range with that particular sensor’s unique correction data applied.
Troubleshooting
Troubleshooting information is intended to first isolate the power sensor, the
cable, or the power meter as the defective component. When the power sensor is
isolated, an appropriate Sensor Module must be used for repair.
54 Keysight E-Series E9300 Operating and Service Guide
Page 55

If error message 241 or 310 is indicated on the power meter, suspect a failed
CAUTION
CAUTION
power sensor. If no error message is displayed, but a problem occurs when
making a measurement, try replacing the cable from the power meter to the
power sensor. If the problem still exists, try using a different power sensor to
determine if the problem is in the power meter or in the power sensor.
Electrostatic discharge will render the power sensor inoperative. Do not,
under any circumstances, open the power sensor unless you and the power
sensor are in a static free environment.
Repair of defective sensor
There are no serviceable parts inside the Keysight E-Series E9300 power sensors.
If the sensor is defective, replace the entire “module” with the appropriate
“Restored Sensor Module.”
Disassembly procedure
Disassemble the power sensor by performing the following steps:
Service 4
Disassemble the power sensor only in a static free workstation. Electrostatic
discharge will render the power sensor inoperative.
Keysight E-Series E9300 Operating and Service Guide 55
Page 56

4Service
CAUTION
Reassembly procedure
Figure 4-3 Removing power sensor shell
1 At the rear of the power sensor, insert the blade of a screwdriver between the
plastic shells (See Figure 4-3). To prevent damage to the plastic shells use a
screwdriver blade as wide as the slot between the two shells.
2 Pry alternately at both sides of the connector J1 until the plastic shells are
apart. Remove the shells and the magnetic shields.
Replace the magnetic shields and the plastic shells as shown in Figure 4-2. Snap
the plastic shells together.
Repair and Adjustments
Do not attempt to repair or adjust the power sensor. Due to the extreme static
sensitivity of the power sensor, customer repair is not recommended. If your
power sensor should fail or need calibration, return it to Keysight Technologies.
Do not disassemble the power sensor. The power sensor is extremely static
sensitive and can be easily damaged. If the power sensor shows evidence of
attempted customer repair, the warranty may be voided.
Adjustments are usually required on a yearly basis. They are normally performed
only after a performance verification has indicated that some parameters are out
of specification. Performance verification must be completed after any repairs that
may have altered the characteristics of the E-Series E9300 power sensors. The
E-Series E9300 power sensors can be returned to Keysight for adjustments. To
arrange the return, contact the Keysight Service Center.
56 Keysight E-Series E9300 Operating and Service Guide
Page 57

This information is subject to change
without notice. Always refer to the
English version at the Keysight
website for the latest revision.
© Keysight Technologies 2006 - 2018
Edition 15, March 23, 2018
Printed in Malaysia
*E9300-90016*
E9300-90016
www.keysight.com
 Loading...